Chapter 15. The Documentation Interlude
This part of the book concludes with a brief look at techniques and tools used for documenting Python code. Although Python code is comparatively readable by itself, a few well-placed and human-accessible comments can do much to help others understand the workings of your programs—especially when code grows larger than most in this book. As you’ll see, Python includes both syntax and tools to make documentation easier. In particular, the Pydoc system covered here can render a code file’s documentation as either plain text in an interactive REPL, or HTML in a browser.
While this topic is partly tools related, it’s presented here because it both involves Python’s syntax model and provides a resource for readers struggling to understand Python’s toolset. For the latter purpose, this chapter also expands on documentation pointers first given in Chapter 4. As usual, because this chapter closes out its part, it also ends with some warnings about common pitfalls and a set of exercises for this part of the text, in addition to its chapter quiz.
Python Documentation Sources
By this point in the book, you’re probably starting to realize that Python comes with an amazing amount of prebuilt functionality—built-in functions and exceptions, predefined object attributes and methods, standard library modules, and more. And we’ve really only scratched the surface of each of these categories.
One of the first questions that bewildered beginners often ask is, How do I find information on all the built-in tools? This section provides tips on the various documentation sources available in Python. It also presents documentation strings (docstrings, for short), and the Pydoc system shipped with Python that makes use of them. These topics are somewhat peripheral to the core language itself, but they become essential knowledge as soon as your code becomes large or complex enough to challenge its readers—including yourself, six months down the road.
As summarized in Table 15-1, there are a variety of places to look for information about Python, with generally increasing verbosity. Because documentation is such a crucial tool in practical programming, we’ll explore each of these categories in the sections that follow.
| Form | Role |
|---|---|
# comments |
In-file documentation |
The dir function |
Lists of attributes available in objects |
Docstrings: __doc__ |
In-file documentation attached to objects |
Pydoc: the help function |
Interactive help for objects |
| Pydoc: HTML reports | Module documentation in a browser |
| Sphinx third-party tool | Richer documentation for larger projects |
| The standard manuals | Official language and library descriptions |
| Web resources | Online tutorials, examples, and so on |
# Comments
As we’ve learned—and used in most example listings so far—hash-mark comments are the most basic way to document your code. Python simply ignores all the text following a # (as long as it’s not inside a string literal), so you can follow this character with any words and descriptions meaningful to programmers. Such comments are accessible only in your source files, though; to code comments that are more widely available, you’ll use docstrings (ahead).
In fact, current best practice (generally accepted convention) dictates that docstrings are best for larger functional documentation (e.g., “my script does this”), and # comments are best limited to smaller code documentation (e.g., “this strange expression does that”) and are best limited in scope to a statement or small group of statements within a script or function. Docstrings are a broader topic we’ll get to in a moment; first, let’s see how to explore objects.
The dir Function
As we’ve also seen, the built-in dir function is an easy and automatic way to list of all the attributes available inside an object (i.e., its methods and simpler data items). It can be called with no arguments to list variables in the caller’s scope, something the next part of this book will define in full. More usefully, it can also be called with any object that has attributes, including imported modules and objects of built-in types, as well as the name of a data type itself. For example, to find out what’s available in a module such as the standard library’s sys, import it and pass it to dir:
$python3>>>import sys>>>dir(sys)[…many names here…]
The list of attribute name strings you’ll get back is omitted here because it’s not small and is prone to vary per Python version; run this on your own for a better look. In fact, there are currently 110 attributes in sys, though we generally care only about the 97 that do not have leading double underscores (two underscores usually means interpreter-related), or the 83 that have no leading underscore at all (one underscore usually means implementation private, informally). Rooting out such numbers is a prime example of the preceding chapter’s list comprehension at work:
>>>len(dir(sys))# Number names in sys110 >>>len([x for x in dir(sys) if not x.startswith('__')])# Non __X names only97 >>>len([x for x in dir(sys) if not x[0] == '_'])# Ignore _X names too83
To find out what attributes are provided in objects of built-in types, run dir on a literal, an existing instance, or the name of the desired type. For example, to see all text-string attributes, you can pass an empty or the type name str:
>>>dir('')['__add__', …more names here…, 'zfill'] >>>dir(str) == dir('')True
The dir result for any built-in type includes a set of attributes that are related to the implementation of that type (mostly, for expression operators). Much as in modules, they all begin and end with double underscores to make them distinct, and you can safely ignore them at this point in the book (they’ll resurface later for OOP). For instance, there are 81 text-string attributes, but only 47 that correspond to named methods or data; lists have even fewer:
>>>len(dir('')), len([x for x in dir('') if not x.startswith('__')])(81, 47) >>>len(dir([])), len([x for x in dir([]) if not x.startswith('__')])(48, 11)
To list names, filter out double-underscored items that are not of common program interest by running the same list comprehensions, but print the attributes. To demo, here are the named attributes in lists and dictionaries:
>>>[a for a in dir(list) if not a.startswith('__')]['append', 'clear', 'copy', 'count', 'extend', 'index', 'insert', 'pop', 'remove', 'reverse', 'sort'] >>>[a for a in dir(dict) if not a.startswith('__')]['clear', 'copy', 'fromkeys', 'get', 'items', 'keys', 'pop', 'popitem', 'setdefault', 'update', 'values']
This may seem like a lot to type to get an attribute list, but beginning in the next chapter, you’ll learn how to wrap such code in a simple, importable, and reusable function so you don’t need to type it again.
Aside: type names like str, list, and dict work in dir because they are actually names of types in Python today, not just type-converter functions; calling one of these invokes its constructor to generate an instance of that type. Part VI will have more to say about constructors and operator overloading methods when we discuss classes.
The dir function is mostly a memory jogger—it provides a list of attribute names, but it does not tell you anything about what those names mean. For such extra information, we need to move on to the next documentation source.
Note
Attributes in IDEs: Some GUIs for Python work, including IDLE, have features that list attributes on objects automatically, which can be viewed as alternatives to dir. IDLE, for example, will list an object’s attributes in a pop-up selection window when you type a period after the object’s name and pause or press Tab. This is mostly meant as an autocomplete feature, though, not an information source. Chapter 3 and Appendix A have introductory info on IDLE.
Docstrings and __doc__
Besides # comments, Python supports documentation that is automatically attached to objects and retained at runtime for inspection. Syntactically, such comments are coded as strings literals of any type, except bytes and f-strings. They are located at the tops of code components (module files and function and class statements), and before any other executable code (# comments, including Unix-style #! lines, are OK before them). When present, the text of such strings, known as docstrings, is automatically stuffed into the __doc__ attributes of the corresponding objects.
User-defined docstrings
For example, consider the file, docstrings.py in Example 15-1. You can safely ignore most of its code here (we’ll study functions, modules, and classes in the next three parts of this book), but notice its three string literals: because they are coded at the beginning of the file, and at the start of a function (def) and class (class) within it, they are taken as docstrings and are saved in the associated object’s __doc__ when this file is loaded by a run or import.
Example 15-1. docstrings.py
"""Module documentationThis module defines a name, function and class."""edition=6defsquare(x):r'''Function documentationReturns the \square\ of its \numeric\ argument.'''returnx**2# power operatorclassPartVI:"Class documentation for\U0001F40D👍"pass# Top-level code(square(edition))(square.__doc__)(PartVI.__doc__)
Some fine points about this example’s docstrings:
Literals: the first of this file’s docstrings uses a triple-quoted block at the top of the file. This is common for docstrings as it allows for multiline comments, but any sort of text string (except f-strings) will work. Both single- or double-quoted one-liners like that in the class are fine, but don’t readily support multiline text.
Raw strings: as the function demos,
r'…'strings work too—and may even be required to suppress unwanted backslash escapes and avoid a syntax warning (and eventual error!) for unrecognized escapes each time code is run or recompiled to bytecode (see Chapter 7’s coverage of new\deprecations in Python 3.12).Content: docstrings can contain any sort of text, including the class’s Unicode escape and raw emoji (per the Unicode intro in Chapter 4 and the whole story in Chapter 37). Notice that the
\UUnicode escape requires backslashes to be used, so it precludes using raw strings to avoiding syntax errors in the future (use\\).
The whole point of this documentation protocol is that your comments are retained for inspection in __doc__ attributes after the file is loaded. Thus, to display the docstrings associated with the module and the two code components it defines, we simply import the file and print their __doc__ attributes, where Python has saved the text. Assuming this module is located in the directory in which we’re currently working (and deferring to Chapter 3’s note about imports and directories for background info on why that matters):
$python3>>>import docstrings36 Function documentation Returns the \square\ of its \numeric\ argument. Class documentation for 🐍 👍 >>>print(docstrings.__doc__)Module documentation This module defines a name, function and class. >>>print(docstrings.square.__doc__)Function documentation Returns the \square\ of its \numeric\ argument. >>>print(docstrings.PartVI.__doc__)Class documentation for 🐍 👍
You will usually want to use print like this to view docstrings; otherwise, you’ll get a single string with embedded \n newline characters. Also note that import runs the file’s top-level prints (hence the output immediately following the import), as does launching it as a top-level script. Within the file, square is just square, a simple variable:
$ python3 docstrings.py
36

    Function documentation
    Returns the \square\ of its \numeric\ argument.

Class documentation for 🐍 👍
You can also attach docstrings to methods of classes (covered in Part VI too), but because, as you’ll learn, these are just def statements nested in class statements, they’re not a special case. For instance, to fetch the docstring of a method function inside a class within a module, you would simply extend the path to go through the class: module.class.method.__doc__. We’ll code an example of method docstrings in Chapter 29.
Note
Docstrings futurism: If you look closely, you’ll notice that multiline docstrings, like that of square, retain their leading indentation as it was in the code. Python 3.13, still on the drawing board as this note is being written, plans to remove leading indentation from docstrings, mostly to save space in bytecode files and memory. Even before this mod, though, you won’t normally see the indents in docs, because tools like Pydoc already strip and reformat, as you’ll learn shortly.
Docstring standards
As mentioned earlier, common practice today recommends hash-mark comments for only smaller-scale documentation about an expression, statement, or small group of statements. Docstrings are better used for higher-level and broader functional documentation for a file, function, or class, and have become an expected part of Python software. Beyond these guidelines, though, you still must decide what to write.
Although some companies have internal standards, there is no broad consensus about what should go into the text of a docstring. There have been various markup language and template proposals, including HTML, but they don’t seem to have caught on in the Python world. Frankly, convincing programmers to document their work using handcoded HTML probably won’t happen in our lifetimes, but this shouldn’t apply to documentation in general.
Documentation tends to have a lower priority than it should. Too often, if you get any docs in a file at all, you count yourself lucky (and even better if they’re accurate and up to date). While technically optional, documentation is a crucial part of well-written programs, and you’re encouraged to comment your code liberally. When you do, though, there is no standard docstring format; if you want to use them, anything goes today. Just as for writing code itself, it’s up to you to create docstring content and keep it up to date, but common sense is probably your best ally in both tasks.
Built-in docstrings
While it’s important to document our own code, it turns out that built-in modules and objects in Python use similar techniques to attach documentation above and beyond the attribute lists returned by dir. For example, to view a human-readable description of a built-in module, import it and print its __doc__ string—as we did for our own code:
>>>import sys>>>print(sys.__doc__)This module provides access to some objects used or maintained by the interpreter and to functions that interact strongly with the interpreter. Dynamic objects: argv -- command line arguments; argv[0] is the script pathname if known path -- module search path; path[0] is the script directory, else '' modules -- dictionary of loaded modules …more text omitted…
For finer-grained details, functions, classes, and methods within built-in modules have attached descriptions in their __doc__ attributes as well:
>>> print(sys.getrefcount.__doc__)
Return the reference count of object.
The count returned is generally one higher than you might expect,
because it includes the (temporary) reference as an argument to
getrefcount().
You can also read about built-in functions via their docstrings:
>>> print(map.__doc__)
map(func, *iterables) --> map object
Make an iterator that computes the function using arguments from
each of the iterables.  Stops when the shortest iterable is exhausted.
In fact, you can get a wealth of information about built-in tools by inspecting their docstrings this way—but you don’t have to. The Python help function largely automates this for you, as the next section will explain.
Pydoc: The help Function
The docstring technique proved to be so useful that Python eventually added a tool that makes docstrings even easier to display. Namely, Pydoc is Python code that knows how to extract docstrings and associated structural information and format them into nicely arranged reports of various types. Additional tools for extracting and formatting docstrings are available in the open source domain (including third-party tools that may support structured text—search the Web for pointers), but Python ships with Pydoc in its always-present standard library.
There are a variety of ways to launch Pydoc, but the two most prominent are the built-in help function and the Pydoc browser-based interface. Of these, help may be the most straightforward to use and is always available in a REPL.
We met help briefly in Chapter 4. It invokes Pydoc to generate a simple plain-text report for any Python object. In this mode, help text looks much like a “manpage” on Unix-like systems. In fact, outside GUIs like IDLE, help text works the same way as a Unix “more” when there are multiple pages of text—press the space bar to move to the next page, Enter (or your keyboard’s equivalent) to go to the next line, and Q to quit the display. GUIs generally scroll help text instead. Let’s turn to a few examples to see how this works.
Running help on built-in tools
Because built-in tools come with the docstrings we saw earlier, help gives us a level of reference docs for Python, midway between dir lists and the full manuals. Here it is live, reporting on a standard library module’s function:
>>>import sys>>>help(sys.getrefcount)Help on built-in function getrefcount in module sys: getrefcount(object, /) Return the reference count of object. The count returned is generally one higher than you might expect, because it includes the (temporary) reference as an argument to getrefcount().
You do not have to import sys in order to call help, but you generally have to import sys to get help on sys this way, because help expects an object reference to be passed in. Alternatively, you can also get help for a module you have not imported by quoting the module’s name as a string. For example, help('sys') and help('sys.getrefcount') both work too, without the import step.
For larger objects such as modules and classes, the help display is broken down into multiple sections, the preambles of which are shown here. Run this interactively to see the full report:
>>>help(sys)Help on built-in module sys: NAME sys MODULE REFERENCE https://docs.python.org/3.12/library/sys.html …more omitted… DESCRIPTION This module provides access to some objects used or maintained by the …more omitted… SUBMODULES monitoring FUNCTIONS __breakpointhook__ = breakpointhook(...) …more omitted… DATA __stderr__ = <_io.TextIOWrapper name='<stderr>' mode='w' encoding='utf... …more omitted… FILE (built-in)
Some of the information in this report is docstrings, and some of it (e.g., function call patterns) is structural information that Pydoc gleans automatically by inspecting objects’ internals using tools available to your code too.
Besides modules, you can also use help on built-in functions, methods, and types. To get help for a built-in type, try either the type name (e.g., dict for dictionary or str for string); an actual object of the type (e.g., {} or ''); or a method of an actual object or type name (e.g., 's'.join or str.join ).1 For an entire type, you’ll get a large display that describes all the methods available for that type; for a method, the help is more focused:
>>>help(dict)Help on class dict in module builtins: class dict(object) | dict() -> new empty dictionary | dict(mapping) -> new dictionary initialized from a mapping object's | …more omitted… >>>help(str.replace)Help on method_descriptor: replace(self, old, new, count=-1, /) Return a copy with all occurrences of substring old replaced by new. …more omitted… >>>help(''.replace)Help on built-in function replace: replace(old, new, count=-1, /) method of builtins.str instance Return a copy with all occurrences of substring old replaced by new. …more omitted… >>>help(ord)Help on built-in function ord in module builtins: ord(c, /) Return the Unicode code point for a one-character string.
The “/” in function docs means that arguments before it must be passed by position only (not by name), but this is substantially above this chapter’s pay grade. See the next part of this book for details on this function syntax.
Running help on your own code
Finally, the help function works just as well on your modules as it does on built-ins. Here it is reporting on components define in the docstrings.py file we coded earlier in Example 15-1. Again, some of this is our docstrings, and some is information automatically extracted by inspecting objects’ structures:
>>>import docstrings>>>help(docstrings.square)Help on function square in module docstrings: square(x) Function documentation Returns the \square\ of its \numeric\ argument. >>>help(docstrings.PartVI)Help on class PartVI in module docstrings: class PartVI(builtins.object) | Class documentation for 🐍 👍 | | Data descriptors defined here: | …more omitted…
And asking for help on the entire module collects all parts at once, with your docstrings in the mix:
>>>help(docstrings)Help on module docstrings: NAME docstrings DESCRIPTION Module documentation This module defines a name, function and class. CLASSES builtins.object PartVI class PartVI(builtins.object) | Class documentation for 🐍 👍 | | Data descriptors defined here: | …more omitted… FUNCTIONS square(x) Function documentation Returns the \square\ of its \numeric\ argument. DATA edition = 6 FILE /Users/me/MY-STUFF/Books/Dev/6E/LP6E/LP6E/Examples/Chapter15/docstrings.py
If you look closely, you’ll notice that we didn’t get our file’s printed output on import this time, just because it was imported earlier; as noted in Chapter 3, imports run just once per file per session (more in Part V).
Pydoc: HTML Reports
The text displays of the help function are adequate in many contexts, especially at the interactive prompt. To readers who’ve grown accustomed to richer presentation mediums, though, they may seem a bit rudimentary. This section presents the HTML-based flavor of Pydoc, which renders module documentation more graphically for viewing in a web browser, and can even open one automatically for you. This browser interface scheme combines both search and display in a web page that communicates with an automatically started local server.
Using Pydoc’s browser interface
To view docs in a browser, you’ll usually launch Pydoc’s main script with a pydoc -b command lines. This spawns two components running locally on your device: a documentation server, and a web-browser client that provides both page display and search input for content fetched from the server. A command line like the following starts the show:
$python3 -m pydoc -bServer ready at http://localhost:53965/ Server commands: [b]rowser, [q]uit server>q
This command works on all PCs; it’s known to also work on Android devices in the Pydroid 3 app’s Terminal, but is spotty on phones in general. It uses the Python –m argument to locate Pydoc’s module file on the module-import search path (covered in Part V of this book), and run it as a top-level script. Per Appendix A and Chapter 3, use py instead of python3 in this command on Windows. On macOS and Linux, a pydoc3 -b command has the same effect, and on Windows the “Module Docs” entry in Python’s Start menu automatically runs Pydoc’s -b mode.
However you start it, Pydoc’s browser mode opens with its index page, captured in Figure 15-1. The index page lists all the modules available for imports and includes search boxes (e.g., Get loads a named module’s docs), as well as topic guides and reserved-word info. You’ll see links to the docs of every module on your module search path, including the directory where Pydoc is launched. Pydoc’s server runs on the local host and on a dedicated but by default arbitrary unused port, but this can be tailored; launch Pydoc without -b for more options.
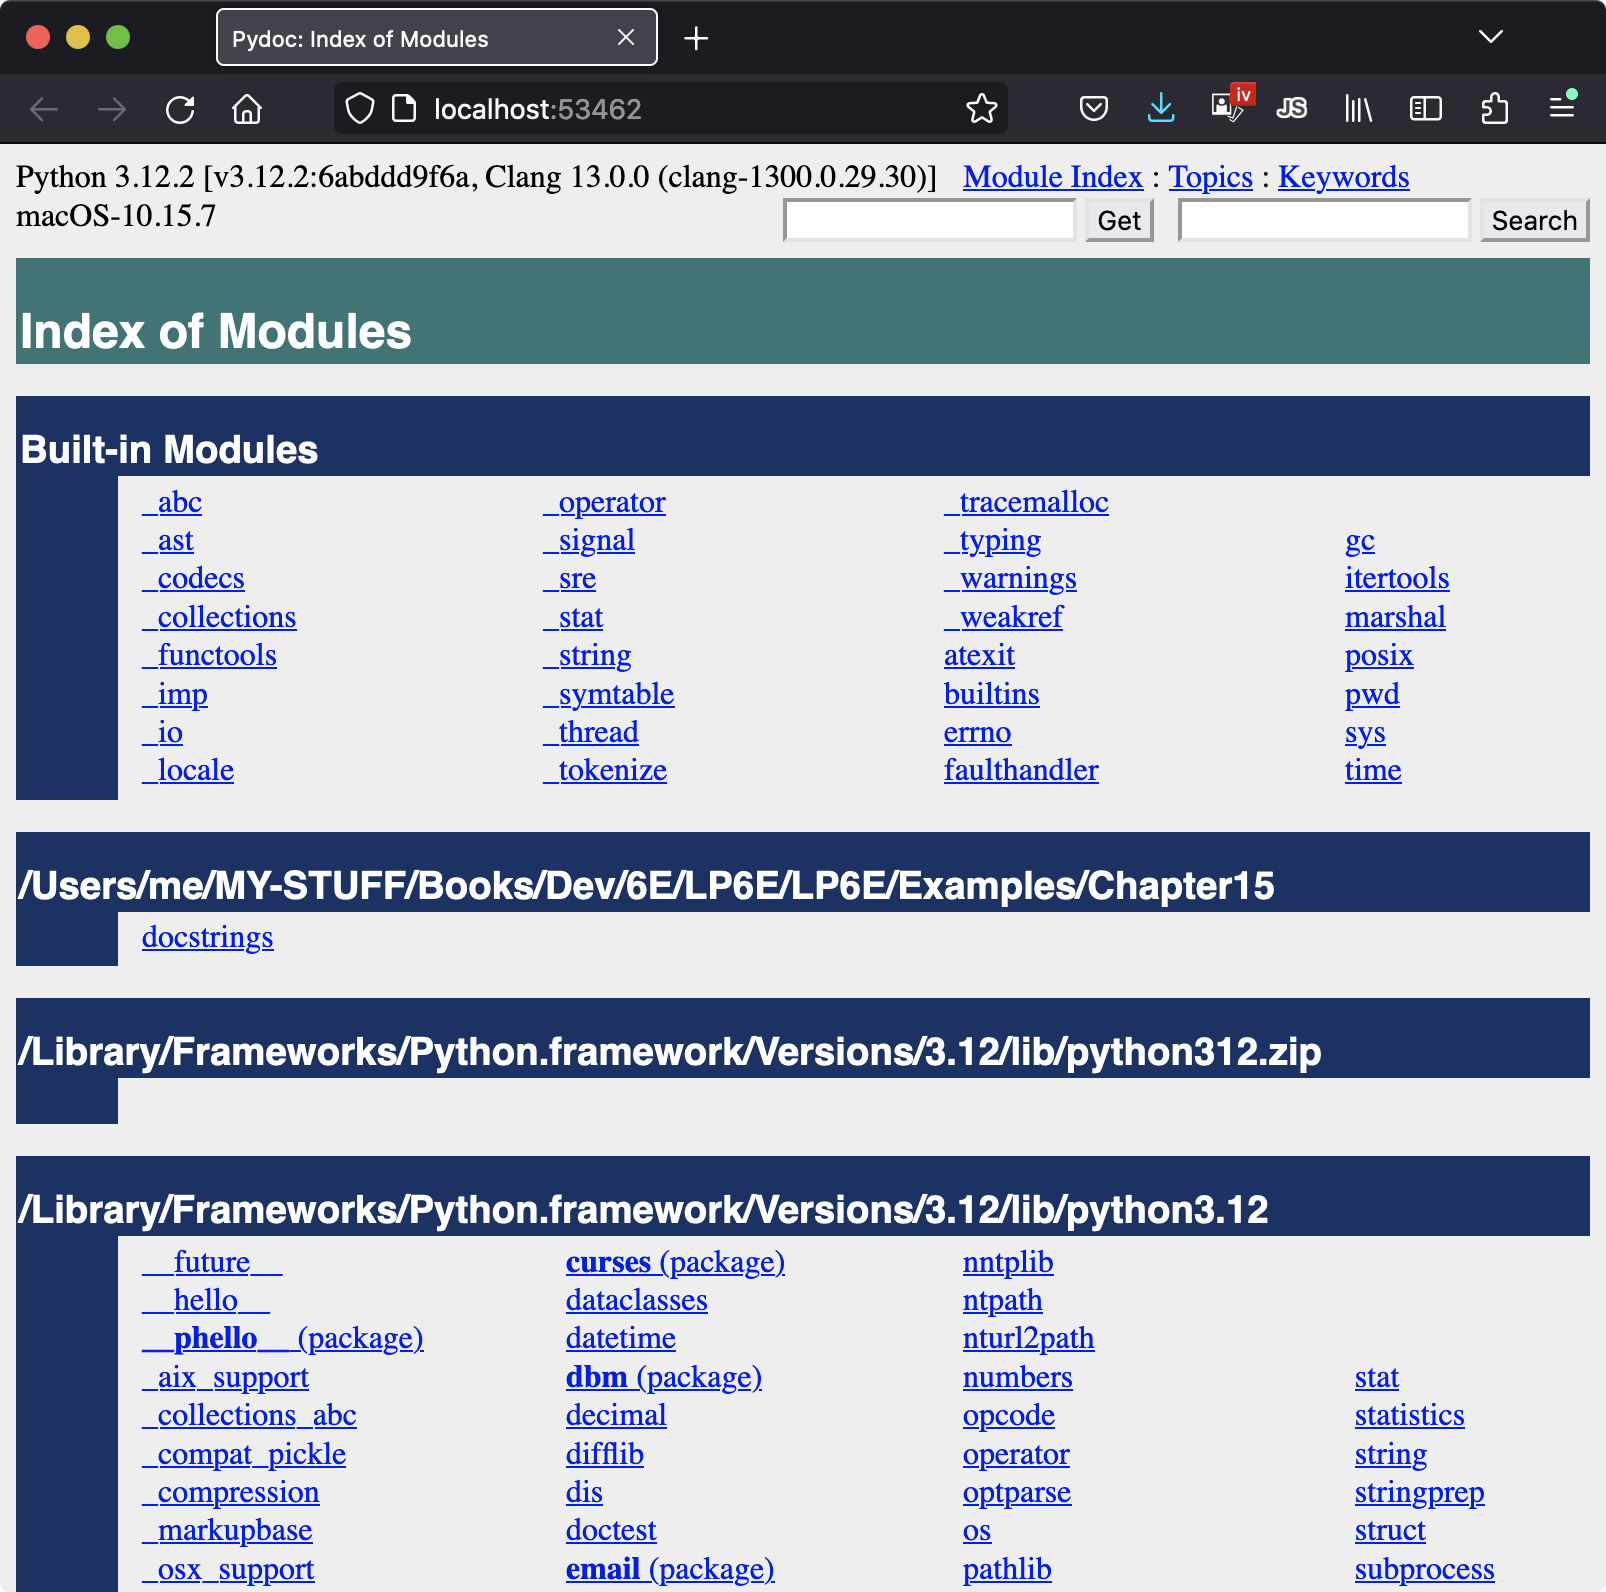
Figure 15-1. The top-level index start page of the Pydoc browser interface
When you click or tap on a module’s entry in Pydoc’s module-index page (or enter its name in Get), you get a page of docs for that module alone—which is essentially the same info that help provides in an interactive REPL, but formatted for display in your browser. Figure 15-2, for example, shows the page we get for the docstrings module we coded earlier in Example 15-1. It’s the same report created for help(docstrings) with a simple HTML layout.
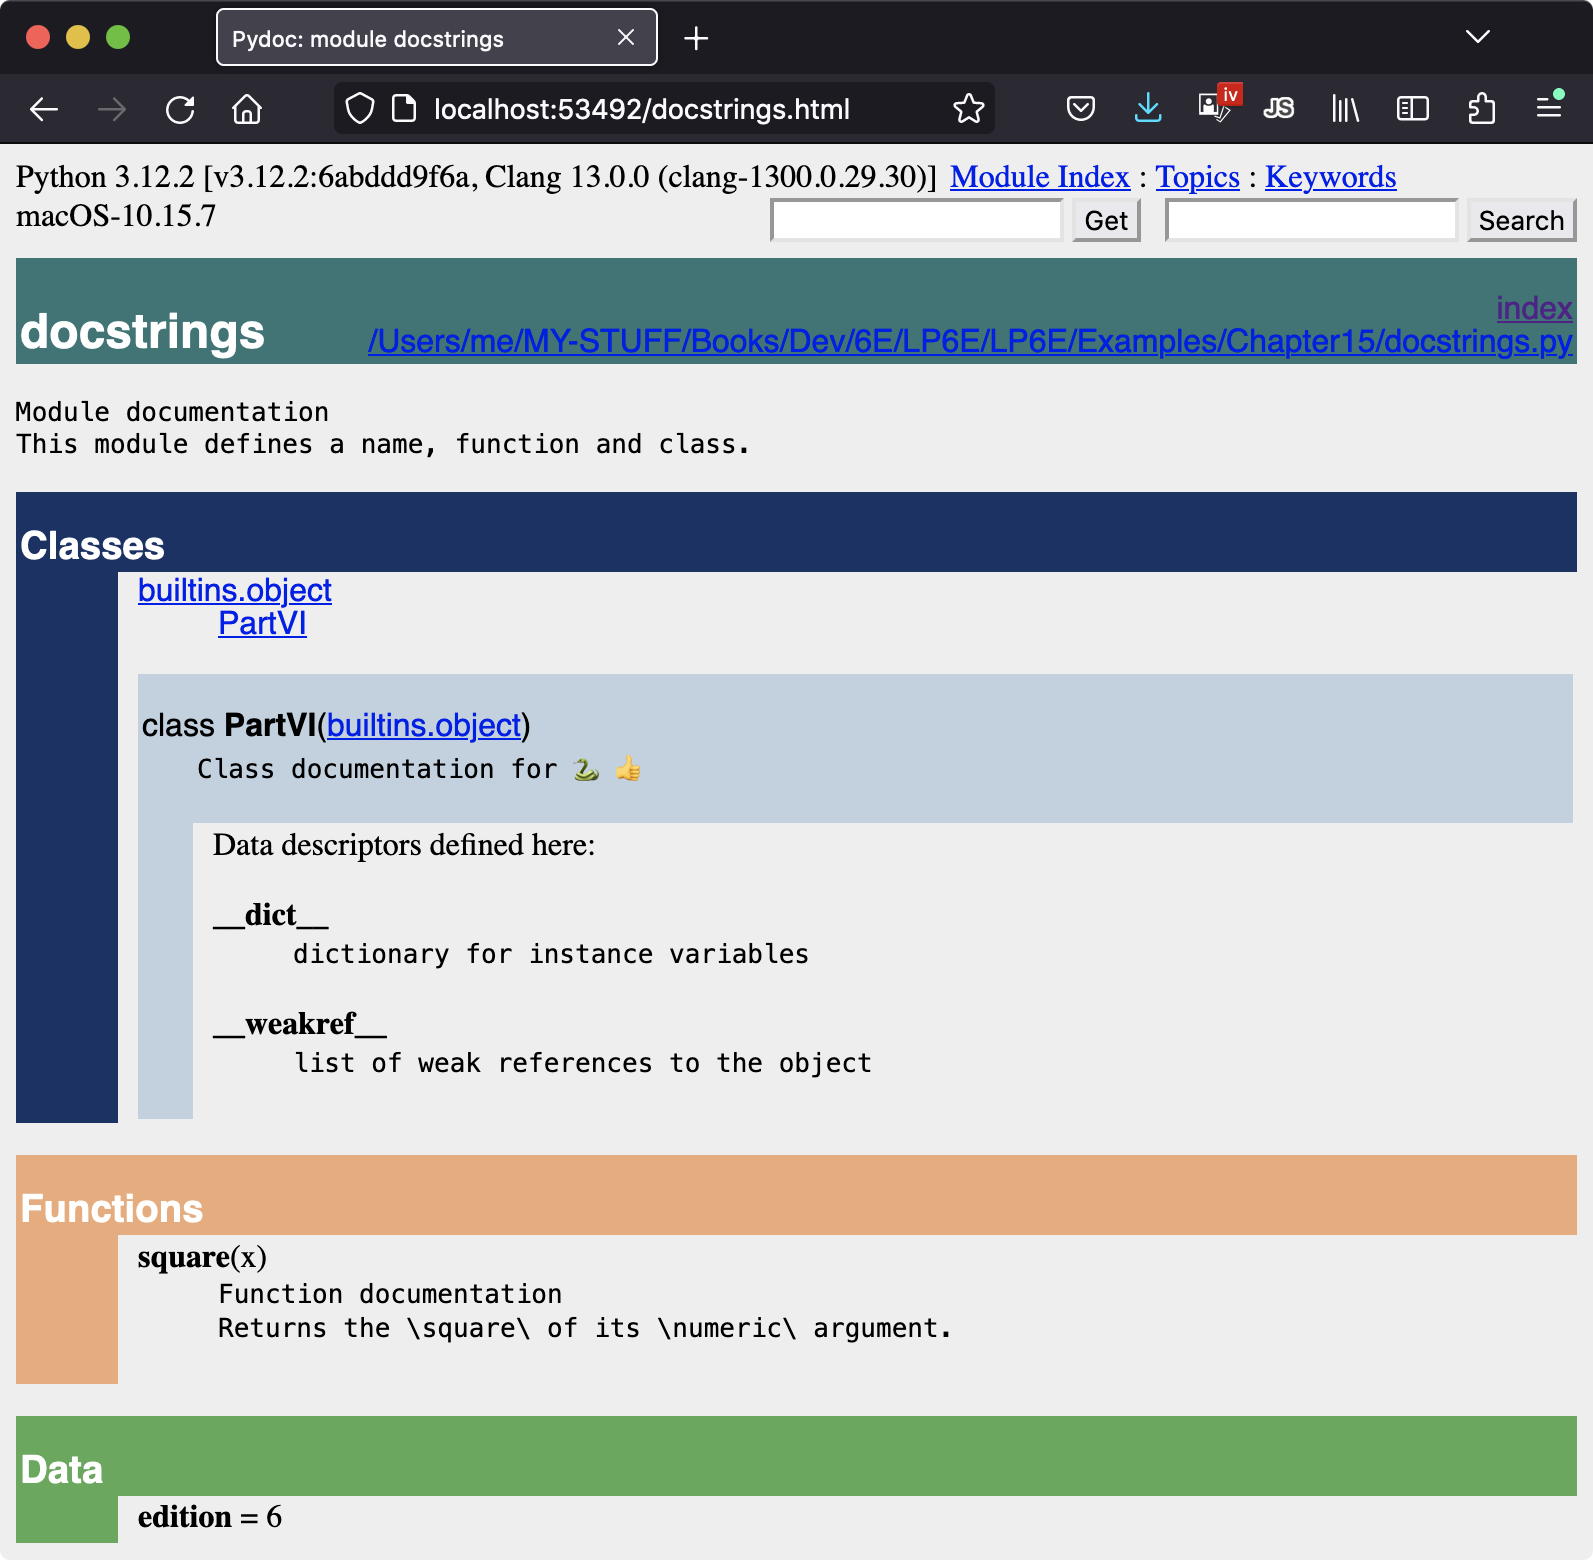
Figure 15-2. Pydoc browser interface displaying a user-defined module’s docs
Experiment with Pydoc on your own for more insight. It’s an optional tool, but provides extra docs for both built-in tools provided by Python, as well as docstring-loaded code files that you write yourself.
Customizing Pydoc
If you run this live, your Pydoc will probably look different than the screenshots in the book, because colors were customized on the machine used to capture the images. Though this is entirely optional and requires some web-development knowledge, you can customize Pydoc’s appearance, too, by editing the simple CSS file it uses to render its pages. To modify colors, edit file _pydoc.css stored in the pydoc_data folder alongside Pydoc’s module—which you can locate on any platform by importing Pydoc’s module and inspecting its __file__ attribute:
$python3 -c "import pydoc; print(pydoc.__file__)"…foldepath…/pydoc.py $ls …foldepath…/pydoc_data# Pydoc's CSS customization file is in here__init__.py topics.py __pycache___pydoc.css
On Windows, use py and dir instead of python3 and ls. This uses the Python -c command-line argument to submit code to be run as a string, which is handy for short bits of one-off code like this; here, the two statements separated by a semicolon run the same as they would if they were typed one at a time at a REPL’s >>> prompt.
You can also find the path to Pydoc by running help('pydoc'): its path shows up at the bottom of the display. Once you’ve located the CSS file, edit it to customize as you like (but save the original first as a fallback). As an example, this book’s captures use RGB color string #173166 for index-decor. All of which assumes CSS skills beyond this book’s scope (plus an undocumented config file that’s prone to change or vanish in the future!), but is probably enough to get you started if you want to have a go.
More Pydoc tips
Pydoc works by importing selected files to extract their documentation. This has two usage implications. First, Pydoc can access only files in folders included on the module search path used by imports. This path automatically includes Python’s standard library, so you can view docs for all built-in modules. It also includes the current working directory—the folder from which Pydoc was started—but that may be meaningless when started from a Windows Start button. Change your PYTHONPATH setting to include other code folders as needed, per Appendix A.
Second, although Pydoc can render docs for both importable modules and runnable scripts in accessible folders, script docs comes with a catch: when a file is selected for help, Pydoc must import it in order to collect its documentation, and as we learned in Chapter 3, importing runs a file’s top-level code. Hence, script help implies a script run.
Imported modules normally just define tools when run, so this is usually irrelevant. If you ask for the documentation of a top-level script file, though, the script will be run, and the console window where you launched Pydoc serves as the script’s standard input and output for any user interaction. This may work better for some scripts and modes than others; script IO may appear before or after help is dismissed in console mode, before help is scrolled in a GUI like IDLE, or interleaved oddly with Pydoc’s own server-command prompts in browser mode.
Later in the book you’ll learn ways to code top-level logic that’s kicked off only when a file is run, not when it is imported (e.g., by nesting it under a test for variable __name__ being '__main__'). If scripts use these protocols, they’re safe to view in Pydoc, because it won’t run any top-level code as an inadvertent side effect of viewing docs.
Finally, Pydoc has additional tools we’ll skip here for space, including a -w switch for saving HTML docs to a file for later viewing, and a plain-text mode run from a command line with just a topic name that works the same as help in a REPL. Again, run Pydoc without any command-line arguments for its full set of options.
Note
Blast from the past: Pydoc once had a simple GUI mode, invoked by flag -g, that launched a tkinter GUI client that communicated with the server. This was available until Python 3.2, when the current browser-only mode was deemed sufficient to warrant dropping the longstanding GUI mode in full. Browsers are GUIs too, of course, and the CSS configuration scheme for Pydoc that arose with the browser mode assumes extra web-development knowledge that many Python users won’t have. In open source, those with time and desire to change things define the future for everyone.
Beyond Docstrings: Sphinx
If you’re looking for a way to document your Python programs in a more sophisticated way, you may wish to check out Sphinx—a documentation generator system used to create Python’s standard manuals described in the next section, as well as docs for many other software projects. It uses simple reStructuredText as its markup language and inherits much from the Docutils suite of parsing and translating tools.
Among other things, Sphinx supports a variety of output formats, automatic cross-references and indexes, and automatic code highlighting (colorization) using Pygments, which is itself a noteworthy Python tool. This is probably overkill for smaller programs where docstrings and help may suffice, but can yield higher-grade documentation for larger projects. See the web for more details on Sphinx, its related tools, and other options in the docs domain.
The Standard Manuals
As you know by now, this book is a tutorial that teaches by example. While its index and table of contents can be used to hunt for random topics after the fact, it’s mainly designed to be read, not to serve as a reference resource. Given that, you’ll probably want to supplement this book with reference tools once you move on to real projects.
Among these, Python’s standard manuals may provide the most complete and most up-to-date reference to the language and its toolset. You can easily view these manuals online with the Documentation link at Python’s website. They can also be viewed via the “Manuals” entry in Python’s entry in the Start menu on Windows, and can be opened from “Python Docs” in the Help menu within the IDLE coding GUI. See your toolset for other access options.
When first opened, the manuals display a root page with a search box, like that captured in Figure 15-3. The two most important entries here are most likely the “Library reference” (which documents built-in types, functions, exceptions, and standard-library modules) and the “Language reference” (which provides a formal description of language-level details). Both will probably be regular companions once you start coding Python in earnest.
Also of notable interest, the “What’s new” documents in this standard manual set chronicle Python changes made in each release beginning with Python 2.0, which came out in late 2000—useful for those porting older Python code, or older Python skills. These documents are also useful for uncovering additional details on the differences in the Python 2.X and 3.X language lines, as well as recent Python 3.X changes covered in this book.
For both better and worse, change has been a constant in Python since its 0.X days. While the future is impossible to predict, the standard manuals’ “What’s new” docs will also cover Python mods almost certain to arise after this book’s release. It’s nearly required reading for anyone working downstream of a perpetually morphing sandbox.
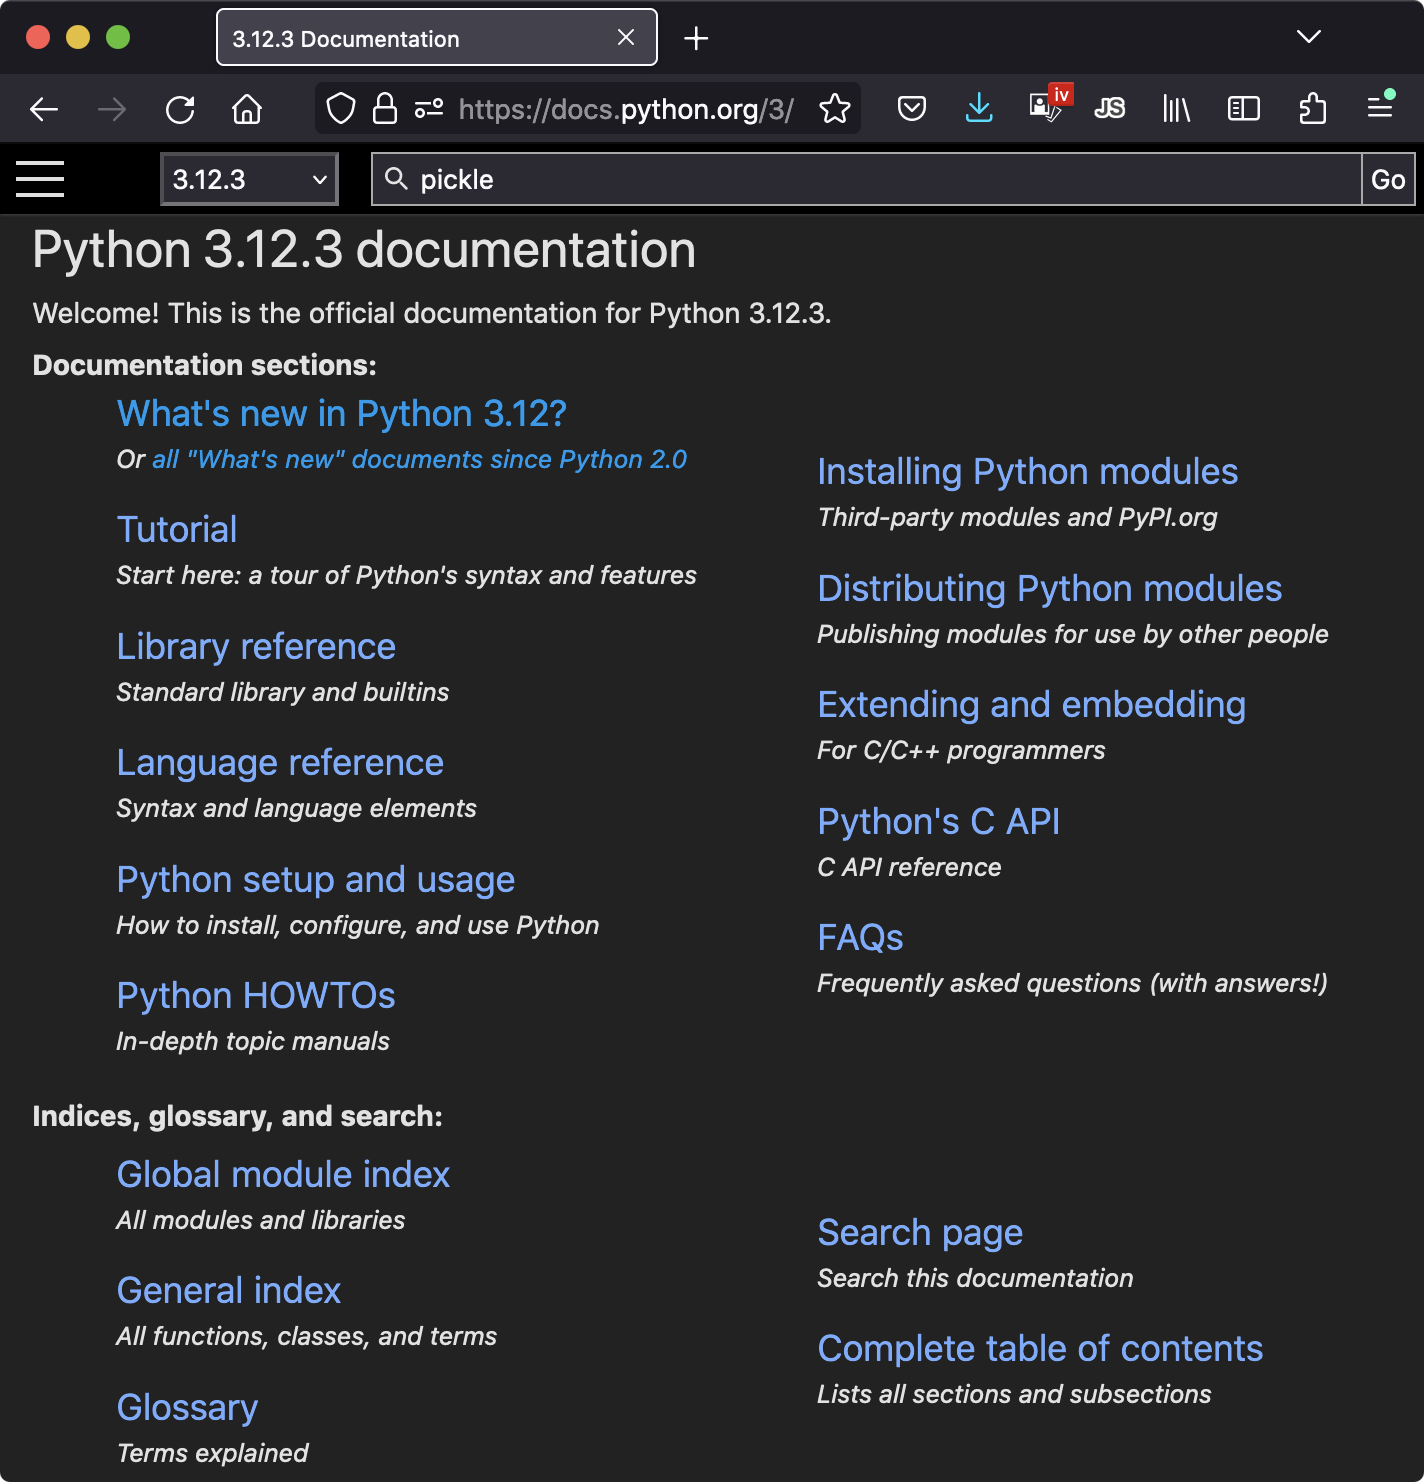
Figure 15-3. Python’s standard manuals, available on the web and elsewhere
Web Resources
Finally, besides the standard manuals, Python’s website also hosts additional resources, some of which cover special topics or domains, including non-English Python resources and introductions scaled to different target audiences.
Today you will also find a multitude of Python blogs, websites, wikis, and other resources on the web at large. Given the explosion of the web in recent decades, some online resources are naturally more authoritative and reliable than others, and some are sadly geared more toward monetization than education. This word of caution includes AI chatbots, which can only do as well as the data they’re fed and paraphrase, and are not a replacement for the deep learning needed to work in software.
That said, there’s a wealth of Python material out there to be had—for those willing to exercise the prudence and skepticism that today’s web demands.
Common Coding Gotchas
Before the programming exercises for this part of the book, let’s run through some of the most common mistakes beginners make when coding Python statements and programs. Many of these are warnings issued earlier in this part of the book, collected here for ease of reference. You’ll learn to avoid these pitfalls once you’ve gained a bit of Python coding experience, but a few words now might help you avoid falling into some of these traps initially:
Don’t forget the colons. Always remember to type a
:at the end of compound statement headers—the first line of anif,match,while,for, etc. You’ll probably forget at first (as have thousands of Python students over the years), but you can take some comfort from the fact that it will soon become an unconscious habit.Start in column 1. Be sure to start top-level (unnested) code in column 1. That includes unnested code typed into module files, as well as unnested code typed at the interactive prompt (a.k.a. REPL). Indented means nested in Python, so it doesn’t work at the top.
Blank lines matter at the interactive prompt. Blank lines in compound statements are always irrelevant and ignored in module files, but when you’re typing code at the interactive prompt, they end the statement. In other words, blank lines tell the interactive REPL that you’ve finished a compound statement; if you want to continue, don’t hit the
Enterkey at the...prompt (if shown) until you’re really done. This also means you can’t paste multiline code at this prompt; it must run one full statement at a time, with blank lines as needed.Indent consistently. Avoid mixing tabs and spaces in the indentation of a nested block. Otherwise, what you see in your editor may not be what Python sees when it counts tabs as a number of spaces. This is true in any block-structured language, not just Python—if the next programmer has tabs set differently, it will be difficult or impossible to understand the structure of your code. It’s safer to use all tabs or all spaces for each block.
Don’t code C in Python. A reminder for C/C++ programmers: you don’t need to type parentheses around tests in
ifandwhileheaders (e.g.,if (X==1)). You can if you like (any expression can be enclosed in parentheses), but they are fully superfluous in this context. Also, do not terminate all your statements with semicolons; it’s technically legal to do this in Python as well, but it’s totally useless unless you’re placing more than one statement on a single line (the end of a line normally terminates a statement). And remember, don’t use{}around blocks (indent your nested code blocks consistently instead), and avoid embedding assignment statements inwhileloop tests unless they’re simple (even though Python now enables this with:=).Use simple
forloops instead ofwhileorrange. Another reminder: a simpleforloop (e.g.,for x in y) is almost always simpler to code and often quicker to run than awhile- orrange-based counter loop. Avoid the temptation to count things in Python; though occasionally required, it’s usually subpar.Beware of mutables in assignments. As cautioned before, be careful about using mutables in a multiple-target assignment (
a = b = []), as well as in an augmented assignment (a += [1, 2]). In both cases, in-place changes may impact other variables. See Chapter 11 for details if you’ve forgotten why this is true.Don’t expect results from functions that change objects in place. We encountered this nag earlier, too: in-place change operations like the
list.appendandlist.sortmethods presented in Chapter 8 do not return values (other thanNone), so you should call them without assigning the result. It’s not uncommon for beginners to say something likemylist = mylist.append(X)to try to get the result of anappend, but this assignsmylisttoNone, not to the modified list (in fact, you’ll lose your reference to the list altogether).Always use parentheses to call a function. You must add parentheses after a function name to call it, whether it takes arguments or not (e.g., use
function(), notfunction). In the next part of this book, you’ll learn that functions are simply objects that have a special operation—a call that you trigger with the parentheses—but they can be referenced like any other object without triggering a call. This often crops with files; it’s common for beginners to typefile.closeto close a file, rather thanfile.close(). Because it’s legal to reference a function without calling it, the first version succeeds silently, but it does not close the file.Don’t use extensions or paths in imports and reloads. Omit directory paths and file extensions in
importstatements—sayimport mod, notimport mod.py. We discussed module basics in Chapter 3 and will continue studying modules in Part V. Because modules may have other extensions besides .py (e.g., .pyc for byte code), hardcoding a particular extension is not only invalid syntax, it doesn’t make sense. Python picks an extension automatically, and any platform-specific directory path syntax comes from module search path settings, not theimportstatement. Until we explore this in more depth, use just a simple name in imports.And other pitfalls in other parts. Be sure to also see the built-in type warnings at the end of Part II, as they may qualify as coding issues too. There are additional “gotchas” that crop up commonly in Python coding—losing a built-in function by reassigning its name, hiding a library module by using its name for one of your own, changing mutable argument defaults, and so on—but we don’t have enough background to cover them yet. To learn more about both what you should and shouldn’t do in Python, you’ll have to read on; later parts extend the set of “gotchas” and fixes we’ve enumerated here.
Chapter Summary
This chapter toured documentation—both documentation we write ourselves in our own programs, and documentation available for tools we use. We met docstrings, explored reference resources for Python, and learned how Pydoc’s help function and browser-based interfaces provide extra sources of documentation. Because this is the last chapter in this part of the book, we also reviewed common coding mistakes to help you avoid them.
In the next part of this book, we’ll start applying what we already know to larger program constructs. Specifically, the next part takes up the topic of functions—a tool used to group statements for reuse. Before moving on, however, be sure to work through the set of lab exercises for this part of the book that appear at the end of this chapter. And even before that, let’s run through this chapter’s quiz to review.
Test Your Knowledge: Quiz
When should you use documentation strings instead of hash-mark comments?
Name three ways you can view documentation strings.
How can you obtain a list of the available attributes in an object?
How can you get a list of all importable modules on your computer?
Test Your Knowledge: Answers
Documentation strings (docstrings) are considered best for larger, functional documentation, describing the use of modules, functions, classes, and methods in your code. Hash-mark comments are better limited to smaller-scale documentation about arcane expressions or statements at strategic points on your code. This is partly because docstrings are easier to find in a source file (they have specific locations), but also because they can be extracted and displayed by the Pydoc system.
You can see docstrings by printing an object’s
__doc__attribute, by passing it to Pydoc’shelpfunction, and by selecting modules in Pydoc’s HTML-based browser interface. The latter is launched with a-bcommand-line switch, and runs a client/server system that displays documentation in a popped-up web browser. Pydoc can also be run to save a module’s documentation in an HTML file for later viewing or printing.The built-in
dir(X)function returns a list of all the attributes attached to any object. A list comprehension like[a for a in dir(X) if not a.startswith('__')]can be used to filter out internals names with underscores (you’ll learn how to wrap this in a function in the next part of the book to make it reusable).Because the index page opened for Pydoc’s browser-based
-bmode displays every module on your import search path, this shows all the modules available for imports in your programs. This relies on configurable search-path settings that we’ll cover more fully later in this book, but it includes both the current directory and Python’s standard library by default. You can also write code of your own to achieve this using the same tools the Pydoc uses (it’s just Python code, after all), but it’s a significant manual task.
Test Your Knowledge: Part III Exercises
Now that you know how to code basic program logic, the following exercises will ask you to implement some simple tasks with statements. Much of the work is in exercise 4, which lets you explore coding alternatives. There are always many ways to arrange statements, and part of learning Python is learning which arrangements work better than others. You’ll eventually gravitate naturally toward what experienced Python programmers call “best practice,” but best practice takes practice.
See “Part III, Statements and Syntax” in Appendix B for solutions to the following exercises:
Coding basic loops. This exercise asks you to experiment with
forloops.Write a
forloop that prints the ASCII code point of each character in a string namedS. Use the built-in functionord(character)to convert each character to an its integer code point. This function technically returns a Unicode code point that may not fall in ASCII’s range, but if you restrict its content to ASCII characters, you’ll get back ASCII codes. (Test it interactively to see how it works if needed.)Next, change your loop to compute the sum of the ASCII code points of all the characters in a string.
Finally, modify your loop again to return a new list that contains the ASCII code points of each character in the string. Does the expression
map(ord, S)have a similar effect? How about[ord(c) for c in S]? Why? (Hint: see Chapter 14.)
Coding basic selections. Write Python
ifandmatchstatements that print the first three month names of the year, given their relative numbers. For example, given 1, the output should be January, and for 3, it should be March (or whatever months are named in your locale). Then do the same by coding the choice with both a dictionary-key index and a list-offset index. How would you handle out-of-range month numbers?Backslash characters. What happens on your machine when you type the following code interactively?
for i in range(50):
    print(f'hello {i}\a')
Beware that if it’s run outside of some interfaces like IDLE, this example may beep at you, so you may not want to run it in a crowded room! IDLE ignores odd characters instead of beeping—spoiling much of the joke (see the backslash escape characters in Table 7-2).
Sorting dictionaries. In Chapter 8, we saw that dictionaries are collections that store keys by insertion order only. Write a
forloop that prints a dictionary’s items in sorted (ascending) key-value order. (Hint: store keys in unordered fashion, and use the dictionarykeysand listsortmethods, or thesortedbuilt-in function.)Program logic alternatives. Consider the following code, which uses a
whileloop andfoundflag to search a list of powers of 2 for the value of 2 raised to the fifth power (32). It’s stored in a module file called power.py.L = [1, 2, 4, 8, 16, 32, 64] X = 5 found = False i = 0 while not found and i < len(L): if 2 ** X == L[i]: found = True else: i = i+1 if found: print('at index', i) else: print(X, 'not found') $python3 power.pyat index 5As is, the example doesn’t follow normal Python coding techniques. Follow the steps outlined here to improve it (for all the transformations, you may either type your code interactively or store it in a script file run from the system command line or other interface—using a file makes this exercise much easier):
First, rewrite this code with a
whileloopelseclause to eliminate thefoundflag and finalifstatement.Next, rewrite the example to use a
forloop with anelseclause, to eliminate the explicit list-indexing logic. (Hint: to get the index of an item, use the listindexmethod—L.index(X)returns the offset of the firstXin listL.)Next, remove the loop completely by rewriting the example with a simple
inoperator membership expression. (See Chapter 8 for more details, or type this to test:2 in [1, 2, 3].)Finally, use a
forloop and the listappendmethod to generate the powers-of-2 list (L) instead of hardcoding a list literal.
Deeper thoughts:
Do you think it would improve performance to move the
2 ** Xexpression outside the loops? How would you code that?As we saw in exercise 1, Python includes a
map(function, iterable)tool that can generate a powers-of-2 list, too:map(lambda x: 2 ** x, range(7)). Try typing this code interactively; you’ll meetlambdamore formally in the next part of this book, especially in Chapter 19. Would a list comprehension help here (see Chapter 14)? How about a:=expression (see Chapter 11)?
1 Note that asking for help on an actual string object directly (e.g., help('xyz')) doesn’t work as you may expect: you usually get no help, because strings are interpreted specially—as a request for help on a topic or tool by name, as described earlier. You must use the str type name in this context, though both an empty string (help('')) and string method names referenced through actual objects (help(''.join)) work fine. An interactive help mode, started by typing just help(), avoids manual help calls, and may avoid some of their drama.