Chapter 3. How You Run Programs
OK, it’s time to start running some code. Now that you have a handle on Python’s purpose and execution model, you’re finally ready to start some real Python programming.
There are multiple ways to tell Python to execute the code you type, and this chapter covers all the major program launching techniques in common use today. Along the way, you’ll learn both how to run code interactively, and how to save it in files to be run using a variety of techniques—with command lines, icon clicks, the IDLE GUI, mobile apps, web-based interfaces, module imports, and more.
As for the previous chapter, if you have prior programming experience and are anxious to start digging into Python itself, you may want to skim this chapter and move on to Chapter 4. But don’t skip this chapter’s early coverage of preliminaries and conventions, its overview of debugging techniques, or its first look at module imports—a topic essential to understanding Python’s program architecture, which we won’t revisit until Part V. It’s also worthwhile to browse the sections on IDEs and apps, to sample tools that may be more useful once you start coding larger programs.
Installing Python
This book will generally assume that you have access to a recent version of Python on your computer, tablet, or phone. Python installation is not required for this book, and isn’t necessary in some contexts, but you’ll need a Python to work along with examples and do end-of-part exercises, and both are great ways to make concepts more concrete.
If you don’t have a Python and wish to set one up, see Appendix A now for per-platform install help. In short:
Windows and macOS users fetch and run a self-installing executable file that puts Python on their devices. Simply double-click and say Yes or Next at all prompts.
Linux (including Windows WSL) users may have a usable Python preinstalled on their computers, but can install one if needed or desired from their distribution’s repositories.
Android and iOS users install an app that allows them to run Python locally on their phones and tablets.
Unix (and some Linux) users often compile Python from its full source code distribution package.
For example, smartphone users fetch a Python app at an app store, and Windows and macOS PC users get an installer at the downloads page of Python’s main website. Python may also be had through other distribution channels, and some Python coding modes covered ahead, such as Jupyter notebooks, have unique install and usage steps. You may not be able to select a Python version in some contexts, but this book uses Python 3.12, so closer to that is better.
Before you install, you should generally check to see if Python is already present. Look for it on Windows in the Start menu, and on most platforms by running a Python command line as described both in Appendix A and this chapter’s next section. To see how, let’s take installs as a given, and move on to learning the many ways to run Python code.
Interactive Code
This section gets us started with the basics of interactive Python coding. Because it’s our first look at running code, we also cover some startup logistics here, such as setting up a working directory, so be sure to read this section first if you’re relatively new to programming. This section also explains some conventions used throughout the book, so most readers should probably take at least a quick look here.
Starting an Interactive REPL
By most measures, the simplest way to run Python code is to type it at Python’s interactive command line, sometimes called the interactive prompt, and often more concisely labeled the REPL (which stands for read–eval–print loop).
There are a variety of ways to start this command line—in a coding GUI or app, in a web notebook, from a system console, and so on. Assuming Python is installed locally as an executable program on your device, the most platform-neutral way to start an interactive interpreter session is to simply type a Python command at your device’s console prompt, without any arguments. Since this is most common, nearly universal, and arguably simplest, let’s start here.
Despite this scheme’s generality, both the Python command you’ll type, and where you’ll type it, varies per platform. On Windows, macOS, and Android, for example, py, python3, and python, respectively, do the job as follows:
$pyPython 3.12.3 (…etc…, Apr 9 2024, 14:05:25) [MSC v.1938 64 bit (AMD64)] on win32 Type "help", "copyright", "credits" or "license" for more information. >>>^Z$python3Python 3.12.2 (…etc…, Feb 6 2024, 17:02:06) [Clang 13.0.0…)] on darwin Type "help", "copyright", "credits" or "license" for more information. >>>^D$pythonPython 3.11.4 (…etc…, Jul 2 2023, 11:17:00) [Clang 14.0.7…)] on linux Type "help", "copyright", "credits" or "license" for more information. >>>^D
A python3 works on Android and Linux, too, if you want to narrow this to one exception—for Windows’ py. This book uses python3 in platform-neutral examples just because it works almost everywhere; use py instead if you’re working on Windows (python3 works on Windows, too, but is reserved for a lesser Store install today: see Appendix A). Also per that appendix, all these commands must be on your system search path (generally known as PATH) and require a full pathname if they’re not, but most installs set this up automatically.
Typing a Python command at your system prompt like this begins an interactive Python session (i.e., REPL). The $ character at the start of listings here stands for a generic system prompt on all platforms throughout this book—it will likely vary on your device and is not input that you type yourself. On Windows, a Ctrl+Z key combo (followed by Enter) ends this session as shown; on Unix (which includes macOS, Linux, and Android), it’s Ctrl+D instead.
You’ll notice that the interactive prompt opens with a message that identifies the Python being used (e.g., “3.12.3” is Python 3.12) and the platform it’s running on (e.g., “win32” for Windows, “darwin” for macOS, and “linux” for both Linux and Android), followed by a line with tips for more info. We’re going to omit these opening lines in this book, except where they’re helpful.
The notion of a system prompt (a.k.a. shell or console) where you type the Python command is generic, but exactly how you access it varies by platform. It might be Command Prompt or PowerShell on Windows; Terminal on macOS and Linux; the Termux app on Android; or a dedicated terminal screen in some apps like Pydroid 3.
On most platforms, you can also start an interactive session in ways that don’t require typing a command at all, but they vary even more widely. On Windows, for example, a Start-menu option opens a similar REPL, as do the IDLE GUI on all PCs, dedicated screens in apps on Android and iOS, and some web-browser interfaces. We’ll cover some of these options ahead, but see Appendix A for more platform tips, and the web for more help with other options.
Anywhere you see the >>> prompt, though, you’re in an interactive Python session and REPL—you can type any Python statement or expression here and run it immediately by simply pressing the enter key (or similar button). We will do so in a moment, but first we need to get a few admin details sorted out to make sure all readers are set to go.
Where to Run: Code Folders
Now that you’re starting to learn how to run code, you’ll also need to know where to run code. You can save and run code anywhere you can make files, but this book has two recommendations for using its examples, especially for newcomers:
- Work in a dedicated code folder
- To avoid stomping on other content, run this book’s examples from a dedicated code folder (a.k.a. directory) on your device. For instance, this book runs all its code in a folder nested in the user account (or “home”) folder on each device. Your code folder can be located wherever you like and called whatever you wish, but running out of one folder will help you keep track of your work and simplify some tasks.
- Work in per-chapter subfolders of your code folder
- To avoid clutter and filename collisions, also organize your code into per-chapter subfolders, nested in your dedicated code folder. Per-chapter subfolders will ensure that imports in examples will work without advanced settings (that you’ll learn later). There’s more on imports and directories in an upcoming note. For now, keep in mind that console commands in this book will implicitly be run in a per-chapter subfolder of a dedicated code folder on the host. The folder name will normally be omitted for platform neutrality and is irrelevant to the code.
If you’ll be using this book’s examples package, it’s already done the setup work for you. For example, unzipping the examples creates a code folder named LP6E, whose Chapter03 subfolder has this chapter’s code. If you’ll be using this package to avoid typing code or copying from emedia, simply run its examples in the subfolder of the chapter you’re studying. This is where REPLs will be started and where script files will be run. As you’ll learn later, this is also where data files that our scripts create will show up, unless scripts use filenames with explicit folder paths.
If you’ll be creating code on your own, you should probably create a similar code directory structure of your own before we move on. On PCs, use your system’s file explorer, or run a command line: mkdir folder works on Windows and Unix. On Android, you can also use a file explorer (or mkdir in Termux), but be sure to pick a folder accessible to your Python app. Some coding interfaces may offer other ways to create folders; see your tool for info.
Once your per-chapter code folders are set to go, always start there to write, save, and run the examples in this book. How you’ll do this depends on your usage mode. In consoles, a portable cd folder command changes directories. In a GUI like IDLE, opening and running a file may go to its folder. And in other interfaces, you might launch a REPL for a file in the UI or use other schemes too varied to cover here. As a fallback, Python’s os.getcwd() you’ll meet shortly shows the current directory and its os.chdir('path') changes it—as long as you import os first.
What Not to Type: Prompts and Comments
Speaking of commands, remember not to type the $ character used at the start of this book’s command lines to denote a system console prompt; type just the text after these prompts. This may sound simple to experienced programmers, but it’s a very common first error for beginners, and we’re not excluding anyone here.
Similarly, do not type the >>> and ... prompt characters shown at the start of lines in interpreter interaction listings and used by this book to denote code run in a REPL; type just the text after these prompts. These are prompts that Python’s standard REPL displays automatically as visual guides for interactive code entry and may or may not appear in your interface. For instance, the ... prompt is used for continuation lines in some REPLs, but is just a label in IDLE, and is omitted by some of this book’s listings for easier copy/paste; either way, don’t type it yourself.
To help you remember this, user inputs you must type are shown in bold in this book, and prompts are not. Also keep in mind that commands typed after these system and Python prompts are meant to be run immediately and are not generally intended to be saved in the source files we will be creating; you’ll see why this distinction matters ahead.
In the same vein, you normally don’t need to type text that starts with a # character in this book’s code listings—as you’ll learn later, these are comments, not executable code. Except when # is used to introduce a #! directive at the top of a script, you can safely omit it and the rest of the line that follows it (there’s more about #! in Appendix A).
Other Python REPLs
Having said all that, you should also know that Python REPLs can also be had in systems that convolute the traditional model covered in this chapter. IPython, for example, provides an alternative, separately installed, and enhanced Python interactive session, which labels commands by number and doesn’t use >>> prompts. Jupyter notebooks provide the IPython REPL, too, and run it in a web browser instead of system console (we’ll explore Jupyter later in this chapter).
To muddy this story further, the PyPy system of Chapter 2 uses >>>> for its REPL prompts to distinguish it from CPython’s ternary >>> (though you may have to look hard to tell); the IDLE GUI covered ahead displays >>> off to the side (and not in a system console); smartphone apps may vary too (see Appendix A); and the interactive prompt can technically be changed to anything (it’s sys.ps1 to your code, and can be set in a startup file, per Python docs).
All of which means that your Python interactive session may differ from the mainstream model that this chapter often employs. Depending on your tools and goals, you might see a different prompt or none at all, and you might type interactive Python code into a web browser, GUI, or app instead of the system console.
In general, though, this book recommends the traditional and simpler options it demos and covers, when you’re first starting out. IPython and Jupyter, for example, have learning curves of their own, and Jupyter is geared toward scientific work, which is just one of many Python roles. If and when you opt to use alternative coding interfaces like these, and others sure to arise in the future, extrapolate to their REPLs’ minor differences as needed.
Note
REPL futurism: The standard CPython is scheduled to improve its interactive REPL interface in version 3.13, not yet released as this book was written. Per plans, the REPL will gain color prompts, automatic indentation, multiline editing and paste, and colorized exceptions borrowed from other UIs and IDEs. Colors won’t matter in this book’s print version, of course, and the future is not yet written, but a more colorful future may have arrived by the time you read this note.
Running Code Interactively
With those preliminaries out of the way, let’s move on to typing some actual code. However it’s started, the Python interactive session begins by printing some informational text (again, mostly omitted hereafter), then prompts for input with >>> (or similar) when it’s waiting for you to type a new Python statement or expression.
When working interactively, the results of your code are displayed below the >>> input lines after you press the Enter key (or similar). For instance, here are the results of two Python print statements:
$python3>>>print('Hello world!')Hello world! >>>print(2 ** 8)256
There it is—we’ve just run some Python code (it’s not much, but it proves the point). We’re still skipping most code details for now, but in brief, print is a built-in tool that sends a line displaying whatever you pass to it, to wherever you’re working; because it’s a function call in Python, the parentheses in this code are required. We’ve used it here to display a Python string and an integer, as shown by the output lines that appear after each >>> input line.
When coding interactively like this, you can type as many Python commands as you like; each is run immediately after it’s entered. Moreover, because the interactive session automatically prints the results of expressions you type, you don’t usually need to say “print” explicitly at this prompt; the format of the following automatic displays can differ slightly from print, but it’s not yet important to know how:
>>>language = 'Python'>>>language'Python' >>>2 ** 8256 >>>^Z# Use Ctrl-D (on Unix) or Ctrl-Z (on Windows) to exit$
Here, the first line saves a value by assigning it to a variable (language), which is created by the = assignment; and the last two lines typed are expressions (language and 2 ** 8), whose results are displayed automatically. Again, to exit an interactive session like this and return to your system prompt, type Ctrl+D on Unix-like machines, and Ctrl+Z on Windows. In the IDLE GUI discussed later, either type Ctrl+D everywhere, or simply close the window.
Notice the italicized note about this on the right side of this listing—starting with # here. This book uses these throughout to add remarks about what is being illustrated, but you don’t need to type this text yourself; if you do, they’re ignored by Python as comments. In fact, much like system $ and Python >>> prompts, you shouldn’t type this when it’s on a system command line; the #… part is ignored by Python but may be an error in system shells.
Now, we didn’t do much in this session’s code—just typed some Python print and assignment statements, along with a few expressions, all of which we’ll study in detail later. The main thing to notice is that the Python REPL executes the code entered on each line immediately, when the Enter key (or similar) is pressed.
For example, when we typed the first print statement at the >>> prompt, the output (a Python string) was echoed back right away. There was no need to create a source code file, and no need to run the code through a compiler and linker first, as you’d normally do when using a language such as C or C++. Strictly speaking, interactive code is compiled to bytecode in memory and run by the PVM in CPython (see Chapter 2), but you don’t need to care.
As you’ll see in later chapters, you can also run multiline statements (e.g., for loops) at the interactive prompt; such a statement may prompt for continuation lines with ... as noted earlier and runs immediately after you’ve entered all of its lines and pressed Enter twice to add a blank line. Blank lines aren’t required (and are ignored) in code files, but needed to let some REPLs know your statements are complete. Also, bear in mind that the current and standard REPL runs just one statement at a time—don’t paste large code blocks at its prompt!
Why the Interactive Prompt?
The interactive prompt runs code and echoes results as you go, but it doesn’t save your code in a file. Although this means you won’t do the bulk of your real-world coding in interactive sessions, the interactive prompt turns out to be a great place to both learn the language and test program files on the fly. Here’s a quick rundown of these roles.
Learning
Because it executes code immediately, the interactive prompt is ideal for experimenting with code and learning the language, and we’ll be using it throughout this book to demonstrate smaller examples and amplify concepts. In fact, this is the first rule of thumb to remember: if you’re ever in doubt about how a piece of Python code works, fire up the interactive command line and try the code out to see what happens.
For instance, suppose you’re reading a Python program’s code and you come across an expression like 'Hack!' * 8 whose meaning you don’t understand. At this point, you can spend ten minutes wading through manuals, books, and the web to try to figure out what the code does, or you can simply run it interactively:
$python3>>>'Hack!' * 8# Learning by trying'Hack!Hack!Hack!Hack!Hack!Hack!Hack!Hack!'
This immediate feedback you receive at the interactive prompt is often the quickest way to deduce what a piece of code does. Here, it’s clear that it does string repetition: in Python, * means multiply for numbers, but repeat for strings—it’s like concatenating a string to itself repeatedly (there’s more on strings in Chapter 4).
Chances are good that you won’t break anything by experimenting this way—at least, not yet. To do real damage, like deleting files and running shell commands, you must really try by importing modules explicitly (we’ll sample tools that can make you that dangerous later in this chapter). Straight Python code, though, is almost always safe to run.
For instance, watch what happens when you make a mistake at the interactive prompt:
>>>X# Making mistakes is OKTraceback (most recent call last): File "<stdin>", line 1, in <module> NameError: name 'X' is not defined
In Python, using a variable before it has been assigned a value is always an error—otherwise, if names were filled in with defaults, some errors might go undetected until it’s too late. This means you must initialize counters to zero before you can add to them, must initialize lists to empty before extending them, and so on. You don’t need to declare variables in Python, but they must be assigned before you can fetch their values.
Other error messages try to be more helpful in Python today with “Did you…?” tips—as when looking for the sys.ps1 prompt hook mentioned earlier. You must import modules like sys before using them (though you probably won’t need the reminder fairly soon, and we’ll be truncating some error messages in this book for brevity):
>>>sys.ps1# Requires "import sys"Traceback (most recent call last): File "<stdin>", line 1, in <module> NameError: name 'sys' is not defined. Did you forget to import 'sys'?
You’ll learn more about all that later. The important point here is that you won’t crash Python or your computer when you make a mistake this way. Instead, you get a meaningful error message pointing out the mistake and the line of code that made it, and you can continue on in your session or script. In fact, once you get comfortable with Python, its error messages may often provide as much debugging support as you’ll need (watch for more about debugging options in the sidebar “Debugging Python Code”).
Testing
Besides serving as a tool for experimenting while you’re learning the language, the interactive interpreter is also an ideal place to test code you’ve written in files. You can import your module files interactively and run tests on the tools they define by typing calls at the interactive prompt on the fly.
For instance, the following tests a function in a precoded module that ships with Python in its standard library (detail: os.getcwd prints the name of the directory you’re currently working in, here on a macOS host), but you can do the same once you start writing module files of your own:
>>>import os>>>os.getcwd()# Testing on the fly'/Users/me/code'
More generally, the interactive prompt is a place to test program components, regardless of their source—you can import and test functions and classes in your Python files, type calls to linked-in C functions, exercise Java classes under Jython, and more. Partly because of its interactive nature, Python supports an experimental and exploratory programming style you’ll find convenient. Although Python programmers also test with in-file code (and you’ll learn ways to make this simple later in the book), for many, the interactive prompt is still their first line of testing defense.
Program Files
Although the interactive prompt is great for experimenting and testing, it has one big disadvantage: programs you type there go away as soon as the Python interpreter executes them. Because the code you type interactively is never stored in a file, you can’t run it again without retyping it from scratch. Cut-and-paste and command recall can help some here, but not much, especially when you start writing larger programs. To cut and paste code from an interactive session, you would have to edit out Python prompts, program outputs, and so on—which is too tedious to try.
To save programs permanently, you need to write your code in files, which are usually known as modules. Modules are simply text files containing Python statements. Once they are coded, you can ask the Python interpreter to execute the statements in such a file any number of times, and in a variety of ways—by system command lines, by file icon clicks, by options in the IDLE user interface, and more. Regardless of how it is run, Python executes all the code in a module file from top to bottom each time you run the file.
Terminology in this domain can vary by role. For instance, module files are often referred to as programs in Python—that is, a program is considered to be a series of precoded statements stored in a file for repeated execution. Module files that are run directly are also sometimes called scripts—an informal term usually meaning a top-level program file. Some reserve the term module for a file imported from another file, and script for the main file of a program; we generally will here too (stay tuned for more on the meaning of top-level, imports, and main files later in this chapter).
Whatever you call them, the next few sections explore ways to run code typed into files. In this section, you’ll learn how to run files in the most basic and portable way: by listing their names in a Python command line entered at your computer’s system prompt. Though this might seem primitive to some—and can often be avoided altogether by using alternatives discussed later—for many programmers, a system console window for command lines, together with a text editor window, constitutes as much of an integrated development environment as they will ever need and provides more direct control over programs.
A First Script
Let’s get started. Open your favorite text editor, type or copy/paste the statements in Example 3-1 into a new text file named script1.py and save it in your working code directory that you set up earlier (make it now if you skipped over that step). Any editor will work, including vi, Notepad, a smartphone app’s editor, and the IDLE GUI coming up soon. You can also find this file in the book examples package, but typing code is an important exercise early on.
Example 3-1. script1.py
# A first Python script import sys# Load a library moduleprint(sys.platform) print(2 ** 100)# Raise 2 to a powerx = 'Hack!' print(x * 8)# String repetition
This file is our first official Python script (not counting the two-liner in Chapter 2). You shouldn’t worry too much about this file’s contents just yet, but as a brief description, its code:
Imports a Python module (libraries of additional tools) to fetch the name of the platform
Runs three
printfunction calls to display the script’s resultsUses a variable named
x, created when it’s assigned, to hold onto a string objectApplies various object operations that we’ll begin exploring in the next chapter
The sys.platform here is just a string that identifies the kind of computer you’re working on; it lives in a Python module called sys (part of its standard library), which you must import to load (again, more on imports later). Also notice how this file uses explicit print calls; unlike the REPL, output in files is never automatic, so you must say print in files to see their output (and forgetting this is a regular first mistake, but at least you’ve been warned!).
For color, this file adds some Python comments—the text after the # characters. These were mentioned earlier, but should be more formal now that they’re showing up in scripts. Comments can show up on lines by themselves, or to the right of code on a line. The text after a # is simply ignored as a human-readable note and is not considered part of the statement’s syntax. If you’re copying this code, you can ignore the comments; they are just informative. This book uses a different formatting style to make comments more visually distinctive, but they’ll be normal text in your code.
Again, don’t focus on the syntax of the code in this file for now; you’ll learn about all of it later. The main point to notice is that you’ve typed this code into a file, rather than at the interactive prompt. In the process, you’ve coded a fully functional Python script.
Notice, though, that the module file is named script1.py. As for all top-level files (i.e., files run directly), it could also be named simply script1, but files of code you want to import in another file or REPL have to end with a .py suffix. Because you may want to import them in the future, it’s a good idea to use .py suffixes for most Python files that you code. Also, some text editors and file explorers detect Python files by their .py suffix; if the suffix is not present, you may not get features like syntax colorization and automatic indentation in editors or tap-to-run in explorers.
Running Files with Command Lines
Once you’ve saved the preceding section’s text file, you can ask Python to run it by listing its full filename as the first argument to a Python command—like the following typed at the system shell’s $ prompt on a Unix device (but don’t type this at a Python REPL prompt, and read on to the next paragraph if this doesn’t work right away for you):
$ python3 script1.py
darwin
1267650600228229401496703205376
Hack!Hack!Hack!Hack!Hack!Hack!Hack!Hack!
Just as for starting the REPL we studied earlier, the command name may vary (e.g., use py instead of python3 on Windows, usually), and you can type such a command in whatever your system provides for command-line entry—Command Prompt on Windows, Terminal on macOS, or the Termux app on Android, among others. You might also run this code file with a dedicated run button in a GUI, app, or browser-based UI, but we’ll postpone such options until later in this chapter (see also Appendix A for all things platform specific).
Be sure to run your Python command in the same working directory where you’ve saved your script file (cd there first if needed), and run it at the system prompt, not Python’s >>> prompt. Also like starting the REPL, you may have to replace the command’s first word with a full directory path if Python isn’t on your PATH setting, but most installs automatically ensure that it is (see Appendix A for more on Python installs and PATH).
If all works as planned, this shell command (or similar) makes Python run the code in this file line by line, and you will see the output of the script’s three print statements—the name of the underlying platform as known to Python, 2 raised to the power 100, and the result of the same string repetition expression we saw earlier (there’s more on the meaning of the last two of these in Part II).
If all didn’t work as planned, you’ll get an error message—make sure you’ve entered the code in your file exactly as shown, and try again. We’ll talk about debugging options in the sidebar “Debugging Python Code,” but at this point in the book your best bet is probably rote imitation. And if all else fails, you might also try running under the IDLE GUI discussed ahead—a tool that sugarcoats some launching details, though sometimes at the expense of the more explicit control you have when using command lines.
If copying code grows too tedious or error-prone, you can also fetch this book’s examples on the web, though again, typing code initially will help you learn to avoid syntax errors. See the Preface for info on obtaining the examples.
Command-Line Usage Variations
When you type a command to run a Python code file, the command you type is run by a system shell program (e.g., Bash on Unix). Because of this, all of the shell’s syntax is available for more custom runs. For instance, you can route the printed output of a Python script to a file to save it for later use or inspection, by using special shell syntax:
$ python3 script1.py > saveit.txt
In this case, the three output lines shown in the prior run are stored in the file saveit.txt instead of being printed. This is generally known as stream redirection; it works for both output (>) and input (<) text and is available on Windows and Unix-like systems. This is useful for testing, as you can write programs that watch for changes in other programs’ outputs. It also has little to do with Python, though (Python simply supports it), so we will skip further details on shell redirection syntax here. Redirection is for command lines only, though, because it’s a function of the system shell.
On Windows, you can also type just the name of your script and omit the name of Python itself. Because Windows uses filename associations to find a program with which to run a file, the file’s name is enough to run a .py file. The following command, for example, will automatically be run by Python on Windows (technically, by Python’s py Windows launcher described in Appendix A):
$ script1.py
This works just as though you had clicked on the file’s icon in File Explorer (a launch mode covered later). One fine point here: Command Prompt runs programs this way in its own window, but PowerShell may not; use py to view unredirected output in the latter if needed (or use the icon-click input() trick also coming up).
Finally, remember to give the full path to your script file if it lives in a different directory than the one in which you are working. For example, the py Python command in the following, run in PowerShell on Windows, assumes Python is in your system path but runs a file located elsewhere:
PS C:\Users\me\code>cd D:\temp\savecode# Go to a different folderPS D:\temp\savecode>py C:\Users\me\code\script1.py# Run a script elsewherewin32 1267650600228229401496703205376 Hack!Hack!Hack!Hack!Hack!Hack!Hack!Hack!
If your PATH doesn’t include Python’s directory, and neither Python nor your script file is in the directory you’re working in, use full paths for both—like the following on macOS, which for good measure throws in output stream redirection to a file located outside the current working directory (where you are when this command is run):
$ /usr/local/bin/python3 /Users/me/code/script1.py > /Users/me/data/saveit.py
This is a lot to type, but also pathological and atypical. To keep your commands simpler than this, make sure Python is on your PATH, and cd to script or data folders first. Again, most installs setup PATH automatically, so you need only focus on script and data folders when running commands.
Other Ways to Run Files
If you’re not a fan of command lines, you can generally avoid them by launching Python scripts with file icon clicks, development GUIs, and other schemes that vary per platform and role. This book generally recommends command-line usage for learners, both because it’s simple, and because it’s a common, general, portable, and powerful way to run code. But it’s not required. While the Python world is too rich in options for exhaustive coverage here, let’s take a quick tour of the most prominent command-line alternatives to close out this chapter.
Clicking and Tapping File Icons
On most PC platforms, Python program files can be run by simply clicking or tapping their filename or icon in the local file explorer. For example, this works automatically on Windows in File Explorer, thanks to filename associations set up during Python’s install. Clicks also run code files on macOS in Finder, if made to Open With the Python Launcher included in the macOS install; drags to the Python Launcher app when available work the same as clicks.
The file-clicks story is more involved on Linux, where files likely need executable permission and a #! first line to name Python. On smartphones, tapping a filename in a file explorer on Android (or Files on iOS) may open the file in an associated Python app, but this may work only for some explorer/app combos, and may not give access to all of a program’s files in some contexts. For more insight, consult your platform and app docs, or experiment on your device.
Also see Appendix A for more info. As noted there, Windows and Linux clicks don’t keep the window open for viewing output and error messages after programs end: if a script just prints and exits, it, well, just prints and exits—the console window appears, and text is printed there, but the console window closes and disappears on program exit. Per Appendix A, coding a closing call to Python’s input() forces a pause before exit so you can see output, but this doesn’t help for error messages. Use other run techniques when this matters.
The IDLE Graphical User Interface
So far, we’ve seen how to run Python code with interactive sessions, system command lines, and icon clicks. If you’re looking for something a bit more visual, IDLE provides a GUI for Python programming, and it’s a standard and free part of the Python system. IDLE is usually referred to as an integrated development environment (IDE), because it binds together multiple development tasks into a single view.
In short, IDLE lets you edit, run, browse, and debug Python programs, all from the same GUI. Because it’s coded in Python with the tkinter GUI toolkit, it runs portably on all Python PC platforms—Windows, macOS, and Linux. For many, IDLE represents an easy-to-use alternative to typing command lines, a less problem-prone alternative to clicking on icons, and a great way for newcomers to get started editing and running code. You’ll sacrifice some control in the bargain, but this typically becomes important only later in your Python career.
IDLE install and startup are covered in Appendix A, so we won’t repeat the full details here. In brief, it’s standard with the python.org Python installers for Windows and macOS and can be had separately in Linux repositories. Once installed, it can be launched with the usual suspects: Start on Windows, Launchpad or Finder on macOS, a command line on Linux, and file right-clicks where supported.
Appendix A also has screenshots that capture IDLE in action on each platform, but Figure 3-1 captures its dark theme on Windows for both variety and a quicker look; as it demos, after running this chapter’s script1.py from Example 3-1 in the edit window on top, its output appears in the interactive Shell window.
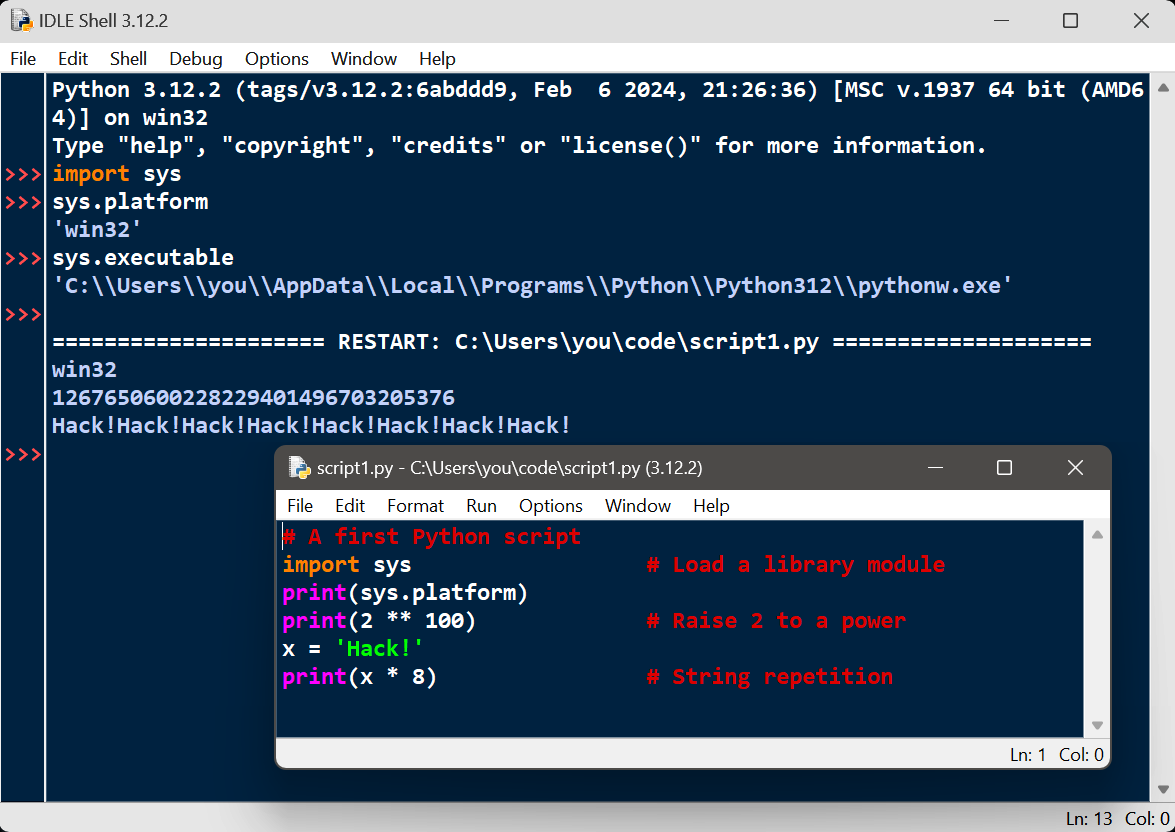
Figure 3-1. IDLE with its dark theme on Windows
Tip: because IDLE is just a Python script on the module search path in the standard library, you can also generally run it on any platform and from any directory by typing the following Python command in a system console window (use py instead of python3 on Windows, as usual). Python’s –m flag simply locates a module using the normal import search, but runs it as a top-level script (Part V covers both this search, and the “.” package syntax required here):
$python3 -m idlelib.idle# Find and run idle.py in a package folder
Once IDLE is started, its usage is straightforward and documented in its in-program Help. In brief, the Shell window provides the usual interactive REPL with command recall, and each edit window allows you to view, modify, and run a file of code. The Shell’s File→New File and File→Open… start and open code files. Edit windows’ Run→Run Module runs code in the window where it’s selected, and Run→Run… Customized supports passing command-line arguments to scripts (which is out of scope here and not a full system shell, but useful for scripts that expect these).
IDLE has many more features, but as a sampler: it also does tab completions, pop-up balloon help for functions, and object attribute lists as you type code, and includes an object browser and GUI debugger. To use IDLE’s debugger, enable it in the Debug menu, set breakpoints by right-clicks in edit windows, and run. For simpler debugging needs, right-click on the text of any error message in the Shell window to jump to the line of code where the error occurred.
For more IDLE tips, see this book’s Appendix A, IDLE’s own Help menu, and the notes for your platform in “Python Setup and Usage” in Python’s standard manuals. Like most GUIs, the best way to learn IDLE may be to test-drive it for yourself. At the end of the day, its usability may be essential for some beginners, but it comes with an extra learning curve, is not as flexible as command lines, and adds sugarcoating that might be a negative when your programming needs outgrow its scope. As always, vet for yourself on a PC near you.
Other IDEs for Python
Because IDLE is free, portable, and a standard part of Python, it’s a nice first development tool to become familiar with if you want to use an IDE at all. There are, however, a handful of alternative IDEs for Python developers, some of which are substantially more powerful and robust than IDLE.
Among these, PyCharm, PyDev, Wing, VSCode, Spyder, and PyScripter all come with the usual edit-and-run GUIs, but some add additional and advanced tools such as code refactoring and source-control integration. These IDEs also have major learning curves and are not recommended for most Python beginners. Still, you may wish to file this away for later in your Python career when you’ve mastered the language and move on to industrial-strength development.
Smartphone Apps
If you’re running this book’s examples on an Android or iOS smartphone or tablet, you’ll be using an app. Some, like Termux on Android, come with a traditional command line and support all the REPL and file commands we’ve seen. In others, though, you’ll launch code files with devices in the app’s user interface (e.g., button taps), instead of traditional command lines. This isn’t much different in spirit from running code in IDLE or other IDEs, but because details vary per app, see Appendix A for mobile platform tips, as well as your app’s docs for more info.
WebAssembly for Browsers
Although an emerging technology, it’s also possible to run Python code in web browsers. This is enabled today by WebAssembly (a.k.a. Wasm), which defines a portable bytecode format that is run by web browsers, much as the Python PVM runs its own bytecode (see Chapter 2). By compiling the Python interpreter’s source code to this format with tools like the Emscripten LLVM-based compiler, web browsers are able to run Python, and hence your Python programs. While other Python-in-the-browser initiatives of the past have largely fizzled, WebAssembly is standardized by the World Wide Web Consortium (W3C) and already supported by all major desktop and mobile web browsers.
Compiling Python itself to Wasm is not trivial (and far too much to ask of Python beginners), but the Pyodide system has already done most of the work for you: it’s a port of CPython to the WebAssembly/Emscripten platform compiled and ready to run, with JavaScript integration for access to the browser Document Object Model (DOM) and web APIs. To use Pyodide in a web page, you’ll load it from a server and initialize it in a browser, with an HTML document that uses provided JavaScript code and API tools. The end result can run many Python programs in web browsers, with no local installs required.
The chief downsides of this model seem to be speed and utility. Downloading a compiled CPython interpreter to run a Python script in a browser is not quick, and the speed of Python scripts in this context may vary. Moreover, Pyodide comes with a fixed set of Python tools, and Python scripts run by browsers live in a sandbox with limited access to tools and resources on the host device. Persistent storage, for example, may support POSIX file calls and paths, but is virtual and ultimately limited in this context to options supported by browsers.
Hence, while this option may avoid some Python installs and open possibilities for Python on the web, it’s not as useful for general software development as others, and its future is impossible to predict. Watch the web for more on this evolving story—including the alternative MicroPython for Wasm, which is smaller than CPython but implements a constrained Python subset per Chapter 2, and the py2wasm Python-to-Wasm compiler, announced just as this book was being written.
Jupyter Notebooks for Science
We met this option earlier in conjunction with REPLs. Jupyter is a set of tools that allow Python code to be run in web browsers, with a focus on supporting scientific-programming tasks. Its primary and classic tools require a server to be separately installed and launched to run the code you enter in a web page, but it also comes in a form that runs code locally in browsers using the WebAssembly and Pyodide systems described in the preceding section. In both forms, Jupyter pages follow a flexible notebook paradigm, with interactive coding using the IPython REPL we also met earlier, code cells that run with a button click, visualization using Python numeric tools, and more.
While Jupyter is a useful and popular tool in many STEM roles, it’s not targeted at general-purpose software development and isn’t as broadly applicable as traditional tools like command lines stressed in this book. See other resources for usage details if Jupyter notebooks may be a part of your Python coding future.
Ahead-of-Time Compilers for Speed
Also per Chapter 2, a number of AOT compiler systems, including Nuitka and Shed Skin, compile Python programs all the way to machine code, much like C and C++ compilers. Once you install such a system, you’ll run its compiler on a file of Python code first, and then run the resulting program like any other executable. AOT compilers can boost program speed but add extra development steps that slow the programming process substantially, and negate some of the advantage of using Python. Especially for Python newcomers, these systems are probably best explored after learning the Python language using more accessible options, like traditional REPLs, IDEs, and command lines.
Running Code in Code
This chapter has talked about “importing modules” a few times without really explaining what this term means. We’ll study modules and larger program architecture in depth in Part V, but because imports are also a way to launch programs, this section will introduce enough module basics to get you started. Like imports, the Python exec built-in can be used to launch files in code too, and tools in standard-library modules let you launch programs with command lines. While we can’t go into full detail in this chapter, this section briefly surveys the launchers in this department.
Importing modules
In simple terms, every file of Python source code whose name ends in a .py extension is a module. No special code or syntax is required to make a file a module: any such file will do. Other files can access the items a module defines by importing that module—which essentially loads another file and grant access to that file’s contents. The contents of a module are made available to the outside world through its attributes—a term defined informally in the next section.
This module paradigm turns out to be the core idea behind program architecture in Python. Larger programs usually take the form of multiple module files, which import tools from other module files. One of the modules is designated as the main or top-level file, also often called the script—the file launched to start the entire program, which runs line by line as usual. Below this level, it’s all modules importing modules.
We’ll delve into such architectural issues in more detail later in this book. This chapter is mostly interested in the fact that import operations run the code in a file that is being loaded as a final step. Because of this, importing a file is yet another way to launch it. For instance, if you start an interactive session (from a system command line or otherwise), you can run the script1.py file we wrote earlier in Example 3-1 with a simple import statement—which is really Python code running other Python code:
$python3>>>import script1darwin
1267650600228229401496703205376
Hack!Hack!Hack!Hack!Hack!Hack!Hack!Hack!
Note
Where to run imports: Be sure to run this Python command in the directory (i.e., folder) containing script1.py. Per this chapter’s earlier coverage of code folders, this is easiest if you save module files and run imports in a per-chapter folder for the chapter you’re working in. Later in this book, you’ll learn that imports in a REPL search for a module in the current directory, plus those listed on environment variable PYTHONPATH or specified otherwise. The current directory part of this will suffice for most imports you’re likely to try until then—as long as all your code files reside there.
Reloading modules
Imports work to run a file, but only once per session (really, process—a program run) by default. After the first import, later imports do nothing, even if you change and save the module’s source file again in another window:
>>>import script1>>>import script1
This is by design; imports are too expensive an operation to repeat more than once per file in a given program run. As you’ll learn in Chapter 22, imports must find files, compile them to bytecode, and run the code line by line, and importers usually care only that the module’s lines have defined its exports.
If you really want to force Python to run the file again in the same session without stopping and restarting the REPL, you need to instead call the reload function available in the importlib standard library module (and previously in the now-defunct imp module, and a built-in function before that: that’s three incarnations, for anyone counting!):
>>>from importlib import reload>>>reload(script1)darwin 1267650600228229401496703205376 Hack!Hack!Hack!Hack!Hack!Hack!Hack!Hack! <module 'script1' from '/Users/me/Code/script1.py'>
The from statement here simply copies a name out of a module (more on this in the next section). The reload function itself loads and runs the current version of your file’s source code, picking up the file’s changes if you’ve modified and saved it in another window.
This allows you to edit and use new code on the fly in the current Python interactive session. The reload function expects the name of an already-loaded module object, so you have to have successfully imported a module before you can reload it (and if the import failed with an error, you can’t yet reload and must import again).
Notice that reload also expects parentheses around the module object name, whereas import does not—reload is a function that is called with an argument, and import is a statement. That’s also why you get back an extra output line when reloading—the odd last line is just the display representation of the reload call’s return value, a Python module object. You’ll learn more about using functions in general in Chapter 16; for now, when you hear “function,” remember that parentheses are required to run a call, even if there’s nothing to send.
Module attributes: a first look
Imports and reloads provide a natural program launch option because import operations execute files as a last step. In the broader scheme of things, though, modules serve the role of libraries of tools, as you’ll learn in Part V. The basic idea is straightforward, though: a module is mostly just a package of variable names, known as a namespace, and the names within that package are called attributes—variable names that are attached to a specific object (like a module).
In more concrete terms, all the names assigned at the top level of a module’s file become its attributes, and a module’s importers gain access to all of them. These names are usually assigned to tools exported by the module—functions, classes, variables, and so on—that are intended to be used in other files and other programs. Externally, a module file’s names can be fetched with two Python statements, import and from, and may be reset with the reload call.
To illustrate, use a text editor to create a one-line Python module file called myfile.py in your working directory, with the contents in Example 3-2.
Example 3-2. myfile.py
title='Learning Python, 6th Edition'
This may be one of the world’s simplest Python modules (it contains a single assignment statement), but it’s enough to illustrate the point. When this file is imported, its code is run to generate the module’s attribute. That is, the assignment statement creates a variable and module attribute named title.
You can access this module’s title attribute in other components in two different ways. First, you can load the module as a whole with an import statement, and then qualify the module name with the attribute name to fetch it (note that we’re letting the interpreter print automatically here):
$python3# Start Python REPL>>>import myfile# Run file, load module as a whole>>>myfile.title# Use its attribute names: '.' to qualify'Learning Python, 6th Edition'
In general, the dot expression syntax object.attribute lets you fetch any attribute attached to any object and is one of the most common operations in Python code. Here, we’ve used it to access the string variable title inside the module myfile—in other words, myfile.title.
Alternatively, you can fetch (really, copy) names out of a module with from statements:
$python3# Restart Python REPL>>>from myfile import title# Run file, copy its names>>>title# Use name directly: no need to qualify'Learning Python, 6th Edition'
As you’ll see in more detail later, from is just like an import, with an extra assignment to names in the importing code. Technically, from copies a module’s attributes, such that they become simple variables in the recipient. So, you can refer to the imported string this time as title (a variable) instead of myfile.title (an attribute).
Naturally, modules usually define more than one name to be used both in and outside their files. Example 3-3, for instance, defines three.
Example 3-3. threenames.py
a = 'PC'# Define three attributesb = 'Phone'# Exported to other filesc = 'Tablet' print(a, b, c)# Also used as variables in this file
This code file, threenames.py, assigns three variables, and so generates three attributes for the outside world. It also uses its own three variables in a print statement, as you see when this is run as a top-level file from a system prompt:
$ python3 threenames.py
PC Phone Tablet
All of this file’s code also runs as usual the first time it is imported elsewhere, by either an import or from. Clients of this file that use import get a module with attributes, while clients that use from get copies of the file’s names:
$python3>>>import threenames# Grab the whole module: it runs herePC Phone Tablet >>>threenames.b, threenames.c# Access its attributes: qualify to use('Phone', 'Tablet') >>>from threenames import b, c# Copy multiple names out: use directly>>>b, c('Phone', 'Tablet')
The results here are printed in parentheses because they are really tuples—a kind of object created by the comma in the inputs (and covered in the next part of this book)—that you can safely accept on faith for now.
From a grander perspective, modules form the highest layer of Python program architecture: as self-contained namespaces, they naturally support code organization and reuse, and they automatically minimize name collisions in your code. We’ll deal with their loftier goals later in this book.
For this chapter, it’s enough to know that imports and reloads are another way to run your code files, though probably a secondary option: due to complicated quirks that we’ll skip here (e.g., reload updates importers using import but not from), tools like command lines and IDEs are generally better bets for running Python code.
The exec built-in
Python also provides a way to launch files with code that does not rely on the module concepts of the preceding section. The exec built-in function compiles and runs whatever Python source code statements are in the string you pass to it. Along with its eval expression cousin, this supports many dynamic roles you’ll meet in upcoming chapters.
By passing a code file’s loaded contents to exec, though, this yields another way to launch code files from a REPL or other file without having to import and later reload. Each such exec runs the current version of the code read from a file, without requiring imports or reloads. For instance, using Example 3-1’s script1.py again:
$python3>>>exec(open('script1.py').read())darwin 1267650600228229401496703205376 Hack!Hack!Hack!Hack!Hack!Hack!Hack!Hack!
To understand this code, you must first know that the open and read nested inside it run first, and left to right, and load the file’s entire contents as a string. We’ll study files in the next part of this book, so take this as a preview for now. (This was also a forward knowledge dependency added in Python 3.X, but that’s what this book presents.)
Once the file is loaded, though, the exec call has an effect similar to an import, but it doesn’t actually import the module. Instead, each time you run an exec/open combo this way it runs the file’s code anew and unconditionally—as though you had pasted the file’s code at the place where exec is called. As one consequence, this exec/open scheme does not require module reloads after file changes.
On the downside, because it works as if you’ve pasted code into the place where it is called, exec has the potential to silently overwrite variables you may currently be using. For example, our script1.py assigns to a variable named x. If that name is also being used in the place where exec is called, the name’s value is replaced—sans warning:
>>>x = 999>>>exec(open('script1.py').read())# Code run in this namespace by default…same output… >>>x# Its assignments can overwrite names here'Hack!'
This potential for name collisions is a downside shared by the last section’s from statement. By contrast, the basic import statement makes the file a separate module namespace so that its assignments will not change variables in the importer’s scope. The price you pay for its namespace partitioning of modules is the need to reload and qualify.
Command-line launchers
Finally, Python code can also be run by Python code that uses standard library tools which spawn command lines in parallel processes. The os module’s system call, for instance, runs a command as if you typed it at a system console (its 0 return value echoed at the end here means all worked well):
$python3>>>import os>>>os.system('python3 script1.py')darwin 1267650600228229401496703205376 Hack!Hack!Hack!Hack!Hack!Hack!Hack!Hack! 0
This os module’s popen call does similar but returns a file object from which you can read the spawned command’s printed output as a string for use in the spawning code; and Python’s subprocess.run call can be used to launch programs by command lines with much more control over the fine points. We’ll deploy popen in Chapter 21.
Though related to running code, all these tools are well beyond the scope of this getting-started chapter, so consult Python’s library manuals for the full story if and when such utilities become useful in your future work. And a caution: these tools, along with exec, will happily run any command line you throw at them—including one to erase all your files!—so they’re best limited to running Python commands unless and until you’re sure that other commands are safe.
Other Launch Options
You’ve already seen a blizzard of code-launching options for Python, but this accounting is still incomplete. For example, Python code can also be run today by:
Programs written in C, C++, Java, and more, which embed Python and Python code
Text editors that aren’t full IDEs, but know how to run Python code you’re editing
Excel spreadsheets, when calculating a sheet’s cells coded in Python
Web servers that spawn scripts automatically in response to browser UI actions
Users launching standalone executables, which we explored in Chapter 2
And (as usual) more
Moreover, launching techniques tend to evolve as rapidly as everything else in computing, and future options are impossible to foresee. In general, because Python keeps pace with such changes, you should be able to launch Python programs in whatever way makes sense for the machines you use, both now and in the future—be that by swiping on your smartphone, grabbing icons in a virtual reality, or shouting a script’s name over your coworkers’ conversations.
Which Option Should I Use?
With all these options, beginners might naturally ask, Which one is best for me? In general, you should try both basic command lines and the IDLE GUI if you are just getting started with Python, unless you’ll be working in smartphone apps or web-based notebooks with interfaces that are more unique. Command lines are simple and powerful, but IDLE provides a user-friendly GUI environment that hides some underlying details and works the same on all PCs.
If, on the other hand, you are an experienced programmer, you might be more comfortable with simply the text editor of your choice in one window, and a system console interface in another for launching edited programs via Python command lines. Because the choice of development environments is very subjective, this book can’t offer much more in the way of universal guidelines. In general, whatever environment you like to use will be the best for you to use.
Chapter Summary
In this chapter, we’ve explored common ways to launch Python programs: by running code typed interactively and by running code stored in files with system command lines, file icon clicks, IDE GUIs such as IDLE, and more. We’ve covered a lot of pragmatic startup territory here. This chapter’s goal was to equip you with enough information to enable you to start writing some code, which you’ll do in the next part of this book. There, we will start exploring the Python language itself, beginning with its core data types—the objects that are the subjects of your programs.
First, though, take the usual chapter quiz to exercise and review what you’ve learned here. Because this is the last chapter in this part of the book, it’s followed with a set of more complete exercises that test your mastery of this entire part’s topics. For help and answers for the latter set of problems, or just for a refresher, be sure to turn to Appendix B after you’ve given the exercises a try.
Test Your Knowledge: Quiz
How can you start a Python interactive interpreter session (REPL)?
Where do you type a system command line to launch a script file?
Name four or more ways to run the code saved in a script file.
What pitfall is related to clicking file icons on Windows and Linux?
Why might you need to reload a module?
How do you run a script from within the IDLE GUI?
How are modules, attributes, and namespaces related?
Test Your Knowledge: Answers
A Python interactive session can be started by typing a Python command line in your system’s console window. Type
pyon Windows andpython3everywhere else and type it into a Command Prompt or PowerShell window on Windows, Terminal on macOS and Linux, and the Termux app on Android. Another alternative is to launch IDLE, as its main Shell window is an interactive session. Other IDEs, smartphone apps, and browser-based systems may offer REPLs in more unique ways.You type system command lines in the same interface used to launch an interactive session by command line. This is whatever your platform provides as a system console: again, Command Prompt or PowerShell on Windows; Terminal on macOS and Linux; Termux on Android; or other. You type this at the system’s prompt shown as
$in this book, not at the Python interactive interpreter’s>>>prompt used to enter Python code—be careful not to confuse these prompts, because Python and the system shell are different systems.Code in a script (really, module) file can be run with system command lines, file icon clicks, imports and reloads, the
execbuilt-in function,osmodule tools, and IDE GUI devices such as IDLE’s Run→Run Module menu option. Some platforms support more specialized launching techniques, like drag and drop on macOS, app UIs on smartphones, and web notebooks. In addition, some text editors have unique ways to run Python code, some Python programs are provided and run as standalone executables, and some systems use Python code in embedded mode, where it is run by an enclosing program written in another language. Though in its early days, code may also be run in web browsers with a Python port to WebAssembly like Pyodide.Scripts that print and then exit cause the output file to disappear immediately, before you can view the output.
input()can pause before exit so the output window stays open, but error messages generated by your script also appear in an output window that closes before you can examine its contents—and before aninput()pause is reached. Hence, system command lines and IDEs such as IDLE are better for most development.Python imports (i.e., loads) a module only once per process, by default, so if you’ve changed its source code and want to run the new version without stopping and restarting Python, you’ll have to reload it. You must import a module at least once before you can reload it. Running files of code from a system shell command line, via an icon click, or in an IDE such as IDLE generally makes this a nonissue, as those launch schemes usually run the current version of the source code file each time. An
exec/openpair can avoid reloads too.Within the text edit window of the file you wish to run, select the window’s Run→Run Module menu option. This runs the window’s source code as a top-level script file in IDLE and displays its output back in the interactive Python “Shell” window.
Each module file is automatically a namespace—that is, a package of variables reflecting the assignments made at the top level of the file. Each of the module’s variables becomes an attribute of the module when it’s imported and are accessed by “.” qualification or
fromname copies. Namespaces help avoid name collisions in Python programs: because each module file is a self-contained namespace, files must explicitly import other files in order to use their names.
Test Your Knowledge: Part I Exercises
It’s time to start doing a little coding on your own. This first exercise session is fairly simple, but it is designed to make sure you’re ready to work along with the rest of the book, and a few of its questions hint at topics to come in later chapters. Be sure to check the section “Part I, Getting Started” in Appendix B for the answers; the exercises and their solutions sometimes contain supplemental information not discussed in the main text, so you’re encouraged to take a peek at the solutions even if you manage to answer all the questions on your own.
Interaction. Using a system command line, IDLE, or any other method that works on your device, start the Python interactive command line (the
>>>prompt, a.k.a. REPL), and type the expression'Hello World!'(including the quotes). The string should be echoed back to you. The purpose of this exercise is to get your environment configured to run Python. In rare scenarios, you may need to type the full path to the Python executable or add its path to yourPATHenvironment variable. See Appendix A for tips on environment-variable settings if needed.Programs. With the text editor of your choice, write a simple module file containing the single statement
print('Hello module world!')and store it as module1.py. Now, run this file by using any launch option you like: running it in IDLE, clicking or tapping on its file icon, starting it by command line in a console (e.g.,python3 module1.py), executing it in code with tools likeexecand imports/reloads, or by using UI options in apps, other IDEs, and web notebooks. In fact, experiment by running your file with as many of the launch techniques discussed in this chapter as you can. Which technique seems easiest to you?Modules. Start the Python interactive command line (
>>>prompt) and import the module you wrote in exercise 2. Try moving the file to a different directory and importing it again from its original directory (i.e., run Python in the original directory when you import). What happens? Hint: there’s still a .pyc bytecode file for module1 in a __pycache__ subdirectory there, but it’s named oddly. In general, imports search for modules in the current directory, plus every directory listed on thePYTHONPATHenvironment variable—as you’ll learn in Part V.Scripts. If your platform supports it, copy your module1.py module file to another named script1.py; then add the
#!line to the top of script1.py, give this file executable privileges, and run it directly as an executable (e.g., sans the “python3”). What does the first line need to contain?#!lines traditionally have meaning only on Unix-like platforms (e.g., macOS, Linux, and Android), but also apply to Windows today, thanks to thepyWindows launcher. If you’re working on Windows, also try running your file by listing just its name in a Command Prompt window without the wordpybefore it, via the Start menu,Windows+RRun dialog, or other schemes. On macOS, try a drag-and-drop to the Python Launcher app in Applications (or elsewhere).Errors and debugging. Experiment with typing mathematical expressions and assignments at the Python interactive command line (that is, REPL). Along the way, type the expressions
2 ** 500and1 / 0, and reference an undefined variable name as we did early on in this chapter. What happens?You may not know it yet, but when you make a mistake, you’re doing exception processing, a topic we’ll explore in depth in Part VII. As you’ll learn there, you are technically triggering what’s known as the default exception handler—logic that prints a standard error message. If you do not catch an error, the default handler does and prints the standard error message in response.
Exceptions are also bound up with the notion of debugging in Python. When you’re first starting out, Python’s default error messages on exceptions will probably provide as much error-handling support as you need—they give the cause of the error, as well as showing the lines in your code that were active when the error occurred. For more about debugging, see the upcoming sidebar “Debugging Python Code”.
Breaks and cycles. In any Python REPL, type:
L = [1, 2]
# Make a 2-item listL.append(L)# Append L as a single item to itselfL# Print L: a cyclic/circular objectWhat happens? In all but the most ancient of Python versions, you’ll see a strange output that is described in the Appendix B solution, and which will make more sense when you study object references in the next part of the book. Why do you think your version of Python responds the way it does for this code?
Documentation. Spend at least 5 minutes browsing the Python library and language manuals before moving on to get a feel for the available tools in the standard library and the structure of the documentation set. It takes at least this long to become familiar with the locations of major topics in the manual set; once you’ve done this, it’s easy to find what you need. You can find this manual via the Python Start menu entry on some Windows, in the Python Docs option on the Help pull-down menu in IDLE, or online at http://www.python.org/doc. You’ll also learn more about the manuals and other documentation sources (including PyDoc and the
helpfunction) in Chapter 15. If you still have time, go explore the Python website, as well as its PyPI third-party extension repository; python.org’s About and Search, for example, may be useful when you’re getting started.