Chapter 7. Configuring Stack Instances
Using a single stack code project makes it easier to maintain multiple consistent instances of infrastructure, as described in “Pattern: Reusable Stack”. However, you often need to customize different instances of a stack. For example, you might size a cluster with fewer servers in a development environment than in production.
Here is an example of stack code that defines a container hosting cluster with configurable minimum and maximum numbers of servers:
container_cluster:web_cluster-${environment}min_size:${cluster_minimum}max_size:${cluster_maximum}
You pass different parameter values to this code for each environment, as depicted in Figure 7-1.
Stack tools such as Terraform and CloudFormation support multiple ways of setting configuration parameter values. These typically include passing values on the command line, reading them from a file, and having the infrastructure code retrieve them from a key-value store.
Teams managing infrastructure need to decide how to use these features to manage and pass configuration values to their stack tool. It’s essential to ensure the values are defined and applied consistently to each environment.
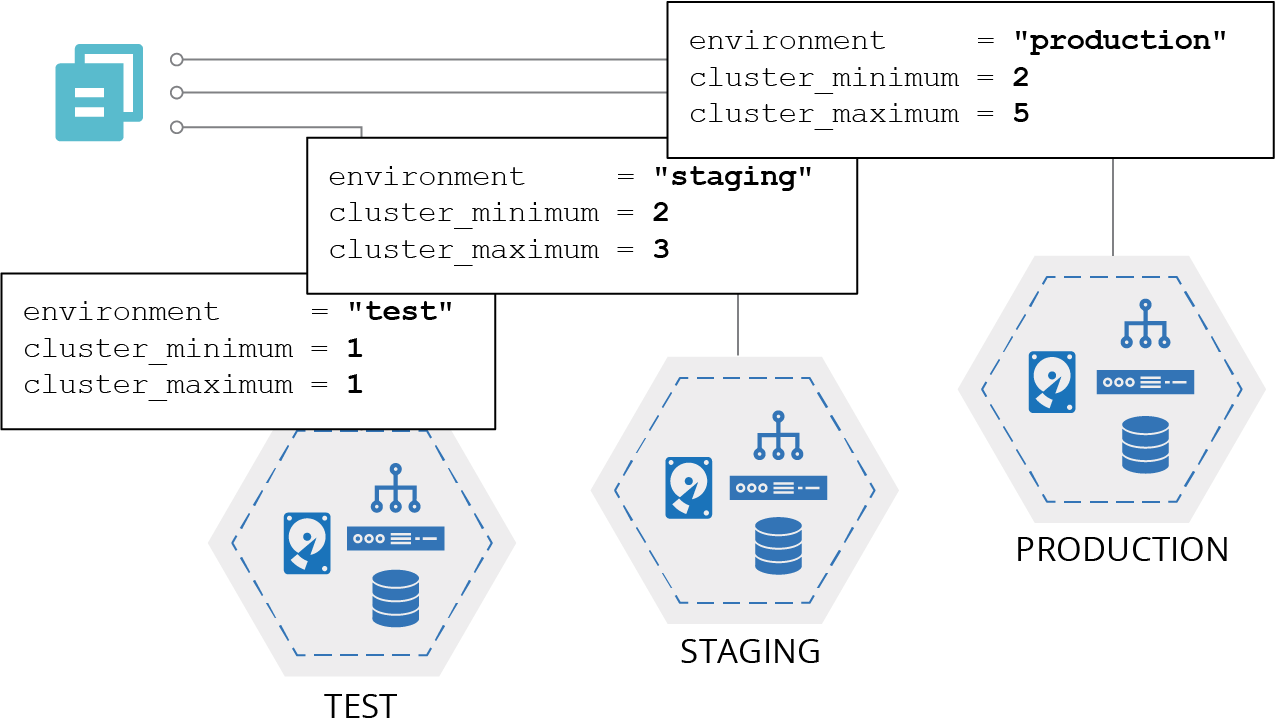
Figure 7-1. Using the same code with different parameter values for each environment
Using Stack Parameters to Create Unique Identifiers
If you create multiple stack instances from the same project (per the reusable stack pattern discussed in “Pattern: Reusable Stack”), you may see failures from infrastructure resources that require unique identifiers. To see what I mean, look at the following pseudocode that defines an application server:
server:id:appserversubnet_id:appserver-subnet
The fictional cloud platform requires the id value to be unique, so when I run the stack command to create the second stack, it fails:
>stack upenvironment=test--source mystack/srcSUCCESS: stack 'test' created>stack upenvironment=staging --source mystack/srcFAILURE: server 'appserver' already exists in another stack
I can use parameters in my stack code to avoid these clashes. I change my code to take a parameter called environment and use it to assign a unique server ID. I also add the server into a different subnet in each environment:
server:id:appserver-${environment}subnet_id:appserver-subnet-${environment}"
Now I can run my fictional stack command to create multiple stack instances without error.
Example Stack Parameters
I’ll use an example stack to compare and contrast the different stack configuration patterns in this chapter. The example is a template stack project that defines a container cluster, composed of a dynamic pool of host nodes and some networking constructs. Example 7-1 shows the project structure.
Example 7-1. Example project structure for a template stack that defines a container cluster
├── src/│ ├── cluster.infra│ └── networking.infra└── test/
The cluster stack uses the parameters listed in Example 7-2 for three different stack instances. environment is a unique ID for each environment, which can be used to name things and create unique identifiers. cluster_minimum and cluster_maximum define the range of sizes for the container host cluster. The infrastructure code in the file cluster.infra defines the cluster on the cloud platform, which scales the number of host nodes depending on load. Each of the three environments, test, staging, and production, uses a different set of values.
Example 7-2. Example parameter values used for the pattern descriptions
| Stack instance | environment | cluster_minimum | cluster_maximum |
|---|---|---|---|
cluster_test |
test |
1 |
1 |
cluster_staging |
staging |
2 |
3 |
cluster_production |
production |
2 |
6 |
Patterns for Configuring Stacks
We’ve looked at why you need to parameterize stacks and a bit on how the tools implement parameters. Now I’ll describe some patterns and antipatterns for managing parameters and passing them to your tool:
- Manual stack parameters
-
Run the stack tool and type the parameter values on the command line.
- Scripted parameters
-
Hardcode parameter values for each instance in a script that runs the stack tool.
- Stack configuration files
-
Declare parameter values for each instance in configuration files kept in the stack code project.
- Wrapper stack
-
Create a separate infrastructure stack project for each instance, and import a shared module with the stack code.
- Pipeline stack parameters
-
Define parameter values in the configuration of a pipeline stage for each instance. Stack parameter registry pattern: Store parameter values in a central location.
Antipattern: Manual Stack Parameters
The most natural approach to provide values for a stack instance is to type the values on the command line manually, as in Example 7-3.
Example 7-3. Example of manually typing command-line parameters
>stack upenvironment=production --source mystck/srcFAILURE: No such directory 'mystck/src'>stack upenvironment=production --source mystack/srcSUCCESS: new stack 'production' created>stack destroyenvironment=production --source mystack/srcSUCCESS: stack 'production' destroyed>stack upenvironment=production --source mystack/srcSUCCESS: existing stack 'production' modified
Motivation
It’s dirt-simple to type values on the command line, which is helpful when you’re learning how to use a tool. It’s also useful to type parameters on the command line to experiment.
Consequences
It’s easy to make a mistake when typing a value on the command line. It can also be hard to remember which values to type. For infrastructure that people care about, you probably don’t want the risk of accidentally breaking something important by mistyping a command when making an improvement or fix. When multiple people work on an infrastructure stack, as in a team, you can’t expect everyone to remember the correct values to type for each instance.
Manual stack parameters aren’t suitable for automatically applying infrastructure code to environments, such as with CI or CD.
Implementation
For the example parameters (Example 7-2), pass the values on the command line according to the syntax expected by the particular tool. With my fictional stack tool, the command looks like this:
stack up \environment=test \cluster_minimum=1 \cluster_maximum=1 \ssl_cert_passphrase="correct horse battery staple"
Anyone who runs the command needs to know the secrets, like passwords and keys, to use for a given environment and pass them on the command line. Your team should use a team password management tool to store and share them between team members securely, and rotate secrets when people leave the team.1
Related patterns
The scripted parameters pattern (see “Pattern: Scripted Parameters”) takes the command that you would type and puts it into a script. The pipeline stack parameters pattern (see “Pattern: Pipeline Stack Parameters”) does the same thing but puts them into the pipeline configuration instead of a script.
Pattern: Stack Environment Variables
The stack environment variables pattern involves setting parameter values as environment variables for the stack tool to use. This pattern is often combined with another pattern to set the environment variables.
The environment variables are set beforehand, as shown in Example 7-4 (see “Implementation” for more on how).
Example 7-4. Setting environment variables
export STACK_ENVIRONMENT=testexport STACK_CLUSTER_MINIMUM=1export STACK_CLUSTER_MAXIMUM=1export STACK_SSL_CERT_PASSPHRASE="correct horse battery staple"
There are different implementation options, but the most basic one is for the stack code to reference them directly, as shown in Example 7-5.
Example 7-5. Stack code using environment variables
container_cluster:web_cluster-${ENV("STACK_ENVIRONMENT")}min_size:${ENV("STACK_CLUSTER_MINIMUM")}max_size:${ENV("STACK_CLUSTER_MAXIMUM")}
Motivation
Most platforms and tools support environment variables, so it’s easy to do.
Applicability
If you’re already using environment variables in your system and have suitable mechanisms to manage them, you might find it convenient to use them for stack parameters.
Consequences
You need to use an additional pattern from this chapter to get the values to set. Doing this adds moving parts, making it hard to trace configuration values for any given stack instance, and more work to change the values.
Using environment variables directly in stack code, as in Example 7-5, arguably couples stack code too tightly to the runtime environment.
Setting secrets in environment variables may expose them to other processes that run on the same system.
Implementation
Again, you need to set the environment variables to use, which means selecting another pattern from this chapter. For example, if you expect people to set environment variables in their local environment to apply stack code, you are using the manual stack parameters antipattern (see “Antipattern: Manual Stack Parameters”). You could set them in a script that runs the stack tool (the scripted parameters pattern, as discussed in “Pattern: Scripted Parameters”), or have the pipeline tool set them (see “Pattern: Pipeline Stack Parameters”).
Another approach is to put the values into a script that people or instances import into their local environment. This is a variation of the stack configuration files pattern (see “Pattern: Stack Configuration Files”). The script to set the variables would be exactly like Example 7-4, and any command that runs the stack tool would import it into the environment:
source ./environments/staging.envstack up --source ./src
Alternatively, you could build the environment values into a compute instance that runs the stack tool. For example, if you provision a separate CD agent node to run the stack tool to build and update stacks in each environment, the code to build the node could set the appropriate values as environment variables. Those environment variables would be available to any command that runs on the node, including the stack tool.
But to do this, you need to pass the values to the code that builds your agent nodes. So you need to select another pattern from this chapter to do that.
The other side of implementing this pattern is how the stack tool gets the environment values. Example 7-5 showed how stack code can directly read environment variables.
But you could, instead, use a stack orchestration script (see “Using Scripts to Wrap Infrastructure Tools”) to read the environment variables and pass them to the stack tool on the command line. The code in the orchestration script would look like this:
stack up\environment=${STACK_ENVIRONMENT}\cluster_minimum=${STACK_CLUSTER_MINIMUM}\cluster_maximum=${STACK_CLUSTER_MAXIMUM}\ssl_cert_passphrase="${STACK_SSL_CERT_PASSPHRASE}"
This approach decouples your stack code from the environment it runs in.
Pattern: Scripted Parameters
Scripted parameters involves hardcoding the parameter values into a script that runs the stack tool. You can write a separate script for each environment or a single script that includes the values for all of your environments:
if${ENV}=="test"stack upcluster_maximum=1env="test"elsif${ENV}=="staging"stack upcluster_maximum=3env="staging"elsif${ENV}=="production"stack upcluster_maximum=5env="production"end
Motivation
Scripts are a simple way to capture the values for each instance, avoiding the problems with the manual stack parameters antipattern (see “Antipattern: Manual Stack Parameters”). You can be confident that values are used consistently for each environment. By checking the script into version control, you ensure you are tracking any changes to the configuration values.
Applicability
A stack provisioning script is a useful way to set parameters when you have a fixed set of environments that don’t change very often. It doesn’t require the additional moving parts of some of the other patterns in this chapter.
Because it is wrong to hardcode secrets in scripts, this pattern is not suitable for secrets. That doesn’t mean you shouldn’t use this pattern, only that you’ll need to implement a separate pattern for dealing with secrets (see “Handling Secrets as Parameters” for suggestions).
Consequences
It’s common for the commands used to run the stack tool to become complicated over time. Provisioning scripts can grow into messy beasts. “Using Scripts to Wrap Infrastructure Tools” discusses how these scripts are used and outlines pitfalls and recommendations for keeping them maintainable. You should test provisioning scripts since they can be a source of issues with the systems they provision.
Implementation
There are two common implementations for this pattern. One is a single script that takes the environment as a command-line argument, with hardcoded parameter values for each environment. Example 7-6 is a simple example of this.
Example 7-6. Example of a script that includes the parameters for multiple environments
#!/bin/shcase$1intest)CLUSTER_MINIMUM=1CLUSTER_MAXIMUM=1;;staging)CLUSTER_MINIMUM=2CLUSTER_MAXIMUM=3;;production)CLUSTER_MINIMUM=2CLUSTER_MAXIMUM=6;;*)echo"Unknown environment$1"exit1;;esacstack up\environment=$1\cluster_minimum=${CLUSTER_MINIMUM}\cluster_maximum=${CLUSTER_MAXIMUM}
Another implementation is a separate script for each stack instance, as shown in Example 7-7.
Example 7-7. Example project structure with a script for each environment
our-infra-stack/├── bin/│ ├── test.sh│ ├── staging.sh│ └── production.sh├── src/└── test/
Each of these scripts is identical but has different parameter values hardcoded in it. The scripts are smaller because they don’t need logic to select between different parameter values. However, they need more maintenance. If you need to change the command, you need to make it across all of the scripts. Having a script for each environment also tempts people to customize different environments, creating inconsistency.
Commit your provisioning script or scripts to source control. Putting it in the same project as the stack it provisions ensures that it stays in sync with the stack code. For example, if you add a new parameter, you add it to the infrastructure source code and also to your provisioning script. You always know which version of the script to run for a given version of the stack code.
“Using Scripts to Wrap Infrastructure Tools” discusses the use of scripts to run stack tools in much more detail.
As mentioned earlier, you shouldn’t hardcode secrets into scripts, so you’ll need to use a different pattern for those. You can use the script to support that pattern. In Example 7-8, a command-line tool fetches the secret from a secrets manager, following the parameter registry pattern (see “Pattern: Stack Parameter Registry”).
Example 7-8. Fetching a key from a secrets manager in a script
...# (Set environment specific values as in other examples)...SSL_CERT_PASSPHRASE=$(some-tool get-secretid="/ssl_cert_passphrase/${ENV}")stack up\environment=${ENV}\cluster_minimum=${CLUSTER_MINIMUM}\cluster_maximum=${CLUSTER_MAXIMUM}\ssl_cert_passphrase="${SSL_CERT_PASSPHRASE}"
The some-tool command connects to the secrets manager and retrieves the secret for the relevant environment using the ID /ssl_cert_passphrase/${ENV}. This example assumes the session is authorized to use the secrets manager. An infrastructure developer may use the tool to start a session before running this script. Or the compute instance that runs the script may be authorized to retrieve secrets using secretless authorization (as I describe in “Secretless Authorization”).
Related patterns
Provisioning scripts run the command-line tool for you, so are a way to move beyond the manual stack parameters antipattern (see “Antipattern: Manual Stack Parameters”). The stack configuration files pattern extracts the parameter values from the script into separate files.
Pattern: Stack Configuration Files
Stack configuration files manage parameter values for each instance in a separate file, which you manage in version control with your stack code, such as in Example 7-9.
Example 7-9. Example project with a parameter file for each environment
├── src/│ ├── cluster.infra│ ├── host_servers.infra│ └── networking.infra├── environments/│ ├── test.properties│ ├── staging.properties│ └── production.properties└── test/
Motivation
Creating configuration files for a stack’s instances is straightforward and easy to understand. Because the file is committed to the source code repository, it is easy to:
-
See what values are used for any given environment (“What is the maximum cluster size for production?”)
-
Trace the history for debugging (“When did the maximum cluster size change?”)
-
Audit changes (“Who changed the maximum cluster size?”)
Stack configuration files enforce the separation of configuration from the stack code.
Applicability
Stack configuration files are appropriate when the number of environments doesn’t change often. They require you to add a file to your project to add a new stack instance. They also require (and help enforce) consistent logic in how different instances are created and updated, since the configuration files can’t include logic.
Consequences
When you want to create a new stack instance, you need to add a new configuration file to the stack project. Doing this prevents you from automatically creating new environments on the fly. In “Pattern: Ephemeral Test Stack”, I describe an approach for managing test environments that relies on creating environments automatically. You could work around this by creating a configuration file for an ephemeral environment on demand.
Parameter files can add friction for changing the configuration of downstream environments in a change delivery pipeline of the kind described in “Infrastructure Delivery Pipelines”. Every change to the stack project code must progress through each stage of the pipeline before being applied to production. It can take a while for this to complete and doesn’t add any value when the configuration change is only applied to production.
Defining parameter values can be a source of considerable complexity in provisioning scripts. I’ll talk about this more in “Using Scripts to Wrap Infrastructure Tools”, but as a teaser, consider that teams often want to define default values for stack projects, and for environments, and then need logic to combine these into values for a given instance of a given stack in a different environment. Inheritance models for parameter values can get messy and confusing.
Configuration files in source control should not include secrets. So for secrets, you either need to select an additional pattern from this chapter to handle secrets or implement a separate secrets configuration file outside of source control.
Implementation
You define stack parameter values in a separate file for each environment, as shown earlier in Example 7-9.
The contents of a parameter file could look like this:
env=stagingcluster_minimum=2cluster_maximum=3
Pass the path to the relevant parameter file when running the stack command:
stack up --source ./src --config ./environments/staging.propertiesIf the system is composed of multiple stacks, then it can get messy to manage configuration across all of the environments. There are two common ways of arranging parameter files in these cases. One is to put configuration files for all of the environments with the code for each stack:
├── cluster_stack/│ ├── src/│ │ ├── cluster.infra│ │ ├── host_servers.infra│ │ └── networking.infra│ └── environments/│ ├── test.properties│ ├── staging.properties│ └── production.properties│└── appserver_stack/├── src/│ ├── server.infra│ └── networking.infra└── environments/├── test.properties├── staging.properties└── production.properties
The other is to centralize the configuration for all of the stacks in one place:
├── cluster_stack/│ ├── cluster.infra│ ├── host_servers.infra│ └── networking.infra│├── appserver_stack/│ ├── server.infra│ └── networking.infra│└── environments/├── test/│ ├── cluster.properties│ └── appserver.properties├── staging/│ ├── cluster.properties│ └── appserver.properties└── production/├── cluster.properties└── appserver.properties
Each approach can become messy and confusing in its own way. When you need to make a change to all of the things in an environment, making changes to configuration files across dozens of stack projects is painful. When you need to change the configuration for a single stack across the various environments it’s in, trawling through a tree full of configuration for dozens of other stacks is also not fun.
If you want to use configuration files to provide secrets, rather than using a separate pattern for secrets, then you should manage those files outside of the project code checked into source control.
For local development environments, you can require users to create the file in a set location manually. Pass the file location to the stack command like this:
stack up --source ./src \--config ./environments/staging.properties \--config ../.secrets/staging.properties
In this example, you provide two --config arguments to the stack tool, and it reads parameter values from both. You have a directory named .secrets outside the project folder, so it is not in source control.
It can be trickier to do this when running the stack tool automatically, from a compute instance like a CD pipeline agent. You could provision similar secrets property files onto these compute instances, but that can expose secrets to other processes that run on the same agent. You also need to provide the secrets to the process that builds the compute instance for the agent, so you still have a bootstrapping problem.
Related patterns
Putting configuration values into files simplifies the provisioning scripts described in “Pattern: Scripted Parameters”. You can avoid some of the limitations of environment configuration files by using the stack parameter registry pattern instead (see “Pattern: Stack Parameter Registry”). Doing this moves parameter values out of the stack project code and into a central location, which allows you to use different workflows for code and configuration.
Pattern: Wrapper Stack
A wrapper stack uses an infrastructure stack project for each instance as a wrapper to import a stack code component (see Chapter 16). Each wrapper project defines the parameter values for one instance of the stack. It then imports a component shared by all of the stack instances (see Figure 7-2).
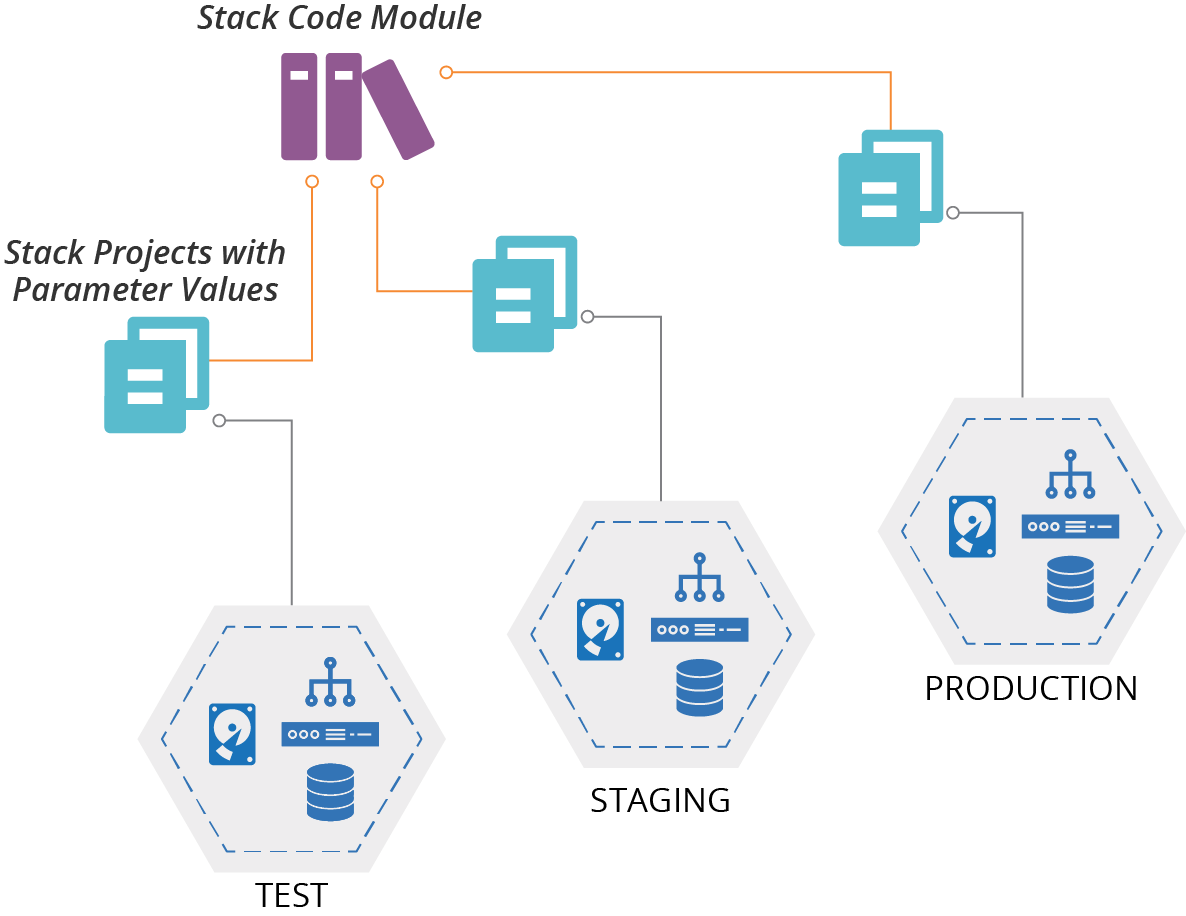
Figure 7-2. A wrapper stack uses an infrastructure stack project for each instance as a wrapper to import a stack module
Motivation
A wrapper stack leverages the stack tool’s module functionality or library support to reuse shared code across stack instances. You can use the tool’s module versioning, dependency management, and artifact repository functionality to implement a change delivery pipeline (see “Infrastructure Delivery Pipelines”). As of this writing, most infrastructure stack tools don’t have a project packaging format that you can use to implement pipelines for stack code. So you need to create a custom stack packaging process yourself. You can work around this by using a wrapper stack, and versioning and promoting your stack code as a module.
With wrapper stacks, you can write the logic for provisioning and configuring stacks in the same language that you use to define your infrastructure, rather than using a separate language as you would with a provisioning script (see “Pattern: Scripted Parameters”).
Consequences
Components add an extra layer of complexity between your stack and the code contained in the component. You now have two levels: the stack project, which contains the wrapper projects, and the component that contains the code for the stack.
Because you have a separate code project for each stack instance, people may be tempted to add custom logic for each instance. Custom instance code makes your codebase inconsistent and hard to maintain.
Because you define parameter values in wrapper projects managed in source control, you can’t use this pattern to manage secrets. So you need to add another pattern from this chapter to provide secrets to stacks.
Implementation
Each stack instance has a separate infrastructure stack project. For example, you would have a separate Terraform project for each environment. You can implement this like a copy-paste environment (see “Antipattern: Copy-Paste Environments”), with each environment in a separate repository.
Alternatively, each environment project could be a folder in a single repository:
my_stack/├── test/│ └── stack.infra├── staging/│ └── stack.infra└── production/└── stack.infra
Define the infrastructure code for the stack as a module, according to your tool’s implementation. You could put the module code in the same repository with your wrapper stacks. However, this would prevent you from leveraging module versioning functionality. That is, you wouldn’t be able to use different versions of the infrastructure code in different environments, which is crucial for progressively testing your code.
The following example is a wrapper stack that imports a module called
container_cluster_module, specifying the version of the module, and the configuration parameters to pass to it:
module:name:container_cluster_moduleversion:1.23parameters:env:testcluster_minimum:1cluster_maximum:1
The wrapper stack code for the staging and production environments is similar, other than the parameter values, and perhaps the module version they use.
The project structure for the module could look like this:
├── container_cluster_module/│ ├── cluster.infra│ └── networking.infra└── test/
When you make a change to the module code, you test and upload it to a module repository. How the repository works depends on your particular infrastructure stack tool. You can then update your test stack instance to import the new module version and apply it to the test environment.
Terragrunt is a stack orchestration tool that implements the wrapper stack pattern.
Pattern: Pipeline Stack Parameters
With the pipeline stack parameters pattern, you define values for each instance in the configuration of a delivery pipeline (see Figure 7-3).
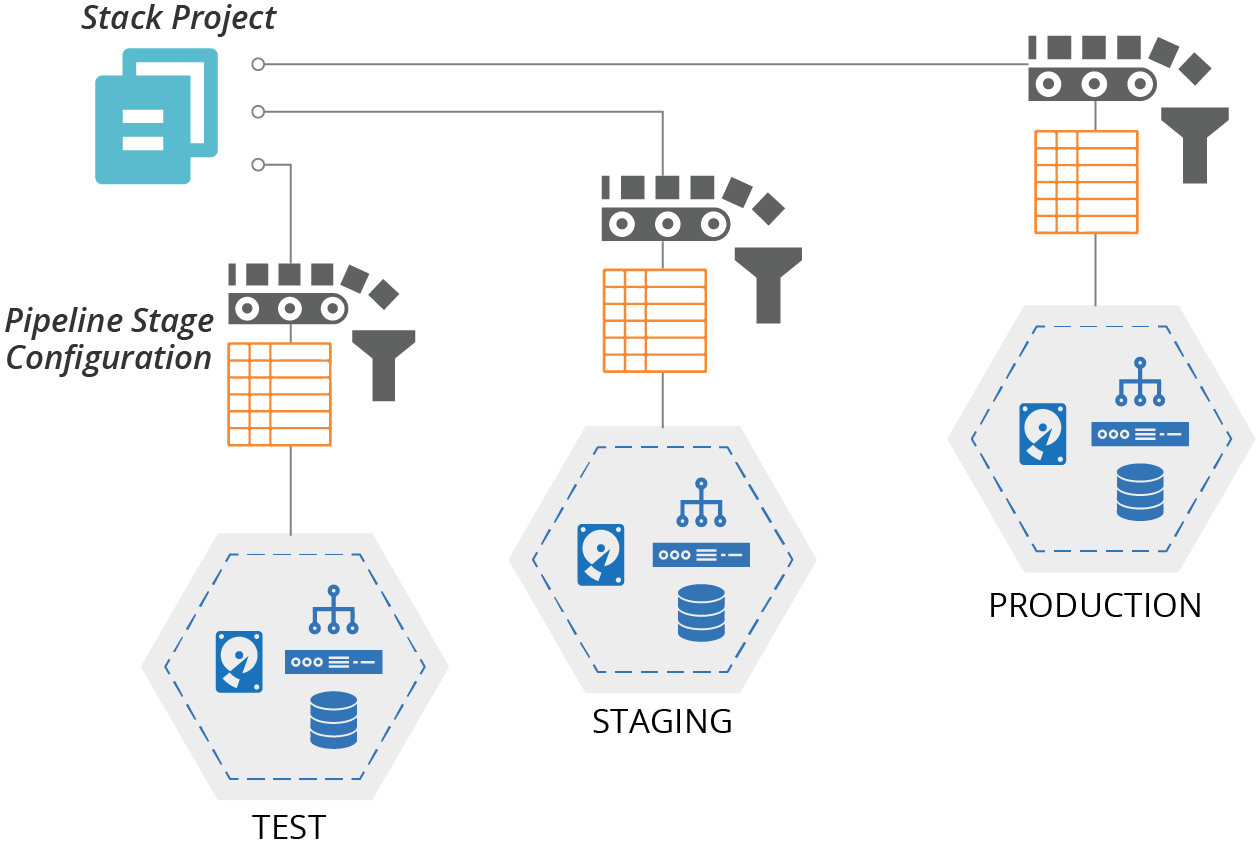
Figure 7-3. Each stage that applies the stack code passes the relevant configuration values for the environment
I explain how to use a change delivery pipeline to apply infrastructure stack code to environments in “Infrastructure Delivery Pipelines”. You can implement a pipeline using a tool like Jenkins, GoCD, or ConcourseCI (see “Delivery Pipeline Software and Services” for more on these tools).
Motivation
If you’re using a pipeline tool to run your infrastructure stack tool, it provides the mechanism for storing and passing parameter values to the tool out of the box. Assuming your pipeline tool is itself configured by code, then the values are defined as code and stored in version control.
Configuration values are kept separate from the infrastructure code. You can change configuration values for downstream environments and apply them immediately, without needing to progress a new version of the infrastructure code from the start of the pipeline.
Applicability
Teams who are already using a pipeline to apply infrastructure code to environments can easily leverage this to set stack parameters for each environment. However, if stacks require more than a few parameter values, defining these in the pipeline configuration has serious drawbacks, so you should avoid this.
Consequences
By defining stack instance variables in the pipeline configuration, you couple configuration values with your delivery process. There is a risk of the pipeline configuration becoming complicated and hard to maintain.
The more configuration values you define in your pipeline, the harder it is to run the stack tool outside the pipeline. Your pipeline can become a single point of failure—you may not be able to fix, recover, or rebuild an environment in an emergency until you have recovered your pipeline. And it can be hard for your team to develop and test stack code outside the pipeline.
In general, it’s best to keep the pipeline configuration for applying a stack project as small and simple as possible. Most of the logic should live in a script called by the pipeline, rather than in the pipeline configuration.
CI Servers, Pipelines, and Secrets
The first thing most attackers look for when they gain access to a corporate network is CI and CD servers. These are well-known treasure troves of passwords and keys that they can exploit to inflict the maximum evil on your users and customers.
Most of the CI and CD tools that I’ve worked with do not provide a very robust security model. You should assume that anyone who has access to your pipeline tool or who can modify code that the tool executes (i.e., probably every developer in your organization) can access any secret stored by the tool.
This is true even when the tool encrypts the secrets, because the tool can also decrypt the secrets. If you can get the tool to run a command, you can usually get it to decrypt any secret it stores. You should carefully analyze any CI or CD tool you use to assess how well it supports your organization’s security requirements.
Implementation
Parameters should be implemented using “as code” configuration of the pipeline tool. Example 7-10 shows a pseudocode pipeline stage configuration.
Example 7-10. Example pipeline stage configuration
stage:apply-test-stackinput_artifacts:container_cluster_stackcommands:unpack ${input_artifacts}stack up --source ./src environment=test cluster_minimum=1 cluster_maximum=1stack test environment=test
This example passes the values on the command line. You may also set them as environment variables that the stack code uses, as shown in Example 7-11 (see also “Pattern: Stack Environment Variables”).
Example 7-11. Example pipeline stage configuration using environment variables
stage:apply-test-stackinput_artifacts:container_cluster_stackenvironment_vars:STACK_ENVIRONMENT=testSTACK_CLUSTER_MINIMUM=1STACK_CLUSTER_MAXIMUM=1commands:unpack ${input_artifacts}stack up --source ./srcstack test environment=test
In this example, the pipeline tool sets those environment variables before running the commands.
Many pipeline tools provide secret management features that you can use to pass secrets to your stack command. You set the secret values in the pipeline tool in some fashion, and can then refer to them in your pipeline job, as shown in Example 7-12.
Example 7-12. Example pipeline stage with secret
stage:apply-test-stackinput_artifacts:container_cluster_stackcommands:unpack ${input_artifacts}stack up --source ./src environment=test \cluster_minimum=1 \cluster_maximum=1 \ssl_cert_passphrase=${STACK_SSL_CERT_PASSPHRASE}
Pattern: Stack Parameter Registry
A stack parameter registry manages the parameter values for stack instances in a central location, rather than with your stack code. The stack tool retrieves the relevant values when it applies the stack code to a given instance (see Figure 7-4).
Configuration Registries and Stack Parameter Registries
I use the term configuration registry to describe a service that stores configuration values that may be used for many purposes, including service discovery, stack integration, or monitoring configuration. I’ll describe this in more detail in “Configuration Registry”.
When talking specifically about storing configuration values for stack instances, I use the term stack parameter registry. So a stack parameter registry is a specific use case for a configuration registry.
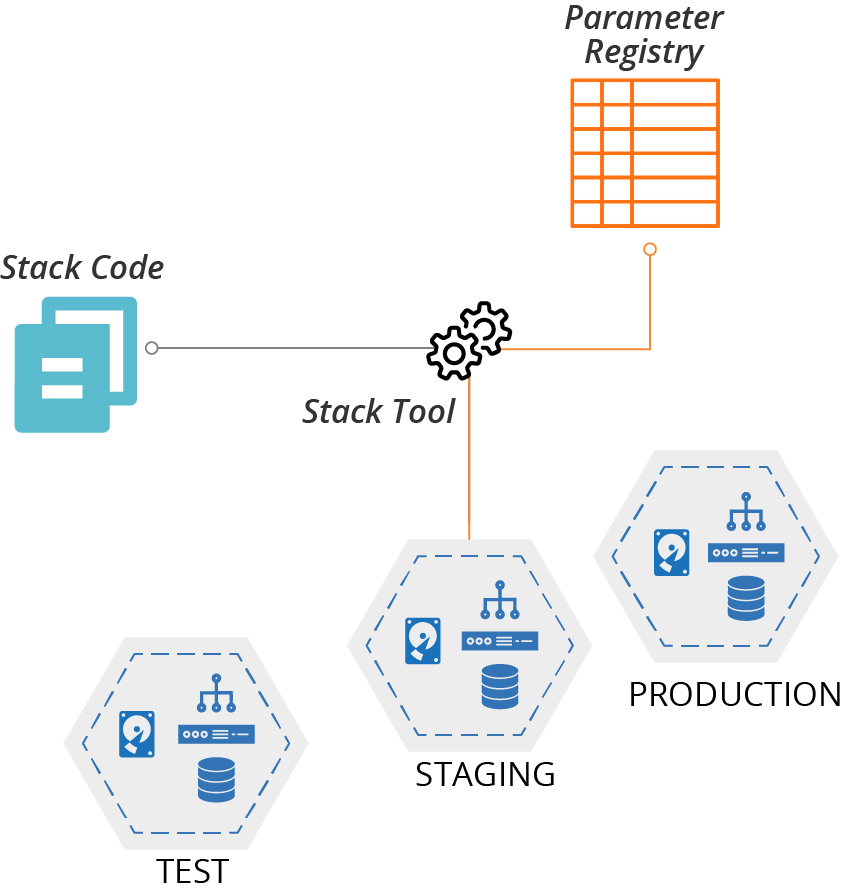
Figure 7-4. Stack instance parameter values stored in a central registry
Motivation
Storing parameter values in a registry separates configuration from implementation. Parameters in a registry can be set, used, and viewed by different tools, using different languages and technologies. This flexibility reduces coupling between different parts of the system. You can replace any tool that uses the registry without affecting any other tool that uses it.
Because they are tool-agnostic, stack parameter registries can act as a source of truth for infrastructure and even system configuration, acting as a Configuration Management Database (CMDB). This configuration data can be useful in regulated contexts, making it easy to generate reports for auditing.
Applicability
If you are using a configuration registry for other purposes, it makes sense to use it as a stack parameter registry, as well. For example, a configuration registry is a useful way to integrate multiple stacks (see “Discovering Dependencies Across Stacks”).
Consequences
A stack parameter registry requires a configuration registry, which is an extra moving part for your overall system. The registry is a dependency for your stack and a potential point of failure. If the registry becomes unavailable, it may be impossible to re-provision or update the infrastructure stack until you can restore it. This dependency can be painful in disaster recovery scenarios, putting the registry service on the critical path.
Managing parameter values separately from the stack code that uses it has trade-offs. You can change the configuration of a stack instance without making a change to the stack project. If one team maintains a reusable stack project, other teams can use it to create their own stack instances without needing to add or change configuration files in the stack project itself.
On the other hand, making changes across more than one place—stack project and parameter registry—adds complexity and opportunity for mistakes.
Implementation
I’ll discuss ways to implement a parameter registry in “Configuration Registry”. In short, it may be a service that stores key/value pairs, or it could be a file or directory structure of files that contain key-value pairs. Either way, parameter values can usually be stored in a hierarchical structure, so you can store and find them based on the environment and the stack, and perhaps other factors like the application, service, team, geography, or customer.
The values for this chapter’s example container cluster could look like Example 7-13.
Example 7-13. Example of configuration registration entries
└── env/├── test/│ └── cluster/│ ├── min = 1│ └── max = 1├── staging/│ └── cluster/│ ├── min = 2│ └── max = 3└── production/└── cluster/├── min = 2└── max = 6
When you apply the infrastructure stack code to an instance, the stack tool uses the key to retrieve the relevant value. You will need to pass the environment parameter to the stack tool, and the code uses this to refer to the relevant location in the registry:
cluster:id:container_cluster-${environment}minimum:${get_value("/env/${environment}/cluster/min")}maximum:${get_value("/env/${environment}/cluster/max")}
The get_registry_item() function in the stack code looks up the value.
This implementation ties your stack code to the configuration registry. You need the registry to run and test your code, which can be too heavy. You could work around this by fetching the values from the registry in a script, which then passes them to the stack code as normal parameters. Doing this gives you the flexibility to set parameter values in other ways. For reusable stack code this is particularly useful, giving users of your code more options for how to configure their stack instances.
Secrets management services (see “Storage Resources”) are a special type of parameter registry. Used correctly, they ensure that secrets are only available to people and services that require them, without exposing them more widely. Some configuration registry products and services can be used to store both secret and non-secret values. But it’s important to avoid storing secrets in registries that don’t protect them. Doing so makes the registry an easy target for attackers.
Configuration Registry
Larger organizations with many teams working across larger systems with many moving parts often find a configuration registry useful. It can be useful for configuring stacks instances, as I described in “Pattern: Stack Parameter Registry”. It can also be useful for managing integration dependencies across different stack instances, applications, and other services, as I’ll explain in “Discovering Dependencies Across Stacks”.
A registry can provide a useful source of information about the composition and state of your infrastructure. You can use this to create tools, dashboards, and reports, as well as for monitoring and auditing your systems.
So it’s worth digging into how to implement and use a configuration registry.
Implementing a Configuration Registry
There are different ways to build a configuration registry. You can use a registry provided out of the box by your infrastructure automation tool, or you can run a general-purpose registry product. Most cloud providers also have configuration registry services that you can use. If you are brave, you can hand-roll a practical registry using fairly basic pieces.
Infrastructure automation tool registries
Many infrastructure automation toolchains include a configuration registry service. These tend to be part of a centralized service that may also include features such as source code management, monitoring, dashboards, and command orchestration. Examples of these include:
You may be able to use these services with tools outside the toolchain that provides them. Most can expose values, so you could write a script that discovers information about the current state of infrastructure managed by the configuration tool. Some infrastructure tool registries are extensible, so you can use them to store the data from other tools.
However, this creates a dependency on whatever toolchain provides the registry service. The service may not fully support integration with third-party tools. It might not offer a contract or API that guarantees future compatibility.
So if you’re considering using an infrastructure tool’s data store as a general-purpose configuration registry, consider how well it supports this use case, and what kind of lock-in it creates.
General-purpose configuration registry products
There are many dedicated configuration registry and key-value store database products available outside the toolchains of a particular automation tool. Some examples include:
These are generally compatible with different tools, languages, and systems, so avoid locking you into any particular toolchain.
However, it can take a fair bit of work to define how data should be stored. Should keys be structured like environment/service/application, service/application/environment, or something else entirely? You may need to write and maintain custom code to integrate different systems with your registry. And a configuration registry gives your team yet another thing to deploy and run.
Platform registry services
Most cloud platforms provide a key-value store service, such as the AWS SSM Parameter Store. These give you most of the advantages of a general-purpose configuration registry product, without forcing you to install and support it yourself. However, it does tie you to that cloud provider. In some cases, you may find yourself using a registry service on one cloud to manage infrastructure running on another!
DIY configuration registries
Rather than running a configuration registry server, some teams build a custom lightweight configuration registry by storing configuration files in a central location, or by using distributed storage. They typically use an existing file storage service like an object store (e.g., an S3 bucket on AWS), a version control system, networked filesystem, or even a web server.
A variation of this is packaging configuration settings into system packages, such as a .deb or .rpm file (for Debian-based or Rad Hat-Based Linux distributions, respectively), and pushing them to an internal APT or YUM repository. You can then download configuration files to local servers using the standard package management tool.
Another variation is using a standard relational or document store database server.
All of these approaches leverage existing services, so they can be quick to implement for a simple project rather than needing to install and run a new server. But when you get beyond trivial situations, you may find yourself building and maintaining the functionality that you could get off the shelf.
Single or Multiple Configuration Registries
Combining all configuration values from across all of your systems, services, and tools is an appealing idea. You could keep everything in one place rather than sprawling across many different systems. “One registry to rule them all.” However, this isn’t always practical in larger, more heterogeneous environments.
Many tools, such as monitoring services and server configuration systems, have their own registry. You’ll often find different registry and directory products that are very good at specific tasks, such as license management, service discovery, and user directories. Bending all of these tools to use a single system creates an ongoing flow of work. Every update to every tool needs evaluation, testing, and potentially more work to maintain the integration.
It may be better to pull relevant data from across the services where they are stored. Make sure you know which system is the source of truth for any particular data or configuration item. Design your systems and tools with this understanding.
Some teams use messaging systems to share configuration data as events. Whenever a system changes a configuration value, it sends an event. Other systems can monitor the event queue for changes to configuration items in which they are interested.
Handling Secrets as Parameters
Systems need various secrets. Your stack tool may need a password or key to use your platform’s API to create and change infrastructure. You may also need to provision secrets into environments, for example, making sure an application has the password to connect to a database.
It’s essential to handle these types of secrets in a secure way from the very beginning. Whether you are using a public cloud or a private cloud a leaked password can have terrible consequences. So even when you are only writing code to learn how to use a new tool or platform, you should never put secrets into code. There are many stories of people who checked a secret into a source repository they thought was private, only to find it had been discovered by hackers who exploited it to run up huge bills.
There are a few approaches for handling secrets needed by infrastructure code without actually putting them into code. They include encrypted secrets, secretless authorization, runtime secret injection, and disposable secrets.
Encrypting Secrets
The exception to the rule of never putting a secret in source code is encrypting it in the source code; git-crypt, blackbox, sops, and transcrypt are a few tools that help you to encrypt secrets in a repository.
The key to decrypt the secret should not be in the repository itself; otherwise, it would be available to attackers who gain access to the code. You’ll need to use one of the other approaches described here to enable decryption.
Secretless Authorization
Many services and systems provide ways to authorize an action without using a secret. Most cloud platforms can mark a compute service—such as a virtual machine or container instance—as authorized for privileged actions.
For example, an AWS EC2 instance can be assigned an IAM profile that gives processes on the instance rights to carry out a set of API commands. If you configure a stack management tool to run on one of these instances, you avoid the need to manage a secret that might be exploited by attackers.
In some cases, secretless authorization can be used to avoid the need to provision secrets on infrastructure when it is created. For example, an application server might need to access a database instance. Rather than a server configuration tool provisioning a password onto the application server, the database server might be configured to authorize connections from the application server, perhaps based on its network address.
Tying privileges to a compute instance or network address only shifts the possible attack vector. Anyone gaining access to that instance can exploit those privileges. You need to put in the work to protect access to privileged instances. On the other hand, someone gaining access to an instance may be able to access secrets stored there, so giving privileges to the instance may not be any worse. And a secret can potentially be exploited from other locations, so removing the use of secrets entirely is generally a good thing.
Injecting Secrets at Runtime
When you can’t avoid using a secret for a stack or other infrastructure code, you can explore ways to inject the secret at runtime. You’ll normally implement it as a stack parameter, which is the topic of Chapter 7. I describe the details of handling secrets as parameters with each of the patterns and antipatterns in that chapter.
There are two different runtime situations to consider: local development and unattended agents. People who work on infrastructure code will often keep secrets in a local file that isn’t stored in version control.3 The stack tool could read that file directly, which is especially appropriate if you’re using the stack configuration file pattern (see “Pattern: Stack Configuration Files”). Or the file could be a script that sets the secrets in environment variables, which works well with the stack environment variables pattern (see “Pattern: Stack Environment Variables”).
These approaches also work on unattended agents, such as those used for CI testing or CD delivery pipelines.4 But you need to store the secrets on the server or container that runs the agent. Alternatively, you can use secrets management features of your agent software to provide secrets to the stack command, as with the pipeline stack parameters pattern (see “Pattern: Pipeline Stack Parameters”). Another option is to pull secrets from a secrets management service (of the type described in “Storage Resources”), which aligns to the stack parameter registry pattern (see “Pattern: Stack Parameter Registry”).
Disposable Secrets
A cool thing you can do with dynamic platforms is to create secrets on the fly, and only use them on a “need-to-know” basis. In the database password example, the code that provisions the database automatically generates a password and passes it to the code that provisions the application server. Humans don’t ever need to see the secret, so it’s never stored anywhere else.
You can apply the code to reset the password as needed. If the application server is rebuilt, you can rerun the database server code to generate a new password for it.
Secrets management services, such as HashiCorp Vault, can also generate and set a password in other systems and services on the fly. It can then make the password available either to the stack tool when it provisions the infrastructure, or else directly to the service that uses it, such as the application server. One-time passwords take this approach to the extreme of creating a new password every time authentication occurs.
Conclusion
Reusing stack projects requires you to be able to configure different instances of a given stack. Configuration should be minimized. If you find that you need different instances of a stack to be radically different from one another, you should define them as different stacks.
A stack project should define the shape of a stack that is consistent across instances. It’s perfectly fine to have two different stack projects that define something superficially similar—application servers, for example—but with different shapes.
1 Some examples of tools teams can use to securely share passwords include GPG, KeePass, 1Password, Keeper, and LastPass.
2 Consul is a product of HashiCorp, which also makes Terraform, and of course, these products work well together. But Consul was created and is maintained as an independent tool, and is not required for Terraform to function. This is why I count it as a general-purpose registry product.
3 I explain how people can work on stack code locally in more detail in “Personal Infrastructure Instances”.
4 I describe how these are used in “Infrastructure Delivery Pipelines”.