Chapter 7. How to Test Terraform Code
The DevOps world is full of fear: fear of downtime; fear of data loss; fear of security breaches. Every time you go to make a change, you’re always wondering, what will this affect? Will it work the same way in every environment? Will this cause another outage? And if there is an outage, how late into the night will you need to stay up to fix it this time? As companies grow, there is more and more at stake, which makes the deployment process even scarier, and even more error prone. Many companies try to mitigate this risk by doing deployments less frequently, but the result is that each deployment is larger, and actually more prone to breakage.
If you manage your infrastructure as code, you have a better way to mitigate risk: tests. The goal of testing is to give you the confidence to make changes. The key word here is confidence: no form of testing can guarantee that your code is free of bugs, so it’s more of a game of probability. If you can capture all of your infrastructure and deployment processes as code, you can test that code in a preproduction environment, and if it works there, there’s a high probability that when you use the exact same code in production, it will work there, too. And in a world of fear and uncertainty, high probability and high confidence go a long way.
In this chapter, I’ll go over the process of testing infrastructure code, including both manual testing and automated testing, with the bulk of the chapter spent on the latter topic:
-
Manual tests
-
Manual testing basics
-
Cleaning up after tests
-
-
Automated tests
-
Unit tests
-
Integration tests
-
End-to-end tests
-
Other testing approaches
-
Example Code
As a reminder, you can find all of the code examples in the book at https://github.com/brikis98/terraform-up-and-running-code.
Manual Tests
When thinking about how to test Terraform code, it can be helpful to draw some parallels with how you would test code written in a general-purpose programming language such as Ruby. Let’s say you were writing a simple web server in Ruby in web-server.rb:
classWebServer<WEBrick::HTTPServlet::AbstractServletdefdo_GET(request,response)caserequest.pathwhen"/"response.status=200response['Content-Type']='text/plain'response.body='Hello, World'elseresponse.status=404response['Content-Type']='text/plain'response.body='Not Found'endendend
This code will send a 200 OK response with the body “Hello, World” for the / URL and a 404 for all other URLs. How
would you manually test this code? The typical answer is to add a bit of code to run the web server on localhost:
# This will only run if this script was called directly from the CLI, but# not if it was required from another fileif__FILE__==$0# Run the server on localhost at port 8000server=WEBrick::HTTPServer.new:Port=>8000server.mount'/',WebServer# Shut down the server on CTRL+Ctrap'INT'doserver.shutdownend# Start the serverserver.startend
When you run this file from the CLI, it will start the web server on port 8000:
$ ruby web-server.rb
[2019-05-25 14:11:52] INFO  WEBrick 1.3.1
[2019-05-25 14:11:52] INFO  ruby 2.3.7 (2018-03-28) [universal.x86_64-darwin17]
[2019-05-25 14:11:52] INFO  WEBrick::HTTPServer#start: pid=19767 port=8000
You can test this server using a web browser or curl:
$ curl localhost:8000/
Hello, World

$ curl localhost:8000/invalid-path
Not Found
Now, suppose that you made a change to this code, adding a /api endpoint that responds with a 201 Created and a JSON
body:
classWebServer<WEBrick::HTTPServlet::AbstractServletdefdo_GET(request,response)caserequest.pathwhen"/"response.status=200response['Content-Type']='text/plain'response.body='Hello, World'when"/api"response.status=201response['Content-Type']='application/json'response.body='{"foo":"bar"}'elseresponse.status=404response['Content-Type']='text/plain'response.body='Not Found'endendend
To manually test your updated code, you’d press Ctrl-C and rerun the script to restart the server:
$ ruby web-server.rb
[2019-05-25 14:11:52] INFO  WEBrick 1.3.1
[2019-05-25 14:11:52] INFO  ruby 2.3.7 (2018-03-28) [universal.x86_64-darwin17]
[2019-05-25 14:11:52] INFO  WEBrick::HTTPServer#start: pid=19767 port=8000
^C
[2019-05-25 14:15:54] INFO  going to shutdown ...
[2019-05-25 14:15:54] INFO  WEBrick::HTTPServer#start done.

$ ruby web-server.rb
[2019-05-25 14:11:52] INFO  WEBrick 1.3.1
[2019-05-25 14:11:52] INFO  ruby 2.3.7 (2018-03-28) [universal.x86_64-darwin17]
[2019-05-25 14:11:52] INFO  WEBrick::HTTPServer#start: pid=19767 port=8000
And you’d again use curl to test the new version:
$ curl localhost:8000/api
{"foo":"bar"}
Manual Testing Basics
What is the equivalent of this sort of manual testing with Terraform code? For example, from the previous chapters, you already have Terraform code for deploying an ALB. Here’s a snippet from modules/networking/alb/main.tf:
resource"aws_lb" "example"{name=var.alb_nameload_balancer_type="application"subnets=var.subnet_idssecurity_groups=[aws_security_group.alb.id]}resource"aws_lb_listener" "http"{load_balancer_arn=aws_lb.example.arnport=local.http_portprotocol="HTTP"# By default, return a simple 404 pagedefault_action{type="fixed-response"fixed_response{content_type="text/plain"message_body="404: page not found"status_code=404}}}resource"aws_security_group" "alb"{name=var.alb_name}# (...)
If you compare this code to the Ruby code, one difference should be fairly obvious: you can’t deploy AWS ALBs, target groups, listeners, security groups, and all the other infrastructure on your own computer.
This brings us to key testing takeaway #1: when testing Terraform code, there is no localhost.
This applies to most IaC tools, not just Terraform. The only practical way to do manual testing
with Terraform is to deploy to a real environment (i.e., deploy to AWS). In other words, the way you’ve been manually
running terraform apply and terraform destroy throughout the book is how you do manual testing with Terraform.
This is one of the reasons why it’s essential to have easy-to-deploy examples in the examples folder for each module, as
described in Chapter 6. The easiest way to manually test the alb module is to use the example code
you created for it in examples/alb:
provider"aws"{region="us-east-2"# Allow any 2.x version of the AWS providerversion="~> 2.0"}module"alb"{source="../../modules/networking/alb"alb_name="terraform-up-and-running"subnet_ids=data.aws_subnet_ids.default.ids}
As you’ve done many times throughout the book, you deploy this example code using terraform apply:
$ terraform apply

(...)

Apply complete! Resources: 5 added, 0 changed, 0 destroyed.

Outputs:

alb_dns_name = hello-world-stage-477699288.us-east-2.elb.amazonaws.com
When the deployment is done, you can use a tool such as curl to test, for example, that the default action of the ALB is
to return a 404:
$ curl \
  -s \
  -o /dev/null \
  -w "%{http_code}" \
  hello-world-stage-477699288.us-east-2.elb.amazonaws.com

404
Validating Infrastructure
The examples in this chapter use curl and HTTP requests to validate that the infrastructure is working, because the
infrastructure we’re testing includes a load balancer that responds to HTTP requests. For other types of
infrastructure, you’ll need to replace curl and HTTP requests with a different form of validation. For example, if
your infrastructure code deploys a MySQL database, you’ll need to use a MySQL client to validate it; if your
infrastructure code deploys a VPN server, you’ll need to use a VPN client to validate it; if your infrastructure code
deploys a server that isn’t listening for requests at all, you might need to SSH to the server and execute some commands
locally to test it; and so on. So although you can use the same basic test structure described in this chapter with
any type of infrastructure, the validation steps will change depending on what you’re testing.
As a reminder, the ALB returns a 404 because it has no other listener rules configured, and the default action in the
alb module is to return a 404:
resource"aws_lb_listener" "http"{load_balancer_arn=aws_lb.example.arnport=local.http_portprotocol="HTTP"# By default, return a simple 404 pagedefault_action{type="fixed-response"fixed_response{content_type="text/plain"message_body="404: page not found"status_code=404}}}
Now that you have a way to run and test your code, you can begin making changes. Every time you make a change—for example,
change the default action to return a 401—you rerun terraform apply to deploy the new changes:
$ terraform apply

(...)

Apply complete! Resources: 0 added, 1 changed, 0 destroyed.

Outputs:

alb_dns_name = hello-world-stage-477699288.us-east-2.elb.amazonaws.com
You also rerun curl to test the new version:
$ curl \
  -s \
  -o /dev/null \
  -w "%{http_code}" \
  hello-world-stage-477699288.us-east-2.elb.amazonaws.com

401
When you’re done, you run terraform destroy to clean up:
$ terraform destroy

(...)

Apply complete! Resources: 0 added, 0 changed, 5 destroyed.
In other words, when working with Terraform, every developer needs good example code to test and a real deployment environment (e.g., an AWS account) to use as an equivalent to localhost for running those tests. In the process of manual testing, you’re likely to bring up and tear down a lot of infrastructure, and likely make lots of mistakes along the way, so this environment should be completely isolated from your other, more stable environments, such as staging, and especially production.
Therefore, I strongly recommend that every team sets up an isolated sandbox environment, in which developers can bring up and tear down any infrastructure they want without worrying about affecting others. In fact, to reduce the chances of conflicts between multiple developers (e.g., two developers trying to create a load balancer with the same name), the gold standard is that each developer gets their own completely isolated sandbox environment. For example, if you’re using Terraform with AWS, the gold standard is for each developer to have their own AWS account that they can use to test anything they want.1
Cleaning Up After Tests
Having many sandbox environments is essential for developer productivity, but if you’re not careful, you can end up with infrastructure running all over the place, cluttering up all of your environments, and costing you a lot of money.
To keep costs from spiraling out of control, key testing takeaway #2 is: regularly clean up your sandbox environments.
At a minimum, you should create a culture in which developers clean up whatever they deploy when they are done testing
by running terraform destroy. Depending on your deployment environment, you might also be able to find tools that you can
run on a regular schedule (e.g., a cron job) to automatically clean up unused or old resources. Here are some examples:
- cloud-nuke
-
An open source tool that can delete all the resources in your cloud environment. It currently supports a number of resources in AWS (e.g., Amazon EC2 Instances, ASGs, ELBs, etc.), with support for other resources and other clouds (Google Cloud, Azure) coming in the future. The key feature is the ability to delete all resources older than a certain age. For example, a common pattern is to run
cloud-nukeas a cron job once per day in each sandbox environment to delete all resources that are more than two days old, based on the assumption that any infrastructure a developer fired up for manual testing is no longer necessary after a couple days:$ cloud-nuke aws --older-than 48h
- Janitor Monkey
-
An open source tool that cleans up AWS resources on a configurable schedule (default is once per week). Supports configurable rules to determine whether a resource should be cleaned up and even the ability to send a notification to the owner of the resource a few days before deletion. This is part of the Netflix Simian Army project, which also includes Chaos Monkey, a tool for testing application resiliency. Note that the Simian Army project is no longer actively maintained, but various parts of it are being picked up by new projects, such as Janitor Monkey being replaced by Swabbie.
- aws-nuke
-
An open source tool dedicated to deleting everything in an AWS account. You specify to
aws-nukewhich accounts and resources to delete using a YAML configuration file:# Regions to nukeregions:-us-east-2# Accounts to nukeaccounts:"111111111111":{}# Only nuke these resourcesresource-types:targets:-S3Object-S3Bucket-IAMRoleAnd you run it as follows:
$ aws-nuke -c config.yml
Automated Tests
Warning: Lots of Coding Ahead
Writing automated tests for infrastructure code is not for the faint of heart. This automated testing section is arguably the most complicated part of the book and does not make for light reading. If you’re just skimming, feel free to skip this part. On the other hand, if you really want to learn how to test your infrastructure code, roll up your sleeves and get ready to write some code! You don’t need to run any of the Ruby code (it’s just there to help build up your mental model), but you’ll want to write and run as much Go code as you can.
The idea with automated testing is to write test code that validates that your real code behaves the way it should. As you’ll see in Chapter 8, you can set up a CI server to run these tests after every single commit and then immediately revert or fix any commits that cause the tests to fail, thereby always keeping your code in a working state.
Broadly speaking, there are three types of automated tests:
- Unit tests
-
Unit tests verify the functionality of a single, small unit of code. The definition of unit varies, but in a general-purpose programming language, it’s typically a single function or class. Usually, any external dependencies—for example, databases, web services, even the filesystem—are replaced with test doubles or mocks that allow you to finely control the behavior of those dependencies (e.g., by returning a hard-coded response from a database mock) to test that your code handles a variety of scenarios.
- Integration tests
-
Integration tests verify that multiple units work together correctly. In a general-purpose programming language, an integration test consist of code that validates that several functions or classes work together correctly. Integration tests typically use a mix of real dependencies and mocks: for example, if you’re testing the part of your app that communicates with the database, you might want to test it with a real database, but mock out other dependencies, such as the app’s authentication system.
- End-to-end tests
-
End-to-end tests involve running your entire architecture—for example, your apps, your data stores, your load balancers—and validating that your system works as a whole. Usually, these tests are done from the end-user’s perspective, such as using Selenium to automate interacting with your product via a web browser. End-to-end tests typically use real systems everywhere, without any mocks, in an architecture that mirrors production (albeit with fewer/smaller servers to save money).
Each type of test serves a different purpose, and can catch different types of bugs, so you’ll likely want to use a mix of all three types. The purpose of unit tests is to have tests that run quickly so that you can get fast feedback on your changes and validate a variety of different permutations to build up confidence that the basic building blocks of your code (the individual units) work as expected. But just because individual units work correctly in isolation doesn’t mean that they will work correctly when combined, so you need integration tests to ensure the basic building blocks fit together correctly. And just because different parts of your system work correctly doesn’t mean they will work correctly when deployed in the real world, so you need end-to-end tests to validate that your code behaves as expected in conditions similar to production.
Let’s now go through how to write each type of test for Terraform code.
Unit Tests
To understand how to write unit tests for Terraform code, it’s helpful to first look at what it takes to write unit tests for a general-purpose programming language such as Ruby. Take a look again at the Ruby web server code:
classWebServer<WEBrick::HTTPServlet::AbstractServletdefdo_GET(request,response)caserequest.pathwhen"/"response.status=200response['Content-Type']='text/plain'response.body='Hello, World'when"/api"response.status=201response['Content-Type']='application/json'response.body='{"foo":"bar"}'elseresponse.status=404response['Content-Type']='text/plain'response.body='Not Found'endendend
Writing a unit test for this code is a little tricky because you would need to do the following:
-
Instantiate the
WebServerclass. This is more difficult than it sounds, since the constructor forWebServer, which extendsAbstractServlet, requires passing in a full WEBrickHTTPServerclass. You could create a mock of it, but that’s a lot of work. -
Create a
requestobject, which is of typeHTTPRequest. There’s no easy way to instantiate this class, and creating a mock of it is a fair amount of work. -
Create a
responseobject, which is of typeHTTPResponse. Again, there’s no easy way to instantiate this class, and creating a mock of it is a fair amount of work.
When you find it difficult to write unit tests, that’s often a code smell, and indicates that the code needs to be refactored.
One way to refactor this Ruby code to make unit testing easier is to extract the “handlers”—that is, the code that
handles the /, /api, and not found paths—into its own Handlers class:
classHandlersdefhandle(path)casepathwhen"/"[200,'text/plain','Hello, World']when"/api"[201,'application/json','{"foo":"bar"}']else[404,'text/plain','Not Found']endendend
There are two key properties to notice about this new Handlers class:
- Simple values as inputs
-
The
Handlersclass does not depend onHTTPServer,HTTPRequest, orHTTPResponse. Instead, all of its inputs are basic parameters, such as thepathof the URL, which is a string. - Simple values as outputs
-
Instead of setting values on a mutable
HTTPResponseobject (a side effect), the methods in theHandlersclass return the HTTP response as a simple value (an array that contains the HTTP status code, content type, and body).
Code that takes in simple values as inputs and returns simple values as outputs is typically easier to understand,
update, and test. Let’s first update the WebServer class to use the new Handlers class to respond to requests:
classWebServer<WEBrick::HTTPServlet::AbstractServletdefdo_GET(request,response)handlers=Handlers.newstatus_code,content_type,body=handlers.handle(request.path)response.status=status_coderesponse['Content-Type']=content_typeresponse.body=bodyendend
This code calls the handle method of the Handlers class and sends back the status code, content type, and body
returned by that method as an HTTP response. As you can see, using the Handlers class is clean and simple. This same
property will make testing easy, too. Here’s what a unit test for the / endpoint looks like:
classTestWebServer<Test::Unit::TestCasedefinitialize(test_method_name)super(test_method_name)@handlers=Handlers.newenddeftest_unit_hellostatus_code,content_type,body=@handlers.handle("/")assert_equal(200,status_code)assert_equal('text/plain',content_type)assert_equal('Hello, World',body)endend
The test code calls the same handle method of the Handlers class and uses several assert methods to validate the
response that comes back from the / endpoint. Here’s how you run the test:
$ ruby web-server-test.rb
Loaded suite web-server-test
Finished in 0.000287 seconds.
-------------------------------------------
1 tests, 3 assertions, 0 failures, 0 errors
100% passed
-------------------------------------------
Looks like the test passed. Let’s now add unit tests for the /api and 404 endpoints:
deftest_unit_apistatus_code,content_type,body=@handlers.handle("/api")assert_equal(201,status_code)assert_equal('application/json',content_type)assert_equal('{"foo":"bar"}',body)enddeftest_unit_404status_code,content_type,body=@handlers.handle("/invalid-path")assert_equal(404,status_code)assert_equal('text/plain',content_type)assert_equal('Not Found',body)end
Run the tests again:
$ ruby web-server-test.rb
Loaded suite web-server-test
Finished in 0.000572 seconds.
-------------------------------------------
3 tests, 9 assertions, 0 failures, 0 errors
100% passed
-------------------------------------------
In 0.0005272 seconds, you can now find out whether your web server code works as expected. That’s the power of unit
testing: a fast feedback loop that helps you build confidence in your code. If you make any mistake in your code—e.g.,
you unintentionally changed the response of the /api endpoint—you find out about that almost immediately:
$ ruby web-server-test.rb
Loaded suite web-server-test
============================================================================
Failure: test_unit_api(TestWebServer)
web-server-test.rb:25:in `test_unit_api'
     22:     status_code, content_type, body = Handlers.new.handle("/api")
     23:     assert_equal(201, status_code)
     24:     assert_equal('application/json', content_type)
  => 25:     assert_equal('{"foo":"bar"}', body)
     26:   end
     27:
     28:   def test_unit_404
<"{\"foo\":\"bar\"}"> expected but was
<"{\"foo\":\"whoops\"}">

diff:
? {"foo":"bar   "}
?         whoops
============================================================================

Finished in 0.007904 seconds.
-------------------------------------------
3 tests, 9 assertions, 1 failures, 0 errors
66.6667% passed
-------------------------------------------
Unit testing basics
What is the equivalent of this sort of unit testing with Terraform code? The first step is to identify what a “unit” is
in the Terraform world. The closest equivalent to a single function or class in Terraform is a single generic module
(using the term “generic module” as defined in “Composable Modules”), such as the alb module you created in
Chapter 6. How would you test this module?
With Ruby, to write unit tests, you needed to refactor the code so you could run it without complicated dependencies such
as HTTPServer, HTTPRequest, or HTTPResponse. If you think about what your Terraform code is doing—making API
calls to AWS to create the load balancer, listeners, target groups, and so on—you’ll realize that 99% of what this code is
doing is communicating with complicated dependencies! There’s no practical way to reduce the number of external dependencies to
zero, and even if you could, you’d effectively be left with no code to test.2
That brings us to key testing takeaway #3: you cannot do pure unit testing for Terraform code.
But don’t despair. You can still build confidence that your Terraform code behaves as expected by writing automated tests that use your code to deploy real infrastructure into a real environment (e.g., into a real AWS account). In other words, unit tests for Terraform are really integration tests. However, I prefer to still call them unit tests to emphasize that the goal is to test a single unit (i.e., a single generic module) to get feedback as quickly as possible.
This means that the basic strategy for writing unit tests for Terraform is:
-
Create a generic, standalone module.
-
Create an easy-to-deploy example for that module.
-
Run
terraform applyto deploy the example into a real environment. -
Validate that what you just deployed works as expected. This step is specific to the type of infrastructure you’re testing: for example, for an ALB, you’d validate it by sending an HTTP request and checking that you receive back the expected response.
-
Run
terraform destroyat the end of the test to clean up.
In other words, you do exactly the same steps as you would when doing manual testing, but you capture those steps as code. In fact, that’s a good mental model for creating automated tests for your Terraform code: ask yourself, “How would I have tested this manually to be confident it works?” and then implement that test in code.
You can use any programming language you want to write the test code. In this book, all of the tests are
written in the Go programming language to take advantage of an open source Go library called
Terratest, which supports testing a wide variety of infrastructure as
code tools (e.g., Terraform, Packer, Docker, Helm) across a wide variety of environments (e.g., AWS,
Google Cloud, Kubernetes). Terratest is a bit like a Swiss Army knife, with hundreds of tools built in that make
it significantly easier to test infrastructure code, including first-class support for the test strategy just described, where you terraform apply some code, validate that it works, and then run terraform destroy at the end to clean
up.
To use Terratest, you need to do the following:
-
Install Go: https://golang.org/doc/install.
-
Configure the
GOPATHenvironment variable: https://golang.org/doc/code.html#GOPATH. -
Add
$GOPATH/binto yourPATHenvironment variable. -
Install Dep, a dependency manager for Go: https://golang.github.io/dep/docs/installation.html. 3
-
Create a folder within your
GOPATHfor your test code: e.g., the defaultGOPATHis $HOME/go, so you could create $HOME/go/src/terraform-up-and-running. -
Run
dep initin the folder you just created. This should create Gopkg.toml, Gopkg.lock, and an empty vendors folder.
As a quick sanity check that your environment is set up correctly, create go_sanity_test.go in your new folder with the following contents:
packagetestimport("fmt""testing")funcTestGoIsWorking(t*testing.T){fmt.Println()fmt.Println("If you see this text, it's working!")fmt.Println()}
Run this test using the go test command and make sure you see the following output:
$ go test -v

If you see this text, it's working!

PASS
ok  	terraform-up-and-running	0.004s
(The -v flag means verbose, which ensures that the test always shows all log output).
If that’s working, feel free to delete go_sanity_test.go, and move on to writing a unit test for the alb
module. Create alb_example_test.go in your test folder with the following skeleton of a unit test:
packagetestimport("testing")funcTestAlbExample(t*testing.T){}
The first step is to direct Terratest to where your Terraform code resides by using the terraform.Options type:
packagetestimport("github.com/gruntwork-io/terratest/modules/terraform""testing")funcTestAlbExample(t*testing.T){opts:=&terraform.Options{// You should update this relative path to point at your alb// example directory!TerraformDir:"../examples/alb",}}
Note that to test the alb module, you actually test the example code in your examples folder (you should
update the relative path in TerraformDir to point to the folder where you created that example). This means that
example code now serves three roles: executable documentation; a way to run manual tests for your modules; and a way to run automated tests for your modules.
Also, note that there’s now a new import for the Terratest library at the top of the file. To download this dependency
to your computer, run dep ensure:
$ dep ensure
The dep ensure command will scan your Go code, find any new imports, automatically download them and all their
dependencies to the vendor folder, and add them to Gopkg.lock. If that’s a bit too magical for you, you can
alternatively use the dep ensure -add command to explicitly add the dependencies you want:
$ dep ensure -add github.com/gruntwork-io/terratest/modules/terraform
The next step in the automated test is to run terraform init and terraform apply to deploy the code. Terratest has
handy helpers for doing that:
funcTestAlbExample(t*testing.T){opts:=&terraform.Options{// You should update this relative path to point at your alb// example directory!TerraformDir:"../examples/alb",}terraform.Init(t,opts)terraform.Apply(t,opts)}
In fact, running init and apply is such a common operation with Terratest, that there is a convenient helper method
that does both in one command:
funcTestAlbExample(t*testing.T){opts:=&terraform.Options{// You should update this relative path to point at your alb// example directory!TerraformDir:"../examples/alb",}// Deploy the exampleterraform.InitAndApply(t,opts)}
The preceding code is already a fairly useful unit test, since it will run terraform init and terraform apply and fail
the test if those commands don’t complete successfully (e.g., due to a problem with your Terraform code). However, you
can go even further by making HTTP requests to the deployed load balancer and checking that it returns the data you
expect. To do that, you need a way to get the domain name of the deployed load balancer. Fortunately, that’s available
as an ouptut variable in the alb example:
output"alb_dns_name"{value=module.alb.alb_dns_namedescription="The domain name of the load balancer"}
Terratest has helpers built in to read outputs from your Terraform code:
funcTestAlbExample(t*testing.T){opts:=&terraform.Options{// You should update this relative path to point at your alb// example directory!TerraformDir:"../examples/alb",}// Deploy the exampleterraform.InitAndApply(t,opts)// Get the URL of the ALBalbDnsName:=terraform.OutputRequired(t,opts,"alb_dns_name")url:=fmt.Sprintf("http://%s",albDnsName)}
The OutputRequired function returns the output of the given name, or it fails the test if that output doesn’t exist
or is empty. The preceding code builds a URL from this output using the fmt.Sprintf function that’s built into Go (don’t
forget to import the fmt package). The next step is to make some HTTP requests to this URL:
packagetestimport("fmt""github.com/gruntwork-io/terratest/modules/http-helper""github.com/gruntwork-io/terratest/modules/terraform""testing")funcTestAlbExample(t*testing.T){opts:=&terraform.Options{// You should update this relative path to point at your alb// example directory!TerraformDir:"../examples/alb",}// Deploy the exampleterraform.InitAndApply(t,opts)// Get the URL of the ALBalbDnsName:=terraform.OutputRequired(t,opts,"alb_dns_name")url:=fmt.Sprintf("http://%s",albDnsName)// Test that the ALB's default action is working and returns a 404expectedStatus:=404expectedBody:="404: page not found"http_helper.HttpGetWithValidation(t,url,expectedStatus,expectedBody)}
This new code uses a new import from Terratest, the http_helper package, so you’ll need to run dep ensure one more
time to download it. The http_helper.HttpGetWithValidation method will make an HTTP GET request to the URL you pass
in and fail the test if the response doesn’t have the status code and body you specified.
There’s one problem with this code: there is a brief period of time between when terraform apply finishes and the DNS
name of the load balancer is working (i.e, has propagated). If you run http_helper.HttpGetWithValidation immediately,
there’s a chance that it will fail, even though 30 seconds or a minute later, the ALB would be working just fine. As
discussed in “Eventual Consistency Is Consistent…Eventually”, this sort of asynchronous and eventually consistent behavior is normal
in AWS—normal in most distributed systems, actually—and the solution is to add retries. Terratest has a helper for that, too:
funcTestAlbExample(t*testing.T){opts:=&terraform.Options{// You should update this relative path to point at your alb// example directory!TerraformDir:"../examples/alb",}// Deploy the exampleterraform.InitAndApply(t,opts)// Get the URL of the ALBalbDnsName:=terraform.OutputRequired(t,opts,"alb_dns_name")url:=fmt.Sprintf("http://%s",albDnsName)// Test that the ALB's default action is working and returns a 404expectedStatus:=404expectedBody:="404: page not found"maxRetries:=10timeBetweenRetries:=10*time.Secondhttp_helper.HttpGetWithRetry(t,url,expectedStatus,expectedBody,maxRetries,timeBetweenRetries,)}
The http_helper.HttpGetWithRetry method is nearly identical to http_helper.HttpGetWithValidation, except that if it
doesn’t get back the expected status code or body, it will retry up to the specified maximum number of retries (10), with
the specified amount of time between retries (10 seconds). If it eventually achieves the expected response, the test will
pass; if the maximum number of retries is reached without the expected response, the test will fail.
The last thing you need to do is to run terraform destroy at the end of the test to clean up. As you can guess, there
is a Terratest helper for this: terraform.Destroy. However, if you call terraform.Destroy at the very end of the
test, if any of the code before that causes a test failure (e.g., HttpGetWithRetry fails because the ALB is
misconfigured), the test code will exit before getting to terraform.Destroy, and the infrastructure deployed for
the test will never be cleaned up.
Therefore, you want to ensure that you always run terraform.Destroy, even if the test fails. In many programming
languages, this is done with a try / finally or try / ensure construct, but in Go, this is done by using the
defer statement, which will guarantee that the code you pass to it will be executed when the surrounding function
returns (no matter how that return happens):
funcTestAlbExample(t*testing.T){opts:=&terraform.Options{// You should update this relative path to point at your alb// example directory!TerraformDir:"../examples/alb",}// Clean up everything at the end of the testdeferterraform.Destroy(t,opts)// Deploy the exampleterraform.InitAndApply(t,opts)// Get the URL of the ALBalbDnsName:=terraform.OutputRequired(t,opts,"alb_dns_name")url:=fmt.Sprintf("http://%s",albDnsName)// Test that the ALB's default action is working and returns a 404expectedStatus:=404expectedBody:="404: page not found"maxRetries:=10timeBetweenRetries:=10*time.Secondhttp_helper.HttpGetWithRetry(t,url,expectedStatus,expectedBody,maxRetries,timeBetweenRetries,)}
Note that the defer is added early in the code, even before the call to terraform.InitAndApply, to ensure that nothing
can cause the test to fail before getting to the defer statement, and preventing it from queueing up the call to
terraform.Destroy.
OK, this unit test is finally ready to run. Because this test deploys infrastructure to AWS, before running the test, you need to authenticate to your AWS account as usual (see Authentication Options). You saw earlier in this chapter that you should do manual testing in a sandbox account; for automated testing, this is even more important, so I recommend authenticating to a totally separate account. As your automated test suite grows, you might be spinning up hundreds or thousands of resources in every test suite, so keeping them isolated from everything else is essential.
I typically recommend that teams have a completely separate environment (e.g., completely separate AWS account) just for automated testing—separate even from the sandbox environments you use for manual testing. That way, you can safely delete all resources that are more than a few hours old in the testing environment, based on the assumption that no test will run that long.
After you’ve authenticated to an AWS account that you can safely use for testing, you can run the test, as follows:
$ go test -v -timeout 30m

TestAlbExample 2019-05-26T13:29:32+01:00 command.go:53:
Running command terraform with args [init -upgrade=false]

(...)

TestAlbExample 2019-05-26T13:29:33+01:00 command.go:53:
Running command terraform with args [apply -input=false -lock=false]

(...)

TestAlbExample 2019-05-26T13:32:06+01:00 command.go:121:
Apply complete! Resources: 5 added, 0 changed, 0 destroyed.

(...)

TestAlbExample 2019-05-26T13:32:06+01:00 command.go:53:
Running command terraform with args [output -no-color alb_dns_name]

(...)

TestAlbExample 2019-05-26T13:38:32+01:00 http_helper.go:27:
Making an HTTP GET call to URL
http://terraform-up-and-running-1892693519.us-east-2.elb.amazonaws.com

(...)

TestAlbExample 2019-05-26T13:38:32+01:00 command.go:53:
Running command terraform with args
[destroy -auto-approve -input=false -lock=false]

(...)

TestAlbExample 2019-05-26T13:39:16+01:00 command.go:121:
Destroy complete! Resources: 5 destroyed.

(...)

PASS
ok  	terraform-up-and-running	229.492s
Note the use of the -timeout 30m argument with go test. By default, Go imposes a time limit of 10 minutes for
tests, after which it forcibly kills the test run, causing the tests to not only fail, but even preventing the cleanup
code (i.e., terraform destroy) from running. This ALB test should take closer to five minutes, but whenever running a Go
test that deploys real infrastructure, it’s safer to set an extra long timeout to avoid the test being killed part way
through and leaving all sorts of infrastructure still running.
The test will produce a lot of log output, but if you read through it carefully, you should be able to spot all of the key parts of the test:
-
Running
terraform init -
Running
terraform apply -
Reading output variables using
terraform output -
Repeatedly making HTTP requests to the ALB
-
Running
terraform destroy
It’s nowhere near as fast as the Ruby unit tests, but in less than five minutes, you can now automatically find out whether
your alb module works as expected. This is about as fast of a feedback loop as you can get with infrastructure in
AWS, and it should give you a lot of confidence that your code works as expected. If you make any mistake in your
code—e.g., you unintentionally changed the status code in the default action to a 401—you’ll find out about that fairly
quickly:
$ go test -v -timeout 30m

(...)

Validation failed for URL
http://terraform-up-and-running-931760451.us-east-2.elb.amazonaws.com.
Response status: 401. Response body: 404: page not found.

(...)

Sleeping for 10s and will try again.

(...)

Validation failed for URL
http://terraform-up-and-running-h2ezYz-931760451.us-east-2.elb.amazonaws.com.
Response status: 401. Response body: 404: page not found.

(...)

Sleeping for 10s and will try again.

(...)

--- FAIL: TestAlbExample (310.19s)
    http_helper.go:94:
    HTTP GET to URL
    http://terraform-up-and-running-931760451.us-east-2.elb.amazonaws.com
    unsuccessful after 10 retries

FAIL	terraform-up-and-running	310.204s
Dependency injection
Let’s now see what it would take to add a unit test for some slightly more complicated code. Going back to the Ruby
web server example once more, consider what would happen if you needed to add a new /web-service endpoint that made
HTTP calls to an external dependency:
classHandlersdefhandle(path)casepathwhen"/"[200,'text/plain','Hello, World']when"/api"[201,'application/json','{"foo":"bar"}']when"/web-service"# New endpoint that calls a web serviceuri=URI("http://www.example.org")response=Net::HTTP.get_response(uri)[response.code.to_i,response['Content-Type'],response.body]else[404,'text/plain','Not Found']endendend
The updated Handlers class now handles the /web-service URL by calling a new method call web_service, which makes
an HTTP GET to example.org and proxies the response. When you curl this endpoint, you get the following:
$ curl localhost:8000/web-service

<!doctype html>
<html>
<head>
    <title>Example Domain</title>
    <-- (...) -->
</head>
<body>
<div>
    <h1>Example Domain</h1>
    <p>
      This domain is established to be used for illustrative
      examples in documents. You may use this domain in
      examples without prior coordination or asking for permission.
    </p>
    <!-- (...) -->
</div>
</body>
</html>
How would you add a unit test for this new method? If you tried to test the code as-is, your unit tests would be
subject to the behavior of an external dependency (in this case, example.org). This has a number of downsides:
-
If that dependency has an outage, your tests will fail, even though there’s nothing wrong with your code.
-
If that dependency changed its behavior from time to time (e.g., returned a different response body), your tests would fail from time to time, and you’d need to constantly keep updating the test code, even though there’s nothing wrong with the implementation.
-
If that dependency were slow, your tests would be slow, which negates one of the main benefits of unit tests, the fast feedback loop.
-
If you wanted to test that your code handles various corner cases based on how that dependency behaves (e.g., does the code handle redirects?), you’d have no way to do it without control of that external dependency.
Although working with real dependencies might make sense for integration and end-to-end tests, with unit tests, you should try to minimize external dependencies as much as possible. The typical strategy for doing this is dependency injection, in which you make it possible to pass (or “inject”) external dependencies from outside your code, rather than hardcoding them within your code.
For example, the Handlers class shouldn’t need to deal with all of the details of how to call a web service. Instead,
you can extract that logic into a separate WebService class:
classWebServicedefinitialize(url)@uri=URI(url)enddefproxyresponse=Net::HTTP.get_response(@uri)[response.code.to_i,response['Content-Type'],response.body]endend
This class takes a URL as an input and exposes a proxy method to proxy the HTTP GET response from that URL. You can
then update the Handlers class to take a WebService Instance as an input and use that Instance in the web_service
method:
classHandlersdefinitialize(web_service)@web_service=web_serviceenddefhandle(path)casepathwhen"/"[200,'text/plain','Hello, World']when"/api"[201,'application/json','{"foo":"bar"}']when"/web-service"# New endpoint that calls a web service@web_service.proxyelse[404,'text/plain','Not Found']endendend
Now, in your implementation code, you can inject a real WebService Instance that makes HTTP calls to example.org:
classWebServer<WEBrick::HTTPServlet::AbstractServletdefdo_GET(request,response)web_service=WebService.new("http://www.example.org")handlers=Handlers.new(web_service)status_code,content_type,body=handlers.handle(request.path)response.status=status_coderesponse['Content-Type']=content_typeresponse.body=bodyendend
In your test code, you can create a mock version of the WebService class that allows you to specify a mock response
to return:
classMockWebServicedefinitialize(response)@response=responseenddefproxy@responseendend
And now you can create an Instance of this MockWebService class and inject it into the Handlers class in your
unit tests:
deftest_unit_web_serviceexpected_status=200expected_content_type='text/html'expected_body='mock example.org'mock_response=[expected_status,expected_content_type,expected_body]mock_web_service=MockWebService.new(mock_response)handlers=Handlers.new(mock_web_service)status_code,content_type,body=handlers.handle("/web-service")assert_equal(expected_status,status_code)assert_equal(expected_content_type,content_type)assert_equal(expected_body,body)end
Rerun the tests to make sure it all still works:
$ ruby web-server-test.rb
Loaded suite web-server-test
Started
...

Finished in 0.000645 seconds.
--------------------------------------------
4 tests, 12 assertions, 0 failures, 0 errors
100% passed
--------------------------------------------
Fantastic. Using dependency injection to minimize external dependencies allows you to write fast, reliable tests, and check all the various corner cases. And since the three test cases you added earlier are still passing, you can be confident that your refactoring hasn’t broken anything.
Let’s now turn our attention back to Terraform and see what dependency injection looks like with Terraform modules,
starting with the hello-world-app module. If you haven’t already, the first step is to create an easy-to-deploy
example for it in the examples folder:
provider"aws"{region="us-east-2"# Allow any 2.x version of the AWS providerversion="~> 2.0"}module"hello_world_app"{source="../../../modules/services/hello-world-app"server_text="Hello, World"environment="example"db_remote_state_bucket="(YOUR_BUCKET_NAME)"db_remote_state_key="examples/terraform.tfstate"instance_type="t2.micro"min_size=2max_size=2enable_autoscaling=false}
The dependency problem becomes apparent immediately: the hello-world-app assumes that you’ve already deployed the mysql
module and requires that you pass in the details of the S3 bucket where the mysql module is storing state using the
db_remote_state_bucket and db_remote_state_key arguments. The goal here is to create a unit test for the
hello-world-app module, and although a pure unit test with 0 external dependencies isn’t possible with Terraform, it’s
still a good idea to minimize external dependencies whenever possible.
One of the first steps with minimizing dependencies is to make it clearer what dependencies your module has. A file-naming convention you might want to adopt is to move all of the data sources and resources that represent external dependencies into a separate dependencies.tf file. For example, here’s what modules/services/hello-world-app/dependencies.tf would look like:
data"terraform_remote_state" "db"{backend="s3"config={bucket=var.db_remote_state_bucketkey=var.db_remote_state_keyregion="us-east-2"}}data"aws_vpc" "default"{default=true}data"aws_subnet_ids" "default"{vpc_id=data.aws_vpc.default.id}
This convention makes it easier for users of your code to know, at a glance, what this code depends on in the outside
world. In the case of the hello-world-app module, you can quickly see that it depends on a database, VPC, and subnets.
So, how can you inject these dependencies from outside the module so that you can replace them at test time? You already
know the answer to this: input variables.
For each of these dependencies, you should add a new input variable in modules/services/hello-world-app/variables.tf:
variable"vpc_id"{description="The ID of the VPC to deploy into"type=stringdefault=null}variable"subnet_ids"{description="The IDs of the subnets to deploy into"type=list(string)default=null}variable"mysql_config"{description="The config for the MySQL DB"type=object({address=stringport=number})default=null}
There’s now an input variable for the VPC ID, subnet IDs, and MySQL config. Each variable specifies a default, so
they are optional variables that the user can set to something custom or omit to get the default value. The
default for each variable is using a value you haven’t seen before: null. If you set the default value to
an empty value, such as an empty string for vpc_id or an empty list for subnet_ids, you wouldn’t be able to distinguish between (a) an empty value you set as a default versus (b) if the user of your module intentionally passed
in an empty value they wanted to use. The null value is handy in these cases, because it is used specifically to indicate
that a variable is unset and that the user wants to fall back to the default behavior.
Note that the mysql_config variable uses the object type constructor to create a nested type with address and
port keys. This type is intentionally designed to match the output types of the mysql module:
output"address"{value=aws_db_instance.example.addressdescription="Connect to the database at this endpoint"}output"port"{value=aws_db_instance.example.portdescription="The port the database is listening on"}
One of the advantages of doing this is that, as soon as the refactor is complete, one of the ways you’ll be able to use the
hello-world-app and mysql modules together is as follows:
module"hello_world_app"{source="../../../modules/services/hello-world-app"server_text="Hello, World"environment="example"# Pass all the outputs from the mysql module straight through!mysql_config=module.mysqlinstance_type="t2.micro"min_size=2max_size=2enable_autoscaling=false}module"mysql"{source="../../../modules/data-stores/mysql"db_name=var.db_namedb_username=var.db_usernamedb_password=var.db_password}
Because the type of mysql_config matches the type of the mysql module outputs, you can pass them all straight
through in one line. And if the types are ever changed and no longer match, Terraform will give you an error right
away so that you know to update them. This is not only function composition at work, but type-safe function composition.
But before that can work, you’ll need to finish refactoring the code. Because the MySQL configuration can be passed in as
an input, this means that the db_remote_state_bucket and db_remote_state_key variables should now be optional, so set
their default values to null:
variable"db_remote_state_bucket"{description="The name of the S3 bucket for the DB's Terraform state"type=stringdefault=null}variable"db_remote_state_key"{description="The path in the S3 bucket for the DB's Terraform state"type=stringdefault=null}
Next, use the count parameter to optionally create the three data sources in
modules/services/hello-world-app/dependencies.tf based on whether the corresponding input variable is set to null:
data"terraform_remote_state" "db"{count=var.mysql_config==null?1:0backend="s3"config={bucket=var.db_remote_state_bucketkey=var.db_remote_state_keyregion="us-east-2"}}data"aws_vpc" "default"{count=var.vpc_id==null?1:0default=true}data"aws_subnet_ids" "default"{count=var.subnet_ids==null?1:0vpc_id=data.aws_vpc.default.id}
Now you need to update any references to these data sources to conditionally use either the input variable or the data source. Let’s capture these as local values:
locals{mysql_config=(var.mysql_config==null?data.terraform_remote_state.db[0].outputs:var.mysql_config)vpc_id=(var.vpc_id==null?data.aws_vpc.default[0].id:var.vpc_id)subnet_ids=(var.subnet_ids==null?data.aws_subnet_ids.default[0].ids:var.subnet_ids)}
Note that because the data sources use the count parameters, they are now arrays, so any time you reference them, you
need to use array lookup syntax (i.e., [0]). Go through the code, and anywhere you find a reference to one of these
data sources, replace it with a reference to the corresponding local value, instead. Start by updating the
aws_subnet_ids data source to use local.vpc_id:
data"aws_subnet_ids" "default"{count=var.subnet_ids==null?1:0vpc_id=local.vpc_id}
Then, set the subnet_ids parameters of the asg and alb modules to use the local.subnet_ids:
module"asg"{source="../../cluster/asg-rolling-deploy"cluster_name="hello-world-${var.environment}"ami=var.amiuser_data=data.template_file.user_data.renderedinstance_type=var.instance_typemin_size=var.min_sizemax_size=var.max_sizeenable_autoscaling=var.enable_autoscalingsubnet_ids=local.subnet_idstarget_group_arns=[aws_lb_target_group.asg.arn]health_check_type="ELB"custom_tags=var.custom_tags}module"alb"{source="../../networking/alb"alb_name="hello-world-${var.environment}"subnet_ids=local.subnet_ids}
Update the db_address and db_port variables in user_data to use local.mysql_config:
data"template_file" "user_data"{template=file("${path.module}/user-data.sh")vars={server_port=var.server_portdb_address=local.mysql_config.addressdb_port=local.mysql_config.portserver_text=var.server_text}}
Finally, update the vpc_id parameter of the aws_lb_target_group to use local.vpc_id:
resource"aws_lb_target_group" "asg"{name="hello-world-${var.environment}"port=var.server_portprotocol="HTTP"vpc_id=local.vpc_idhealth_check{path="/"protocol="HTTP"matcher="200"interval=15timeout=3healthy_threshold=2unhealthy_threshold=2}}
With these updates, you can now choose to inject the VPC ID, subnet IDs, and/or MySQL config parameters into the
hello-world-app module, or omit any of those parameters, and the module will use an appropriate data source to fetch
those values by itself. Let’s update the “Hello, World” app example to allow the MySQL config to be injected, but omit
the VPC ID and subnet ID parameters because using the default VPC is good enough for testing. Add a new input variable to
examples/hello-world-app/variables.tf:
variable"mysql_config"{description="The config for the MySQL DB"type=object({address=stringport=number})default={address="mock-mysql-address"port=12345}}
Pass this variable through to the hello-world-app module in examples/hello-world-app/main.tf:
module"hello_world_app"{source="../../../modules/services/hello-world-app"server_text="Hello, World"environment="example"mysql_config=var.mysql_configinstance_type="t2.micro"min_size=2max_size=2enable_autoscaling=false}
You can now set this mysql_config variable in a unit test to any value you want. Create a unit test in
test/hello_world_app_example_test.go with the following contents:
funcTestHelloWorldAppExample(t*testing.T){opts:=&terraform.Options{// You should update this relative path to point at your// hello-world-app example directory!TerraformDir:"../examples/hello-world-app/standalone",}// Clean up everything at the end of the testdeferterraform.Destroy(t,opts)terraform.InitAndApply(t,opts)albDnsName:=terraform.OutputRequired(t,opts,"alb_dns_name")url:=fmt.Sprintf("http://%s",albDnsName)expectedStatus:=200expectedBody:="Hello, World"maxRetries:=10timeBetweenRetries:=10*time.Secondhttp_helper.HttpGetWithRetry(t,url,expectedStatus,expectedBody,maxRetries,timeBetweenRetries,)}
This code is nearly identical to the unit test for the alb example. The only difference is that the TerraformDir setting
is pointing to the hello-world-app example (be sure to update the path as necessary for your filesystem) and the
expected response from the ALB is a 200 OK with the body “Hello, World.” There’s just one new thing you’ll need to add
to this test—set the mysql_config variable:
opts:=&terraform.Options{// You should update this relative path to point at your// hello-world-app example directory!TerraformDir:"../examples/hello-world-app/standalone",Vars:map[string]interface{}{"mysql_config":map[string]interface{}{"address":"mock-value-for-test","port":3306,},},}
The Vars parameter in terraform.Options allows you to set variables in your Terraform code. This code is passing in
some mock data for the mysql_config variable. Alternatively, you could set this value to anything you want: for
example, you could fire up a small, in-memory database at test time and set the address to that database’s IP.
Run this new test using go test, specifying the -run argument to run just this test (otherwise, Go’s default
behavior is to run all tests in the current folder, including the ALB example test you created earlier):
$ go test -v -timeout 30m -run TestHelloWorldAppExample

(...)

PASS
ok  	terraform-up-and-running	204.113s
If all goes well, the test will run terraform apply; make repeated HTTP requests to the load balancer; and as soon as it
gets back the expected response, will run terraform destroy to clean everything up. All told, it should take only a
few minutes, and you now have a reasonable unit test for the “Hello, World” app.
Running tests in parallel
In the previous section, you ran just a single test using the -run argument of the go test command. If you had
omitted that argument, Go would’ve run all of your tests—sequentially. Although four to five minutes to run a single test isn’t too
bad for testing infrastructure code, if you have dozens of tests, and each one runs sequentially, it could take hours to
run your entire test suite. To shorten the feedback loop, you want to run as many tests in parallel as you can.
To instruct Go to run your tests in parallel, the only change you need to make is to add t.Parallel() to the top of each
test. Here it is in test/hello_world_app_example_test.go:
funcTestHelloWorldAppExample(t*testing.T){t.Parallel()opts:=&terraform.Options{// You should update this relative path to point at your// hello-world-app example directory!TerraformDir:"../examples/hello-world-app/standalone",Vars:map[string]interface{}{"mysql_config":map[string]interface{}{"address":"mock-value-for-test","port":3306,},},}// (...)}
And similarly in test/alb_example_test.go:
funcTestAlbExample(t*testing.T){t.Parallel()opts:=&terraform.Options{// You should update this relative path to point at your alb// example directory!TerraformDir:"../examples/alb",}// (...)}
If you run go test now, both of those tests will execute in parallel. However, there’s one gotcha: some of the
resources created by those tests—for example, the ASG, security group, and ALB—use the same name, which will cause the
tests to fail due to the name clashes. Even if you weren’t using t.Parallel() in your tests, if multiple people on
your team were running the same tests or if you had tests running in a CI environment, these sorts of name clashes would
be inevitable.
This leads to key testing takeaway #4: you must namespace all of your resources.
That is, design modules and examples so that the name of every resource is (optionally) configurable. With the alb
example, this means that you need to make the name of the ALB configurable. Add a new input variable in
examples/alb/variables.tf with a reasonable default:
variable"alb_name"{description="The name of the ALB and all its resources"type=stringdefault="terraform-up-and-running"}
Next, pass this value through to the alb module in examples/alb/main.tf:
module"alb"{source="../../modules/networking/alb"alb_name=var.alb_namesubnet_ids=data.aws_subnet_ids.default.ids}
Now, set this variable to a unique value in test/alb_example_test.go:
packagetestimport("fmt""github.com/gruntwork-io/terratest/modules/http-helper""github.com/gruntwork-io/terratest/modules/random""github.com/gruntwork-io/terratest/modules/terraform""testing""time")funcTestAlbExample(t*testing.T){t.Parallel()opts:=&terraform.Options{// You should update this relative path to point at your alb// example directory!TerraformDir:"../examples/alb",Vars:map[string]interface{}{"alb_name":fmt.Sprintf("test-%s",random.UniqueId()),},}// (...)}
(Note the use of a new helper from the Terratest random package; you’ll need to run dep ensure once more.)
This code sets the alb_name var to test-<RANDOM_ID>, where RANDOM_ID is a random unique ID returned by the
random.UniqueId() helper in Terratest. This helper returns a randomized, six-character base-62 string. The idea
is that it’s a short identifier you can add to the names of most resources without hitting length-limit issues, but
random enough to make conflicts very unlikely ( = 56+ billion combinations). This ensures that you can run a huge
number of ALB tests in parallel with no concern of having a name conflict.
Make a similar change to the “Hello, World” app example, first by adding a new input variable in examples/hello-world-app/variables.tf:
variable"environment"{description="The name of the environment we're deploying to"type=stringdefault="example"}
Then by passing that variable through to the hello-world-app module:
module"hello_world_app"{source="../../../modules/services/hello-world-app"server_text="Hello, World"environment=var.environmentmysql_config=var.mysql_configinstance_type="t2.micro"min_size=2max_size=2enable_autoscaling=false}
Finally, setting environment to a value that includes random.UniqueId() in
test/hello_world_app_example_test.go:
funcTestHelloWorldAppExample(t*testing.T){t.Parallel()opts:=&terraform.Options{// You should update this relative path to point at your// hello-world-app example directory!TerraformDir:"../examples/hello-world-app/standalone",Vars:map[string]interface{}{"mysql_config":map[string]interface{}{"address":"mock-value-for-test","port":3306,},"environment":fmt.Sprintf("test-%s",random.UniqueId()),},}// (...)}
With these changes complete, it should now be safe to run all your tests in parallel:
$ go test -v -timeout 30m

TestAlbExample 2019-05-26T17:57:21+01:00 (...)
TestHelloWorldAppExample 2019-05-26T17:57:21+01:00 (...)
TestAlbExample 2019-05-26T17:57:21+01:00 (...)
TestHelloWorldAppExample 2019-05-26T17:57:21+01:00 (...)
TestHelloWorldAppExample 2019-05-26T17:57:21+01:00 (...)

(...)

PASS
ok  	terraform-up-and-running	216.090s
You should see both tests running at the same time so that the entire test suite takes roughly as long as the slowest of the tests, rather than the combined time of all the tests running back to back.
Running Tests in Parallel in the Same Folder
One other type of parallelism to take into account is what happens if you try to run multiple automated tests in
parallel against the same Terraform folder. For example, perhaps you’d want to run several different tests against
examples/hello-world-app, where each test sets different values for the input variables before running
terraform apply. If you try this, you’ll hit a problem: the tests will end up clashing because they all try to run
terraform init and end up overwriting one another’s .terraform folder and Terraform state files.
If you want to run multiple tests against the same folder in parallel, the easiest solution is to have each test copy
that folder to a unique temporary folder, and run Terraform in the temporary folder to avoid conflicts. Terratest, of
course, has a built-in helper to do this for you, and it even does it in a way that ensures relative file paths within
those Terraform modules work correctly: check out the test_structure.CopyTerraformFolderToTemp method and its
documentation for details.
Integration Tests
Now that you’ve got some unit tests in place, let’s move on to integration tests. Again, it’s helpful to start with the Ruby web server example to build up some intuition that you can later apply to the Terraform code. To do an integration test of the Ruby web server code, you need to do the following:
-
Run the web server on localhost so that it listens on a port.
-
Send HTTP requests to the web server.
-
Validate you get back the responses you expect.
Let’s create a helper method in web-server-test.rb that implements these steps:
defdo_integration_test(path,check_response)port=8000server=WEBrick::HTTPServer.new:Port=>portserver.mount'/',WebServerbegin# Start the web server in a separate thread so it# doesn't block the testthread=Thread.newdoserver.startend# Make an HTTP request to the web server at the# specified pathuri=URI("http://localhost:#{port}#{path}")response=Net::HTTP.get_response(uri)# Use the specified check_response lambda to validate# the responsecheck_response.call(response)ensure# Shut the server and thread down at the end of the# testserver.shutdownthread.joinendend
The do_integration_test method configures the web server on port 8000, starts it in a background thread (so the web
server doesn’t block the test from running), sends an HTTP GET to the path specified, passes the HTTP response to
the specified check_response function for validation, and at the end of the test, shuts down the web server. Here’s
how you can use this method to write an integration test for the / endpoint of the web server:
deftest_integration_hellodo_integration_test('/',lambda{|response|assert_equal(200,response.code.to_i)assert_equal('text/plain',response['Content-Type'])assert_equal('Hello, World',response.body)})end
This method calls the do_integration_test method with the / path and passes it a lambda (essentially, an inline
function) that checks the response was a 200 OK with the body “Hello, World.” The integration
tests for the other endpoints are analogous, although the tests for the /web-service endpoint do a less-specific
check (i.e., assert_include rather than assert_equal) to try to minimize possible disruption from the example.org
endpoint changing:
deftest_integration_apido_integration_test('/api',lambda{|response|assert_equal(201,response.code.to_i)assert_equal('application/json',response['Content-Type'])assert_equal('{"foo":"bar"}',response.body)})enddeftest_integration_404do_integration_test('/invalid-path',lambda{|response|assert_equal(404,response.code.to_i)assert_equal('text/plain',response['Content-Type'])assert_equal('Not Found',response.body)})enddeftest_integration_web_servicedo_integration_test('/web-service',lambda{|response|assert_equal(200,response.code.to_i)assert_include(response['Content-Type'],'text/html')assert_include(response.body,'Example Domain')})end
Let’s run all of the tests:
$ ruby web-server-test.rb

(...)

Finished in 0.221561 seconds.
--------------------------------------------
8 tests, 24 assertions, 0 failures, 0 errors
100% passed
--------------------------------------------
Note that before, with solely unit tests, the test suite took 0.000572 seconds to run, but now, with integration tests, it takes 0.221561 seconds, a slowdown of roughly 387 times. Of course, 0.221561 seconds is still blazing fast, but that’s only because the Ruby web server code is intentionally a minimal example that doesn’t do much. The important thing here is not the absolute numbers, but the relative trend: integration tests are typically slower than unit tests. I’ll come back to this point later.
Let’s now turn our attention to integration tests for Terraform code. If a “unit” in Terraform is a single module, an integration test that validates how several units work together would need to deploy several modules and see that they work correctly. In the previous section, you deployed the “Hello, World” app example with mock data instead of a real MySQL DB. For an integration test, let’s deploy the MySQL module for real and make sure the “Hello, World” app integrates with it correctly. You should already have just such code under live/stage/data-stores/mysql and live/stage/services/hello-world-app. That is, you can create an integration test for (parts of) your staging environment.
Of course, as mentioned earlier in the chapter, all automated tests should run in an isolated AWS account. So while
you’re testing the code that is meant for staging, you should authenticate to an isolated testing account and run the
tests there. If your modules have anything in them hardcoded for the staging environment, this is the time to make
those values configurable so you can inject test-friendly values. In particular, in
live/stage/data-stores/mysql/variables.tf, expose the database name via a new db_name input variable:
variable"db_name"{description="The name to use for the database"type=stringdefault="example_database_stage"}
Pass that value through to the mysql module in live/stage/data-stores/mysql/main.tf:
module"mysql"{source="../../../../modules/data-stores/mysql"db_name=var.db_namedb_username=var.db_usernamedb_password=var.db_password}
Let’s now create the skeleton of the integration test in test/hello_world_integration_test.go and fill in the implementation details later:
// Replace these with the proper paths to your modulesconstdbDirStage="../live/stage/data-stores/mysql"constappDirStage="../live/stage/services/hello-world-app"funcTestHelloWorldAppStage(t*testing.T){t.Parallel()// Deploy the MySQL DBdbOpts:=createDbOpts(t,dbDirStage)deferterraform.Destroy(t,dbOpts)terraform.InitAndApply(t,dbOpts)// Deploy the hello-world-apphelloOpts:=createHelloOpts(dbOpts,appDirStage)deferterraform.Destroy(t,helloOpts)terraform.InitAndApply(t,helloOpts)// Validate the hello-world-app worksvalidateHelloApp(t,helloOpts)}
The test is structured as follows: deploy mysql, deploy the hello-world-app, validate the app, undeploy the
hello-world-app (runs at the end due to defer), and finally, undeploy mysql (runs at the end due to defer).
The createDbOpts, createHelloOpts, and validateHelloApp methods don’t exist yet, so let’s implement them one at a
time, starting with the createDbOpts method:
funccreateDbOpts(t*testing.T,terraformDirstring)*terraform.Options{uniqueId:=random.UniqueId()return&terraform.Options{TerraformDir:terraformDir,Vars:map[string]interface{}{"db_name":fmt.Sprintf("test%s",uniqueId),"db_password":"password",},}}
Not much new so far: the code points terraform.Options at the passed-in directory and sets the db_name and
db_password variables.
The next step is to deal with where this mysql module will store its state. Up to now, the backend configuration
has been set to hardcoded values:
terraform{backend"s3"{# Replace this with your bucket name!bucket="terraform-up-and-running-state"key="stage/data-stores/mysql/terraform.tfstate"region="us-east-2"# Replace this with your DynamoDB table name!dynamodb_table="terraform-up-and-running-locks"encrypt=true}}
These hardcoded values are a big problem for testing, because if you don’t change them, you’ll end up overwriting the real
state file for staging! One option is to use Terraform workspaces (as discussed in “Isolation via Workspaces”),
but that would still require access to the S3 bucket in the staging account, whereas you should be running tests in a
totally separate AWS account. The better option is to use partial configuration, as introduced in
“Limitations with Terraform’s Backends”. Move the entire backend configuration into an external file, such as backend.hcl:
bucket="terraform-up-and-running-state"key="stage/data-stores/mysql/terraform.tfstate"region="us-east-2"dynamodb_table="terraform-up-and-running-locks"encrypt=true
leaving the backend configuration in live/stage/data-stores/mysql/main.tf empty:
terraform{backend"s3"{}}
When you’re deploying the mysql module to the real staging environment, you tell Terraform to use the backend
configuration in backend.hcl via the -backend-config argument:
$ terraform init -backend-config=backend.hcl
When you’re running tests on the mysql module, you can tell Terratest to pass in test-time-friendly values using the
BackendConfig parameter of terraform.Options:
funccreateDbOpts(t*testing.T,terraformDirstring)*terraform.Options{uniqueId:=random.UniqueId()bucketForTesting:="YOUR_S3_BUCKET_FOR_TESTING"bucketRegionForTesting:="YOUR_S3_BUCKET_FOR_TESTING"dbStateKey:=fmt.Sprintf("%s/%s/terraform.tfstate",t.Name(),uniqueId)return&terraform.Options{TerraformDir:terraformDir,Vars:map[string]interface{}{"db_name":fmt.Sprintf("test%s",uniqueId),"db_password":"password",},BackendConfig:map[string]interface{}{"bucket":bucketForTesting,"region":bucketRegionForTesting,"key":dbStateKey,"encrypt":true,},}}
You’ll need to update the bucketForTesting and bucketRegionForTesting variables with your own values. You can
create a single S3 bucket in your test AWS account to use as a backend, as the key configuration (the path within
the bucket) includes the uniqueId, which should be unique enough to have a different value for each test.
The next step is to make some updates to the hello-world-app module in the staging environment. Open
live/stage/services/hello-world-app/variables.tf and expose variables for db_remote_state_bucket,
db_remote_state_key and environment:
variable"db_remote_state_bucket"{description="The name of the S3 bucket for the database's remote state"type=string}variable"db_remote_state_key"{description="The path for the database's remote state in S3"type=string}variable"environment"{description="The name of the environment we're deploying to"type=stringdefault="stage"}
Pass those values through to the hello-world-app module in live/stage/services/hello-world-app/main.tf:
module"hello_world_app"{source="../../../../modules/services/hello-world-app"server_text="Hello, World"environment=var.environmentdb_remote_state_bucket=var.db_remote_state_bucketdb_remote_state_key=var.db_remote_state_keyinstance_type="t2.micro"min_size=2max_size=2enable_autoscaling=false}
Now you can implement the createHelloOpts method:
funccreateHelloOpts(dbOpts*terraform.Options,terraformDirstring)*terraform.Options{return&terraform.Options{TerraformDir:terraformDir,Vars:map[string]interface{}{"db_remote_state_bucket":dbOpts.BackendConfig["bucket"],"db_remote_state_key":dbOpts.BackendConfig["key"],"environment":dbOpts.Vars["db_name"],},}}
Note that db_remote_state_bucket and db_remote_state_key are set to the values used in the BackendConfig for
the mysql module to ensure that the hello-world-app module is reading from the exact same state to which the mysql
module just wrote. The environment variable is set to the db_name just so all the resources are namespaced the
same way.
Finally, you can implement the validateHelloApp method:
funcvalidateHelloApp(t*testing.T,helloOpts*terraform.Options){albDnsName:=terraform.OutputRequired(t,helloOpts,"alb_dns_name")url:=fmt.Sprintf("http://%s",albDnsName)maxRetries:=10timeBetweenRetries:=10*time.Secondhttp_helper.HttpGetWithRetryWithCustomValidation(t,url,maxRetries,timeBetweenRetries,func(statusint,bodystring)bool{returnstatus==200&&strings.Contains(body,"Hello, World")},)}
This method uses the http_helper package, just as with the unit tests, except this time, it’s with the
http_helper.HttpGetWithRetryWithCustomValidation method that allows you to specify custom validation rules for the
HTTP response status code and body. This is necessary to check that the HTTP response contains the string
“Hello, World”, rather than equals that string exactly, as the User Data script in the hello-world-app module returns
an HTML response with other text in it as well.
Alright, run the integration test to see whether it worked:
$ go test -v -timeout 30m -v "TestHelloWorldAppStage"

(...)

PASS
ok  	terraform-up-and-running	795.63s
Excellent, you now have an integration test that you can use to check that several of your modules work correctly together. This integration test is more complicated than the unit test, and it takes more than twice as long (10–15 minutes rather than 4–5 minutes). In general, there’s not much that you can do to make things faster—the bottleneck here is how long AWS takes to deploy and undeploy RDS, ASGs, ALBs, etc.—but in certain circumstances, you might be able to make the test code do less using test stages.
Test stages
If you look at the code for your integration test, you may notice that it consists of five distinct “stages”:
-
Run
terraform applyon themysqlmodule. -
Run
terraform applyon thehello-world-appmodule. -
Run validations to make sure everything is working.
-
Run
terraform destroyon thehello-world-appmodule. -
Run
terraform destroyon themysqlmodule.
When you run these tests in a CI environment, you’ll want to run all of the stages, from start to finish. However, if
you’re running these tests in your local Dev environment while iteratively making changes to the code, running all of
these stages is unnecessary. For example, if you’re making changes only to the hello-world-app module, re-running
this entire test after every change means you’re paying the price of deploying and undeploying the mysql module, even
though none of your changes affect it. That adds 5 to 10 minutes of pure overhead to every test run.
Ideally, the workflow would look more like this:
-
Run
terraform applyon themysqlmodule. -
Run
terraform applyon thehello-world-appmodule. -
Now, you start doing iterative development:
-
Make a change to the
hello-world-appmodule. -
Rerun
terraform applyon thehello-world-appmodule to deploy your updates. -
Run validations to make sure everything is working.
-
If everything works, move on to the next step. If not, go back to step (3a).
-
-
Run
terraform destroyon thehello-world-appmodule. -
Run
terraform destroyon themysqlmodule.
Having the ability to quickly do that inner loop in step 3 is the key to fast, iterative development with Terraform. To support this, you need to break your test code into stages, in which you can choose the stages to execute and those that you can skip.
Terratest supports this natively with the test_structure package (remember to run dep ensure to add it). The idea
is that you wrap each stage of your test in a function with a name, and you can then direct Terratest to skip some of
those names by setting environment variables. Each test stage stores test data on disk so that it can be read back from
disk on subsequent test runs. Let’s try this out on test/hello_world_integration_test.go, writing the skeleton of the
test first and then filling in the underlying methods later:
funcTestHelloWorldAppStageWithStages(t*testing.T){t.Parallel()// Store the function in a short variable name solely to make the// code examples fit better in the book.stage:=test_structure.RunTestStage// Deploy the MySQL DBdeferstage(t,"teardown_db",func(){teardownDb(t,dbDirStage)})stage(t,"deploy_db",func(){deployDb(t,dbDirStage)})// Deploy the hello-world-appdeferstage(t,"teardown_app",func(){teardownApp(t,appDirStage)})stage(t,"deploy_app",func(){deployApp(t,dbDirStage,appDirStage)})// Validate the hello-world-app worksstage(t,"validate_app",func(){validateApp(t,appDirStage)})}
The structure is the same as before—deploy mysql, deploy hello-world-app, validate hello-world-app, undeploy
hello-world-app (runs at the end due to defer), undeploy mysql (runs at the end due to defer)—except now, each
stage is wrapped in test_structure.RunTestStage. The RunTestStage method takes three arguments:
- t
-
The first argument is the
tvalue that Go passes as an argument to every automated test. You can use this value to manage test state. For example, you can fail the test by callingt.Fail(). - Stage name
-
The second argument allows you to specify the name for this test stage. You’ll see an example shortly of how to use this name to skip test stages.
- The code to execute
-
The third argument is the code to execute for this test stage. This can be any function.
Let’s now implement the functions for each test stage, starting with deployDb:
funcdeployDb(t*testing.T,dbDirstring){dbOpts:=createDbOpts(t,dbDir)// Save data to disk so that other test stages executed at a later// time can read the data back intest_structure.SaveTerraformOptions(t,dbDir,dbOpts)terraform.InitAndApply(t,dbOpts)}
Just as before, to deploy mysql, the code calls createDbOpts and terraform.InitAndApply. The only new thing is
that, in between those two steps, there is a call to test_structure.SaveTerraformOptions. This writes the data in
dbOpts to disk so that other test stages can read it later on. For example, here’s the implementation of the
teardownDb function:
functeardownDb(t*testing.T,dbDirstring){dbOpts:=test_structure.LoadTerraformOptions(t,dbDir)deferterraform.Destroy(t,dbOpts)}
This function uses test_structure.LoadTerraformOptions to load the dbOps data from disk that was earlier saved by
the deployDb function. The reason you need to pass this data via the hard drive rather than passing it in memory is
that you can run each test stage as part of different test run—and therefore, as part of a different process. As you’ll
see a little later in this chapter, on the first few runs of go test, you might want to run deployDb but skip
teardownDb, and then in later runs do the opposite, running teardownDb but skipping deployDb. To ensure that you’re
using the same database across all those test runs, you must store that database’s information on disk.
Let’s now implement the deployHelloApp function:
funcdeployApp(t*testing.T,dbDirstring,helloAppDirstring){dbOpts:=test_structure.LoadTerraformOptions(t,dbDir)helloOpts:=createHelloOpts(dbOpts,helloAppDir)// Save data to disk so that other test stages executed at a later// time can read the data back intest_structure.SaveTerraformOptions(t,helloAppDir,helloOpts)terraform.InitAndApply(t,helloOpts)}
This function reuses the createHelloOpts function from before, and calls terraform.InitAndApply on it. Again,
the only new behavior is the use of test_structure.LoadTerraformOptions to load dbOpts from disk, and the use of
test_structure.SaveTerraformOptions to save helloOpts to disk. At this point, you can probably guess what the
implementation of the teardownApp method looks like:
functeardownApp(t*testing.T,helloAppDirstring){helloOpts:=test_structure.LoadTerraformOptions(t,helloAppDir)deferterraform.Destroy(t,helloOpts)}
And the implementation of the validateApp method:
funcvalidateApp(t*testing.T,helloAppDirstring){helloOpts:=test_structure.LoadTerraformOptions(t,helloAppDir)validateHelloApp(t,helloOpts)}
So, overall, the test code is identical to the original integration test, except each stage is wrapped in a call to
test_structure.RunTestStage, and you need to do a little work to save and load data to and from disk. These simple
changes unlock an important ability: you can instruct Terratest to skip any test stage called foo by setting the
environment variable SKIP_foo=true. Let’s go through a typical coding workflow to see how this works.
Your first step will be to run the test, but to skip both of the teardown stages, so that the mysql and
hello-world-app modules stay deployed at the end of the test. Because the teardown stages are called teardown_db and
teardown_app, you need to set the SKIP_teardown_db and SKIP_teardown_app environment
variables, respectively, to direct Terratest to skip those two stages:
$ SKIP_teardown_db=true \
  SKIP_teardown_app=true \
  go test -timeout 30m -run 'TestHelloWorldAppStageWithStages'

(...)

The 'SKIP_deploy_db' environment variable is not set,
so executing stage 'deploy_db'.

(...)

The 'deploy_app' environment variable is not set,
so executing stage 'deploy_db'.

(...)

The 'validate_app' environment variable is not set,
so executing stage 'deploy_db'.

(...)

The 'teardown_app' environment variable is set,
so skipping stage 'deploy_db'.

(...)

The 'teardown_db' environment variable is set,
so skipping stage 'deploy_db'.

(...)

PASS
ok  	terraform-up-and-running	423.650s
Now you can start iterating on the hello-world-app module, and each time you make a change, you can rerun the
tests, but this time, direct them to skip not only the teardown stages, but also the mysql module deploy stage (because
mysql is still running), so that the only things that execute are terraform apply and the validations for the
hello-world-app module:
$ SKIP_teardown_db=true \
  SKIP_teardown_app=true \
  SKIP_deploy_db=true \
  go test -timeout 30m -run 'TestHelloWorldAppStageWithStages'

(...)

The 'SKIP_deploy_db' environment variable is set,
so skipping stage 'deploy_db'.

(...)

The 'deploy_app' environment variable is not set,
so executing stage 'deploy_db'.

(...)

The 'validate_app' environment variable is not set,
so executing stage 'deploy_db'.

(...)

The 'teardown_app' environment variable is set,
so skipping stage 'deploy_db'.

(...)

The 'teardown_db' environment variable is set,
so skipping stage 'deploy_db'.

(...)

PASS
ok  	terraform-up-and-running	13.824s
Notice how fast each of these test runs is now: instead of waiting 10 to 15 minutes after every change, you can try out new changes in 10 to 60 seconds (depending on the change). Given that you’re likely to rerun these stages dozens or even hundreds of times during development, the time savings can be massive.
Once the hello-world-app module changes are working the way you expect, it’s time to clean everything up. Run the
tests once more, this time skipping the deploy and validation stages so that only the teardown stages are executed:
$ SKIP_deploy_db=true \
  SKIP_deploy_app=true \
  SKIP_validate_app=true \
  go test -timeout 30m -run 'TestHelloWorldAppStageWithStages'

(...)

The 'SKIP_deploy_db' environment variable is set,
so skipping stage 'deploy_db'.

(...)

The 'SKIP_deploy_app' environment variable is set,
so skipping stage 'deploy_app'.

(...)

The 'SKIP_validate_app' environment variable is set,
so skipping stage 'validate_app'.

(...)

The 'SKIP_teardown_app' environment variable is not set,
so executing stage 'teardown_app'.

(...)

The 'SKIP_teardown_db' environment variable is not set,
so executing stage 'teardown_db'.

(...)

PASS
ok  	terraform-up-and-running	340.02s
Using test stages lets you get rapid feedback from your automated tests, dramatically increasing the speed and quality of iterative development. It won’t make any difference in how long tests take in your CI environment, but the impact on the development environment is huge.
Retries
After you start running automated tests for your infrastructure code on a regular basis, you’re likely to run into a problem: flaky tests. That is, tests occasionally will fail for transient reasons, such as an EC2 Instance occasionally failing to launch, or a Terraform eventual consistency bug, or a TLS handshake error talking to S3. The infrastructure world is a messy place, so you should expect intermittent failures in your tests and handle them accordingly.
To make your tests a bit more resilient, you can add retries for known errors. For example, while writing this book, I’d occasionally get the following type of error, especially when running many tests in parallel:
* error loading the remote state: RequestError: send request failed
Post https://xxx.amazonaws.com/: dial tcp xx.xx.xx.xx:443:
connect: connection refused
To make tests more reliable in the face of such errors, you can enable retries in Terratest using the MaxRetries,
TimeBetweenRetries, and RetryableTerraformErrors arguments of terraform.Options:
funccreateHelloOpts(dbOpts*terraform.Options,terraformDirstring)*terraform.Options{return&terraform.Options{TerraformDir:terraformDir,Vars:map[string]interface{}{"db_remote_state_bucket":dbOpts.BackendConfig["bucket"],"db_remote_state_key":dbOpts.BackendConfig["key"],"environment":dbOpts.Vars["db_name"],},// Retry up to 3 times, with 5 seconds between retries,// on known errorsMaxRetries:3,TimeBetweenRetries:5*time.Second,RetryableTerraformErrors:map[string]string{"RequestError: send request failed":"Throttling issue?",},}}
In the RetryableTerraformErrors argument, you can specify a map of known errors that warrant a retry: the keys of the
map are the error messages to look for in the logs (you can use regular expressions here) and the values are
additional information to display in the logs when Terratest matches one of these errors and kicks off a retry. Now,
whenever your test code hits one of these known errors, you should see a message in your logs, followed by a sleep of
TimeBetweenRetries, and then your command will rerun:
$ go test -v -timeout 30m

(...)

Running command terraform with args [apply -input=false -lock=false -auto-approve]

(...)

* error loading the remote state: RequestError: send request failed
Post https://s3.amazonaws.com/: dial tcp 11.22.33.44:443:
connect: connection refused

(...)

'terraform [apply]' failed with the error 'exit status code 1'
but this error was expected and warrants a retry. Further details:
Intermittent error, possibly due to throttling?

(...)

Running command terraform with args [apply -input=false -lock=false -auto-approve]
End-to-End Tests
Now that you have unit tests and integration tests in place, the final type of tests that you might want to add are end-to-end tests. With the Ruby web server example, end-to-end tests might consist of deploying the web server, any data stores it depends on, and testing it from the web browser using a tool such as Selenium. The end-to-end tests for Terraform infrastructure will look similar: deploy everything into an environment that mimics production and test it from the end-user’s perspective.
Although you could write your end-to-end tests using the exact same strategy as the integration tests—that is, create a
few dozen test stages to run terraform apply, do some validations, and then terraform destroy—this is rarely done
in practice. The reason for this has to do with the test pyramid, which you can see in Figure 7-1.
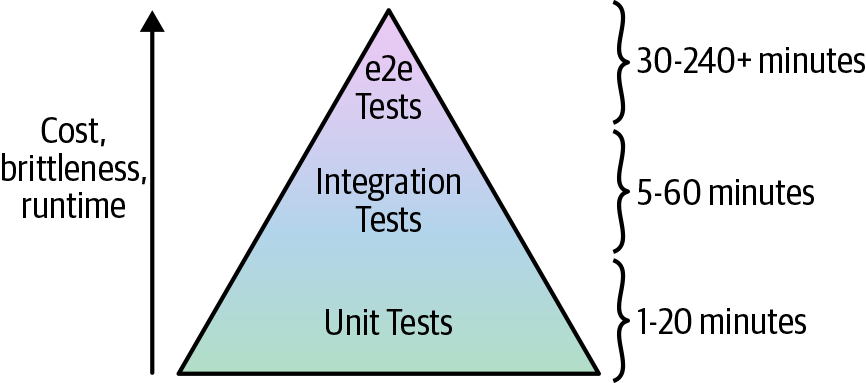
Figure 7-1. The test pyramid
The idea of the test pyramid is that you should typically be aiming for a large number of unit tests (the bottom of the pyramid), a smaller number of integration tests (the middle of the pyramid), and an even smaller number of end-to-end tests (the top of the pyramid). This is because, as you go up the pyramid, the cost and complexity of writing the tests, the brittleness of the tests, and the runtime of the tests all increase.
That gives us key testing takeaway #5: smaller modules are easier and faster to test.
You saw in the previous sections that it required a fair amount of work with namespacing, dependency injection, retries,
error handling, and test stages to test even a relatively simple hello-world-app module. With larger and more
complicated infrastructure, this only becomes more difficult. Therefore, you want to do as much of your testing as low in the
pyramid as you can because the bottom of the pyramid offers the fastest, most reliable feedback loop.
In fact, by the time you get to the top of the test pyramid, running tests to deploy a complicated architecture from scratch becomes untenable for two main reasons:
- Too slow
-
Deploying your entire architecture from scratch and then undeploying it all again can take a very long time: on the order of several hours. Test suites that take that long provide relatively little value because the feedback loop is simply too slow. You’d probably run such a test suite only overnight, which means in the morning you’ll get a report about a test failure, you’ll investigate for a while, submit a fix, and then wait for the next day to see whether it worked. That limits you to roughly one bug fix attempt per day. In these sorts of situations, what actually happens is developers begin blaming others for test failures, convincing management to deploy despite the test failures, and eventually ignoring the test failures entirely.
- Too brittle
-
As mentioned in the previous section, the infrastructure world is messy. As the amount of infrastructure you’re deploying goes up, the odds of hitting an intermittent, flaky issue goes up, as well. For example, suppose that a single resource (e.g., such as an EC2 Instance) has a one-in-a-thousand chance (0.1%) of failing due to an intermittent error (actual failure rates in the DevOps world are likely higher). This means that the probability that a test that deploys a single resource runs without any intermittent errors is 99.9%. So what about a test that deploys two resources? For that test to succeed, you need both resources to deploy without intermittent errors, and to calculate those odds, you multiply the probabilities: . With three resources, the odds are . With N resources, the formula is .
So now let’s consider different types of automated tests. If you had a unit test of a single module that deployed, say, 20 resources, the odds of success are . This means that 2 test runs out of 100 will fail; if you add a few retries, you can typically make these tests fairly reliable. Now, suppose that you had an integration test of 3 modules that deployed 60 resources. Now the odds of success are . Again, with enough retry logic, you can typically make these tests stable enough to be useful. So what happens if you want to write an end-to-end test that deploys your entire infrastructure, which consists of 30 modules, or about 600 resources? The odds of success are . This means that nearly half of your test runs will fail for transient reasons!
You’ll be able to handle some of these errors with retries, but it quickly turns into a never-ending game of whack-a-mole. You add a retry for a TLS handshake timeout, only to be hit by an APT repo downtime in your Packer template; you add retries to the Packer build, only to have the build fail due to a Terraform eventual-consistency bug; just as you are applying the band-aid to that, the build fails due to a brief GitHub outage. And because end-to-end tests take so long, you get only one attempt, maybe two, per day to fix these issues.
In practice, very few companies with complicated infrastructure run end-to-end tests that deploy everything from scratch. Instead, the more common test strategy for end-to-end tests works as follows:
-
One time, you pay the cost of deploying a persistent, production-like environment called “test,” and you leave that environment running.
-
Every time someone makes a change to your infrastructure, the end-to-end test does the following:
-
Applies the infrastructure change to the test environment.
-
Runs validations against the test environment (e.g., use Selenium to test your code from the end-user’s perspective) to make sure everything is working.
-
By changing your end-to-end test strategy to applying only incremental changes, you’re reducing the number of resources that are being deployed at test time from several hundred to just a handful so that these tests will be faster and less brittle.
Moreover, this approach to end-to-end testing more closely mimics how you’ll be deploying those changes in production. After all, it’s not like you tear down and bring up your production environment from scratch to roll out each change. Instead, you apply each change incrementally, so this style of end-to-end testing offers a huge advantage: you can test not only that your infrastructure works correctly, but that the deployment process for that infrastructure works correctly, too.
For example, a critical property you will want to test is that you can roll out updates to your infrastructure without
downtime. The asg-rolling-deploy module you created claims to be able to do a zero-downtime, rolling deployment, but
how do you validate that claim? Let’s add an automated test to do just that.
You can do this with just a few tweaks to the test you just wrote in test/hello_world_integration_test.go, since the
hello-world-app module uses the asg-rolling-deploy module under the hood. The first step is to expose a
server_text variable in live/stage/services/hello-world-app/variables.tf:
variable"server_text"{description="The text the web server should return"default="Hello, World"type=string}
Pass this variable through to the hello-world-app module in live/stage/services/hello-world-app/main.tf:
module"hello_world_app"{source="../../../../modules/services/hello-world-app"server_text=var.server_textenvironment=var.environmentdb_remote_state_bucket=var.db_remote_state_bucketdb_remote_state_key=var.db_remote_state_keyinstance_type="t2.micro"min_size=2max_size=2enable_autoscaling=false}
The hello-world-app module uses the server_text argument in its User Data script, so every time you change that
variable, it forces a (hopefully) zero-downtime deployment. Let’s try this out by adding one more test stage called
redeploy_app to test/hello_world_integration_test.go at the end of the test, directly after the validate_app stage:
funcTestHelloWorldAppStageWithStages(t*testing.T){t.Parallel()// Store the function in a short variable name solely to make the// code examples fit better in the book.stage:=test_structure.RunTestStage// Deploy the MySQL DBdeferstage(t,"teardown_db",func(){teardownDb(t,dbDirStage)})stage(t,"deploy_db",func(){deployDb(t,dbDirStage)})// Deploy the hello-world-appdeferstage(t,"teardown_app",func(){teardownApp(t,appDirStage)})stage(t,"deploy_app",func(){deployApp(t,dbDirStage,appDirStage)})// Validate the hello-world-app worksstage(t,"validate_app",func(){validateApp(t,appDirStage)})// Redeploy the hello-world-appstage(t,"redeploy_app",func(){redeployApp(t,appDirStage)})}
Next, implement the new redeployApp method:
funcredeployApp(t*testing.T,helloAppDirstring){helloOpts:=test_structure.LoadTerraformOptions(t,helloAppDir)albDnsName:=terraform.OutputRequired(t,helloOpts,"alb_dns_name")url:=fmt.Sprintf("http://%s",albDnsName)// Start checking every 1s that the app is responding with a 200 OKstopChecking:=make(chanbool,1)waitGroup,_:=http_helper.ContinuouslyCheckUrl(t,url,stopChecking,1*time.Second,)// Update the server text and redeploynewServerText:="Hello, World, v2!"helloOpts.Vars["server_text"]=newServerTextterraform.Apply(t,helloOpts)// Make sure the new version deployedmaxRetries:=10timeBetweenRetries:=10*time.Secondhttp_helper.HttpGetWithRetryWithCustomValidation(t,url,maxRetries,timeBetweenRetries,func(statusint,bodystring)bool{returnstatus==200&&strings.Contains(body,newServerText)},)// Stop checkingstopChecking<-truewaitGroup.Wait()}
This method does the following:
-
Uses the Terratest
http_helper.ContinuouslyCheckUrlhelper to run a goroutine (a lightweight thread managed by the Go runtime) in the background that, once every second, does an HTTP GET to the given ALB URL, and fails the test if at any point it receives a response that isn’t a 200 OK. -
Updates the new
server_textvariable and runsterraform applyto kick off the rolling deployment. -
After the deployment has completed, it makes sure the server is responding with the new
server_textvalue. -
Stops the goroutine that is continuously checking the ALB URL.
When you run this test and it gets to this final stage, you’ll see log output that shows the continuous HTTP GET calls
to the ALB interspersed with the terraform apply log output of the rolling deployment:
$ SKIP_teardown_db=true \
  SKIP_teardown_app=true \
  go test -timeout 30m -run 'TestHelloWorldAppStageWithStages'

(...)

Making an HTTP GET call to URL
http://hello-world-test-thlMBF-168938547.us-east-2.elb.amazonaws.com
Got response 200 and err <nil> from URL at
http://hello-world-test-thlMBF-168938547.us-east-2.elb.amazonaws.com

Making an HTTP GET call to URL
http://hello-world-test-thlMBF-168938547.us-east-2.elb.amazonaws.com
Got response 200 and err <nil> from URL at
http://hello-world-test-thlMBF-168938547.us-east-2.elb.amazonaws.com

(...)

Running command terraform with args
[apply -input=false -lock=false -auto-approve]

(...)

Making an HTTP GET call to URL
http://hello-world-test-thlMBF-168938547.us-east-2.elb.amazonaws.com
Got response 200 and err <nil> from URL at
http://hello-world-test-thlMBF-168938547.us-east-2.elb.amazonaws.com

Making an HTTP GET call to URL
http://hello-world-test-thlMBF-168938547.us-east-2.elb.amazonaws.com
Got response 200 and err <nil> from URL at
http://hello-world-test-thlMBF-168938547.us-east-2.elb.amazonaws.com

(...)

PASS
ok  	terraform-up-and-running	551.04s
If this test passes, it means that the hello-world-app and asg-rolling-deploy module are able to do a
zero-downtime, rolling deployment as promised! Every time your end-to-end test applies an incremental change to
your test environment, you could use this strategy to make sure that the deployment does not cause downtime.
Other Testing Approaches
Most of this chapter has focused on using the Terratest approach for automated tests, but there are two other categories of testing approaches that you might want to include as part of your testing tool belt:
-
Static analysis
-
Property testing
Just as different types of automated tests (unit, integration, end-to-end) catch different types of bugs, each of these testing approaches will catch different types of bugs as well, so you’ll most likely want to use several of these together to get the best results. Let’s go through these new categories one at a time.
Static analysis
There are several tools that can analyze your Terraform code without running it, including:
terraform validate-
This is a command built into Terraform that you can use to check your Terraform syntax and types (a bit like a compiler).
- tflint
-
A “lint” tool for Terraform that can scan your Terraform code and catch common errors and potential bugs based on a set of built-in rules.
- HashiCorp Sentinel
-
A “policy as code” framework that allows you to enforce rules across various HashiCorp tools. For example, you could create a policy to disallow security group rules in your Terraform code that allow inbound access
0.0.0.0/0. As of this writing, Sentinel is available only with HashiCorp Enterprise products, including Terraform Enterprise.
Property testing
There are a number of testing tools that focus on validating specific “properties” of your infrastructure,:
Most of these tools provide a simple domain-specific language (DSL) for checking that the infrastructure you’ve
deployed conforms to some sort of specification. For example, if you were testing a Terraform module that deployed an
EC2 Instance, you could use the following inspec code to validate that the Instance has proper permissions on
specific files, has certain dependencies installed, and is listening on a specific port:
describefile('/etc/myapp.conf')doit{shouldexist}its('mode'){shouldcmp0644}enddescribeapache_confdoits('Listen'){shouldcmp8080}enddescribeport(8080)doit{shouldbe_listening}end
The advantage of these tools is that the DLSs tend to be concise, easy to use, and offer an efficient, declarative way to validate a large number of properties about your infrastructure. This is great for enforcing checklists of requirements, especially around compliance (e.g., PCI compliance, HIPAA compliance, etc.). The disadvantage of these tools is that it’s possible for all the property checks to pass and the infrastructure still doesn’t work! For comparison, the “Terratest way” to validate these same properties would be to make an HTTP request to the server and see whether you get back the expected response.
Conclusion
Everything in the infrastructure world is continuously changing: Terraform, Packer, Docker, Kubernetes, AWS, Google Cloud, Azure, and so on are all moving targets. This means that infrastructure code rots very quickly. Or to put it another way:
Infrastructure code without automated tests is broken.
I mean this both as an aphorism and as a literal statement. Every single time I’ve gone to write infrastructure code, no matter how much effort I put into keeping the code clean, testing it manually, and doing code reviews, as soon as I took the time to write automated tests, I found numerous, nontrivial bugs. Something magical happens when you take the time to automate the testing process and, almost without exception, it flushes out problems that you otherwise would’ve never found yourself (but your customers would’ve). And not only do you find these bugs when you first add automated tests, but if you run your tests after every commit, you’ll keep finding bugs over time, especially as the DevOps world changes all around you.
The automated tests I’ve added to my infrastructure code have not only caught bugs in my own code, but also bugs in the tools I was using, including nontrivial bugs in Terraform, Packer, Elasticsearch, Kafka, AWS, and so on. Writing automated tests as shown in this chapter is not easy: it takes considerable effort to write these tests; it takes even more effort to maintain them and add enough retry logic to make them reliable; and still more effort to keep your test environment clean to keep costs in check. But it’s all worth it.
When I build a module to deploy a data store, for example, after every commit to that repo, my tests fire up a dozen copies of that data store in various configurations, write data, read data, and then tear everything back down. Each time those tests pass, that gives me huge confidence that my code still works. If nothing else, the automated tests let me sleep better. Those hours I spent dealing with retry logic and eventual consistency pay off in the hours I won’t be spending at 3 a.m. dealing with an outage.
This Book Has Tests, Too!
All the code examples in this book have tests, too. You can find all of the code examples, and all of their corresponding tests, at https://github.com/brikis98/terraform-up-and-running-code.
Throughout this chapter, you saw the basic process of testing Terraform code, including the following key takeaways:
- When testing Terraform code, there is no localhost
-
Therefore, you need to do all of your manual testing by deploying real resources into one or more isolated sandbox environments.
- Regularly clean up your sandbox environments
-
Otherwise, the environments will become unmanageable, and costs will spiral out of control.
- You cannot do pure unit testing for Terraform code
-
Therefore, you have to do all of your automated testing by writing code that deploys real resources into one or more isolated sandbox environments.
- You must namespace all of your resources
-
This ensures that multiple tests running in parallel do not conflict with one another.
- Smaller modules are easier and faster to test
-
This was one of the key takeaways in Chapter 6, and it’s worth repeating in this chapter, too: smaller modules are easier to create, maintain, use, and test.
In Chapter 8, you’ll see how to incorporate Terraform code and your automated test code into your team’s workflow, including how to manage environments, how to configure a Continuous Integration/Continuous Development pipeline, and more.
1 AWS doesn’t charge anything extra for additional AWS accounts, and if you use AWS Organizations, you can create multiple “child” accounts that all roll up their billing to a single “master” account.
2 In limited cases, it is possible to override the endpoints Terraform uses to communicate with providers. For example, you can override the endpoint Terraform uses to communicate with Amazon S3 and replace it with a mock endpoint that implements the S3 API. This works fine for a small number of endpoints, but most Terraform code makes hundreds of different API calls to the underlying provider, and mocking out all of them is impractical. Moreover, even if you do mock them all out, it’s not clear that the resulting unit test can give you much confidence that your code works correctly: e.g., if you create mock endpoints for ASGs and ALBs, your terraform apply might succeed, but does that tell you anything useful about whether your code would have actually deployed a working app on top of that infrastructure?
3 Future versions of Terratest will most likely switch to using go mod for dependency management. As of this writing, there was only preliminary support for go mod, but by the time Go 1.13 comes out, go mod should be enabled by default, so it’ll likely become the standard tool for dependency management in Go—and remove the need for GOPATH as an added bonus. See https://blog.golang.org/using-go-modules for details.