Chapter 6. Production-Grade Terraform Code
Building production-grade infrastructure is difficult. And stressful. And time consuming. By production-grade infrastructure, I mean the servers, data stores, load balancers, security functionality, monitoring and alerting tools, building pipelines, and all the other pieces of your technology that are necessary to run a business. Your company is placing a bet on you: it’s betting that your infrastructure won’t fall over if traffic goes up, or lose your data if there’s an outage, or allow that data to be compromised when hackers try to break in—and if that bet doesn’t work out, your company can go out of business. That’s what’s at stake when I refer to production-grade infrastructure in this chapter.
I’ve had the opportunity to work with hundreds of companies, and based on all of these experiences, here’s roughly how long you should expect your next production-grade infrastructure project to take:
-
If you want to deploy a service fully managed by a third party, such as running MySQL using the AWS Relational Database Service (RDS), you can expect it to take you one to tow weeks to get that service ready for production.
-
If you want to run your own stateless distributed app, such as a cluster of Node.js apps that don’t store any data locally (e.g., they store all their data in RDS) running on top of an AWS Auto Scaling Group (ASG), that will take roughly twice as long, or about two to four weeks to get ready for production.
-
If you want to run your own stateful distributed app, such as an Amazon Elasticsearch (Amazon ES) cluster that runs on top of an ASG and stores data on local disks, that will be another order of magnitude increase, or about two to four months to get ready for production.
-
If you want to build out your entire architecture, including all of your apps, data stores, load balancers, monitoring, alerting, security, and so on, that’s another order of magnitude (or two) increase, or about 6 to 36 months of work, with small companies typically being closer to six months and larger companies typically taking several years.
Table 6-1 shows a summary of this data.
| Type of infrastructure | Example | Time estimate |
|---|---|---|
Managed service |
Amazon RDS |
1–2 weeks |
Self-managed distributed system (stateless) |
A cluster of Node.js apps |
2–4 weeks |
Self-managed distributed system (stateful) |
Amazon ES |
2–4 months |
Entire architecture |
Apps, data stores, load balancers, monitoring, etc. |
6–36 months |
If you haven’t gone through the process of building out production-grade infrastructure, you may be surprised by these numbers. I often hear reactions like the following:
-
“How can it possibly take that long?”
-
“I can deploy a server on <cloud> in a few minutes. Surely it can’t take months to get the rest done!”
-
And all too often, from many-an-over-confident-engineer, “I’m sure those numbers apply to other people, but I will be able to get this done in a few days.”
And yet, anyone who has gone through a major cloud migration or assembled a brand new infrastructure from scratch knows that these numbers, if anything, are optimistic—a best-case scenario, really. If you don’t have people on your team with deep expertise in building production-grade infrastructure, or if your team is being pulled in a dozen different directions and you can’t find the time to focus on it, it might take you significantly longer.
In this chapter, I’ll go over why it takes so long to build production-grade infrastructure, what production grade really means, and what patterns work best for creating reusable, production-grade modules:
-
Why it takes so long to build production-grade infrastructure
-
The production-grade infrastructure checklist
-
Production-grade infrastructure modules
-
Small modules
-
Composable modules
-
Testable modules
-
Releasable modules
-
Beyond Terraform modules
-
Example Code
As a reminder, you can find all of the code examples in the book at https://github.com/brikis98/terraform-up-and-running-code.
Why It Takes So Long to Build Production-Grade Infrastructure
Time estimates for software projects are notoriously inaccurate. Time estimates for DevOps projects, doubly so. That quick tweak that you thought would take five minutes takes up the entire day; the minor new feature that you estimated at a day of work takes two weeks; the app that you thought would be in production in two weeks is still not quite there six months later. Infrastructure and DevOps projects, perhaps more than any other type of software, are the ultimate examples of Hofstadter’s Law1:
Hofstadter’s Law: It always takes longer than you expect, even when you take into account Hofstadter’s Law.
Douglas Hofstadter
I think there are three major reasons for this. The first reason is that DevOps, as an industry, is still in the Stone Ages. I don’t mean that as an insult, but rather, in the sense that the industry is still in its infancy. The terms “cloud computing,” “infrastructure as code,” and “DevOps” only appeared in the mid to late 2000s and tools like Terraform, Docker, Packer, and Kubernetes were all initially released in the mid to late 2010s. All of these tools and techniques are relatively new and all of them are changing rapidly. This means that they are not particularly mature and few people have deep experience with them, so it’s no surprise that projects take longer than expected.
The second reason is that DevOps seems to be particularly susceptible to yak shaving. If you haven’t heard of “yak shaving” before, I assure you, this is a term that you will grow to love (and hate). The best definition I’ve seen of this term comes from a blog post by Seth Godin:2
“I want to wax the car today.”
“Oops, the hose is still broken from the winter. I’ll need to buy a new one at Home Depot.”
“But Home Depot is on the other side of the Tappan Zee bridge and getting there without my EZPass is miserable because of the tolls.”
“But, wait! I could borrow my neighbor’s EZPass…”
“Bob won’t lend me his EZPass until I return the mooshi pillow my son borrowed, though.”
“And we haven’t returned it because some of the stuffing fell out and we need to get some yak hair to restuff it.”
And the next thing you know, you’re at the zoo, shaving a yak, all so you can wax your car.
Seth Godin
Yak shaving consists of all the tiny, seemingly unrelated tasks you must do before you can do the task you originally wanted to do. If you develop software, and especially if you work in the DevOps industry, you’ve probably seen this sort of thing a thousand times. You go to deploy a fix for a small typo, only to trigger a bug in your app configuration. You roll out the fix for the app configuration and suddenly hit a TLS certificate issue. After spending hours on StackOverflow, you have the TLS issue sorted, try the deployment again, and this time it fails due to some issue with your deployment system. You spend hours digging into that problem and find out it’s due to an out-of-date Linux version. The next thing you know, you’re updating the operating system on your entire fleet of servers, all so you can deploy a “quick” one-character typo fix.
DevOps seems to be especially prone to these sorts of yak-shaving incidents. In part, this is a consequence of the immaturity of DevOps technologies and modern system design, which often involves lots of tight coupling and duplication in the infrastructure. Every change you make in the DevOps world is a bit like trying to pull out a single USB cable from a box of tangled wires—it just tends pull up everything else in the box with it. In part, this is because the term “DevOps” covers an astonishingly broad set of topics: everything from build to deployment to security and so on.
This brings us to the third reason why DevOps work takes so long. The first two reasons—DevOps is in the Stone Ages and yak shaving—can be classified as accidental complexity. Accidental complexity refers to the problems imposed by the particular tools and processes you’ve chosen, as opposed to essential complexity, which refers to the problems inherent to whatever it is that you’re working on.3 For example, if you’re using C++ to write stock-trading algorithms, dealing with memory allocation bugs is accidental complexity—had you picked a different programming language with automatic memory management, you wouldn’t have this as a problem at all—whereas figuring out an algorithm that can beat the market is essential complexity—you’d have to solve this problem no matter what programming language you picked.
The third reason why DevOps takes so long—the essential complexity of this problem—is that there is a genuinely long checklist of tasks that you must do to prepare infrastructure for production. The problem is that the vast majority of developers don’t know about most of the items on the checklist, so when they estimate a project, they forget about a huge number of critical—and time-consuming—details. This checklist is the focus of the next section.
The Production-Grade Infrastructure Checklist
Here’s a fun experiment: go around your company and ask, “what are the requirements for going to production?” In most companies, if you ask this question to five people, you’ll get five different answers. One person will mention the need for metrics and alerts; another will talk about capacity planning and high availability; someone else will go on a rant about automated tests and code reviews; yet another person will bring up encryption, authentication, and server hardening; and if you’re lucky, someone might remember to bring up data backups and log aggregation. Most companies do not have a clear definition of the requirements for going to production, which means each piece of infrastructure is deployed a little differently and can be missing some critical functionality.
To help improve this situation, I’d like to share with you the production-grade infrastructure checklist, as shown in Table 6-2. This list covers most of the key items that you need to consider to deploy infrastructure to production.
| Task | Description | Example tools |
|---|---|---|
Install |
Install the software binaries and all dependencies. |
Bash, Chef, Ansible, Puppet |
Configure |
Configure the software at runtime. Includes port settings, TLS certs, service discovery, leaders, followers, replication, etc. |
Bash, Chef, Ansible, Puppet |
Provision |
Provision the infrastructure. Includes servers, load balancers, network configuration, firewall settings, IAM permissions, etc. |
Terraform, CloudFormation |
Deploy |
Deploy the service on top of the infrastructure. Roll out updates with no downtime. Includes blue-green, rolling, and canary deployments. |
Terraform, CloudFormation, Kubernetes, ECS |
High availability |
Withstand outages of individual processes, servers, services, data centers, and regions. |
Multidatacenter, multiregion, replication, auto scaling, load balancing |
Scalability |
Scale up and down in response to load. Scale horizontally (more servers) and/or vertically (bigger servers). |
Auto scaling, replication, sharding, caching, divide and conquer |
Performance |
Optimize CPU, memory, disk, network, and GPU usage. Includes query tuning, benchmarking, load testing, and profiling. |
Dynatrace, valgrind, VisualVM, ab, Jmeter |
Networking |
Configure static and dynamic IPs, ports, service discovery, firewalls, DNS, SSH access, and VPN access. |
VPCs, firewalls, routers, DNS registrars, OpenVPN |
Security |
Encryption in transit (TLS) and on disk, authentication, authorization, secrets management, server hardening. |
ACM, Let’s Encrypt, KMS, Cognito, Vault, CIS |
Metrics |
Availability metrics, business metrics, app metrics, server metrics, events, observability, tracing, and alerting. |
CloudWatch, DataDog, New Relic, Honeycomb |
Logs |
Rotate logs on disk. Aggregate log data to a central location. |
CloudWatch Logs, ELK, Sumo Logic, Papertrail |
Backup and Restore |
Make backups of DBs, caches, and other data on a scheduled basis. Replicate to separate region/account. |
RDS, ElastiCache, replication |
Cost optimization |
Pick proper Instance types, use spot and reserved Instances, use auto scaling, and nuke unused resources. |
Auto scaling, spot Instances, reserved Instances |
Documentation |
Document your code, architecture, and practices. Create playbooks to respond to incidents. |
READMEs, wikis, Slack |
Tests |
Write automated tests for your infrastructure code. Run tests after every commit and nightly. |
Terratest, inspec, serverspec, kitchen-terraform |
Most developers are aware of the first few tasks: install, configure, provision, and deploy. It’s all the ones that come after them that catch people off guard. For example, did you think through the resilience of your service and what happens if a server goes down? Or a load balancer goes down? Or an entire datacenter goes dark? Networking tasks are also notoriously tricky: setting up VPCs, VPNs, service discovery, and SSH access are all essential tasks that can take months, and yet are often entirely left out of many project plans and time estimates. Security tasks, such as encrypting data in transit using TLS, dealing with authentication, and figuring out how to store secrets are also often forgotten until the last minute.
Every time you’re working on a new piece of infrastructure, go through this checklist. Not every single piece of infrastructure needs every single item on the list, but you should consciously and explicitly document which items you’ve implemented, which ones you’ve decided to skip, and why.
Production-Grade Infrastructure Modules
Now that you know the list of tasks that you need to do for each piece of infrastructure, let’s talk about the best practices for building reusable modules to implement these tasks. Here are the topics I’ll cover:
-
Small modules
-
Composable modules
-
Testable modules
-
Releasable modules
-
Beyond Terraform modules
Small Modules
Developers who are new to Terraform, and IaC in general, often define all of their infrastructure for all of their environments (Dev, Stage, Prod, etc.) in a single file or single module. As discussed in “Isolating State Files”, this is a bad idea. In fact, I’ll go even further and make the following claim: large modules—modules that contain more than a few hundred lines of code or that deploy more than a few closely related pieces of infrastructure—should be considered harmful.
Here are just a few of the downsides of large modules:
- Large modules are slow
-
If all of your infrastructure is defined in one Terraform module, running any command will take a long time. I’ve seen modules grow so large that
terraform plantakes five to six minutes to run! - Large modules are insecure
-
If all your infrastructure is managed in a single large module, to change anything, you need permissions to access everything. This means that almost every user must be an admin, which goes against the principle of least privilege.
- Large modules are risky
-
If all your eggs are in one basket, a mistake anywhere could break everything. You might be making a minor change to a frontend app in staging, but due to a typo or running the wrong command, you delete the production database.
- Large modules are difficult to understand
-
The more code you have in one place, the more difficult it is for any one person to understand it all. And when you don’t understand the infrastructure you’re dealing with, you end up making costly mistakes.
- Large modules are difficult to review
-
Reviewing a module that consists of several dozen lines of code is easy; reviewing a module that consists of several thousand lines of code is nearly impossible. Moreover,
terraform plannot only takes longer to run, but if the output of theplancommand is several thousand lines, no one will bother to read it. And that means no one will notice that one little red line that means your database is being deleted. - Large modules are difficult to test
-
Testing infrastructure code is hard; testing a large amount of infrastructure code is nearly impossible. I’ll come back to this point in Chapter 7.
In short, you should build your code out of small modules that each do one thing. This is not a new or controversial insight. You’ve probably heard it many times before, albeit in slightly different contexts, such as this version from Clean Code:4
The first rule of functions is that they should be small. The second rule of functions is that they should be smaller than that.
Robert C. Martin
Imagine you were using a general-purpose programming language such as Java or Python or Ruby, and you came across a single, massive function that was 20,000 lines long:
defhuge_function(data_set)x_pca=PCA(n_components=2).fit_transform(X_train)clusters=clf.fit_predict(X_train)ax=plt.subplots(1,2,figsize=(4))ay=plt.subplots(0,2,figsize=(2))fig=plt.subplots(3,4,figsize=(5))fig.subplots_adjust(top=0.85)predicted=svc_model.predict(X_test)images_and_predictions=list(zip(images_test,predicted))forxin0..xlimitax[0].scatter(X_pca[x],X_pca[1],c=clusters)ax[0].set_title('Predicted Training Labels')ax[1].scatter(X_pca[x],X_pca[1],c=y_train)ax[1].set_title('Actual Training Labels')ax[2].scatter(X_pca[x],X_pca[1],c=clusters)endforyin0..ylimitay[0].scatter(X_pca[y],X_pca[1],c=clusters)ay[0].set_title('Predicted Training Labels')ay[1].scatter(X_pca[y],X_pca[1],c=y_train)ay[1].set_title('Actual Training Labels')ay[2].scatter(X_pca[y],X_pca[1],c=clusters)end## ... 20,000 more lines...#end
You immediately know this is a code smell and that the better approach is to refactor it into a number of small, standalone functions that each do one thing:
defcalculate_images_and_predictions(images_test,predicted)x_pca=PCA(n_components=2).fit_transform(X_train)clusters=clf.fit_predict(X_train)ax=plt.subplots(1,2,figsize=(4))fig=plt.subplots(3,4,figsize=(5))fig.subplots_adjust(top=0.85)predicted=svc_model.predict(X_test)returnlist(zip(images_test,predicted))enddefprocess_x_coords(ax)forxin0..xlimitax[0].scatter(X_pca[x],X_pca[1],c=clusters)ax[0].set_title('Predicted Training Labels')ax[1].scatter(X_pca[x],X_pca[1],c=y_train)ax[1].set_title('Actual Training Labels')ax[2].scatter(X_pca[x],X_pca[1],c=clusters)endreturnaxenddefprocess_y_coords(ax)foryin0..ylimitay[0].scatter(X_pca[y],X_pca[1],c=clusters)ay[0].set_title('Predicted Training Labels')ay[1].scatter(X_pca[y],X_pca[1],c=y_train)ay[1].set_title('Actual Training Labels')ay[2].scatter(X_pca[y],X_pca[1],c=clusters)endreturnayend## ... Lots more small functions...#
You should use the same strategy with Terraform. Imagine that you came across the architecture shown in Figure 6-1.
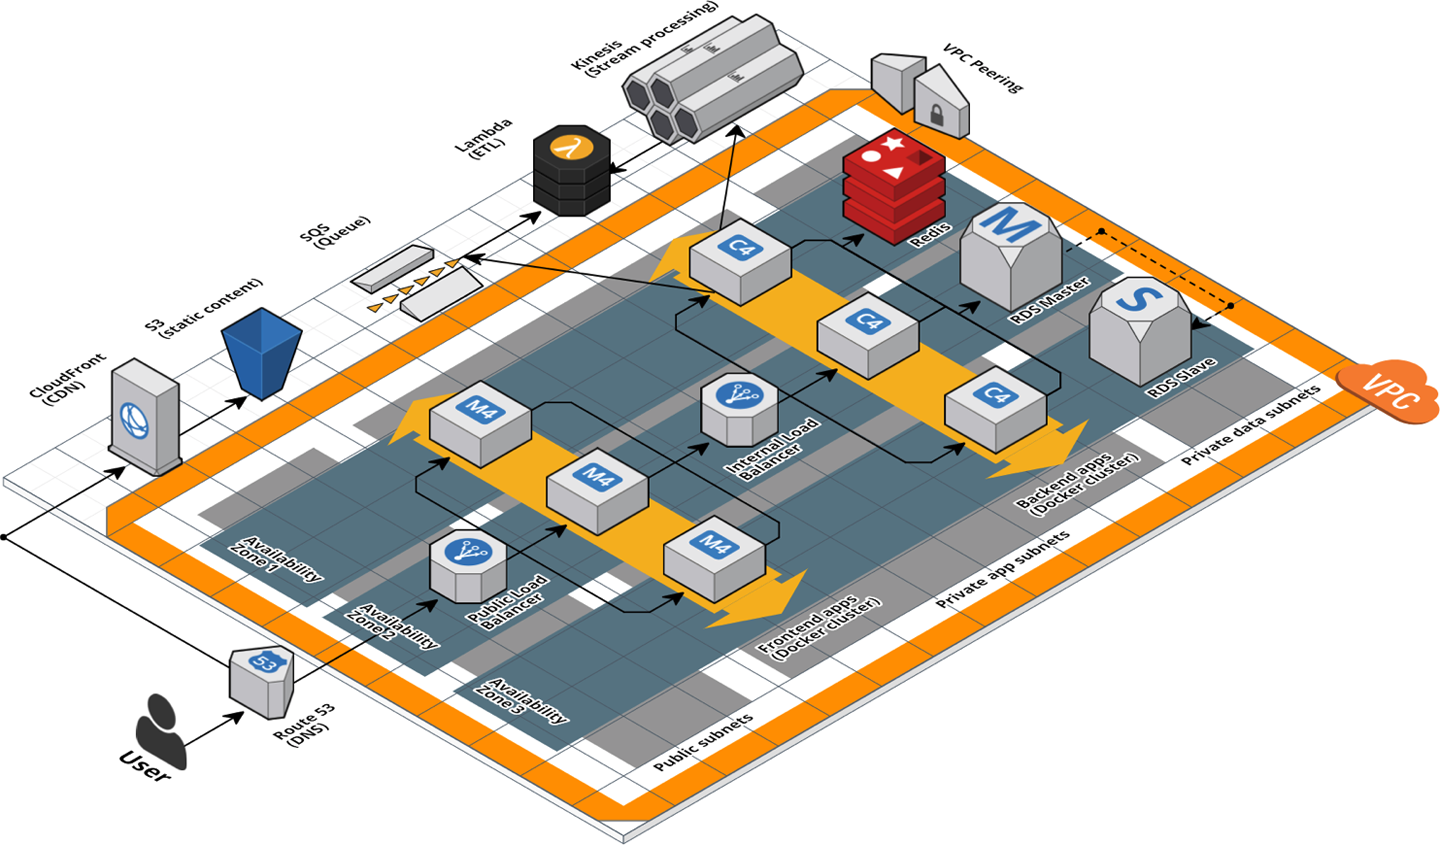
Figure 6-1. A relatively complicated AWS architecture
If this architecture was defined in a single, massive Terraform module that was 20,000 lines long, you should immediately think of it as a code smell. The better approach is to refactor into a number of small, standalone modules that each do one thing, as shown in Figure 6-2.
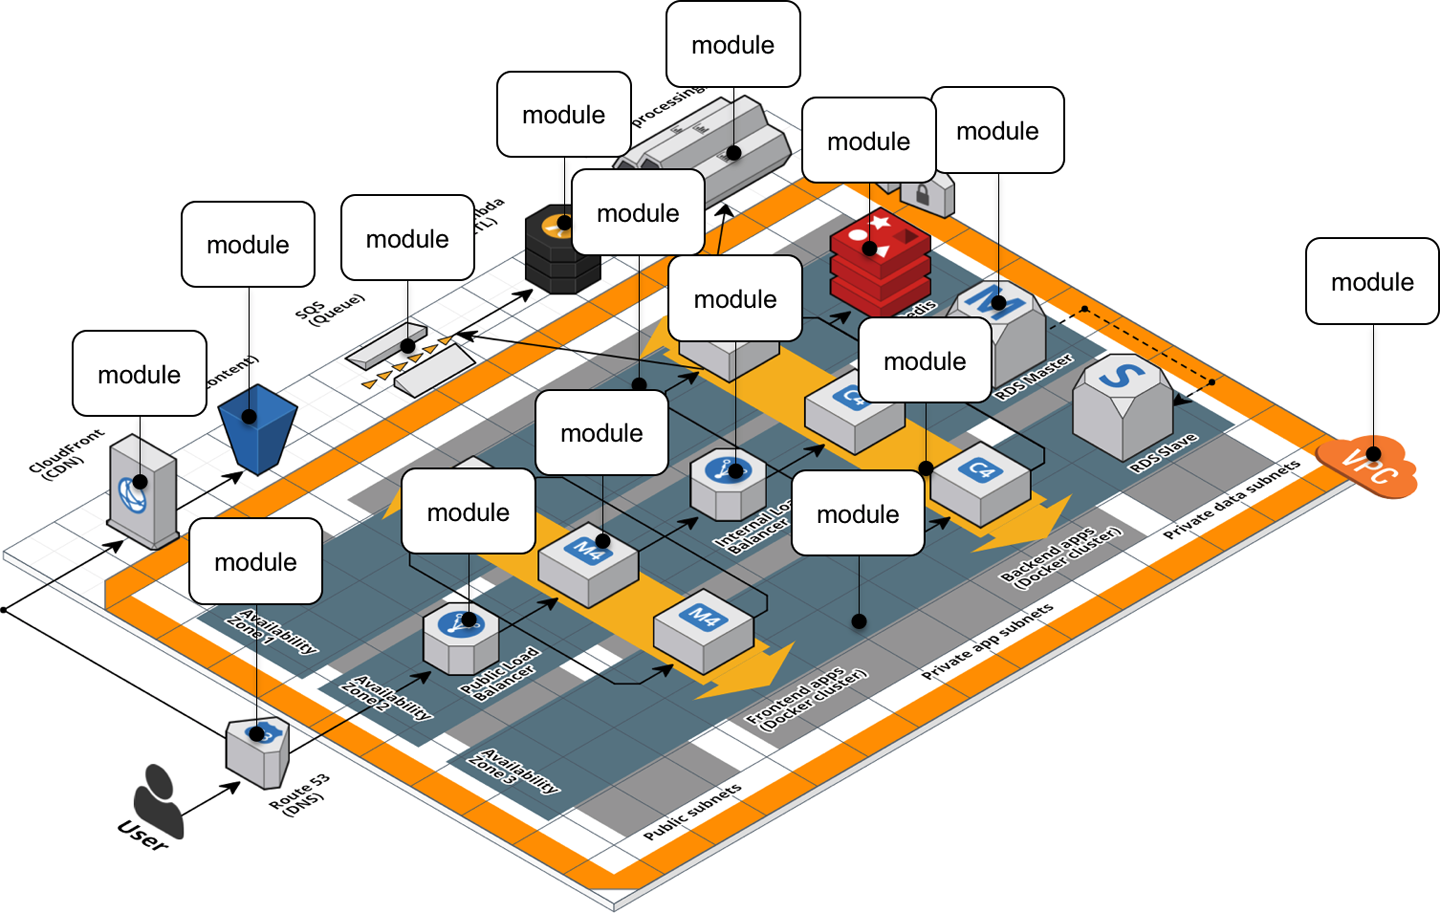
Figure 6-2. A relatively complicated AWS architecture refactored into many small modules
The webserver-cluster module you’ve built up to this point is starting to become a bit large, and it’s handling
three somewhat unrelated tasks:
- Auto Scaling Group (ASG)
-
The
webserver-clustermodule deploys an ASG that can do a zero-downtime, rolling deployment. - Application Load Balancer (ALB)
-
The
webserver-clusterdeploys an ALB. - Hello, World app
-
The
webserver-clustermodule also deploys a simple “Hello, World” app.
Let’s refactor the code accordingly into three smaller modules:
modules/cluster/asg-rolling-deploy-
A generic, reusable, standalone module for deploying an ASG that can do a zero-downtime, rolling deployment.
modules/networking/alb-
A generic, reusable, standalone module for deploying an ALB.
modules/services/hello-world-app-
A module specifically for deploying the “Hello, World” app.
Before getting started, make sure to run terraform destroy on any webserver-cluster deployments you have from previous chapters.
After you do that, you can start putting together the asg-rolling-deploy and alb modules. Create a new folder at modules/cluster/asg-rolling-deploy and move (i.e., cut and paste) the
following resources from module/services/webserver-cluster/main.tf to modules/cluster/asg-rolling-deploy/main.tf:
-
aws_launch_configuration -
aws_autoscaling_group -
aws_autoscaling_schedule(both of them) -
aws_security_group(for the Instances, but not for the ALB) -
aws_security_group_rule(both of the rules for the Instances, but not those for the ALB) -
aws_cloudwatch_metric_alarm(both of them)
Next, move the following variables from to module/services/webserver-cluster/variables.tf to modules/cluster/asg-rolling-deploy/variables.tf:
-
cluster_name -
ami -
instance_type -
min_size -
max_size -
enable_autoscaling -
custom_tags -
server_port
Let’s now move on to the ALB module. Create a new folder at modules/networking/alb and move the following resources from module/services/webserver-cluster/main.tf to modules/networking/alb/main.tf:
-
aws_lb -
aws_lb_listener -
aws_security_group(the one for the ALB, but not for the Instances) -
aws_security_group_rule(both of the rules for the ALB, but not for the Instances)
Create modules/networking/alb/variables.tf and define a single variable within:
variable"alb_name"{description="The name to use for this ALB"type=string}
Use this variable as the name argument of the aws_lb resource:
resource"aws_lb" "example"{name=var.alb_nameload_balancer_type="application"subnets=data.aws_subnet_ids.default.idssecurity_groups=[aws_security_group.alb.id]}
And the name argument of the aws_security_group resource:
resource"aws_security_group" "alb"{name=var.alb_name}
This is a lot of code to shuffle around, so feel free to use the code examples for this chapter from https://github.com/brikis98/terraform-up-and-running-code.
Composable Modules
You now have two small modules—asg-rolling-deploy and alb—that each do one thing and do it well. How do you make them work together? How do you build
modules that are reusable and composable? This question is not unique to Terraform, but something programmers have been
thinking about for decades. To quote Doug McIlroy,5 the original developer of Unix pipes and a number of other Unix tools, including
diff, sort, join, and tr:
This is the Unix philosophy: Write programs that do one thing and do it well. Write programs to work together.
Doug McIlroy
One way to do this is through function composition, in which you can take the outputs of one function and pass them as the inputs to another. For example, if you had the following small functions in Ruby:
# Simple function to do additiondefadd(x,y)returnx+yend# Simple function to do subtractiondefsub(x,y)returnx-yend# Simple function to do multiplicationdefmultiply(x,y)returnx*yend
You can use function composition to put them together by taking the outputs from add and sub and passing them as
the inputs to multiply:
# Complex function that composes several simpler functionsdefdo_calculation(x,y)returnmultiply(add(x,y),sub(x,y))end
One of the main ways to make functions composable is to minimize side effects: that is, where possible, avoid reading state from the outside world, and instead have it passed in via input parameters; and avoid writing state to the outside world, and instead return the result of your computations via output parameters. Minimizing side effects is one of the core tenets of functional programming because it makes the code easier to reason about, easier to test, and easier to reuse. The reuse story is particularly compelling, since function composition allows you to gradually build up more complicated functions by combining simpler functions.
Although you can’t avoid side effects when working with infrastructure code, you can still follow the same basic principles in your Terraform modules: pass everything in through input variables, return everything through output variables, and build more complicated modules by combining simpler modules.
Open up modules/cluster/asg-rolling-deploy/variables.tf and add four new input variables:
variable"subnet_ids"{description="The subnet IDs to deploy to"type=list(string)}variable"target_group_arns"{description="The ARNs of ELB target groups in which to register Instances"type=list(string)default=[]}variable"health_check_type"{description="The type of health check to perform. Must be one of: EC2, ELB."type=stringdefault="EC2"}variable"user_data"{description="The User Data script to run in each Instance at boot"type=stringdefault=""}
The first variable, subnet_ids, directs the asg-rolling-deploy module to the subnets to deploy into. Whereas the
webserver-cluster module was hardcoded to deploy into the Default VPC and subnets, by exposing the subnet_ids
variable, you allow this module to be used with any VPC or subnets. The next two variables, target_group_arns and
health_check_type, configure how the ASG integrates with load balancers. Whereas the webserver-cluster module had a
built-in ALB, the asg-rolling-deploy module is meant to be a generic module, so exposing the load-balancer
settings as input variables allows you to use the ASG with a wide variety of use cases; e.g., no load balancer, one ALB,
multiple NLBs, and so on.
Take these three input variables and pass them through to the aws_autoscaling_group resource in
modules/cluster/asg-rolling-deploy/main.tf, replacing the previously hardcoded settings that are referencing
resources (e.g., the ALB) and data sources (e.g., aws_subnet_ids) that we did not bother copying into the
asg-rolling-deploy module:
resource"aws_autoscaling_group" "example"{# Explicitly depend on the launch configuration's name so each time# it's replaced, this ASG is also replacedname="${var.cluster_name}-${aws_launch_configuration.example.name}"launch_configuration=aws_launch_configuration.example.namevpc_zone_identifier=var.subnet_ids# Configure integrations with a load balancertarget_group_arns=var.target_group_arnshealth_check_type=var.health_check_typemin_size=var.min_sizemax_size=var.max_size# Wait for at least this many instances to pass health checks before# considering the ASG deployment completemin_elb_capacity=var.min_size# (...)}
The fourth variable, user_data, is for passing in a User Data script. Whereas the webserver-cluster module had a
hardcoded User Data script and could only be used to deploy the “Hello, World” app, by taking in a User Data script
as an input variable, the asg-rolling-deploy module can be used to deploy any app across an ASG. Pass this user_data
variable through to the aws_launch_configuration resource (replacing the reference to the template_file data source
we didn’t copy into the asg-rolling-deploy module):
resource"aws_launch_configuration" "example"{image_id=var.amiinstance_type=var.instance_typesecurity_groups=[aws_security_group.instance.id]user_data=var.user_data# Required when using a launch configuration with an auto scaling group.# https://www.terraform.io/docs/providers/aws/r/launch_configuration.htmllifecycle{create_before_destroy=true}}
You’ll also want to add a couple of useful output variables to modules/cluster/asg-rolling-deploy/outputs.tf:
output"asg_name"{value=aws_autoscaling_group.example.namedescription="The name of the Auto Scaling Group"}output"instance_security_group_id"{value=aws_security_group.instance.iddescription="The ID of the EC2 Instance Security Group"}
Outputting this data makes the asg-rolling-deploy module even more reusable, since consumers of the module can use these
outputs to add new behaviors, such as attaching custom rules to the security group.
For similar reasons, you should add several output variables to modules/networking/alb/outputs.tf:
output"alb_dns_name"{value=aws_lb.example.dns_namedescription="The domain name of the load balancer"}output"alb_http_listener_arn"{value=aws_lb_listener.http.arndescription="The ARN of the HTTP listener"}output"alb_security_group_id"{value=aws_security_group.alb.iddescription="The ALB Security Group ID"}
You’ll see how to use these shortly.
The last step is to convert the webserver-cluster module into a hello-world-app module that can deploy a
“Hello, World” app using the asg-rolling-deploy and alb modules. To do this, rename
module/services/webserver-cluster to module/services/hello-world-app. After all the changes in the previous steps,
you should have only the following resources and data sources left in module/services/hello-world-app/main.tf:
-
template_file(for User Data) -
aws_lb_target_group -
aws_lb_listener_rule -
terraform_remote_state(for the DB) -
aws_vpc -
aws_subnet_ids
Add the following variable to modules/services/hello-world-app/variables.tf:
variable"environment"{description="The name of the environment we're deploying to"type=string}
Now, add the asg-rolling-deploy module that you created earlier to the hello-world-app module to deploy an ASG:
module"asg"{source="../../cluster/asg-rolling-deploy"cluster_name="hello-world-${var.environment}"ami=var.amiuser_data=data.template_file.user_data.renderedinstance_type=var.instance_typemin_size=var.min_sizemax_size=var.max_sizeenable_autoscaling=var.enable_autoscalingsubnet_ids=data.aws_subnet_ids.default.idstarget_group_arns=[aws_lb_target_group.asg.arn]health_check_type="ELB"custom_tags=var.custom_tags}
And add the alb module, also that you created earlier, to the hello-world-app module to deploy an ALB:
module"alb"{source="../../networking/alb"alb_name="hello-world-${var.environment}"subnet_ids=data.aws_subnet_ids.default.ids}
Note the use of the the input variable environment as a way to enforce a naming convention, so all of your resources
will be namespaced based on the environment (e.g., hello-world-stage, hello-world-prod). This code also sets the
new subnet_ids, target_group_arns, health_check_type, and user_data variables you added earlier to appropriate
values.
Next, you need to configure the ALB target group and listener rule for this app. Update the aws_lb_target_group
resource in modules/services/hello-world-app/main.tf to use environment in its name:
resource"aws_lb_target_group" "asg"{name="hello-world-${var.environment}"port=var.server_portprotocol="HTTP"vpc_id=data.aws_vpc.default.idhealth_check{path="/"protocol="HTTP"matcher="200"interval=15timeout=3healthy_threshold=2unhealthy_threshold=2}}
Now, update the listener_arn parameter of the aws_lb_listener_rule resource to point at the alb_http_listener_arn
output of the ALB module:
resource"aws_lb_listener_rule" "asg"{listener_arn=module.alb.alb_http_listener_arnpriority=100condition{field="path-pattern"values=["*"]}action{type="forward"target_group_arn=aws_lb_target_group.asg.arn}}
Finally, pass through the important outputs from the asg-rolling-deploy and alb modules as outputs of the
hello-world-app module:
output"alb_dns_name"{value=module.alb.alb_dns_namedescription="The domain name of the load balancer"}output"asg_name"{value=module.asg.asg_namedescription="The name of the Auto Scaling Group"}output"instance_security_group_id"{value=module.asg.instance_security_group_iddescription="The ID of the EC2 Instance Security Group"}
This is function composition at work: you’re building up more complicated behavior (a “Hello, World” app) from simpler parts (ASG and ALB modules). A fairly common pattern you’ll see with Terraform is that you’ll have at least two types of modules:
- Generic modules
-
Modules such as
asg-rolling-deployandalbare the basic building blocks of your code, reusable across a wide variety of use cases. You’ve already seen them used to deploy a “Hello, World” app, but you could also use the exact same modules to deploy, for example, an ASG to run a Kafka cluster or a completely standalone ALB that can distribute load across many different apps (running one ALB for all apps is cheaper than one ALB for each app). - Use-case-specific modules
-
Modules such as
hello-world-appcombine multiple generic modules to serve one specific use case such as deploying the “Hello, World” app.
In real-world usage, you might need to break your modules down even further to support better composition and reuse. For
example, you can use a set of open source, reusable modules for running HashiCorp Consul in the terraform-aws-consul repo. Consul is an open source, distributed, key-value store that
sometimes needs to listen for network requests on a large number of different ports (server RPC, CLI RPC, Serf WAN,
HTTP API, DNS, etc.), so it ends up with about 20 security group rules. In the terraform-aws-consul repo, these
security group rules are defined in a standalone consul-security-group-rules
module.
To understand why, it’s useful to understand how Consul is deployed. One common use case is to deploy Consul as the data store for HashiCorp Vault, an open source, distributed secrets store that you can use to securely store passwords, API keys, TLS certs, etc. You can find a set of open source, reusable modules for running Vault in the terraform-aws-vault repo, including the diagram in Figure 6-3, which shows the typical production architecture for Vault.
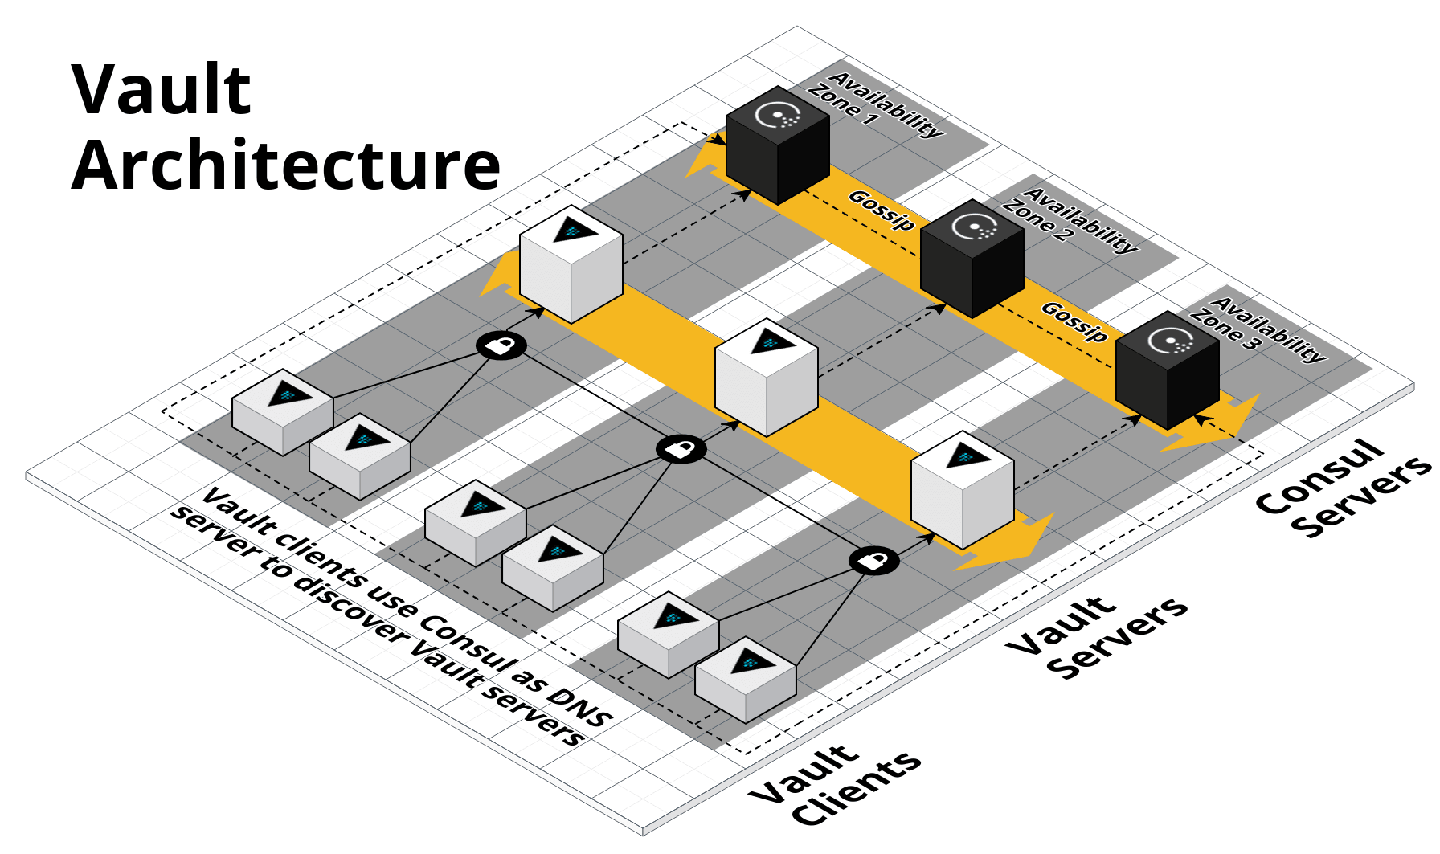
Figure 6-3. HashiCorp Vault and Consul architecture
In production, you typically run Vault on one ASG of three to five servers (deployed via the vault-cluster
module), and Consul on a
separate ASG of three to five servers (deployed via the consul-cluster
module), so each can be
scaled and secured separately. However, in a staging environment, running this many servers is overkill, and to save
money, you might want to run both Vault and Consul on the same ASG, perhaps of size 1, deployed by the vault-cluster
module. If all of Consul’s security group rules were defined in the consul-cluster module, you’d have no way to
reuse them (without copying and pasting the 20-plus rules) if you’re actually deploying Consul using the vault-cluster module.
However, because the rules are defined in a separate consul-security-group-rules module, you can attach them to the
vault-cluster or almost any other type of cluster.
This sort of breakdown would be overkill for a simple “Hello, World” app, but for complicated real-world infrastructure, breaking out security group rules, IAM policies, and other cross-cutting concerns into separate, standalone modules is often essential to supporting different deployment patterns. We’ve used this pattern not only with Consul and Vault, but also the ELK stack (i.e., run Elasticsearch, Logstash, and Kibana on separate clusters in Prod but the same cluster in Dev), the Confluent Platform (i.e., run Kafka, ZooKeeper, REST Proxy, and Schema Registry on separate clusters in Prod but the same cluster in Dev), the TICK stack (i.e., run Telegraf, InfluxDB, Chronograf, and Kapacitor on separate clusters in Prod or the same cluster in Dev), and so on.
Testable Modules
At this stage, you’ve written a whole lot of code in the form of three modules: asg-rolling-deploy, alb, and
hello-world-app. The next step is to check that your code actually works.
The modules you’ve created aren’t root modules meant to be deployed directly. To deploy them, you need to write some
Terraform code to plug in the arguments you want, set up the provider, configure the backend, and so on. A great
way to do this is to create an examples folder that, as the name suggests, shows examples of how to use your
modules. Let’s try it out.
Create examples/asg/main.tf with the following contents:
provider"aws"{region="us-east-2"}module"asg"{source="../../modules/cluster/asg-rolling-deploy"cluster_name=var.cluster_nameami="ami-0c55b159cbfafe1f0"instance_type="t2.micro"min_size=1max_size=1enable_autoscaling=falsesubnet_ids=data.aws_subnet_ids.default.ids}data"aws_vpc" "default"{default=true}data"aws_subnet_ids" "default"{vpc_id=data.aws_vpc.default.id}
This bit of code uses the asg-rolling-deploy module to deploy an ASG of size 1. Try it out by running
terraform init and terraform apply and checking to see that it runs without errors and actually spins up an ASG.
Now, add in a README.md file with these instructions, and suddenly this tiny little example takes on a whole lot
of power. In just several files and lines of code, you now have the following:
- A manual test harness
-
You can use this example code while working on the
asg-rolling-deploymodule to repeatedly deploy and undeploy it by manually runningterraform applyandterraform destroyto check that it works as you expect. - An automated test harness
-
As you will see in Chapter 7, this example code is also how you create automated tests for your modules. I typically recommend that tests go into the test folder.
- Executable documentation
-
If you commit this example (including README.md) into version control, other members of your team can find it, use it to understand how your module works, and take the module for a spin without writing a line of code. It’s both a way to teach the rest of your team and, if you add automated tests around it, a way to ensure that your teaching materials always work as expected.
Every Terraform module you have in the modules folder should have a corresponding example in the examples folder.
And every example in the examples folder should have a corresponding test in the test folder. In fact, you’ll most
likely have multiple examples (and therefore, multiple tests) for each module, with each example showing different
configurations and permutations of how that module can be used. For example, you might want to add other examples for
the asg-rolling-deploy module that show how to use it with auto scaling policies, how to hook up load
balancers to it, how to set custom tags, and so on.
Putting this all together, the folder structure for a typical modules repo will look something like this:
modules
 └ examples
   └ alb
   └ asg-rolling-deploy
     └ one-instance
     └ auto-scaling
     └ with-load-balancer
     └ custom-tags
   └ hello-world-app
   └ mysql
 └ modules
   └ alb
   └ asg-rolling-deploy
   └ hello-world-app
   └ mysql
 └ test
   └ alb
   └ asg-rolling-deploy
   └ hello-world-app
   └ mysql
As an exercise for the reader, I leave it up to you to turn the RDS code you wrote earlier into a MySQL module, and to
add lots of examples for the alb, asg-rolling-deploy, mysql, and hello-world-app modules.
A great practice to follow when developing a new module is to write the example code first, before you write even a line of module code. If you begin with the implementation, it’s too easy to become lost deep in the implementation details, and by the time you resurface and make it back to the API, you end up with a module that is unintuitive and difficult to use. On the other hand, if you begin with the example code, you’re free to think through the ideal user experience and come up with a clean API for your module and then work backward to the implementation. Because the example code is the primary way of testing modules anyway, this is a form of Test-Driven Development (TDD); I’ll dive more into testing in Chapter 7.
There’s one other practice that you will find useful as soon as you start regularly testing your modules: version
pinning. You should pin all of your Terraform modules to a specific version of Terraform using the required_version
argument. At a bare minimum, you should require a specific major version of Terraform:
terraform{# Require any 0.12.x version of Terraformrequired_version=">=0.12,<0.13"}
The preceding code will allow you to use only 0.12.x versions of Terraform with that module, but not 0.11.x and not
0.13.x. This is critical, because each major release of Terraform is backward incompatible: e.g., upgrading from
0.11.x to 0.12.x requires many code changes, so you don’t want to do it by accident. By adding the required_version
setting, if you try to run terraform apply with a different version, you immediately get an error:
$ terraform apply

Error: Unsupported Terraform Core version

This configuration does not support Terraform version 0.11.11. To proceed,
either choose another supported Terraform version or update the root module's
version constraint. Version constraints are normally set for good reason, so
updating the constraint may lead to other errors or unexpected behavior.
For production-grade code, I recommend pinning the version even more strictly:
terraform{# Require Terraform at exactly version 0.12.0required_version="=0.12.0"}
The reason for this is that even patch version number bumps (e.g., 0.12.0 → 0.12.1) can cause problems. Occasionally,
they are buggy; occasionally, they are backward incompatible (though that is more rare these days). But an even bigger
issue is that once a Terraform state file has been written with a newer version of Terraform, you can no longer use
that state file with any older version of Terraform. For example, suppose that all of your code is deployed with
Terraform 0.12.0, and one day a developer who just happens have 0.12.1 installed comes along and runs
terraform apply on a few of your modules. The state files for those modules are now no longer usable with 0.12.0, so
now you’re forced to update all of your developer computers and all your CI servers to 0.12.1!
This situation will likely get better when Terraform hits 1.0.0 and begins enforcing backward compatibility, but until then, I recommend pinning yourself to an exact Terraform version. That way, there will be no accidental updates. Instead, you choose when you’re ready to update, and when you do it, you can update all of your code, all of your developer computers, and all of your CI servers at once.
I also recommend pinning all of your provider versions:
provider"aws"{region="us-east-2"# Allow any 2.x version of the AWS providerversion="~> 2.0"}
This code pins the AWS provider code to any 2.x version (the ~> 2.0 syntax is equivalent to >= 2.0, < 3.0). Again,
the bare minimum is to pin to a specific major version number to avoid accidentally pulling in backward-incompatible
changes. Whether you need to pin the provider to an exact version depends on the provider. For example, the AWS
provider updates often and does a good job of maintaining backward compatibility, so you typically want to pin
to a specific major version but allow new patch versions to be picked up automatically so that you get easy access to new
features. However, each provider is different, so pay attention to how good of a job they do at maintaining backward
compatibility and pin the version number accordingly.
Releasable modules
After you have written and tested your modules, the next step is to release them. As you saw in “Module Versioning”, you can use Git tags with semantic versioning as follows:
$ git tag -a "v0.0.5" -m "Create new hello-world-app module"
$ git push --follow-tags
For example, to deploy version v0.0.5 of your hello-world-app module in the staging environment, put the following
code into live/stage/services/hello-world-app/main.tf:
provider"aws"{region="us-east-2"# Allow any 2.x version of the AWS providerversion="~> 2.0"}module"hello_world_app"{# TODO: replace this with your own module URL and version!!source="git@github.com:foo/modules.git//services/hello-world-app?ref=v0.0.5"server_text="New server text"environment="stage"db_remote_state_bucket="(YOUR_BUCKET_NAME)"db_remote_state_key="stage/data-stores/mysql/terraform.tfstate"instance_type="t2.micro"min_size=2max_size=2enable_autoscaling=false}
Next, pass through the ALB DNS name as an output in live/stage/services/hello-world-app/outputs.tf:
output"alb_dns_name"{value=module.hello_world_app.alb_dns_namedescription="The domain name of the load balancer"}
Now you can deploy your versioned module by running terraform init and terraform apply:
$ terraform apply

(...)

Apply complete! Resources: 13 added, 0 changed, 0 destroyed.

Outputs:

alb_dns_name = hello-world-stage-477699288.us-east-2.elb.amazonaws.com
If that works well, you can then deploy the exact same version—and therefore, the exact same code—to other environments, including production. If you ever encounter an issue, versioning also gives you the option to roll back by deploying an older version.
Another option for releasing modules is to publish them in the Terraform Registry. The Public Terraform Registry resides at https://registry.terraform.io/ and includes hundreds of reusable, community-maintained, open source modules for AWS, Google Cloud, Azure, and many other providers. There are a few requirements to publish a module to the Public Terraform Registry:6
-
The module must live in a public GitHub repo.
-
The repo must be named
terraform-<PROVIDER>-<NAME>, wherePROVIDERis the provider the module is targeting (e.g.,aws) andNAMEis the name of the module (e.g.,vault). -
The module must follow a specific file structure, including defining Terraform code in the root of the repo, providing a README.md, and using the convention of main.tf, variables.tf, and outputs.tf as filenames.
-
The repo must use Git tags with semantic versioning (
x.y.z) for releases.
If your module meets those requirements, you can share it with the world by logging in to the Terraform Registry with your GitHub account and using the web UI to publish the module. Once your module is in the Registry, you get a nice UI to browse the module, as shown in Figure 6-4.
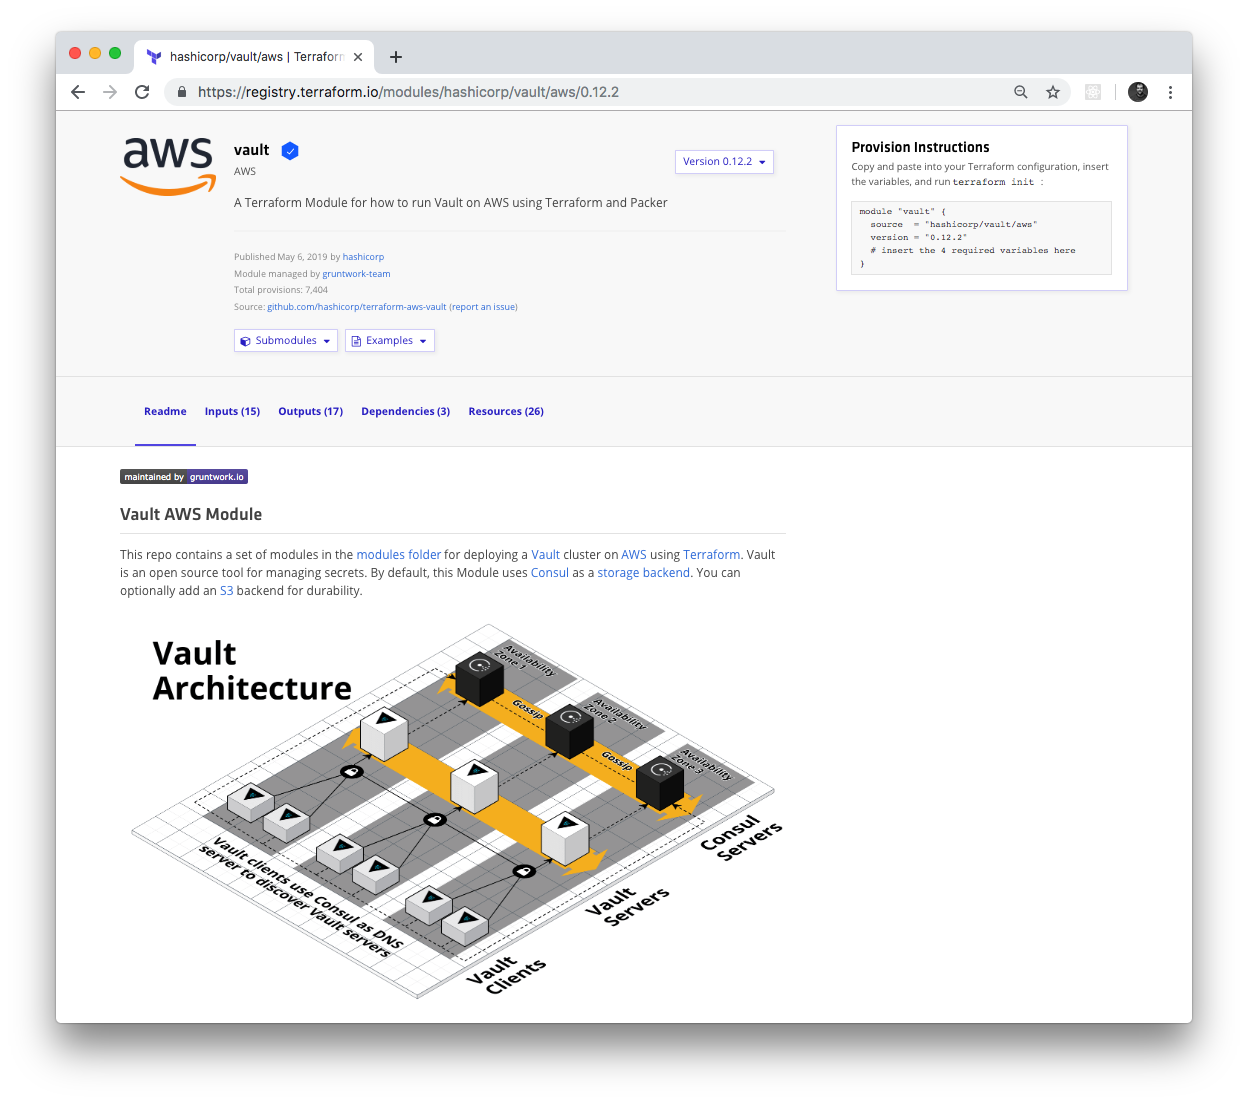
Figure 6-4. HashiCorp Vault module in the Terraform Registry
The Terraform Registry knows how to parse module inputs and outputs, so those show up in the UI as well, including the
type and description fields, as shown in Figure 6-5.
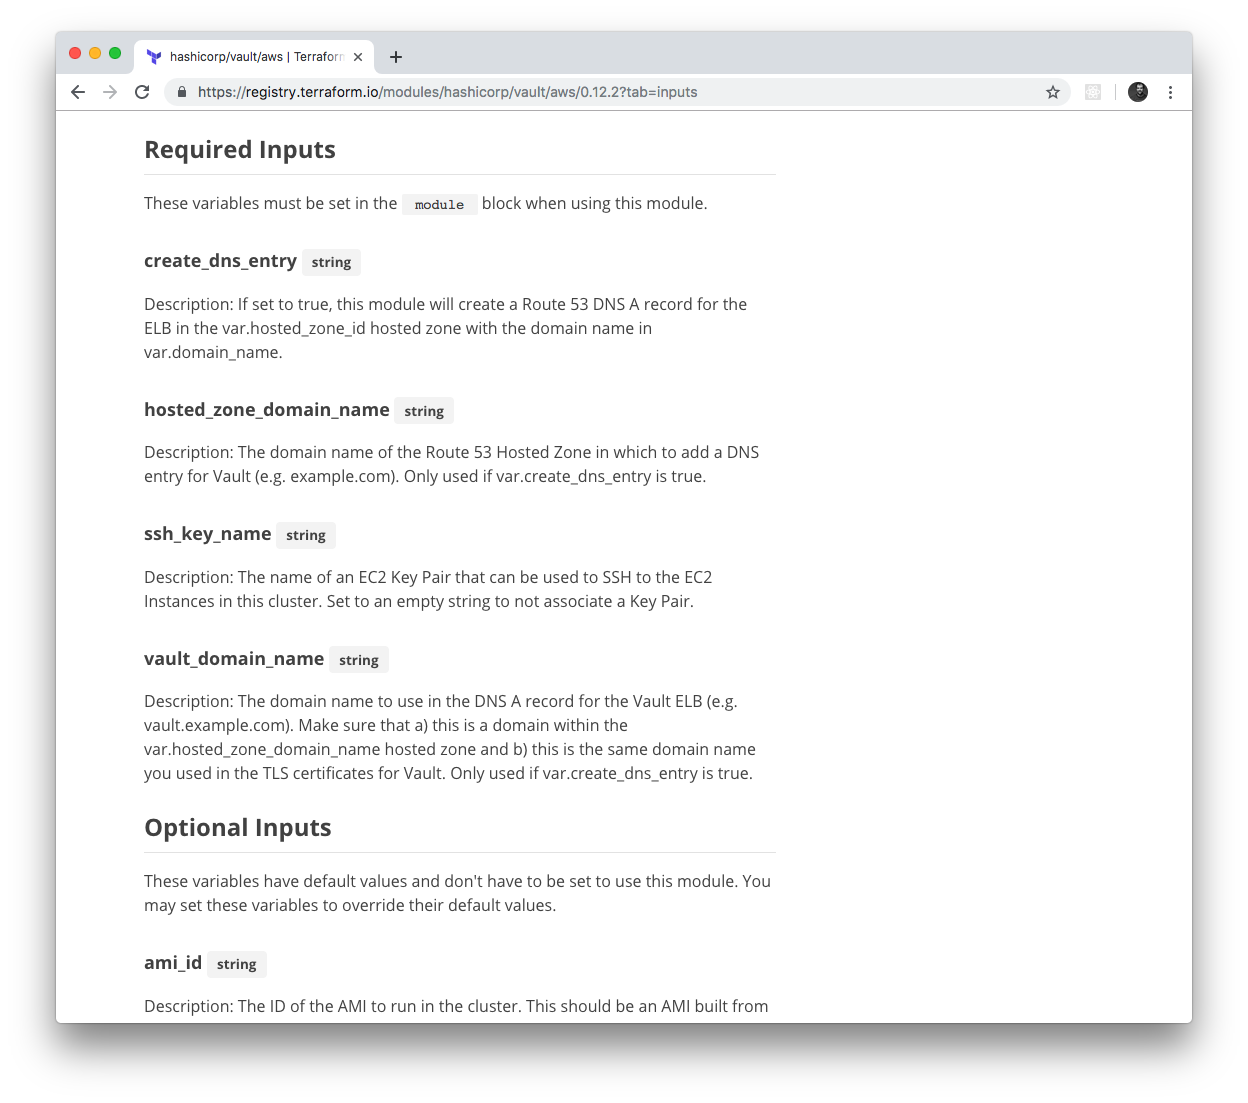
Figure 6-5. The Terraform Registry automatically parses and displays module inputs and outputs
Terraform even supports a special syntax for consuming modules from the Terraform Registry. Instead of long Git URLs
with hard-to-spot ref parameters, you can use a special shorter registry URL in the source argument and specify the
version via a separate version argument using the following syntax:
module"<NAME>"{source="<OWNER>/<REPO>/<PROVIDER>"version="<VERSION>"# (...)}
where NAME is the identifier to use for the module in your Terraform code, OWNER is the owner of the GitHub repo
(e.g., in github.com/foo/bar, the owner is foo), REPO is the name of the GitHub repo (e.g., in
github.com/foo/bar, the repo is bar), PROVIDER is the provider you’re targeting (e.g., aws), and VERSION is
the version of the module to use. Here’s an example of how to use the Vault module from the Terraform Registry:
module"vault"{source="hashicorp/vault/aws"version="0.12.2"# (...)}
If you are a customer of HashiCorp’s Terraform Enterprise, you can have this same experience with a Private Terraform Registry; that is, a registry that lives in your private Git repos, and is only accessible to your team. This can be a great way to share modules within your company.
Beyond Terraform Modules
Although this book is all about Terraform, to build out your entire production-grade infrastructure, you’ll need to
use other tools, too, such as Docker, Packer, Chef, Puppet, and, of course, the duct tape, glue, and work horse of the
DevOps world, the trusty Bash script. Most of this code can reside in the modules folder directly alongside your Terraform
code. For example, in the HashiCorp Vault repo you saw earlier, the modules folder contains not only Terraform code,
such as the vault-cluster module mentioned earlier, but Bash scripts, such as the run-vault Bash
script that can be run on a
Linux server during boot (e.g., via User Data) to configure and start Vault.
However, every now and then, you might need to go further, and run some non-Terraform code (e.g., a script) directly from a Terraform module. Sometimes, this is to integrate Terraform with another system (e.g., you’ve already used Terraform to configure User Data scripts for execution on EC2 Instances); other times, it’s to work around a limitation of Terraform, such as a missing provider API, or the inability to implement complicated logic due to Terraform’s declarative nature. If you search around, you can find a few “escape hatches” within Terraform that make this possible:
-
Provisioners
-
Provisioners with
null_resource -
External data source
Let’s go through these one a time.
Provisioners
Terraform provisioners are used to execute scripts either on the local machine or a remote machine when you run
Terraform, typically to do the work of bootstrapping, configuration management, or cleanup. There are several different
kinds of provisioners, including local-exec (execute a script on the local machine), remote-exec (execute a script
on a remote resource), chef (run Chef Client on a remote resource), and file (copy files to a remote
resource).7
You can add provisioners to a resource by using a provisioner block. For example, here is how you can use the
local-exec provisioner to execute a script on your local machine:
resource"aws_instance" "example"{ami="ami-0c55b159cbfafe1f0"instance_type="t2.micro"provisioner"local-exec"{command="echo \"Hello, World from $(uname -smp)\""}}
When you run terraform apply on this code, it prints “Hello, World from” and then the local operating system
details using the uname command:
$ terraform apply

(...)

aws_instance.example (local-exec): Hello, World from Darwin x86_64 i386

(...)

Apply complete! Resources: 1 added, 0 changed, 0 destroyed.
Trying out a remote-exec provisioner is a little more complicated. To execute code on a remote resource, such as an
EC2 Instance, your Terraform client must be able to do the following:
- Communicate with the EC2 Instance over the network
-
You already know how to allow this with a security group.
- Authenticate to the EC2 Instance
-
The
remote-execprovisioner supports SSH and WinRM connections. Since you’ll be launching a Linux EC2 Instance (Ubuntu), you’ll want to use SSH authentication. And that means you’ll need to configure SSH keys.
Let’s begin by creating a security group that allows inbound connections to port 22, the default port for SSH:
resource"aws_security_group" "instance"{ingress{from_port=22to_port=22protocol="tcp"# To make this example easy to try out, we allow all SSH connections.# In real world usage, you should lock this down to solely trusted IPs.cidr_blocks=["0.0.0.0/0"]}}
With SSH keys, the normal process would be for you to generate an SSH key pair on your computer, upload the public key
to AWS, and store the private key somewhere secure where your Terraform code can access it. However, to make it easier
for you to try out this code, you can use a resource called tls_private_key to automatically generate a private key:
# To make this example easy to try out, we generate a private key in Terraform.# In real-world usage, you should manage SSH keys outside of Terraform.resource"tls_private_key" "example"{algorithm="RSA"rsa_bits=4096}
This private key is stored in Terraform state, which is not great for production use cases, but is fine for this
learning exercise. Next, upload the public key to AWS using the aws_key_pair resource:
resource"aws_key_pair" "generated_key"{public_key=tls_private_key.example.public_key_openssh}
Finally, let’s begin writing the code for the EC2 Instance:
resource"aws_instance" "example"{ami="ami-0c55b159cbfafe1f0"instance_type="t2.micro"vpc_security_group_ids=[aws_security_group.instance.id]key_name=aws_key_pair.generated_key.key_name}
The first few lines of this code should be familiar to you: it’s deploying an Ubuntu Amazon Machine Image (AMI) on a t2.micro and
associating the security group you created earlier with this EC2 Instance. The only new item is the use of the
key_name attribute to instruct AWS to associate your public key with this EC2 Instance. AWS will add that public key to
the server’s authorized_keys file, which will allow you to SSH to that server with the corresponding private key.
Next, let’s add the remote-exec provisioner to this EC2 Instance:
resource"aws_instance" "example"{ami="ami-0c55b159cbfafe1f0"instance_type="t2.micro"vpc_security_group_ids=[aws_security_group.instance.id]key_name=aws_key_pair.generated_key.key_nameprovisioner"remote-exec"{inline=["echo \"Hello, World from $(uname -smp)\""]}}
This looks nearly identical to the local-exec provisioner, except you use an inline argument to pass a list of
commands to execute, instead of a single command argument. Finally, you need to configure Terraform to use SSH to
connect to this EC2 Instance when running the remote-exec provisioner. You do this by using a connection block:
resource"aws_instance" "example"{ami="ami-0c55b159cbfafe1f0"instance_type="t2.micro"vpc_security_group_ids=[aws_security_group.instance.id]key_name=aws_key_pair.generated_key.key_nameprovisioner"remote-exec"{inline=["echo \"Hello, World from $(uname -smp)\""]}connection{type="ssh"host=self.public_ipuser="ubuntu"private_key=tls_private_key.example.private_key_pem}}
This connection block tells Terraform to connect to the EC2 Instance’s public IP address using SSH with "ubuntu" as
the username (this is the default username for the root user on Ubuntu AMIs) and the autogenerated private key. Note
the use of the self keyword to set the host parameter. Self expressions use the following syntax:
self.<ATTRIBUTE>
You can use this special syntax solely in connection and provisioner blocks to refer to an output ATTRIBUTE of
the surrounding resource. If you tried to use the standard aws_instance.example.<ATTRIBUTE> syntax, you’d get a
circular dependency error, as resources can’t have references to themselves, so the self expression is a workaround
added specifically for provisioners.
If you run terraform apply on this code, you’ll see the following:
$ terraform apply

(...)

aws_instance.example: Creating...
aws_instance.example: Still creating... [10s elapsed]
aws_instance.example: Still creating... [20s elapsed]
aws_instance.example: Provisioning with 'remote-exec'...
aws_instance.example (remote-exec): Connecting to remote host via SSH...
aws_instance.example (remote-exec): Connecting to remote host via SSH...
aws_instance.example (remote-exec): Connecting to remote host via SSH...

(... repeats a few more times ...)

aws_instance.example (remote-exec): Connecting to remote host via SSH...
aws_instance.example (remote-exec): Connected!
aws_instance.example (remote-exec): Hello, World from Linux x86_64 x86_64

Apply complete! Resources: 4 added, 0 changed, 0 destroyed.
The remote-exec provisioner doesn’t know exactly when the EC2 Instance will be booted and ready to accept
connections, so it will retry the SSH connection multiple times until it succeeds or hits a timeout (the default
timeout is five minutes, but you can configure it). Eventually, the connection succeeds, and you get a “Hello, World” from
the server.
Note that, by default, when you specify a provisioner, it is a creation-time provisioner, which means that it runs
(a) during terraform apply, and (b) only during the initial creation of a resource. The provisioner will not run
on any subsequent calls to terraform apply, so creation-time provisioners are mainly useful for running initial
bootstrap code. If you set the when = "destroy" argument on a provisioner, it will be a destroy-time provisioner,
which will run (a) after you run terraform destroy, and (b) just before the resource is deleted.
You can specify multiple provisioners on the same resource and Terraform will run them one at a time, in order, from
top to bottom. You can use the on_failure argument to instruct Terraform how to handle errors from the provisioner: if
set to "continue", Terraform will ignore the error and continue with resource creation or destruction; if set to
"abort", Terraform will abort the creation or destruction.
Provisioners with null_resource
Provisioners can be defined only within a resource, but sometimes, you want to execute a provisioner without tying it
to a specific resource. You can do this using something called the null_resource, which acts just like a normal
Terraform resource, except that it doesn’t create anything. By defining provisioners on the null_resource, you can run
your scripts as part of the Terraform life cycle, but without being attached to any “real” resource:
resource"null_resource" "example"{provisioner"local-exec"{command="echo \"Hello, World from $(uname -smp)\""}}
The null_resource even has a handy argument called triggers, which takes in a map of keys and values. Whenever the
values change, the null_resource will be recreated, therefore forcing any provisioners within it to be reexecuted.
For example, if you want to execute a provisioner within a null_resource every single time you run terraform
apply, you could use the uuid() built-in function, which returns a new, randomly generated UUID each time it’s
called, within the triggers argument:
resource"null_resource" "example"{# Use UUID to force this null_resource to be recreated on every# call to 'terraform apply'triggers={uuid=uuid()}provisioner"local-exec"{command="echo \"Hello, World from $(uname -smp)\""}}
Now, every time you call terraform apply, the local-exec provisioner will execute:
$ terraform apply

(...)

null_resource.example (local-exec): Hello, World from Darwin x86_64 i386

$ terraform apply

null_resource.example (local-exec): Hello, World from Darwin x86_64 i386
External data source
Provisioners will typically be your go-to for executing scripts from Terraform, but they aren’t always the correct fit.
Sometimes, what you’re really looking to do is execute a script to fetch some data and make that data available within
the Terraform code itself. To do this, you can use the external data source, which allows an external command that
implements a specific protocol to act as a data source.
The protocol is as follows:
-
You can pass data from Terraform to the external program using the
queryargument of theexternaldata source. The external program can read in these arguments as JSON from stdin. -
The external program can pass data back to Terraform by writing JSON to stdout. The rest of your Terraform code can then pull data out of this JSON by using the
resultoutput attribute of the external data source.
Here’s an example:
data"external" "echo"{program=["bash", "-c", "cat /dev/stdin"]query={foo="bar"}}output"echo"{value=data.external.echo.result}output"echo_foo"{value=data.external.echo.result.foo}
This example uses the external data source to execute a Bash script that echoes back to stdout any data it receives on
stdin. Therefore, any data we pass in via the query argument should come back as-is via the result output attribute.
Here’s what happens when you run terraform apply on this code:
$ terraform apply

(...)

Apply complete! Resources: 0 added, 0 changed, 0 destroyed.

Outputs:

echo = {
  "foo" = "bar"
}
echo_foo = bar
You can see that data.external.<NAME>.result contains the JSON returned by the external program and that you can
navigate within that JSON using the syntax data.external.<NAME>.result.<PATH> (e.g., data.external.echo.result.foo).
The external data source is a lovely escape hatch if you need to access data in your Terraform code and there’s no
existing data source that knows how to retrieve that data. However, be conservative with your use of external data
sources and all of the other Terraform “escape hatches,” since they make your code less portable and more brittle. For
example, the external data source code you just saw relies on Bash, which means you won’t be able to deploy that
Terraform module from Windows.
Conclusion
Now that you’ve seen all of the ingredients of creating production-grade Terraform code, it’s time to put them together. The next time you begin to work on a new module, use the following process:
-
Go through the production-grade infrastructure checklist in Table 6-2 and explicitly identify the items you’ll be implementing and the items you’ll be skipping. Use the results of this checklist, plus Table 6-1, to come up with a time estimate for your boss.
-
Create an examples folder and write the example code first, using it to define the best user experience and cleanest API you can think of for your modules. Create an example for each important permutation of your module and include enough documentation and reasonable defaults to make the example as easy to deploy as possible.
-
Create a modules folder and implement the API you came up with as a collection of small, reusable, composable modules. Use a combination of Terraform and other tools like Docker, Packer, and Bash to implement these modules. Make sure to pin your Terraform and provider versions.
-
Create a test folder and write automated tests for each example.
Now it’s time to explore how to write automated tests for your infrastructure code, which you’ll do next in Chapter 7.
1 Hofstadter, Douglas R. Gödel, Escher, Bach: An Eternal Golden Braid. 20 Anv edition. New York: Basic Books, 1999.
2 Godin, Seth. “Don’t Shave That Yak!” Seth’s Blog, March 5, 2005.
3 Brooks, Frederick P. Jr. The Mythical Man-Month: Essays on Software Engineering. Anniversary edition. Reading, MA: Addison-Wesley Professional, 1995.
4 Martin, Robert C. Clean Code: A Handbook of Agile Software Craftsmanship. 1st edition. Upper Saddle River, NJ: Prentice Hall, 2008.
5 Salus, Peter H. A Quarter-Century of Unix. New York: Addison-Wesley Professional, 1994.
6 You can find the full details on publishing modules at http://bit.ly/2M53hi0.
7 You can find the full list of provisioners at http://bit.ly/2M7s1pK.