Chapter 2. Getting Started with Terraform
In this chapter, you’re going to learn the basics of how to use Terraform. It’s an easy tool to learn, so in the span of about 40 pages, you’ll go from running your first Terraform commands all the way up to using Terraform to deploy a cluster of servers with a load balancer that distributes traffic across them. This infrastructure is a good starting point for running scalable, highly available web services. In subsequent chapters, you’ll develop this example even further.
Terraform can provision infrastructure across public cloud providers such as Amazon Web Services (AWS), Azure, Google Cloud, and DigitalOcean, as well as private cloud and virtualization platforms such as OpenStack and VMWare. For just about all of the code examples in this chapter and the rest of the book, you are going to use AWS. AWS is a good choice for learning Terraform because of the following:
-
AWS is the most popular cloud infrastructure provider, by far. It has a 45% share in the cloud infrastructure market, which is more than the next three biggest competitors (Microsoft, Google, and IBM) combined.
-
AWS provides a huge range of reliable and scalable cloud-hosting services, including Amazon Elastic Compute Cloud (Amazon EC2), which you can use to deploy virtual servers; Auto Scaling Groups (ASGs), which make it easier to manage a cluster of virtual servers; and Elastic Load Balancers (ELBs), which you can use to distribute traffic across the cluster of virtual servers.1
-
AWS offers a generous Free Tier for the first year that should allow you to run all of these examples for free. If you already used up your free tier credits, the examples in this book should still cost you no more than a few dollars.
If you’ve never used AWS or Terraform before, don’t worry; this tutorial is designed for novices to both technologies. I’ll walk you through the following steps:
-
Setting up your AWS account
-
Installing Terraform
-
Deploying a single server
-
Deploying a single web server
-
Deploying a configurable web server
-
Deploying a cluster of web servers
-
Deploying a load balancer
-
Cleaning up
Example Code
As a reminder, you can find all of the code examples in the book at https://github.com/brikis98/terraform-up-and-running-code.
Setting Up Your AWS Account
If you don’t already have an AWS account, head over to https://aws.amazon.com and sign up. When you first register for AWS, you initially sign in as the root user. This user account has access permissions to do absolutely anything in the account, so from a security perspective, it’s not a good idea to use the root user on a day-to-day basis. In fact, the only thing you should use the root user for is to create other user accounts with more-limited permissions, and then switch to one of those accounts immediately.2
To create a more-limited user account, you will need to use the Identity and Access Management (IAM) service. IAM is where you manage user accounts as well as the permissions for each user. To create a new IAM user, go to the IAM Console, click Users, and then click the Create New Users button. Enter a name for the user and make sure “Generate an access key for each user” is selected, as shown in Figure 2-1 (note, AWS has been making design changes to its web console, so the IAM pages might look slightly different when you are reading this book).
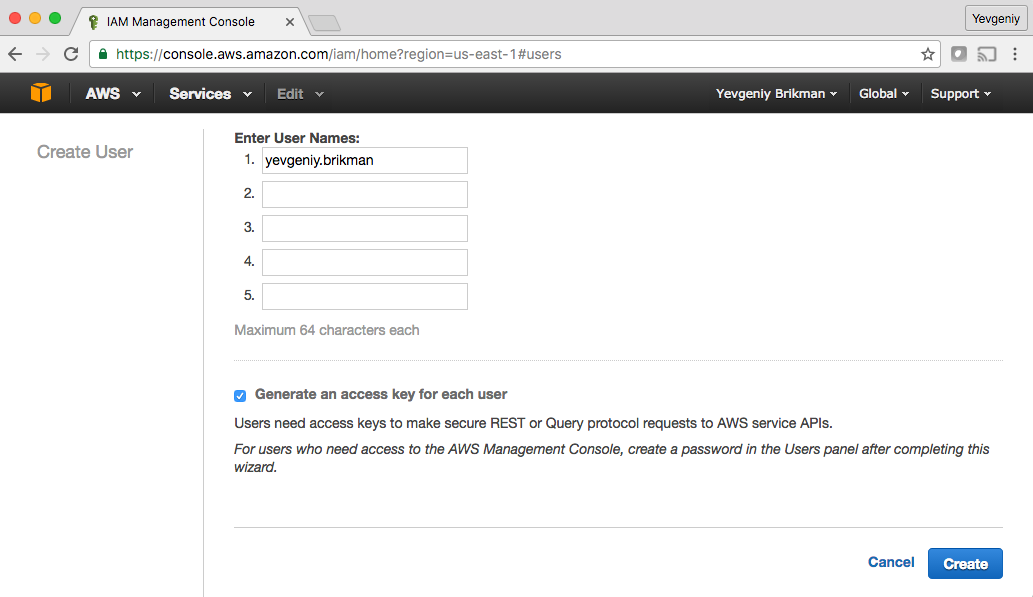
Figure 2-1. Creating a new IAM user
Click the Create button. AWS will show you the security credentials for that user, which consist of an Access Key ID and a Secret Access Key, as shown in Figure 2-2. You must save these immediately because they will never be shown again, and you’ll need them later on in this tutorial. Remember that these credentials give access to your AWS account, so store them somewhere secure (e.g., a password manager such as 1Password, LastPass, or OS X Keychain) and never share them with anyone.
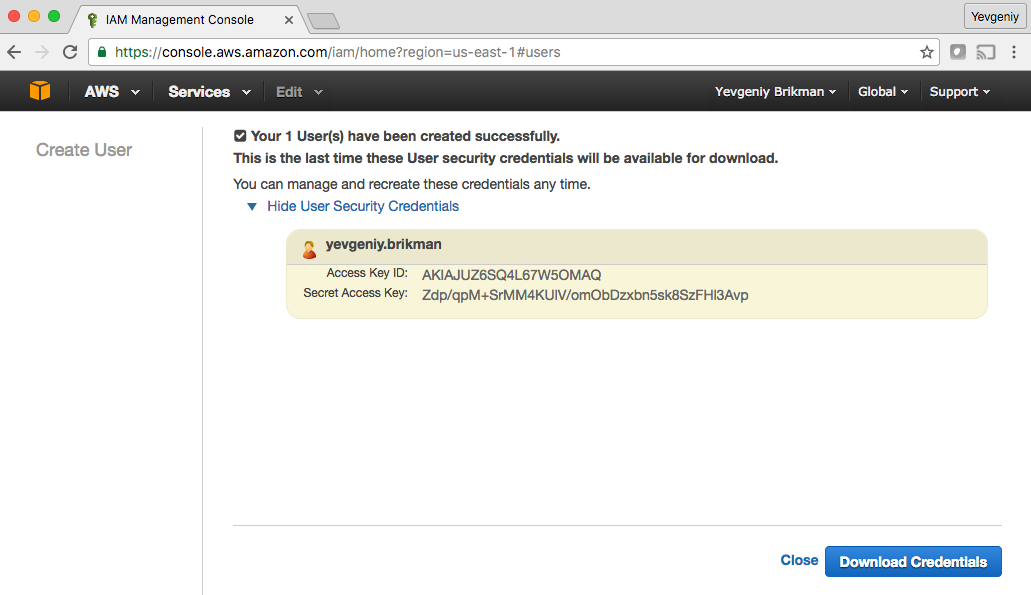
Figure 2-2. Store your AWS credentials somewhere secure. Never share them with anyone. (Don’t worry, the ones in the screenshot are fake.)
After you’ve saved your credentials, click the Close button. This takes you to the list of IAM users. Click the user you just created and select the Permissions tab. By default, new IAM users have no permissions whatsoever, and therefore cannot do anything in an AWS account.
To give an IAM user permissions to do something, you need to associate one or more IAM Policies with that user’s account. An IAM Policy is a JSON document that defines what a user is or isn’t allowed to do. You can create your own IAM Policies or use some of the predefined IAM Policies, which are known as Managed Policies.3
To run the examples in this book, you will need to add the following Managed Policies to your IAM user, as shown in Figure 2-3:
-
AmazonEC2FullAccess: required for this chapter. -
AmazonS3FullAccess: required for Chapter 3. -
AmazonDynamoDBFullAccess: required for Chapter 3. -
AmazonRDSFullAccess: required for Chapter 3. -
CloudWatchFullAccess: required for Chapter 5. -
IAMFullAccess: required for Chapter 5.
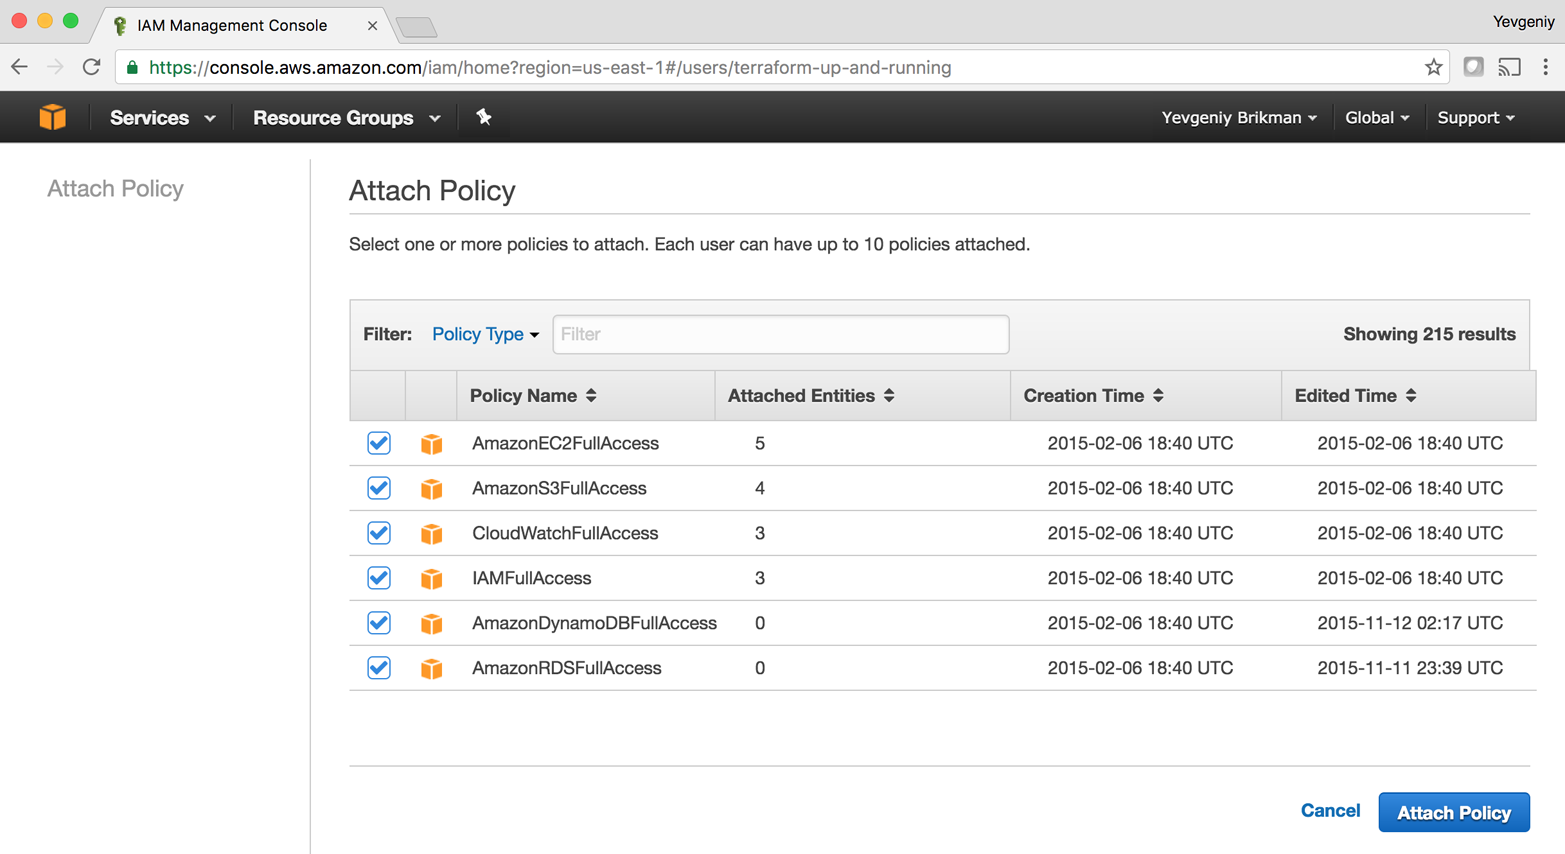
Figure 2-3. Adding several Managed IAM Policies to your new IAM user
A Note on Default Virtual Private Clouds
If you are using an existing AWS account, it must have a Default VPC in it. A VPC, or Virtual
Private Cloud, is an isolated area of your AWS account that has its own virtual network and IP address space. Just
about every AWS resource deploys into a VPC. If you don’t explicitly specify a VPC, the resource will be deployed into
the Default VPC, which is part of every new AWS account. All of the examples in this book rely on this Default VPC, so
if for some reason you deleted the one in your account, either use a different region (each region has its own Default
VPC) or create a new Default VPC using the AWS Web Console. Otherwise, you’ll
need to update almost every example to include a vpc_id or subnet_id parameter pointing to a custom VPC.
Install Terraform
You can download Terraform from the Terraform home page. Click the download link, select the
appropriate package for your operating system, download the ZIP archive, and unzip it into the directory where you
want Terraform to be installed. The archive will extract a single binary called terraform, which you’ll want to add
to your PATH environment variable. Alternatively, Terraform might be available in your operating system’s package
manager; for example, you can run brew install terraform on OS X.
To check whether things are working, run the terraform command, and you should see the usage instructions:
$ terraform
Usage: terraform [-version] [-help] <command> [args]

Common commands:
    apply              Builds or changes infrastructure
    console            Interactive console for Terraform interpolations
    destroy            Destroy Terraform-managed infrastructure
    env                Workspace management
    fmt                Rewrites config files to canonical format
    (...)
For Terraform to be able to make changes in your AWS account, you will need to set the AWS credentials for the
IAM user you created earlier as the environment variables AWS_ACCESS_KEY_ID and AWS_SECRET_ACCESS_KEY. For example,
here is how you can do it in a Unix/Linux/macOS terminal:
$ export AWS_ACCESS_KEY_ID=(your access key id)
$ export AWS_SECRET_ACCESS_KEY=(your secret access key)
Note that these environment variables apply only to the current shell, so if you reboot your computer or open a new terminal window, you’ll need to export these variables again.
Authentication Options
In addition to environment variables, Terraform supports the same authentication mechanisms
as all AWS CLI and SDK tools. Therefore, it’ll also be able to use credentials in $HOME/.aws/credentials, which are
automatically generated if you run the configure command on the AWS CLI, or IAM Roles, which you can add to almost
any resource in AWS. For more info, see
A Comprehensive Guide to Authenticating to AWS on the Command Line.
Deploy a Single Server
Terraform code is written in the HashiCorp Configuration Language (HCL) in files with the extension .tf.4 It is a declarative language, so your goal is to describe the infrastructure you want, and Terraform will figure out how to create it. Terraform can create infrastructure across a wide variety of platforms, or what it calls providers, including AWS, Azure, Google Cloud, DigitalOcean, and many others.
You can write Terraform code in just about any text editor. If you search around, you can find Terraform syntax highlighting support for most editors (note, you may have to search for the word “HCL” instead of “Terraform”), including vim, emacs, Sublime Text, Atom, Visual Studio Code, and IntelliJ (the latter even has support for refactoring, find usages, and go to declaration).
The first step to using Terraform is typically to configure the provider(s) you want to use. Create an empty folder and put a file in it called main.tf that contains the following contents:
provider"aws"{region="us-east-2"}
This tells Terraform that you are going to be using AWS as your provider and that you want to deploy your
infrastructure into the us-east-2 region. AWS has datacenters all over the world, grouped into regions. An AWS region is a separate geographic area, such as us-east-2 (Ohio), eu-west-1
(Ireland), and ap-southeast-2 (Sydney). Within each region, there are multiple isolated datacenters known as
Availability Zones (AZs), such as us-east-2a, us-east-2b, and so on.5
For each type of provider, there are many different kinds of resources that you can create, such as servers, databases, and load balancers. The general syntax for creating a resource in Terraform is:
resource"<PROVIDER>_<TYPE>" "<NAME>"{[CONFIG...]}
where PROVIDER is the name of a provider (e.g., aws), TYPE is the type of resource to create in that provider
(e.g., instance), NAME is an identifier you can use throughout the Terraform code to refer to this
resource (e.g., my_instance), and CONFIG consists of one or more arguments that are specific to
that resource.
For example, to deploy a single (virtual) server in AWS, known as an EC2 Instance, use the aws_instance resource
in main.tf as follows:
resource"aws_instance" "example"{ami="ami-0c55b159cbfafe1f0"instance_type="t2.micro"}
The aws_instance resource supports many different arguments, but for now, you only need to set the two required ones:
ami-
The Amazon Machine Image (AMI) to run on the EC2 Instance. You can find free and paid AMIs in the AWS Marketplace or create your own using tools such as Packer (see “Server Templating Tools” for a discussion of machine images and server templating). The preceding code example sets the
amiparameter to the ID of an Ubuntu 18.04 AMI inus-east-2. This AMI is free to use. instance_type-
The type of EC2 Instance to run. Each type of EC2 Instance provides a different amount of CPU, memory, disk space, and networking capacity. The EC2 Instance Types page lists all the available options. The preceding example uses
t2.micro, which has one virtual CPU, 1 GB of memory, and is part of the AWS free tier.
Use the Docs!
Terraform supports dozens of providers, each of which supports dozens of resources, and each resource has dozens of
arguments. There is no way to remember them all. When you’re writing Terraform code, you should be regularly referring
to the Terraform documentation to look up what resources are available and how to use each one. For example, here’s the
documentation for the aws_instance resource. I’ve been using Terraform for years and I still refer to
these docs multiple times per day!
In a terminal, go into the folder where you created main.tf and run the terraform init command:
$ terraform init

Initializing the backend...

Initializing provider plugins...
- Checking for available provider plugins...
- Downloading plugin for provider "aws" (terraform-providers/aws) 2.10.0...

The following providers do not have any version constraints in configuration,
so the latest version was installed.

To prevent automatic upgrades to new major versions that may contain breaking
changes, it is recommended to add version = "..." constraints to the
corresponding provider blocks in configuration, with the constraint strings
suggested below.

* provider.aws: version = "~> 2.10"

Terraform has been successfully initialized!
The terraform binary contains the basic functionality for Terraform, but it does not come with the code for any of
the providers (e.g., the AWS provider, Azure provider, GCP provider, etc.), so when you’re first starting to use Terraform, you
need to run terraform init to tell Terraform to scan the code, figure out which providers you’re using,
and download the code for them. By default, the provider code will be downloaded into a .terraform folder, which is
Terraform’s scratch directory (you may want to add it to .gitignore). You’ll see a few other uses for the init
command and .terraform folder in later chapters. For now, just be aware that you need to run init any time you
start with new Terraform code, and that it’s safe to run init multiple times (the command is idempotent).
Now that you have the provider code downloaded, run the terraform plan command:
$ terraform plan

(...)

Terraform will perform the following actions:

  # aws_instance.example will be created
  + resource "aws_instance" "example" {
      + ami                          = "ami-0c55b159cbfafe1f0"
      + arn                          = (known after apply)
      + associate_public_ip_address  = (known after apply)
      + availability_zone            = (known after apply)
      + cpu_core_count               = (known after apply)
      + cpu_threads_per_core         = (known after apply)
      + get_password_data            = false
      + host_id                      = (known after apply)
      + id                           = (known after apply)
      + instance_state               = (known after apply)
      + instance_type                = "t2.micro"
      + ipv6_address_count           = (known after apply)
      + ipv6_addresses               = (known after apply)
      + key_name                     = (known after apply)
      (...)
  }

Plan: 1 to add, 0 to change, 0 to destroy.
The plan command lets you see what Terraform will do before actually making any changes. This is a great way to
sanity check your code before unleashing it onto the world. The output of the plan command is similar to the output
of the diff command that is part of Unix, Linux, and git: anything with a plus sign (+) will be created, anything
with a minus sign (–) will be deleted, and anything with a tilde sign (~) will be modified in place. In the
preceding output, you can see that Terraform is planning on creating a single EC2 Instance and nothing else, which
is exactly what you want.
To actually create the Instance, run the terraform apply command:
$ terraform apply

(...)

Terraform will perform the following actions:

  # aws_instance.example will be created
  + resource "aws_instance" "example" {
      + ami                          = "ami-0c55b159cbfafe1f0"
      + arn                          = (known after apply)
      + associate_public_ip_address  = (known after apply)
      + availability_zone            = (known after apply)
      + cpu_core_count               = (known after apply)
      + cpu_threads_per_core         = (known after apply)
      + get_password_data            = false
      + host_id                      = (known after apply)
      + id                           = (known after apply)
      + instance_state               = (known after apply)
      + instance_type                = "t2.micro"
      + ipv6_address_count           = (known after apply)
      + ipv6_addresses               = (known after apply)
      + key_name                     = (known after apply)
      (...)
  }

Plan: 1 to add, 0 to change, 0 to destroy.

Do you want to perform these actions?
  Terraform will perform the actions described above.
  Only 'yes' will be accepted to approve.

  Enter a value:
You’ll notice that the apply command shows you the same plan output and asks you to confirm whether you actually want to
proceed with this plan. So, while plan is available as a separate command, it’s mainly useful for quick sanity checks
and during code reviews (a topic you’ll see more of in Chapter 8), and most of the time you’ll run
apply directly and review the plan output it shows you.
Type yes and hit Enter to deploy the EC2 Instance:
Do you want to perform these actions?
  Terraform will perform the actions described above.
  Only 'yes' will be accepted to approve.

  Enter a value: yes

aws_instance.example: Creating...
aws_instance.example: Still creating... [10s elapsed]
aws_instance.example: Still creating... [20s elapsed]
aws_instance.example: Still creating... [30s elapsed]
aws_instance.example: Creation complete after 38s [id=i-07e2a3e006d785906]

Apply complete! Resources: 1 added, 0 changed, 0 destroyed.
Congrats, you’ve just deployed an EC2 Instance in your AWS account using Terraform! To verify this, head over to the EC2 console; and you should see something similar to Figure 2-4.
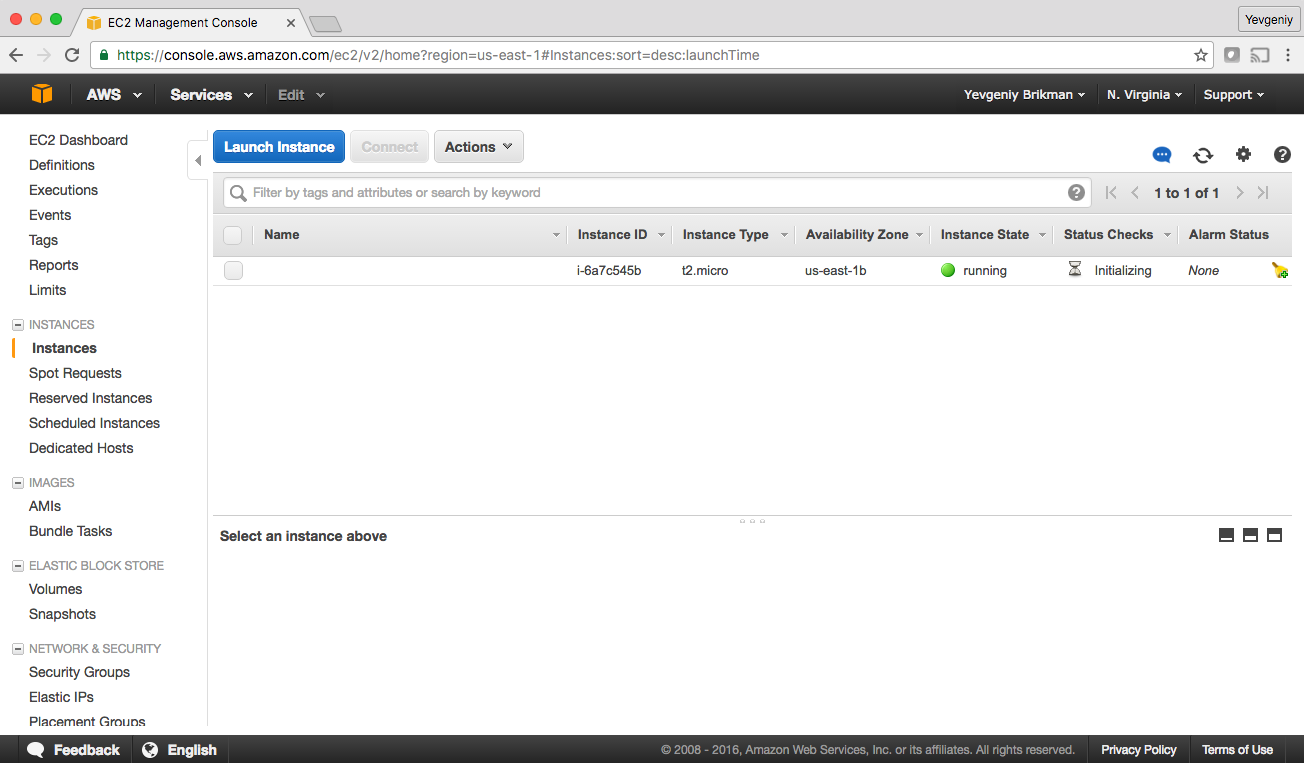
Figure 2-4. A single EC2 Instance
Sure enough, the Instance is there, though admittedly, this isn’t the most exciting example. Let’s make it a bit more
interesting. First, notice that the EC2 Instance doesn’t have a name. To add one, you can add tags to the
aws_instance resource:
resource"aws_instance" "example"{ami="ami-0c55b159cbfafe1f0"instance_type="t2.micro"tags={Name="terraform-example"}}
Run terraform apply again to see what this would do:
$ terraform apply

aws_instance.example: Refreshing state...
(...)

Terraform will perform the following actions:

  # aws_instance.example will be updated in-place
  ~ resource "aws_instance" "example" {
        ami                          = "ami-0c55b159cbfafe1f0"
        availability_zone            = "us-east-2b"
        instance_state               = "running"
        (...)
      + tags                         = {
          + "Name" = "terraform-example"
        }
        (...)
    }

Plan: 0 to add, 1 to change, 0 to destroy.

Do you want to perform these actions?
  Terraform will perform the actions described above.
  Only 'yes' will be accepted to approve.

  Enter a value:
Terraform keeps track of all the resources it already created for this set of configuration files, so it knows your EC2
Instance already exists (notice Terraform says Refreshing state… when you run the apply command), and it can
show you a diff between what’s currently deployed and what’s in your Terraform code (this is one of the advantages of
using a declarative language over a procedural one, as discussed in “How Terraform Compares to Other IaC Tools”). The preceding diff shows
that Terraform wants to create a single tag called Name, which is exactly what you need, so type yes and hit
Enter.
When you refresh your EC2 console, you’ll see something similar to Figure 2-5.
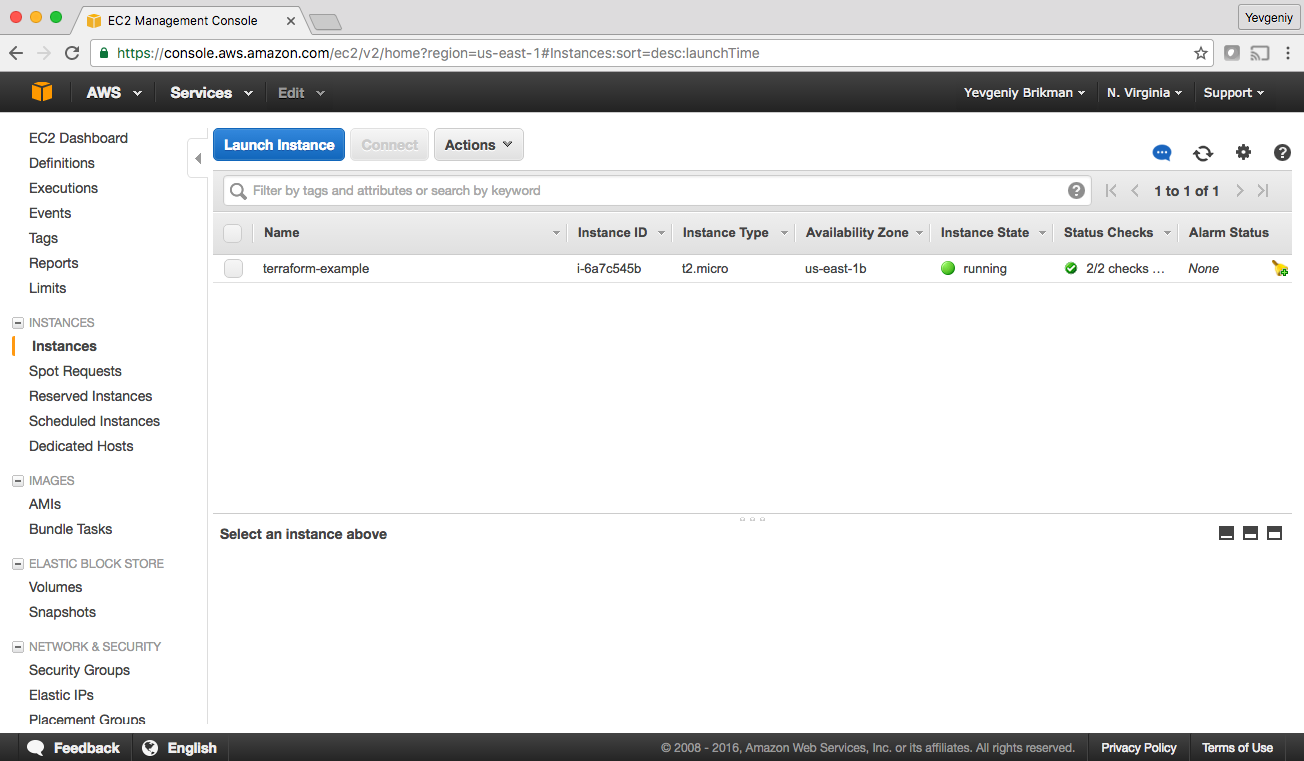
Figure 2-5. The EC2 Instance now has a name tag
Now that you have some working Terraform code, you may want to store it in version control. This allows you to share your code with other team members, track the history of all infrastructure changes, and use the commit log for debugging. For example, here is how you can create a local Git repository and use it to store your Terraform configuration file:
git init
git add main.tf
git commit -m "Initial commit"
You should also create a file called .gitignore that tells Git to ignore certain types of files so that you don’t accidentally check them in:
.terraform
*.tfstate
*.tfstate.backup
The preceding .gitignore file instructs Git to ignore the .terraform folder, which Terraform uses as a temporary scratch directory, as well as *.tfstate files, which Terraform uses to store state (in Chapter 3, you’ll see why state files shouldn’t be checked in). You should commit the .gitignore file, too:
git add .gitignore
git commit -m "Add a .gitignore file"
To share this code with your teammates, you’ll want to create a shared Git repository that you can all access. One way
to do this is to use GitHub. Head over to github.com, create an account if you don’t have one already, and create a
new repository. Configure your local Git repository to use the new GitHub repository as a remote endpoint named origin
as follows:
git remote add origin git@github.com:<YOUR_USERNAME>/<YOUR_REPO_NAME>.git
Now, whenever you want to share your commits with your teammates, you can push them to origin:
git push origin master
And whenever you want to see changes your teammates have made, you can pull them from origin:
git pull origin master
As you go through the rest of this book, and as you use Terraform in general, make sure to regularly git commit and
git push your changes. This way, you’ll not only be able to collaborate with team members on this code, but all of your
infrastructure changes will also be captured in the commit log, which is very handy for debugging. You’ll learn more
about using Terraform as a team in Chapter 8.
Deploy a Single Web Server
The next step is to run a web server on this Instance. The goal is to deploy the simplest web architecture possible: a single web server that can respond to HTTP requests, as shown in Figure 2-6.

Figure 2-6. Start with a simple architecture: a single web server running in AWS that responds to HTTP requests
In a real-world use case, you’d probably build the web server using a web framework like Ruby on Rails or Django, but to keep this example simple, let’s run a dirt-simple web server that always returns the text “Hello, World”:6
#!/bin/bashecho"Hello, World"> index.html nohup busybox httpd -f -p8080&
This is a Bash script that writes the text “Hello, World” into index.html and runs a tool called
busybox (which is installed by default on Ubuntu) to fire up a web server on port 8080 to serve
that file. I wrapped the busybox command with nohup and & so that the web server runs permanently in the
background, whereas the Bash script itself can exit.
Port Numbers
The reason this example uses port 8080, rather than the default HTTP port 80, is that listening on any port less than 1024 requires root user privileges. This is a security risk, because any attacker who manages to compromise your server would get root privileges, too.
Therefore, it’s a best practice to run your web server with a non-root user that has limited permissions. That means you have to listen on higher-numbered ports, but as you’ll see later in this chapter, you can configure a load balancer to listen on port 80 and route traffic to the high-numbered ports on your server(s).
How do you get the EC2 Instance to run this script? Normally, as discussed in “Server Templating Tools”, you would
use a tool like Packer to create a custom AMI that has the web server installed on it. Since the dummy web server in
this example is just a one-liner that uses busybox, you can use a plain Ubuntu 18.04 AMI, and run the
“Hello, World” script as part of the EC2 Instance’s User Data configuration. When you launch an EC2
Instance, you have the option of passing either a shell script or cloud-init directive to User Data, and the EC2
Instance will execute it during boot. You pass a shell script to User Data by setting the user_data argument in
your Terraform code as follows:
resource"aws_instance" "example"{ami="ami-0c55b159cbfafe1f0"instance_type="t2.micro"user_data=<<-EOF#!/bin/bashecho"Hello, World">index.htmlnohupbusyboxhttpd-f-p8080&EOFtags={Name="terraform-example"}}
The <<-EOF and EOF are Terraform’s heredoc syntax, which allows you to create multiline strings without
having to insert newline characters all over the place.
You need to do one more thing before this web server works. By default, AWS does not allow any incoming or outgoing traffic from an EC2 Instance. To allow the EC2 Instance to receive traffic on port 8080, you need to create a security group:
resource"aws_security_group" "instance"{name="terraform-example-instance"ingress{from_port=8080to_port=8080protocol="tcp"cidr_blocks=["0.0.0.0/0"]}}
This code creates a new resource called aws_security_group (notice how all resources for the AWS provider begin
with aws_) and specifies that this group allows incoming TCP requests on port 8080 from the CIDR block 0.0.0.0/0.
CIDR blocks are a concise way to specify IP address ranges. For example, a CIDR block of 10.0.0.0/24 represents all
IP addresses between 10.0.0.0 and 10.0.0.255. The CIDR block 0.0.0.0/0 is an IP address range that includes all
possible IP addresses, so this security group allows incoming requests on port 8080 from any IP.7
Simply creating a security group isn’t enough; you also need to tell the EC2 Instance to actually use it by passing
the ID of the security group into the vpc_security_group_ids argument of the aws_instance resource. To do that,
you first need to learn about Terraform expressions.
An expression in Terraform is anything that returns a value. You’ve already seen the simplest type of expressions,
literals, such as strings (e.g., "ami-0c55b159cbfafe1f0") and numbers (e.g., 5). Terraform supports many
other types of expressions that you’ll see throughout the book.
One particularly useful type of expression is a reference, which allows you to access values from other parts of your code. To access the ID of the security group resource, you are going to need to use a resource attribute reference, which uses the following syntax:
<PROVIDER>_<TYPE>.<NAME>.<ATTRIBUTE>
where PROVIDER is the name of the provider (e.g., aws), TYPE is the type of resource (e.g., security_group),
NAME is the name of that resource (e.g., the security group is named "instance"), and ATTRIBUTE is either one of
the arguments of that resource (e.g., name) or one of the attributes exported by the resource (you can find the
list of available attributes in the documentation for each resource).
The security group exports an attribute called id , so the expression to
reference it will look like this:
aws_security_group.instance.id
You can use this security group ID in the vpc_security_group_ids argument of the aws_instance:
resource"aws_instance" "example"{ami="ami-0c55b159cbfafe1f0"instance_type="t2.micro"vpc_security_group_ids=[aws_security_group.instance.id]user_data=<<-EOF#!/bin/bashecho"Hello, World">index.htmlnohupbusyboxhttpd-f-p8080&EOFtags={Name="terraform-example"}}
When you add a reference from one resource to another, you create an implicit dependency.
Terraform parses these dependencies, builds a dependency graph from them, and uses that to automatically determine in
which order it should create resources. For example, if you were deploying this code from scratch, Terraform would know
that it needs to create the security group before the EC2 Instance, because the EC2 Instance references the ID of the
security group. You can even get Terraform
to show you the dependency graph by running the graph command:
$ terraform graph

digraph {
	compound = "true"
	newrank = "true"
	subgraph "root" {
		"[root] aws_instance.example"
		  [label = "aws_instance.example", shape = "box"]
		"[root] aws_security_group.instance"
		  [label = "aws_security_group.instance", shape = "box"]
		"[root] provider.aws"
		  [label = "provider.aws", shape = "diamond"]
		"[root] aws_instance.example" ->
		  "[root] aws_security_group.instance"
		"[root] aws_security_group.instance" ->
		  "[root] provider.aws"
		"[root] meta.count-boundary (EachMode fixup)" ->
		  "[root] aws_instance.example"
		"[root] provider.aws (close)" ->
		  "[root] aws_instance.example"
		"[root] root" ->
		  "[root] meta.count-boundary (EachMode fixup)"
		"[root] root" ->
		  "[root] provider.aws (close)"
	}
}
The output is in a graph description language called DOT, which you can turn into an image, similar to the dependency graph shown in Figure 2-7, by using a desktop app such as Graphviz or webapp like GraphvizOnline.
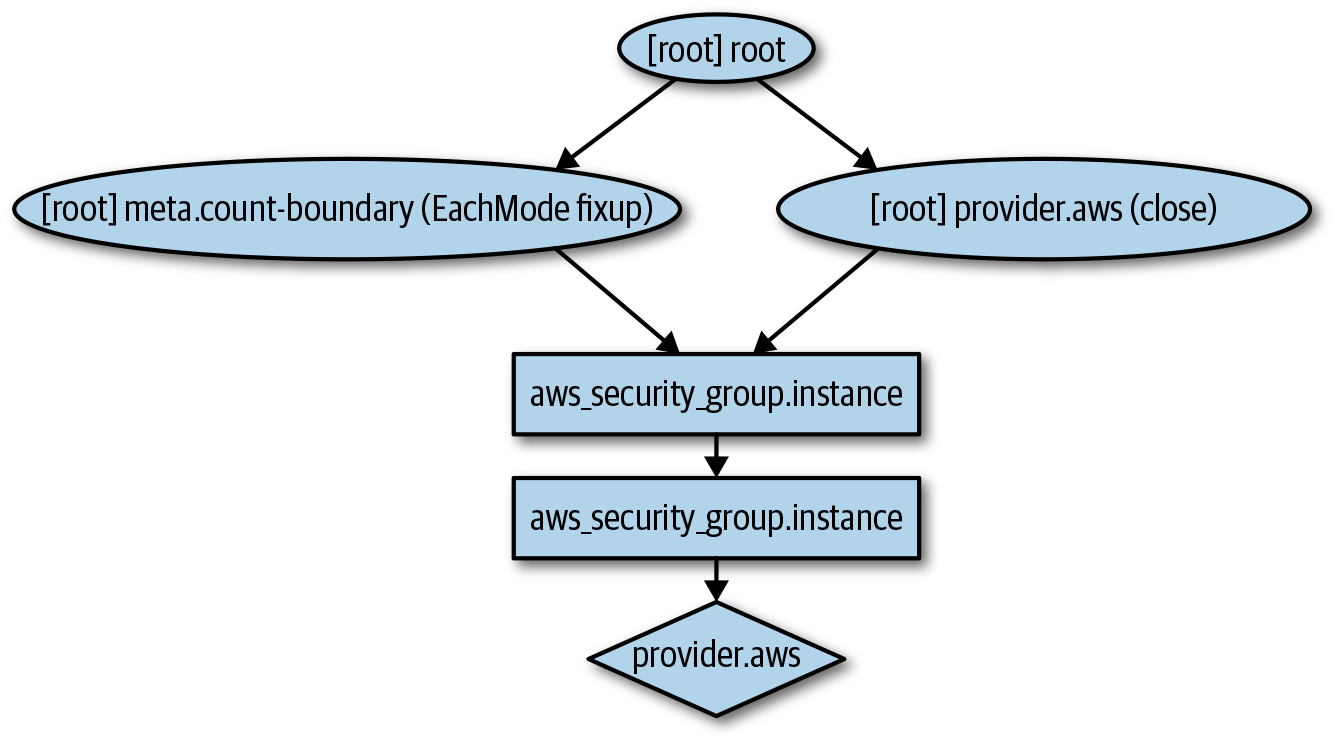
Figure 2-7. The dependency graph for the EC2 Instance and its security group
When Terraform walks your dependency tree, it creates as many resources in parallel as it can, which means that it can apply your changes fairly efficiently. That’s the beauty of a declarative language: you just specify what you want and Terraform determines the most efficient way to make it happen.
If you run the apply command, you’ll see that Terraform wants to create a security group and replace the EC2 Instance
with a new one that has the new user data:
$ terraform apply

(...)

Terraform will perform the following actions:

  # aws_instance.example must be replaced
-/+ resource "aws_instance" "example" {
        ami                          = "ami-0c55b159cbfafe1f0"
      ~ availability_zone            = "us-east-2c" -> (known after apply)
      ~ instance_state               = "running" -> (known after apply)
        instance_type                = "t2.micro"
        (...)
      + user_data                    = "c765373..." # forces replacement
      ~ volume_tags                  = {} -> (known after apply)
      ~ vpc_security_group_ids       = [
          - "sg-871fa9ec",
        ] -> (known after apply)
        (...)
    }

  # aws_security_group.instance will be created
  + resource "aws_security_group" "instance" {
      + arn                    = (known after apply)
      + description            = "Managed by Terraform"
      + egress                 = (known after apply)
      + id                     = (known after apply)
      + ingress                = [
          + {
              + cidr_blocks      = [
                  + "0.0.0.0/0",
                ]
              + description      = ""
              + from_port        = 8080
              + ipv6_cidr_blocks = []
              + prefix_list_ids  = []
              + protocol         = "tcp"
              + security_groups  = []
              + self             = false
              + to_port          = 8080
            },
        ]
      + name                   = "terraform-example-instance"
      + owner_id               = (known after apply)
      + revoke_rules_on_delete = false
      + vpc_id                 = (known after apply)
    }

Plan: 2 to add, 0 to change, 1 to destroy.

Do you want to perform these actions?
  Terraform will perform the actions described above.
  Only 'yes' will be accepted to approve.

  Enter a value:
The -/+ in the plan output means “replace”; look for the text “forces replacement” in the plan output to figure out
what is forcing Terraform to do a replacement. Many of the arguments on the aws_instance resource will force a
replacement if changed, which means that the original EC2 Instance will be terminated and a completely new Instance will be
created. This is an example of the immutable infrastructure
paradigm discussed in “Server Templating Tools”.
It’s worth mentioning that although the web server is being replaced, any users of that web server would experience
downtime; you’ll see how to do a zero-downtime deployment with Terraform in Chapter 5.
Since the plan looks good, enter yes, and you’ll see your new EC2 Instance deploying, as shown in
Figure 2-8.
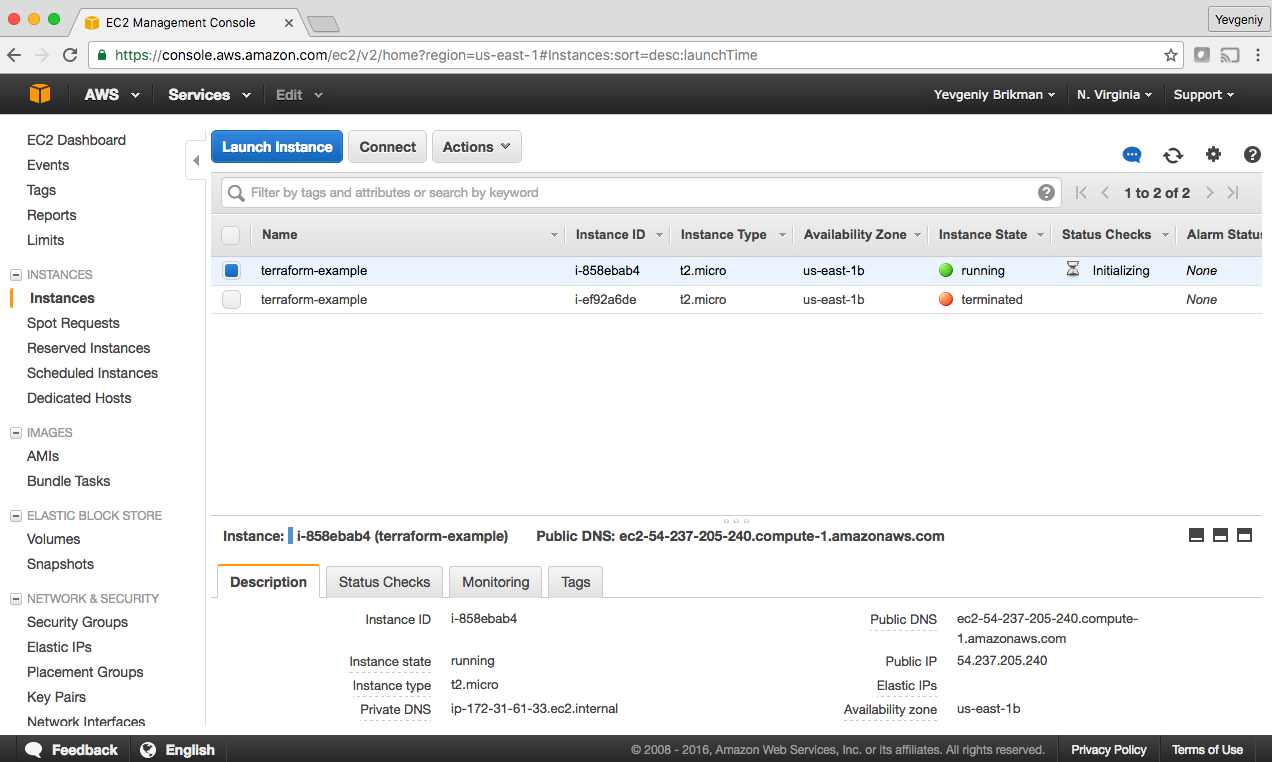
Figure 2-8. The new EC2 Instance with the web server code replaces the old Instance
If you click your new Instance, you can find its public IP address in the description panel at the bottom of the
screen. Give the Instance a minute or two
to boot up and then use a web browser or a tool like curl to make an HTTP request to this IP address at port 8080:
$ curl http://<EC2_INSTANCE_PUBLIC_IP>:8080
Hello, World
Yay! You now have a working web server running in AWS!
Network Security
To keep all of the examples in this book simple, they deploy not only into your Default VPC (as mentioned earlier), but also the default subnets of that VPC. A VPC is partitioned into one or more subnets, each with its own IP addresses. The subnets in the Default VPC are all public subnets, which means they get IP addresses that are accessible from the public internet. This is why you are able to test your EC2 Instance from your home computer.
Running a server in a public subnet is fine for a quick experiment, but in real-world usage, it’s a security risk. Hackers all over the world are constantly scanning IP addresses at random for any weakness. If your servers are exposed publicly, all it takes is accidentally leaving a single port unprotected or running out-of-date code with a known vulnerability, and someone can break in.
Therefore, for production systems, you should deploy all of your servers, and certainly all of your data stores, in private subnets, which have IP addresses that can be accessed only from within the VPC and not from the public internet. The only servers you should run in public subnets are a small number of reverse proxies and load balancers that you lock down as much as possible (you’ll see an example of how to deploy a load balancer later in this chapter).
Deploy a Configurable Web Server
You might have noticed that the web server code has the port 8080 duplicated in both the security group and the User Data configuration. This violates the Don’t Repeat Yourself (DRY) principle: every piece of knowledge must have a single, unambiguous, authoritative representation within a system.8 If you have the port number in two places, it’s easy to update it in one place but forget to make the same change in the other place.
To allow you to make your code more DRY and more configurable, Terraform allows you to define input variables. Here’s the syntax for declaring a variable:
variable"NAME"{[CONFIG...]}
The body of the variable declaration can contain three parameters, all of them optional:
description-
It’s always a good idea to use this parameter to document how a variable is used. Your teammates will not only be able to see this description while reading the code, but also when running the
planorapplycommands (you’ll see an example of this shortly). default-
There are a number of ways to provide a value for the variable, including passing it in at the command line (using the
-varoption), via a file (using the-var-fileoption), or via an environment variable (Terraform looks for environment variables of the nameTF_VAR_<variable_name>). If no value is passed in, the variable will fall back to this default value. If there is no default value, Terraform will interactively prompt the user for one. type-
This allows you enforce type constraints on the variables a user passes in. Terraform supports a number of type constraints, including
string,number,bool,list,map,set,object,tuple, andany. If you don’t specify a type, Terraform assumes the type isany.
Here is an example of an input variable that checks to verify that the value you pass in is a number:
variable"number_example"{description="An example of a number variable in Terraform"type=numberdefault=42}
And here’s an example of a variable that checks whether the value is a list:
variable"list_example"{description="An example of a list in Terraform"type=listdefault=["a", "b", "c"]}
You can combine type constraints, too. For example, here’s a list input variable that requires all of the items in the list to be numbers:
variable"list_numeric_example"{description="An example of a numeric list in Terraform"type=list(number)default=[1,2,3]}
And here’s a map that requires all of the values to be strings:
variable"map_example"{description="An example of a map in Terraform"type=map(string)default={key1="value1"key2="value2"key3="value3"}}
You can also create more complicated structural types using the object and tuple type constraints:
variable"object_example"{description="An example of a structural type in Terraform"type=object({name=stringage=numbertags=list(string)enabled=bool})default={name="value1"age=42tags=["a", "b", "c"]enabled=true}}
The precending example creates an input variable that will require the value to be an object with the keys name (which
must be a string), age (which must be a number), tags (which must be a list of strings), and enabled (which must
be a Boolean). If you try to set this variable to a value that doesn’t match this type, Terraform immediately
gives you a type error. The following example demonstrates trying to set enabled to a string instead of a Boolean:
variable"object_example_with_error"{description="An example of a structural type in Terraform with an error"type=object({name=stringage=numbertags=list(string)enabled=bool})default={name="value1"age=42tags=["a", "b", "c"]enabled="invalid"}}
You get the following error:
$ terraform apply

Error: Invalid default value for variable

  on variables.tf line 78, in variable "object_example_with_error":
  78:   default = {
  79:     name    = "value1"
  80:     age     = 42
  81:     tags    = ["a", "b", "c"]
  82:     enabled = "invalid"
  83:   }

This default value is not compatible with the variable's type constraint: a
bool is required.
For the web server example, all you need is a variable that stores the port number:
variable"server_port"{description="The port the server will use for HTTP requests"type=number}
Note that the server_port input variable has no
default, so if you run the apply command now, Terraform will interactively prompt you to enter a value for
server_port and show you the description of the variable:
$ terraform apply

var.server_port
  The port the server will use for HTTP requests

  Enter a value:
If you don’t want to deal with an interactive prompt, you can provide a value for
the variable via the
-var command-line option:
$ terraform plan -var "server_port=8080"
You could also set the variable via an environment variable named TF_VAR_<name>, where <name> is the name of the
variable you’re trying to set:
$ export TF_VAR_server_port=8080
$ terraform plan
And if you don’t want to deal with remembering extra command-line arguments every time you run plan or apply, you
can specify a default value:
variable"server_port"{description="The port the server will use for HTTP requests"type=numberdefault=8080}
To use the value from an input variable in your Terraform code, you can use a new type of expression called a variable reference, which has the following syntax:
var.<VARIABLE_NAME>
For example, here is how you can set the from_port and to_port parameters of the security group to the value of
the server_port variable:
resource"aws_security_group" "instance"{name="terraform-example-instance"ingress{from_port=var.server_portto_port=var.server_portprotocol="tcp"cidr_blocks=["0.0.0.0/0"]}}
It’s also a good idea to use the same variable when setting the port in the User Data script. To use a reference inside of a string literal, you need to use a new type of expression called an interpolation, which has the following syntax:
"${...}"You can put any valid reference within the curly braces, and Terraform will convert it to a string. For example, here’s
how you can use var.server_port inside of the User Data string:
user_data=<<-EOF#!/bin/bashecho"Hello, World">index.htmlnohupbusyboxhttpd-f-p${var.server_port}&EOF
In addition to input variables, Terraform also allows you to define output variables by using the following syntax:
output"<NAME>"{value=<VALUE>[CONFIG...]}
The NAME is the name of the output variable, and VALUE can be any Terraform expression that you would like to output.
The CONFIG can contain two additional parameters, both optional:
description-
It’s always a good idea to use this parameter to document what type of data is contained in the output variable.
sensitive-
Set this parameter to
trueto instruct Terraform not to log this output at the end ofterraform apply. This is useful if the output variable contains sensitive material or secrets such as passwords or private keys.
For example, instead of having to manually poke around the EC2 console to find the IP address of your server, you can provide the IP address as an output variable:
output"public_ip"{value=aws_instance.example.public_ipdescription="The public IP address of the web server"}
This code uses an attribute reference again, this time referencing the public_ip attribute of the aws_instance
resource. If you run the apply command again, Terraform will not apply any changes (because you haven’t
changed any resources), but it will show you the new output at the very end:
$ terraform apply

(...)

aws_security_group.instance: Refreshing state... [id=sg-078ccb4f9533d2c1a]
aws_instance.example: Refreshing state... [id=i-028cad2d4e6bddec6]

Apply complete! Resources: 0 added, 0 changed, 0 destroyed.

Outputs:

public_ip = 54.174.13.5
As you can see, output variables show up in the console after you run terraform apply, which users of your Terraform
code might find useful (e.g., you now know what IP to test after the web server is deployed). You can
also use the terraform output command to list all outputs without applying any
changes:
$ terraform output
public_ip = 54.174.13.5
And you can run terraform output <OUTPUT_NAME> to see the value of a specific output called <OUTPUT_NAME>:
$ terraform output public_ip
54.174.13.5
This is particularly handy for scripting. For example, you could create a deployment script that runs terraform
apply to deploy the web server, uses terraform output public_ip to grab its public IP, and runs curl on the
IP as a quick smoke test to validate that the deployment worked.
Input and output variables are also essential ingredients in creating configurable and reusable infrastructure code, a topic you’ll see more of in Chapter 4.
Deploying a Cluster of Web Servers
Running a single server is a good start, but in the real world, a single server is a single point of failure. If that server crashes, or if it becomes overloaded from too much traffic, users will be unable to access your site. The solution is to run a cluster of servers, routing around servers that go down, and adjusting the size of the cluster up or down based on traffic.9
Managing such a cluster manually is a lot of work. Fortunately, you can let AWS take care of it for by you using an Auto Scaling Group (ASG), as shown in Figure 2-9. An ASG takes care of a lot of tasks for you completely automatically, including launching a cluster of EC2 Instances, monitoring the health of each Instance, replacing failed Instances, and adjusting the size of the cluster in response to load.

Figure 2-9. Instead of a single web server, run a cluster of web servers using an Auto Scaling Group
The first step in creating an ASG is to create a launch configuration, which specifies how to configure each EC2
Instance in the ASG. The
aws_launch_configuration resource uses almost exactly the same parameters as the
aws_instance resource (two of the parameters have different names: ami is now image_id and
vpc_security_group_ids is now security_groups), so you can cleanly replace the latter with the former:
resource"aws_launch_configuration" "example"{image_id="ami-0c55b159cbfafe1f0"instance_type="t2.micro"security_groups=[aws_security_group.instance.id]user_data=<<-EOF#!/bin/bashecho"Hello, World">index.htmlnohupbusyboxhttpd-f-p${var.server_port}&EOF}
Now you can create the ASG itself using the aws_autoscaling_group resource:
resource"aws_autoscaling_group" "example"{launch_configuration=aws_launch_configuration.example.namemin_size=2max_size=10tag{key="Name"value="terraform-asg-example"propagate_at_launch=true}}
This ASG will run between 2 and 10 EC2 Instances (defaulting to 2 for the initial launch), each tagged with the name
terraform-asg-example. Note that the ASG uses a reference to fill in the launch configuration name. This leads to a
problem: launch configurations are immutable, so if you change any parameter of your launch configuration, Terraform
will try to replace it. Normally, when replacing a resource, Terraform deletes the old resource first and then creates
its replacement, but because your ASG now has a reference to the old resource, Terraform won’t be able to delete it.
To solve this problem, you can use a lifecycle setting. Every Terraform resource supports several lifecycle
settings that configure how that resource is created, updated, and/or deleted. A particularly useful lifecycle setting
is create_before_destroy. If you set create_before_destroy to true, Terraform will invert the order in which it
replaces resources, creating the replacement resource first (including updating any references that were pointing at
the old resource to point to the replacement) and then deleting the old resource. Add the lifecycle block to your
aws_launch_configuration as follows:
resource"aws_launch_configuration" "example"{image_id="ami-0c55b159cbfafe1f0"instance_type="t2.micro"security_groups=[aws_security_group.instance.id]user_data=<<-EOF#!/bin/bashecho"Hello, World">index.htmlnohupbusyboxhttpd-f-p${var.server_port}&EOF# Required when using a launch configuration with an auto scaling group.# https://www.terraform.io/docs/providers/aws/r/launch_configuration.htmllifecycle{create_before_destroy=true}}
There’s also one other parameter that you need to add to your ASG to make it work: subnet_ids. This parameter specifies to the ASG into
which VPC subnets the EC2 Instances should be deployed (see Network Security for background info on subnets). Each
subnet lives in an isolated AWS AZ (that is, isolated datacenter), so by deploying your Instances across
multiple subnets, you ensure that your service can keep running even if some of the datacenters have an outage. You
could hardcode the list of subnets, but that won’t be maintainable or portable, so a better option is to use data
sources to get the list of subnets in your AWS account.
A data source represents a piece of read-only information that is fetched from the provider (in this case, AWS) every time you run Terraform. Adding a data source to your Terraform configurations does not create anything new; it’s just a way to query the provider’s APIs for data and to make that data available to the rest of your Terraform code. Each Terraform provider exposes a variety of data sources. For example, the AWS provider includes data sources to look up VPC data, subnet data, AMI IDs, IP address ranges, the current user’s identity, and much more.
The syntax for using a data source is very similar to the syntax of a resource:
data"<PROVIDER>_<TYPE>" "<NAME>"{[CONFIG...]}
Here, PROVIDER is the name of a provider (e.g., aws), TYPE is the type of data source you want to use (e.g.,
vpc), NAME is an identifier you can use throughout the Terraform code to refer to this data source, and CONFIG
consists of one or more arguments that are specific to that data source. For example, here is how you can use the
aws_vpc data source to look up the data for your Default VPC (see A Note on Default Virtual Private Clouds for background information):
data"aws_vpc" "default"{default=true}
Note that with data sources, the arguments you pass in are typically search filters that indicate to the data source what
information you’re looking for. With the aws_vpc data source, the only filter you need is default = true, which
directs Terraform to look up the Default VPC in your AWS account.
To get the data out of a data source, you use the following attribute reference syntax:
data.<PROVIDER>_<TYPE>.<NAME>.<ATTRIBUTE>
For example, to get the ID of the VPC from the aws_vpc data source, you would use the following:
data.aws_vpc.default.id
You can combine this with another data source, aws_subnet_ids, to look up the subnets within that VPC:
data"aws_subnet_ids" "default"{vpc_id=data.aws_vpc.default.id}
Finally, you can pull the subnet IDs out of the aws_subnet_ids data source and tell your ASG to use those subnets via
the (somewhat oddly named) vpc_zone_identifier argument:
resource"aws_autoscaling_group" "example"{launch_configuration=aws_launch_configuration.example.namevpc_zone_identifier=data.aws_subnet_ids.default.idsmin_size=2max_size=10tag{key="Name"value="terraform-asg-example"propagate_at_launch=true}}
Deploying a Load Balancer
At this point, you can deploy your ASG, but you’ll have a small problem: you now have multiple servers, each with its own IP address, but you typically want to give of your end users only a single IP to use. One way to solve this problem is to deploy a load balancer to distribute traffic across your servers and to give all your users the IP (actually, the DNS name) of the load balancer. Creating a load balancer that is highly available and scalable is a lot of work. Once again, you can let AWS take care of it for you, this time by using Amazon’s Elastic Load Balancer (ELB) service, as shown in Figure 2-10.
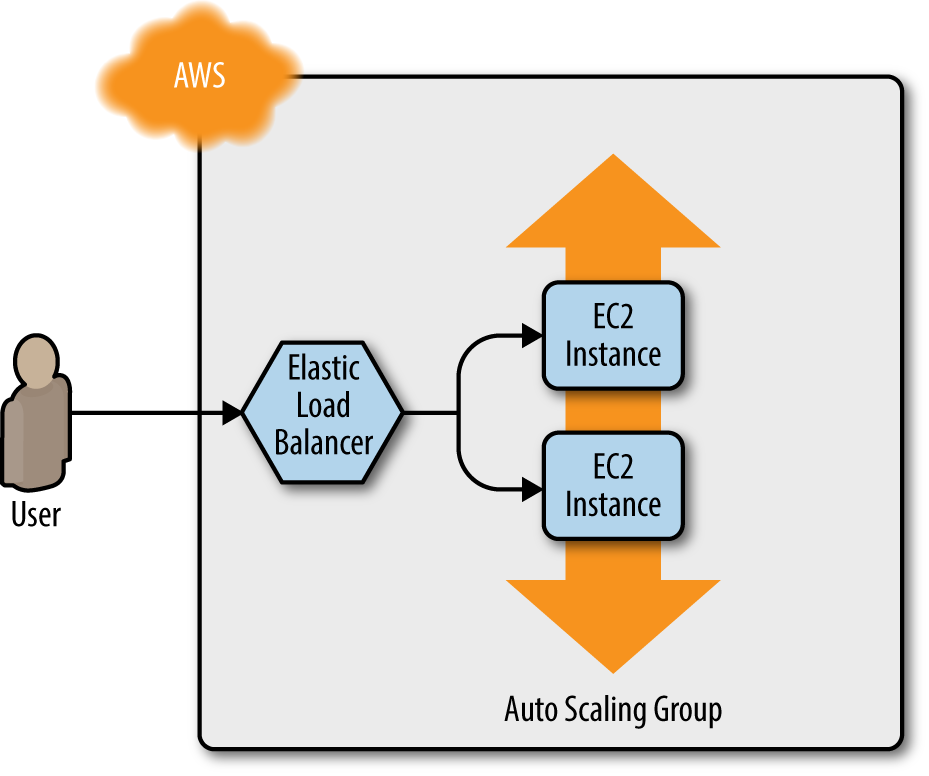
Figure 2-10. Using Amazon ELB to distribute traffic across the Auto Scaling Group
AWS offers three different types of load balancers:
- Application Load Balancer (ALB)
-
Best suited for load balancing of HTTP and HTTPS traffic. Operates at the application layer (Layer 7) of the OSI model.
- Network Load Balancer (NLB)
-
Best suited for load balancing of TCP, UDP, and TLS traffic. Can scale up and down in response to load faster than the ALB (the NLB is designed to scale to tens of millions of requests per second). Operates at the transport layer (Layer 4) of the OSI model.
- Classic Load Balancer (CLB)
-
This is the “legacy” load balancer that predates both the ALB and NLB. It can handle HTTP, HTTPS, TCP, and TLS traffic, but with far fewer features than either the ALB or NLB. Operates at both the application layer (L7) and transport layer (L4) of the OSI model.
Most applications these days should use either the ALB or the NLB. Because the simple web server example you’re working on is an HTTP app without any extreme performance requirements, the ALB is going to be the best fit.
As shown in Figure 2-11, the ALB consists of several parts:
- Listener
-
Listens on a specific port (e.g., 80) and protocol (e.g., HTTP).
- Listener rule
-
Takes requests that come into a listener and sends those that match specific paths (e.g.,
/fooand/bar) or hostnames (e.g.,foo.example.comandbar.example.com) to specific target groups. - Target groups
-
One or more servers that receive requests from the load balancer. The target group also performs health checks on these servers and only sends requests to healthy nodes.
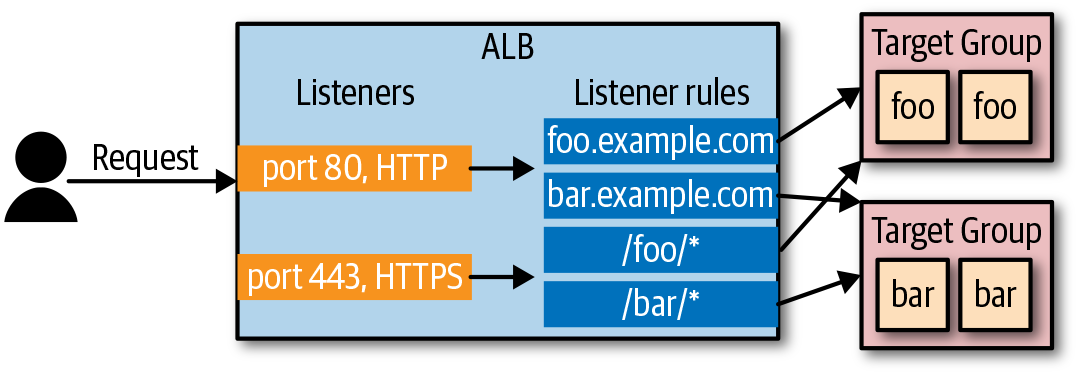
Figure 2-11. Application Load Balancer (ALB) overview
The first step is to create the ALB itself using the aws_lb resource:
resource"aws_lb" "example"{name="terraform-asg-example"load_balancer_type="application"subnets=data.aws_subnet_ids.default.ids}
Note that the subnets parameter configures the load balancer to use all the subnets in your Default VPC by using the
aws_subnet_ids data source.10 AWS load balancers don’t consist of a single server, but multiple servers
that can run in separate subnets (and therefore, separate datacenters). AWS automatically scales the number of
load balancer servers up and down based on traffic and handles failover if one of those servers goes down, so you get
scalability and high availability out of the box.
The next step is to define a listener for this ALB using the aws_lb_listener resource:
resource"aws_lb_listener" "http"{load_balancer_arn=aws_lb.example.arnport=80protocol="HTTP"# By default, return a simple 404 pagedefault_action{type="fixed-response"fixed_response{content_type="text/plain"message_body="404: page not found"status_code=404}}}
This listener configures the ALB to listen on the default HTTP port, port 80, use HTTP as the protocol, and send a simple 404 page as the default response for requests that don’t match any listener rules.
Note that, by default, all AWS resources, including ALBs, don’t allow any incoming or outgoing traffic, so you need to create a new security group specifically for the ALB. This security group should allow incoming requests on port 80 so that you can access the load balancer over HTTP, and outgoing requests on all ports so that the load balancer can perform health checks:
resource"aws_security_group" "alb"{name="terraform-example-alb"# Allow inbound HTTP requestsingress{from_port=80to_port=80protocol="tcp"cidr_blocks=["0.0.0.0/0"]}# Allow all outbound requestsegress{from_port=0to_port=0protocol="-1"cidr_blocks=["0.0.0.0/0"]}}
You’ll need to tell the aws_lb resource to use this security group via the security_groups argument:
resource"aws_lb" "example"{name="terraform-asg-example"load_balancer_type="application"subnets=data.aws_subnet_ids.default.idssecurity_groups=[aws_security_group.alb.id]}
Next, you need to create a target group for your ASG using the aws_lb_target_group resource:
resource"aws_lb_target_group" "asg"{name="terraform-asg-example"port=var.server_portprotocol="HTTP"vpc_id=data.aws_vpc.default.idhealth_check{path="/"protocol="HTTP"matcher="200"interval=15timeout=3healthy_threshold=2unhealthy_threshold=2}}
Note that this target group will health check your Instances by periodically sending an HTTP request to each Instance
and will consider the Instance “healthy” only if the Instance returns a response that matches the configured matcher
(e.g., you can configure a matcher to look for a 200 OK response). If an Instance fails to respond, perhaps because that
Instance has gone down or is overloaded, it will be marked as “unhealthy,” and the target group will automatically stop
sending traffic to it to minimize disruption for your users.
How does the target group know which EC2 Instances to send requests to? You could attach a static list of EC2 Instances
to the target group using the aws_lb_target_group_attachment resource, but with an ASG, Instances can launch or
terminate at any time, so a static list won’t work.
Instead, you can take advantage of the first-class integration between the ASG and the ALB. Go back to the
aws_autoscaling_group resource and set its target_group_arns argument to point at your new target group:
resource"aws_autoscaling_group" "example"{launch_configuration=aws_launch_configuration.example.namevpc_zone_identifier=data.aws_subnet_ids.default.idstarget_group_arns=[aws_lb_target_group.asg.arn]health_check_type="ELB"min_size=2max_size=10tag{key="Name"value="terraform-asg-example"propagate_at_launch=true}}
You should also update the health_check_type to "ELB". The default health_check_type is "EC2", which is a
minimal health check that considers an Instance unhealthy only if the AWS hypervisor says the VM is completely down
or unreachable. The "ELB" health check is more robust, because it instructs the ASG to use the target group’s health
check to determine whether an Instance is healthy and to automatically replace Instances if the target group reports
them as unhealthy. That way, Instances will be replaced not only if they are completely down, but also if, for example,
they’ve stopped serving requests because they ran out of memory or a critical process crashed.
Finally, it’s time to tie all these pieces together by creating listener rules using the aws_lb_listener_rule
resource:
resource"aws_lb_listener_rule" "asg"{listener_arn=aws_lb_listener.http.arnpriority=100condition{field="path-pattern"values=["*"]}action{type="forward"target_group_arn=aws_lb_target_group.asg.arn}}
The preceding code adds a listener rule that send requests that match any path to the target group that contains your ASG.
There’s one last thing to do before you deploy the load balancer—replace the old public_ip output of the single EC2 Instance
you had before with an output that shows the DNS name of the ALB:
output"alb_dns_name"{value=aws_lb.example.dns_namedescription="The domain name of the load balancer"}
Run terraform apply and read through the plan output. You should see that your original single EC2 Instance is being
removed, and in its place, Terraform will create a launch configuration, ASG, ALB, and a security group. If the plan
looks good, type yes and hit Enter. When apply completes, you should see the alb_dns_name output:
Outputs:
alb_dns_name = terraform-asg-example-123.us-east-2.elb.amazonaws.com
Copy down this URL. It’ll take a couple minutes for the Instances to boot and show up as healthy in the ALB. In the meantime, you can inspect what you’ve deployed. Open up the ASG section of the EC2 console, and you should see that the ASG has been created, as shown in Figure 2-12.
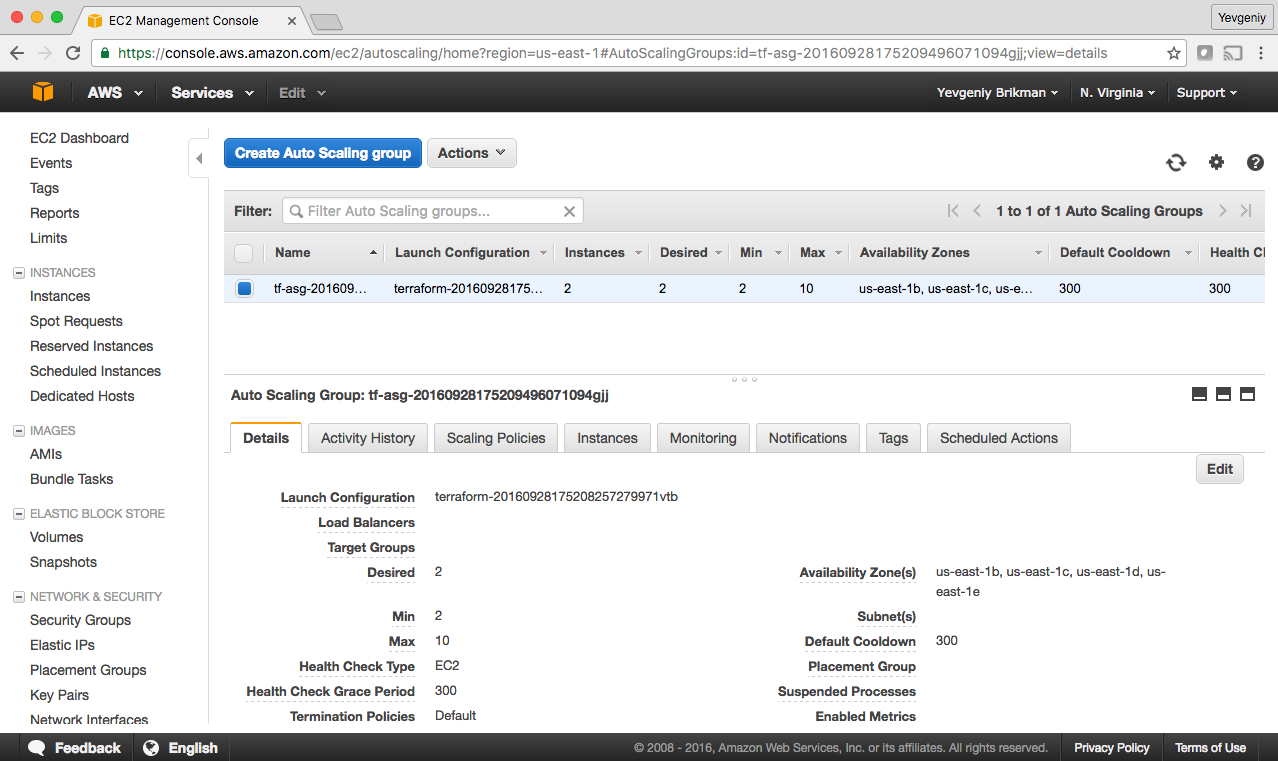
Figure 2-12. The Auto Scaling Group
If you switch over to the Instances tab, you’ll see the two EC2 Instances launching, as shown in Figure 2-13.
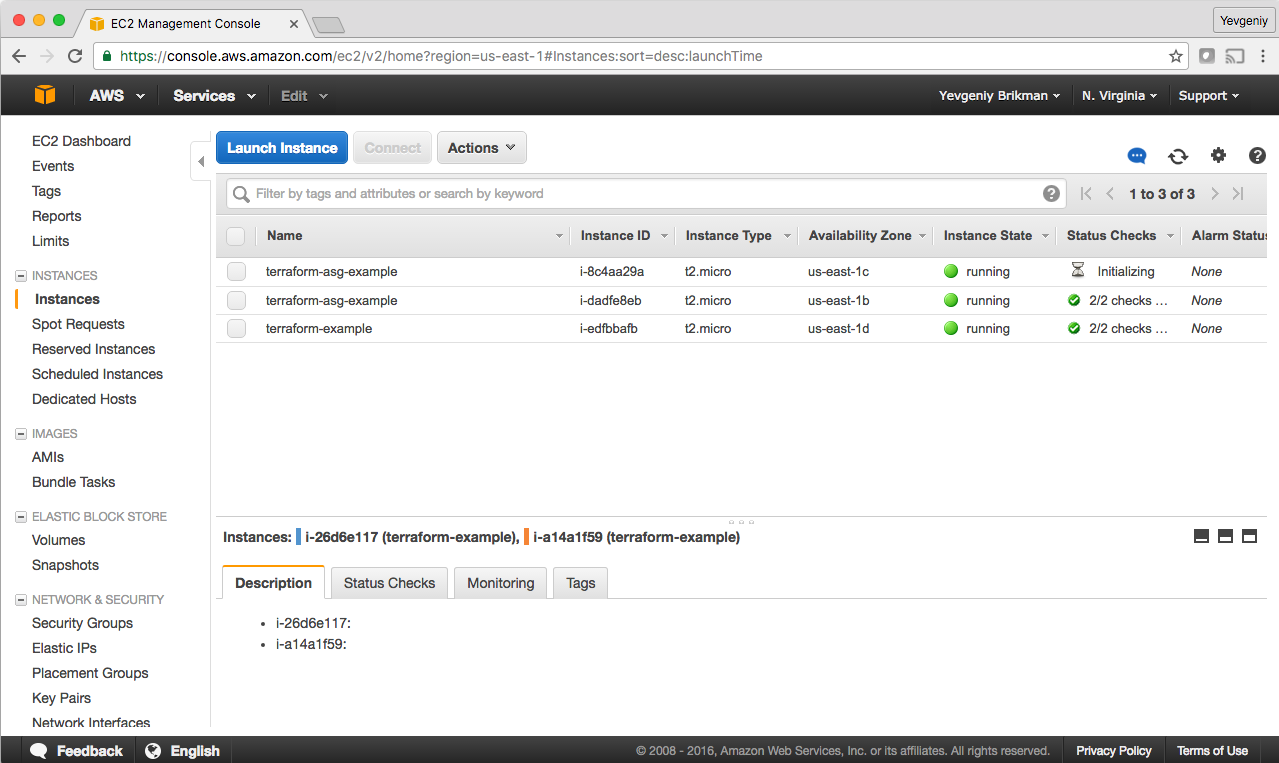
Figure 2-13. The EC2 Instances in the ASG are launching
If you click the Load Balancers tab, you’ll see your ALB, as shown in Figure 2-14.
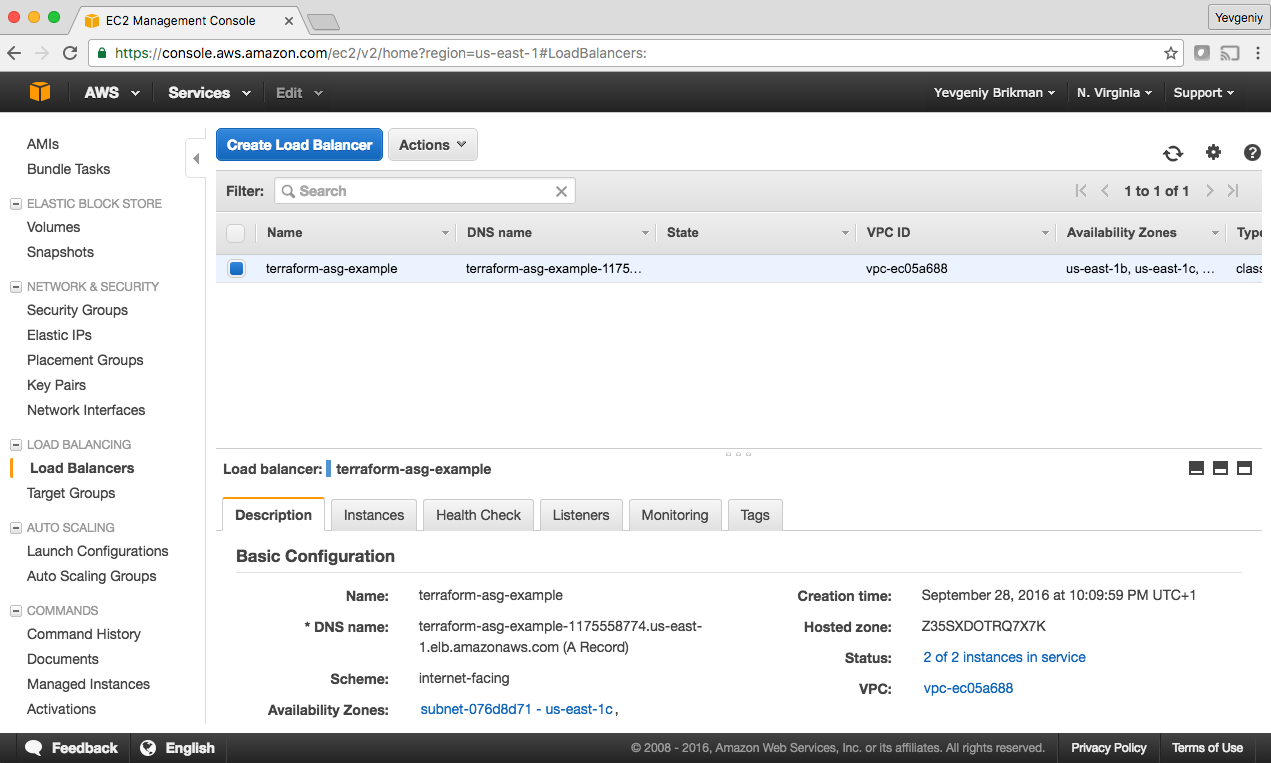
Figure 2-14. The Application Load Balancer
Finally, if you click the Target Groups tab, you can find your target group, as shown in Figure 2-15.
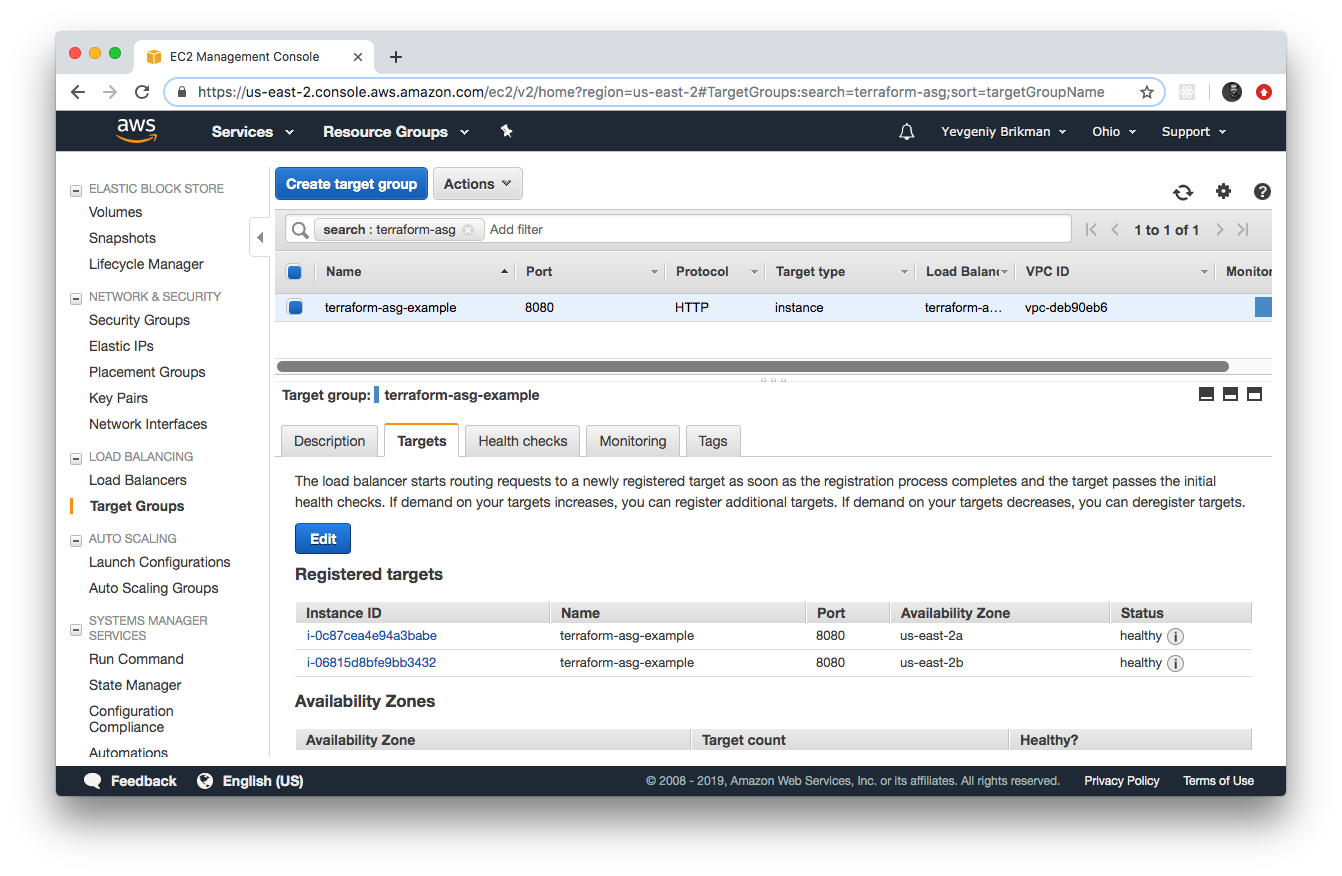
Figure 2-15. The target group
If you click on your target group and find the Targets tab in the bottom half of the screen, you can see your Instances
registering with the target group and going through health checks. Wait for the Status indicator to indicate “healthy” for
both of them. This typically takes one to two minutes. When you see it, test the alb_dns_name output you
copied earlier:
$ curl http://<alb_dns_name>
Hello, World
Success! The ALB is routing traffic to your EC2 Instances. Each time you acess the URL, it’ll pick a different Instance to handle the request. You now have a fully working cluster of web servers!
At this point, you can see how your cluster responds to firing up new Instances or shutting down old ones. For example,
go to the Instances tab and terminate one of the Instances by selecting its checkbox, clicking the Actions button
at the top, and then setting the Instance State to Terminate. Continue to test the ALB URL and you should get a 200 OK
for each request, even while terminating an Instance, because the ALB will automatically detect that the Instance is down
and stop routing to it. Even more interesting, a short
time after the Instance shuts down, the ASG will detect that fewer than two Instances are running, and automatically
launch a new one to replace it (self-healing!). You can also see how the ASG resizes
itself by adding a desired_capacity parameter to your Terraform code and rerunning apply.
Cleanup
When you’re done experimenting with Terraform, either at the end of this chapter, or at the end of future chapters,
it’s a good idea to remove all of the resources you created so that AWS doesn’t charge you for them.
Because Terraform keeps track of what resources you created, cleanup is simple. All you need to do is run the destroy
command:
$ terraform destroy

(...)

Terraform will perform the following actions:

  # aws_autoscaling_group.example will be destroyed
  - resource "aws_autoscaling_group" "example" {
      (...)
    }

  # aws_launch_configuration.example will be destroyed
  - resource "aws_launch_configuration" "example" {
      (...)
    }

  # aws_lb.example will be destroyed
  - resource "aws_lb" "example" {
      (...)
    }

  (...)

Plan: 0 to add, 0 to change, 8 to destroy.

Do you really want to destroy all resources?
  Terraform will destroy all your managed infrastructure, as shown above.
  There is no undo. Only 'yes' will be accepted to confirm.

  Enter a value:
It goes without saying that you should rarely, if ever, run destroy in a production environment! There’s no “undo”
for the destroy command, so Terraform gives you one final chance to review what you’re doing, showing you the list of
all the resources you’re about to delete, and prompting you to confirm the deletion. If everything looks good, type yes and hit Enter; Terraform will build the dependency graph and delete all of the resources in the correct order,
using as much parallelism as possible. In a minute or two, your AWS account should be clean again.
Note that later in the book, you will continue to develop this example, so don’t delete the Terraform code! However,
feel free to run destroy on the actual deployed resources whenever you want. After all, the beauty of infrastructure
as code is that all of the information about those resources is captured in code, so you can re-create all of them at
any time with a single command: terraform apply. In fact, you might want to commit your latest changes to Git so that you
can keep track of the history of your infrastructure.
Conclusion
You now have a basic grasp of how to use Terraform. The declarative language makes it easy to describe exactly the
infrastructure you want to create. The plan command allows you to verify your changes and catch bugs before deploying
them. Variables, references, and dependencies allow you to remove duplication from your code and make it highly
configurable.
However, you’ve only scratched the surface. In Chapter 3, you’ll learn how Terraform keeps track of what infrastructure it has already created, and the profound impact that has on how you should structure your Terraform code. In Chapter 4, you’ll see how to create reusable infrastructure with Terraform modules.
1 If you find the AWS terminology confusing, be sure to check out AWS in Plain English.
2 For more details on AWS user management best practices, see http://amzn.to/2lvJ8Rf.
3 You can learn more about IAM Policies on the AWS website.
4 You can also write Terraform code in pure JSON in files with the extension .tf.json. You can learn more about Terraform’s HCL and JSON syntax on the Terraform website.
5 You can learn more about AWS regions and Availability Zones on the AWS website.
6 You can find a handy list of HTTP server one-liners on GitHub.
7 To learn more about how CIDR works, see its Wikipedia page. For a handy calculator that converts between IP address ranges and CIDR notation, use either http://cidr.xyz/ in your browser or install the ipcalc command in your terminal.
8 From The Pragmatic Programmer by Andy Hunt and Dave Thomas (Addison-Wesley Professional).
9 For a deeper look at how to build highly available and scalable systems on AWS, see http://bit.ly/2mpSXUZ.
10 To keep these examples simple, we’re running the EC2 Instances and ALB in the same subnets. In production usage, you’d most likely run them in different subnets, with the EC2 Instances in private subnets (so they aren’t directly accessible from the public internet) and the ALBs in public subnets (so users can access them directly).