6 Graphics and Multimedia
With HTML, you can add graphics, videos, and other multimedia content to the HTML document.
The options to add multimedia content, such as graphics, animations, video, or audio, to a website have become more versatile and easier in HTML. For this reason, this chapter deals with the following topics:
-
Images
Today, it’s hard to imagine a website without images, graphics, or logos, so here you’ll learn how to add images to an HTML document. -
Link-sensitive graphics
You’ll learn how to embed multiple hypertext links within a graphic. -
Flexible images
You can also load the appropriate image from multiple image sources with HTML. -
Favorites icons
Everyone knows those little icons in the address bar, tab, or bookmarks. Here, I’ll explain how you can add such a favicon to a website. -
Vector graphics
If you want to use vector graphics for your website, you can read here what options are available to you to do so. -
Drawing graphics
With HTML, you can also draw something directly on a web page. However, HTML only provides the canvas for this, which you’ll learn how to create. -
Video
Playing videos is also an issue and has become much easier thanks to the video element. You’ll get to know which video formats are supported. Likewise, you’ll learn how you can add a video to your website via YouTube. -
Audio
Playing music and sounds on web pages has also been simplified significantly thanks to the audio element. You’ll learn how to insert your own audio files into an HTML document. -
Other active content
There’s a lot more other content, such as PDF documents, Flash animations, and Java applets, for which there’s no special HTML element available. But I’ll also describe how you can include such active content in an HTML document.
Table 6.1 lists the HTML elements used with graphics and multimedia.
|
HTML Element |
Meaning |
|---|---|
|
<img> |
Including a graphic file in an HTML document |
|
<map>, <area> |
Creating a link-sensitive graphic |
|
<picture>, <source> |
Loading the appropriate image from several image sources |
|
<svg> |
Integrating a scalable vector graphic into the web page |
|
<math> |
Including a formula written with MathML |
|
<canvas> |
Providing a canvas for drawing graphics |
|
<video> |
Playing video files without plug-ins |
|
<audio> |
Playing audio files without plug-ins |
|
<embed> |
Embedding active elements such as PDF documents, Flash animations, Java applets, Word documents, and many others |
Table 6.1 Brief Overview of the HTML Elements for Graphics and Multimedia Covered in This Chapter
6.1 Embedding Images Using <img>
The internet without graphics and images is hardly imaginable today. There are several types of images that you can add to an HTML document. These include logos, charts, photos, illustrations, animations, and advertising banners, to name just a few examples. You can embed such images using the standalone img element.
6.1.1 Adding Images to an HTML Document
You can add images to a web page via the standalone img element (img = image). The graphic gets inserted at the position where you write the img element in the HTML document. In addition, no line break is used after the graphic if you use a graphic in the body text.
At least the HTML attributes src and alt must be present in the <img> tag. You can use the src attribute to specify where the web browser finds the image file. The alt attribute, on the other hand, is used for an alternative description of the image in case the image can’t be loaded or displayed, and it also helps people with visual impairments because the text it contains is read aloud by screen readers (and should describe what is shown in the image). While this alternative text can be of almost any length, you should limit the text to the essentials. A recommended limit is about 12 to 16 words or 75 to 125 characters.
Does the “alt” Attribute Necessarily Have to Be Used in the <img> Element?
You don’t necessarily have to use the alt attribute in the img element, but if the attribute is missing, the validation check will report an error asking you to use it. This is confusing at first because it says that the alt attribute must be used, whereas the attribute value isn’t mandatory. If you don't want to use the alt attribute, then at least the surrounding text should describe the image. For example, if there’s no relevant content in a graphic (e.g., an empty graphic as a placeholder), and a description with the alt attribute makes no sense at all, it’s recommended to use an empty alt="".
Description Text in “alt” for Search Engines
The alt attribute is also important for search engines because a web crawler can’t “see” what’s in an image. Thus, web crawlers have to rely on a meaningful description with meaningful keywords in the alt attribute. While there’s no official recommendation on how much you should put into the alt attribute, you shouldn’t overdo it here. However, the more data the web crawler has at its disposal, the more positive the effect will be on the website’s ranking. Thus, in addition to a meaningful alt attribute, it’s advisable to provide a short description of the image in the surrounding text.
The following example demonstrates the img element in use:
...
  <h1>Pushkar in India</h1>
  <p>
    <img src="images/TongueOut.jpg" alt="Pilgrim in Pushkar">
    <img src="images/singer.jpg" alt="Singer in Pushkar">
  </p>
  <p>
    A pilgrim in Pushkar. <img src="images/pilgrim.jpg"
    alt="Pilgrim in Pushkar"> He’s on his way to the ghats.
  </p>
...
Listing 6.1 /examples/chapter006/6_1_1/index.html
As you can see in Figure 6.1, images are left-aligned by default to match the alignment of the text. The top two images are displayed side by side if they fit the width of the browser window. This figure also shows how to align an image between body text flush with the font baseline.
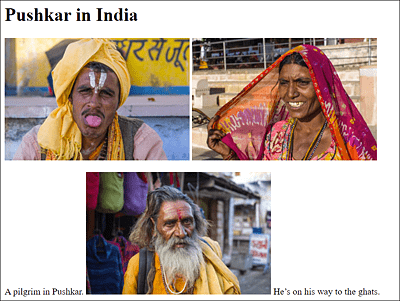
Figure 6.1 Three Images Were Added to an HTML Document Using the <img> Element
Using a Custom Folder for Images
For creating a website, it has proven useful to store all images in a separate directory. Especially when the website becomes more extensive, you can maintain a better overview of where the individual files are stored. Graphics and images are often placed in a directory named images or pictures. When you want to insert a graphic into a web page, you’ll be grateful to simply use src="/images/imagename.jpg" or similar, instead of also having to bother about where the graphic is located and what the reference to the image is.
Using the Global “title” Attribute for Images
The global title attribute is often used for images. The content of the title attribute gets displayed when you hold the mouse cursor over the image. The following figure shows an example with the title attribute.
Using the title attribute to provide additional information about images is fine here. If you use an image as a link to another page, it would make more sense to use this title element to indicate what happens when the user clicks on this image. For example, if an enlarged version of the image displays in a new window, the following use of the title attribute would make sense semantically:
...
<a href="images/TongueOut_big.jpg" target="_blank">
   <img src="images/TongueOut.jpg" alt="Pilgrim in Pushkar"
   title="Opens this image in a larger version in a
   new window or tab.">
</a>
...

Figure 6.2 This Additional Piece of Information Was Added in the <img> Tag with “title="A classical singer in Pushkar (India)"”
As you can see in Figure 6.3, the image has been captioned with a link to a larger version of the image. Accordingly, the description with the title attribute was changed.
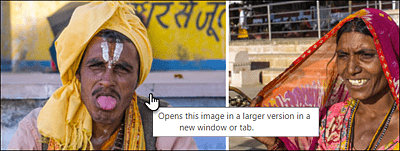
Figure 6.3 The “title” Attribute Allows You to Indicate That the Image Is Available in a Larger Version, Which You Can Open via the Link
Adding an Image or Linking an Image to a Website?
Note that an image isn’t technically inserted into the HTML document; instead, it’s linked to the HTML document. The <img> tag only creates the necessary space for the referenced content.
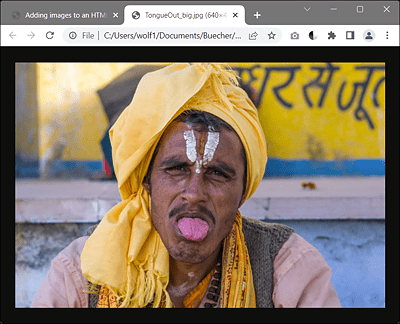
Figure 6.4 When the Visitor Clicks on the Image with the Link, the Larger Image Will Get Displayed in a New Tab
6.1.2 Specifying the Height and Width of a Graphic
Other useful attributes are height and width, which you can use to specify the height and width (in pixels) for the graphic. The purpose of using this information is that loading images usually takes longer than loading the HTML code to be displayed. This way, the web browser can already build and display the complete HTML document, leaving enough space for the images right away—more precisely, a free space is displayed for the images that haven’t been loaded yet. This avoids unsightly subsequent corrections and rescreening with the graphics. Visitors with a fast internet connection won’t even notice this loading process. However, if the internet connection is slow, a mobile device is being used, or the page is simply taking longer than usual to load, reading the content this way while the images are still loading is easier because the entire content doesn’t get repositioned with each reloaded image.
Here’s an example with the attributes height and width:
...
  <p>
    <img src="images/TongueOut.jpg" alt="Pilgrim in Pushkar"
     width="320" height="212">
    <img src="images/singer.jpg" alt="Singer in Pushkar"
     width="320" height="212">
  </p>
  <p>
    A pilgrim in Pushkar. <img src="images/pilgrim.jpg"
    alt="Pilgrim in Pushkar" width="320" height="212"> He is on
    his way to the Ghats.
  </p>
...
Listing 6.2 /examples/chapter006/6_1_2/index.html
Scaling Images in the Web Browser Using “height” and “width”
You can also scale the display size of images in the web browser using the height and width specifications. This “trick” of scaling images in the web browser is often used when an image is a little too large, as shown in Figure 6.5.

Figure 6.5 The Image Is Too Large in Its Original Size of 800 × 526 Pixels to Be Displayed Appropriately in the Window
You could scale this image down in the web browser using height and width and by specifying the desired dimensions:
...
<img src="images/yafo.jpg" alt="Tel Aviv Yafo"
  width="320" height="210">
...
The original image with 800 × 526 pixels is scaled down to 320 × 210 pixels by specifying width and height. The scaling process only takes place in the web browser’s display and doesn’t change the file size itself. Alternatively, you can specify only the width or the height with reduced values and let the web browser adjust the other value proportionally. You can see the result of scaling down in the web browser from 800 × 526 to 320 × 210 pixels in Figure 6.6, where the photo from Figure 6.5 is displayed smaller. Loading the file takes the same amount of time as before because the file size is the same. You can find the example in /examples/chapter006/6_1_2/index2.html.
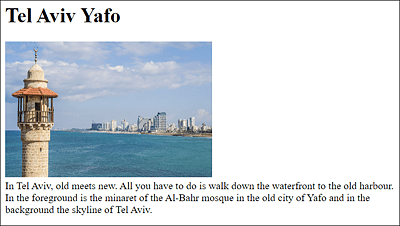
Figure 6.6 The Image Was Scaled Down by the Web Browser Using the “width” and “height” Attributes
Scaling in the Web Browser versus Using an Image Editor
While scaling in the web browser using width and height is possible and allowed, you should use an image editor in practice to scale the images to the actual size if possible for two reasons: you reduce the amount of data (traffic), and you don’t run the risk of ugly and rough shrinkage of the graphic. After all, you’re relying on your visitors’ web browsers to render the site, giving you a bit of control over how the images are displayed.
6.1.3 Labeling Images Using <figure> and <figcaption>
The two HTML elements <figure> and <figcaption> (described in Chapter 4, Section 4.2.9) are well suited for adding a caption to a graphic. To do this, you just need to enclose the image, that is, the img element, between <figure> and </figure> and then add the figcaption element with the caption. If you write <figcaption>... </figcaption> right after the opening <figure>, the caption will appear above the image. If you write <figcaption>...</figcaption> directly before the closing </figure>, the caption will appear below the image. Figure 6.7 shows the following simple example in execution:
...
<figure>
  <img src="images/painter.jpg" alt="Painter in Tel Aviv"
   width="400" height="256"><br>
   <figcaption>The scenery in front of the old port of Yofa in
    Tel Aviv is just perfect for painting.</figcaption>
</figure>
...
Listing 6.3 /examples/chapter006/6_1_3/index.html
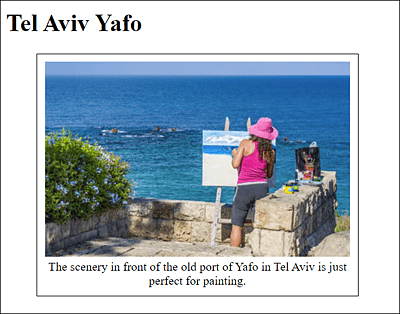
Figure 6.7 The Caption Has Been Formatted with CSS for Clarity, So That the <figure> Element Can Be Seen More Clearly
Merging Multiple Images
You can also use the figure element to include multiple images or different content. No matter how many elements you specify between <figure> and </figure>, you can use only one figcaption element for a caption. In addition, figcaption must be the first or the last element of the figure element.
6.1.4 HTML Attributes for the HTML Element <img>
Finally, the following table describes the attributes of the img element, the most important of which you’ve already learned about.
|
Attribute |
Description |
|---|---|
|
You can specify alternative text to be displayed when images or graphics can’t be displayed. This attribute is also helpful for visitors with a visual impairment or for search engines. |
|
|
You can specify the vertical extent (height) of the image in pixels. |
|
|
You can use this Boolean value if the images are a server-side image map. This server-side technique is rarely used, so I won’t go into the detail here. I’ll describe link-sensitive graphics (client-side technique) in Section 6.2. |
|
|
You can specify the link destination to the image file. In addition to the file name, you can specify a relative or absolute path as well as an entire internet address. The specification of this attribute is mandatory. |
|
|
You can specify the name of an image map to be associated with the image. This is a client-side link-sensitive graphic, which will be described in Section 6.2. |
|
|
You can specify the size in the horizontal direction (width) of the image in pixels. |
Table 6.2 The HTML Attributes of the <img> Element