4.2 HTML Elements for Structuring Text
This section describes the HTML elements for grouping or structuring plain text content, such as paragraph text or a line break. This has nothing to do with dividing an HTML document into individual sections or areas. You’ve previously learned how to do that in Section 4.1.
|
HTML Element |
Meaning |
|---|---|
|
<p> |
Text paragraph |
|
<br> |
Forcing a line break |
|
<wbr> |
Optional line break within a word |
|
<hr> |
Topic-based separation at the paragraph level |
|
<blockquote> |
Citation as a text paragraph |
|
<div> |
Defining a general section |
|
<main> |
Used for the main content area of a web page |
|
<figure> |
Grouping or summarizing content for separate description |
|
<figcaption> |
Labeling content grouped via the figure element |
|
<ul> |
Unordered bulleted list |
|
<ol> |
Ordered list (mostly numbered) |
|
List element in a ul or ol list |
|
|
<dl> |
Creating a description list using dt and dd |
|
<dt> |
Expression to be described before the dd element |
|
<dd> |
Description that follows the dt element |
Table 4.2 Brief Overview of the Elements Covered Here for Grouping and Dividing Content
4.2.1 Adding Text Paragraphs Using <p>
The p element (p = paragraph) is the classic element for text paragraphs in a longer continuous text. Anything you write here between the opening <p> and the closing </p> is treated as a text paragraph. Within such a text paragraph you can use images, videos, audio clips, or other text markup in addition to multiline body text. However, you can’t use other group elements, headings(<h1> to <h6>), or section elements within <p> and </p>.
The following example demonstrates two slightly longer paragraph texts with the p element in use:
...
  <body>
  ...
  <h2>News on HTML</h2>
  <article>
    <h3>A preview of the new HTML elements</h3>.
    <p>Lorem ipsum dolor sit amet, consectetuer adipiscing
       elit. Aenean commodo ligula eget dolor. Aenean massa.
       Cum sociis natoque penatibus et magnis dis parturient
       montes, nascetur ridiculus mus. Donec quam felis,
       ultricies nec, pellentesque eu, pretium quis, sem.
       Nulla consequat massa quis enim. Donec pede justo,
       fringilla vel, aliquet nec, vulputate eget, arcu. In
       enim justo, rhoncus ut, imperdiet a, venenatis vitae,
       justo.
    </p>
    <p>Nullam dictum felis eu pede mollis pretium. Integer
       tincidunt. Cras dapibus. Vivamus elementum semper
       nisi. Aenean vulputate eleifend tellus. Aenean leo
       ligula, porttitor eu, consequat vitae, eleifend ac,
       enim. Aliquam lorem ante, dapibus in, viverra quis,
       feugiat a, tellus.
    </p>
  </article>
  ...
  </body>
...
Listing 4.9 /examples/chapter004/4_2_1/index.html
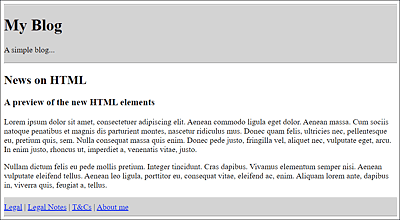
Figure 4.11 Two Paragraphs with Body Text between <p> and </p> Displayed in the Web Browser
Aligning and Formatting Paragraph Text Using CSS
Paragraph text with the p element can be formatted using CSS or CSS features.
4.2.2 Forcing Line Breaks Using <br>
If you try to insert a line break or a space in the body text of the example just shown, /examples/chapter004/4_2_1/index.html, you’ll notice that it doesn’t work. The point at which the line break is supposed to be inserted is decided by the web browser based on a space that separates words. Nevertheless, you can also force a line break at a certain point in the text using <br> (br = break). <br> is a standalone tag. Even though you can use multiple line breaks simultaneously via <br>, you shouldn’t overuse it for separating paragraphs.
The following example is commonly used to represent an address neatly by means of forced line breaks (see Figure 4.12):
...
    Written by <a href="mailto:#">John</a><br>
    <address>
       John Doe<br>
       Sample Town<br>
       www.address.com
    </address>
...
Listing 4.10 /examples/chapter004/4_2_2/index.html
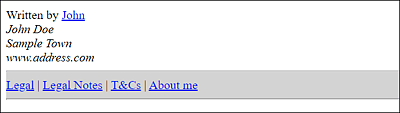
Figure 4.12 You Can Force Line Breaks via the <br> Element
4.2.3 Adding Optional Line Breaks Using <wbr>
If, on the other hand, you need an optional line break that only occurs at a specific position when it’s necessary for an optimal display in the web browser and to save the user from scrolling sideways, you can use the standalone <wbr> (or <wbr /> in XHTML) tag for this (wbr = word break). <wbr> can be quite useful if you want to prevent the web browser from breaking a line in the wrong place. A simple example follows:
<p>Taumatawhakatangi<wbr>
hangakoauauotamatea<wbr>
turipukakapikimaungah<wbr>
oronukupokaiwhen<wbr>
uakitanatahu</p>
Depending on how wide the display section is in the web browser, the long word can be wrapped only at the places where <wbr> was inserted.
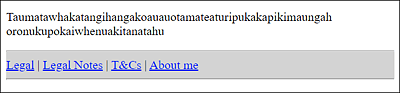
Figure 4.13 An Extremely Long Word Wrapped at a Position Suggested by <wbr>
Line Break via <wbr>
The optional line break via <wbr> was added to the standard HTML version at a later time, but it had been around since HTML 2.0. The Netscape web browser had introduced this element a long time ago, and other browser manufacturers had implemented it as well.
Nevertheless, this word separation is unattractive because the line gets broken without consideration of a grammatically correct separation. As an alternative, the named entity ­ is suitable for a conditional hyphen. Similar to <wbr>, this allows the web browser to separate the word at this point if necessary. Unlike <wbr>, the web browser adds a hyphen at the end of the wrapped word. The alternative example looks as follows:
<p>Taumatawhakatangi­
hangakoauauotamatea­
turipukakapikimaungah­
oronukupokaiwhen­
uakitanatahu</p>
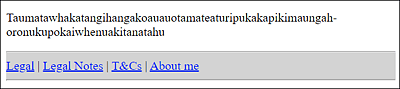
Figure 4.14 A Long Word Can Also Be Wrapped at the Position Suggested by “­” but It Also Adds a Separator, Unlike <wbr>
4.2.4 Forcing Spaces and Preventing Wrapping Using " "
If you want to insert multiple spaces between two words, you can force this with the named character (  = nonbreaking space). Let’s take a look at a simple example:
<p>word1 word2</p>
<p>word3 word4</p>
Between word1 and word2, the named HTML entity character has been written four times, resulting in four spaces between these two words, which is also displayed by the web browser. In the example with word3 and word4 the same was tried by pressing the spacebar four times. Nevertheless, in this case, the web browser displays only one space between the words.
In addition to forcing a space, you can also use the named entity character to prevent a break between two words, which the web browser automatically performs when there is insufficient space at the end of a line. For example:
... word1 word2 ...
By placing this between word1 and word2, you can prevent the two words from being split between two different lines by the web browser if there’s a lack of space. word1 and word2 thus stick together in the same line forever.
4.2.5 Adding a Topic-Based Separation Using <hr>
You can use <hr> to create a topic-based separation in an HTML document, for example, to separate content more clearly. However, even though <hr> is visualized as a separator in HTML by web browsers, the element is also to be treated as a semantic element and not a presentation element. For example, it isn’t valid HTML to use the hr element between <p> and </p> or within a heading (<h1> to <h6>), even though web browsers are quite fault-tolerant about this.
The example shown in Figure 4.15 with a horizontal line can be found under /examples/chapter004/4_2_5/index.html. You’ll see that a separator line also creates a paragraph.
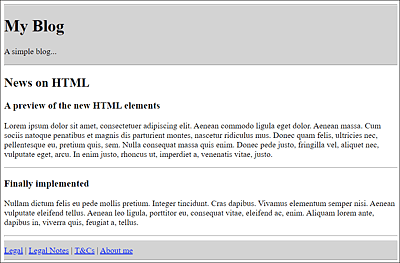
Figure 4.15 With <hr>, a Visual Topic-Based Separation Has Been Added as a Separator Line behind the Paragraph Text
4.2.6 Adding Paragraphs or Citations Using <blockquote>
Between <blockquote> and </blockquote>, you can quote a text from another source. Most web browsers indent the text in a new paragraph. Within such block quotes, you can use other HTML elements besides text.
The blockquote element contains cite, an HTML attribute that allows you to specify the source of the citation. With regard to books, this can also be a link to the corresponding book page or to a store where this book can be purchased. Unfortunately, no web browser provides the option to somehow make this source visible or to call the corresponding URL yet. So, to be on the safe side, you should add the source, as I did in the following example; in Figure 4.16, you can see the display in the web browser.
...
<blockquote cite="http://www.blindtextgenerator.com/">
   Nulla consequat massa quis enim. Donec pede justo,
   fringilla vel, aliquet nec, vulputate eget, arcu. In enim
   justo, rhoncus ut, imperdiet a, venenatis vitae, justo.
   <small> - http://www.blindtextgenerator.com/ - </small>
</blockquote>
...
Listing 4.11 /examples/chapter004/4_2_6/index.html
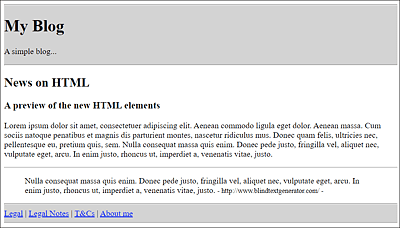
Figure 4.16 Text Quoted between <blockquote> and </blockquote> from the www.blindtextgenerator.com Website
4.2.7 Defining a General Section Using <div>
Between <div> and </div> (div = division), you can define a general section, which at first usually does nothing but create a new line. This div element doesn’t have any meaning until CSS comes into play, which is the main use of <div>: defining layout sections. In the following example, the HTML attribute class was used, which you can use to assign the div elements to a class that you can later select with CSS (using a selector) and visually customize or style. Here’s a familiar example that demonstrates such an application in use:
...
  <body>
  <div class="header">
    <hr />
    <h1>My Blog</h1>
    <p>A simple blog ...</p>
    <hr />
  </div>
  <h2>News on HTML</h2>
  <div class="article">
    <h3>A preview of the new HTML elements</h3>
    <p>Lorem ipsum dolor ...</p>
  </div>
  <div class="footer">
    <hr />
    <a href="#">Legal</a> |
    <a href="#">Legal Notes</a> |
    <a href="#">T&Cs</a> |
    <a href="#">About me</a>
    <hr />
  </div>
  </body>
...
Listing 4.12 /examples/chapter004/4_2_7/index.html
For such examples, you should prefer semantic elements such as <header>, <footer>, <article>, <nav>, and so on instead of the div element.
Therefore, you should use the div element only if no other suitable HTML element is available. You can find more information about this in greater detail in Section 4.3. In regard to the /examples/chapter004/4_2_7/index.html example, you should, as previously described in the book, use the HTML elements <header>, <article>, and <footer> that have been newly introduced in HTML instead of the <div class="header">, <div class="article">, and <div class="footer "> sections used in the previous example. The corresponding example thus looks as follows (see Listing 4.13).
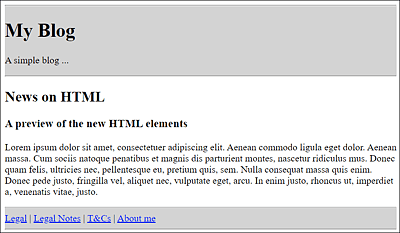
Figure 4.17 The Header and Footer of the HTML Document Appear in Gray
...
  <body>
  <header>
    <hr />
    <h1>My Blog</h1>
    <p>A simple blog ...</p>
    <hr />
  </header>
  <h2>News on HTML</h2>
  <article>
    <h3>A preview of the new HTML elements</h3>
    <p>Lorem ipsum dolor ... </p>
  </article>
  <footer>
    <hr />
    <a href="#">Legal</a> |
    <a href="#">Legal Notes</a> |
    <a href="#">T&Cs</a> |
    <a href="#">About me</a>
    <hr />
  </footer>
  </body>
...
Listing 4.13 /examples/chapter004/4_2_7/index2.html
4.2.8 Using <main>: An HTML Element for the Main Content
I described the div element in the previous section, so it makes sense to deal with the main element at this point. Where <div id="main">...</div> was used in the past, you can use <main>...</main> from now on. The id attribute identifies an element that occurs only once within a document.
Like all other new HTML elements, you should use the main element as sensibly as possible. In practice, you use it for the main content of a website, which means it’s best not to place it inside <article>, <aside>, <footer>, <nav>, or header elements.
In the web browser, the main element is rendered like the div element with no special properties and only creates a line break. However, unlike the div element, you should use the main element only once (visibly) in an HTML document. In contrast to the <section> element, the main element isn’t a section element, but a pure grouping element. Thus, the use of such a section doesn’t affect the heading structure (the document outline) of the HTML document.
Here’s an example of how you can group a section as the main section of a web page:
...
  <body>
  <header>
    <h1>My Blog</h1>
    <p>A simple blog ...</p>
  </header>
  <main>
    <h2>News on HTML</h2>
    <article>
      <h3>A preview of the new HTML elements</h3>
      <p>Lorem ipsum dolor...</p>
    </article>
  </main>
  <footer>
    <a href="#">Legal</a> |
    <a href="#">Legal Notes</a> |
    <a href="#">T&Cs</a> |
    <a href="#">About me</a>
  </footer>
  </body>
...
Listing 4.14 /examples/chapter004/4_2_8/index.html
Using <main> Multiple Times?
<main> is intended to present the main content of an HTML document and should therefore be included only once in a document. If it’s used more than once, then this page won’t pass the validation check. Nevertheless, there are single-page web applications, that is, applications that consist of a single HTML document and whose content is dynamically reloaded, where this rule can become an issue. For this reason, the use of the main element has been adjusted somewhat, and multiple main elements can now be used. However, only one <main> element of those can be visible at a time. All other main elements must be provided with the hidden attribute. For example:
<main>...</main>
<main hidden>...</main>
<main hidden>...</main>
Although there are other ways in CSS to hide individual elements, you can use only the hidden attribute with <main> for the HTML document to be valid. All other options are invalid.
4.2.9 Labeling Content Separately Using <figure> and <figcaption>
To set off or group certain content such as tables, images, listings, videos, or other HTML elements from the usual body text, you can use the figure element. If you want to link this section with an (optional) caption, you should use the figcaption element. Like the figure element, the figcaption element can contain other HTML elements besides ordinary body text. Thus, the figure element serves as the semantic parent for an element belonging to the page content, such as an image, table, listing, or other content, and the figcaption element encloses the subtitle to that element.
Here’s a simple example, the result of which is shown in Figure 4.18:
...
  <h2>HTML</h2>
  <article>
    <h3>figure and figcaption in use</h3>
    <p>The text before figure ...</p>
    <figure>
      <img src="opera.jpg" alt="Chinese Opera" />
      <figcaption>Figure 1: Once upon a time ...</figcaption>
      </figure>
    <p>The text after figure</p>
  </article>
...
Listing 4.15 /examples/chapter004/4_2_9/index.html
If you want to place the (optional) caption with the figcaption element before the content (above the image in the example), you need to use the element right after the opening <figure>. However, it’s only possible to use a figcaption element between <figure> and </figure>, and <figcaption> must be the first or last element of the figure element.
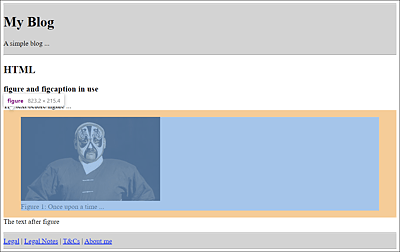
Figure 4.18 In the <article> Element between <figure> and </figure>, an Image Has Been Inserted with the <img> Element and a Caption with the <figcaption> Element
Between <figure> and </figure> you can also use more than one content type (e.g., an image in the example). In the web browser, a figure usually doesn’t get displayed separately. In addition to a separate line, the content between <figure> and </figure> is often displayed slightly indented. However, CSS is used for the design of the figure element anyway.
4.2.10 Creating Unordered Lists Using <ul> and <li>
An unordered list is basically nothing more than an unnumbered bulleted list in which all list entries are given a bullet character. The web browsers usually display this bullet with a bullet point.
You can introduce such a list with an opening <ul> (ul = unordered list), followed by the actual bullet points, which you write between <li> and </li>. Each li element (li = list item) is a bullet point. At the end, you must end the unordered bullet list with the closing </ul>. Only li elements can be contained between <ul> and </ul>. In between the li elements, you can also use other HTML elements (except for section elements).
Here’s a simple example of an unordered list, the execution of which you can see in Figure 4.19.
...
<article>
  <h2>Unordered bullet list with ul</h2>
  <ul>
     <li>Lorem ipsum dolor sit amet</li>
     <li>Donec quam felis ultricies</li>
     <li>Nulla consequat massa quis</li>
     <li>Etiam ultricies nisi vel</li>
     <li>Donec vitae sapien ut libero</li>
  </ul>
</article>
...
Listing 4.16 /examples/chapter004/4_2_10_15/index.html
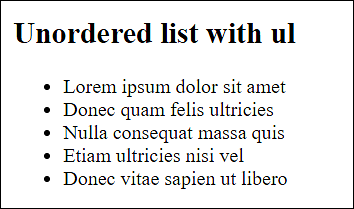
Figure 4.19 Bulleted Lists with the <ul> Element Are Usually Displayed with a Bullet Point
4.2.11 Creating Ordered Lists Using <ol> and <li>
What you’ve just read about the ul element also applies to the ol element (ol = ordered list). The only exception is that the ol element is an ordered list—more precisely, a numbered list in which the individual li elements are automatically numbered.
Here’s an example of an ordered list, the execution of which you can see in Figure 4.20.
...
<article>
  <h2>Numbered bullet list with ol</h2>
  <ol>
     <li>Lorem ipsum dolor sit amet</li>
     <li>Donec quam felis ultricies</li>
     <li>Nulla consequat massa quis</li>
     <li>Etiam ultricies nisi vel</li>
     <li>Donec vitae sapien ut libero</li>
  </ol>
</article>
...
Listing 4.17 /examples/chapter004/4_2_10_15/index.html
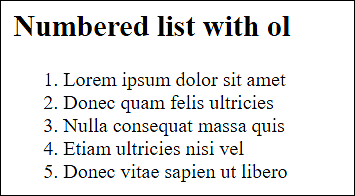
Figure 4.20 The Numbered List with the <ol> Element Uses Arabic Numerals by Default
4.2.12 Reversing the Numbering of an Ordered List
With HTML, it’s also possible to reverse the order of numbering via the HTML attribute reversed in the opening <ol> tag, so that the numbering gets displayed in descending order. Based on the preceding example, you only need to insert the following:
<ol reversed="reversed">
   ...
</ol>
Besides <ol reversed="reversed">, you can also just use <ol reversed> here because it’s a standalone attribute. But if you want to be XHTML compliant, you must use the form <ol reversed="reversed">. In HTML, you can use both versions.
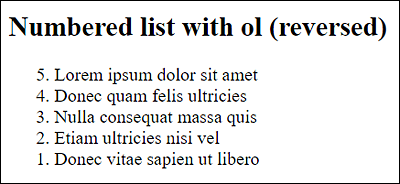
Figure 4.21 The Numbering Order Was Reversed via the “reversed” Attribute
4.2.13 Changing the Numbering of an Ordered List
You can use the HTML attribute start to specify the start value of the first li element in the opening <ol> tag. All values that follow the first li element are incremented by the value 1. Even within an opening <li> tag, you can use the HTML attribute value to change the numbering of the list entry. All subsequent entries are incremented by the value 1 using the value specified in value.
The execution of the following example is shown in Figure 4.22.
...
<ol start="20">
  <li>Lorem ipsum dolor sit amet</li>
  <li>Donec quam felis ultricies</li>
  <li>Nulla consequat massa quis</li>
  <li value="101">Etiam ultricies nisi vel</li>
  <li>Donec vitae sapien ut libero</li>
</ol>
...
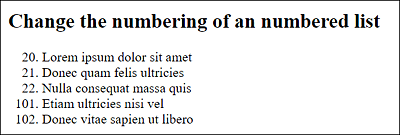
Figure 4.22 The Starting Numbering Was Set to 20 Right in the Opening <ol> Tag with the Attribute “start” and Then Again in an Opening <li> Tag with the Attribute “value” to 101
4.2.14 Nesting Lists within Each Other
You can nest both numbered lists and bulleted lists. Such nested lists are used when, for example, you need a finer structuring of the lists, such as a table of contents (e.g., at the beginning of this book). A navigation with submenus is also often formulated by means of a bulleted list.
Nesting lists can get a little messy, so if you have a deeper bulleted hierarchy, you should use indentations and/or add a comment. When nesting, the li elements aren’t nested inside each other, as might be assumed, but a ul or ol element must be written again with the nested li elements inside an opening parent <li> tag. Only when you close the opening <li> tag with </li> will this list be marked and displayed as a child list.
The execution of the following code snippet is shown in Figure 4.23.
...
<h2>Nesting bullet lists ul</h2>
<ul>
  <li>Lorem ipsum dolor sit amet
  <ul><!-- Start: 1. Nesting -->
     <li>Donec quam felis ultricies</li>
     <li>Nulla consequat massa quis</li>
  </ul><!-- End: 1. Nesting -->
  </li>
  <li>Etiam ultricies nisi vel</li>
  <li>Donec vitae sapien ut libero</li>
</ul>
...
<h2>Nesting numbered lists ol</h2>
<ol>
  <li>Lorem ipsum dolor sit amet
  <ol><!-- Start: 1. Nesting -->
     <li>Donec quam felis ultricies</li>
     <li>Nulla consequat massa quis</li>
  </ol><!-- End: 1. Nesting -->
  </li>
  <li>Etiam ultricies nisi vel</li>
  <li>Donec vitae sapien ut libero</li>
</ol>
...
Listing 4.18 /examples/chapter004/4_2_10_15/index.html
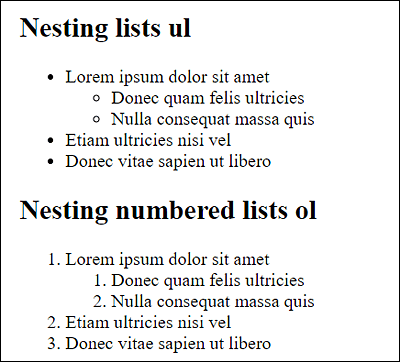
Figure 4.23 The Nesting of Unnumbered Lists and Numbered Lists during Execution
Of course, you can nest the lists even deeper. Mixing unordered and ordered lists is also possible without any problem. Unfortunately, it isn’t possible to force automatic numbering such as 1.2, 1.3, 1.4, and so on for the numbered sublists.
To illustrate this, the following is an example of a deeper and mixed nesting, the result of which is shown in Figure 4.24.
...
<h2>Deeper nesting and mixing lists</h2>
<ol>
  <li>Lorem ipsum dolor sit amet
  <ol><!-- Start: 1. Nesting -->
      <li>Donec quam felis ultricies</li>
      <li>Nulla consequat massa quis
      <ol><!-- Start: 2. Nesting -->
          <li>Donec quam felis ultricies</li>
          <li>Nulla consequat massa quis</li>
      </ol><!-- End: 2. Nesting -->
      </li>
  </ol><!-- End: 1. Nesting -->
  </li>
  <li>Etiam ultricies nisi vel
  <ul><!-- Start: 1. Nesting (bullet point) -->
      <li>Donec quam felis ultricies</li>
      <li>Nulla consequat massa quis</li>
  </ul><!-- End: 1. Nesting (bullet point) -->
  </li>
  <li>Donec vitae sapien ut libero</li>
</ol>
...
Listing 4.19 /examples/chapter004/4_2_10_15/index.html
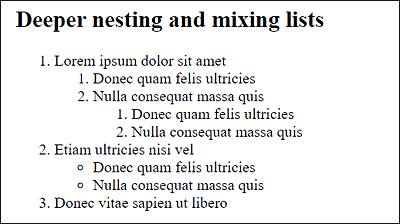
Figure 4.24 Further Nesting Depths and Mixing of Ordered and Unordered Lists
Omitting the Closing Tag from Lists
As you may remember from Chapter 2, Section 2.1.6, it’s possible to omit the closing tags in some places. Especially if a list is deeply and extensively nested, this may even be clearer and easier than setting the closing tags. As mentioned earlier, this style isn’t used in this book, and I’ve never used it in practice (yet). Nevertheless, it should be pointed out here because the lists are listed as a pro-argument, especially by the “omission faction.”
4.2.15 Creating a Description List Using <dl>, <dt>, and <dd>
In HTML, there’s another type of list you can use—the description list. This list is more of a name-value mapping list. Typical use cases for the description list are glossaries or the listing of special metadata and values; in other words, it’s simply a special list with certain data in which a value or a description is assigned.
A description list gets summarized between <dl> and </dl> (dl = description list). The dl element may only contain the dt and dd elements described in the same way. The expression to be described, that is, the name of the name-value mapping list, is marked with <dt> and </dt> (dt = description term). The associated description is written after the dt element between <dd> and </dd> (dd = definition description). In turn, other HTML elements may be used in dt and dd elements—except for grouping elements and HTML elements for new sections (sectioning).
Here’s a simple example of a description list, the result of which is shown in Figure 4.25. By default, web browsers display the descriptions (<dd> elements) slightly indented compared to the expression (<dt> elements). Here the description list was used for a list of abbreviations in the web jargon.
...
<h3>Web lingo</h3>
<dl>
  <dt>4U</dt>
  <dd>For you</dd>
  <dt>ACK</dt>
  <dd>Acknowledgment</dd>
  <dt>ASAP</dt>
  <dd>As soon as possible</dd>
  <dt>FYI</dt>
  <dd>For your information</dd>
</dl>
...
Listing 4.20 /examples/chapter004/4_2_10_15/index.html
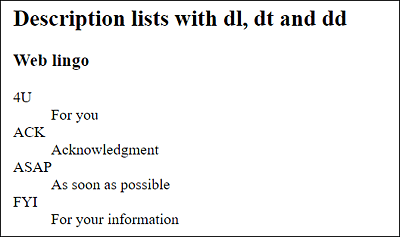
Figure 4.25 Descriptions (<dd> Elements) Slightly Indented Compared to the Expression (<dt> Elements)
Such a name-value pair list can also be used within other HTML elements such as between <aside> and </aside> or the new details element, as shown in the following example:
...
<h3>Book launch</h3>
<img src="Computer stories.png"
alt="Computer stories"><br>
<details>
  <summary>Book information:</summary>.
  <dl>
    <dt>Publisher</dt>
    <dd>Rheinwerk Verlag</dd>
    <dt>Author</dt>
    <dd>Juergen Wolf</dd>
    <dt>Scope</dt>
    <dd>400 pages</dd>
    <dt>Price</dt>
    <dd>$24.90</dd>
    <dt>ISBN</dt>
    <dd> ISBN 978-3-8362-7777-8 </dd>
  </dl>
</details>
...
Listing 4.21 /examples/chapter004/4_2_10_15/index.html
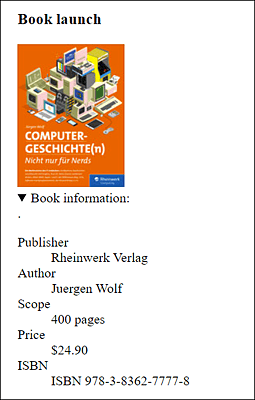
Figure 4.26 The Description List for an Image (a Book) Has Been Wrapped inside the <details> Element, Allowing the Description to be Expanded and Collapsed