2 Basic Structure of HTML and HTML Documents
This chapter introduces you to the basic syntax and structure of HTML as a language, as well as the individual components that make up a classic HTML document.
You’ll also learn how an HTML document is generally structured. At this point, it’s not yet important that you understand the examples and the individual HTML elements. At the end of the chapter, you’ll know what HTML tags and HTML elements are and into which sections an HTML document is basically divided, which is sufficient for the time being.
You’ll learn about the following important aspects in this chapter:
-
How to implement a structure using HTML
-
What HTML tags and HTML elements are
-
How to correctly nest HTML elements
-
What HTML attributes (properties of HTML tags) are
-
How to use comments in an HTML document
-
How an HTML document is structured
-
How to set the document type to <!doctype>
2.1 Syntax and Structure of HTML and HTML Documents
This section describes the basic grammar of HTML and the basic structure of HTML documents. You certainly can use HTML without knowing the grammar, but if you really want to learn and use valid HTML, you should know and follow the rules.
2.1.1 How to Structure a Document in HTML
HTML is structured in the same way as you know it from other media or applications. When you look at this book, a newspaper, or even a document in a word processor (e.g., Word), you’ll always find some kind of structure. In this book, for example, each chapter contains a heading followed by text with paragraphs and occasionally some pictures. Here and there, you’ll also come across some tables. In some sections, subheadings are used at different hierarchical levels. In the same way, an HTML document is structured via HTML elements.
For demonstration purposes, let’s take a look at an HTML document with a simple HTML page structure, which will then be explained:
<!doctype html>
<html>
  <head>
    <meta charset="UTF-8">
    <title>Window Title</title>
  </head>
  <body>
    <h1>The main heading</h1>
    <p>Here is an ordinary paragraph text.</p>
    <h2>A subheading</h2>
    <p>Another paragraph with text.</p>
  </body>
</html>
Listing 2.1 /examples/chapter002/2_1_1/index.html
When you load this HTML document into your web browser, you should see a display similar to Figure 2.1.
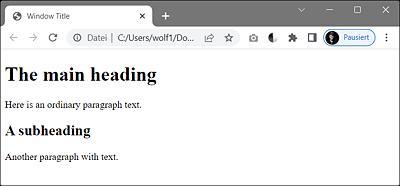
Figure 2.1 A Structured HTML Document in the Web Browser (Google Chrome)
Figure 2.2 shows the basic elements of the page structure of an HTML document and their meaning. The main focus is on the HTML code and its elements for structured presentation. You’ll learn more about the actual basic framework and the individual HTML elements in detail in the course of the next chapters.
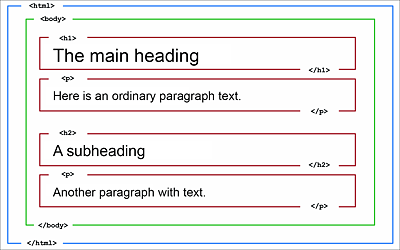
Figure 2.2 Basic Page Structure of an HTML Document
Everything you see here between <html> and </html> is the HTML code for the HTML document. For this reason, the html element is often referred to as the root element of an HTML file. There can be only one such root element in an HTML file. This element also summarizes the header data between <head> and </head>. The part visible in the web browser is written between <body> and </body>. In this example, you’ll find a first-order heading between <h1> and </h1>, followed by plain paragraph text between <p> and </p>. This is followed by another second-order heading between <h2> and </h2>, followed by another paragraph text between <p> and </p>.
Figure 2.2 also shows you that the individual elements are nested as in a rectangular container, and the HTML document is structured with the HTML elements. Strictly speaking, in this figure, the area between <html> and </html> should be drawn a bit wider (outside the display area) because it also contains elements that aren’t displayed in the web browser.
If you think web pages are assembled from rectangular elements, you’re right. Web pages consist of rectangular boxes that are arranged in the browser below each other, next to each other, and inside each other. In Figure 2.3, I made these rectangular boxes visible using CSS. Later in the book, you’ll learn how to design such boxes with CSS.
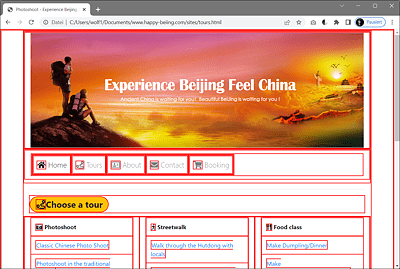
Figure 2.3 The Rectangular Boxes That Make Up a Web Page Have Been Made Visible
2.1.2 Viewing the Tree Structure Using the Document Object Model Inspector
The HTML code of an HTML document consists of pure text. Only a web browser creates a model from this HTML document in the form of a tree structure of objects such as HTML elements, attributes, and text. This model is referred to as the Document Object Model (DOM). Each object in this DOM tree is referred to as a node and can be manipulated via a public interface using JavaScript.
If you want to view or examine this tree structure of HTML elements in your web browser, you can do so with a DOM inspector. All major browser manufacturers provide such web developer tools along with the web browser.
In Figure 2.4, you can see the DOM inspector of the Google Chrome web browser in use. When you look at an example with such a tool, you can clearly see the nested tree structure of HTML. The hierarchical DOM view was called using the DOM Inspector of the Google Chrome web browser (via More Tools • Developer Tools).
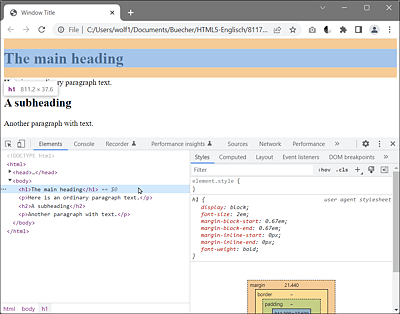
Figure 2.4 Hierarchical DOM View
2.1.3 HTML Tags and HTML Elements
In the previous section, you saw how different HTML elements such as <h1>...</h1>, <h2>...</h2>, and <p>...</p> were used to describe the page structure. A complete HTML element usually consists of an opening HTML tag, a closing HTML tag, and everything in between. For example, the following line represents a complete HTML element:
<tagname>Text within the HTML element</tagname>
Instead of tagname, real HTML keywords describing different parts of a web page are used for this purpose. For example, you can represent a first-order heading using the following line:
<h1>HTML element as heading</h1>
An HTML element is usually the completely displayable element such as a heading, paragraph text, or an entire hyperlink. The HTML elements, in turn, are marked by HTML tags.
The HTML tags (also called HTML markup tags) are keywords surrounded by angle brackets, such as <p>. Most HTML tags come as a pair, such as <p> and </p>. The first tag of the pair is the start tag, and the second one is the end tag. In practice, these tags are also called opening tag (= start tag) and closing tag (= end tag). Both tags have the same tag name, except that the closing tag is terminated by a forward slash (e.g., </p>).
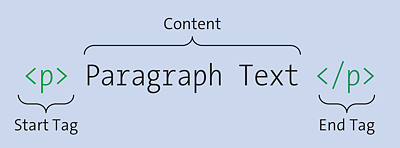
Figure 2.5 A Complete HTML Element with Its Individual Components (Start Tag, Element Content, and End Tag)
2.1.4 Nesting HTML Elements and the Hierarchical Structure
Most HTML elements can be nested and contain other HTML elements. Such nesting creates a hierarchical structure. The following example demonstrates such a simple nesting of HTML elements:
<!doctype html>
<html>
  <head>
    <meta charset="UTF-8">
    <title>Window Title</title>
  </head>
  <body>
    <p>This is an <b>ordinary</b> paragraph text.</p>
  </body>
</html>
Listing 2.2 /examples/chapter002/2_1_4/index.html
Here, another HTML element has been nested within the paragraph text between <p> and </p>. The b element makes sure that the text is displayed in bold font (b = bold). In the example, the HTML element from <b> to </b> is actually the child element of the HTML element from <p> to </p>. Strictly speaking, the HTML element from <p> to </p> is again just a child element of the HTML element from <body> to </body>. This creates a fairly structured markup. Complex HTML documents therefore often contain deep nesting.
When you take a look at the DOM inspector in Figure 2.6, you’ll see the structured markup from the parent <html> element, through the child <body> element, and the child-child <p> element, to the innermost HTML element, the child-child <b> element.
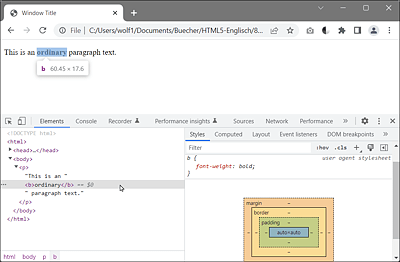
Figure 2.6 A DOM Inspector Lists the Hierarchical Structure Very Clearly
2.1.5 Avoiding Incorrect Nesting of HTML Elements
It’s important to always ensure that a child element is completely contained within the parent element. This means that you have to write an end tag of a child element within the parent element, that is, before the end tag of the parent element. In this context, you should take a look at the following erroneous example:
...
<body>
  <p>This is a <b>common paragraph text.</p></b>
</body>
...
When you validate this HTML code, three error messages get returned at once, as you can see in Figure 2.7. First, it’s noted that an end tag </p> was used, although it still contains open elements (here, only <b>). Then the start tag <b> is also noted as not having been closed. Finally, the end tag </b> is described as invalid at the end because no start tag <b> was found in the corresponding scope here.

Figure 2.7 Incorrect Nesting Is Immediately Detected by Means of Validation
You can fix the error by writing the end tag </b> into the section, which in this case is between <p> and </p>, because the start tag <b> is also in it. You must always close the innermost elements first and only then the outer ones. The correct notation of the preceding example looks as follows:
...
<body>
  <p>This is a <b>common paragraph text.</b></p>
</body>
...
2.1.6 Omitting the End Tag of an HTML Element
In HTML, there are some optional tags—that is, HTML tags—that you could omit. For example, under certain conditions, you can omit the end tag, as shown in the following code snippet:
...
  <body>
    <p>This is an ordinary paragraph text.
    <p>This is another paragraph text.
  </body>
...
Here, the closing end tags </p> have been omitted, which works and is permitted in most web browsers. In addition, it’s possible to omit the <html> start tag and </html> end tag or even <body> and </body> under certain conditions. Missing tags are inserted in the right places by the web browser when the DOM tree gets generated. When you use the DOM inspector and look at an HTML element with a missing end tag and the same one without a missing end tag, you’ll notice that the web browser always ends up generating the same HTML code from the document.
However, omitting tags requires that you know and follow the rules defined for doing so. For example, it isn’t possible to omit an end tag just like that for all HTML elements. Many HTML elements produce an unexpected result or error when the end tag is missing. You can, for instance, omit the end tag for p, ul, or li elements, but not for div elements. These somewhat inconsistent requirements make it harder rather than being helpful, especially for beginners. For this reason, theoretically and practically, you can write the example /examples/chapter002/2_1_4/index.html without the html and body tags as follows, and still the web browser would create the same DOM tree from it as shown earlier in Figure 2.6.
<!doctype html>
<meta charset="UTF-8">
<title>Window Title</title>
<p>This is a <b>common</b> paragraph text.</p>
Listing 2.3 /examples/chapter002/2_1_6/index.html
More Information Online
For an overview of the circumstances under which you can omit specific tags, see https://html.spec.whatwg.org/multipage/syntax.html#optional-tags.
2.1.7 Standalone HTML Tags without End Tags
Some HTML elements are standalone tags (or void tags) that have no content and therefore don’t require an end tag. An example of such a tag without contents is <br>, which causes a line break:
<p>A line break<br>The next line</p>
However, the HTML element <br> shouldn’t be misused to increase the spacing between two lines. For this purpose, we can use either CSS (e.g., with the margin feature) or the p element.
Case Sensitivity of HTML Tags
In HTML, you can capitalize and lowercase the names of the tags as they aren’t case-sensitive: <h1> and <H1> mean the same thing. We use lowercase throughout this book.
2.1.8 Additional HTML Attributes for HTML Elements
The HTML elements can contain additional attributes (sometimes also referred to as properties) that you can use to specify additional information about an element. You can use attributes only for the start tags and the standalone tags. The attribute details are specified in an attribute name-value manner such as name="value". Let’s take a look at some simple examples:
...
<body>
  <p lang="en">
    Please <a href="http://rheinwerk-computing.com/">click here</a>.
  </p>
  <p>
    <img src="cover.png" alt="Book cover">
  </p>
</body>
...
Listing 2.4 /examples/chapter002/2_1_8/index.html
You can use the lang="en" attribute to specify the language used in the p element. lang stands for language and en for English. The a element allows you to define a hyperlink to another page. Without the href attribute, the HTML element wouldn’t make any sense at all here as it specifies the URL of the page (here, http://rheinwerk-computing.com/) to which the link should go when the user clicks on the text written between <a> and </a>. The same applies to the standalone img element, where you specify the URL to an image (here, cover.png) via the src attribute. In addition, for an img element, you must specify the alt attribute for an alternative text (here: Book cover).
The img element shows that you can use more than one attribute for HTML elements. The order in which you note the attributes in the HTML element is arbitrary. For example, for the img element, you could specify the alt attribute first and then the src attribute. When you use multiple attributes, there must be at least one space between an attribute name-value pair. It’s recommended to write the values of attributes between quotation marks, for example, "value". Most of the time, double quotes are used for this, although single quotes (e.g., 'value') are also permitted. The reason for this recommendation is the downward compatibility.

Figure 2.8 HTML Elements Can Contain Additional Attributes
It’s probably unnecessary to mention that certain attributes can only be used for certain elements. For example, you can’t use the href attribute in a p element. Nevertheless, there are also global attributes in HTML, such as lang, which you can use in almost all HTML elements.
2.1.9 Using Comments in HTML Documents
If you want to comment on an HTML code at any place, you can introduce such a comment via the <!-- string and conclude it with the --> string. Everything you write between <!-- and --> will be suppressed by the web browser and won’t be displayed. Here’s a simple example with comments:
...
<body>
  <!-- Find a meaningful header -->
  <h1>Header</h1>
  <!--
       Think about what fits
       into the paragraph for this heading.
  -->
  <p>A lot of text</p>
  <!-- <p>A second paragraph with text</p> -->
</body>
...
The lines in bold are comments, which are suppressed and won’t be displayed by the web browser. As you can see, this also applies to HTML elements such as the p element in the example. Here, the complete p element has been commented out so that it gets ignored by the web browser for rendering.
Warning: Comments Can Be Viewed in the Source Code
Comments are quite useful to add annotations at certain places in the HTML code or information about the creation date or other credits. However, even if the comments aren’t displayed in the web browser, they remain in the source code. This means you should always think twice about what kind of comments you write because every visitor can see the source code.