5 Tables and Hyperlinks
This chapter introduces you to more HTML elements. More specifically, you’ll learn how to add and use tables and hyperlinks.
This chapter describe other essential HTML elements that haven’t been dealt with up to now. In particular, you’ll learn more about the following topics:
-
Tables
You’ll learn how to use tables to represent information or data in a grid. -
Hyperlinks
Every internet user is familiar with hyperlinks that allow them to move from one website to another. You’ll learn how to link an HTML document to other HTML documents.
5.1 Structuring Data in a Table
Tables are useful when you want to display data such as stock quotes, financial information, travel schedules, train schedules, bus schedules, travel reports, or sports scores in a grid of rows and columns. HTML provides some viable options to structure such a table, as listed in Table 5.1.
|
HTML Element |
Meaning |
|---|---|
|
<table> |
Table |
|
<tr> |
Table row |
|
<td> |
Table cell |
|
<th> |
Table header cell for heading |
|
<thead> |
Table header area |
|
<tbody> |
Table body |
|
<tfoot> |
Table foot section |
|
<colgroup> |
Group of table columns |
|
Table column |
|
|
<caption> |
Table header/legend |
Table 5.1 Brief Overview of the Table Elements Covered Here
Formatting with CSS
HTML is used only for semantic and structural logical markup, and this is also true for tables in HTML. Tables in HTML don’t provide any formatting options. All attributes for formatting from old HTML, except for border, are no longer supported by the current standard HTML version. For this reason, the same applies here: tables should be formatted using CSS.
5.1.1 A Simple Table Structure Using <table>, <tr>, <td>, and <th>
Every table in HTML is created between the elements <table> and </table>. The contents of the table are written row by row. The beginning of a row must contain an opening <tr>, while the row must end with a closing </tr> (tr = table row). Within a table row between <tr> and </tr>, you write the individual cells (or also columns) with <td> and </td> (td = table data).
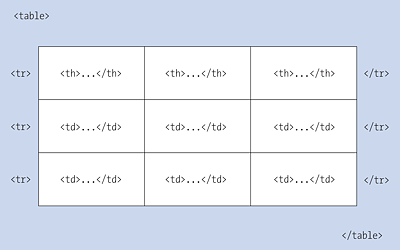
Figure 5.1 A Basic Table Structure in HTML
If you want to use cells or columns as headers of a table, you can place the data between <th> and </th> (th = table heading). You can use the th element in the same way as the td element, except that web browsers usually highlight this element with a bold font centered in the column. If it makes sense, you should use table headings, as this is helpful for visitors with screen readers and, if applicable, for search engines, which can index your website better with table headings.
For this purpose, we want to create a simple example of a table in which web browser statistics data from a website is summarized in a grid and displayed in a clear overview:
...
  <table>
    <tr>
      <th>Browser</th>
      <th>Accesses</th>
      <th>Percent</th>
    </tr>
    <tr>
      <td>Chrome</td>
      <td>14478</td>
      <td>59.6%</td>
    </tr>
    <tr>
      <td>Firefox</td>
      <td>3499</td>
      <td>14.4%</td>
    </tr>
    <tr>
      <td>Safari</td>
      <td>1619</td>
      <td>6.6%</td>
    </tr>
  </table>
...
Listing 5.1 /examples/chapter005/5_1_1/index.html
As you can see in Figure 5.2, web browsers display the table without any formatting. The height and width of a table are usually adjusted to its contents.
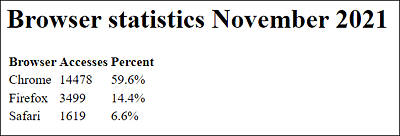
Figure 5.2 The Structured Representation of a Basic Table in HTML
What Is Allowed in a Table Cell?
In a cell between <td> and </td>, you can use other HTML elements in addition to text. Theoretically, you could insert another complete table into it. If you want to use an empty cell without content, you must still specify an empty <td></td> or <th></th>; otherwise, the table won’t be displayed correctly. In old web browsers, you can also write a forced space with the HTML entity in the cell to be on the safe side because there could be problems with empty cells.
5.1.2 Combining Columns or Rows Using “colspan” or “rowspan”
If you want to combine (or span) table entries across multiple cells, you can do this using the HTML attributes colspan and rowspan. Based on the numerical value you pass to these attributes, the number of cells you want to merge is specified. As you might guess from the attribute names, colspan is used to group columns together, and rowspan is used to group rows together.
Here’s a simple example in which the daily schedule of a photography seminar was summarized in a table:
...
  <table>
    <tr>
      <th></th>
      <th scope="col">Morning</th>
      <th scope="col">Noon</th>
      <th scope="col">Afternoon</th>
    </tr>
    <tr>
      <th scope="row">Monday</th>
      <td colspan="2">Photo shooting (outdoor)</td>
      <td>Image editing workshop</td>
    </tr>
    <tr>
      <th scope="row">Tuesday</th>
      <td>Street photography (city)</td>
      <td colspan="2">Photo shooting (portrait)</td>
    </tr>
    <tr>
      <th scope="row">Wednesday</th>
      <td>Nude photography</td>
      <td>Image editing workshop</td>
      <td>Closing ceremony</td>
    </tr>
  </table>
...
Listing 5.2 /examples/chapter005/5_1_2/index.html
As you can see in Figure 5.3, CSS was used to frame the table so that the result of colspan is more visible.
Here, you can see how, on Monday, the Photo shooting (outdoor) cell spans both the Morning and Noon columns thanks to colspan="2". The same is true for Tuesday and the column Photo shooting (portrait), where Noon to Afternoon has been combined.
When using colspan, you must keep in mind that you need to reduce the number of cells if, for example, you combine a colspan across two cells. In the Monday example, you thus only need to write two td elements instead of three because the first td element already spans two columns.
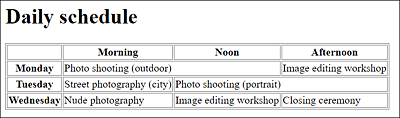
Figure 5.3 Merging Columns Using the “colspan” Attribute
By the way, there’s nothing against merging more than two columns. Here, you must pay attention to the number of columns that are actually present. As an example, on Tuesday, you could merge the Photo shooting (portrait) across three columns:
However, the Street photography (city) cell would then have to be removed as well.
The "Scope" Attribute of <th>
In the example, the scope attribute was used with the th element. This allows you to specify whether the table heading should apply to a column (scope="col") or a row (scope="row").
Everything just described also applies if you want to combine table entries across multiple rows using rowspan. For this purpose, here’s the example again in which the daily schedule for the photo seminar has been changed a bit because now Street photography (city) takes place in the morning on Tuesday and Wednesday:
...
  <table>
    <tr>
      <th></th>
      <th scope="col">Morning</th>
      <th scope="col">Noon</th>
      <th scope="col">Afternoon</th>
    </tr>
...
      <th scope="row">Tuesday</th>
      <td rowspan="2">Street photography (city)</td>
      <td colspan="2">Photo shooting (portrait)</td>
    </tr>
    <tr>
      <th scope="row">Wednesday</th>
      <td>Image editing workshop</td>
      <td>Closing ceremony</td>
    </tr>
  </table>
...
Listing 5.3 /examples/chapter005/5_1_2/index2.html
In the last tr element, you need to remove the td element with Nude photography because you’ve extended the Street photography (city) entry above it downward using the rowspan attribute, which causes that entry to take up space in the cell below it, as you can see in Figure 5.4.
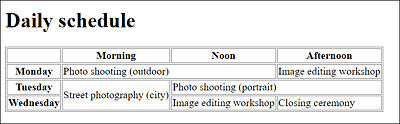
Figure 5.4 Merging Rows Using the “rowspan” Attribute
5.1.3 HTML Attributes for the Table Elements
For the table element, HTML supports only the border attribute to indicate a border; the value can be "1" or "". CSS is recommended as the better option here. For example, to copy border="1", you can simply add the following CSS construct to the HTML document head:
...
<style>
  table, td, th { border: 1px solid gray }
<style>
...
There are no attributes for the table row with <tr>. You’ve already learned about the attributes of <td> and <th> with colspan, rowspan, and scope.
Layout with Tables?
You should no longer use tables to create the layout of a website. This was done in the previous millennium. I only mention this here because you may have already looked or will look at one or the other source code of an older website, and there are still numerous websites from that time that use a table to lay out or align the document content. Most of the time, these are websites that aren’t maintained, or they come from developers who are no longer up to date. Today, you use CSS for the layout of a website.
5.1.4 Structuring Tables Using <thead>, <tbody>, and <tfoot>
As an alternative to the basic table elements of HTML you can also divide a table using the elements <thead>, <tbody>, and <tfoot> into a head, data, and foot section, respectively.
The table head is enclosed between <thead> and </thead> (thead = table head). It makes sense to use the th element for the individual cells. You can mark the actual data for the table using <tbody> and </tbody> (tbody = table body). If you want to write a range as a table foot, you must enclose it with <tfoot> and </tfoot> (tfoot = table foot).
Here’s an example that uses these three elements in a table:
...
  <table>
  <thead>
    <tr>
      <th>Month</th>
      <th>Visitors</th>
      <th>Bytes</th>
    </tr>
  </thead>
  <tfoot>
    <tr>
      <th>Total</th>
      <th>23423</th>
      <th>3234 MB</th>
    </tr>
  </tfoot>
  <tbody>
    <tr>
      <td>January</td>
      <td>3234</td>
      <td>132 MB</td>
    </tr>
...
...
    <tr>
      <td>December</td>
      <td>7193</td>
      <td>894 MB</td>
    </tr>
  </tbody>
  </table>
...
Listing 5.4 /examples/chapter005/5_1_4/index.html
If you look at the HTML source code and the corresponding display in Figure 5.5, you’ll notice that the web browser is able to reproduce the order of the table correctly on its own. Although the foot section was specified at the top in the source code, the web browser displays it appropriately at the bottom.

Figure 5.5 A Longer Table with <thead>, <tbody>, and <tfoot> Elements in Use
Dividing a table into three different sections is optional and usually doesn’t affect the display in the web browser. This is a purely semantic representation. However, these elements are often used to format the appearance of these areas with CSS.
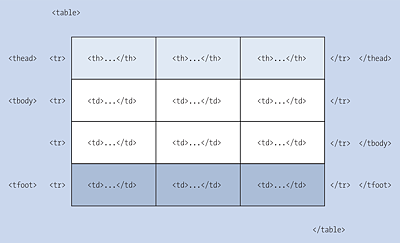
Figure 5.6 Only with CSS Can You Visualize These Sections Separately
In addition, when printing long tables across multiple pages, the web browser could use this division to print the table header and footer on each page as well. This makes it easier to see which column contains the individual data or what the data means. Another option is to scroll only the body area between <tbody> and </tbody> for long tables, while leaving the header and footer unchanged. Unfortunately, no web browser supports these features yet, but you may be able to do that yourself with CSS and JavaScript if necessary.
5.1.5 Grouping Columns of a Table Using <colgroup> and <col>
Just as you could divide the table rows into three sections using <thead>, <tbody>, and <tfoot>, you can also divide the individual columns into semantic and logical parts by means of the <colgroup> and <col> elements, if that made sense. Grouping columns is useful, for example, to apply specific CSS formatting to a particular column or group of columns, rather than repeating the style for each cell in the column.
You need to write the <colgroup> and <col> elements after the opening table element and before any other elements such as tr, thead, tfoot, or tbody. You can open a column group using <colgroup> and close it with </colgroup> (colgroup = column group). To group a column, you can use the standalone <col> tag. If you want to combine several columns in one col element, you can do this using the attribute span and the number of columns as the attribute value.
Here’s a simple example that illustrates what has just been described:
...
<table>
  <colgroup>
    <col span="2" style="background-color:lightgray;">
    <col style="background-color:snow;">
  </colgroup>
    <tr>
      <th>Browser</th>
      <th>Accesses</th>
      <th>Percent</th>
    </tr>
    <tr>
      <td>Chrome</td>
      <td>14478</td>
      <td>59.6%</td>
    </tr>
    ...
    ...
  </table>
...
Listing 5.5 /examples/chapter005/5_1_5/index.html
In Figure 5.7, the first two columns have been grouped together using span="2" and highlighted in color with CSS for demonstration purposes. The last column is a separate column group.
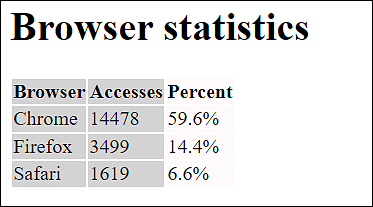
Figure 5.7 First Two Columns Have Been Grouped Together with Last Column as a Separate Column Group
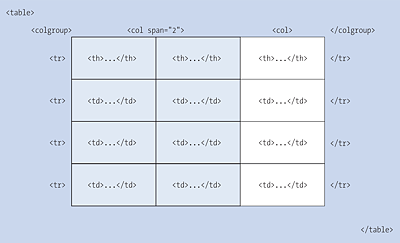
Figure 5.8 Semantic Division of Columns into Groups: Here, You Can See a Group with Two Columns and a Group with One Column
If, on the other hand, you want to use a separate group for each column, you can do this as follows:
  <table>
  <colgroup>
    <col style="background-color: lightgray;">
    <col style="background-color: snow;">
    <col style="background-color: lightgray;">
  </colgroup>
    <tr>
      <th>Browser</th>
      <th>Accesses</th>
      <th>Percent</th>
    </tr>
...
  </table>
...
Now each column has been grouped into its own col group. The advantage doesn’t become apparent until you want to style columns with CSS. The semantic division into three columns can be found in Figure 5.9.
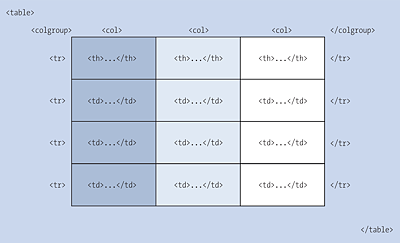
Figure 5.9 Semantic Division into Three Columns
5.1.6 Labeling Tables Using <caption> or <figcaption>
To assign a label to a table, you can either use the caption element, which must be used immediately after the opening <table> tag, or the new figure and figcaption elements.
Labeling a Table with <caption>
As mentioned previously, the caption element must follow immediately after the opening <table> tag. In addition, only one label can be used per table. Let’s look at a simple example:
...
  <table>
    <caption>Browser statistics 11/2023</caption>
  <tr>
      <th>Browser</th>
      <th>Accesses</th>
      <th>Percent</th>
    </tr>
    <tr>
      <td>Chrome</td>
      <td>14478</td>
      <td>59.6%</td>
    </tr>
    ...
    ...
  </table>
...
Listing 5.6 /examples/chapter005/5_1_6/index.html
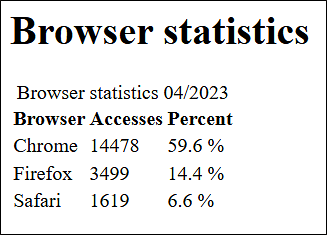
Figure 5.10 The Caption Is Displayed Centered above the Table by Default
Formatting <caption> with CSS
The web browsers usually display the caption centered above the table. With CSS, it’s no problem to use the CSS features text-align and caption-side to align the table caption differently and position it somewhere else.
If you want to add notes to a table caption, you can place the HTML elements details and summary between <caption> and </caption>.
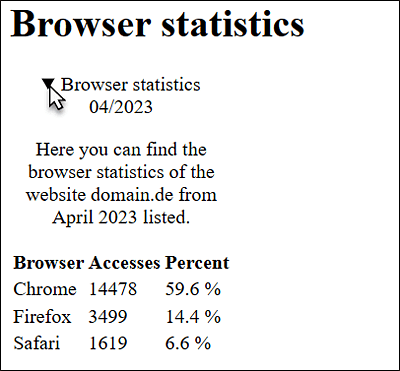
Figure 5.11 Expanding and Collapsing Information Thanks to the HTML Elements <details> and <summary> (Example in /examples/chapter005/5_1_6/index2.html)
Labeling a Table Using <figcaption>
I already described the figcaption and figure elements in Chapter 4, Section 4.2.9. It’s a good idea to position tables between <figure> and </figure> and to insert a caption for this table at the beginning after the opening <figure> or at the end before the closing </figure>. Here’s an example of how you can label a table using the new figure and figcaption elements:
...
  <article>
  <h1>Browser Statistics </h1>
  <figure>
  <table>
  <tr>
      <th>Browser</th>
      <th>Accesses</th>
      <th>Percent</th>
    </tr>
    <tr>
      <td>Chrome</td>
      <td>14478</td>
      <td>59.6%</td>
    </tr>
...
  </table>
  <figcaption>Table 1: Browser Statistics 04/2023</figcaption>
  </figure>
  </article>
...
Listing 5.7 /examples/chapter005/5_1_6/index3.html
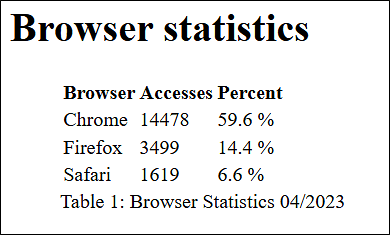
Figure 5.12 Labeling Tables Using <figure> and <figcaption>