Chapter 7. Build
We’ve spent a lot of time covering the design aspects of microservices, but we need to start getting a bit deeper into how your development process may need to change to accommodate this new style of architecture. In the following chapters, we’ll look at how we deploy and test our microservices, but before that we need to look at what comes first—what happens when a developer has a change ready to check in?
We’ll start this exploration by reviewing some foundational concepts—continuous integration and continuous delivery. They’re important concepts no matter what kind of systems architecture you might be using, but microservices open up a host of unique questions. From there we’ll look at pipelines and at different ways of managing source code for your services.
A Brief Introduction to Continuous Integration
Continuous integration (CI) has been around for a number of years. However, it’s worth spending a bit of time going over the basics, as there are some different options to consider, especially when we think about the mapping between microservices, builds, and version control repositories.
With CI, the core goal is to keep everyone in sync with each other, which we achieve by frequently making sure that newly checked-in code properly integrates with existing code. To do this, a CI server detects that the code has been committed, checks it out, and carries out some verification such as making sure that the code compiles and that tests pass. As a bare minimum, we expect this integration to be done on a daily basis, although in practice I’ve worked in multiple teams in which a developer has in fact integrated their changes multiple times per day.
As part of this process, we often create artifacts that are used for further validation, such as deploying a running service to run tests against it (we’ll explore testing in depth in Chapter 9). Ideally, we want to build these artifacts once and once only and use them for all deployments of that version of the code. This is so we can avoid doing the same thing over and over again, and so we can confirm that the artifacts we deploy are the ones we tested. To enable these artifacts to be reused, we place them in a repository of some sort, either provided by the CI tool itself or in a separate system.
We’ll be looking at the role of artifacts in more depth shortly, and we’ll look in depth at testing in Chapter 9.
CI has a number of benefits. We get fast feedback as to the quality of our code, through the use of static analysis and testing. CI also allows us to automate the creation of our binary artifacts. All the code required to build the artifact is itself version controlled, so we can re-create the artifact if needed. We can also trace from a deployed artifact back to the code, and, depending on the capabilities of the CI tool itself, we can see what tests were run on the code and artifact too. If embracing infrastructure as code, we can also version control all the code needed to configure the infrastructure for our microservice alongside the code for the microservice itself, improving transparency around changes and making it even easier to reproduce builds. It’s for these reasons that CI has been so successful.
Are You Really Doing CI?
CI is a key practice that allows us to make changes quickly and easily, and without which the journey into microservices will be painful. I suspect you are probably using a CI tool in your own organization, but that might not be the same thing as actually doing CI. I’ve seen many people confuse adopting a CI tool with actually embracing CI. A CI tool, used well, will help you do CI—but using a tool like Jenkins, CircleCI, Travis, or one of the many other options out there doesn’t guarantee you’re actually doing CI right.
So how do you know if you’re actually practicing CI? I really like Jez Humble’s three questions he asks people to test if they really understand what CI is about—it might be interesting to ask yourself these same questions:
- Do you check in to mainline once per day?
-
You need to make sure your code integrates. If you don’t check your code together with everyone else’s changes frequently, you end up making future integration harder. Even if you are using short-lived branches to manage changes, integrate as frequently as you can into a single mainline branch—at least once a day.
- Do you have a suite of tests to validate your changes?
-
Without tests, we just know that syntactically our integration has worked, but we don’t know if we have broken the behavior of the system. CI without some verification that our code behaves as expected isn’t CI.
- When the build is broken, is it the #1 priority of the team to fix it?
-
A passing green build means our changes have safely been integrated. A red build means the last change possibly did not integrate. You need to stop all further check-ins that aren’t involved in fixing the builds to get it passing again. If you let more changes pile up, the time it takes to fix the build will increase drastically. I’ve worked with teams where the build has been broken for days, resulting in substantial efforts to eventually get a passing build.
Branching Models
Few topics around build and deployment seem to cause as much of a controversy as that of using source code branching for feature development. Branching in source code allows for development to be done in isolation without disrupting the work being done by others. On the surface, creating a source code branch for each feature being worked on—otherwise known as feature branching—seems like a useful concept.
The problem is that when you work on a feature branch, you aren’t regularly integrating your changes with everyone else. Fundamentally, you are delaying integration. And when you finally decide to integrate your changes with everyone else, you’ll have a much more complex merge.
The alternative approach is to have everyone check in to the same “trunk” of source code. To keep changes from impacting other people, techniques like feature flags are used to “hide” incomplete work. This technique of everyone working off the same trunk is called trunk-based development.
The discussion around this topic is nuanced, but my own take is that the benefits of frequent integration—and validation of that integration—are significant enough that trunk-based development is my preferred style of development. Moreover, the work to implement feature flags is frequently beneficial in terms of progressive delivery, a concept we’ll explore in Chapter 8.
Be Careful About Branches
Integrate early, and integrate often. Avoid the use of long-lived branches for feature development, and consider trunk-based development instead. If you really have to use branches, keep them short!
Quite aside from my own anecdotal experience, there is a growing body of research that shows the efficacy of reducing the number of branches and adopting trunk-based development. The 2016 State of DevOps report by DORA and Puppet1 carries out rigorous research into the delivery practices of organizations around the world and studies which practices are commonly used by high-performing teams:
We found that having branches or forks with very short lifetimes (less than a day) before being merged into trunk, and less than three active branches in total, are important aspects of continuous delivery, and all contribute to higher performance. So does merging code into trunk or master on a daily basis.
The State of DevOps report has continued to explore this topic in more depth in subsequent years, and has continued to find evidence for the efficacy of this approach.
A branch-heavy approach is still common in open source development, often through adopting the “GitFlow” development model. It’s worth noting that open source development is not the same as normal day-to-day development. Open source development is characterized by a large number of ad hoc contributions from time-poor “untrusted” committers, whose changes require vetting by a smaller number of “trusted” contributors. Typical day-to-day closed source development is normally done by a tight-knit team whose members all have commit rights, even if they decide to adopt some form of code review process. So what might work for open source development may not work for your day job. Even then, the State of DevOps report for 2019,2 further exploring this topic, found some interesting insights into open source development and the impact of “long lived” branches:
Our research findings extend to open source development in some areas:
- Committing code sooner is better: In open source projects, many have observed that merging patches faster to prevent rebases helps developers move faster.
- Working in small batches is better: Large “patch bombs” are harder and slower to merge into a project than smaller, more readable patchsets since maintainers need more time to review the changes.
Whether you are working on a closed-source code base or an open source project, short-lived branches; small, readable patches; and automatic testing of changes make everyone more productive.
Build Pipelines and Continuous Delivery
Very early on in doing CI, my then-colleagues at Thoughtworks and I realized the value in sometimes having multiple stages inside a build. Tests are a very common case in which this comes into play. I may have a lot of fast, small-scoped tests, and a small number of slow, large-scoped tests. If we run all the tests together, and if we’re waiting for our large-scoped slow tests to finish, we may not be able to get fast feedback when our fast tests fail. And if the fast tests fail, there probably isn’t much sense in running the slower tests anyway! A solution to this problem is to have different stages in our build, creating what is known as a build pipeline. So we can have a dedicated stage for all the fast tests, which we run first, and if they all pass, we then run a separate stage for the slower tests.
This build pipeline concept gives us a nice way of tracking the progress of our software as it clears each stage, helping give us insight into the quality of our software. We create a deployable artifact, the thing that will ultimately be deployed into production, and use this artifact throughout the pipeline. In our context, this artifact will relate to a microservice we want to deploy. In Figure 7-1, we see this happening—the same artifact is used in each stage of the pipeline, giving us more and more confidence that the software will work in production.
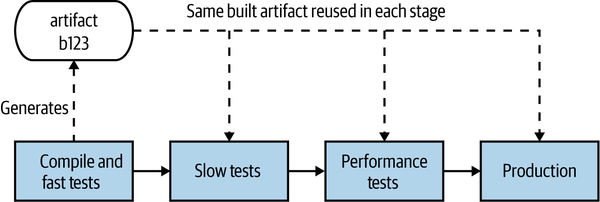
Figure 7-1. A simple release process for our Catalog service modeled as a build pipeline
Continuous delivery (CD) builds on this concept, and then some. As outlined in Jez Humble and Dave Farley’s book of the same name,3 CD is the approach whereby we get constant feedback on the production readiness of each and every check-in, and furthermore treat each and every check-in as a release candidate.
To fully embrace this concept, we need to model all the processes involved in getting our software from check-in to production, and we need to know where any given version of the software is in terms of being cleared for release. In CD, we do this by modeling each and every stage our software has to go through, both manual and automated, an example of which I shared for our Catalog service in Figure 7-1. Most CI tools nowadays provide some support for defining and visualizing the state of build pipelines like this.
If the new Catalog service passes whatever checks are carried out at a stage in the pipeline, it can then move on to the next step. If it doesn’t pass a stage, our CI tool can let us know which stages the build has passed and can get visibility about what failed. If we need to do something to fix it, we’d make a change and check it in, allowing the new version of our microservice to try and pass all the stages before being available for deployment. In Figure 7-2, we see an example of this: build-120 failed the fast test stage, build-121 failed at the performance tests, but build-122 made it all the way to production.
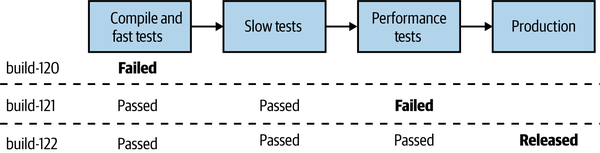
Figure 7-2. Our Catalog microservice can get deployed only if it passes each step in our pipeline
Tooling
Ideally, you want a tool that embraces continuous delivery as a first-class concept. I have seen many people try to hack and extend CI tools to make them do CD, often resulting in complex systems that are nowhere near as easy to use as tools that build in CD from the beginning. Tools that fully support CD allow you to define and visualize these pipelines, modeling the entire path to production for your software. As a version of our code moves through the pipeline, if it passes one of these automated verification stages, it moves to the next stage.
Some stages may be manual. For example, if we have a manual user acceptance testing (UAT) process, I should be able to use a CD tool to model it. I can see the next available build ready to be deployed into our UAT environment and then deploy it, and then if it passes our manual checks, mark that stage as being successful so it can move to the next one. If the subsequent stage is automated, it will then get triggered automatically.
Trade-Offs and Environments
As we move our microservice artifact through this pipeline, our microservice gets deployed into different environments. Different environments serve different purposes, and they may have different characteristics.
Structuring a pipeline, and therefore working out what environments you’ll need, is in and of itself a balancing act. Early on in the pipeline, we’re looking for fast feedback on the production readiness of our software. We want to let developers know as soon as possible if there is a problem—the sooner we get feedback about a problem occurring, the quicker it is to fix it. As our software gets closer to production, we want more certainty that the software will work, and we’ll therefore be deploying into increasingly production-like environments—we can see this trade-off in Figure 7-3.
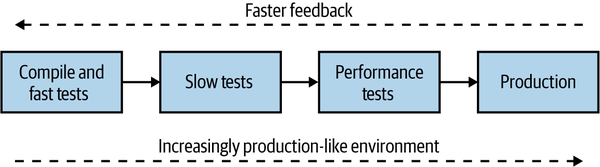
Figure 7-3. Balancing a build pipeline for fast feedback and production-like execution environments
You get the fastest feedback on your development laptop—but that is far from production-like. You could roll out every commit to an environment that is a faithful reproduction of your actual production environment, but that will likely take longer and cost more. So finding the balance is key, and continuing to review the trade-off between fast feedback and the need for production-like environments can be an incredibly important ongoing activity.
The challenges of creating a production-like environment are also part of why more people are doing forms of testing in production, including techniques such as smoke testing and parallel runs. We’ll come back to this topic in Chapter 8.
Artifact Creation
As we move our microservice into different environments, we actually have to have something to deploy. It turns out there are a number of different options for what type of deployment artifact you can use. In general, which artifact you create will depend greatly on the technology you have chosen to adopt for deployment. We’ll be looking at that in depth in the next chapter, but I wanted to give you some very important tips about how artifact creation should fit into your CI/CD build process.
To keep things simple, we’ll sidestep exactly what type of artifact we are creating—just consider it a single deployable blob for the moment. Now, there are two important rules we need to consider. Firstly, as I mentioned earlier, we should build an artifact once and once only. Building the same thing over and over again is a waste of time and bad for the planet, and it can theoretically introduce problems if the build configuration isn’t exactly the same each time. On some programming languages, a different build flag can make the software behave quite differently. Secondly, the artifact you verify should be the artifact you deploy! If you build a microservice, test it, say “yes, it’s working,” and then build it again for deployment into production, how do you know that the software you validated is the same software you deployed?
Taking these two ideas together, we have a pretty simple approach. Build your deployable artifact once and once only, and ideally do it pretty early in the pipeline. I would typically do this after compiling the code (if required) and running my fast tests. Once created, this artifact is stored in an appropriate repository—this could be something like Artifactory or Nexus, or perhaps a container registry. Your choice of deployment artifact likely dictates the nature of the artifact store. This same artifact can then be used for all stages in the pipeline that follow, up to and including deployment into production. So coming back to our earlier pipeline, we can see in Figure 7-4 that we create an artifact for our Catalog service during the first stage of the pipeline and then deploy the same build-123 artifact as part of the slow tests, performance tests, and production stages.

Figure 7-4. The same artifact is deployed into each environment
If the same artifact is going to be used across multiple environments, any aspects of configuration that vary from environment to environment need to be kept outside the artifact itself. As a simple example, I might want to configure application logs so that everything at DEBUG level and above is logged when running the Slow Tests stage, giving me more information to diagnose why a test fails. I might decide, though, to change this to INFO to reduce the log volume for the Performance Tests and Production deployment.
Artifact Creation Tips
Build a deployment artifact for your microservice once. Reuse this artifact everywhere you want to deploy that version of your microservice. Keep your deployment artifact environment-agnostic—store environment-specific configuration elsewhere.
Mapping Source Code and Builds to Microservices
We’ve already looked at one topic that can excite warring factions—feature branching versus trunk-based development—but it turns out that the controversy isn’t over for this chapter. Another topic that is likely to elicit some pretty diverse opinions is the organization of code for our microservices. I have my own preferences, but before we get to those, let’s explore the main options for how we organize code for our microservices.
One Giant Repo, One Giant Build
If we start with the simplest option, we could lump everything in together. We have a single, giant repository storing all our code, and we have a single build, as we see in Figure 7-5. Any check-in to this source code repository will cause our build to trigger, where we will run all the verification steps associated with all our microservices and produce multiple artifacts, all tied back to the same build.
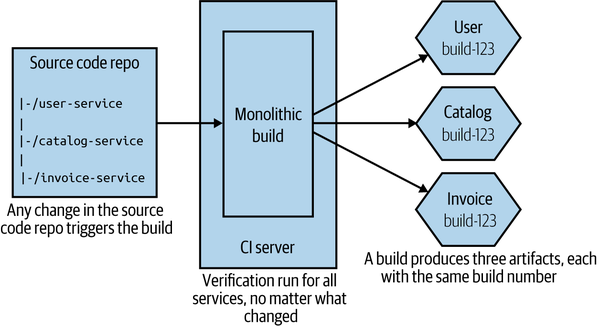
Figure 7-5. Using a single source code repository and CI build for all microservices
Compared to other approaches, this seems much simpler on the surface: fewer repositories to be concerned about, and a conceptually simpler build. From a developer point of view, things are pretty straightforward too. I just check code in. If I have to work on multiple services at once, I just have to worry about one commit.
This model can work perfectly well if you buy into the idea of lockstep releases, where you don’t mind deploying multiple services at once. In general, this is absolutely a pattern to avoid, but very early on in a project, especially if only one team is working on everything, this model might make sense for short periods of time.
Now let me explain some of the significant downsides to this approach. If I make a one-line change to a single service—for example, changing behavior in the User service in Figure 7-5—all the other services get verified and built. This could take more time than needed—I’m waiting for things that probably don’t need to be tested. This impacts our cycle time, the speed at which we can move a single change from development to live. More troubling, though, is knowing what artifacts should or shouldn’t be deployed. Do I now need to deploy all the build services to push my small change into production? It can be hard to tell; trying to guess which services really changed just by reading the commit messages is difficult. Organizations using this approach often fall back to just deploying everything together, which we really want to avoid.
Furthermore, if my one-line change to the User service breaks the build, no other changes can be made to the other services until that break is fixed. And think about a scenario in which you have multiple teams all sharing this giant build. Who is in charge?
Arguably, this approach is a form of monorepo. In practice, however, most of the monorepo implementations I’ve seen map multiple builds to different parts of the repo, something we’ll explore in more depth shortly. So you could see this pattern of one repo mapping to a single build as the worst form of monorepo for those wanting to build multiple independently deployable microservices.
In practice, I almost never see this approach used, except in the earliest stages of projects. To be honest, either of the two following approaches are significantly preferable, so we’ll focus on those instead.
Pattern: One Repository per Microservice (aka Multirepo)
With the one repository per microservice pattern (more commonly referred to as the multirepo pattern when being compared to the monorepo pattern), the code for each microservice is stored in its own source code repository, as we see in Figure 7-6. This approach leads to a straightforward mapping between source code changes and CI builds.
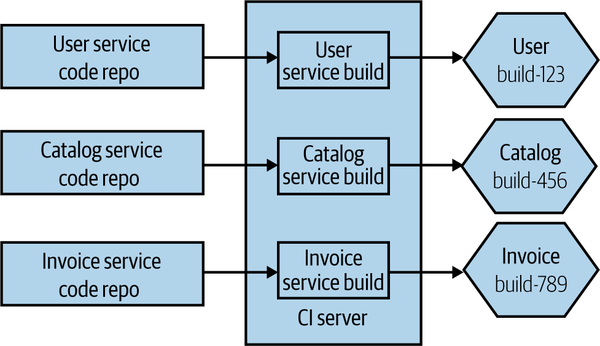
Figure 7-6. The source code for each microservice is stored in a separate source code repository
Any change to the User source code repository triggers the matching build, and if that passes, I’ll have a new version of my User microservice available for deployment. Having a separate repository for each microservice also allows you to change ownership on a per-repository basis, something that makes sense if you want to consider a strong ownership model for your microservices (more on that shortly).
The straightforward nature of this pattern does create some challenges, however. Specifically, developers may find themselves working with multiple repositories at a time, which is especially painful if they are trying to make changes across multiple repositories at once. Additionally, changes cannot be made in an atomic fashion across separate repositories, at least not with Git.
Reusing code across repositories
When using this pattern, there is nothing to stop a microservice from depending on other code that is managed in different repositories. A simple mechanism for doing this is to have the code you want to reuse packaged into a library that then becomes an explicit dependency of the downstream microservices. We can see an example of that in Figure 7-7, where the Invoice and Payroll services both make use of the Connection library.
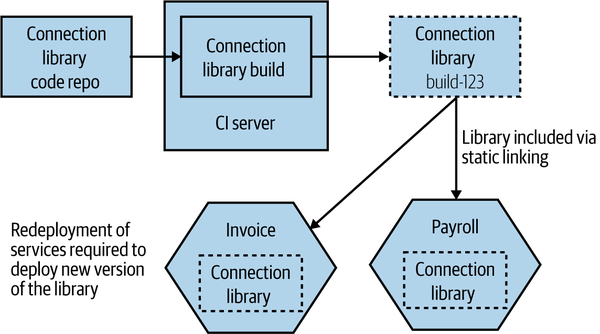
Figure 7-7. Reusing code across different repositories
If you wanted to roll out a change to the Connection library, you’d have to make the changes in the matching source code repository and wait for its build to complete, giving you a new versioned artifact. To actually deploy new versions of the Invoice or Payroll services using this new version of the library, you’d need to change the version of the Connection library they use. This might require a manual change (if you are depending on a specific version), or it could be configured to happen dynamically, depending on the nature of the CI tooling you are using. The concepts behind this are outlined in more detail in the book Continuous Delivery by Jez Humble and Dave Farley.4
The important thing to remember, of course, is that if you want to roll out the new version of the Connection library, then you also need to deploy the newly built Invoice and Payroll services. Remember, all the caveats we explored in “DRY and the Perils of Code Reuse in a Microservice World” regarding reuse and microservices still apply—if you choose to reuse code via libraries, then you must be OK with the fact that these changes cannot be rolled out in an atomic fashion, or else we undermine our goal of independent deployability. You also have to be aware that it can be more challenging to know if some microservices are using a specific version of a library, which may be problematic if you’re trying to deprecate the use of an old version of the library.
Working across multiple repositories
So, aside from reusing code via libraries, how else can we make a change across more than one repository? Let’s look at another example. In Figure 7-8, I want to change the API exposed by the Inventory service, and I also need to update the Shipping service so it can make use of the new change. If the code for both Inventory and Shipping was in the same repository, I could commit the code once. Instead, I’ll have to break the changes into two commits—one for Inventory and another for
Shipping.
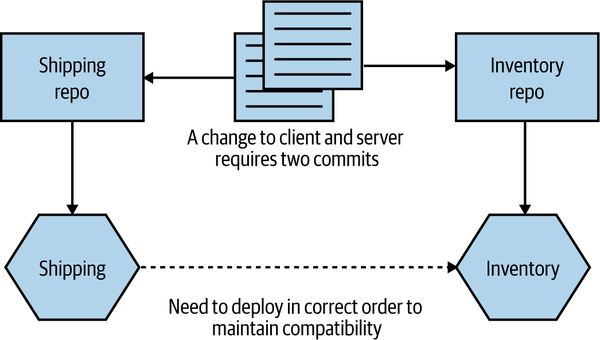
Figure 7-8. Changes across repository boundaries require multiple commits
Having these changes split could cause problems if one commit fails but the other works—I may need to make two changes to roll back the change, for example, and that could be complicated if other people have checked in in the meantime. The reality is that in this specific situation, I’d likely want to stage the commits somewhat, in any case. I’d want to make sure the commit to change the Inventory service worked before I change any client code in the Shipping service—if the new functionality in the API isn’t present, there is no point having client code that makes use of it.
I’ve spoken to multiple people who find the lack of atomic deployment with this to be a significant problem. I can certainly appreciate the complexity this brings, but I think that in most cases it points to a bigger underlying issue. If you are continually making changes across multiple microservices, then your service boundaries might not be in the right place, and it could imply too much coupling between your services. As we’ve already discussed, we’re trying to optimize our architecture, and our microservice boundaries, so that changes are more likely going to apply within a microservice boundary. Cross-cutting changes should be the exception, not the norm.
In fact, I’d argue that the pain of working across multiple repos can be useful in helping enforce microservice boundaries, as it forces you to think carefully about where these boundaries are, and about the nature of the interactions between them.
Tip
If you are constantly making changes across multiple microservices, it’s likely that your microservice boundaries are in the wrong place. It may be worth considering merging microservices back together if you spot this happening.
Then there is the hassle of having to pull from multiple repos and push to multiple repos as part of your normal workflow. In my experience, this can be simplified either by using an IDE that supports multiple repositories (this is something that all IDEs I’ve used over the last five years can handle) or by writing simple wrapper scripts to simplify things when working on the command line.
Where to use this pattern
Using the one repository per microservice approach works just as well for small teams as it does for large teams, but if you find yourself making lots of changes across microservice boundaries, then it may not be for you, and the monorepo pattern we discuss next may be a better fit—although making lots of changes across service boundaries can be considered a warning sign that something isn’t right, as we’ve discussed previously. It can also make code reuse more complex than using a monorepo approach, as you need to depend on code being packaged into version artifacts.
Pattern: Monorepo
With a monorepo approach, code for multiple microservices (or other types of projects) is stored in the same source code repository. I have seen situations in which a monorepo is used just by one team to manage source control for all its services, although the concept has been popularized by some very large tech companies where multiple teams and hundreds if not thousands of developers can all work on the same source code repository.
By having all the source code in the same repository, you allow for source code changes to be made across multiple projects in an atomic fashion, and for finer-grained reuse of code from one project to the next. Google is probably the best-known example of a company using a monorepo approach, although it’s far from the only one. Although there are some other benefits to this approach, such as improved visibility of other people’s code, the ability to reuse code easily and to make changes that impact multiple different projects is often cited as the major reason for adopting this pattern.
If we take the example we just discussed, where we want to make a change to the Inventory so that it exposes some new behavior and also update the Shipping service to make use of this new functionality that we’ve exposed, then these changes can be made in a single commit, as we see in Figure 7-9.
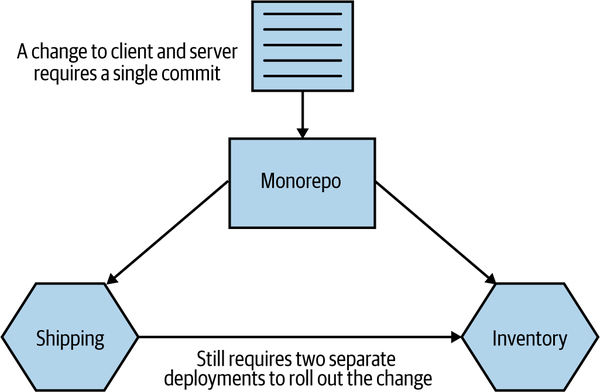
Figure 7-9. Using a single commit to make changes across two microservices using a monorepo
Of course, as with the multirepo pattern discussed previously, we still need to deal with the deployment side of this. We’d likely need to carefully consider the order of deployment if we want to avoid a lockstep deployment.
Atomic Commits Versus Atomic Deploy
Being able to make an atomic commit across multiple services doesn’t give you atomic rollout. If you find yourself wanting to change code across multiple services at once and roll it out into production all at the same time, this violates the core principle of independent deployability. For more on this, see “DRY and the Perils of Code Reuse in a Microservice World”.
Mapping to build
With a single source code repository per microservice, mapping from the source code to a build process is straightforward. Any change in that source code repository can trigger a matching CI build. With a monorepo, it gets a bit more complex.
A simple starting point is to map folders inside the monorepo to a build, as shown in Figure 7-10. A change made to the user-service folder would trigger the User service build, for example. If you checked in code that changed files both in the user-service folder and the catalog-service folder, then both the User build and the Catalog build would get triggered.
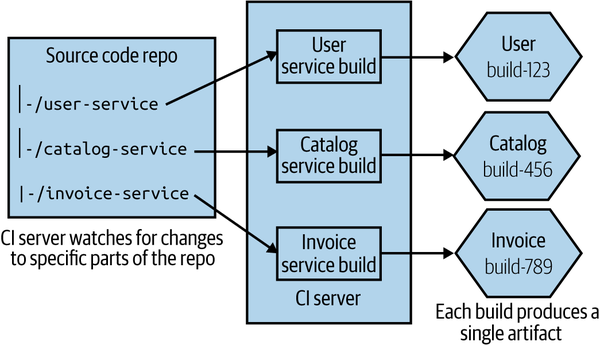
Figure 7-10. A single source repo with subdirectories mapped to independent builds
This gets more complex as you have more involved folder structures. On larger projects you can end up with multiple different folders wanting to trigger the same build, and with some folders triggering more than one build. At the simple end of the spectrum, you might have a “common” folder used by all microservices, a change to which causes all microservices to be rebuilt. At the more complex end, teams end up needing to adopt more graph-based build tools like the open source Bazel tool to manage these dependencies more effectively (Bazel is an open source version of Google’s own internal build tool). Implementing a new build system can be a significant undertaking, so it is not something to be done lightly—but Google’s own monorepo would be impossible without tools like this.
One of the benefits of a monorepo approach is that we can practice finer-grained reuse across projects. With a multirepo model, if I want to reuse someone else’s code, it will likely have to be packaged as a versioned artifact that I can then include as part of my build (such as a Nuget package, a JAR file, or an NPM). With our unit of reuse being a library, we are potentially pulling in more code than we really want. Theoretically, with a monorepo I could just depend on a single source file from another project—although this of course will cause me to have a more complex build mapping.
Defining ownership
With smaller team sizes and small codebase sizes, monorepos can likely work well with the traditional build and source code management tools that you are used to. However, as your monorepo gets bigger, you’ll likely need to start looking at different types of tools. We’ll explore ownership models in more detail in Chapter 15, but in the meantime it’s worth exploring briefly how this plays out when we think about source control.
Martin Fowler has previously written about different ownership models, outlining a sliding scale of ownership from strong ownership through weak ownership and on to collective ownership. Since Martin captured those terms, development practices have changed, so it’s perhaps worth revisiting and redefining these terms.
With strong ownership, some code is owned by a specific group of people. If someone from outside that group wants to make a change, they have to ask the owners to make the change for them. Weak ownership still has the concept of defined owners, but people outside the ownership group are allowed to make changes, although any of these changes must be reviewed and accepted by someone in the ownership group. This would cover a pull request being sent to the core ownership team for review, before the pull request is merged. With collective ownership, any developer can change any piece of code.
With a small number of developers (20 or fewer, as a general guide), you can afford to practice collective ownership—where any developer can change any other microservice. As you have more people, though, you’re more likely to want to move toward either a strong or weak ownership model to create more defined boundaries of responsibility. This can cause a challenge for teams using monorepos if their source control tool doesn’t support finer-grained ownership controls.
Some source code tools allow you to specify ownership of specific directories or even specific filepaths inside a single repository. Google initially implemented this system on top of Perforce for its own monorepo before developing its own source control system, and it’s also something that GitHub has supported since 2016. With GitHub, you create a CODEOWNERS file, which lets you map owners to directories or filepaths. You can see some examples in Example 7-1, drawn from GitHub’s own documentation, that show the kinds of flexibility these systems can bring.
Example 7-1. Examples of how to specify ownership in specific directories in a GitHub CODEOWNERS file
# In this example, @doctocat owns any files in the build/logs
# directory at the root of the repository and any of its
# subdirectories.
/build/logs/ @doctocat

# In this example, @octocat owns any file in an apps directory
# anywhere in your repository.
apps/ @octocat

# In this example, @doctocat owns any file in the `/docs`
# directory in the root of your repository.
/docs/ @doctocat
GitHub’s own code ownership concept ensures that code owners for source files are requested for review whenever a pull request is raised for the relevant files. This could be a problem with larger pull requests, as you could end up needing sign-off from multiple reviewers, but there are lots of good reasons to aim for smaller pull requests, in any case.
Tooling
Google’s own monorepo is massive, and it takes significant amounts of engineering to make it work at scale. Consider things like a graph-based build system that has gone through multiple generations, a distributed object linker to speed up build times, plug-ins for IDEs and text editors that can dynamically keep dependency files in check—it’s an enormous amount of work. As Google grew, it increasingly hit limitations on its use of Perforce and ended up having to create its own proprietary source control tool called Piper. When I worked in this part of Google back in 2007–2008, there were over a hundred people maintaining various developer tools, with a significant part of this effort given over to dealing with implications of the monorepo approach. That’s something that you can justify if you have tens of thousands of engineers, of course.
For a more detailed overview of the rationale behind Google’s use of a monorepo, I recommend “Why Google Stores Billions of Lines of Code in a Single Repository” by Rachel Potvin and Josh Levenberg.5 In fact, I’d suggest it is required reading for anyone thinking, “We should use a monorepo, because Google does!” Your organization probably isn’t Google and probably doesn’t have Google-type problems, constraints, or resources. Put another way, whatever monorepo you end up with probably won’t be Google’s.
Microsoft experienced similar issues with scale. It adopted Git to help manage the main source code repository for Windows. A full working directory for this codebase is around 270 GB of source files.6 Downloading all of that would take an age, and it’s also not necessary—developers will end up working on just one small part of the overall system. So Microsoft had to create a dedicated virtual file system, VFS for Git (previously known as GVFS), that ensures only the source files that a developer needs are actually downloaded.
VFS for Git is an impressive achievement, as is Google’s own toolchain, although justifying these kinds of investments in this sort of technology is much easier for companies like this. It’s also worth pointing out that although VFS for Git is open source, I’ve yet to meet a team outside Microsoft using it—and the vast bulk of Google’s own toolchain supporting its monorepo is closed source (Bazel is a notable exception, but it’s unclear to what extent the open source Bazel actually mirrors what is used inside Google itself).
Markus Oberlehner’s piece “Monorepos in the Wild” introduced me to Lerna, a tool created by the team behind the Babel JavaScript compiler. Lerna is designed to make it easier to produce multiple versioned artifacts from the same source code repository. I can’t speak directly to how effective Lerna is at this task (in addition to a number of other notable deficiencies, I am not an experienced JavaScript developer), but it seems from a surface examination to simplify this approach somewhat.
How “mono” is mono?
Google doesn’t store all of its code in a monorepo. There are some projects, especially those being developed in the open, that are held elsewhere. Nonetheless, at least based on the previously mentioned ACM article, 95% of Google’s code was stored in the monorepo as of 2016. In other organizations, a monorepo may be scoped to only one system, or to a small number of systems. This means a company could have a small number of monorepos for different parts of the organization.
I’ve also spoken to teams that practice per-team monorepos. While technically speaking this probably doesn’t match up to the original definition of this pattern (which typically talks in terms of multiple teams sharing the same repository), I still think it’s more “monorepo” than anything else. In this situation, each team has its own monorepo that is fully under its control. All microservices owned by that team have their code stored in that team’s monorepo, as shown in Figure 7-11.
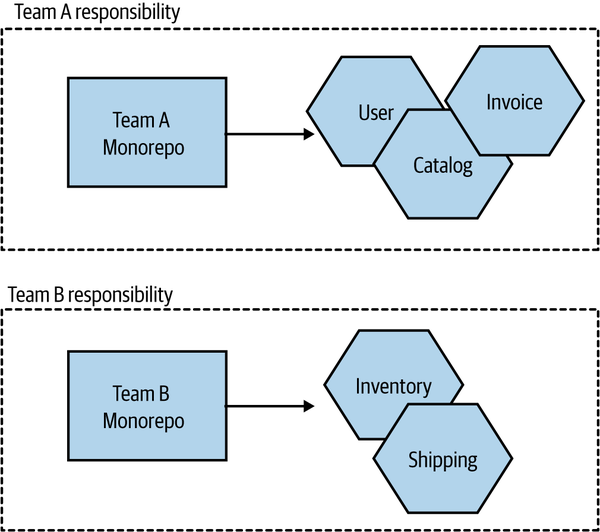
Figure 7-11. A pattern variation in which each team has its own monorepo
For teams practicing collective ownership, this model has a lot of benefits, arguably providing most of the advantages of a monorepo approach while sidestepping some of the challenges that occur at larger scale. This halfway house can make a lot of sense in terms of working within existing organizational ownership boundaries, and it can somewhat mitigate the concerns about the use of this pattern at larger scale.
Where to use this pattern
Some organizations working at very large scale have found the monorepo approach to work very well for them. We’ve already mentioned Google and Microsoft, and we can add Facebook, Twitter, and Uber to the list. These organizations all have one thing in common—they are big, tech-focused companies that are able to dedicate significant resources to getting the best out of this pattern. Where I see monorepos work well is at the other end of the spectrum, with smaller numbers of developers and teams. With 10 to 20 developers, it is easier to manage ownership boundaries and keep the build process simple with the monorepo approach. Pain points seem to emerge for organizations in the middle—those with the scale to start hitting issues that require new tooling or ways of working, but without the spare bandwidth to invest in these ideas.
Which Approach Would I Use?
In my experience, the main advantages of a monorepo approach—finer-grained reuse and atomic commits—don’t seem to outweigh the challenges that emerge at scale. For smaller teams, either approach is fine, but as you scale, I feel that the one repository per microservice (multirepos) approach is more straightforward. Fundamentally, I’m concerned about the encouragement of cross-service changes, the more confused lines of ownership, and the need for new tooling that monorepos can bring.
A problem I’ve seen repeatedly is that organizations that started small, where collective ownership (and therefore monorepos) worked well initially, have struggled to move to different models later on, as the concept of the monorepo is so ingrained. As the delivery organization grows, the pain of the monorepo increases, but so too does the cost of migrating to an alternative approach. This is even more challenging for organizations that grew rapidly, as it’s often only after that rapid growth has occurred that the problems become evident, at which point the cost of migration to a multirepo approach looks too high. This can lead to the sunk cost fallacy: you’ve invested so much in making the monorepo work up to this point—just a bit more investment will make it work as well as it used to, right? Perhaps not—but it’s a brave soul who can recognize that they are throwing good money after bad and make a decision to change course.
The concerns about ownership and monorepos can be alleviated through the use of fine-grained ownership controls, but that tends to require tooling and/or an increased level of diligence. My opinion on this might change as the maturity of tooling around monorepos improves, but despite a lot of work being done in regard to the open source development of graph-based build tools, I’m still seeing very low take-up of these toolchains. So it’s multirepos for me.
Summary
We’ve covered some important ideas in this chapter that should stand you in good stead whether or not you end up using microservices. There are many more aspects to explore around these ideas, from continuous delivery to trunk-based development, monorepos to multirepos. I’ve given you a host of resources and further reading, but it’s time for us to move on to a subject that is important to explore in some depth—deployment.
1 Alanna Brown, Nicole Forsgren, Jez Humble, Nigel Kersten, and Gene Kim, 2016 State of DevOps Report, https://oreil.ly/YqEEh.
2 Nicole Forsgren, Dustin Smith, Jez Humble, and Jessie Frazelle, Accelerate: State of DevOps 2019, https://oreil.ly/mfkIJ.
3 For more details, see Jez Humble and David Farley, Continuous Delivery: Reliable Software Releases Through Build, Test, and Deployment Automation (Upper Saddle River, NJ: Addison-Wesley, 2010).
4 See “Managing Dependency Graphs” in Continuous Delivery, pp. 363–73.
5 Rachel Potvin and Josh Levenberg, “Why Google Stores Billions of Lines of Code in a Single Repository,” Communications of the ACM 59, no. 7 (July 2016): 78–87.