19.4 Accessing Elements in the DOM
JavaScript is commonly used to read, modify, or extend elements in the DOM. For those types of access to the DOM and its element nodes, the document object provides several methods.
|
Description |
|
|---|---|
|
document.getElementById() |
Finds an element based on the id attribute |
|
document.getElementsByTagName() |
Finds all elements with a specific tag name |
|
document.getElementsByClassName() |
Finds all elements of a given CSS class |
|
document.getElementsByName() |
Finds HTML elements with a specific “name” attribute |
|
document.querySelector(s) |
Returns the first element (and only this one) that corresponds to the specified CSS selector s |
|
document.querySelectorAll(s) |
Returns a list with all elements that match the specified CSS selector s |
Table 19.1 Methods for Finding HTML Elements
Although there are several methods available to you to access individual elements with JavaScript, in practice, the two still somewhat newer methods querySelector() and querySelectorAll() are usually sufficient. They are also much easier to use because you can use them to search for the usual CSS selectors such as elements, classes, and IDs, as well as other attributes.
19.4.1 Finding an HTML Element with a Specific “id” Attribute
The old way to access a node in the document object is to search for a specific id attribute of an element using the getElementById(id) method. This method returns a reference to the element object if successful, or it returns null if no element with this id attribute exists. Here’s the same example again, but this time with an if check that queries whether the element was found.
First, here’s the important HTML part:
...
<h1>The DOM interface</h1>
<p id="msg">The paragraph text</p>

<script src="js/script.js"></script>
...
Listing 19.3 /examples/chapter019/19_4_1/index.html
Then, here’s the JavaScript code:
let elem = document.getElementById('msg');
if (elem) {
    let text = elem.innerHTML;
    text += " " + "has been extended!";
    elem.innerHTML = text;
} else {
    console.log("Element with ID msg was not found!");
}
Listing 19.4 /examples/chapter019/19_4_1/index.html
In this example, if() is first used to check the condition as to whether a corresponding ID (here, msg) is contained in the HTML document at all. If that’s true, the element will be manipulated. If it isn’t true, the else branch will be executed, and a corresponding error message will be output to the console.
As briefly indicated at the beginning, this method of accessing elements with the IDs and JavaScript is somewhat outdated. In the past, one simply used as many id attributes as possible, which then, together with the class names for the presentation, made for a rather extensive and confusing HTML document. You can avoid inflating the HTML document with IDs and classes for JavaScript by simply using the appropriate (semantic) elements.
In addition, accessing the element via getElementById() is quite cumbersome and could be done right away using the querySelector method as the better alternative:
...
  let elem = document.querySelector('#msg');
...
Listing 19.5 /examples/chapter019/19_4_1/js/script-2.js
The use of querySelector('#msg') shown here corresponds to that with getElementById('msg'). In addition, querySelector() also makes it much clearer to access the common CSS selectors, such as #msg, for an ID here.
19.4.2 Finding HTML Elements with a Specific Tag Name
If you’re looking for HTML elements with a specific tag name, you can do this by using the getElementsByTagName() method. From the method name in the plural (getElements), you can probably already guess that not only will one element in the HTML document be returned but also a collection of all nodes with a corresponding tag name. You can access the individual nodes via square brackets and the corresponding index value. The number of elements found will be returned by the length property.
“getElementsByTagName()” Doesn’t Return an Array
Although it may seem so, getElementsByTagName() doesn’t return an array, but a node list (live NodeList), which you can read with a loop. You can’t call array-type methods such as forEach() directly on a node list.
Here’s a simple example that demonstrates how you can use getElementsByTagName(). First of all, here’s the HTML document again:
...
<article id="lead">
  <h2>The DOM interface</h2>
  <p>First paragraph text in the article</p>
  <p>Second paragraph text in the article</p>
</article>

<p>First paragraph text outside the article</p>
<p>Second paragraph text outside the article</p>

    <h2>Output:</h2>
    <output></output>
    <script src="js/script.js"></script>

...
Listing 19.6 /examples/chapter019/19_4_2/index.html
And here’s the JavaScript code for it:
let plainText = "";
let pElements = document.getElementsByTagName('p');
for (let i = 0; i < pElements.length; i++) {
    plainText += pElements[i].innerHTML + '\n';
}
console.log(plainText); // Output for demonstration

let htmlText = "p elements in document: " + pElements.length + "<br>";
let articleElements = document.getElementById('lead');
let articlePElements;
if (articleElements) {
    articlePElements = articleElements.getElementsByTagName('p');
    htmlText += "Of which contained in the article element: " +
                articlePElements.length + "<br>";
}
htmlText += "The second paragraph in the article is: " +
articlePElements[1].innerHTML;
document.querySelector('output').innerHTML = htmlText;
Listing 19.7 /examples/chapter019/19_4_2/js/script.js
At the beginning, after calling let pElements = document.getElementsByTagName('p');, all found p elements of the HTML document are contained in pElements. pElements.length contains the number of p elements in a for loop, and the length property as a termination condition allows you to use console.log() to output the individual elements found with the index in the square brackets and the innerHTML property to the JavaScript console for demonstration. Then, we still incorporate this information into the htmlText string with the number of p elements found in the HTML document.
You use let articleElements = document.getElementById('lead'); to search for an element where the attribute value of id is equal to lead. The returned node gets saved in articleElements. Using the node, you can search with articlePElements = articleElements.getElementsByTagName('p'); for all p elements that are inside the node. In the example, the attribute value id='lead' is used for the article element. Thus, in articlePElements, you’ll find all p elements that are contained within the article element. You also append this information to the htmlText string. Last but not least, we’ll demonstrate how you can access the individual contents directly using the index (here, with articlePElements[1].innerHTML). This text was also added to the end of the htmlText string. You can see the result of the example during execution in Figure 19.4.
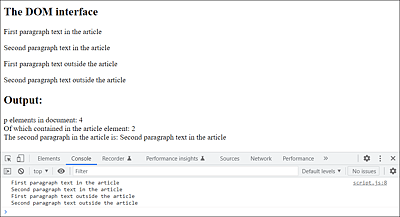
Figure 19.4 Demonstrates the “getElementsByTagName()” Method, Which Returns All Nodes of a Certain Tag Name (Here, “p”)
If you look at the following JavaScript lines in the example, you’ll probably agree that this is a relatively awkward solution after all:
...
let articleElements = document.getElementById('lead');
let articlePElements;
if (articleElements) {
    articlePElements = articleElements.getElementsByTagName('p');
    htmlText += "Of which contained in the article element: " +
                articlePElements.length + "<br>";
}
...
Listing 19.8 /examples/chapter019/19_4_2/js/script.js
First, getElementById() is used to search for an element with the ID lead and, in case of a find within if(), getElementsByTagName() is used to search for the individual p elements. Of course, you could just give the p elements a class name and then search for them, but again, querySelectorAll() provides a method that makes searching for the right elements a breeze. querySelectorAll() works like querySelector(), but this method returns a list of found elements. querySelector(), on the other hand, returns only the first element found that matches the CSS selector. Thus, the preceding lines can be simplified as follows by using querySelectorAll():
...
let articlePElements = document.querySelectorAll('#lead p');
if (articlePElements) {
    htmlText += "Of which contained in the article element: " +
                articlePElements.length + "<br>";
}
...
Listing 19.9 /examples/chapter019/19_4_2/js/script-2.js
This has the same effect as the preceding example and returns all p elements that are within the ID #lead.
19.4.3 Finding HTML Elements with a Specific “class” Attribute
If you’re looking for an HTML element with a specific CSS class name assigned with the HTML attribute class, you can use the getElementsByClassName() method to do so:
let myc = document.getElementsByClassName('aClass');
Like getElementsByTagName(), this method returns all found nodes in the HTML document with the class name aClass. Because getElementsByClassName() works just like getElementsByTagName(), except that it searches for nodes with a specific class attribute value, we don’t need an extra example here.
Here, too, it’s now convenient to use the much more universal querySelectorAll() method in the following way to find all CSS classes:
let myc = document.querySelectorAll('.aClass');
19.4.4 Finding HTML Elements with a Specific “name” Attribute
The getElementsByName() method is the version to search for nodes in the HTML document that contain the HTML attribute name with a specific value. Again, all found nodes are stored in a list, which you can access again with the corresponding index in square brackets. The name attribute is mainly used in form elements and can be used, for example, to evaluate related radio buttons. Take a look at the following example. First, the HTML document:
...
<input name="color" type="radio" value="Red">Red
<input name="color" type="radio" value="Blue">Blue
<input type="button" onclick="getColor()" value="Choose color"><br>
<output></output>

<script src="js/script.js"></script>
...
Listing 19.10 /examples/chapter019/19_4_4/index.html
And here’s the JavaScript for it:
function getColor() {
    let colors = document.getElementsByName('color');
    let htmlText = "Colors to choose from : " + colors.length +
        "<br>You have chosen :";
    if (colors[0].checked) {
        htmlText += "Red";
    } else if (colors[1].checked) {
        htmlText += "Blue";
    } else {
        htmlText += "None";
    }
    document.querySelector('output').innerHTML = htmlText;
}
Listing 19.11 /examples/chapter019/19_4_4/js/script.js
In the example, the event handler onclick is used as an HTML attribute in the HTML tag and will execute the event function getColor() when the element (here, the button) is clicked. I’ll describe event handlers separately, but you can already see that they’re an important link between HTML and JavaScript.
The statement let colors=document.getElementsByName("color"); in getColor() makes sure that all nodes are found where name="color" is written and stored in colors. You can use the if conditions (colors[i].checked) to check whether the corresponding radio button has been activated (= true) or not activated (= false). You’ll learn more about HTML forms with JavaScript later in this chapter. The example during execution is shown in Figure 19.5.
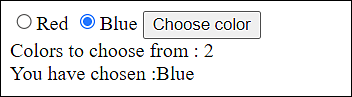
Figure 19.5 Evaluation of Radio Buttons Using the “getElementsByName()” Method
You’ll certainly ask yourself now whether that’s also possible with querySelectorAll(). And indeed, instead of getElementsByName(), you can use the querySelectorAll() method here as well, as follows:
...
let colors = document.querySelectorAll('[name="color"]');
...
Listing 19.12 /examples/chapter019/19_4_4/js/script-2.js
19.4.5 Using “querySelector()” and “querySelectorAll()”
If you’ve read everything from the beginning up to this point, you should already have noticed that, in practice, you really only need querySelector() and querySelectorAll() to select elements based on CSS selectors. Not only are these two methods more flexible than the getElementById() and getElementsByTagName() methods, they’re also faster. The querySelector() method returns the first element found, while querySelectorAll() returns a list of all elements found in a NodeList.
Because you can select the elements using CSS selectors with querySelector() and querySelectorAll(), even more complex accesses can be implemented relatively easily. Let’s take a look at the following example:
...
  <article>
    <h2>Article Heading 1</h2>
    <p>The 1st paragraph text</p>
  </article>
  <article>
    <h2>Article Heading 2</h2>
    <p>The 2nd paragraph text</p>
  </article>
    <article>
    <h2>Article Heading 3</h2>
    <p>The 3rd paragraph text</p>
  </article>
  <article>
    <h2>Article Heading 4</h2>
    <p>The 4th paragraph text</p>
  </article>

  <h2>Heading 5 (no article)</h2>
  <p>The 5th paragraph text</p>

  <script src="js/script.js"></script>
...
Listing 19.13 /examples/chapter019/19_4_5/index.html
If, in this example, you want to alternate the article elements with special background color, this is easier than you might think if you use querySelectorAll(). Here’s the corresponding example:
let elem = document.querySelectorAll('article:nth-child(odd)');
for (let i = 0; i < elem.length; i++) {
  elem[i].style.backgroundColor = "wheat";
}
...
Listing 19.14 /examples/chapter019/19_4_5/js/script.js
As you can see in Figure 19.6, each article element has been styled with a wheat-colored background color if it’s an odd element (nth-child(odd)) of the parent element. Thus, in this example, the first, third, fifth, seventh, and so on element would be styled. On the other hand, if you want to additionally style all even elements, you just need to use article:nth-child(even) instead. The fifth heading with the paragraph text wasn’t styled because it isn’t an article element. Here, you could also see how easy it is to change the style of an HTML element via DOM. To learn more about changing the style of an HTML element via DOM, see Section 19.5.3.
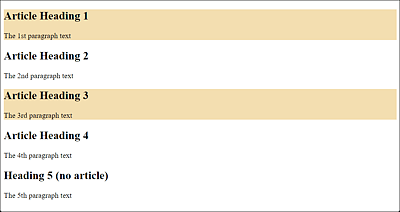
Figure 19.6 The “querySelector()” and “querySelectorAll()” Methods Provide a Flexible Way to Access DOM Elements
19.4.6 Other Object and Property Collections
In addition, ready-made object collections and properties are available to help you find HTML elements. An overview of this is shown in Table 1.2. But in a small example, you’ll first see how you can use these ready-made collections:
let evaluation = document.querySelector('output');
if (evaluation) {
    evaluation.innerHTML = "Content of the title element: " + document.title;
}
Listing 19.15 /examples/chapter019/19_4_6/js/script.js
The example returns the content of the title element with document.title, as you can see in Figure 19.7.
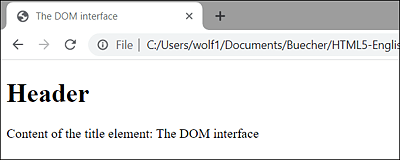
Figure 19.7 You Can Use “document.title” to Determine the Content of the <title> Element
Of course, the object and property collection is only a convenience over the other ways of locating an HTML element described earlier. To access the content of the title element, you could just as well have used on of the following two options instead of document.title:
document.querySelector('title').innerHTML
document.querySelector('title').textContent
“innerHTML” versus “textContent”
The textContent property contains only the text content of an HTML element and all child elements. With the innerHTML property, on the other hand, the HTML code is used in addition to the text content.
Other object collections, in turn, return an entire list of values. The following example returns all links of the HTML document.

Figure 19.8 Finding All Hypertext Links in an HTML Document
The HTML code for this follows:
...
<p>A link to
   <a href="https://www.rheinwerk-verlag.de/">Rheinwerk Publishing</a>
</p>
<p>Another link to the
  <a href="/html/standard/index.html">homepage</a>
</p>

<output></output>
<script src="js/script-2.js"></script>
...
Listing 19.16 /examples/chapter019/19_4_6/index-2.html
Here’s the corresponding JavaScript:
let hyperlinks = document.links;
let text = "";
for (let i = 0; i < hyperlinks.length; i++) {
    text += i + 1 + ". Link: " + hyperlinks[i].innerHTML + "<br>";
}
document.querySelector('output').innerHTML = text;
Listing 19.17 /examples/chapter019/19_4_6/js/script-2.js
Table 19.2 contains an overview of all object and property collections that can make your life with DOM easier with regard to searching for HTML elements.
|
Method |
Description |
|---|---|
|
Returns the absolute base URI of the HTML document. |
|
|
Returns the body element. |
|
|
Returns all cookies of the document. |
|
|
Returns the doctype of the document. |
|
|
Returns the html element. |
|
|
Returns the URI of the document. |
|
|
Returns the domain name from the document server. |
|
|
Returns the DOM configuration. |
|
|
Returns a list of all embed elements. |
|
|
Returns a collection of all form elements. |
|
|
Returns the head element. |
|
|
Returns a collection with all images. |
|
|
Returns the DOM implementation. |
|
|
Returns the character set (encoding) of the document. |
|
|
Returns the date and time when the document was last modified. |
|
|
Returns a collection of all links with the a and area element that contain a value in the href attribute. |
|
|
Returns the load status of the document. |
|
|
Returns the URI of the linking document. This assumes that the document to be linked has been accessed via a link. If an address was selected directly or via a bookmark, document.referrer is empty. |
|
|
Returns a list with all script elements. |
|
|
Returns the title element. |
|
|
Returns the complete URL of the document. |
Table 19.2 Overview of Ready-Made Object and Property Collections