19.5 Changing an HTML Element, an Attribute, or the Style
Several properties are available to change the content of an HTML element. Table 19.3 contains a brief overview of these properties or methods, which will be described separately later in this chapter.
|
Method or Property |
Description |
|---|---|
|
element.innerHTML= |
Changes the content of an HTML element |
|
element.attribute= |
Changes the value of an HTML attribute |
|
Changes the value of an HTML attribute |
|
|
element.style.property= |
Changes the style (CSS) of an HTML element |
Table 19.3 Various Properties and a Method for Changing HTML Elements
19.5.1 Changing the Content of HTML Elements Using “innerHTML”
You can change the content of HTML elements using the innerHTML property, which is something you’ve already done numerous times in this book. All HTML elements, except those without opening and closing HTML tags (e.g., <img>), have this innerHTML property. In the following example, the content of an h1 and a p element is again manipulated using innerHTML:
...
<h1>Heading</h1>
<p>Paragraph text</p>

<button onclick="changeContent()">
  Change with innerHTML
</button>

<script scr="js/script.js"></script>

...
Listing 19.18 /examples/chapter019/19_5_1/index.html
function changeContent() {
    document.querySelector('h1').innerHTML = "New Heading!";
    let elem = document.querySelector('p');
    elem.innerHTML = "New content for the paragraph text";
}
Listing 19.19 /examples/chapter019/19_5_1/js/script.js
In this HTML document, you’ll find an h1 element and a p element. You can search for both elements using the querySelector() method. Then, you can change the content of these elements using innerHTML. Here, I’ll also present two different ways to access the content of HTML elements: one directly without and one indirectly by using a variable.
Figure 19.9 shows the example in its original state, and Figure 19.10 shows the example after changing the content of the h1 and p elements with innerHTML by clicking the button and calling the JavaScript function changeContent() you wrote yourself.
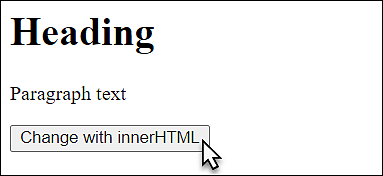
Figure 19.9 The HTML Document in Its Original State
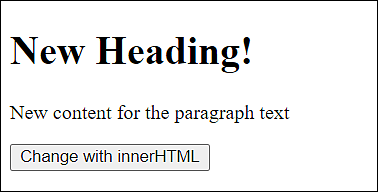
Figure 19.10 The Example after Changing the Content of the <h1> and <p> Elements with “innerHTML”
Setting HTML Tags in “innerHTML”
Besides the option to simply put a text with innerHTML into an HTML element, you can also use HTML tags. The trick is that these tags will also be rendered as elements in the HTML document. For example, with regard to the example shown here, if you want to highlight the New Content text string, you can do so using the strong element as follows:
elem.innerHTML = "<strong>New Content</strong> for the paragraph text";
To prevent a cross-site scripting attack, HTML5 provides that a <script> tag inserted in innerHTML must not be executed. Because you can still run JavaScript without a script element, you shouldn’t use innerHTML for strings that are beyond your control.
19.5.2 Changing the Value of an HTML Attribute
You can also change the value of HTML attributes. First you need to search for the corresponding HTML element as usual and change the relevant attribute in it. Here’s a simple example where you change the src and alt attributes of an img element to change the picture. First, the HTML document:
...
<h1>Change picture</h1>
<p><img class="pic" src="images/bild01.jpg" old="image-01" ></p>
<button onclick="changePicture()">Change picture</button>
<script src="js/script.js"></script>

...
Listing 19.20 /examples/chapter019/19_5_2/index.html
And here’s the JavaScript for it:
let xchange = true;

function changePicture() {
    let current = document.querySelector('.pic');

    if (xchange) {
        current.src = "images/image-02.png";
        current.old = "JavaScript Handbook";
        xchange = false;
    } else {
        current.src = "images/image-01.png";
        current.old = "HTML Handbook";
        xchange = true;
    }
}
Listing 19.21 /examples/chapter019/19_5_2/index.html
In this example, you start the JavaScript function changePicture() every time the user clicks the Change picture button. First, you search the HTML document for an element with class="pic" using querySelector() and assign the element to the current variable. The if check and else branch are only needed to enable you to exchange the image again and again when the button has been clicked by checking the global variable xchange and setting it again in the corresponding branch according to the change. The actual modification of the src and old attributes takes place with current.src and current.old, respectively, and the assignment of a different image and text, respectively. You can also change the value of an attribute in one go as follows:
document.querySelector('.pic').src = "images/image-02.png";
document.querySelector('.pic').old = "JavaScript Handbook";
The principle works exactly as shown here with all other HTML attributes. Let’s take a look at the example in Figure 19.11.
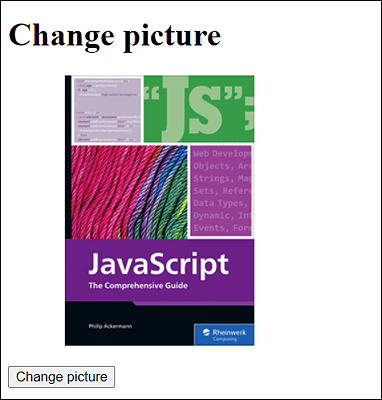
Figure 19.11 In This Example, the “src” and “old” Attributes of the <img> Element Are Changed So the Image Gets Replaced
19.5.3 Changing the Style (CSS) of an HTML Element
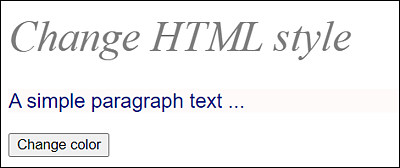
Changing the style of an HTML element is relatively easy once the relevant element has been found. The following example changes the style of the p element. The h1 element can be changed by clicking the button, whereupon the self-written JavaScript function changeColor() gets called and does its work. Here’s the corresponding basic HTML structure:
...
<h1 class="headline">Change HTML style</h1>
<p class="p-style">A simple paragraph text ...</p>
<button onclick="changeColor()">Change color</button>
<script src="js/script.js"></script>

...
Listing 19.22 /examples/chapter019/19_5_3/index.html
Here’s the corresponding JavaScript code:
let element = document.querySelector('.p-style');
element.style.color = "navy";
element.style.background = "snow";
element.style.font = "1.2em Arial";

function changeColor() {
    let headline = document.querySelector('.headline');
    headline.style.color = "gray";
    headline.style.font = "2.5em serif";
    headline.style.fontStyle = "italic";

}
Listing 19.23 /examples/chapter019/19_5_3/js/script.js
In this example, you first search for the HTML element (here, via querySelector()) and change the corresponding HTML element via .style.cssProperty by assigning a valid CSS value. The p element was given a blue font color (color="navy") and a snow-white background (background="snow"). In addition, the font size was set to 1.2em and the font to Arial.
Camel Case
You may be a little puzzled about fontStyle in the /examples/chapter019/19_5_3/js/script.js example and wonder why font-style wasn’t used, which is the actual name of the CSS property. In JavaScript, the hyphens are used for the minus sign, which is why the hyphen isn’t used here, and the first letter after a hyphen is capitalized. A CSS property such as border-color becomes borderColor in JavaScript, or border-top-right-radius becomes borderTopRightRadius. This notation for CSS properties is referred to as a camel case.
The style of the h1 element, on the other hand, doesn’t change until the user clicks the button (onclick event). When the button is clicked, the font color of the h1 element will be formatted to gray, and the font style will be italic via 2.5em and a serif font. You can see the example during execution in Figure 19.12.