14.3 Designing Appealing Tables with CSS
Tables are commonly used to present data in a clear way. Thanks to CSS, you can make a boring HTML table more attractive and appealing. You already know many CSS features for designing a table from other sections (but not yet in connection with tables). At this point, I only want to mention the CSS features that are particularly useful in the context of tables. To demonstrate this, we’ll style the timetable shown in Figure 14.39 from pure HTML with CSS in the following sections.
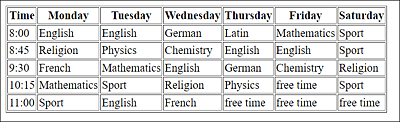
Figure 14.39 A Boring Table in Pure HTML
14.3.1 Creating Fixed-Width Tables
From Chapter 5, Section 5.1, you know that if width is too small, the contents of table cells without special specifications will take up the space they just need to get displayed. It doesn’t matter if you want to reduce the table width explicitly via width to 500px, 300px, or 50px, the result will always look as shown in Figure 14.39 because the table always tries to fit to the content.
It’s still possible to use the CSS feature table-layout to assign a specified and fixed width to the table elements. The default value of table-layout is auto and provides the view you’re used to. If, on the other hand, you use the value fixed for the CSS feature table-layout, then exactly the width you specified via width will be used. If the content doesn’t fit into the table cell anymore, it will be wrapped, truncated (depending on the value of the overflow feature), or just written beyond the cell boundary. For example, with reference to Figure 14.39, I’ve limited the width of the table to 500 pixels and fixed the table layout as follows:
...
.table-fixed {
  table-layout: fixed;
  width: 500px;
}
...
Listing 14.25 /examples/chapter014/14_3_1/css/style.css
You can see the (not really appealing) result of this fixation in Figure 14.40.
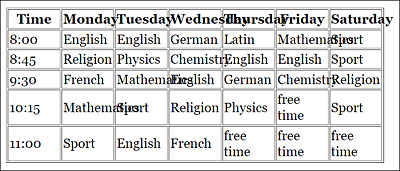
Figure 14.40 When You Use “table-layout: fixed;”, Then No More Consideration Is Given to the Content
14.3.2 General Recommendation: Designing Appealing Tables with CSS
Because you may also look in this book for a general recipe for formatting a table properly with CSS, I’ll discuss this briefly here and give you a few tips on how I would go about it. I summarize a table in HTML as usual. Then the table is assigned a width via width. I format the table header differently from the rest of the table cells. For a better overview, I color the individual table rows alternately with two different colors. Almost all table cells get padding by means of padding. When it makes sense, I use the CSS pseudo-class :hover, which highlights a table row when the user hovers over it with the mouse. In summary, a basic layout of a table with CSS usually looks like this in my case:
...
table {
  width: 700px;
}
th {
  padding: 0.5em;
  text-transform: uppercase;
  border-top: 1px solid black;
  border-bottom: 1px solid black;
  text-align: left;
}
tr:nth-child(even) { background: lightgray; }
td:nth-child(1) {
  font-weight: bold;
  width: 100px;
}
td { padding: 0.5em; }
tr:hover {
  background: darkblue;
  color: white;
}
...
Listing 14.26 /examples/chapter014/14_3_2/css/style.css
You can see the result of these few lines of CSS used to design a complete table in Figure 14.41.
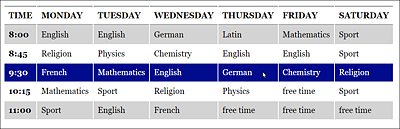
Figure 14.41 The Basic Formatting of an HTML Table with CSS Is Done with a Few Lines
14.3.3 Collapsing Borders for Table Cells Using “border-collapse”
The CSS feature border-collapse allows you to specify whether the borders of individual cells are displayed separately (border-collapse: separate;, default setting) or collapsed (border-collapse: collapse;). In Figure 14.42, you can see the use of the separate value, and in Figure 14.43 the use of collapse.
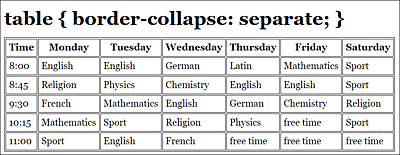
Figure 14.42 Frames of Adjacent Elements Are Displayed Separately with “border-collapse: separate;” (= default setting)
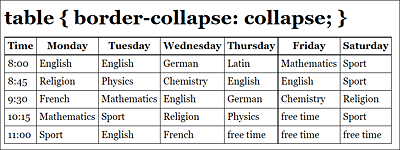
Figure 14.43 Due to “border-collapse: collapse;”, the Borders of the Adjacent Elements Collapse (Example in /examples/chapter014/14_3_3/index.html)
14.3.4 Setting the Spacing between Cells via “border-spacing”
If the CSS feature of border-collapse isn’t equal to collapse, you can set the spacing of adjacent cells by using border-spacing. The specification for this is mostly in pixels, and you can also specify separately the values for a horizontal and vertical spacing. Compared to Figure 14.42, for the example in Figure 14.44, we used border-spacing: 5px 10px;, where the spacing in horizontal direction is 5 pixels and in the vertical direction 10 pixels to the adjacent table element.
“border-spacing: 0px;”
If you set border-spacing to 0, the borders won’t collapse as they do with border-collapse: collapse;, but the cells will be positioned exactly next to each other.
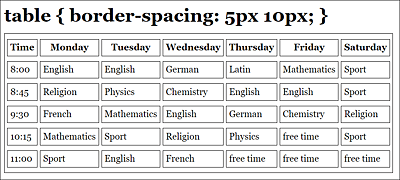
Figure 14.44 You Can Adjust the Spacing between the Table Cells via “border-spacing” (Example in /examples/chapter014/14_3_4/index.html)
14.3.5 Displaying Empty Table Cells Using “empty-cells”
If you have an empty table cell, you can use the CSS feature empty-cells to specify whether or not you want to draw a border around it. By default, the web browser usually displays a border around an empty table cell, as shown in Figure 14.45, which corresponds to the value show (empty-cells: show;).
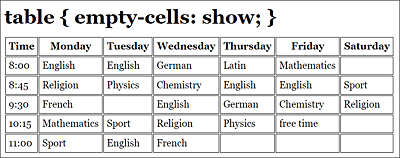
Figure 14.45 Showing Borders for Empty Cells Is the Default Setting, Which Can Also Be Written as “empty-cells: show;”
If you don’t want a border to be drawn around a table cell with no content, you just need to assign the hide value to the empty-cells feature, as was done in the example in Figure 14.46. If you use the collapse value and not separate for the CSS feature border-collapse, the empty-cells: hide; specification will be ignored.
Empty Cells
A line feed, space, or tab feed is considered invisible content. On the other hand, if you write an enforced blank space with in the table cell, this will be considered visible content, and a border will be drawn around it if you’ve used empty-cells: hide;.
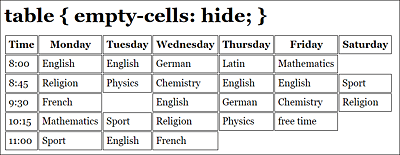
Figure 14.46 If You Want to Hide the Border for Empty Cells, You Can Do This by Using “empty-cells: hide;” (Example in /examples/chapter014/14_3_5/index.html)
14.3.6 Positioning Table Captions via “caption-side”
As you may already recognize from the title of the CSS feature caption-side, this feature sets the position of the table caption you used with the caption element. The default is usually a display above the table, which corresponds to the top value for caption-side. By means of bottom, you can position the caption below the table, as I did in Figure 14.47.
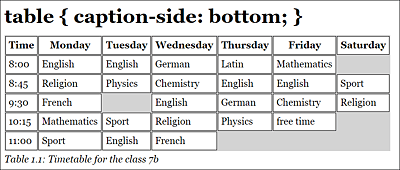
Figure 14.47 The Table Caption with <caption> Has Been Moved to the Bottom with “caption-side: bottom;” (Example in /examples/chapter014/14_3_6/index.html)