5.2 Electronic References (Hyperlinks) Using <a>
Hyperlinks are probably one of the most important elements of HTML because they make it possible to move from one website to another. You’ll need hyperlinks, often just called links or references, to structure your project and implement references to other content. Starting from your main page, you often need links to other subpages and perhaps also links that return you to the main page. Only if you link multiple files does your website become a meaningfully usable website. Besides linking your own content, you can create links to other websites or other documents located elsewhere on the internet.
You can create a link in HTML using the a element (a = anchor). The text you write between <a> and </a> is called link text or reference text and is activated by using the href attribute in the opening <a> tag. The link text can be any text you want to write, but it isn’t always helpful to simply write Please click here. A meaningful link text can help your visitors get where they want to go faster, as well as help visitors with screen readers. Elements other than text can be placed between <a> and </a>, such as a graphic as a link.
What Is Allowed between <a> and </a>?
As mentioned earlier, you can use other HTML elements besides text, such as graphics between <a> and </a>. You’re even allowed to use grouping elements such as paragraphs, lists, articles, and block sets. As a matter of fact, you can use almost anything between <a> and </a>, apart from interactive elements such as links, form elements, and audio and video. That said, I recommend you don’t put too much content into a single link between <a> and </a>. Screen readers will read the text aloud multiple times, and visitors might be overwhelmed by this because they are used to activating individual links in the traditional link style. Of course, this depends on the content of the website. I don’t want to go into more detail here, but you now know that more HTML elements are available to you for links in HTML. If you’ve put an extreme amount of content between <a> and </a> and are no longer sure if it’s still valid, you can validate the source code.
The most important attribute used with the a element is the href attribute. You can use the href attribute to specify the link users will be taken to when they click on the link text.

Figure 5.13 Classic Structure of a Hyperlink
A link text is commonly underlined by the web browser (usually in blue). If the link has already been visited, it will have a different color (usually purple). The color of links and visited links may vary depending on the web browser used, so there is no standard link color in this regard as each web browser has its own default stylesheet. You can change both at any time with CSS. Usually, when you move with the mouse pointer over the link, the cursor changes its shape into a hand, with the index finger pointing to the link. Most web browsers additionally display the address at the bottom left where the browser would land after a mouse click on the link.
If the link has been clicked, the web browser searches for the address (also called URL) specified in the link, loads it into the browser window, and replaces the old web page. If the address of the specified link can’t be found, an error message will display, such as 404 - web page not found. When the new web page has been loaded into the browser window, you can use the Back button to go back to the previous page.
Further Reading
I’ve already described the specification of terms; directory name; directory structure; and full, absolute, and relative paths in Chapter 3, Section 3.3. You can refer to that section if you have problems with the terms used in the following sections.
5.2.1 Inserting Links to Other HTML Documents on Your Own Website
When you create your website, these links are likely to be the first links you use to structure the loose collections of HTML documents into a coherent website—more precisely, to create the navigation of the website. If you want to provide a link to another page on the same website, you usually don’t need to include the full domain name, but instead use a relative URL. The directory structure shown in Figure 5.14 should serve as an example.
The linking for the start page, index.html, to the other pages, links.html, about.html, and legalnotes.html, looks as follows:
...
  <nav>
    Blog |
    <a href="pages/links.html">Links</a> |
    <a href="pages/about.html">About me</a> |
    <a href="pages/legalnotes.html">Legal Notes</a>
  </nav>
  <h1>My Blog</h1>
  <p>Latest reports on HTML</p>
...
Listing 5.8 /examples/chapter005/5_2_1/index.html

Figure 5.14 Directory Structure for an Example of Links to Other Pages on the Same Website
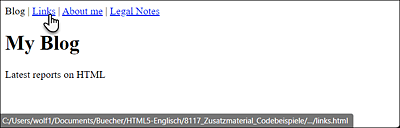
Figure 5.15 Thanks to Linking via a Relative URL, Any Page Can Be Visited and Viewed within the Pages of the Same Website
Of course, you also need to adjust the links to the other pages, such as links.html, about. html, and legalnotes.html, in this example. When specifying the relative URL (see Figure 5.14), you must make sure that the pages (in this example) are located in a subfolder called pages. With regard to the links.html page, the specifications for the href attribute would look as follows:
...
  <nav>
    <a href="../index.html">Blog</a> |
    Links |
    <a href="about.html">About me</a> |
    <a href="legalnotes.html">Legal Notes</a>
  </nav>
...
Listing 5.9 /examples/chapter005/5_2_1/pages/links.html
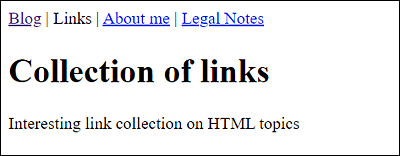
Figure 5.16 HTML Document links.html
Here you can see how to navigate from the pages subfolder (here ../index.html) with ../ to the parent folder in which index.html is located. The other two files, about.html and legalnotes.html, are located in the same folder as links.html, so it’s sufficient to specify only the file name. Both the about.html and legalnotes.html files need to be linked in the same way.
5.2.2 Inserting Links to Other Websites
Links to other websites must be written in the same way as the links to the pages of the same website, the only difference being that you must specify the complete address, that is, the absolute URL, to that page in the href attribute. For this purpose, here’s a simple example in which links to external pages are included (see Listing 5.10).
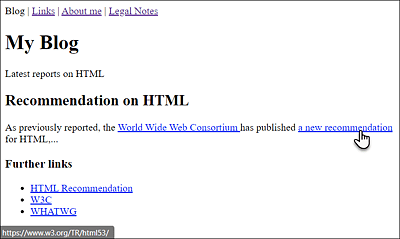
Figure 5.17 Many Web Browsers Display the Link’s Destination Address at the Bottom of the Status Bar When You Hover over It
...
  <article>
    <header>
      <h2>Recommendation on HTML</h2>
    </header>
    <p>As previously reported, the
       <a href="http://www.w3.org/">World Wide Web Consortium
       </a> has published
       <a href=" https://www.w3.org/TR/html53/">
       a new recommendation</a> for HTML,...
    </p>
    <aside>
    <h3>Further links</h3>
      <nav>
      <ul>
       <li>
       <a href="https://www.w3.org/TR/html53/">
        HTML Recommendation</a></li>
       <li><a href="http://www.w3.org/">W3C</a></li>
       <li><a href="http://www.whatwg.org/">WHATWG</a></li>
      </ul>
      </nav>
    </aside>
  </article>
...
Listing 5.10 /examples/chapter005/5_2_2/index.html

Figure 5.18 When You Activate the Link, the Destination Address Gets Loaded into the Web Browser and Displayed
5.2.3 Opening Links with the “target” Attribute in a New Window
You can use the HTML attribute target of the a element to open a reference target in a new window or tab. To do so, you only need to pass the attribute value _blank to target, for example:
<p>As previously reported, the
   <a target="_blank" href="http://www.w3.org/">W3C</a> has
   published a new draft for HTML,...
</p>
If you activated the link text W3C in this example, the target address (here, www.w3.org) is actually opened and loaded in a new window or tab. The primary goal of using target="_blank" is, of course, to avoid “losing” visitors to the page but to leave the page open so that they’ll return to it when they have finished reading the page in the newly opened window or tab.
In addition to the most commonly used attribute value _blank, you can also use _self (= current window), _parent (= parent window), _top (= top window level), and names of windows that can be processed with JavaScript.
Using or Not Using the Attribute "target="_blank""?
Even though some websites are quite fond of using this attribute, you shouldn’t open a new window for every link, come hell or high water. In practice, you should leave it up to the user to decide whether or not to open a new page for a link. Even though you may be used to having countless tabs and multiple websites open at the same time, you should think about the more inexperienced visitors who just aren’t or don’t want to be that much into the World Wide Web. Use the target="_blank" attribute sparingly, and, if possible, let visitors know that a new window or tab will open when they activate the link.
5.2.4 Email Links with “href=mailto: . . .”
You certainly also know the sort of links where the email application opens with a specific email address when you activate it. These links are also created via the a element and the href attribute. Those email references start at href with mailto: and are followed by the desired email address, for example:
...
  <footer>
    <a href="mailto:1@woafu.de">Send email</a>
  </footer>
...
Listing 5.11 /examples/chapter005/5_2_4/index.html
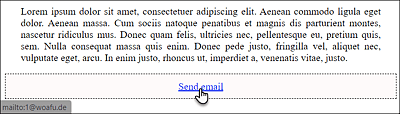
Figure 5.19 When You Hover Your Mouse over the Link, You’ll Usually See the Email Address Associated with That Link in the Status Bar
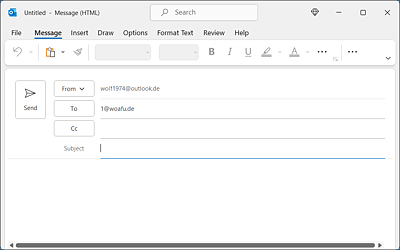
Figure 5.20 When You Activate the Link, the Email Application often Opens, an Email Gets Created Automatically, and the Email Address Is Entered as the Recipient
The Functionality of a “mailto” Reference Isn’t Reliable
Unfortunately, there is no guarantee that a mailto link will actually work. To make sure that it works, either the web browser must support the email creation and dispatch, or a local email application must be launched when a mailto reference is implemented. If a visitor doesn’t use or hasn’t set up a local email application, but only uses the classic webmail in the web browser, the mailto reference will only work if the web browser has been configured accordingly. In addition, there are web browsers that you can’t configure in this way at all. It’s therefore useful and recommended to also provide the email address in readable form, so that visitors who can’t execute the mail reference can still send you an email.
Beware of Spam!
Due to the publication of email addresses on a website, you’ll eventually have to face unsolicited commercial emails (spam) because there are web crawlers that scan websites for email addresses. You even have the obligation to name the email address in the legal notes. The only protection in this regard consists of avoiding mentioning the email address in the source code.
The first way to do that would be to include it as a graphic. However, this would be leave out people who rely on screen readers, and, furthermore, a “graphic email address” is also legally questionable. Often, obfuscation versions are still in use, in which the @ sign is replaced by (at) (e.g., webmaster (at) donald-bear.com). Likewise, the dot is written out as (dot) (e.g., webmaster (at) donald-bear (dot) com). Of course, this means the visitor has to enter the email address manually.
JavaScript obfuscation is another solution. There are many approaches to this. An interesting website with information about how you can hide your email address with JavaScript, for example, can be found at http://alistapart.com/article/gracefulemailobfuscation.
Google’s reCAPTCHA module, which ensures that the email address gets displayed or forms are submitted by a human being, has also proven useful. However, this also entails extra work for the website visitor, who may have to type words or solve an image task. You can find more information on this topic, including an introductory video, at http://google.com/recaptcha/intro/index.html.
5.2.5 Setting Links to Other Types of Content
If you set links to other document types not commonly used on the web, such as Word, Excel, or PDF documents, it depends on the web browser to handle those document types further. As a web developer, you have no influence on this. Here, the general recommendation is first to use widely used formats. For example, a link to a PDF document is more likely to cause the web browser to launch a corresponding PDF reader and open the document within it than if the content type link is a platform-dependent or vendor-specific document (e.g., a Word document). Let’s look at a simple example:
...
<h1>Reference to other content types</h1>
<p>Open a PDF document: <a href="document.pdf">PDF</a></p>
<p>Open a MOV movie: <a href="ganges.mov">MOV</a></p>
<p>Open a Word document: <a href="worddocument.doc"
   type="application/msword">DOC</a></p>
...
Listing 5.12 /examples/chapter005/5_2_5/index.html
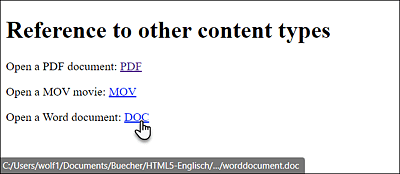
Figure 5.21 Three Links to Different Types of Content
What will happen with the three links used in the example can’t be completely predicted as it depends on the web browser. The PDF document shouldn’t be a problem because the web browser should know how to handle it. It might be more difficult with the movie in MOV format, because that usually requires a QuickTime plug-in from Apple. Some web browsers offer the option to download and install the appropriate plug-in; others, however, don’t.
The same applies to the Word document. If Word is installed on your computer, the web browser often provides a dialog box to open the document with Microsoft Word, or at least the option to select a corresponding application with which you want to open this document. Most of the time, however, only the option to download the document is provided. This again depends on how you’ve set the web browser.
Including the Content Type
For special types of content, you can provide the web browser with the multipurpose internet mail extension (MIME) type in the type attribute within the opening <a> tag, which is what I did in the example with application/msword for a Word document. The information is very useful for the web browser and also other web clients. It almost always makes sense to specify the file format if the link target isn’t an HTML document.
Inform Visitors about What Is behind a Link
If you use non-HTML documents, you should definitely inform the visitor what is hiding behind the link and possibly how big the specific file is. You can use the global title attribute in the opening a element for this purpose, but it’s recommended to mention more precise details directly with the link text. An example of how you don’t want to do that looks like the following:
<a href="annualrevenue.pdf">Annual Revenue 2020</a>
The visitor will only see the link text Annual Revenue 2020 here and may be confused about whether this link is to a PDF document that may take a little longer to load. For this reason, it’s better to write the following:
<a title="Opens the PDF file with the annual revenue in 2020"
   href="annual-revenue.pdf">
   Annual Revenue 2020 (PDF, 3.9 MB)
</a>
5.2.6 Adding Download Links Using the “download” Attribute
You can also add links as download references irrespective of the content type (i.e., MIME type) of the link target. For this purpose, you want to use the download attribute in the opening <a> tag. Here, we use the same HTML code from example /examples/chapter005/5_2_5/index.html, but now all three files are provided for download using the download attribute:
...
<h1>Reference to other content types</h1>
<p>Download a PDF document:
   <a href="document.pdf" download>PDF</a></p>
<p>Download a MOV movie:
   <a href="ganges.mov" download="movie.mov">MOV</a></p>
<p>Download a Word document: <a href="worddocument.doc"
   download="worddocument.doc">DOC</a></p>
<p>Download an HTML document: <a href="website.html"
   download="website.html">HTML</a></p>
...
Listing 5.13 /examples/chapter005/5_2_6/index.html
The download attribute allows you to instruct a web browser to provide this file for download, even if it could display the file itself or knows the appropriate plug-in or add-on to do so, which it would usually use for such a content type.
You can use the download attribute as a standalone attribute, as shown in the first example with the PDF document. The name of the file that gets downloaded matches the specification in href (here, document.pdf). If the link in href doesn’t contain a meaningful name, you can also assign a different name to the download attribute, as is the case in the example with the MOV movie whose actual document name is ganges.mov, but the download name of the file is movie.mov. The example with the HTML document is only intended to demonstrate that even typical web browser content types such as an HTML document with the attribute download are really only provided for download. Note, however, that this attribute only works if you try the example online.
Informing Visitors about What Gets Downloaded
As is the case with linking to non-HTML documents, you should let readers know what they are downloading and what they can use to view or reuse the document. For example, if you provide Excel spreadsheets with an annual revenue report for download, you should inform the reader what software they need to view the spreadsheet.
The same applies to ZIP archives. Here, too, you should add an additional note on how to unpack such an archive or a link to the relevant software. Keep in mind that many visitors don’t know what to do with file extensions such as *.odt, *.xls, *.zip, *.tar.bz, and so on. You mustn’t take this for granted just because you deal with countless data formats every day. It’s recommended to include the file size when downloading. You could thus note the download of a large ZIP archive as follows:
...
<a title="Annual revenue in Excel format packed into a ZIP archive".
   href="archive.zip" download="annualrevenue2020.zip">
      Annual revenue 2020 (ZIP archive; 2.5 MB)</a>
   <small>(To unpack the ZIP archive, you need a
           packing program such as 7-Zip. The annual revenue figures are
           maintained in Excel format and thus require
           software that can view Excel spreadsheets.)
   </small>
...
Next to the title attribute, I’ve specified the file format (here, a ZIP archive) as well as the file size. In addition, I’ve written some small-print information between <small> and </small>.
5.2.7 Setting Links to Specific Parts of a Web Page
Nothing can be more annoying for visitors than reading a long scientific treatise of a specific topic on a web page and having to scroll up and down for a long time to get to a specific section. For those cases, you can set anchors with the global attribute id, which you can jump to via an ordinary link in the a element. For an example of such target anchors, view any Wikipedia page’s table of contents of a topic. To link to a specific section of a web page, you only need the following:
-
An anchor (jump marker) that you can create with the id="anchorname" attribute, for example:
<h1 id="anchorname">Heading xyz</h1>
-
A link pointing to the anchor via href="#anchorname". For this purpose, the hash character # is written in front of the anchor name, for example:
<a href="#anchorname">Go to heading xyz</a>
Here’s a simple example of how you can set and use such jump markers in practice:
...
  <h1 id="top">Table of contents</h1>
  <ul>
    <li><a href="#intro">Introduction to HTML</a></li>
    <li><a href="#syntax">The Syntax of HTML</a></li>
    <li><a href="#versions">Versions of HTML</a></li>
    <li><a href="#techniques">Techniques around HTML</a></li>
    <li><a href="#practice">Getting Started</a></li>
  </ul>
  <h1 id="intro">Introduction to HTML</h1>
  <p>Lorem ipsum dolor sit amet ... <p>
  <p><a href="#top">To Table of Contents</a></p>
  <h2 id="syntax">The Syntax of HTML</h2>
  <p>Lorem ipsum dolor sit amet ... <p>
  <p><a href="#top">To Table of Contents</a></p>
  <h2 id="versions">Versions of HTML</h2>
  <p>Lorem ipsum dolor sit amet ... <p>
  <p><a href="#top">To Table of Contents</a></p>
  <h2 id="techniques">Techniques around HTML</h2>
  <p>Lorem ipsum dolor sit amet ... <p>
  <p><a href="#top">To Table of Contents</a></p>
  <h2 id="practice">Getting Started</h2>
  <p>Lorem ipsum dolor sit amet ... <p>
  <p><a href="#top">To Table of Contents</a></p>
...
Listing 5.14 /examples/chapter005/5_2_7/index.html
Figure 5.22 shows the example in the web browser. Thanks to jump markers, you can reach the desired section more quickly here.
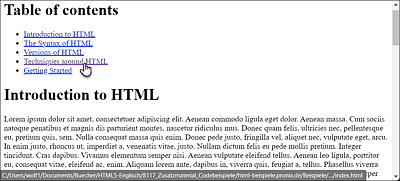
Figure 5.22 Jump Markers Are Provided for Users to Reach Desired Sections Quickly
For example, if you activate the Techniques around HTML link, it will jump directly to the corresponding section with the jump marker, as you can see in Figure 5.23. Another link to jump back to the table of contents has also been added below each section.
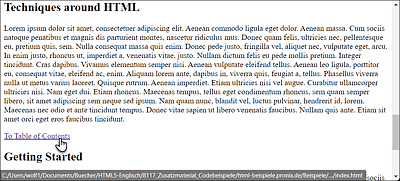
Figure 5.23 Clicking the “Techniques around HTML” Link Jumps the User Directly to the Corresponding Section
Setting Anchors Using the “id” Attribute
Before you can create a link to a specific part within a web page, you must set the jump marker (or an anchor) using the global id attribute (id="anchorname") within an opening HTML tag. In the example, this was done for the main headings <h1> and <h2> (e.g., <h2 id="techniques">). The attribute value of id must start with a letter or an underscore (never a number) and mustn’t contain any spaces. It’s also advisable to use a descriptive name to avoid losing track. You shouldn’t use meaningless designations such as anchor1, anchor2, and so on. Also note that this is case-sensitive.
Referencing an Anchor Using “#anchorname”
To use a link to the anchors, you need to specify the attribute value for the anchor in href in the opening <a> tag. For example, if the anchor is <h2 id="techniques">, you want to write the hash character # in front of the anchor name (here, "techniques"). With reference to our example, you’d have to write this as follows:
<li><a href="#techniques">Techniques around HTML</a></li>
If you activate this link, the HTML document will jump to the element where the value of the id attribute is "techniques". In this example, that would be the h2 element with the heading Techniques around HTML.
Creating Links to a Specific Section of Another Website
Likewise, you can create a link to a section of another HTML document. This requires that the other HTML document contains a corresponding anchor. If the anchor is in another document, you can create a reference to it as follows:
<a href="tech.html#techniques">Techniques around HTML</a>
This would cause a jump to the section with the #techniques anchor in another HTML document located in the same directory and whose filename is tech.html.
If the file with the anchor is even on another website, you must specify the complete URL there:
<a href="http://www.domain.com/path/tech.html#techniques">...</a>
Of course, it’s also possible to use a link to parts of third-party websites. However, it goes without saying that you can’t set an anchor here, but only link existing anchors. For example, here’s a link to an anchored section of a Wikipedia page:
<a href="https://en.wikipedia.org/wiki/HTML#Versions">...</a>
Here, you’d jump directly to the Wikipedia page with the entry HTML to the #Versions anchor. This is based on the assumption that the anchor exists—which was still the case when the book went to press, but could change at any time. If the anchor no longer exists or is wrong, the website will be called, and the anchor will get ignored as if #anchorname hadn’t been specified when linking to the a element.
5.2.8 Creating Links to Phone Numbers
Because more and more users mostly go online with a mobile device, you can also create a link to a phone number. When the user taps on it, this number can be called directly from the website. However, the respective web browser must also support this function. This is shown in the following example:
…
<p>
  Customer Service Rheinwerk Publishing:
  <a href="tel:+1.781.228.5070.200">+1.781.228.5070 Ext. 200</a>
</p>
…
Listing 5.15 /examples/chapter005/5_2_8/index.html
The phone reference starts with tel: followed by the number. It’s recommended to use the plus sign and the country code and to omit the leading 0 in the area code. Spaces can be written as a period. Because it depends on the web browser whether or not the number gets dialed immediately, you should also list the phone number.
You can also set other services such as Skype as a link, which allows you to start a Skype session with one click. The prerequisite for this is, of course, that the user also uses Skype. A Skype example is shown here:
Listing 5.16 /examples/chapter005/5_2_8/index.html
Again, there’s no guarantee that the web browser will start a Skype session, so you should also list the appropriate data. The same applies to FaceTime.
Automatic “tel:”
There are mobile web browsers, such as Safari, which automatically recognize a phone number and generate a tel: link from it. This is convenient, but perhaps not always desirable, especially when the number in question isn’t a phone number at all. There are meta tags available for this, which you can use to instruct the web browser not to use this feature on the web page.
For Safari:
<meta name="format-detection" content="telephone=no">
For BlackBerry:
<meta http-equiv="x-rim-auto-match" content="none">
5.2.9 HTML Attributes for the HTML Element <a>
Finally, the HTML attributes for the links should be explained here, which can be quite useful for search engines, among other things. In Table 5.2, you can see an overview of all existing attributes for the a element. You already know some of them.
|
Attribute |
Description |
|---|---|
|
This attribute indicates that you provide the referenced target for download, even if the web browser could display the target’s content type by itself. |
|
|
This attribute specifies the URL of the page the link will lead to when activated. |
|
|
This attribute specifies the language of the linked document. The usual language abbreviations are permitted as specifications (e.g., de for Germany). |
|
|
This attribute allows you to specify information about the media for which the link target has been optimized. You can either enumerate media types, separate by commas, or specify all for all media types. |
|
|
You already know the attribute from the link element described in Chapter 3, Section 3.5.1 , which you can refer to if you need more information. This attribute allows you to determine the type of linking. Especially for the a element, the rel attribute values bookmark, external, nofollow, and noreferrer are of special importance because they can only be used in the a element:
However, you can’t use the attribute values icon, pingback, prefetch, and stylesheet for a elements. |
|
|
This attribute enables you to enter where the link target should be opened. Possible values are listed here:
|
|
|
This attribute allows you to inform the web browser about the MIME type (file format) to which the linked file belongs. This specification is useful if the target isn’t an HTML document. |
Table 5.2 Attributes for Links with the <a> Element