Chapter 1. Project Setup
You want to get started with TypeScript, fantastic! The big question is: How do you start? There are many ways how you can integrate TypeScript into your projects, and they all are slightly different depending on your project’s needs. Just as JavaScript runs on many runtimes, there are plenty of ways to configure TypeScript so it meets your target’s needs.
This chapter covers all the possibilities of introducing TypeScript to your project, as an extension next to JavaScript that gives you basic auto-completion and error indication, up to full-fledge setups for full-stack applications on Node.js and the browser.
Since JavaScript tooling is a field with endless possibilities — some say that a new JavaScript build chain is released every week, almost as much as new frameworks — this chapter focuses more on things you can do with the TypeScript compiler alone and without any extra tool.
TypeScript offers everything you need for your transpilation needs, except the ability to create minified and optimized bundles for web distribution. Bundlers like ESBuild or Webpack take care of this task. Also, there are setups that include other transpilers like Babel.js which can play along nicely with TypeScript. Bundlers and other transpilers are not in the scope of this chapter. Refer to their documentation for the inclusion of TypeScript, and use the knowledge in this chapter to get the right configuration setup.
With TypeScript being a project with more than a decade worth of history, it carries some remains from older times, that for the sake of compatibility TypeScript can’t just get rid of. Therefore, this chapter will spotlight modern JavaScript syntax and recent developments in web standards. If you still need to target Internet Explorer 8 or Node.js 10, then first: I’m sorry, these platforms are really hard to develop for. And second: You will be able to put together the pieces for older platforms with the knowledge from this chapter and the official TypeScript documentation.
1.1 Type-checking JavaScript
Problem
You want to get basic type-checking for JavaScript with the lowest amount of effort possible.
Solution
Add a single-line comment with @ts-check at the beginning of every JavaScript file you want to type-check. With the right editors, you already get red squiggly lines whenever TypeScript encounters things that don’t quite add up.
Discussion
TypeScript has been designed as a superset of JavaScript, and every valid JavaScript is also valid TypeScript. This means that TypeScript is also really good at figuring out potential errors in regular JavaScript code.
We can make use of this if we don’t want to have a full-blown TypeScript setup but want some basic hints and type-checks to ease our development workflow.
A good pre-requisite if you only want to type-check JavaScript is a good editor or integrated development environment (IDE). An editor that goes really well with TypeScript is Visual Studio Code. Visual Studio Code — or VSCode for short — was the first major project to utilize TypeScript, even far before TypeScript’s release.
A lot of people recommend VSCode if you want to write JavaScript or TypeScript. But really, every editor is great as long as it features TypeScript support. And nowadays most of them do.
With Visual Studio Code we get one very important thing for type-checking JavaScript: Red squiggly lines when something doesn’t quite add up, as you can see in Figure 1-1. This is probably the lowest barrier to entry.
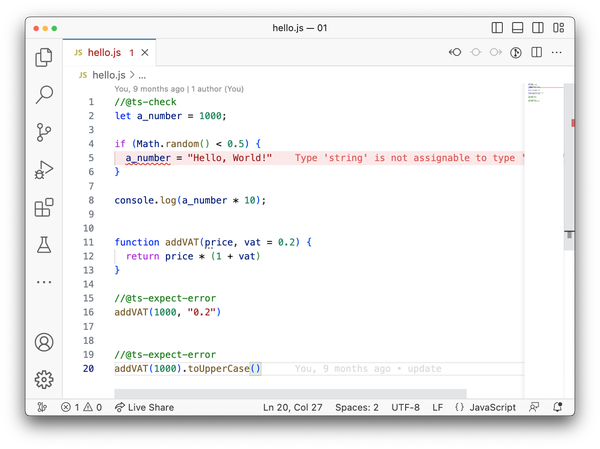
Figure 1-1. Red squiggly lines in code editors: First-level feedback if something in your code doesn’t add up.
TypeScript’s type system has different levels of strictness when working with a codebase.
First, the type system will try to infer types from JavaScript code through usage. If you have a line like this in your code:
leta_number=1000;
TypeScript will correctly infer number as the type of a_number.
One difficulty with JavaScript is that types are dynamic. Bindings via let, var, or const:footnote[Objects which are assigned to a const binding can still change values and properties, and thus change their types.] can change type based on usage. Take a look at the following example:
leta_number=1000;if(Math.random()<0.5){a_number="Hello, World!";}console.log(a_number*10);
We assign a number to a_number and change the binding to a string if the condition in the next line evaluates to true. This wouldn’t be that much of a problem if we wouldn’t try to multiply a_number on the last line. In approximately 50% of all cases, this example will produce unwanted behavior.
TypeScript can help us here. With the addition of a single-line comment with @ts-check at the very top of our JavaScript file, TypeScript activates the next strictness level: Type-checking JavaScript files based on the type information available in the JavaScript file.
In our example, TypeScript will figure out that we try to assign a string to a binding that TypeScript has inferred to be a number. We will get an error in our editor.
// @ts-checkleta_number=1000;if(Math.random()<0.5){a_number="Hello, World!";// ^-- Type 'string' is not assignable to type 'number'.ts(2322)}console.log(a_number*10);
Now we can start to fix our code, TypeScript will guide us.
Type inference for JavaScript goes a long way. In the following example, TypeScript infers types by looking at operations like multiplication and addition, as well as default values.
functionaddVAT(price,vat=0.2){returnprice*(1+vat);}
The function addVat takes two arguments. The second argument is optional, as it has been set to a default value of 0.2. TypeScript will tell you if you try to pass a value that doesn’t work.
addVAT(1000,"a string");// ^-- Argument of type 'string' is not assignable// to parameter of type 'number'.ts(2345)
Also, since we use multiplication and addition operations within the function body, TypeScript understands that we will return a number from this function.
addVAT(1000).toUpperCase();// ^-- Property 'toUpperCase' does not// exist on type 'number'.ts(2339)
There are situations where you need more than type-inference. In JavaScript files, you can annotate function arguments and bindings through JSDoc type annotations. JSDoc is a comment convention that allows you to describe your variables and function interfaces in a way it’s not only nice to read for humans, but also interpretable by machines. TypeScript will pick up your annotations and uses them as types for the type system.
/** @type {number} */letamount;amount='12';// ^-- Argument of type 'string' is not assignable// to parameter of type 'number'.ts(2345)/*** Adds VAT to a price** @param {number} price The price without VAT* @param {number} vat The VAT [0-1]** @returns {number}*/functionaddVAT(price,vat=0.2){returnprice*(1+vat);}
JSDoc also allows you to define new, complex types for objects.
/*** @typedef {Object} Article* @property {number} price* @property {number} vat* @property {string} string* @property {boolean=} sold*//*** Now we can use Article as a proper type* @param {[Article]} articles*/functiontotalAmount(articles){returnarticles.reduce((total,article)=>{returntotal+addVAT(article);},0);}
The syntax might feel a bit clunky, though, we will find better ways to annotate objects in Recipe 1.3.
Given that you have a JavaScript codebase that is well documented via JSDoc, adding a single line on top of or files will give you already a really good understanding if something goes wrong in your code.
1.2 Installing TypeScript
Problem
Red squigglies in the editor are not enough, you want to have command line feedback, status codes, configuration, and options to type-check JavaScript and compile TypeScript.
Solution
Install TypeScript via Node’s primary package registry: NPM.
Discussion
TypeScript is written in TypeScript, compiled to JavaScript, and uses the Node.js JavaScript runtime as its primary execution environment.1. So even if you’re not writing a Node.js app, the tooling for your JavaScript applications will run on Node.
So, make sure you get Node.js from the official website and get familiar with its command line tools.
For a new project, make sure you initialize your project’s folder with a fresh package.json. This file contains all the information for Node and its package manager NPM to figure out your project’s contents. Generate a new package.json file with default contents in your project’s folder with the NPM command line tool.
$npminit-y
Note
Throughout this book, we will see commands that should be executed in your terminal. For the sake of convenience, we decided to show these commands as they would appear on BASH or similar shells that are available for Linux, macOS, or the Windows subsystem for Linux. The leading $ sign is a convention to indicate a command but is not meant to write by you. Note that all commands also work on the regular Windows command line interface as well as PowerShell.
npm is Node’s package manager. It comes with a CLI, a registry, and other tools that allow you to install dependencies. Once you initialized your package.json, install TypeScript from NPM. We install it as a development dependency, meaning that TypeScript won’t be included if you intend to publish your project as a library to NPM itself.
$npminstall-Dtypescript
There is a way to globally install TypeScript so you have the TypeScript compiler available everywhere, but I’d strongly suggest installing TypeScript separately per project. Depending on how frequently you visit your projects, you will end up with different TypeScript versions that are in sync with your project’s code. Installing (and updating) TypeScript globally might break projects you haven’t touched in a while.
Note
If you install front-end dependencies via NPM, you will need an additional tool to make sure that your code also runs in your browser: A bundler. TypeScript doesn’t include a bundler that works with the supported module systems, so you need to make sure that you have the proper tooling set up. Tools like Webpack are common, and so is ESBuild. All tools are designed to execute TypeScript as well. Or you can go full native, as described in Recipe 1.8
Now that TypeScript is installed, initialize a new TypeScript project. Use NPX for that, it allows you to execute a command line utility that you installed relatively to your project.
With
$npxtsc--init
you can run your project’s local version of the TypeScript compiler, and pass the "init"` flag to create a new tsconfig.json.
The tsconfig.json is the main configuration file for your TypeScript project. It contains all the configuration needed TypeScript understands how to interpret your code, how to make types available for dependencies, and if you need to turn certain features on or off.
Per default, TypeScript sets these options for you:
{"compilerOptions":{"target":"es2016","module":"commonjs","esModuleInterop":true,"forceConsistentCasingInFileNames":true,"strict":true,"skipLibCheck":true}}
Let’s look at them in detail.
target is es2016, which means that if you run the TypeScript compiler, it will compile your TypeScript files to an ECMAScript 2016 compatible syntax. Depending on your supported browsers or environments, you can either set that to something more recent (ECMAScript versions are nowadays named after the year of release), or something almost ancient. Like es5 for people who have to support very old Internet Explorer versions. We all hope you don’t have to.
module is commonjs. This allows you to write ECMAScript module syntax, but instead of carrying this syntax over to the output, TypeScript will compile it to the CommonJS format. This means that a
import{name}from"./my-module";console.log(name);//...
becomes a
constmy_module_1=require("./my-module");console.log(my_module_1.name);
once you compile. CommonJS was the module system for Node.js and has become very common because of Node’s popularity. Node.js since has adopted ECMAScript modules as well, something that we tackle in Recipe 1.9.
esModuleInterop makes sure that modules that aren’t ECMAScript modules are aligned to the standard once imported. forceConsistentCasingInFileNames helps people who have case-sensitive file systems cooperating with folks who have case insensitive file systems. And skipLibCheck assumes that your installed type definition files (more on that later) have no errors. So your compiler won’t check them and will become a little faster.
One of the most interesting features is TypeScript’s strict mode. If set to true, TypeScript will behave differently in certain areas. It’s the way for the TypeScript team to define their view on how the type system should behave.
If TypeScript introduces a breaking change because their view on the type system changes, it will get incorporated in strict mode. This ultimately means that your code might break if you update TypeScript and always run in strict mode.
To give you time to adapt to changes, TypeScript also allows you to turn certain strict mode features on or off feature by feature.
Additionally to the default settings, I strongly recommend setting two more:
{"compilerOptions":{//..."rootDir":"./src","outDir":"./dist"}}
You tell TypeScript to pick up source files from an src folder and put the compiled files into a dist folder. This setup allows you to separate your built files from the ones you author. You will have to create the src folder, of course, the dist folder will be created after you compile.
Oh, compilation. Once you have your project set up, create an index.ts file in src.
console.log("Hello World");
The .ts extension indicates it’s a TypeScript file. Now run
$npxtsc
in your command line and see the compiler at work.
1.3 Keeping Types on the Side
Problem
You want to write regular JavaScript with no extra build-step, but still get some editor support and proper type information for your functions. But you don’t want to define your complex object types with JSDoc like shown in Recipe 1.1.
Solution
Keep type definition files “on the side” and run the TypeScript compiler in the “check JavaScript” mode.
Discussion
Gradual adoption has always been a dedicated goal for TypeScript. With this technique, which I dubbed “types on the side”, you are able to write TypeScript syntax for object types and advanced features like generics and conditional types (see Chapter 5) instead of clunky JSDoc comments, but still write JavaScript for your actual app.
Somewhere in your project, maybe in a @types folder, create a type definition file. Its ending is .d.ts, and as opposed to regular .ts files, its purpose is to hold declarations, no actual code.
This is where you can write your interfaces, type aliases, and complex types.
// @types/person.d.ts// An interface for objects of this shapeexportinterfacePerson{name:string;age:number;}// An interface that extends the original one// this is tough to write with JSDoc comments alone.exportinterfaceStudentextendsPerson{semester:number;}
Note that you export the interfaces from the declaration files. This is so you can import them in your JavaScript files.
// index.js/** @typedef { import ("../@types/person").Person } Person */
The comment on the very first line tells TypeScript to import the Person type from @types/person, and make it available under the name Person.
Now you can use this identifier to annotate function parameters or objects just like you would with primitive types like string.
// index.js, continued/*** @param {Person} person*/functionprintPerson(person){console.log(person.name);}
To make sure that you get editor feedback, you still need to set @ts-check at the beginning of your JavaScript files as described in Recipe 1.1. Or, you can configure your project to always check JavaScript.
Open tsconfig.json and set the checkJs flag to true. This will pick up all the JavaScript files from your src folder and give you constant feedback on type errors in your editor. You are also able to run npx tsc to see if you have errors in your command line.
If you don’t want TypeScript to transpile your JavaScript files to older versions of JavaScript, make sure you set noEmit to true.
{"compilerOptions":{"checkJs":true,"noEmit":true,}}
With that, TypeScript will have a look at your source files, and will give you all the type information you need, but won’t touch your code.
This technique is also known to scale. Prominent JavaScript libraries like Preact work like this and are able to provide fantastic tooling for their users as well as their contributors.
1.4 Migrating a Project to TypeScript
Problem
You want to get the full benefits of TypeScript for your project, but you need to migrate an entire code-base.
Solution
Rename your modules file by file from .js to .ts. Make use of several compiler options and features that help you iron out errors.
Discussion
The benefit of having TypeScript files instead of JavaScript files with types is that you get to have your types and implementations in one file, which gives you better editor support, access to more TypeScritp features, and increases compatibility with other tools.
However, just renaming all files from .js to .ts will result most likely in one thing: Tons and tons of errors. This is why you should go file by file, and gradually increase type safety as you go along.
The biggest problem when migrating is that you’re suddenly dealing with a TypeScript project, not with JavaScript anymore. But still, lots of your modules will be JavaScript, and with no type information, they will fail the type checking step.
Make it easier for you and for TypeScript if you turn off type checking for JavaScript, but allow for TypeScript modules to load and refer to JavaScript files.
{"compilerOptions":{"checkJs":false,"allowJs":true}}
Should you run npx tsc now, you will see that TypeScript picks up all JavaScript and TypeScript files in your source folder and creates respective JavaScript files in your destination folder. TypeScript will also transpile your code to be compatible with the specified target version.
If you are working with dependencies a lot, you will see that some of them don’t come with type information. This will also produce TypeScript errors.
import_from"lodash";// ^- Could not find a declaration// file for module 'lodash'.
Install third-party type definitions to get rid of this error. See Recipe 1.5
Once you migrate file by file, you might realize that you won’t be able to get all typings for one file right in one go. There are dependencies, and you will quickly go down the rabbit hole of having too many files to adjust before you can tackle the one that you actually need.
You can always decide to just live with the error. By default, TypeScript sets the compiler option noEmitOnError to false.
{"compilerOptions":{"noEmitOnError":false}}
This means that no matter how many errors you have in your project, TypeScript will generate result files, trying not to block you. This might be a setting you want to turn on after you finished migrating.
In strict mode, TypeScript’s feature flag noImplicitAny is set to true. This flag will make sure that you don’t forget to assign a type to a variable, constant, or function parameter. Even if it’s just any.
functionprintPerson(person:any){// This doesn't make sense, but is ok with anyconsole.log(person.gobbleydegook);}// This also doesn't make sense, but any allows itprintPerson(123);
Any is the catch-all type in TypeScript. Every value is compatible with any, and any allows you to access every property or call every method. Any effectively turns off type-checking, giving you some room to breathe during your migration process.
Alternatively, you can annotate your parameters with unknown. This also allows you to pass everything to a function, but won’t allow you to do anything with it until you make sure you know more about the type.
You can also decide to ignore errors by adding a @ts-ignore comment before the line you want to exclude from type checking. A `@ts-nocheck comment at the beginning of your file turns off type checking entirely for this particular module.
A comment directive that is fantastic for migration is @ts-expect-error. It works like @ts-ignore as it will swallow errors from the type-checking progress, but will produce red squiggly lines if there is no type error to be found. When migrating this helps you find the spots that you successfully moved to TypeScript. When there are no @ts-expect-error directives left anymore, you’re done.
functionprintPerson(person:Person){console.log(person.name);}// This error will be swallowed// @ts-expect-errorprintPerson(123);functionprintNumber(nr:number){console.log(nr);}// v- Unused '@ts-expect-error' directive.ts(2578)// @ts-expect-errorprintNumber(123);
The great thing about this technique is that you flip responsibilities. Usually, you would have to make sure that you pass in the right values to a function, now you can make sure that the function is able to handle the right input.
All possibilities to get rid of errors throughout your migration process have one thing in common: They’re explicit. You need to explicitly set @ts-expect-error comments, annotate function parameters as any, or ignore files entirely from type checking. With that, you can always search for those escape hatches during the migration process, and make sure that over time, you got entirely rid of them.
1.5 Loading Types from Definitely Typed
Problem
You rely on a dependency that hasn’t been written in TypeScript and therefore lacks typings.
Solution
Install community-maintained type definitions from Definitely Typed.
Discussion
Definitely Typed is one of the biggest and most active repositories on GitHub, and collects high-quality TypeScript type definitions developed and maintained by the community.
The number of maintained type definitions is close to 10.000, and there is rarely a JavaScript library not available.
All type definitions are linted, checked, and deployed to the Node.js package registry NPM under the @types namespace. NPM has an indicator on each package’s information site that shows if Definitely Typed type definitions are available, as you can see in Figure 1-2.
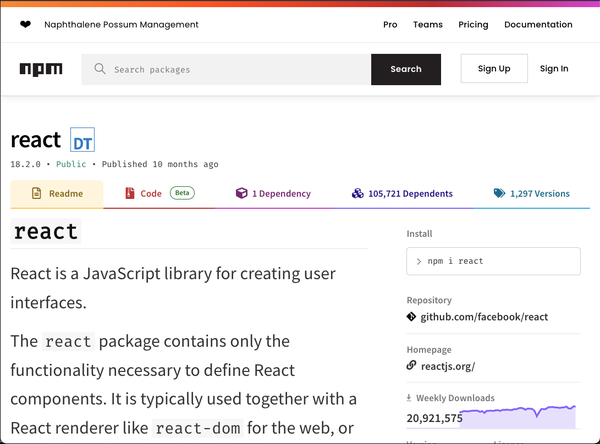
Figure 1-2. The NPM site for React shows a DT logo right next to the package name. This indicates available type definitions from Definitely Typed.
A click on this logo leads you to the actual site for type definitions. If a package has first-party type definitions already available, it shows a small TS logo right next to the package name, as shown in Figure 1-3.
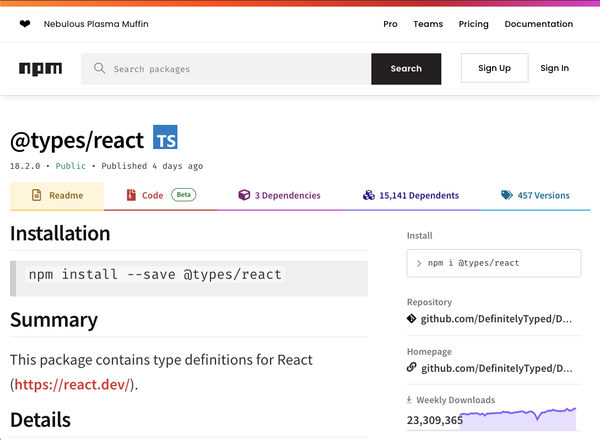
Figure 1-3. Type Definitions for React from Definitely Typed
To install e.g. typings for the popular JavaScript framework React, you install the @types/react package to your local dependencies.
# Installing React$npminstall--savereact# Installing Type Definitions$npminstall--save-dev@types/react
Note
In this example we install types to development dependencies, since we consume them while developing the application, and the compiled result has no use of the types anyways.
By default, TypeScript will pick up any type definitions it can find that are in visible @types folders relative to your project’s root folder. It will also pick up all type definitions from node_modules/@types, this is where NPM installs e.g. @types/react.
This is because the typeRoots compiler option in tsconfig.json is set to @types and ./node_modules/@types. Should you have the need to override this setting, please make sure to include the original folders if you still want to pick up type definitions from Definitely Typed.
{"compilerOptions":{"typeRoots":["./typings","./node_modules/@types"]}}
Note that by just installing type definitions into node_modules/@types, TypeScript will load them during compilation. This means that if some types declare globals, TypeScript will pick them up.
You might want to explicitly specify which packages should be allowed to contribute to the global scope by specifying them in the types setting in your compiler options.
{"compilerOptions":{"types":["node","jest"]}}
Note that this setting will only affect the contributions to the global scope. If you load node modules via import statements, TypeScript still will pick up the correct types from @types:
// If `@types/lodash` is installed, we get proper// type defintions for this NPM packageimport_from"lodash"constresult=_.flattenDeep([1,[2,[3,[4]],5]]);
We will revisit this setting in Recipe 1.7.
1.6 Setting up A Full-stack Project
Problem
You want to write a full-stack application targeting Node.js and the browser, with shared dependencies.
Solution
Create two tsconfig files for each front-end and back-end, and load shared dependencies as composites.
Discussion
Node.js and the browser both run JavaScript, but they have a very different understanding of what developers should do with the environment. Node.js is meant for servers, command line tools, and everything that runs without a UI — headless. It has its own set of APIs and standard library. This little script starts an HTTP server.
consthttp=require('http');// 1consthostname='127.0.0.1';constport=process.env.PORT||3000;// 2constserver=http.createServer((req,res)=>{res.statusCode=200;res.setHeader('Content-Type','text/plain');res.end('Hello World');});server.listen(port,hostname,()=>{console.log(`Server running at http://${hostname}:${port}/`);// 3});
While it’s without a doubt JavaScript, there are some things unique to Node.js.
-
"http"is a built-in Node.js module for everything related to HTTP. It is loaded viarequire, which is an indicator for Node’s module system called CommonJS. There are other ways to load modules in Node.js nowadays as we see in Recipe 1.9, but CommonJS has been the most common as of recent. -
The process object is a global object containing information on environment variables and the current Node.js process in general. This is also unique to Node.js
-
The
consoleand its functions are available in almost every JavaScript runtime, but what it does in Node is different from what it does in the browser. In Node, it prints on STDOUT, in the browser, it will print a line to the development tools.
There are of course many more unique APIs for Node.js. But the same goes for JavaScript in the browser.
import{msg}from`./msg.js`;// 1document.querySelector('button')?.addEventListener("click",()=>{// 2console.log(msg);// 3});
-
After years without a way to load modules, ECMAScript modules have found their way into JavaScript and the browsers. This line loads an object from another JavaScript module. This runs in the browser natively, and is a second module system for Node.js (see Recipe 1.9).
-
JavaScript in the browser is meant to interact with UI events. The
documentobject and the idea of aquerySelectorthat points to elements in the DOM are unique to the browser. So is adding an event listener and listening on “click” events. You don’t have this in Node.js. -
And again,
console. It has the same API as in Node.js, but the result is a bit different.
The differences are so big, that it’s hard to create one TypeScript project that handles both. If you are writing a full-stack application, you need to create two TypeScript configuration files that deal with each part of your stack.
Let’s work on the back-end first. Let’s assume you want to write an Express.js server in Node.js (Express is a popular server framework for Node). First, you create a new NPM project as shown in Recipe 1.1. Then, install Express as a dependency
$npminstall--saveexpress
And install type definitions for Node.js and Express from Definitely Typed.
$npminstall-D@types/express@types/node
Create a new folder called “server”. This is where your Node.js code goes. Instead of creating a new tsconfig.json via tsc, create a new tsconfig.json in your project’s “server” folder. This is the contents:
// server/tsconfig.json{"compilerOptions":{"target":"ESNext","lib":["ESNext"],"module":"commonjs","rootDir":"./","moduleResolution":"node","types":["node"],"outDir":"../dist/server","esModuleInterop":true,"forceConsistentCasingInFileNames":true,"strict":true,"skipLibCheck":true}}
You should already know a lot of things, but a few things stand out:
-
The
moduleproperty is set tocommonjs, the original Node.js module system. Allimportandexportstatements will be transpiled to their CommonJS counterpart -
The
typesproperty is set to["node"]. This property includes all the libraries you want to have globally available. If"node"is in the global scope, you will get type information forrequire,process, and other Node.js specifics that are in the global space.
To compile your server-side code, run
$npxtsc-pserver/tsconfig.json
Now for the client.
// client/tsconfig.json{"compilerOptions":{"target":"ESNext","lib":["DOM","ESNext"],"module":"ESNext","rootDir":"./","moduleResolution":"node","types":[],"outDir":"../dist/client","esModuleInterop":true,"forceConsistentCasingInFileNames":true,"strict":true,"skipLibCheck":true}}
There are a few similarities, but again, some things stand out.
-
You add “DOM” to the
libproperty. This gives you type definitions for everything related to the browser. Where you needed to install Node.js typings via Definitely Typed, TypeScript ships the most recent type definitions for the browser with the compiler. -
The
typesarray is empty. This will remove"node"from our global typings. Since you only can install type definitions perpackage.json, the"node"type definitions we installed earlier would be available in the entire code base. For theclientpart though, you want to get rid of them.
To compile your front-end code, run
$npxtsc-pclient/tsconfig.json
Please note that you configured two distinct tsconfig.json files. Editors like Visual Studio Code pick up configuration information only for tsconfig.json files per folder. You could as well name them tsconfig.server.json and tsconfig.client.json and have them in your project’s root folder (and adjust all directory properties). tsc will use the correct configurations and throw errors if it finds some, but the editor will mostly stay silent or work with a default configuration.
Things get a bit hairier if you want to have shared dependencies. One way to achieve shared dependencies is to use project references and composite projects. This means that you extract your shared code in its own folder, but tell TypeScript that this is meant to be a dependency project of another one.
Create a shared folder on the same level as client and server. Create a tsconfig.json in shared with the following contents.
// shared/tsconfig.json{"compilerOptions":{"composite":true,"target":"ESNext","module":"ESNext","rootDir":"../shared/","moduleResolution":"Node","types":[],"declaration":true,"outDir":"../dist/shared","esModuleInterop":true,"forceConsistentCasingInFileNames":true,"strict":true,"skipLibCheck":true},}
Two things stand out again:
-
The flag
compositeis set to true. This allows other projects to reference this one. -
The
declarationflag is also set to true. This will generated.tsfiles from your code so other projects can consume type information.
To include them in your client and server code, add this line to client/tsconfig.json and server/tsconfig.json.
// server/tsconfig.json// client/tsconfig.json{"compilerOptions":{// Same as before},"references":[{"path":"../shared/tsconfig.json"}]}
And you are all set. You can write shared dependencies and include them in your client and server code.
There is a caveat, however. This works great if you only share e.g. models and type information, but the moment you share actual functionality, you will see that the two different module systems (CommonJS in Node, ECMAScript modules in the browser) can’t be unified in one compiled file. You either create an ESNext module and can’t import it in CommonJS code, or you create CommonJS code and can’t import it in the browser.
There are two things you can do:
-
Compile to CommonJS and let a bundler take care of the module resolution work for the browser.
-
Compile to ECMAScript modules and write modern Node.js applications based on ECMAScript modules. See Recipe 1.9 for more information.
Since you start out new, I would strongly recommend the second option.
1.7 Setting Up Tests
Problem
You want to write tests, but the globals for testing frameworks interfere with your production code.
Solution
Create a separate tsconfig for development and build, and exclude all test files in the latter one.
Discussion
In the JavaScript and Node.js ecosystem, there are a lot of unit testing frameworks and test runners. They vary in detail, have different opinions, or are tailored for certain needs. Some of them you might just find prettier than others.
While test runners like Ava rely on importing modules to get the framework into scope, others provide a set of globals. Take Mocha for example.
importassertfrom"assert";import{add}from"..";describe("Adding numbers",()=>{it("should add two numbers",()=>{assert.equal(add(2,3),5);});});
assert comes from the Node.js built-in assertion library, but describe, it and many more are globals provided by Mocha. They also only exist when the Mocha CLI is running.
This provides a bit of a challenge for your type setup, as those functions are necessary to write tests, but aren’t available when you execute your actual application.
The solution is to create two different configuration files. A regular tsconfig.json for development that your editor can pick up (remember Recipe 1.6), and a separate tsconfig.build.json that you use when you want to compile your application.
The first one includes all the globals you need, including types for Mocha, the latter one makes sure no test file is included within your compilation.
Let’s go through this step by step. We look at Mocha as an example, but other test runners which provide globals (like Jest) work just the same way.
First, install Mocha and its types.
$npminstall--save-devmocha@types/mocha@types/node
Create a new tsconfig.base.json. Since the only differences between development and build are the set of files to be included and the libraries activated, you want to have all the other compiler settings located in one file you can reuse for both. An example file for a Node.js application would look like this:
// tsconfig.base.json{"compilerOptions":{"target":"esnext","module":"commonjs","esModuleInterop":true,"forceConsistentCasingInFileNames":true,"strict":true,"outDir":"./dist","skipLibCheck":true}}
The source files should be located src, test files should be located in an adjacent folder test. The setup you create in this recipe will also allow you to create files ending with .test.ts anywhere in your project.
Create a new tsconfig.json with your base development configuration. This one is used for editor feedback and for running tests with Mocha. You extend the basic settings from tsconfig.base.json, and inform TypeScript which folders to pick up for compilation.
// tsconfig.json{"extends":"./tsconfig.base.json","compilerOptions":{"types":["node","mocha"],"rootDirs":["test","src"]}}
Note that you add types for Node and Mocha. The types property defines which globals are available, and in the development setting, you have both.
Additionally, you might find compiling your tests before executing them cumbersome. There are shortcuts to help you. For example, ts-node runs your local installation of Node.js and does an in-memory TypeScript compilation first.
$npminstall--save-devts-node$npxmocha-rts-node/registertests/*.ts
With the development environment set up, it’s time for the build environment. Create a tsconfig.build.json. It looks similar to tsconfig.json, but you will spot the difference right away.
// tsconfig.build.json{"extends":"./tsconfig.base.json","compilerOptions":{"types":["node"],"rootDirs":["src"]},"exclude":["**/*.test.ts","**/test/**"]}
Additionally to changing types and rootDirs, you also define which files to exclude from type checking and compilation. You use wild-card patterns that exclude all files ending with .test.ts and are located in test folders. Depending on your taste, you can also add .spec.ts or spec folders to this array.
Compile your project by referring to the right JSON file.
$npxtsc-ptsconfig.build.json
You will see that in the result files (located in dist), you won’t see any test file. Also, while you still can access describe and it when editing your source files, you will get an error if you try to compile.
$ npx tsc -p tsconfig.build.json

src/index.ts:5:1 - error TS2593: Cannot find name 'describe'.
Do you need to install type definitions for a test runner?
Try `npm i --save-dev @types/jest` or `npm i --save-dev @types/mocha`
and then add 'jest' or 'mocha' to the types field in your tsconfig.

5 describe("this does not work", () => {})
  ~~~~~~~~


Found 1 error in src/index.ts:5
If you don’t like polluting your globals during development mode, you can choose a similar setup as in Recipe 1.6, but it won’t allow you to write tests adjacent to your source files.
Additionally, you can always opt for a test runner that prefers the module system.
1.8 Typing ECMAScript Modules from URLs
Problem
You want to work without bundlers and use the browser’s module loading capabilities for your app, yet you still want to have all the type information.
Solution
Set target and module in your tsconfig’s compiler options to esnext, point to your modules with a .js extension. Additionally, install types to dependencies via NPM, and use the path property in your tsconfig to tell TypeScript where to look for types.
// tsconfig.json{"compilerOptions":{"target":"esnext","module":"esnext","paths":{"https://esm.sh/lodash@4.17.21":["node_modules/@types/lodash/index.d.ts"]}}}
Discussion
Modern browser support module loading out of the box. Instead of bundling your app into a smaller set of files, you can use the raw JavaScript files directly.
CDNs2 like esm.sh, UnPKG, and others are designed to distribute node modules and JavaScript dependencies as URLs, consumable by native ECMAScript module loading.
With proper caching and state-of-the-art HTTP, ECMAScript modules become a real alternative for apps.
TypeScript has no modern bundler included, so you would need to install an extra tool anyway. But if you decide to go module first, there are a few things to consider when working with TypeScript.
What you want to achieve is to write import and export statements in TypeScript, but preserve the module loading syntax, and let the browser handle module resolution.
// File module.tsexportconstobj={name:"Stefan",};// File index.tsimport{obj}from"./module";console.log(obj.name);
To achieve this, tell TypeScript to
-
Compile to an ECMAScript version that understands modules
-
Use the ECMAScript module syntax for module code generation
Update two properties in your tsconfig.json.
// tsconfig.json{"compilerOptions":{"target":"esnext","module":"esnext"}}
module tells TypeScript how to transform import and export statements. The default converts module loading to CommonJS, as seen in Recipe 1.2. Setting module to esnext will use ECMAScript module loading, and thus preserve the syntax.
target tells TypeScript the ECMAScript version you want to transpile your code to. Once a year, there’s a new ECMAScript release with new features. Setting target to esnext will always target the latest ECMAScript version.
Depending on your compatibility goals, you might want to set this property to the ECMAScript version compatible with the browsers you want to support. This is usually a version with a year (e.g. es2015, es2016, es2017, etc). ECMAScript modules work with every version from es2015 onwards. If you go for an older version, you won’t be able to load ECMAScript modules natively in the browser.
Changing these compiler options already does one important thing: It leaves the syntax intact. A problem occurs once you want to run our code.
Usually, import statements in TypeScript point to files without an extension. You write import { obj } from "./module", leaving out .ts. Once you compile, this extension s still missing. But the browser needs an extension to actually point to the respective JavaScript file.
The solution: Add a js extension, even though you are pointing to a ts file when you develop. TypeScript is smart enough to pick that up.
// index.ts// This still loads types from 'module.ts', but keeps// the reference intact once we compile it.import{obj}from'./module.js';console.log(obj.name);
For your project’s modules, that’s all you need!
It gets a lot more interesting when you want to use dependencies. If you go native, you might want to load modules from a CDN, like esm.sh.
import_from"https://esm.sh/lodash@4.17.21"// ^- Error 2307constresult=_.flattenDeep([1,[2,[3,[4]],5]]);console.log(result);
TypeScript will error with the following message: Cannot find module … or its corresponding type declarations.(2307)
TypeScript’s module resolution works when files are on your disk, not on some server via HTTP. To get the info we need, we have to provide TypeScript with a resolution of our own.
Even though we are loading dependencies from URLs, the type information for these dependencies lives with NPM. For lodash, you can install type information from Definitely Typed:
$npminstall-D@types/lodash
For dependencies that come with their own types, you can install the dependencies directly.
$npminstall-Dpreact
Once the types are installed, use the path property in your compiler options to tell TypeScript how to resolve your URL.
// tsconfig.json{"compilerOptions":{// ..."paths":{"https://esm.sh/lodash@4.17.21":["node_modules/@types/lodash/index.d.ts"]}}}
Be sure to point to the right file!
There’s also an escape hatch if you don’t want to use typings, or if you just can’t find typings. Within TypeScript, we can use any to intentionally disable type-checking. For modules, we can do something very similar: We can ignore the TypeScript error.
// @ts-ignoreimport_from"https://esm.sh/lodash@4.17.21"
ts-ignore removes the next line from type checking and can be used everywhere, where you want to ignore type errors (See Recipe 1.4). This effectively means that you won’t get any type information for your dependencies and you might run into errors, but it might be the ultimate solution for unmaintained, old dependencies that you just need, but won’t find any types for.
1.9 Loading Different Module Types in Node
Problem
You want to make use of ECMAScript modules in Node.js and the CommonJS interoperability feature for libraries.
Solution
Set TypeScript’s module resolution to "nodeNext" and name your files .mts or .cts.
Discussion
With the advent of Node.js, the CommonJS module system has become one of the most popular module systems in the JavaScript ecosystem and has continued to be popular for a very long time.
The idea is simple and effective: Define exports in one module, and require them in another.
// person.jsfunctionprintPerson(person){console.log(person.name);}exports={printPerson,};// index.jsconstperson=require("./person");person.printPerson({name:"Stefan",age:40});
This system has been a huge influence on ECMAScript modules and has also been the default for TypeScript’s module resolution and transpiler. This means that with the commonjs module setting, your import and export statements are transpiled to require and exports.
Example 1-1. Using the ECMAScript module system
// person.tstypePerson={name:string;age:number;};exportfunctionprintPerson(person){console.log(person.name);}// index.tsimport*aspersonfrom"./person";person.printPerson({name:"Stefan",age:40});
With ECMAScript modules stabilizing, also Node.js has started to adopt them. Even though the basics of both module systems seem to be very similar, there are some differences in the details, like handling default exports, or the fact that you can load ECMAScript modules asynchronously.
As there is no way to treat both module systems the same but with different syntax, the Node.js maintainers decided to give both systems room, and assigned different file endings to indicate the preferred module type. Table 1-1 shows the different endings, how they’re named in TypeScript, what TypeScript compiles them to, and what they can import. Thanks to the CommonJS interoperability, it’s fine to import CommonJS modules from ECMAScript modules, but not the other way around.
| Ending | TypeScript | Compiles to | Can import |
|---|---|---|---|
|
|
CommonJS |
|
|
|
CommonJS |
|
|
|
ES Modules |
|
Library developers who publish on NPM get extra information in their package.json file to indicate the main type of a package (module or commonjs), and to point to a list of main files or fallbacks so module loaders can pick up the right file.
// package.json{"name":"dependency","type":"module","exports":{".":{// Entry-point for `import "dependency"` in ES Modules"import":"./esm/index.js",// Entry-point for `require("dependency") in CommonJS"require":"./commonjs/index.cjs",},},// CommonJS Fallback"main":"./commonjs/index.cjs"}
In TypeScript, you mainly write ECMAScript module syntax and let the compiler decide which module format to create in the end. Now there are possibly two of them: CommonJS and ECMAScript modules.
To allow for both, you can set module resolution in your tsconfig.json to NodeNext.
{"compilerOptions":{"module":"NodeNext"// ...}}
With that flag, TypeScript will pick up the right the modules as described in your dependencies package.json, will recognize mts and cts endings, and will follow Table 1-1 for module imports.
For you as a developer, there are differences in importing files. Since CommonJS didn’t require endings when importing, TypeScript still supports imports without endings. The example in Example 1-1 still works, if all you use is CommonJS.
Importing with file endings, just like in Recipe 1.8, allow modules to be imported in both ECMAScript modules and CommonJS modules.
// index.mtsimport*aspersonfrom"./person.js";// works in bothperson.printPerson({name:"Stefan",age:40});
Should CommonJS interoperability not work, you can always fall back on a require statement. Add "node" as global types to your compiler options.
// tsconfig.json{"compilerOptions":{"module":"NodeNext","types":["node"],}}
Then, import with this TypeScript-specific syntax:
// index.mtsimportperson=require("./person.cjs");person.printPerson({name:"Stefan",age:40});
In a CommonJS module, this will be just another require call, in ECMAScript modules, this will include Node.js helper functions.
// compiled index.mtsimport{createRequireas_createRequire}from"module";const__require=_createRequire(import.meta.url);constperson=__require("./person.cjs");person.printPerson({name:"Stefan",age:40});
Note that this will reduce compatibility to non-Node.js environments like the browser, but might eventually fix interoperability issues.
1.10 Working with Deno and Dependencies
Problem
You want to use TypeScript with Deno, a modern JavaScript runtime for applications outside the browser.
Solution
That’s relatively easy, TypeScript is built-in.
Discussion
Deno is a modern JavaScript runtime created by the same people who developed Node.js in the first place. Deno is very similar to Node.js in many ways, but there are differences which are significant:
-
Deno adopts web platform standards for their main APIs, meaning that you will have it easier to port code from the browser to the server.
-
It bets heavily on security, only allowing file system or network access if you explicitly activate it.
-
Dependencies are not handled via a centralized registry, but — again adopting browser features — via URLs.
Oh, and it comes with built-in development tooling and TypeScript!
Deno is ultimately the tool with the lowest barrier if you want to try out TypeScript. No need to download any other tool (the tsc compiler is already built-in), no need for TypeScript configurations. You write .ts files and Deno handles the rest.
// main.tsfunctionsayHello(name:string){console.log(`Hello${name}`);}sayHello("Stefan");
$denorunmain.ts
Deno’s TypeScript can do everything tsc can do, and is updated with every Deno update. However, there are some differences when you want to configure it.
First, the default configuration is already slightly different in its default settings as opposed to the default configuration issued by tsc --init. Strict mode feature flags are set differently, and there’s support for React (on the server-side!) already included.
To make changes to the configuration, you should create a deno.json file in your roots folder. This will be picked up by Deno automatically unless you tell it not to. deno.json includes several configurations for the Deno runtime, including TypeScript compiler options.
{"compilerOptions":{// Your TSC compiler options},"fmt":{// Options for the auto-formatter},"lint":{// Options for the linter}}
You can see more on what’s possible on the Deno website.
Also, the default libraries are different. Even though Deno supports web platform standards and has browser-compatible APIs, it needs to make some cuts because of the fact that there is no graphical user interface. That’s why some types e.g. the “DOM” library just clash with what can be provided by Deno.
Some libraries of interest are:
-
deno.ns, the default Deno namespace. -
deno.window, the global object for Deno. -
deno.worker, the equivalent for Web Workers in the Deno runtime.
“DOM” and subsets still are included in Deno, but not switched on by default. If your application targets both the browser and Deno, configure Deno to include all browser and Deno libraries:
// deno.json{"compilerOptions":{"target":"esnext","lib":["dom","dom.iterable","dom.asynciterable","deno.ns"]}}
An example of a framework that targets both Deno and the browser is Aleph.js.
One thing that’s also different with Deno is how type information for dependencies is distributed. External dependencies in Deno are loaded via URLs from a CDN. Deno itself hosts its standard library at https://deno.land/std.
But you can also use CDNs like esm.sh or UnPKG, like in Recipe 1.8. All these CDNs distribute types by sending an X-TypeScript-Types header with the HTTP request, showing Deno was to load type declarations. This also goes for dependencies that don’t have first-party type declarations but rely on Definitely Typed.
So the moment you install your dependency, Deno will fetch not only the source files but also all the type information.
If you don’t load a dependency from a CDN, but rather have it locally, you can point to a type declaration file the moment you import the dependency
// @deno-types="./charting.d.ts"import*aschartingfrom"./charting.js";
or include a reference to the typings in the library itself
// charting.js/// <reference types="./charting.d.ts" />
This reference is also called a triple-slash directive and a TypeScript feature, not a Deno feature. There are various triple-slash directives, mostly used for pre-ECMAScript module dependency systems. The docs gives a really good overview. If you stick with ECMAScript modules, you most likely won’t use them, though.
1.11 Using Pre-defined Configurations
Problem
You want to use TypeScript for a certain framework or platform, but don’t know where to start with your configuration.
Solution
Use a pre-defined configuration from tsconfig/bases and extend from.
Discussion
Just like Definitely Typed hosts community-maintained type definitions for popular libraries, tsconfig/bases hosts a set of community-maintained recommendations for TypeScript configurations you can use as a starting point for your own project. This includes frameworks like Ember.js, Svelte, or Next.js, but also JavaScript runtimes like Node.js and Deno.
The configuration files are reduced to a minimum, mostly dealing with recommended libraries, module, and target settings, and a bunch of strict mode flags that make sense for the respective environment.
For example, this is the recommended configuration for Node.js 18, with a recommended strict mode setting, and with ECMAScript modules:
{"$schema":"https://json.schemastore.org/tsconfig","display":"Node 18 + ESM + Strictest","compilerOptions":{"lib":["es2022"],"module":"es2022","target":"es2022","strict":true,"esModuleInterop":true,"skipLibCheck":true,"forceConsistentCasingInFileNames":true,"moduleResolution":"node","allowUnusedLabels":false,"allowUnreachableCode":false,"exactOptionalPropertyTypes":true,"noFallthroughCasesInSwitch":true,"noImplicitOverride":true,"noImplicitReturns":true,"noPropertyAccessFromIndexSignature":true,"noUncheckedIndexedAccess":true,"noUnusedLocals":true,"noUnusedParameters":true,"importsNotUsedAsValues":"error","checkJs":true}}
To make use of this configuration, install it via NPM:
$npminstall--save-dev@tsconfig/node18-strictest-esm
and wire it up in your own TypeScript configuration:
{"extends":"@tsconfig/node18-strictest-esm/tsconfig.json","compilerOptions":{// ...}}
This will pick up all the settings from the pre-defined configuration. You can now start setting your own properties like root and out directories, and so on.