Chapter 9. Distributed Primitives
Data primitives are rather straightforward when dealing with a single-threaded program. Want to make a lock? Just use a boolean. Want a key/value store? A Map instance is your friend. Want to keep an ordered list of data? Reach for an array. When only a single thread reads and writes to an array, it’s as simple as calling Array#push() and Array#pop(). In this situation, the array instance is the complete source of truth. There are no other copies that can get out of sync, no messages in transit that can be received out of order. Persisting the data to disk is as easy as calling JSON.stringify() and fs.writeFileSync().
Unfortunately, the performance impact of such an approach is huge, and scaling to a sizeable userbase is nearly impossible. Not to mention such a system has a single point of failure! Instead, as you’ve seen throughout this book, the answer to performance and avoiding a single point of failure depends on redundant distributed processes. Care must be put into the storage and manipulation of data, particularly when it comes to distributed systems.
Not every problem can be solved using the same data store. Depending on the data requirements—such as entity relationships, the amount of data, and requirements with consistency, durability, and latency—different solutions must be chosen. It’s not uncommon for an application composed of distributed services to require several data storage tools. Sometimes you need a graph database and sometimes you need a document store, but more often than not you might just need a relational database.
This chapter covers several different data primitives, ones that are easy to represent in a single Node.js process, and shows how they may be modeled in a distributed system. While there are many different tools that can be used to implement various primitives, this chapter focuses on using just one of them. But before diving in, it’s useful to first explore a problem that might seem easy to model with a single instance but ends up being rather complex when modeled in a distributed environment.
The ID Generation Problem
Not long ago I found myself on the receiving end of several job interviews. This batch of interviews was the most that I’ve ever had to go through in such a short period of time. Ironically, the purpose wasn’t even so that I could find a new job, but that’s a story for another day. During this round of interviews I was asked the same question by multiple companies. This might even be a question that you’ve received yourself:
“How would you design a link shortening service?”
Seemingly every Silicon Valley tech company
You might already know the song and dance, but just in case you don’t, it goes a little like this: a link shortener is an HTTP service where a user agent can make a request to a short URL (such as http://sho.rt/3cUzamh), and the request will be redirected to a longer URL (like http://example.org/foo/bar?id=123). First, the candidate is supposed to ask a bunch of questions. “How many users will use the service? How long should the short URL be? Is it okay if a user is able to guess a short URL?” Once that’s done, the interviewer takes some notes, and the candidate hits the whiteboard, where they begin drawing architecture diagrams and writing pseudocode.
There are a lot of facets to grading the candidate, and usually the interviewer isn’t so much looking for the perfect answer as they are looking for the candidate to reveal the depth of their computer science knowledge (“…and here we need a DNS server…” or “…a NoSQL key/value store might make more sense than a relational store due to…” or “…a cache for frequently used URLs…”). The part of this question I find most interesting is this: how do you generate IDs used for the short URL?
Ultimately the URL IDs represent a key, and the associated value contains the original full URL. Whether or not the secrecy of the short URL is a requirement, the system will be built differently. Either way, the implications in a distributed environment are pretty similar. For the sake of argument, it’s acceptable in this situation for URLs to be guessable by users. With this requirement it’s then acceptable to have an identifier that is a counter, essentially incrementing from 1 until the service is sunset. Usually there’s some sort of encoding involved to make the URL more efficient. For example, hexadecimal (0-9A-F) allows for representing 16 unique values per byte instead of the 10 values offered by decimal (0-9). Base62 allows for representing 62 unique values per byte (0-9a-zA-Z). For simplicity purposes I’ll just discuss these identifiers in decimal, but in a real system they’d be encoded to save space.
Example 9-1 demonstrates how this link shortener could be built using a single Node.js process.
Example 9-1. link-shortener.js
constfs=require('fs');fs.writeFileSync('/tmp/count.txt','0');// only run oncefunctionsetUrl(url){constid=Number(fs.readFileSync('/tmp/count.txt').toString())+1;fs.writeFileSync('/tmp/count.txt',String(id));fs.writeFileSync(`/tmp/${id}.txt`,url);return`sho.rt/${id}`;}functiongetUrl(code){returnfs.readFileSync(`/tmp/${code}.txt`).toString();}
A single-threaded approach can’t get much simpler than that (at the expense of any error handling). When it comes to setting a link, the identifier for the URL is a number, the identifier is mapped to the full URL, and any call to setUrl() with the full URL will atomically write the URL to disk and return with the identifier used to represent the URL. To get the link, the appropriate file is read. Two primitives are required to build this link shortener. The first is a counter (the counter variable), and the second is a map (the files stored in /tmp/). Figure 9-1 visualizes how the two setUrl() and getUrl() operations work on a timeline.
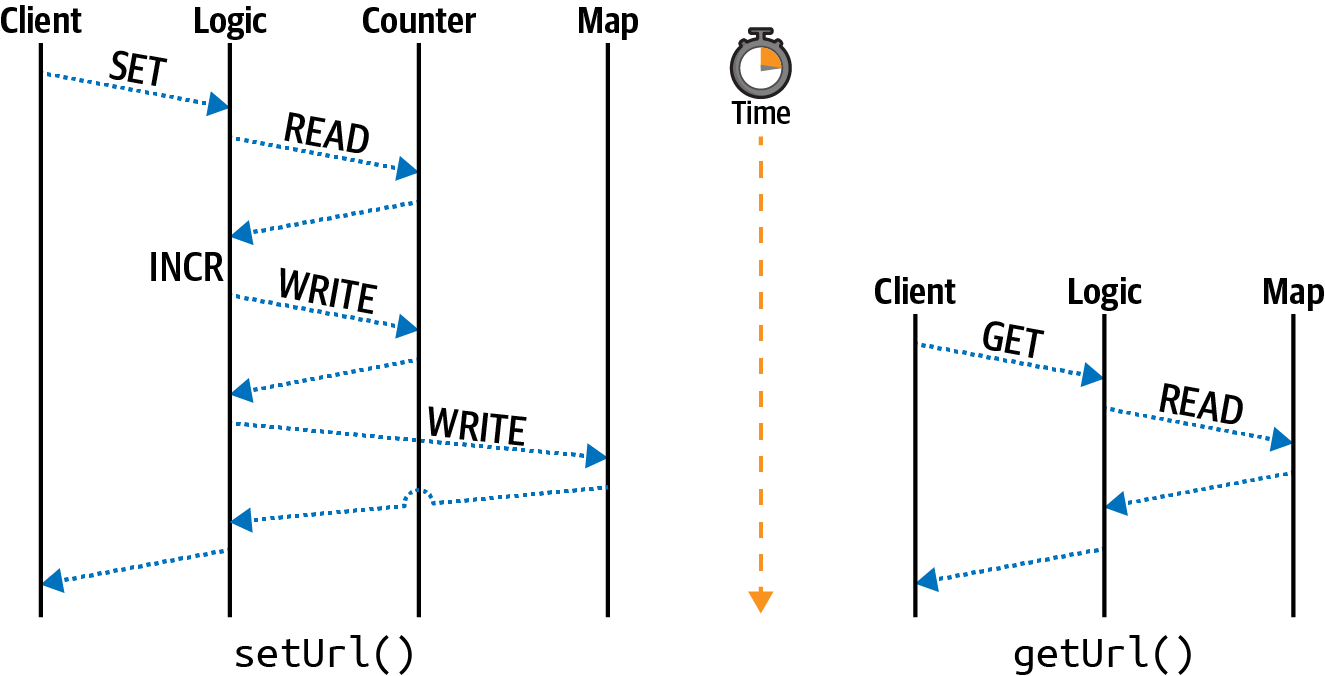
Figure 9-1. Single-threaded get and set operations
This diagram breaks up the operations in the single-threaded Node.js application into different lanes representing the primitive being consulted. In this case, the client lane represents an outside entity calling the two methods. If the code sample exposed a web server, then the client could very well be an external client. The logic lane represents the coordination logic around the primitives; basically it represents the JavaScript code itself. The counter lane represents interaction with the counter primitive, and the map lane represents interaction with the map primitive. Only the setUrl() method needs to access the counter; the getUrl() method is much simpler and only reads from the map.
Other than the lack of error handling, this code is technically fine for a single-threaded service. But throw in a second service instance, and the application is completely broken. In particular, the identifier increment is not atomic. Three steps are required to increment: the first is to read the counter value, the second is to increment the value, and the third is to write the value back to persistent storage. If two separate services receive a request at the same time, they’ll both read the same id value (such as 100), they’ll both increment the value (to 101), and they’ll both write the same value to disk (101). They’ll also both write to the same file (101.txt), and the second process to write will then clobber the value written by the first process.
One way to fix this is with another primitive, called a lock, though it will introduce a lot of complexity. A lock is essentially a Boolean value. If the value is true, then a resource is locked by one client and should be considered read-only by other clients. If the value is false, then the resource is not locked and a client is to try to set a lock. A lock can be implemented using the filesystem by attempting to create a file, but only if the file doesn’t already exist. This can be done using the wx flag when writing a file:
fs.writeFileSync('/tmp/lock.txt','',{flag:'wx'});
Assuming the file doesn’t already exist, this code will create an empty file named lock.txt and will continue running. At that point the application is free to grab the counter value, increment the value, write the counter value again, and release the lock by deleting the lock file with fs.unlinkSync(). However, if the file does exist, then the application needs to do something a little different. For example, the call to fs.writeFileSync() can be made inside of a while loop. If the call throws an error, then catch the error and continue looping. Eventually, the other program should
finish writing to the counter and will release the lock, at which point the call should
succeed.
Sounds a little far-fetched, I know, but that’s essentially what happens under the hood with multithreaded programming. This loop while waiting for a lock to be unlocked is called a spinlock. What happens if a client crashes and doesn’t release a lock? The other client would then sit there waiting forever! In more complex situations involving multiple locks, program instance A and program instance B might end up stuck while they wait for each other to release a lock. When this happens it’s called a deadlock. Manually maintaining locks like this in application code is risky business.
This section covered just one situation where a data primitive is made more complex by moving from a single instance to a distributed system, and as you might have imagined, there are many more situations left for you to discover. Now that you’re familiar with how distributed primitives can be complex, you’re ready to get your hands dirty with a service built to store primitives in a distributed environment.
Introduction to Redis
Redis is a powerful service exposing several useful data structures while providing many different commands to interact with them. Redis has a limitation that many alternative data storage services don’t: the data stored in a Redis instance must fit completely in memory. For this reason, it’s often passed over when considering tools to act as a primary data store—that is, a service to act as the source of truth. More often than not it is pigeonholed into merely serving as a cache.
To truly integrate Redis into your arsenal, and not just treat it as another cache, you must leverage the unique querying capabilities it offers. To do this, you may need to store a subset of data from your primary backing store (such as Postgres) within Redis. Redis often allows for data to be queried in fast and unique ways that other database systems don’t necessarily support.
For example, Redis supports a geospatial data type. This data type stores a list of latitude and longitude pairs associated with an identifier. The identifier can be used to reference a primary key in the primary data store. This geospatial data structure can be queried to get a list of all IDs belonging to records within a configurable distance of a provided latitude and longitude pair. In this case, by querying Redis with a user’s location, a query can be made to look up entries with the matching identifiers. With this approach, Redis only stores a copy of the identifiers and geolocation; the primary backing store contains all that data and more. Since Redis only has a subset of data in this situation, it can be rebuilt using the data in the primary store if Redis were to crash.
Redis is similar to Node.js in some regards. The commands that are run within Redis happen in a single-threaded manner, with one command always sequentially running after another command. However, the fringes of the service do support some multi-threading, such as I/O when data is read from the network or persisted to disk. Essentially, a single Redis instance is single-threaded. However, Redis can be run as part of a cluster, which helps overcome the memory limitation. Three Redis instances with access to 2GB of memory will be able to store a collective of 6GB of data.
Run the following command to start a Redis server on your machine:
$docker run -it --rm\--name distnode-redis\-p 6379:6379\redis:6.0.5-alpine
This command runs Redis while exposing the default port of 6379, tying up the terminal window until the server is killed. The server will only display information about the most important operations that happen, such as a server shutdown or when data is written to disk.
The protocol used by Redis is extremely simple and is mostly based on sending plain text over the network. Execute the following netcat command to illustrate this:
$echo"PING\r\nQUIT\r\n"|nc localhost 6379 > +PONG > +OK
In this case, two commands were sent to Redis. The first is the PING command and the second is QUIT. The commands are separated by carriage return and linefeed characters to differentiate one command from another. Commands can be combined like this, a feature called pipelining, or they can exist as separate TCP messages. The two responses correlate to the two commands. The QUIT command also instructs the Redis server to close the TCP connection. If you received an error while running this command, check to see if your Redis Docker command is formatted properly.
Echoing text directly over TCP isn’t the easiest way to interact with a service. Redis comes with a REPL that can be used by running the redis-cli command inside of the container. The REPL provides some basic autocomplete and coloration features. Run the following command in your terminal to start an interactive Redis REPL:
$dockerexec-it\distnode-redis\redis-cli
Once you have the REPL up and running, type the command INFO server and press enter. You should then see some information about the server as a response. With your Redis server running and your REPL connected, you’re now ready to experiment with the capabilities of the server.
Redis Operations
Redis stores data using key/value pairs. Each key contains data of a specific type, and depending on the data type, different commands may be used to interact with a given key. As of Redis 6, there are over 250 commands available!
When using Redis in a cluster, the name of the key is hashed to determine which Redis instance holds a particular key, a technique called sharding. It’s possible to perform operations that deal with multiple keys, but only if those keys all happen to reside in the same instance. Keep this in mind when modeling your data. In this section, you’re going to work with a single Redis instance.
A Redis key is a string that can contain binary data, but using a reduced encoding like ASCII1 might make application development easier. Since key names are a single string, it’s fairly common for them to contain a compound set of information. For example, a key representing a user might look like user:123, while a key representing the friends of a user might instead resemble user:123:friends. Keys are unique across a Redis database. It’s important to come up with a naming convention ahead of time because any client using the Redis database will need to generate names in the same manner, and unrelated entities shouldn’t have a name collision.
There is metadata attached to every key regardless of the type of data it contains. This includes data like access time, which is useful for cache expiration when the server is configured as an LRU cache, as well as a TTL value, which allows a key to be expired at a specified time.
Create a new directory named redis. In this directory, initialize a new npm project and install the ioredis dependency:
$mkdir redis&&cdredis$npm init -y$npm install ioredis@4.17
While you’re in the directory, create a new file named basic.js. Add the content from Example 9-2 to the file.
Example 9-2. redis/basic.js
#!/usr/bin/env node// npm install ioredis@4.17constRedis=require('ioredis');constredis=newRedis('localhost:6379');(async()=>{awaitredis.set('foo','bar');constresult=awaitredis.get('foo');console.log('result:',result);redis.quit();})();
The ioredis package exposes methods on the redis object named after the equivalent Redis command. In this case, the redis.get() method correlates to the Redis GET command. Arguments passed into these methods then correlate to arguments passed to the underlying Redis command. In this case, the redis.set('foo', 'bar') call in JavaScript results in the SET foo bar command being run in Redis.
Next, execute the file:
$ node redis/basic.js
> result: bar
If you get the same response, your application was able to successfully communicate with the Redis server. If you receive a connection error, then check the command you used to start the Docker container and ensure the connection string is formatted correctly.
Tip
One thing you might have noticed is that the application doesn’t wait for a connection to Redis before sending commands. Internally the ioredis package queues up commands until the connection is ready before dispatching them. This is a convenient pattern used by many database packages. Sending too many commands when an application first runs might constrain resources.
The remainder of this section is dedicated to common Redis commands, categorized by the data types they work with. Familiarizing yourself with them will give you an understanding of the capabilities of Redis. If you would like to run them, you can either modify the redis/basic.js script you made or paste commands into the Redis REPL that you should still have open.
Strings
Strings store binary data and are the most basic data type available in Redis. In a sense, this is the only data type offered by Memcached, a competing cache service. If you strictly use Redis as a cache, then you might not ever need to touch another data type.
The most basic operations that can be performed on a string are to set a value and to get the value. Switch back to your Redis REPL and run the following command:
SET foo "bar"
When you type the SET command, the redis-cli REPL will offer hints as to the remaining arguments for the command. Many of the Redis commands offer more complex arguments, in particular when it comes to changing metadata. The full form of the SET command, according to the REPL, looks like this:
SET key value [EX seconds|PX milliseconds] [NX|XX] [KEEPTTL]
Options in square brackets are optional, and the pipe symbol means one or the other can be used. The first option allows the command to set a TTL value and allows a value to be provided using either seconds (EX 1) or milliseconds (PX 1000). The second pair of options deals with replacing existing values. The NX option will only perform a replacement if a key with the same name does not already exist, while the XX option will only set a value if it already does exist. Finally, the KEEPTTL can be used to retain the existing TTL value of a key that already exists.
Now that you’ve set a value in Redis, run the following command to retrieve it:
GET foo
> "bar"
In this case, the string bar is returned.
For the most part, Redis doesn’t care about the values stored within keys, but there are a few notable exceptions. The string data type, for example, allows for numeric modifications to the values. As an example of this, run the following commands in your REPL:
SET visits "100"
> OK
INCR visits
> (integer) 101
The first command sets a key named visits to the string value of 100. The next command increments the value of the key and returns the result; in this case, the result is the value 101. The INCR and INCRBY commands allow applications to atomically increment a value without having to first retrieve the value, increment it locally, and then set the value. This removes the race condition that was present in the single-threaded Node.js service you built in Example 9-1. Note that the return prompt displays some metadata about the result. In this case, it hints that the value is an integer. If you were to run the GET visits command, the value would be retrieved as a string again.
Note that if you hadn’t first set a value for the visits key, the INCR command would assume the missing value was zero. Redis assumes an appropriate empty value with most operations. This makes interacting with Redis in a distributed environment more convenient. For example, without this zero default, if you were to deploy a fleet of Node.js app instances, each of them incrementing the visits value when a request is received, you would need to manually set visits to zero before your applications run.
Redis has dozens of commands dedicated to operating on strings. Values can be appended to a string using the APPEND command. Bitwise read and write operations can be applied to a subset of a string, and increments can use floating point values using the INCRBYFLOAT command.
Lists
The list data structure stores a linked list of string values and is comparable to a JavaScript array. Much like a JavaScript array, entries are ordered and duplicates are fine.
Run the following commands to add some entries to a list named list and then to retrieve them:
RPUSH list aaa
> (integer) 1
RPUSH list bbb
> (integer) 2
LRANGE list 0 -1
> 1) "aaa"
> 2) "bbb"
Again, like with strings, Redis assumes the appropriate empty value for the list data type. In this case, when you ran the first RPUSH command, the key named list didn’t already exist. Redis assumed an empty list and added an entry to the list. The result of the RPUSH command is the length of the list, first returning a 1 and later returning a 2. Finally, the LRANGE command gets a list of entries in the list. Much like with JavaScript, Redis assumes list indexes are zero based. The first argument to LRANGE is the starting index, and the second argument is the end index. Negative values go from the end of the list, with -1 representing the final element, -2 the penultimate element, etc. The LRANGE key 0 -1 command can always be used to retrieve an entire list regardless of its length.
There are more than a dozen commands related to the list data type available in Redis. Table 9-1 lists many of the Redis list commands and their equivalent operation if performed on a JavaScript array.
| Operation | Redis command | JavaScript array equivalent |
|---|---|---|
Add entry to right |
|
|
Add entry to left |
|
|
Take entry from right |
|
|
Take entry from left |
|
|
Get length |
|
|
Retrieve element at index |
|
|
Replace element at index |
|
|
Move element |
|
|
Get element range |
|
|
Get first occurence |
|
|
Get last occurence |
|
|
Reduce size |
|
|
Some of these commands may seem a little weird at first. For example, why does Redis need the RPOPLPUSH command when it could be rebuilt using a combination of other commands? It all comes down to the need to support many distributed clients performing atomic operations against data in a centralized location. If the RPOPLPUSH command didn’t exist, a client would need to perform both RPOP and LPUSH commands separately, which allows another client to interleave commands that can leave the data in an inconsistent state. “Seeking Atomicity” discuses such situations in more detail.
Note
When the final element from a list is removed, the key is removed entirely from Redis. You can see this by running the RPOP list command twice and then running the KEYS * command; the list key is no longer present. This behavior is different from the string data type, which can contain an empty string.
Sets
A Redis set is an unordered collection of unique values. It is comparable to new Set() in JavaScript. When inserting redundant values into either a JavaScript or Redis set, the redundant entry will silently be ignored.
Run the following commands in your REPL to add some entries to a set and then to retrieve them:
SADD set alpha
> (integer) 1
SADD set beta
> (integer) 1
SADD set beta
> (integer) 0
SMEMBERS set
> 1) "beta"     2) "alpha"
The first SADD command adds an entry named alpha to a set named set. The second command adds an entry named beta to the same set. Both of these commands get a response of 1, meaning that a single entry was successfully added. The third SADD command attempts to add beta to the set again. This time, a 0 was returned, meaning no entries were added. Finally, the SMEMBERS command returns a list of each of the members in the set.
Table 9-2 is a list of some of the Redis set commands and their equivalent operations using a JavaScript Set.
| Operation | Redis command | JavaScript set equivalent |
|---|---|---|
Add entry to set |
|
|
Count entries |
|
|
See if set has entry |
|
|
Remove entry from set |
|
|
Retrieve all entries |
|
|
Move between sets |
|
|
Redis exposes several other commands for interacting with sets, notably commands for acting on unions and differences between sets. There is also the
SRANDMEMBER and SPOP commands for reading a random entry of the set and for popping off an entry. The SSCAN command allows a client to iterate through the entries of a set while using a cursor, which is a way of performing pagination of results.
Similar to a list, a set that has all of its entries removed will result in its key being removed.
Hash
A Redis hash is a single key that contains multiple field/value pairs within it. A Redis hash most closely resembles a new Map() in JavaScript. Values within a hash are also treated as strings, though they do have some of the same operations available as normal Redis strings (like the ability to increment a value). Unlike normal Redis strings, the individual fields in a hash cannot have their own metadata applied (such as a TTL). When it comes to sharding, all fields in a hash will end up on the same machine.
Run the following commands in your REPL to experiment with a hash:
HSET obj a 1
> (integer) 1
HSET obj b 2
> (integer) 1
HSET obj b 3
> (integer) 0
HGETALL obj
1) "a"      2) "1"      3) "b"      4) "3"
Much like with the list commands, the hash command for adding an entry returns the number of entries that were added, though with a slightly different meaning. In this case, the first time HSET obj b is called, the b field didn’t already exist, so the result of the operation is a 1, meaning that one new field was added for the first time. The second time the command is run, it returns a 0, meaning that the field wasn’t newly added. Instead, the call replaced the value that already existed. Finally, the
HGETALL command retrieves a list of all the field/value pairs in the hash. Note that the simple protocol used by Redis doesn’t have a way of differentiating a field from
a value; the two types of data alternate! When using most Redis client packages,
including ioredis, this is automatically converted into the equivalent JavaScript object
{a:1,b:2}.
Table 9-3 is a list of some of the Redis hash commands and their equivalent operations using a JavaScript Map.
| Operation | Redis command | JavaScript map equivalent |
|---|---|---|
Set an entry |
|
|
Remove an entry |
|
|
Has an entry |
|
|
Retrieve an entry |
|
|
Get all entries |
|
|
List keys |
|
|
List values |
|
|
To increment a Map entry in JavaScript, you would need to first retrieve the entry, increment the value, and then set it again, assuming the map contains a value that is a Number instance. If the values contained an object with property v, then you could increment them with something like map.get(field).v++. The equivalent command using Redis is HINCRBY key field 1.
Consider that the string data type in Redis can hold anything that can be represented as a string of bytes. This includes a JSON object. With that in mind, why might you choose to use a hash instead of a JSON-encoded string? Hashes are useful when you want to store multiple properties close together, when all properties should have the same TTL, and when you need to atomically manipulate a subset of the keys. It’s also useful when the size of all the field values is so large that you wouldn’t want to retrieve the whole thing at once.
As an example of this, say that you have a 1MB JSON object representing an employee. One of the fields is the employee’s wages. The JSON representation for this might look something like this:
{"wage":100000,"...other fields":"..."}
To modify the wage field in that document, you would need to call GET key to retrieve it, result = JSON.parse(response) to parse it, result.wage += 1000 to increment the wage, payload = JSON.stringify(result) to serialize it, and SET key payload to persist it. These modifications can’t easily be performed atomically because you’d need some sort of lock to prevent other clients from modifying the data simultaneously. There’s also overhead of reading and writing the 1MB payload, as well as for parsing and encoding the payload. By representing this data as a Redis hash, you’re free to directly modify exactly the field you want.
Since all the fields in a hash are stored together on a single Redis instance, it’s important to make sure that the majority of your data isn’t represented using a single massive hash. For example, if you wanted to store payroll information about every employee in Redis, it would be better to use a single key per employee instead of a single hash key with a field per employee.
Sorted Sets
A Redis sorted set is one of the more complicated data structures available in Redis. It stores a collection of unique string values that are sorted by numeric scores. Entries can be queried based on score ranges. JavaScript doesn’t have a built-in equivalent to a Redis sorted set, though one could be built using multiple data structures.
The stereotypical Redis sorted set example is a leaderboard of player scores for a game. In this use-case, the numeric score is what the player has achieved and the value is an identifier for the player. Redis provides dozens of commands for interacting with sorted sets, many for retrieving entries based on ranges of scores values.
Run the following commands to create an example player leaderboard:
ZADD scores 1000 tlhunter
ZADD scores 500 zerker
ZADD scores 100 rupert
ZINCRBY scores 10 tlhunter
> "1010"
ZRANGE scores 0 -1 WITHSCORES
> 1) "rupert"     2) "100"
> 3) "zerker"     4) "900"
> 5) "tlhunter"   6) "1010"
The first three commands add entries to the sorted set. Calling multiple ZADD calls with the same member will replace the member’s score. The ZADD command returns a 1 when the member is new and a 0 when the entry already exists, much like with lists and sets. The ZINCRBY command increments the score of a member, assuming a score of 0 if the member doesn’t already exist.
The ZRANGE command retrieves a list of entries in the sorted set, based on score order. You can universally use the ZRANGE key 0 -1 command to get a list of all members in a sorted set. The WITHSCORES option instructs Redis to also include their scores.
Table 9-4 is a list of some of the commands available with sorted sets.
| Operation | Redis command |
|---|---|
Add an entry |
|
Count entries |
|
Remove an entry |
|
Get member’s score |
|
Increment member’s score |
|
Get a page of results |
|
Get the numeric rank of a member |
|
Get the reverse numeric rank of a member |
|
Get members within score range |
|
Remove members within score range |
|
Using the leaderboard analogy, you can find out what the numeric rank of a player is by calling ZREVRANK scores tlhunter, which returns a 0 because it has the highest score. Many of the commands have a REV variant that treats the rankings in a reverse manner. Several also have a REM variant that removes the entry from the sorted set.
Generic Commands
Most of the commands available in Redis are tied to keys with a specific data type. For example, the HDEL command deletes a field from a hash. But there are plenty of commands that either affect keys of any type or globally affect the Redis instance.
Table 9-5 contains some popular commands that affect a key of any data type.
| Operation | Redis command |
|---|---|
Delete a key |
|
Check if key exists |
|
Set key expiration |
|
Get key expiration |
|
Remove key expiration |
|
Get data type of key |
|
Rename a key |
|
Get list of keys |
|
Note that the KEYS command helps with local debugging but is inefficient and shouldn’t be used in production.
Table 9-6 lists some popular commands that interact with the Redis server in ways that aren’t associated with an individual key.
| Operation | Redis Command |
|---|---|
Get the number of keys |
|
Remove all keys |
|
Get info about server |
|
List commands being run |
|
Save data to disk |
|
Close the connection |
|
Shut the server down |
|
Note that the MONITOR command helps with local debugging but is inefficient and shouldn’t be used in production.
Other Types
Redis supports a few other data types and related commands that aren’t covered in this chapter.
One of these command sets deal with geolocation data. Internally, the geolocation commands operate on a sorted set containing entries scored by latitude and longitude values represented as a geohash. These values can be quickly retrieved using another command to find all the entries located within a configurable radius of a given latitude and longitude pair. This can be useful to do things like find all the businesses within a 1km radius.
There’s also a HyperLogLog data structure, which is a way of storing a compressed representation of a large set of data. This allows you to measure an approximate number of occurrences of an event. It’s useful for storing sampled data that doesn’t need to be 100% accurate.
Another interesting set of commands available in Redis is the PubSub (Publish/Subscribe) family of commands. These commands allow clients to subscribe to channels to receive messages or publish messages to channels. A copy of the message is sent to every client listening on the channel, though channels can have zero subscribers as well. This makes it convenient to blast information to several clients at once.
Streams are the latest addition to Redis. They are a persistent set of append-only events, similar in use to the PubSub commands in that a client can receive events, but much more powerful. Events are identified by a combination timestamp and sequence number so that identifiers are ordered. Streams use something called “Consumer Groups” to allow messages to either fan out to multiple clients or to be consumed by just one client. Redis streams compete with Kafka.
Seeking Atomicity
Atomicity is a property of a series of actions where either all or none of the actions are performed. It’s also important that when these actions are being carried out that an intermediary state where only some of the actions have been applied will never be observed from an external client. The hello world example of atomicity is when an account balance of $100 is transferred between account A and account B. For the transfer to be atomic, the balance of account A must be decremented by $100 and the balance of account B must be incremented by $100. If a failure happens, then neither of the changes should happen. And while the transfer is happening, no client should see that one balance changed while the other hasn’t.
Within a single Redis server, every single command that is executed is atomic. For example, the fun-to-pronounce RPOPLPUSH command operates on two separate lists, removing an entry from one and adding it to another. Redis enforces the complete success or failure of that command. At no point will the server end up in a state where the popped value disappears, or is present in both lists, either by failure or from another client performing a read operation on the lists while the command is in progress. On the other hand, running multiple commands in succession is not atomic. For example, if a client were to run RPOP and then LPUSH, another client could read or write to the lists in between the two commands being executed.
Redis provides several “compound commands,” which is a term I just invented meaning that a single command can be used in place of multiple commands. Redis provides such compound commands for common use-cases where atomicity is important. Table 9-7 is an example of some of these compound commands, as well as their equivalent Redis commands and application pseudocode.
| Command | Alternative pseudocode |
|---|---|
|
|
|
|
|
|
|
|
|
|
By running a compound command, you’re guaranteed to atomically modify the dataset—and do so efficiently. By running the alternative version of the commands, you’ll need to make multiple round trips from application code, during which time the Redis database is left in an undesirable state. When this happens, another client can read the intermediary state, or the application may crash, leaving the data forever invalid.
This conundrum is illustrated in Figure 9-2 where two clients run the GET, increment, and SET commands simultaneously.
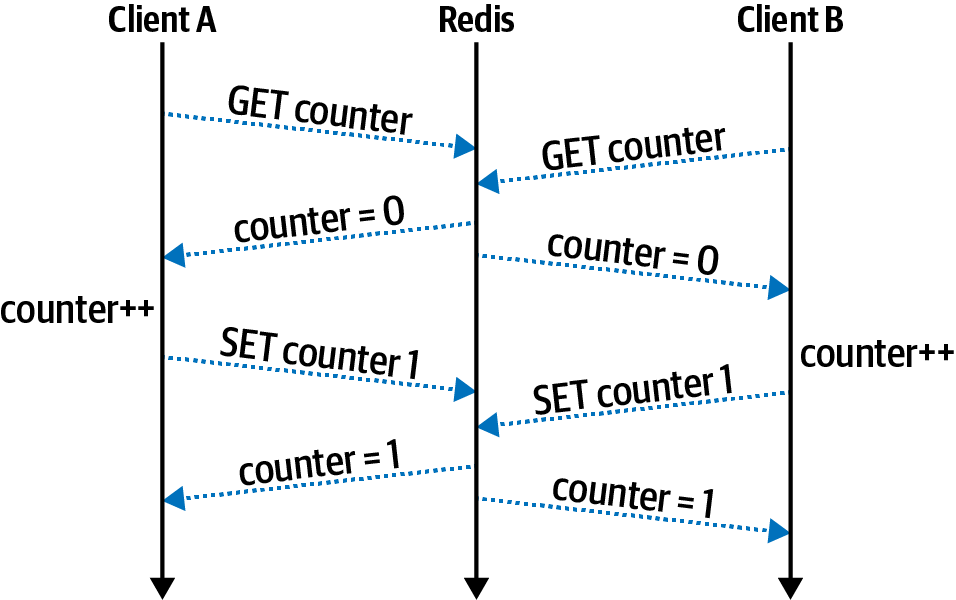
Figure 9-2. Sequential Redis commands like GET and SET aren’t atomic
In this case, both client A and client B want to increment a number. They both read the value of counter at about the same time and get the value 0. Next, both clients increment the value locally, calculating a value of 1. Finally, both clients write their incremented values at about the same time, both setting the value to 1, instead of the proper value of 2.
Sometimes you’ll get lucky and an operation that you need to perform with Redis has a single command available. Figure 9-3 illustrates the proper way to solve the previous conundrum by using the INCR command.
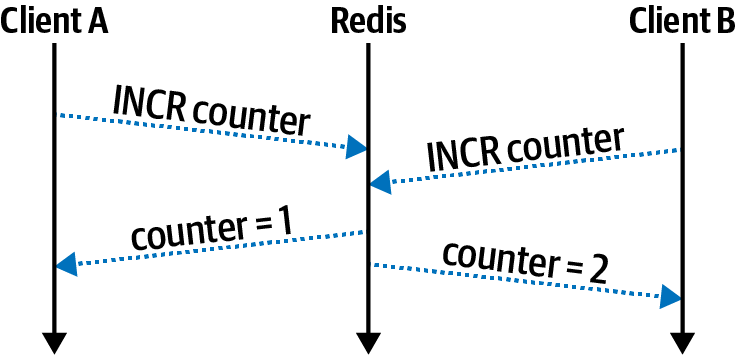
Figure 9-3. INCR is atomic in Redis
In this case, both clients run the INCR command at about the same time. The Redis server handles the details of the mutation internally, and the clients no longer risk losing data. In this case, the value is safely incremented to 2.
Other times you might not get so lucky. For example, you might need to both remove employee ID #42 from a set named employees while also removing the company ID from a hash named employee-42. In this case, there is no Redis command to both remove from a set and remove from a hash. It might take thousands of commands to capture every permutation like this. When this happens, you’ll need to reach for another tool.
Note
Redis does have a feature called pipelining where a client sends a series of commands separated by newlines instead of as individual messages. This ensures that commands are run sequentially for a given client but does not guarantee that other clients won’t run commands in the middle of another client’s pipeline. Individual commands in a pipeline may fail. This means pipelines do not make commands atomic.
The ID generation problem mentioned in “The ID Generation Problem” can be solved by using two of these compound commands. The first operation to atomically increment a counter is achieved using the INCR command. A single key is used to represent the next available short URL code. The second operation to set the URL value can be done using the SETNX command. True to the original example where files are written to, the operation would fail if an entry already exists (which shouldn’t happen).
Transactions
Redis does provide a mechanism to ensure that multiple commands are executed atomically. This is done by preceding a series of commands with MULTI and then following them with EXEC. This allows all of the commands sent from a single client connection to be executed entirely and without interruption. If any of the commands within the transaction fail, then the effects of the commands that succeeded will be rolled back.
Example 9-3 demonstrates how to create a Redis transaction using the ioredis package. Create a new file named redis/transaction.js and add the code to it.
Example 9-3. redis/transaction.js
#!/usr/bin/env node// npm install ioredis@4.17constRedis=require('ioredis');constredis=newRedis('localhost:6379');(async()=>{const[res_srem,res_hdel]=awaitredis.multi().srem("employees","42")// Remove from Set.hdel("employee-42","company-id")// Delete from Hash.exec();console.log('srem?',!!res_srem[1],'hdel?',!!res_hdel[1]);redis.quit();})();

ioredisexposes a chainable.multi()method to begin a transaction.
The
.exec()method finishes the transaction.
This application runs a transaction containing two commands. The first command removes an employee from a set, and the second removes the employee’s company ID from a hash. Run the following commands in a new terminal window to first create some data and then to execute the Node.js application:
$dockerexecdistnode-redis redis-cli SADD employees42tlhunter$dockerexecdistnode-redis redis-cli HSET employee-42 company-id funcorp$node redis/transaction.js > srem?truehdel?true
Several results are returned when running a transaction with Redis, one for each of the commands executed in the transaction. The ioredis package represents the result of these commands as an array, which the application destructures into two variables. Each of these variables is also an array, with the first element being an error state (null in this case) and the second being the result of the command (1 in this case). Run the Node.js application a second time and the output should display srem? false hdel? false.
While Redis is receiving a transaction from client A, which is to say that it has received the MULTI command but hasn’t yet received the EXEC command, other clients are still free to issue commands. This is important because a slow client would prevent Redis from responding to other clients. This at first may seem to violate the rules of atomicity, but the key detail is that Redis simply queues up the commands without running them. Once the server finally receives the EXEC command, all the commands in the transaction are then run. It’s at this point that other clients aren’t able to interact with Redis. Figure 9-4 illustrates a swimlane diagram of such a situation.
Transactions are useful but they do have a major limitation: the output of one command can’t be used as input for another. For example, using MULTI and EXEC, it’s not possible to build a version of the RPOPLPUSH command. That command depends
on the element being output from RPOP to be used as an argument for the LPUSH
command.
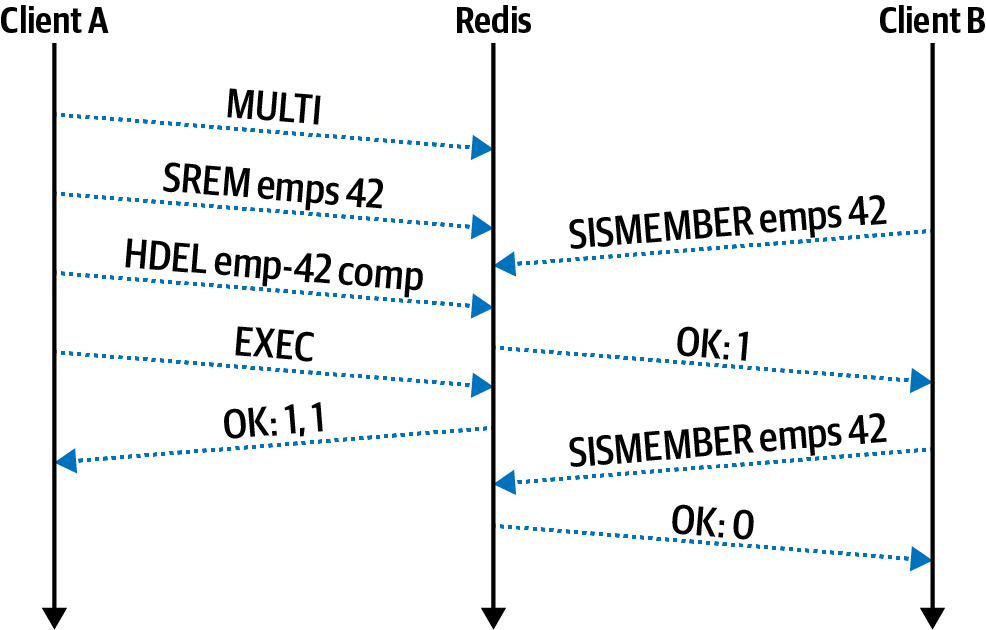
Figure 9-4. Redis transactions wait for EXEC before committing changes
It’s also impossible to perform other types of logic within a transaction. For example, it’s not possible to check if an employee hash has a field named resigned and then conditionally run a command to set the salary field to 0. To overcome these limitations, an even more powerful tool is required.
Lua Scripting
Redis provides a mechanism to execute procedural scripts within the Redis server. This makes complex data interaction possible (for example, reading one key and making a decision before writing to another key). Similar concepts exist in other databases, such as Postgres’s stored procedures or MongoDB’s ability to run JavaScript. Redis chose to use the easily embedded Lua scripting language instead of inventing a new one.
Lua has many of the same features that other languages, such as JavaScript,2 come with. It offers arrays (though the indexing approach starts with 1 instead of 0) and tables (like a JavaScript Map), and it is dynamically typed like JavaScript. There is a nil (null) type, booleans, numbers, strings, and functions. It supports for and while loops, if statements, etc. The complete syntax of Lua isn’t covered here, but it is something that you can easily research while writing scripts for Redis.
There are multiple patterns available for running Lua scripts with Redis. The first pattern is simpler to use but is less efficient. Use it by calling the EVAL command while passing in an entire Lua script as a string argument. This isn’t ideal because it consumes bandwidth by sending potentially long scripts each time the command is called. This pattern is akin to running an SQL query where each query call requires an entire copy of the query string.
The second pattern is more efficient but requires additional work to get it right. In this pattern the SCRIPT LOAD command is first called, while also passing in a script as an argument. When Redis receives this command, it will return a SHA1 string to use to reference the command in the future.3 This script can later be executed using the EVALSHA command with the SHA1 as an argument. This results in less data sent over the wire.
The EVAL and EVALSHA commands essentially have the same arguments, except that the first argument is either a full script or a script reference, respectively. Here’s what the command signatures look like:
EVAL script numkeys key [key ...] arg [arg ...]
EVALSHA sha1 numkeys key [key ...] arg [arg ...]
Recall from before that groups of Redis commands can only affect keys that each exist on the same Redis instance. This applies to transactions as well as Lua scripts. This means Redis needs to know which keys are going to be accessed before attempting to execute the script. For this reason all keys need to be provided as arguments when executing the script.
Warning
It’s possible to embed key names, or even generate them dynamically, within a Lua script without passing the key names in as arguments. Don’t do this! It’ll work when you test it on a single-Redis instance but will cause headaches if you grow to a Redis cluster in the future.
Both key names and arguments can be provided when running a script. The second numkeys argument is required so that Redis may differentiate the names of keys from other arguments. This value tells Redis that the next numkeys arguments are keys and that anything after that is a script argument.
Writing a Lua Script File
Now that you’re familiar with some of the theory behind Lua scripting, you’re ready to build something yourself. For this example, you’re going to build a waiting lobby for a multiplayer game. When players attempt to join a game, they are added to the lobby. If enough players have been added to the lobby, four players in this case, then the players are removed from the lobby and a game is created. A hash is created to contain a collection of actively running games and the players within them. At this point, the application could theoretically notify players that a game has started, but this is an exercise left to the reader.
For the first part of the application, you’ll create a Lua file containing the code to be executed on the Redis server. Create a new file named redis/add-user.lua and add the content from Example 9-4 to it. I bet you never thought you’d be writing Lua code in a Node.js book!
Example 9-4. redis/add-user.lua
localLOBBY=KEYS[1]-- SetlocalGAME=KEYS[2]-- HashlocalUSER_ID=ARGV[1]-- Stringredis.call('SADD',LOBBY,USER_ID)ifredis.call('SCARD',LOBBY)==4thenlocalmembers=table.concat(redis.call('SMEMBERS',LOBBY),",")redis.call('DEL',LOBBY)-- empty lobbylocalgame_id=redis.sha1hex(members)redis.call('HSET',GAME,game_id,members)return{game_id,members}endreturnnil
The Lua scripting environment provided by Redis comes with two global arrays for accessing arguments provided to the script. The first is called KEYS, which contains the list of Redis keys, and the second is ARGV, which contains the normal arguments. The first key is assigned to a variable named LOBBY. This is a Redis set that contains a list of player identifiers. The local keyword is how Lua declares a local variable. The second key is assigned to the variable GAME, which is a hash containing active games. Finally, the only argument to the script is assigned to USER_ID, which is the ID of the player that was just added to the lobby.
Next, the player identifier is added to the LOBBY key. The Redis Lua environment provides the method redis.call() that allows Lua to call Redis commands. The first command being called in this file is the SADD (set add) command.
The next construct is where the first line of imperative programming happens (in this case, an if statement). This statement calls the SCARD (set cardinality) command to count the number of entries on the set. If the number of entries is not equal to 4 (which it isn’t for the very first run), then the if statement body is skipped. Then, the final line is called, and a nil value is returned. The nil value is then converted into a JavaScript null by the ioredis package.
However, once the fourth player has been added to the lobby, the if statement body will execute. The list of players is retrieved from the lobby by using the SMEMBERS (set members) command. This list of players is converted into a comma-separated string using the Lua table.concat() function. Next, the lobby is emptied. Recall that an empty list gets deleted, so in this case the DEL (delete) command is called to essentially clear the list.
Next, an identifier for the game is generated. There are many ways such an ID could have been generated, but in this case, a SHA1 hash of the members string is used. Lua doesn’t come with its own SHA1 function, but the Lua environment that Redis provides does. In this case, the function is provided via redis.sha1hex(). The string that is returned should be unique across all games, assuming the same players can’t join multiple games at the same time.4 This identifier is then set into the games hash using HSET, where the field name is the game ID and the value is a comma-separated list of player IDs.
Finally, an array (table) with two elements is returned, where the first is the game ID and the second is the list of players. Scripts can return data of different types between runs, and in this case, the script returns either a table or a nil.
This script atomically adds players to a lobby and creates games. It does require that both the lobby and the game hash be stored in the same Redis instance. You can ensure this happens either by using a single Redis instance or by using curly braces when naming keys. Normally, Redis chooses which instance to host a key on by hashing the key. However, if you wrap a subset of the key name in curly braces, only the value inside of the curly braces is used for the hash. In this case, if the lobby key was named lobby{pvp} and the game key was named game{pvp}, then the keys would always end up together.
The Lua script isn’t too interesting on its own, but things will get a little more exciting once you create a Node.js application.
Loading the Lua Script
This application connects to the Redis server, evaluates the script, and inserts four players. It’s rather basic and was built to illustrate how to call the commands, instead of integrating with a web server to expose a fully functioning game application.
Create a new file named redis/script.js and add the content from Example 9-5 to it.
Example 9-5. redis/script.js
#!/usr/bin/env node// npm install ioredis@4.17constredis=new(require('ioredis'))('localhost:6379');redis.defineCommand("adduser",{numberOfKeys:2,lua:require('fs').readFileSync(__dirname+'/add-user.lua')});constLOBBY='lobby',GAME='game';(async()=>{console.log(awaitredis.adduser(LOBBY,GAME,'alice'));// nullconsole.log(awaitredis.adduser(LOBBY,GAME,'bob'));// nullconsole.log(awaitredis.adduser(LOBBY,GAME,'cindy'));// nullconst[gid,players]=awaitredis.adduser(LOBBY,GAME,'tlhunter');console.log('GAME ID',gid,'PLAYERS',players.split(','));redis.quit();})();
This file begins by requiring the ioredis package and establishing a connection. Next, the content of the add-user.lua script is read and passed into the redis.defineCommand() method. This method abstracts away the Lua commands and has the application define a command using a chosen name. In this example, the script is aliased to a command named adduser.
Next, the two key names are declared that are used by the Redis Lua scripts. In this case, the lobby list key is lobby and the game hash is game. Theoretically, these key names can change on a per-call basis since they aren’t part of the scripts themselves. This could allow a game to have multiple lobbies, for example, one for silver-ranked players and one for gold-ranked players.
Next, the async function calls the redis.adduser() method four times to simulate four different players joining the lobby. The previous redis.defineCommand() method you called creates this new redis.adduser() method on the redis object. The arguments to this new method reflect the arguments passed to the Lua script (in this case, the lobby key, the game key, and the player ID). Note that this doesn’t create a command called ADDUSER on the Redis server; it’s just a local JavaScript method.
The calls to redis.adduser() will each run the add-user.lua script stored in Redis. The first three times it is called will each result in a null being returned. However, the final fourth call triggers the game creation logic. When that happens, an array is returned, with the first value being the game ID (gid) and the second returning the list of players (players).
Tying It All Together
With your application file and Lua file now ready, it’s time to run the application. Run the following two commands in two separate terminal windows. The first will run the MONITOR command, which prints all the commands that the Redis server receives. The second command runs the application:
$dockerexec-it distnode-redis redis-cli monitor$node redis/script.js
The application displays the results of the four calls to redis.adduser(). In my case, the output from the application looks like this:
null
null
null
GAME ID 523c26dfea8b66ef93468e5d715e11e73edf8620
  PLAYERS [ 'tlhunter', 'cindy', 'bob', 'alice' ]
This illustrates that the first three players that joined didn’t cause a game to start, but the fourth player did. With the returned information, the application could then choose to notify the four players, perhaps by pushing a message to them via WebSocket.
The output from the MONITOR command might prove to be a little more interesting. This command displays a few columns of information. The first is the timestamp of the command, the second is an identifier for the client running the command (or the string lua if run by a Lua script), and the remainder is the command being executed. A simplified version of the output on my machine looks like this:
APP: "info"
APP: "evalsha" "1c..32" "2" "lobby" "game" "alice"
APP: "eval" "local...\n" "2" "lobby" "game" "alice"
LUA: "SADD" "lobby" "alice"
LUA: "SCARD" "lobby"
... PREVIOUS 3 LINES REPEATED TWICE FOR BOB AND CINDY ...
APP: "evalsha" "1c..32" "2" "lobby" "game" "tlhunter"
LUA: "SADD" "lobby" "tlhunter"
LUA: "SCARD" "lobby"
LUA: "SMEMBERS" "lobby"
LUA: "DEL" "lobby"
LUA: "HSET" "game" "52..20" "tlhunter,cindy,bob,alice"
The first command that is executed is the INFO command. The ioredis package runs this to learn the capabilities of the Redis server. Afterwards, ioredis hashes the Lua script itself and attempts to run it for player alice by sending the EVALSHA command with the SHA1 it calculated (abbreviated as 1c..32). That command fails, and
ioredis falls back to running EVAL directly, passing in the script’s content (abbreviated as local…). Once that happens the server now has the hash of the script stored in memory. The Lua script calls the SADD and SCARD commands. The EVALSHA, SADD, and SCARD commands are each repeated two more times, once for bob and once for cindy.
Finally, the fourth call is made for player tlhunter. This results in the SADD, SCARD, SMEMBERS, DEL, and HSET commands being run.
At this point, you’re now finished with the Redis server. Switch to the terminal window running the MONITOR command and kill it with Ctrl + C. You can also switch to the terminal running the Redis server and kill it with the same key sequence, unless you’d like to keep it running for more experimentation.
As a rule of thumb, you should only use Lua scripts if it’s impossible to perform the same actions atomically with regular commands and transactions. For one thing, there’s at least a minimal memory overhead of storing scripts in Redis. More importantly, though, is that Redis is single-threaded, and so is the Lua that it executes. Any slow Lua scripts (or even infinite loops) are going to slow down other clients connected to the server. There’s also a performance penalty for parsing code and evaluating it. If you ran a Lua script to execute a single Redis command, it would undoubtedly be slower than running the Redis command directly.
1 For example, an È has both a single-byte and multibyte UTF representations, which are considered unequal when doing a binary comparison.
2 Check out the Luvit.io project if you’d like to see what a Node.js-like platform implemented in Lua looks like.
3 Redis generates a SHA1 hash of the script and uses that to refer to scripts in an internal cache.
4 And assuming the players haven’t discovered a SHA1 collision.