20 An Introduction to Ajax
If you’ve studied JavaScript in more detail, you’ll inevitably come across the concept of asynchronous data transfer with Ajax. Ajax is an important and useful technology in building websites, so I’ll cover the basics here.
To understand this technology, knowledge of JavaScript, HTML, and CSS is required. This chapter describes what Ajax is and how you can use this technology in your projects. Ajax is not a new technology or programming language, but rather a programming concept. Strictly speaking, it is just JavaScript, server calls, and an intervention in the DOM via JavaScript. In short, it's just using existing technologies in a particular way—sounds more complicated than it is!
20.1 An Introduction to Ajax Programming
The often scary and cryptic Asynchronous JavaScript and XML (Ajax) is used to transfer data asynchronously between a web browser and a web server.
XML
As if everything weren’t already extensive enough, XML is added here as a technology or as a further markup language. Like HTML, XML is a markup language in which the data is hierarchically structured as human-readable text data. XML is widely used for exchanging data between different computer systems, in particular over the internet. Although the x in Ajax stands for XML, JavaScript Object Notation (JSON) is increasingly used in practice when a web server sends complete data, while the use of XML is waning.
Though all this sounds quite complex, it’s actually just a way to refresh individual parts of a web page without reloading the entire web page, which is usually what happens without Ajax. Consequently, you can create faster dynamic web pages by using Ajax. This reduces the amount of data transfer and also saves the nerves of website visitors thanks to shorter loading times.
In the context of Ajax, the term asynchronous means that script execution continues when an HTTP request is made, as this request to the web server is executed in the background, and the web page is still available to the user. Usually, that is, without Ajax, such an operation runs synchronously, which means that the script execution is paused until the requested data has returned from the web server. There are definitely situations where you need to use a synchronous operation even with Ajax and just do one thing at a time. Figure 20.1 represents a synchronous operation, while Figure 20.2 represents an asynchronous operation.
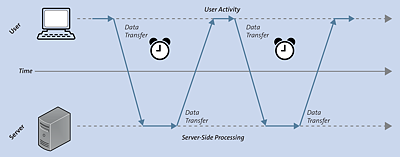
Figure 20.1 The Synchronous Process Flow of a Classic Web Application
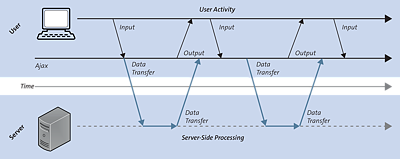
Figure 20.2 The Asynchronous Process Flow of a Web Application with Ajax
Another advantage of Ajax is that Ajax applications are independent of the web browser and operating system, and just about any web browser can handle them. Simply put, an Ajax application often consists of a combination of the following components:
-
The HTTP request with the XMLHttpRequest object to exchange the data with the server asynchronously
-
JavaScript/DOM for displaying and interacting with the information and data
-
XML as the format for data transfer (in addition to XML, methods such as JSON have also become established for asynchronous data transfer)
-
CSS for designing the data
20.1.1 A Simple Ajax Example in Execution
It might be easiest to try out a small Ajax example for yourself in practice. In doing so, you’ll discover that Ajax isn’t rocket science. Because you can’t test the example offline, you should run it on a real web server. Either you upload the files to your web host for this purpose, or you’ve set up your own web server locally. As always, you can test the example online at https://html-examples.pronix.de/. For this purpose, here’s the complete HTML document shown in Figure 20.3 during execution. I’ll go into the details of the example later.
<!DOCTYPE html>
<html>
<head>
  <meta charset="UTF-8">
  <title>Simple Ajax example</title>.
  <script src="js/getServerTime.js"></script>

</head>
<body onload="timestamp()">
  <p id="refreshtime">
     Ajax is used to output the time of the server.
  </p>
  <button type="button" onclick="changeContent()">
      Renew time
  </button>
  <p id="timestamp"></p>
</body>
</html>
Listing 20.1 /examples/chapter020/20_1/index.html
function changeContent() {
    let xmlhttp = null;
    if (window.XMLHttpRequest) {
        xmlhttp = new XMLHttpRequest();
    }
    if (xmlhttp === null) {
        console.log("Error creating an XMLHttpRequest object");
    }
    xmlhttp.onreadystatechange = function() {
        if (xmlhttp.readyState === 4 && xmlhttp.status === 200) {
            document.querySelector('#refreshtime').innerHTML = xmlhttp.responseText;
        }
    }
    xmlhttp.open("GET", "php/server-time.php", false);
    xmlhttp.send();
}

function timestamp() {
    let today = new Date();
    document.querySelector('#timestamp').innerHTML = today;
}
Listing 20.2 /examples/chapter020/20_1/js/getServerTime.js
Here is the code for the PHP script server-time.php, which, in this example, should be placed in the same directory as index.html:
<?php
  echo date('l jS \of F Y h:i:s A');
?>
Listing 20.3 /examples/chapter020/20_1/server-time.php
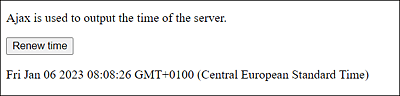
Figure 20.3 This Is What the Example Looks Like
First, here’s the HTML part of the Ajax example:
...
<body onload="timestamp ()">
  <p id="refreshtime">
   Ajax is used to output the time of the server.
  </p>
  <button type="button" onclick="changeContent()">
    Renew time
  </button>
  <p id="timestamp"></p>
</body>
...
Listing 20.4 /examples/chapter020/20_1/index.html
The short Ajax example contains a p element with the ID refreshtime and a button button that calls a function named changeContent(). After the element with the button, there’s another p element with the ID timestamp. When loading the web page (onload), the timestamp() function gets executed too, which was written in the body element. All in all, the entire thing looks like an ordinary HTML file that wants to use various JavaScript functions as event handlers.
20.1.2 Creating the “XMLHttpRequest” Object
The key to an Ajax application is the use of an XMLHttpRequest object. All modern web browsers are capable of doing this. You need this XMLHttpRequest object to exchange data with a web server and thus refresh individual parts of a web page without having to reload the entire web page. Here’s the section with the creation of the XMLHttpRequest object:
...
function changeContent() {
  let xmlhttp;

  if (window.XMLHttpRequest) {
    xmlhttp = new XMLHttpRequest();
  }

...
}

...
Listing 20.5 /examples/chapter020/20_1/js/getServerTime.js
Before you can create an XMLHttpRequest object, you should first verify that the web browser does actually support XMLHttpRequest objects. All modern web browsers will create a new XMLHttpRequest object using the new syntax variable=new XMLHttpRequest().
20.1.3 Making a Request to the Server
With the generated XMLHttpRequest object, you can make a request to the server to exchange data with it. To make such a request, you need to connect to the target page using the open() method and specify the parameters of the XMLHttpRequest object via send(). In the preceding example, you made this request to the server with the following lines:
...
  xmlhttp.open("GET", "server-time.php", true);
  xmlhttp.send();
...
Listing 20.6 /examples/chapter020/20_1/js/getServerTime.js
The open() method has the following syntax:
open(method, url, async)
You can use method to specify the method of the request (HTTP request method), which is usually GET or POST.
You use url to specify the path or URL to the file on the server to be accessed. By the way, this can be any file, and it doesn’t necessarily have to be an executable script on the server, like a PHP script in our example.
You can use async to specify whether the request should be executed asynchronously (true) or synchronously (false). In practice, the asynchronous transfer is usually recommended, that is, setting the value to true, which is what Ajax—Asynchronous JavaScript and XML—stands for. The advantage of an asynchronous data transfer with Ajax is that a JavaScript no longer has to wait for the server’s response and can meanwhile execute other scripts or process the response if it’s available. With a synchronous transfer, on the other hand, a JavaScript doesn’t get executed any further until the response from the server is available. If the server is slow or busy, the application would stop with async=false and remain in a waiting state until the response from the server arrives. Here’s a short summary:
-
async=true stands for asynchronous and makes sure that the script continues to run while the HTTP request is being executed in the background.
-
async=false stands for synchronous and causes the script execution to stop until the data has returned from the server.
The send() method, on the other hand, allows you to send the request along with the data to the server.
20.1.4 Sending Data
Although in this example, no data gets sent to the script, it should be briefly mentioned here how you can do this with GET or POST. If you’ve used GET as a method, you can write the parameters directly into the URL. In the following code snippet, a few parameters are passed to a script:
By using POST, on the other hand, you can specify the data in the send() method of the XMLHttpRequest object. In addition, you must send a special HTTP header with POST. You can do this via the setRequestHeader() method. The required HTTP header is Content type, and the corresponding value is "application/x-www-form-urlencoded". This multipurpose internet mail extension (MIME) type is used for form data. For JSON, the MIME type would again look different. So, here’s what you can do with POST to pass the data to the script:
...
  xmlhttp.open("POST","test.php", true);
  xmlhttp.setRequestHeader("Content type",
      "application/x-www-form-urlencoded");
  xmlhttp.send("name=wolfe&zip=97217");
...
20.1.5 Determining the Status of the “XMLHttpRequest” Object
Now that you know how to make a connection and request to the server, you’re still missing an important component without which the asynchronous data transfer wouldn’t work properly. It’s a callback function that’s still missing, which gets called when results come back from the web server. You pass the callback function that is called in the process to the XMLHttpRequest property onreadystatechange. In this example, you use an anonymous function for this purpose:
xmlhttp.onreadystatechange = function() { ... };
You can also pass a function name as a reference as follows, if required:
function aFunction() { ... }
...
xmlhttp.onreadystatechange = aFunction;
It should be noted here that the readystatechange event gets triggered whenever the state of the XMLHttpRequest object changes.
In this callback function, you first check the state of the XMLHttpRequest object via the readyState property. There are five different states, as listed in Table 20.1.
|
Status |
Description |
|
|---|---|---|
|
0 |
UNSENT |
The open() function hasn’t been called yet. |
|
1 |
OPENED |
The send() function hasn’t been called yet. |
|
2 |
HEADERS_RECEIVED |
The send() function has already been called, and the headers and status are available. |
|
3 |
LOADING |
The download is in progress, but the responseText isn’t yet complete. |
|
4 |
DONE |
The process has been fully completed. |
Table 20.1 You Can Determine the Status of a Request via the “readyState” Attribute
In addition to the status of the XMLHttpRequest object, the status of the response to the request is significant; for example, the value 200 will be returned if the request was successful. For example, the classic value 404 will be returned if the requested page couldn’t be found.
|
Status Code |
Message |
Meaning |
|---|---|---|
|
200 |
Ok |
The request was successfully processed and the result of the response was transmitted. |
|
400 |
Bad Request |
The request message was incorrect. |
|
403 |
Forbidden |
The request could not be performed because no authorization for it exists. |
|
404 |
Not Found |
The requested resource wasn’t found on the web server. |
Table 20.2 List of Common HTTP Status Codes for “status”
Here’s the snippet that is used to check the state of the XMLHttpRequest object:
...
  xmlhttp.onreadystatechange = function() {
    if (xmlhttp.readyState === 4 && xmlhttp.status === 200) {
      document.querySelector('#refreshtime').innerHTML =
           xmlhttp.responseText;
    }
  }
...
Listing 20.7 /examples/chapter020/20_1/js/getServerTime.js
You use the onreadystatechange property to pass the callback function to be called when the server response is available. This function is called whenever the state of the readyState property has changed. In this example, you insert the text in responseText of the XMLHttpRequest object in the HTML document at the HTML element with ID dynamic01 if readyState is 4 and the status of the response in status is 200. The responseText attribute contains the web server’s response to the request as text or null if the request was unsuccessful.
Other Properties of the “XMLHttpRequest” Object
In addition to the onreadystatechange, readyState, status, and responseText properties presented here, there are a number of other attributes the XMLHttpRequest object brings with it, which won’t be described any further here. For more information, you should visit https://developer.mozilla.org/de/docs/DOM/XMLHttpRequest.
20.1.6 Processing the Response from the Server
The response from the server can be found in the responseText or responseXML property of the XMLHttpRequest object. The data contained therein can then be processed further. You can use the following lines to insert the returned text as new text in the HTML element. The ID is dynamic01:
...
document.querySelector('#refreshtime').innerHTML =
    xmlhttp.responseText;
...
Listing 20.8 /examples/chapter020/20_1/js/getServerTime.js
If the return from the server isn’t XML, you should always use the responseText property, where the returned data is an ordinary string. If, on the other hand, the return from the server is XML-encoded and you want to parse this data as an XML object, you should use the responseXML property instead.
20.1.7 The Ajax Example during Execution
Based on the preceding descriptions, you should have understood the example printed at the beginning: /examples/chapter020/20_1/js/getServerTime.js. For this example, you’re still missing the PHP script server-time.php, which was kept quite short and basically only returns an indication of the date and time of the web server:
Listing 20.9 /examples/chapter020/20_1/php/server-time.php
When you run the example, you’ll find the view shown in Figure 20.4 in your web browser. The first paragraph with the text With Ajax, the time ... is supposed to change using the XMLHttpRequest object when the user clicks the button. The timestamp after the button has already been set using the JavaScript function timestamp() when the web page gets loaded in the body element via onload.
In Figure 20.5, the button was clicked and the time of the web server was displayed above it. For the entire process, Ajax was used along with the XMLHttpRequest object. You can click the button as many times as you want, and every time the time output above the button will be updated accordingly.
In this case, however, the website never gets completely reloaded, but only individual information or components of the website are updated. In the example, therefore, only the web server time above the button gets updated all the time. A complete reload of the page would also update the time below the button. The following two figures shows this process.
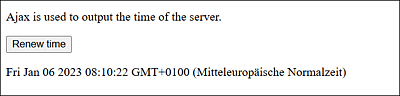
Figure 20.4 The Web Page Was Loaded
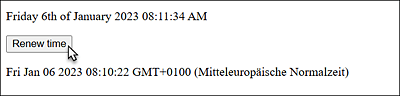
Figure 20.5 Our First Ajax Application during Execution
20.1.8 A More Complex Ajax Example with XML and DOM
Now you’ll create a slightly more complex example using XML and DOM. You'll also use Ajax to create a more interactive application. In the following example, you’ll see how a web page can communicate with the web server while the user is typing something into an input field via the keyboard. By the way, Google does this similarly by providing suggestions while you’re typing something into the search box, but that’s much more complex, of course.
For this example, the following input field is created:
...
<h1>Unit conversion</h1>
<form>
<fieldset>
<legend>Convert meters to miles and yards</legend>.
  <label>Meters</label>
  <input type="number" id="meters" placeholder="Value in meters"
         onkeyup="recalculate(this.value);"> m
  <br><label>Miles</label>
  <input type="number" id="miles"
         placeholder="conversion to miles" readonly >mi
  <br><label>Yards</label>
  <input type="number" id="yards"
         placeholder="Conversion to yards" readonly> yds
</fieldset>
</form>
...
Listing 20.10 /examples/chapter020/20_1_8/index.html
In this user input, users can make a numerical input in meters. After each keystroke (= onkeyup), you send the value with the event handler recalculate() via Ajax to the web server.
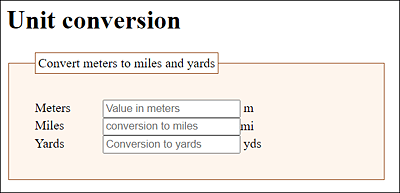
Figure 20.6 Users Can Enter a Numerical Value in Meters
Here’s the code for recalculate(), which takes care of the remaining tasks:
let xmlhttp = null;

function recalculate(str) {
    if (window.XMLHttpRequest) {
        xmlhttp = new XMLHttpRequest();
    }
    if (xmlhttp === null) {
        console.log("Error creating an XMLHttpRequest object");
    }
    xmlhttp.open("GET", "php/calculate.php?meters=" + str, true);
    xmlhttp.onreadystatechange = parseRecalculate;
    xmlhttp.send();
}

function parseRecalculate() {
    if (xmlhttp.readyState === 4 && xmlhttp.status === 200) {
        let xml = xmlhttp.responseXML;
        let miles_response = xml.querySelector('miles');
        let yards_response = xml.querySelector('yards');

        document.querySelector('#miles').value =
           miles_response.firstChild.nodeValue;
        document.querySelector('#yard').value = yard_response.firstChild.nodeValue;
    } else {
        document.querySelector('#miles').value = 0;
        document.querySelector('#yards').value = 0;
    }
}
Listing 20.11 /examples/chapter020/20_1_8/js/convert.js
There isn’t really much new in recalculate(str) itself. First, you create a new XMLHttpRequest object. Then you asynchronously transfer the entered value to the web server via Ajax after each keystroke. This request was still made with the GET method because it’s only a value. You assemble the entered value in str directly after the URL of the open() method. For example, if the user has entered 1000, the URL looks as follows:
calculate.php?meters=1000
Instead of an anonymous function, this example assigned a reference to an existing function as a callback function named onreadystatechange with parseRecalculate. This function will take care of everything else once the request has been sent using send() and the response from the web server is available. Here’s the PHP script calculate.php for that, which calculates the passed value in meters on the web server and responds with an XML-coded calculation:
<?php
  header("Content type: text/xml");
  $meters = $_REQUEST['meters'];
  $miles = $meters * 0.0006213711922373339;
  $yards = $meters * 1.0936133;
  echo "<?xml version=\"1.0\" encoding=\"utf-8\"?>";
?>

<conversion>
    <meters><?php echo $meters; ?></meters>
    <miles><?php echo $miles; ?></miles>
    <yards><?php echo $yards; ?></yards>
</conversion>
Listing 20.12 /examples/chapter020/20_1_8/php/calculate.php
You can retrieve the passed value using $_REQUEST['meters'] and pass it to the $meters variable. Then you convert the value into miles and yards and store these two values in the $miles and $yards variables, respectively. After that, you create the return XML-encoded document as a response. For example, if you’ve entered the value 1000 for meters, the following XML-encoded output will be generated in response:
<?xml version="1.0" encoding="UTF-8"?>
<conversion>
    <meters>1000</meters>
    <miles>0.62137119223733</miles>
    <yards>1093.6133</yards>
</conversion>
You then evaluate this returned XML document using the parseRecalculate() callback function you had set up using onreadystatechange. Here’s the section with the parseRecalculate() function:
...
function parseRecalculate() {
  if (xmlhttp.readyState === 4 && xmlhttp.status === 200) {
   // Response from the server
    let xml = xmlhttp.responseXML;
    let miles_response =
       xml.querySelector('miles');
    let yards_response =
        xml.querySelector('yards');
    // Write results
    document.querySelector('#miles').value =
        miles_response.firstChild.nodeValue;
    document.querySelector('#yards').value =
        yards_response.firstChild.nodeValue;
  }
  else { // In case of an error
    document.querySelector('#miles').value = 0;
    document.querySelector('#yards').value = 0;
  }
}
...
Listing 20.13 /examples/chapter020/20_1_8/js/convert.js
This function has a relatively logical structure as well. First, you use readyState and status to check if the response from the server is ready. If so, you’ll find the response in responseXML of the XMLHttpRequest object because the response is now XML-encoded. Because you’re using an XML file here, you can immediately evaluate the response using the Document Object Model (DOM). In this case, you want to get the value of the node with the tag miles and the other node with the tag yards. You can read these values via DOM as follows:
let miles_response=xml.querySelector('miles');
let yards_response=xml.querySelector('yards');
Here, you can see that you can access the DOM methods directly by using responseXML. Finally, you write the values in miles_response and yards_response that have been read from the XML document via DOM into the appropriate form fields as follows:
document.querySelector('#miles').value =
    miles_response.firstChild.nodeValue;
document.querySelector('#yards').value =
    yards_response.firstChild.nodeValue;
Admittedly, this example is considerably more complex because in addition to JavaScript and server-side script programming, XML and DOM have been added. Nevertheless, the example gives you a first impression of what can be done with Ajax and that it can be worthwhile to deal with it more comprehensively.
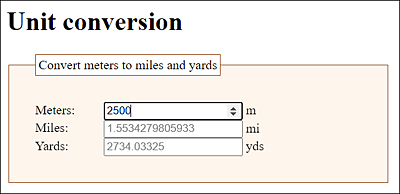
Figure 20.7 The Ajax Application during Execution
20.1.9 The JSON Data Format with Ajax
In the previous example, you performed a data exchange using XML. At the beginning, I mentioned that Ajax also has other data formats for exchanging information between server and client. A very popular and simpler alternative to XML is JSON, which is probably now more widely used than XML. For this reason, here’s a short introduction to this data format.
JSON enables you to specify objects and arrays as ordinary strings, just as you know it from JavaScript. The process is referred to as serialization.
You can specify an array between square brackets:
["text1", "text2", "text3", "text4"]
Objects are placed in curly brackets:
{"property1" : "value", "property2" : "value" }
Even though JSON uses a JavaScript syntax, like XML, this data format is independent of the language. The data format can be read by any programming language.
Here’s a JSON example in which you create a directory object with three entries of zip codes from a combination of city-zip code pairs:
{"directory":[
    {"city":"Portland", "zipCode":97217},
    {"city":"San Francisco", "zipCode":94104},
    {"city":"Philadelphia", "zipCode":19099}
]}
By the way, JSON requires that the property names (e.g., "city" and "zipCode") be enclosed in double quotes. In addition to objects (in curly brackets) and arrays (in square brackets), you can use a number (integer and floating point), a string (in double quotes), a Boolean value (true or false), and the null value (null) as data types.
Because JSON uses JavaScript syntax, it’s easy to create such an array of objects. In JavaScript, all you need to do is the following:
let directory =  [
    {"city":"Portland", "zipCode":97217},
    {"city":"San Francisco", "zipCode":94104},
    {"city":"Philadelphia", "zipCode":19099}
];
Here’s a simple example that demonstrates how you can access the individual entries using JavaScript:
let directory = [
    { "city": "Portland", "zipCode": 97217 },
    { "city": "San Francisco", "zipCode": 94104 },
    { "city": "Philadelphia", "zipCode": 19099 }
];

document.querySelector('#output').innerHTML = "<ul>" +
    "<li>" + directory[0].city + " = " + directory[0].zipCode + "</li>" +
    "<li>" + directory[1].city + " = " + directory[1].zipCode + "</li>" +
    "<li>" + directory[2].city + " = " + directory[2].zipCode +
    "</li></ul>";
Listing 20.14 /examples/chapter020/20_1_9/js/plz.js
Let’s look at an access such as the following:
directory[0].city + " = " + directory[0].zipCode
This returns the following in this example:
Portland = 97217
Similarly, you can also modify the data as follows:
directory[0].city = "Houston"; // Portland becomes Houston
Usually, you use a for loop for traversing each element in the JSON data format, which might look like the following:
...
let txt = "<ul>";
for (let i = 0; i<directory.length; i++) {
  txt += "<li>" + directory[i].city + " = "
      + directory[i].zipCode + "</li>";
}
txt += "</ul>";
document.querySelector('#output').innerHTML = txt;
...
In practice, you’ll use the JSON data format pretty often to read data from a web server to display it on a web page. This returns us to Ajax, which is what this chapter is about. The following data.json file is located on the web server and is supposed to be read and output on the web page:
[
  {
    "url":"http://www.portland.com/",
    "city":"Portland",
    "zipCode":97217
  },
  {
    "url":"http://www.sanfrancisco.com/",
    "city":"San Francisco",
    "zipCode":94104
  },
  {
    "url":"http://www.philadelphia.com/",
    "city":"Philadelphia",
    "zipCode":19099
  }
]
Listing 20.15 /examples/chapter020/20_1_9/json/data.json
You’re probably wondering how to convert this text (i.e., the JSON string), which, if everything goes right, is contained in responseText of the XMLHttpRequest object, into a JavaScript object. For this purpose, JavaScript provides the JSON.parse() method:
let obj = JSON.parse(text);
You can use the JSON.parse() method to convert a JSON text into a JavaScript object.
Other Ways to Parse JSON
For older web browsers that don’t support JSON.parse(), you could use the eval() function to convert a JSON string into a JavaScript object:
let obj = eval ("(" + text + ")");
However, the use of eval() isn’t without problems because it can be used to execute any JavaScript code. If the data comes from your own web server, this can still be okay, but you should never use data from an external URL with it. It’s therefore safer to use one of the many JavaScript frameworks that have their own JSON parser integrated.
Here is the Ajax example where you read this file from the web server using a JSON string, parse it, and output it to a web page:
...
<h1>JSON example with Ajax</h1>
<p id="output"></p>
<script src="js/plzJSON.js"></script>

...
Listing 20.16 /examples/chapter020/20_1_9/index2.html
let xmlhttp = new XMLHttpRequest();
let url = "json/data.json";

xmlhttp.onreadystatechange = function() {
    if (xmlhttp.readyState === 4 && xmlhttp.status === 200) {
        let myArr = JSON.parse(xmlhttp.responseText);
        makeOutput(myArr);
    }
}
xmlhttp.open("GET", url, true);
xmlhttp.send();

function makeOutput(arr) {
    let out = '<ul>';
    for (let i = 0; i < arr.length; i++) {
        out += '<li>' + '<a href="' + arr[i].url + '">' +
            arr[i].city + '</a>' + " = " + arr[i].zipCode + '</li>';
    }
    out += '</ul>';
    document.querySelector('#output').innerHTML = out;
}
Listing 20.17 /examples/chapter020/20_1_9/js/plzJSON.js
Here, you connect to the server and make an HTTP request for the data.json file. If the request was successful, you can parse the string into JSON and create an object:
let myArr = JSON.parse(xmlhttp.responseText);
You pass this data to the myOutput() function, where the content for the web page gets compiled and displayed in HTML. You can see the example during execution in Figure 20.8.
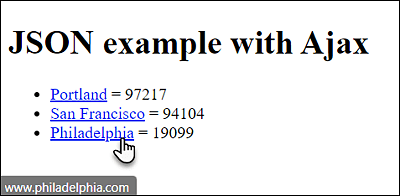
Figure 20.8 The Content of the JSON File data.json Was Read, Parsed, and Displayed on the Web Page Using Ajax
This example is kept simple to give you some understanding of how to use the JSON and Ajax data formats.
Fetch API
By the way, in practice, you don’t have to take the complex way via the XMLHttpRequest object. For Ajax requests, for example, the Fetch application programming interface (API) at https://fetch.spec.whatwg.org is a good choice. It’s much easier to use and simplifies sending Ajax-based requests.