6.7 Playing Videos Using the HTML Element <video>
The video element allows you to play a video in the web browser without any special extension. All modern browsers can handle the video element.
Currently, the three video formats MP4 (MPEG-4/H.264), WebM (Web Media File), and OGG (Ogg Vorbis) are supported by the video element. However, not every web browser can handle all three formats, as there are discrepancies regarding the format licenses of the web browser manufacturers. The most widely used format is MP4, which is also the format most cameras and cell phones use for recording purposes and which every modern web browser can handle. The free formats, OGG and WebM, were intended for use on the web; however, they aren’t supported by Safari and Internet Explorer.
If you want to add a video file to the HTML document via the video element, you can include it using the src attribute as follows:
...
<video width="720" src="Dancing.MP4" controls autoplay>
   Your web browser does not support the video tag.
</video>
...
Listing 6.12 /examples/chapter006/6_7/index.html
Web Browsers without <video>
Web browsers that don’t support the video element will display text if you’ve written one between <video> and </video>. Alternatively, you could provide a download link in that place.
The /examples/chapter006/6_7/index.html example is based on the assumption that the web browser supports the MP4 format. If you want to be on the safe side and provide additional formats in case of nonsupport or have a certain format be used preferentially, then you should include additional video files via the source element for this purpose. In practice, you can do this as follows:
...
<video width="720" controls autoplay>
  <source src="Dancing.webm" type="video/webm">
  <source src="Dancing.MP4" type="video/mp4">
  <source src="Dancing.ogg" type="video/ogg">
  Your web browser does not support the video tag.
</video>
...
Listing 6.13 /examples/chapter006/6_7/index2.html
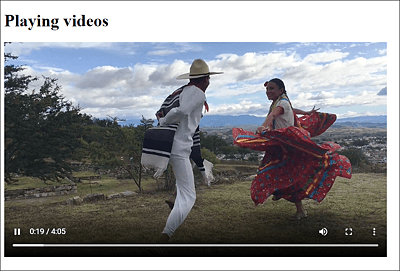
Figure 6.19 Playing a Video Is Hardly a Problem Anymore Thanks to the <video> Element
Inside the video element in /examples/chapter006/6_7/index2.html, you can insert video files via multiple source elements using the standalone <source> tag. In <source>, you can use the src attribute to note the video file you want to play. For src, the usual rules for referencing in HTML apply. You can use the type attribute to indicate the video format. For a list of media types for video formats, see Table 6.6.
Depending on what video format the web browser can handle in the source elements, it will play the first known video file. For example, if a web browser knows all the video formats provided, the Dancing.webm video will be played in this example. If you want to prefer a video format, you must write it with the <source> tag in a higher position between <video> and </video>.
|
Media Type |
|
|---|---|
|
MP4: MPEG-4 with H264 video codec and AAC audio codec |
video/mp4 |
|
OGG: OGG with Theora video codec and Vorbis audio codec |
video/ogg |
|
WebM: WebM with VP8 video codec and Vorbis audio codec |
video/webm |
Table 6.6 Video Formats for <video> and the Corresponding Media Types
6.7.1 HTML Attributes for the HTML Element <video>
Most attributes of <video> are Boolean attributes and can be used by means of attribute names. In the first example in this chapter, the controls and autoplay attributes were used, which means that a control (play, pause, volume, etc.) for the video gets displayed, and the video starts automatically after loading. See Table 6.7 for an overview of common HTML attributes you can use for the video element.
|
Attribute |
Description |
|---|---|
|
Starts the video once it has been loaded: <video autoplay ...> |
|
|
Displays the controls for controlling the video (play, pause, volume, etc.): <video controls ...> |
|
|
Sets video height: <video height="720" ...> |
|
|
Sets video to play in a continuous loop, restarting as soon as it reaches its end: <video loop ...> |
|
|
Sets video to play without sound: <video muted ...> |
|
|
Sets a reference to an image that will be displayed until the video gets started: <video poster="image.jpg" ...> |
|
|
Specifies how the video should be loaded. With the default setting preload="auto", the entire video is loaded when the page loads. Alternatively, you can use metadata to specify that only the metadata gets loaded, whereas none makes sure that nothing at all gets loaded along with the loading of the page: <video preload="none" ...> |
|
|
Specifies the URL of the video file: <video src="video.mp4" type="video/mp4"...> |
|
|
Allows you to indicate the video format. Possible values can be found in Table 6.6. |
|
|
Sets the video width: <video width="1080" ...> |
Table 6.7 HTML Attributes for the <video> Element
Controlling a Video Using JavaScript
You can also control a video with JavaScript.
6.7.2 Adding Subtitles to a Video Using <track>
Now that HTML makes it possible to render a video consistently, you may want to add more resources to the video. For this purpose, HTML provides <track> as an option to define additional tracks. These tracks don’t belong to the part of the video or audio track, but simply represent separate text information you can deposit as video subtitles at the exact time of the information contained there for different languages (or for people with a hearing loss/impairment).
By the way, you can use such tracks not only for <video> but also for <audio>, for instance, to fade in the currently playing soundtrack or the lyrics to a song that’s being played. This allows you to provide visitors with hearing loss/impairment with an easier access to the video or audio material. (Note, however, that song lyrics by well-known artists are often subject to copyright.)
The inclusion of additional tracks via the <track> tag can be implemented as follows:
...
<video width="480" controls>
  <source src="video/Dancing.mp4" type="video/mp4">
  <source src="video/Dancing.ogg" type="video/ogg">
  <source src="video/Dancing.webm" type="video/webm">
  <track default src="subtitles/subtitles_en.vtt" kind="subtitles"
         srclang="en" label="English">
  <track src="subtitles/subtitles_de.vtt" kind="subtitles"
         srclang="de" label="German">
  Your web browser does not support the video tag.
</video>
...
Listing 6.14 /example/chapter006/6_7/index2_subtitles.html
When trying to reproduce the example, you should note that it won’t work on a local machine, but must be run online on a web host. You must write the standalone <track> tag inside a video or audio element for which you want to use the additional track. Table 6.8 provides an overview of the individual attributes of <track> and their meaning.
|
Attribute |
Description |
|---|---|
|
Allows you to declare a subtitle to be the default value. |
|
|
References the data with the subtitles for the additional track. The data should be in the WebVTT (Web Video Text Tracks) format, which is covered later in this section. |
|
|
Enables you to specify the type of additional track. Possible values are as follows:
|
|
|
Sets the language of the text, which should be used for kind="subtitles". |
|
|
Sets a title for the text information. |
Table 6.8 HTML Attributes for <track>
You can see the example with English subtitles in Figure 6.20 during execution.
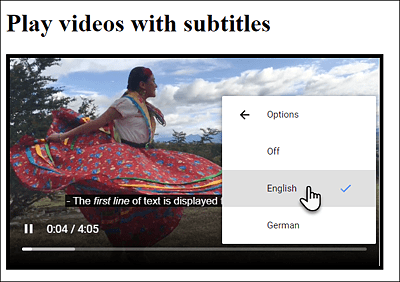
Figure 6.20 A Video with Subtitles: You Can Choose from the Offered Languages “German” and “English”
Here are a few lines about the WebVTT format, which is used to add additional tracks to a video or audio resource. However, the topic is only briefly touched on here so that you can add your own simple subtitles to a video. For a comprehensive study of the WebVTT format, you should refer to the documentation at https://www.w3.org/TR/webvtt1/.
The WebVTT format is saved with the .vtt extension. The files can be edited with a simple text editor and saved with UTF-8 character encoding. For instance, the example containing subtitles.vtt looks as follows:
WEBVTT

1
00:00:01.000 --> 00:00:05.000
The <i>first line</i> of text is displayed for the first 4 seconds.

2
00:00:06.000 --> 00:00:16.000
Now a second line gets
displayed for <b>10 seconds</b>.

3
00:00:17.000 --> 00:00:20.000
This is the final subtitle ...
Listing 6.15 /examples/chapter006/6_7/subtitle/subtitles.vtt
The first line contains WebVTT followed by a blank line. After that, you can write the content of the file by means of cues. Each cue consists of an identification number, a time, a text, and a blank line. The time specification has the following format:
hh:mm:ss.mmm --> hh:mm:ss.mmm
This specifies that from the time hh:mm:ss.mmm to (-->) hh:mm:ss.mmm, the insertion of the text following it takes place. The time specifications must have a leading 0 if the specification is smaller than 10. mmm represents a specification of milliseconds. The other indications are hh for hours, mm for minutes, and ss for seconds. Thus, the meaning of the following lines should be clear:
1
00:00:01.000 --> 00:00:05.000
The <i>first line</i> of text is displayed for the first 4 seconds.
...
From second 1 to second 5, the text following behind it is displayed, as you can see in Figure 6.20. You can see from <b> or <i> that you can also design the text visually. Line breaks are also reproduced. There are a lot of other ways to style the text, which I won’t go into here. A comprehensive overview of the WebVTT format can be found, as already mentioned, at https://www.w3.org/TR/webvtt1/.
6.7.3 Playing Videos via YouTube
Playing videos is no longer a problem thanks to the <video> HTML element. But not everyone has the desire, time, or knowledge to convert a video into different formats and deploy it online. In addition, there’s still the problem of the increasing volume of data. For example, a video file of 100 MB can cause a lot of traffic if a large number of visitors watch this video on your website. That can quickly add up to a few gigabytes, and not everyone has a fast web host with infinite data volumes.
In this regard, it’s a good idea to play the video from YouTube and display it on your website. To do that, you just need to upload the video to YouTube and include the HTML code or link you get from YouTube in the HTML document. Here, you have the choice of using the iframe element, the object element, or the standalone embed element for this purpose. The following example shows all three options in practice, but it only works live on a web server:
...
<iframe width="400" height="225"
  src="https://www.youtube-nocookie.com/embed/H8OYVuyBSNA" allowfullscreen>
</iframe>

<object width="400" height="225"
  data="https://www.youtube-nocookie.com/embed/H8OYVuyBSNA" ></object>

<embed width="400" height="225"
  src="https://www.youtube-nocookie.com/embed/H8OYVuyBSNA" >
...
Listing 6.16 /examples/chapter006/6_7_3/index.html
You can see the example at execution in Figure 6.21.
Pay Attention to GDPR When Embedding YouTube or Vimeo Videos!
If you embed YouTube or Vimeo videos on your website, you should definitely pay attention to data protection when doing so. When a user starts the video, data is also passed to YouTube. There are a few solutions on how to get around the problem. A great overview of this can be found at https://www.thomasvantuycom.com/writing/privacy-friendly-video-embeds/.
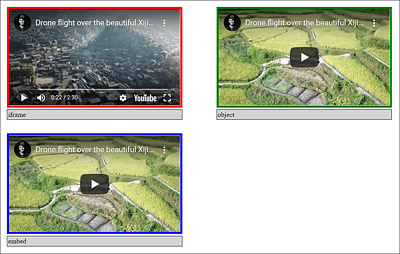
Figure 6.21 Playing a YouTube Video: Examples with <iframe>, with <object>, and with <embed>