17.5 Linux and Web Server Configuration
You should recall that web server software like Apache is responsible for handling HTTP requests on your server. Whether through XAMPP, or some virtualization technology like Vagrant, you likely have been using Apache this whole time. These Apache and NginX are the most popular web servers on the WWW, as illustrated in Figure 17.17. Apache has been evolving for decades, constantly improving, adding features, and fixing security holes, while NginX was more recently developed with a focus on faster serving speed. It is well worth your while to understand what a webserver is, and how to control it. Whether you use a bare metal server, a container from Docker, or a virtual server setup to deploy your webserver, someone at some point needs to configure it correctly to handle requests.
Figure 17.17 Web server popularity
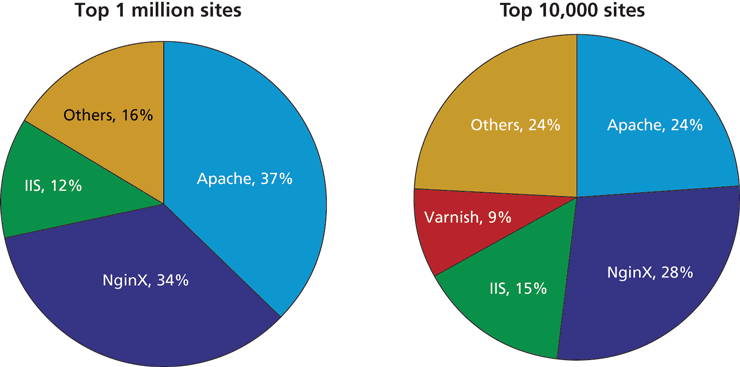
(data courtesy of BuiltWith.com)
There are a lot of potential topics to cover here: connection management, encryption, compression, caching, multiple sites, and more. The need for deeper expertize across all aspects of a production website is embraced by the DevOps philosophy that encourages web developers to build their skills as systems administrators.
 Pro Tip
NginX was designed to serve static files more quickly (using fewer threads) than Apache. It outperforms Apache on static files and has an active community that develops new features, making it increasingly popular. The way it handles PHP is slightly less direct than Apache, and since Apache underlies the XAMPP systems we've used throughout the book, we will focus on Apache configurations. High-traffic servers might consider a hybrid model where NginX serves static content or acts as a load balancer, while dynamic php content is handled by Apache.
Although Apache can be run in multiple operating systems, this section focuses on administering Apache and NginX in a Linux environment. Some understanding of Linux is therefore essential before moving on in this section. Mark Sobel’s guides to Linux 8, 9 are a good reference point for many popular distributions.
17.5.1 Configuration
Apache and NginX can be configured through text-based configuration files. The location of those files is server dependent but often lie in the /etc/ folder. Even if you use containers, you will still edit and push the Apache-specific configuration file to manage your web server.
When both Apache and NginX are started or restarted, they parse the root configuration file, which is normally writable by only root users. The root file may contain references to other files, which use the same syntax but allow for more modular organization with one file per domain or service.
In Apache, multiple directory-level configuration files are also permitted. These files can change the behavior of the server without having to restart Apache. The files are normally named .htaccess (hypertext access), and they can reside inside any of the public folders served by Apache. The .htaccess file control can be turned on and off in the root configuration file.
Inside of the configuration files, there are numerous directives you are allowed to make use of, each of which controls a particular aspect of the server. The directives are keywords whose default values you can override. You will learn about the most common directives, although a complete listing is available.10
17.5.2 Starting and Stopping the Server
The management of services on Linux has been simplified in recent years through the popular systemD suite (introduced in 2010). Using the systemctrl command we can manage processes like Apache, NginX, and sql in the same way which makes things easier for us.
To start Apache and NginX, we enter two commands using systemctrl:
systemctl start httpdsystemctl start nginx
To stop a service, systemctrl commands are just as easy. To stop NginX we type:
systemctl stop nginxTo ensure that Apache starts when the machine boots, type the command:
systemctl enable httpdThis makes life easy for you so that in the event of a restart, the web server can immediately start behaving as a web server.
Applying Configuration Changes
It’s important to know that every time you make a change to a configuration file, you must restart the service in order for the changes to take effect. This is done with
systemctl restart httpdIf the new configuration was successful, you will see the service start with an OK message (or on some systems, no message at all). If there was a configuration error, the server will not start, and an error message will indicate where to look. If you restart the server and an error does occur, you are in trouble because the server is down until the error can be corrected and the server restarted! For that reason you should always check your configuration before restarting to make sure you have no downtime with the command:
apachectrl configtestThis command will literally output Syntax OK if everything is in order and an error message otherwise.
17.5.3 Connection Management
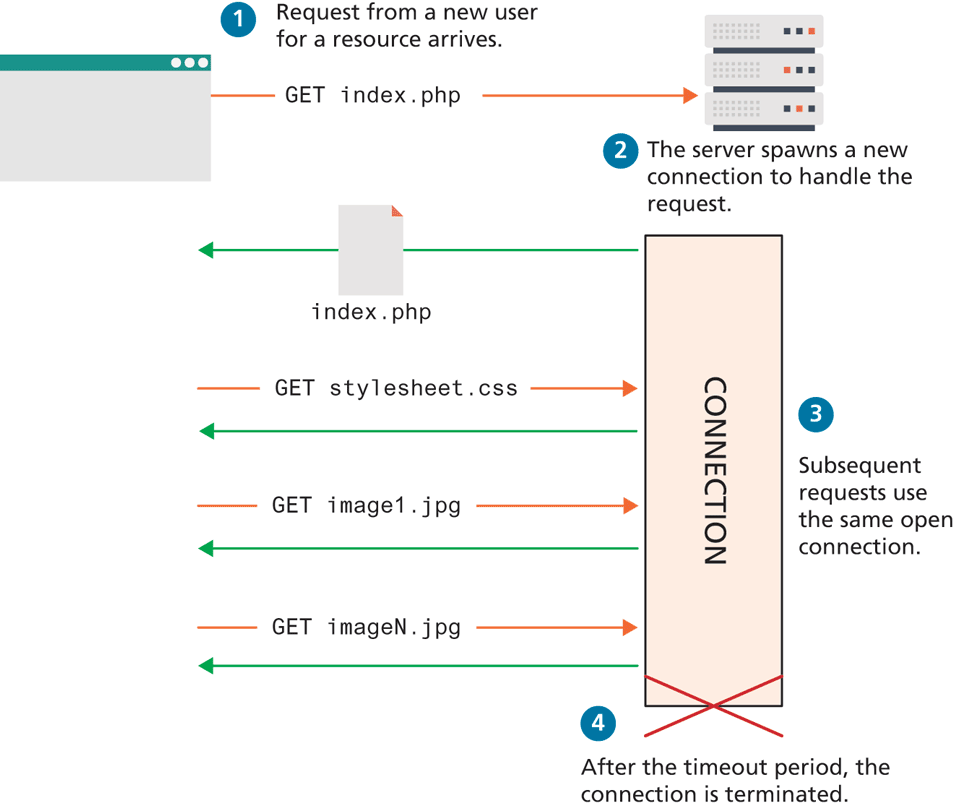
Apache can run with multiple processes, each one with multiple threads. With the ability to keep an HTTP connection open in each thread between requests, a server can perform more efficiently by, for instance, serving all the images in a page using the same connection as shown in Figure 17.18.
Figure 17.18 Illustration of a reused connection in Apache
These options permit a detailed tuning of your server for various loads using configuration directives stored in the root configuration file and directory-level configuration files. Although the defaults will suffice while you are developing applications, those values should be thoughtfully set and tested when readying a production web server. Some of the important directives are:
Timeout defines how long, in seconds, the server waits for receipts from the client (remember, delivery is guaranteed).
KeepAlive is a Boolean value that tells Apache whether or not to allow more than one request per connection. By default, it is false (meaning one request per connection). The development of NginX speaks to the challenge of balancing these two competing demands.
MaxKeepAliveRequests sets how many requests to allow per persistent connection.
KeepAliveTimeout tells the server how long to keep a connection alive between requests.
Additional directives like StartServers, MaxClients, MaxRequestsPerChild, and ThreadsPerChild provide additional control over the number of threads, processes, and connections per thread. In practice, one turns keepalive off, or sets the timeout value very low, but in most modern setups NginX is used nowadays when connection management becomes an issue.
Ports
A web server responds to HTTP requests. A server is said to listen for requests on specific ports. As you saw back in Chapter 1, the various TCP/IP protocols are assigned port numbers. For instance, the FTP protocol is assigned port 21, while the HTTP protocol is assigned port 80. As a consequence, all web servers are expected to listen for TCP/IP connections originating on port 80, although a web server can be configured to listen for connections on different, or additional, ports.
The Listen directive tells the server which IP/Port combinations to listen on. A directive (stored in the root configuration file) to listen to nonstandard port 8080 on all IP addresses would look like:
Listen 8080When combined with VirtualHosts directives, the Listen command can allow you to have different websites running on the same domain with different port numbers, so you could, for example, have a development site running alongside the live site, but only accessible to those who type the port number in the URL.
17.5.4 Data Compression
Most modern browsers support gzip-formatted compression. This means that a web server can compress a resource before transmitting it to the client, knowing that the client can then decompress it. Chapter 2 showed you that the HTTP client request header Accept-Encoding indicates whether compression is supported by the client, and the response header Content-Encoding indicates whether the server is sending a compressed response.
Deciding whether to compress data may at first glance seem like an easy decision, since compressing a file means that less data needs to be transmitted, saving bandwidth. However, some files like .jpg files are already compressed, and re- compressing them will not result in a reduced file size, and worse, will use up CPU time needlessly. One can check how compression is configured by searching for the word DEFLATE in your root configuration file. The directive below could appear in any of the Apache configuration files to enable compression, but only for text, HTML, and XML files.
AddOutputFilterByType DEFLATE text/html text/plain text/xmlNginX uses a very similar way of configuring compression. Just as with Apache, you get no benefit from compressing already compressed files, so you specify the files to compress using similar syntax:
gzip_types text/plain application/xml;17.5.5 Encryption and SSL
Encryption is the process of scrambling a message so that it cannot be easily deciphered. To learn about the mathematics and the theory behind encryption, refer back to Chapter 16 on Security. In the web development world, the applied solution to cryptography manifests as the Transport Layer Security/Secure Socket Layer (TLS/SSL), also known as HTTPS.
All encrypted traffic requires the use of an X.509 public key certificate, which contains cryptographic keys as well as information about the site (identity). The client uses the certificate to encrypt all traffic to the server, and only the server can decrypt that traffic, since it has the private key associated with the public one. While the background into certificates is described in Chapter 16, creating your own certificates is very straightforward, as illustrated by the shell script in Listing 17.1. A Linux shell script is a script designed to be interpreted by the shell (command-line interpreter). In their simplest form, shell scripts can encode a shortcut or sequence of commands.
Listing 17.1 Script to generate a self-signed certificate
# generate key
openssl genrsa -des3 -out server.key 1024
# strip password
mv server.key server.key.pass openssl rsa -in server.key.pass -out \
server.key
# generate certificate signing request (CSR)
openssl req -new -key server.key -out server.csr
# generate self-signed certificate with CSR
openssl x509 -req -days 3650 -in server.csr -signkey server.key -out \
server.crt rm server.csr server.key.pass
The script (which can also be run manually by typing each command in sequence) will prompt the user for some information, the most important being the Common Name (which means the domain name), and contact information as shown in Listing 17.2.
Listing 17.2 Questions and answers to generate the certificate-signing request
Country Name (2 letter code) [AU]:CA
State or Province Name (full name) [Some-State]:Alberta
Locality Name (eg, city) []:Calgary
Organization Name (eg, company) [Internet Widgits Pty Ltd]:Pearson Ed.
Organizational Unit Name (eg, section) []:Computer Science
Common Name (e.g. server FQDN or YOUR name) []:funwebdev.com
Email Address []:ricardo.hoar@siliconhanna.com
In order to have the page work without a warning message, that certificate must be validated by a certificate authority, rather than be self-signed. Self-signed certificates still work; it’s just that the user will have to approve an exception to the strict rules configured by most browsers. In most professional situations, validating your certificate is worth the minor costs (a few hundred dollars per year), given the increased confidence the customer gets that you are who you say you are.
Each certificate authority has their own process by which to issue certificates, but generally requires uploading the certificate signing request generated in Listing 17.1 and getting a server.crt file returned by email or some other means. Check out Thawte, VeriSign, or CertiSign for a paid commercial certificate or ZeroSsl.com for a free 90-day signed certificate.
In any case the server.key and the server.crt files are placed in a secure location (not visible to anyone except the Apache user) and referenced in Apache by adding to the root configuration file; the directives below pointing to the files.
SSLCertificateFile /path/to/this/server.crt
SSLCertificateKeyFile /path/to/this/server.key
Remember, you must also Listen on port 443 in order to get Apache to work correctly using secure connections.
Pro Tip
Since signed certificates cost money, it can be cost effective to create a wildcard certificate that can be used on any subdomain rather than a particular fully qualified domain.
To serve secure files on both www.funwebdev.com and secure.funwebdev.com, the wildcard certificate is created by first entering *.funwebdev.com when asked for the Common Name, and then sending the certificate signing request to the CA for signing.
Unfortunately you cannot have a completely wildcard certificate; you must specify at least the second-level domain.
17.5.6 Managing File Ownership and Permissions
All web servers manage permissions on files and directories. Permissions are designed so that you can grant different users different abilities for particular files. In Linux there are three categories of user: the owner, the group(s), and the world.
The group and owner names are configured when the system administrator creates your account. They can be changed, but often that power is restricted. What’s important for the web developer to understand is that the web service Apache runs as its own user (sometimes called Apache, WWW, or HTTP, depending on configuration). In order for Apache to serve files, it has to have permission to access them. So while you as a user may be able to read and edit a file, Apache may not be able to unless you grant it that permission.
Each file maintains three bits for all three categories of access (user, group, and world). The upper bit is permission to read, the next is permission to write, and the third is permission to execute. Figure 17.19 illustrates how a file’s permissions can be represented using a three-digit octal representation, where each digit represents the permissions for that category of user.
Figure 17.19 Permission bits and the corresponding octal number
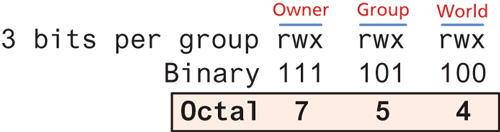
In order for Apache to serve a file, it has to be able to read it, which means the read bit must be set for the world, or a group of which the Apache user is a member. Typically, newly created PHP files are granted 644 octal permissions so that the owner can read and write, while the group and world can read. This means that no matter what username Apache is running under, it can read the file.
Permissions are something that most web developers will struggle with at one time or another. Part of the challenge in getting permissions correct is that the web server runs as a user distinct from your username, and groups are not always able to be changed (in simple shared hosting, for example). This becomes even more complicated when Apache has to have permission to write files to a folder.
 Note
Note
A security risk can arise on a shared server if you set a file to world writable. This means users on the system who can get access to that file can write their own content to it, circumventing any authentication you have in place.
Many shared hosts have been “hacked” by a user simply overwriting the index.php file with a file of their choosing. This is why you should never set permissions to 777, especially on a simple shared host.