16.2 Approaches to Web Authentication
In web applications, there are four principle strategies used for authentication:
Basic HTTP Authentication
Form-Based Authentication
Token HTTP Authentication
Third-Party Authentication
16.2.1 Basic HTTP Authentication
HTTP supports several different forms of authentication via the www-authenticate response header. This section covers basic authentication, which is a basic mechanism to secure folders and files on a public webserver. Token authentication, which is the most commonly used form of HTTP authentication, is covered below.
HTTP Basic Authentication is a way for the server to indicate that a username and password is required to access a resource. It is not commonly used anymore, but it is worth knowing how it works. Figure 16.3 illustrates how basic HTTP authentication works.
Figure 16.3 Basic HTTP Authentication
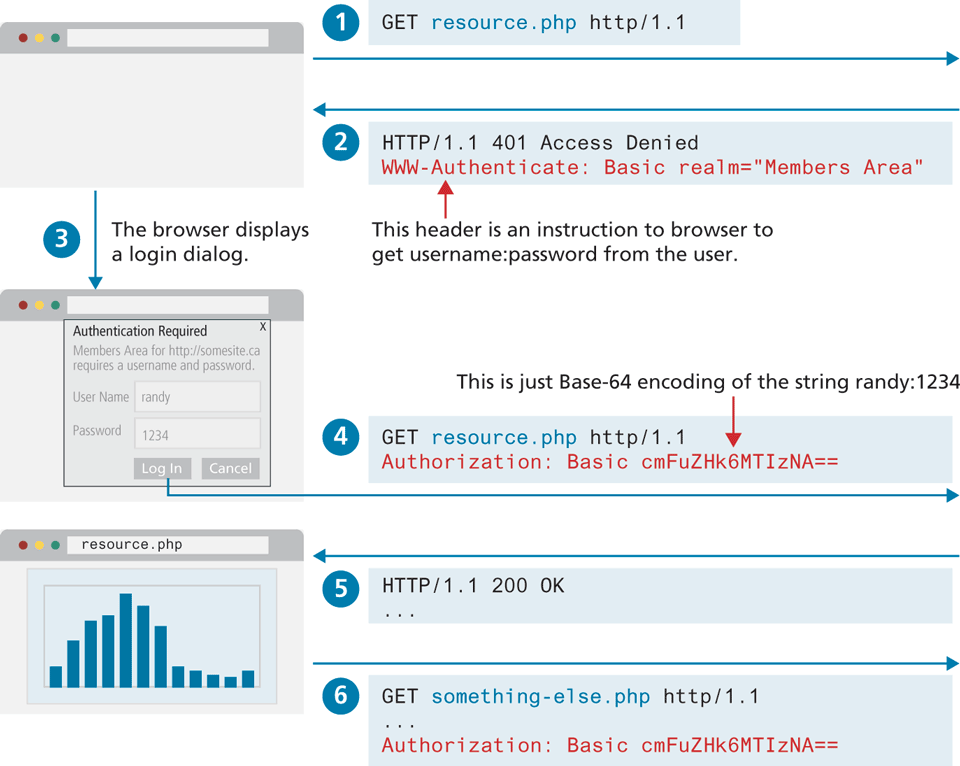
When a protected resource request is received by the server, it sends the following response:
HTTP/1.1 401 Access Denied
WWW-Authenticate: Basic realm="Members Area"
Content-Length: 0
The text content of the Basic realm string can be any value; the realm string is displayed in the login dialog that is displayed by the browser. The browser can now display a pop-up login dialog, and the original request is resent with the entered username and password provided via the Authorization HTTP header.
GET resource.php HTTP/1.1
Host: www.funwebdev.com
Authorization: Basic cmFuZHk6bXlwYXNzd29yZA==
This Authorization header would then accompany all subsequent requests. This approach is sometimes referred to as an example of challenge-response authentication, in that the server provides a “challenge” (no access until you tell me who you are), and the client has to immediately provide a response.
Basic Authentication has a variety of drawbacks, which limit its usage. The first drawback is that there is no control over the login user experience. The browser, not the web site, provides the user login interface (as shown in Figure 16.3), and as a consequence, can be confusing for users. Another drawback is that there is no easy way to log a user out once he or she has logged in. But Basic Authentication has a much more serious drawback.
You might wonder what is in that random-looking bunch of letters and numbers. It looks encrypted, but it is not. It is a Base64 encoding of the username and password in the form username:password. In the above example, it is the encoded string randy:1234. The trouble with Base64 encoding is that it is an open standard that is easily decoded. This means that Basic HTTP Authentication is very vulnerable to man-in-the-middle attacks. That is, anyone who can eavesdrop in on the communication will have access to the user’s username and password combination. For this reason, Basic Authentication cannot be considered a secure form of authentication unless the entire communication is encrypted via HTTPS (covered in Section 16.4).
16.2.2 Form-Based Authentication
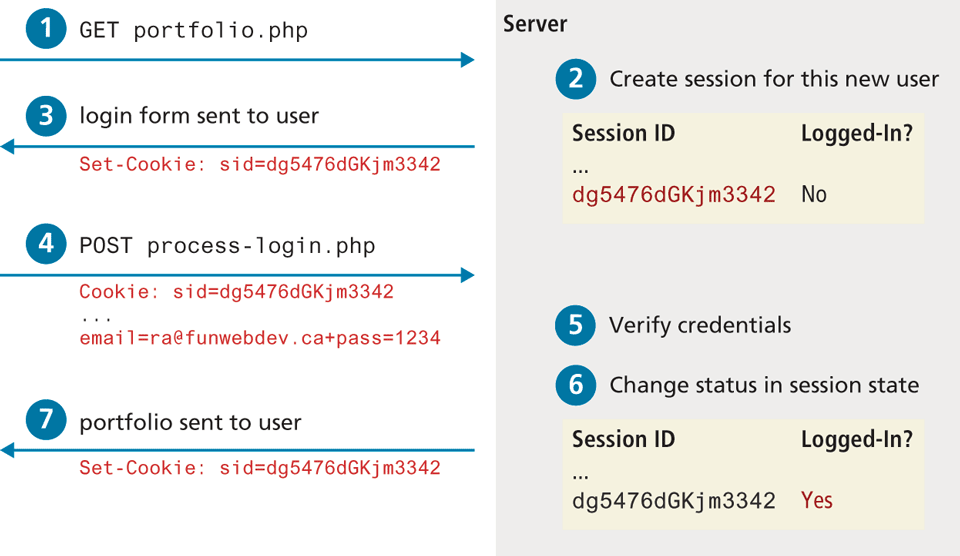
When secure communication is needed, websites generally do not use either of the HTTP authentication approaches. Instead, some form of form-based authentication is used, which gives a site complete control over the visual experience of the login form (unlike basic HTTP authentication which uses a browser-generated form). This means an HTML form is presented to the user, and the login credential information is sent via regular HTTP POST. As shown in Figure 16.4, form authentication needs some way to keep track of the user’s login status. The example in the diagram is using a session cookie, which indicates that some type of server-based storage is keeping track of the user’s log-in status. Figure 16.5 illustrates a simplified version of how this would work (in fact, the session id can be regenerated for each request to make site less vulnerable to session-jacking, which is covered later in this chapter). The key point here in this diagram is that some type of logic will be needed on the server to manage the login status of each user session.
Figure 16.4 The form authentication process
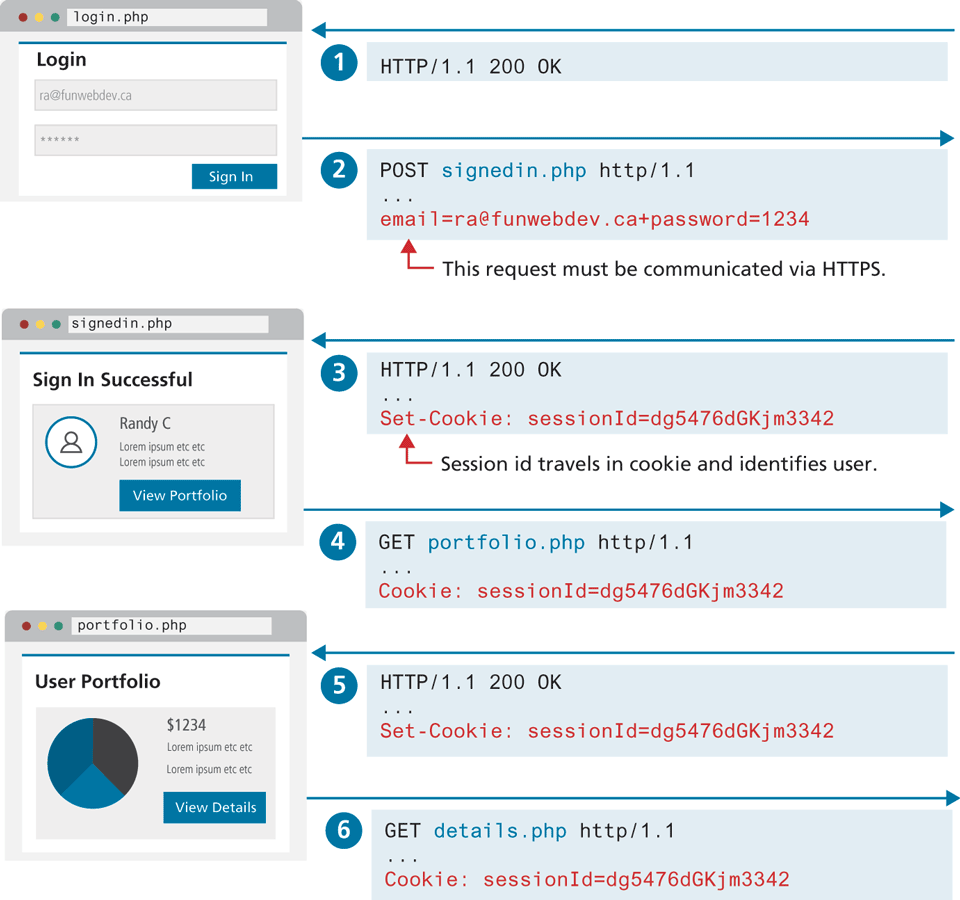
Figure 16.5 Managing login status
Form authentication has the same vulnerabilities (or even more vulnerabilities since HTTP POST data is not even encoded) as Basic Authentication. Security is instead provided by TLS (Transport Layer Security) and HTTPS (covered in Section 16.4), which encrypts the entirety of all requests and responses.
16.2.3 HTTP Token Authentication
HTTP Token Authentication (also known more formally as Bearer Authentication) is a form of HTTP authentication that is commonly used in conjunction with form authentication, as well as with APIs and other services without a user interface. The word “bearer” in the name can be understood as “give access to the bearer of this token.” This token is usually provided by the server after a user has authenticated via a HTML form. The token contains information about the authenticated user and can be in any format. Figure 16.6 illustrates how this token-based approach differs from the cookie-based approach shown in Figure 16.4.
Figure 16.6 Stateless authentication using tokens
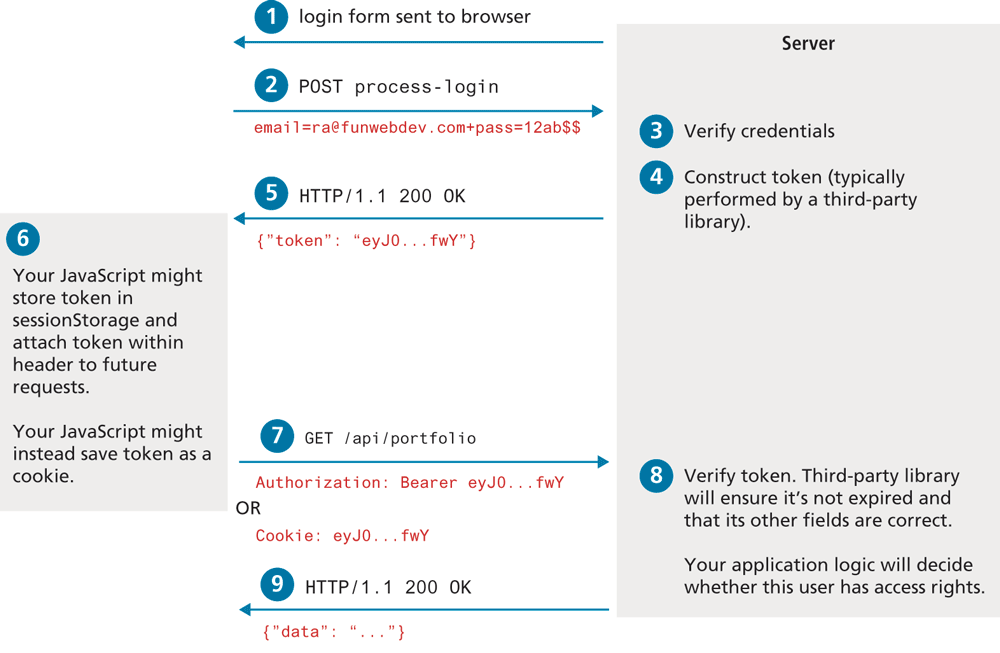
Token authentication provides a way to implement stateless authentication. A small benefit of stateless authentication is that no additional logic is required on the server to manage the logged-in status of the user. The main benefit, and the reason why it has increasingly become the most common form of authentication, is that it is much more scalable than the stateful approach. You may recall from the previous chapter that scaling sessions across multiple load balanced servers requires using a separate state server, which ultimately slows down the performance of a site, and adds in another possible location for failure. And by not using cookies, the token approach eliminates a whole series of cookie-based security vulnerabilities such as XSS and CSRF attacks (covered later in the chapter). As well, token authentication works outside of the browser; thus, mobile applications can make use of the same strategy. It should also be stressed that like with Basic Authentication, Token Authentication requires communication across HTTPS.
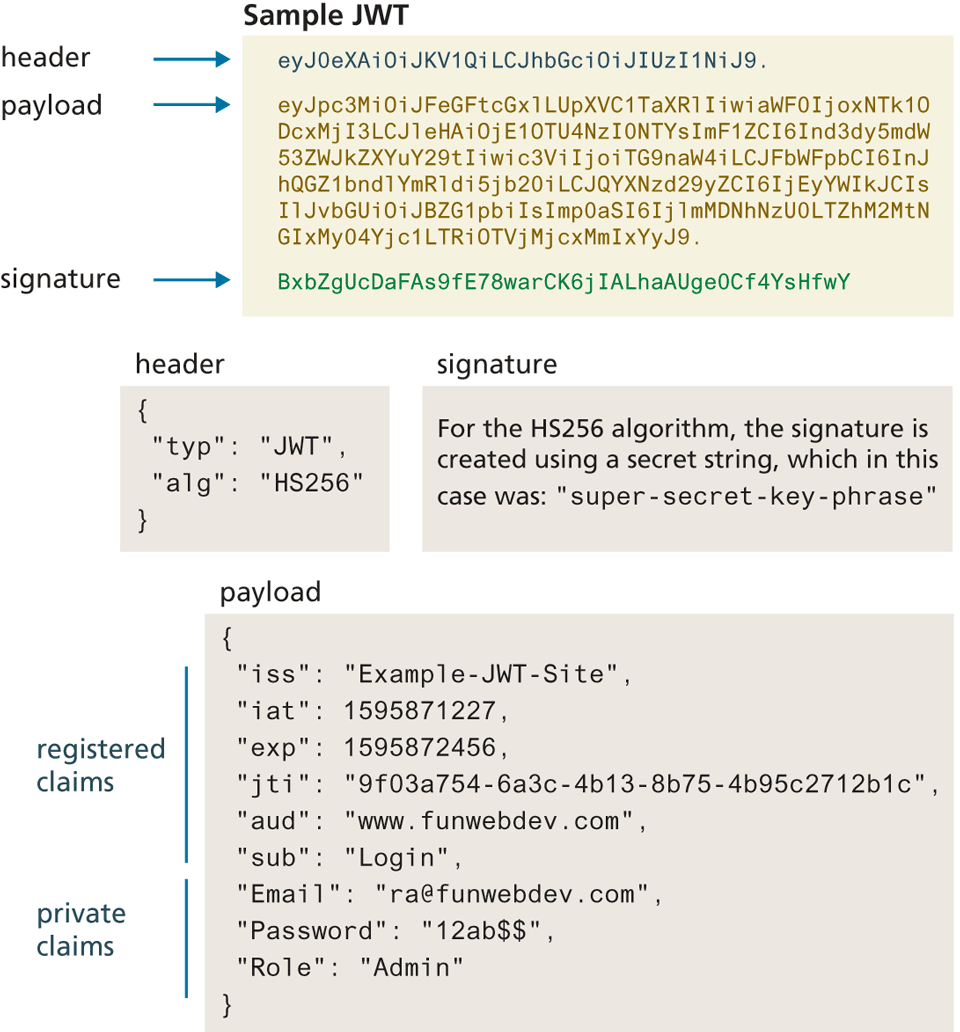
While Token Authentication can use any type of token, by far the most commonly used format is JWT (JSON Web Token). A JWT consists of three Base64-encoded strings separated by dots, which contain:
A header containing metadata about the token.
A payload which contains security claims consisting of name:value pairs.
A signature which is used to validate the token.
Figure 16.7 illustrates the fields in a sample JWT token. For more information about the structure of JWT, see the Auth0 documentation.8
Figure 16.7 JWT structure
16.2.4 Third-Party Authentication
Some of you may be reading this and thinking, this is hard. Authentication is easy when it’s a username and password, but not so when you really consider it in depth (and just wait until you see how to store the credentials).
Fortunately, many popular services allow you to use their system to authenticate the user and provide you with enough data to manage your application. This means you can leverage users’ existing relationships with larger services to benefit from their investment in authentication while simultaneously tapping into the additional services they support.
Third-party authentication schemes like OpenID and oAuth are popular with developers and are used under the hood by many major websites, including Amazon, Facebook, Microsoft, and Twitter, to name but a few. This means that you can present your users with an option to either log in using your system, or use another provider.
OAuth
Open authorization (OAuth) is a popular authorization framework that allows users to use credentials from one site to authenticate at another site. That is, it is an open protocol that allows users to access protected resources on a client app by logging in to an OAuth identity provider such as GitHub or FaceBook. It has matured from version 1.0 in 2007 to the newest specification (2.0) in 2012. If you have ever used Facebook, Google, or GitHub to log in to some other site, then you will almost certainly have used OAuth. While we don’t have the space in this chapter to show how to write the code for an OAuth system, we can provide an overview showing the special terminology and its most common authorization flow.
OAuth uses four user roles in its framework.
The resource owner/user is normally using a user agent (such as a browser or an app) which can gain access to the resources.
The resource server hosts the resources and can satisfy requests with the correct access tokens.
The client/consumer is the application making requests on behalf of the resource owner. The client server and the resource server can be the same computer.
The authorization server issues tokens to the client upon successful authentication of the resource owner. Often this is the same as the resource server.
As shown in Figure 16.8, there are two steps that need to be performed prior to using OAuth. The user has to register on an OAuth provider, and the client needs to register with the OAuth identity provider.
Figure 16.8 The steps required to register and authenticate a user using OAuth
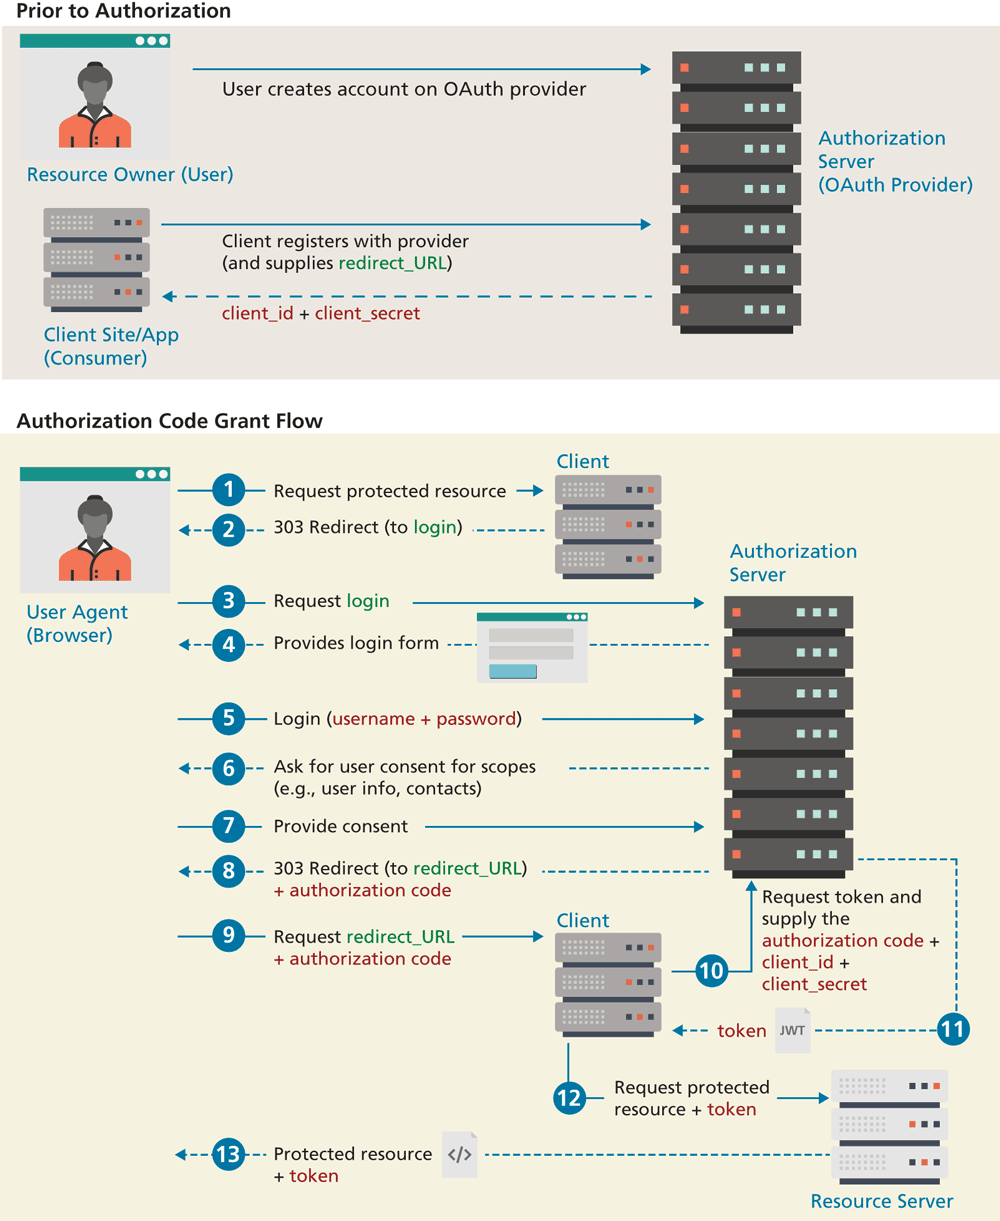
Figure 16.8 illustrates the Authorization Code Grant Flow within OAuth. There are several other “flows” (i.e., ways to authenticate and retrieve an access token), such as Client Credentials Flow (for when two machines/applications need to authenticate), Authorization Code Flow with Proof Key for Code Exchange (for single-page applications), and Implicit Flow (for applications that can’t store client secrets). This particular flow has two actions that have to occur before the authorization attempt. For the client site, it must register with an OAuth provider and provide a URL on the client site to which the provider will redirect. If accepted, it will receive a unique client_id and a client_secret. This secret must be saved only on the client server.
As can be seen in the diagram, the client never “sees” the user’s credentials; the credentials are instead sent to an authorization server such as GitHub or Google. The authorization server provides the user’s authorization code to the client as a query string parameter when it redirects to the previously provided URL after a successful login. The client then has the responsibility to request a JWT token from the authorization server, using the user’s authorization code and the client’s id and secret values. That token is then sent to the resource server for each resource request. The resource server must validate the token to ensure it is valid and that it contains the proper scopes. So while OAuth does provide a standardized way to make use of other sites’ authentication, it still requires custom coding.
 Pro Tip
OpenID allows users to sign in to multiple websites by using a single password. Like OAuth, it is a specification, and the latest OpenID Connect protocol is built “on top of” the OAuth specification. While OAuth provides a mechanism for authorization, OpenID Connect provides additional information about the user who is authenticating into a site. Potentially, OpenID may simplify the process of logging into different sites and services by having a single sign-on that can be used across multiple applications.