13.8 Chapter Summary
This chapter has provided an overview of Node, which has become an essential technology for the modern-day web. While Node can be used to create web pages in a similar way to PHP, its particular architectural advantages makes it instead ideal for implementing APIs and for adding push-based functionality to a web application. This chapter was just an introduction to Node. You will use Node in subsequent chapters and thus learn more about how to use Node in a practical way. In the next chapter, you will learn how to make use of databases in your web applications, first with PHP and then with Node. In Chapters 15 and 16 on state management and security, Node will again be used. Finally, in the labs for Chapter 17 on DevOps and Cloud hosting, you will once again find yourself making use of Node.
13.8.1 Key Terms
13.8.2 Review Questions
What are the key advantages and disadvantages of using Node?
What is npm? What is its role in contemporary web development?
A nonblocking architecture can typically handle more simultaneous requests. Why is that?
What are modules in JavaScript? How does the Node CommonJS module system differ from the one introduced in ES6?
In the context of Node, what is Express?
What are Express routes?
In Express, what is middleware?
What is a CRUD API?
What are WebSockets? How do they differ from HTPP?
What role do view engines play in Node?
What are the benefits of serverless computing?
How does functions-as-a-service differ from platform-as-a-service?
13.8.3 Hands-On Practice
Project 1
Difficulty Level: Beginner
Overview
In this project, you will be creating a data retrieval API.
Instructions
You have been provided a folder named project1, that contains the data and other files needed for this project. Use
npm initto setup the folder, andnpm installto add express.Name your server file art.js. Add a static file handler for resources in the
staticfolder.The data for the APIs is contained in a supplied json file. Create a provider module for this file.
Add the following
GETroute handlers:Route Description /Returns JSON for all paintings /:idReturns for just a single painting /gallery/:idReturns all paintings for a specific gallery id /artist/:idReturns all paintings for a specific artist id /year/min/maxReturns all paintings whose yearOfWorkfield is between the two supplied values.
Guidance and Testing
Break this down into small steps and test after each step.
Project 2
Difficulty Level: Intermediate
Overview
In this project, you will be creating a full CRUD API.
Instructions
You have been provided a folder named project2, that contains the data and other files needed for this project. Use
npm initto set up the folder, andnpm installto add express.Add a static file handler for resources in the static folder.
The data for the APIs is contained in a supplied json file. Create a provider module for this file.
Add the following
GETroute handlers:Route Description /Returns JSON for all companies /:idReturns for just a single company Add
PUT,POST, andDELETEroute handlers, to handle updating an existing company, inserting a new company, and deleting an existing company.Use the supplied form
tester.htmlto verify your APIs work as expected.
Guidance and Testing
Break this down into small steps and test after each step.
While there is a provided form that you can use to test your APIs, it is often easier to test your APIs using a tool such as Postman and Insomnia. We recommend that you install one of these tools and try testing your API with it.
Project 3
Difficulty Level: Intermediate
Overview
In this project, you will create a more sophisticated chat application.
Instructions
You have been provided a folder named project3, that contains the data and other files needed for this project. Use
npm initto set up the folder, andnpm installto add express.Examine chat-adv-client-markup-only.html in the browser. It illustrates the markup of the finished version. You will be working with chat-adv-client.html that doesn’t have the extra markup. You will be writing code in chat-adv-client.js to programmatically generate the markup based on the reception of messages from the server.
Your server code will need to maintain a list of user objects. For each new user, you will need to save the name and an id number, which should be a random number between 1 and 70; this number will be used by the chat client to display a profile picture from https:/
/ randomuser.me. Your server code will also have to emit the updated user list to all clients whenever a new user is added. Because it is a random number, it’s possible that two users could have the same profile picture. For simplicity sake, assume that each user name is unique. On the client side, when it receives a message from the server that there is a new user, it should display a message and then regenerate the list of users in the left side of chat using the passed user list data.
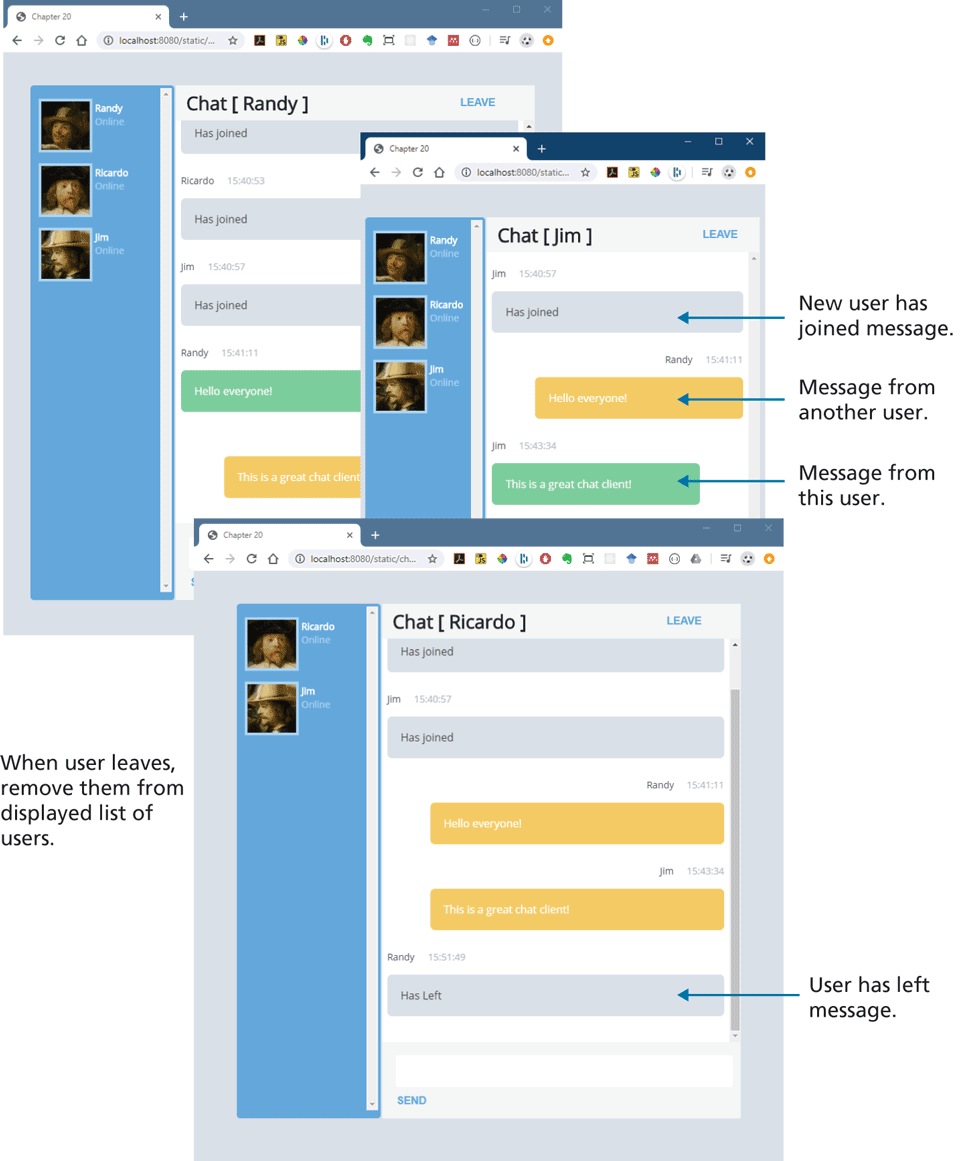
Your chat client has a Leave button. When the user clicks this button, it should send a message to the server that this user has left and then hide the chat window. The server should then remove the user from its list, and then emit a message to all clients of this action and provide an updated user list. The remaining clients should display a message and then regenerate the list of users in the left side of chat using the passed user list data.
The chat client has a textbox and a Send button. When the Send button is clicked, it should display the message directly in the chat window and then send the message to the server. The server, when it receives a new message, should broadcast it out to all the other clients (but not to the one that generated the message). The other clients should display the message content, the user that created it, and the current time.
The chat client can thus display four types of messages in the chat window: a user joined message, a user has left message, another user’s chat message, and the current user’s chat message. Three relevant CSS classes have been provided: .
message-received, .message-sent, and .message-user. Your client code should set the appropriate class depending on which message has been received.
Guidance and Testing
Test by opening multiple windows with different user names. Sending messages and leaving should work appropriately and look as shown in Figure 13.15.
Figure 13.15 Completed Project #3
13.8.4 References
1. https:/
/ blog.risingstack.com/ node-js-is-enterprise-ready/ . 2. Slobodan Stojanović and Aleksandar Simović, Serverless Applications with Node.js, Manning Publications, 2018.
3. Jason Lengstorf, email correspondent.