13.5 Working with Web Sockets
As mentioned earlier in the chapter, one of the key benefits of the Node environment is its ability to create push-based applications. This ability is in fact partly reliant on WebSockets, a browser feature supported, at the time of writing, by all current browsers.
WebSockets is an API that makes it possible to open an interactive (two-way) communication channel between the browser and a server that doesn’t use HTTP (except to initiate the communication). Its main benefit is that it provides a way for the server to send or push content to a client without the client requesting it first. As well, WebSockets allows full-duplex communication, which means communication can be going from client-to-server and server-to-client simultaneously.
There are several WebSocket modules available via npm. In the following example, we will use Socket.io (http://socket.io/). Since Socket.io is not part of the default Node system, to use it you will need to add it to your project via the command:
npm install socket.ioThis command installs the necessary JavaScript code for both the client and the server. This is a point worth reiterating: Socket.io contains two JavaScript APIs: one that runs on the browser and one that runs on the server. To illustrate, let’s look at an example. It consists of two files:
The Node server application (chat-server.js) that will receive and then push out received messages.
The browser client file (chat-client.html) that the server application will send out when a browser makes a request of the server application. The client file will contain the user interface that sends and receives the chat messages.
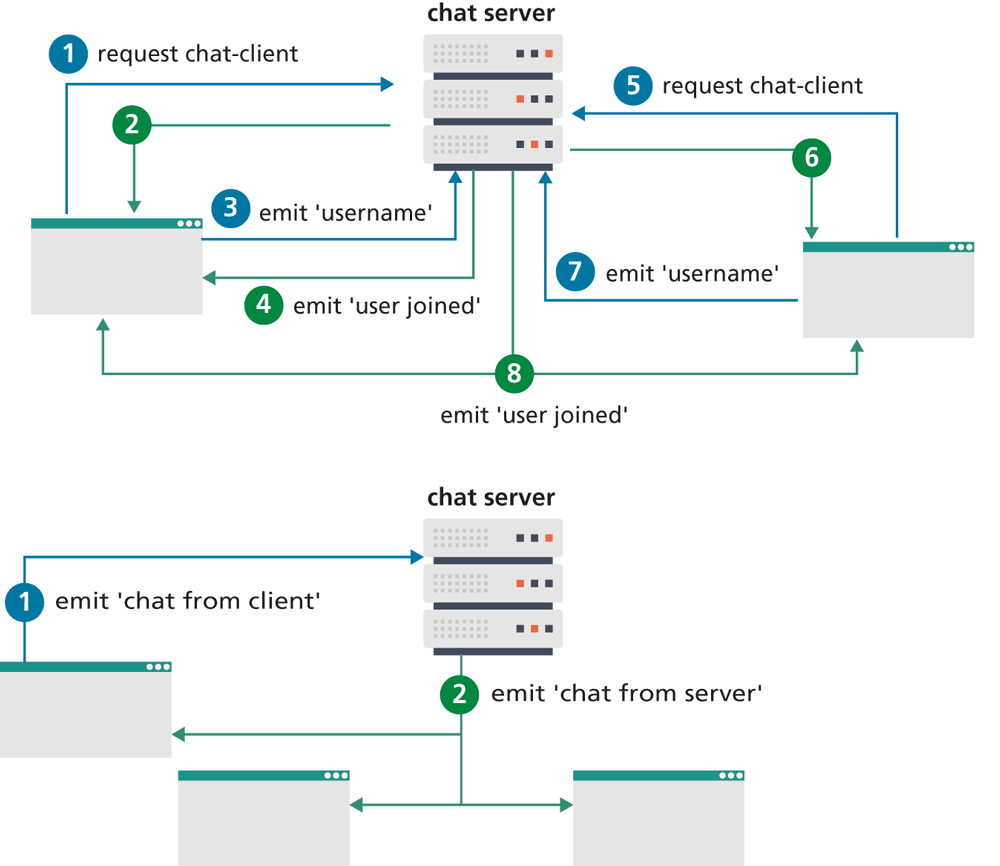
Figure 13.10 illustrates the overall flow of messages between the chat server and the various chat clients. Listing 13.9 shows a simple Node chat server. The Socket.io module does all the real WebSocket work for us.
Figure 13.10 Message flow using Socket.io
Listing 13.9 Chat Server (chat-server.js)
const path = require("path");
const express = require("express");
const app = express();
const http = require("http").createServer (app);
const io = require("socket.io")(http);
// handle requests for static resources
app.use("/static", express.static(path.join(__dirname, "public")));
// every time we receive a root get request, send the chat client
app.get("/", (req, res) => {
   res.sendFile( __dirname + "/public/chat-client.html");
});
// handles all WebSocket events, each client will be given a // unique socket
io.on("connection", (socket) => {
   // client has sent a username message (message names can be
   // any valid string)
   socket.on("username", (msg) => {
      // save username for this socket
      socket.username = msg;
      // broadcast message to all connected clients
      const obj = { user: socket.username, message: msg };
      io.emit("user joined", obj );
   });
   // client has sent a chat message . . . broadcast it
   socket.on("chat from client", (msg) => {
      const obj = { user: socket.username, message: msg };
      io.emit("chat from server", obj);
   });
});
http.listen(7000, () => {
  console.log("listening on *:7000");
});
The io.on() function handles all WebSocket-related events. The socket.io() function handles the reception of messages from clients. You can specify different message types via the first parameter. In Listing 13.9, the server application handles two types of message from its clients: a username message (which provides the client-gathered user name) and a chat from client message. The actual message names can be anything you’d like.
As can be seen in Listing 13.9, a message is broadcast (or pushed) to all connected clients via the io.emit() function. We can send any kind of object via this method. The object in the listing contains the username that generated the message and the text of the message, but we could customize our code to send an object with additional information in it.
The client (shown in Listing 13.10) is only slightly more complicated. The HTML is relatively simple. It includes the Socket.io client JavaScript libraries and includes an area that will display received messages as well as a <form> for submitting chat messages.
Listing 13.10 Chat Client
<head>
   ...
   <script src="/socket.io/socket.io.js"></script>
</head>
<body>
<div class="panel">
  <div class="panel-header"><h3>chat</h3></div>
  <div class="panel-body"><ul id="messages"></div>
  <div class="panel-footer">
    <form action="">
      <input type="text" id="entry" autocomplete="off" />
      <button>Send</button>
    </form>
  </div>
</div>
<script>
// this initiates the WebSocket connection
const socket = io();

// get user name and then tell the server
let username = prompt("What's your username?");
document.querySelector(".panel-header h3").textContent =
     "Chat [" + username + "]";
socket.emit("username", username);

// a new user connection message has been received
socket.on("user joined", msg => {
   const li = document.createElement("li");
   li.innerHTML = `${msg.user} - ${msg.message}`;
   document.querySelector("#messages").appendChild(li);
});

// user has entered a new message
document.querySelector("#chatForm").addEventListener('submit', e => {
   e.preventDefault();
   const entry = document.querySelector("#entry");
   socket.emit("chat from client", entry.value);
   entry.value = "";
});

// a new chat message has been received
socket.on("chat from server", msg => {
   const li = document.createElement("li");
   li.textContent = msg.user + ": " + msg.message;
   document.querySelector("#messages").appendChild(li);
});
</script>
The WebSocket work is handled by the Socket.io client library. It uses the emit() function to send messages to the server; like the emit() function on the server side, you can differentiate different types of messages by supplying different message names. The on() function is used to handle messages that have been received from the server (that is, pushed to the client). Figure 13.11 illustrates the application in the browser.
Figure 13.11 Chat in the browser

Test Your Knowledge #2
Expand the chat server and client in Listings 13.9 and 13.10.
Add a Leave button to the chat client. Add an event handler for this new button that emits a 'client left' message to the server. This message should include the user name.
Add a handler to the chat server for the new 'client left' message that emits a 'user has left' message out to all clients. That message should include the user name.
Add a handler to the chat client for the 'user has left' message. It should display a suitable message in the messages
<ul>element.