13.2 First Steps with Node
Just like with PHP, to work with Node you need to have the software installed on a web server. Also like with PHP, you have a variety of different options to do so. You can install Node locally on your development machine. You may have access to a web server that already has Node installed. Or you may want to make use of preconfigured cloud environment that already has Node installed.
13.2.1 Simple Node Application
Assuming you have installed Node or have access to it, let’s create a simple Node application. We will begin with the usual Hello World example. Create a new file, enter the code shown in Listing 13.1 into that file, and save it as hello.js.
Listing 13.1 Hello World in Node
// make use of the http module
const http = require('http');
// configure HTTP server to respond with simple message to all requests
const server = http.createServer(function (request, response) {
response.writeHead(200, {"Content-Type": "text/plain"});
response.write("Hello this is our first node.js application");
response.end();
});
// Listen on port 8080 on localhost
const port = 8080;
server.listen(port);
// display a message on the terminal
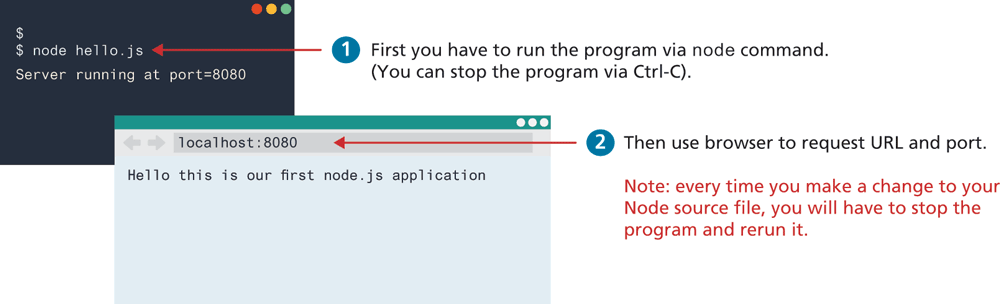
console.log("Server running at port=" + port);How do you think you will run this application? If you try opening this file directly in the browser, it will not work for the same reasons why opening a PHP file directly in the browser doesn’t work. We have to tell Node to execute this file. How do you do that? If you have installed Node locally, you will need to open a command/terminal window, navigate to the folder where you have saved this file, and enter the following command:
node hello.jsThis should display a message that the server is running at a specific port. You now need to switch to your browser, and make a request for localhost on port 8080. If it works, you should see something similar to that shown in Figure 13.5.
Figure 13.5 Running the Hello World example
So what is this code doing? Notice the first line with the require call. It tells the Node runtime to make use of a module named http. You may recall encountering JavaScript modules in Chapter 10, which are a new addition to JavaScript for providing better code encapsulation and for reducing namespace conflicts. Node had to develop its own module system (usually referred to as CommonJS), since JavaScript (until recently) didn’t have one. At the time of writing, Node’s latest version (14.8) supports the newer ES6 syntax for modules (i.e., using the import keywords); nonetheless, most already existing Node code uses the require() function and not the import statement.
So what is a Node module? A module is simply a JavaScript function library with some additional code to wrap the functions within an object. The Node core includes several important modules (e.g., http as in Listing 13.1) that only need the appropriate require() function call. Most Node applications, however, typically require the installation of additional modules, which requires the use of npm, the Node Package Manager (see the nearby Tools Insight section for more information on npm).
The rest of the code in Listing 13.1 consists of a call to createServer(), which is a JavaScript function defined within the http module. Like many other Node functions, it is passed a callback function that you supply. In this example, it sends back an HTTP response code with a Content-Type HTTP header, as well as some text content. The browser will simply display the text content.
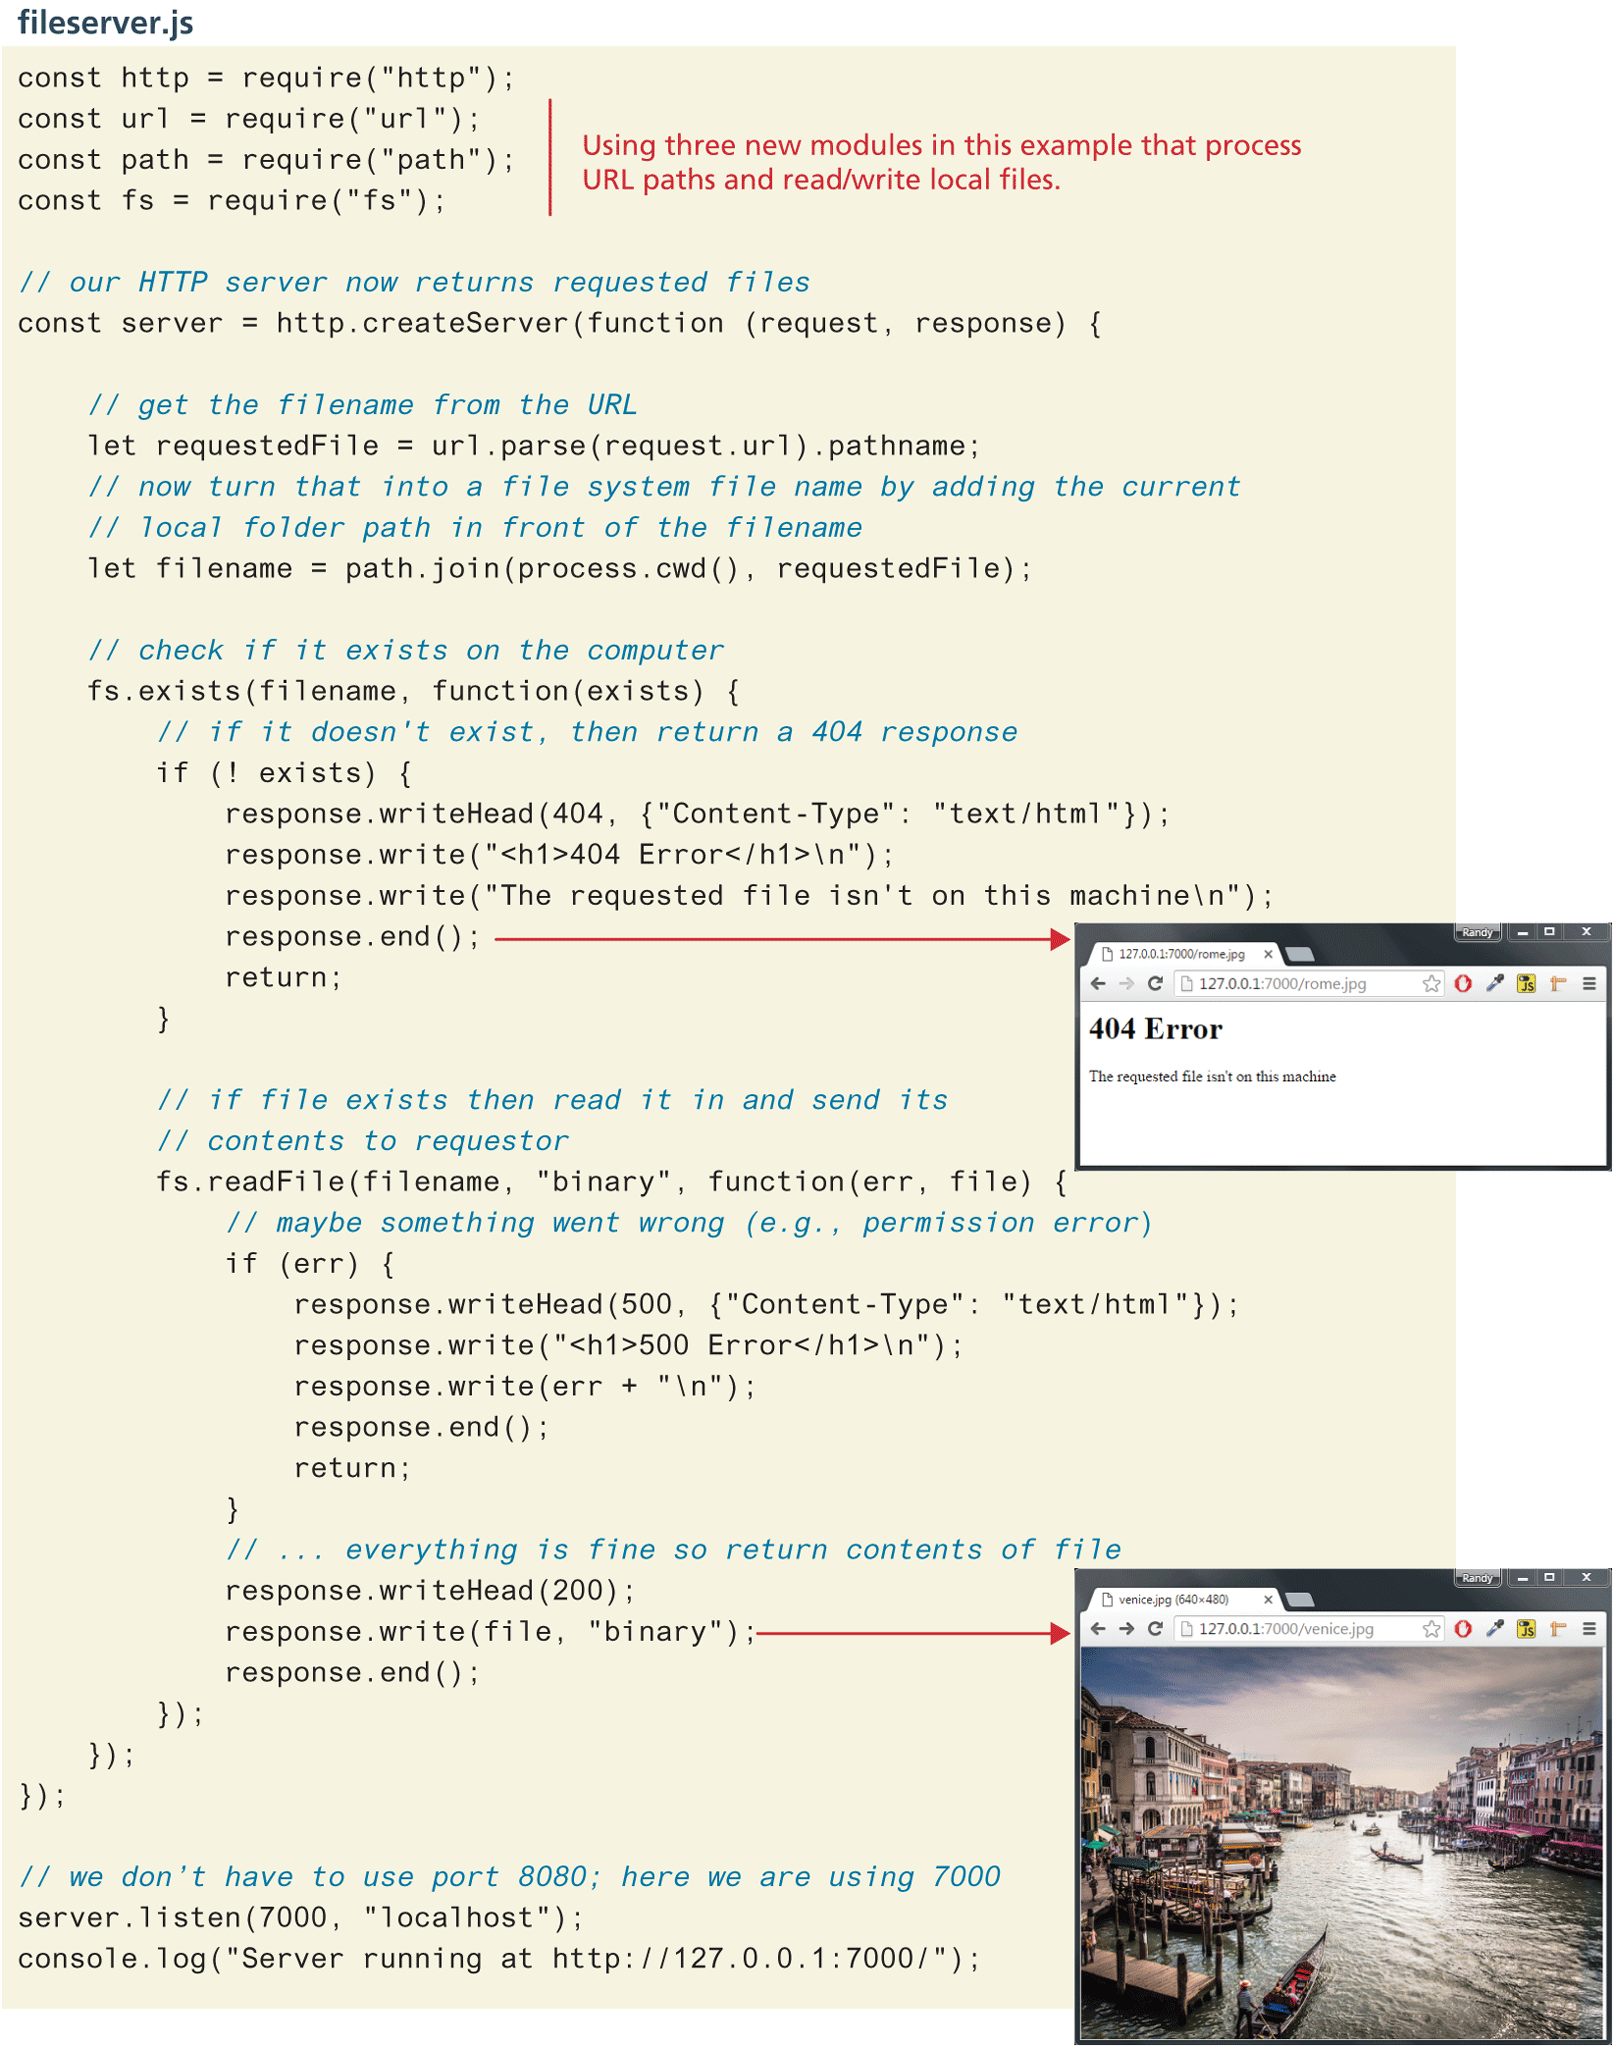
Figure 13.6 provides a slightly more complicated example: a static file server. It responds to an HTTP request for a file by seeing if it exists. If it doesn’t, then it sends the appropriate 404 content back to the requestor. If it does exist, then it sends the content of the requested file. This is your own simple version of Apache or IIS!
Figure 13.6 Static file server
13.2.2 Adding Express
Many Node developers try to simplify and reduce the amount of coding they have to write by making use of preexisting modules. One of the most popular is Express, which is a relatively small and lightweight JavaScript framework to simplify the construction of web applications and web services in Node.
To make use of Express in any Node application, you have to first use npm to install Express’s JavaScript files into your application folder (see earlier Tools Insight section) using the following command:
npm install expressOnce you have done that, you simply need to add the appropriate require() invocation, and then you can begin making use of Express. An (almost) equivalent Express version of the file server in Figure 13.6 can be seen in Listing 13.2.
Listing 13.2 Express version of file server
const path = require("path");
const express = require("express");
const app = express();
const options = {
   // maps root requests (e.g. "/") to subfolder named "public"
   root: path.join(__dirname, "public")
};
// With express, you define handlers for routes.
app.get("/:filename", (req, resp) => {
   resp.sendFile(req.params.filename, options, (err) => {
      if (err) {
         console.log(err);
         resp.status(404).send("File Not Found");
      }
      else {
         console.log("Sent:", req.params.filename);
      }
   });
});
app.listen(8080, () => {
   console.log("Example express file server listening on port 8080");
});
With Express, you typically write handlers for the different routes in your application. What is a route? A route in Express is a URL, a series of folders or files or parameter data within the URL. This particular example has just a single route: the ‘/’. Anything after the slash is treated as parameter data that is contained for you within the filename variable. There is nothing special about the name filename. We could have named this variable anything we wished.
Each handler in Express will be passed at least two parameter variables: a request object and a response object. The request object contains a params object that holds any parameter data included with the request/route. The response object provides methods for setting HTTP headers and cookies, sending files or JSON data, and so on. A third parameter, usually named next, can also be provided, which is described below.
You could in fact make a simple file server even with even less code in Express by using the static() function:
var express = require("express");
var app = express();
app.use("/static", express.static(path.join(__dirname, "public")));
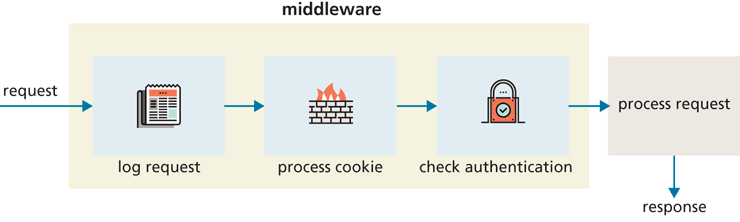
app.listen(8080, () => { ... });The app.use() function executes the provided middleware function. In Express, a middleware function is a function that is normally passed the request object, the response object, and the next function in the chain of functions handling the request. The next function is not always necessary, but processing of the request will end if the middleware function doesn’t call it after it is finished its processing. The rationale behind middleware functions is that a series of functions can each have a turn to preprocess the request. Why would you want to do this? Figure 13.7 illustrates a scenario in which three different middleware functions pre-process each request.
Figure 13.7 Middleware functions in Express
In the previous code using the static() function, the first parameter to the app.use() function is the requested route, while the express.static() function is a middleware function for serving static resources. That line will take all requests for files that begin with the /static route (e.g., http:/public folder.
13.2.3 Environment Variables
Environment variables provide a mechanism for configuring your Node application. You can see what environment variables are available for your system via:
console.log(process.env);Some hosting environments will automatically set some environment variables, such as a PORT value. You can however set your environment variables using the popular dotenv package using the command:
npm install dotenvOnce installed, you can create your own environment variables within a file named .env (there are no characters before the dot). This environment file can contain any number of name=value pairs, such as:
PORT=8080
BUILD=development
Within your Node applications, you can reference the values in this file using the dotenv package, as shown in the following example:
// make use of dotenv package
require('dotenv').config();
// reference values from the .env file
console.log("build type=" + process.env.BUILD);
server.listen(process.env.PORT);
It is common to place sensitive information such as API keys and secret values in this .env file, so you typically need to add .env to your .gitignore file so this information doesn't get accidentally pushed to a public repository.