12.9 Chapter Summary
In this chapter, we have covered two key aspects of server-side development in PHP. We began by exploring what server-side development is in general in the context of the LAMP software stack. The latter half of the chapter focused on introductory PHP syntax, covering all the core programming concepts including variables, functions, and program flow.
12.9.1 Key Terms
branch
local repository
remote repository
12.9.2 Review Questions
What are the superglobal arrays in PHP?
How are array elements accessed in PHP for associative and regular nonassociative arrays?
Write two loops: one to echo out the contents of a one-dimensional array with numeric indexes and one to echo out the elements of a one-dimensional associative array.
In a PHP class, what is a constructor? What is a method?
How does redirection work in PHP? What actually happens with a HTTP redirection?
What is the
header()function used for in PHP?What does it mean that PHP is dynamically typed?
What are server-side include files? Why are they important in PHP?
Can we have two functions with the same name in PHP? Why or why not?
How do we define default function parameters in PHP?
How are parameters passed by reference different than those passed by value?
12.9.3 Hands on Practice
Project 1: Arrays
Difficulty Level: Beginner
Overview
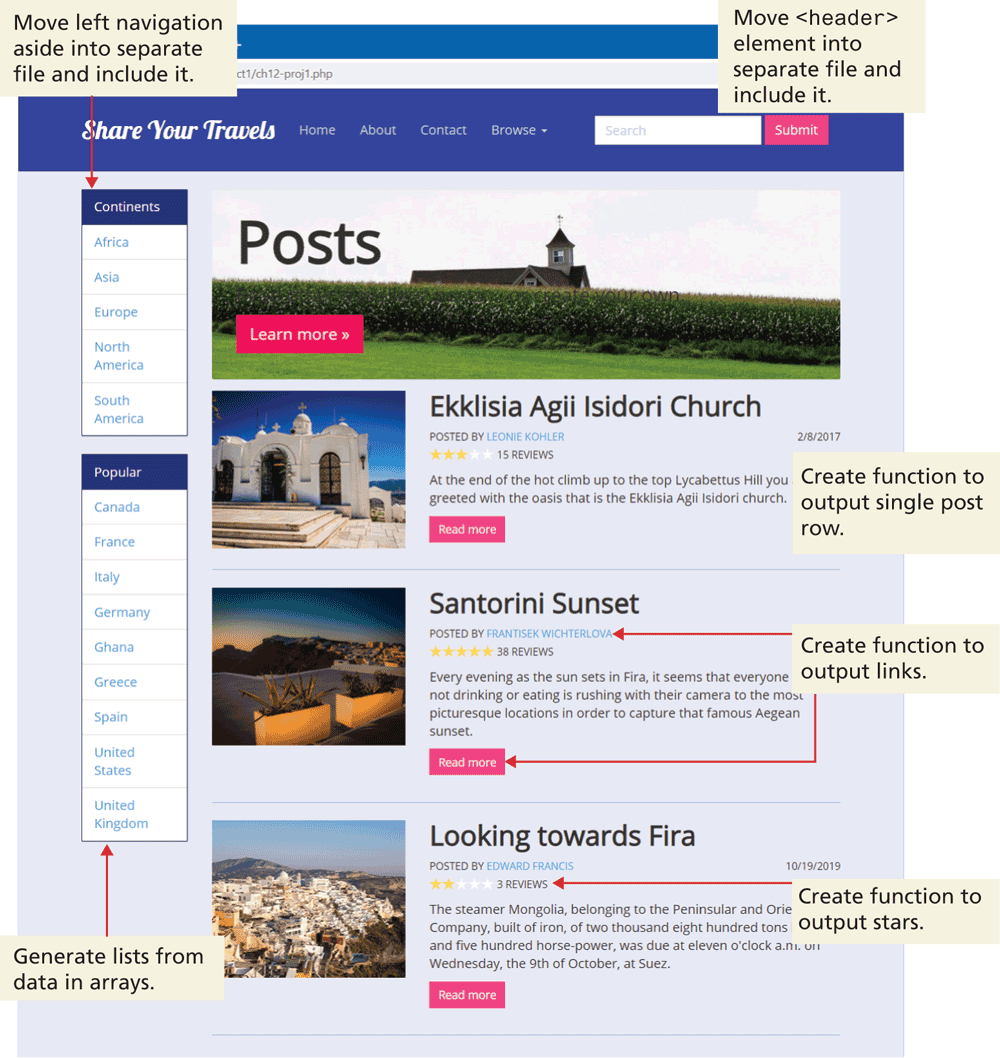
Demonstrate your ability to create a data-driven PHP page by creating PHP functions and include files so that ch12-proj1.php looks similar to that shown in Figure 12.30. The data needed for this page are in a file named data.inc.php.
Figure 12.30 Completed Project 1
Instructions
Examine the provided HTML file (ch12-proj1.html) that demonstrates what markup your PHP must eventually generate. Examine also the provided data file (data.inc.php) that contains three arrays. You will be modifying ch12-proj1.php (initially it is a copy of ch12-proj1.html) for this project.
Move the header and left navigation markup in ch12-proj1.php into two separate include files. Use the PHP
include()function to include each of these files back into the original file.In the left navigation area, replace the static list of
<li>elements containing the continent names, with a loop that displays the same elements but using the data in the$continentsarray.Create a function called
generateLink()that takes three arguments:$url,$label, and$class, which will echo a properly formed hyperlink in the following form:<a href="$url" class="$class">$label</a>In the left navigation area, replace the static list of
<li>elements containing the continent names, with a loop that displays the same elements but using the data in the$countriesarray. Notice that this array is an associative array, so it will require a different type of loop. Use thegenerateLink()function for the country link. Notice that this link contains a query string making use of the key value of the$countriesarray.Create a function called
outputPostRow()that takes as a single argument a post element (i.e., a single element from the$poststwo-dimensional array). This function will echo the necessary markup for a single post. Be sure to also use yourgenerateLink()function for the three links (image, user name, read more) in each post. Notice that these links contain query strings making use of the userId or postId.Create a function that takes one parameter. This parameter will contain a number between (and including) 0 and 5. Your function will output that number of gold star image elements; after that it will also output, however, many white star images so that five stars in total are displayed.
Modify your
outputPostRow()function so that it calls your star-making function.Remove the existing post markup and replace with a loop that calls
outputPostRow().
Guidance and Testing
Remember that you cannot simply open a local PHP page in the browser using its open command. Instead you must have the browser request the page from a server. If you are using a local server such as XAMPP, the file must exist within the
htdocsfolder of the server, and then the request will be localhost/some-path/ch12-proj1.php.Break this problem into smaller steps. After each step, test the page in the browser.
Verify that your page works correctly by altering the data in data.inc.php.
Project 2: Form and Response
Difficulty Level: Beginner
Overview
Demonstrate your ability to create a data-driven PHP page and to use superglobal arrays.
Instructions
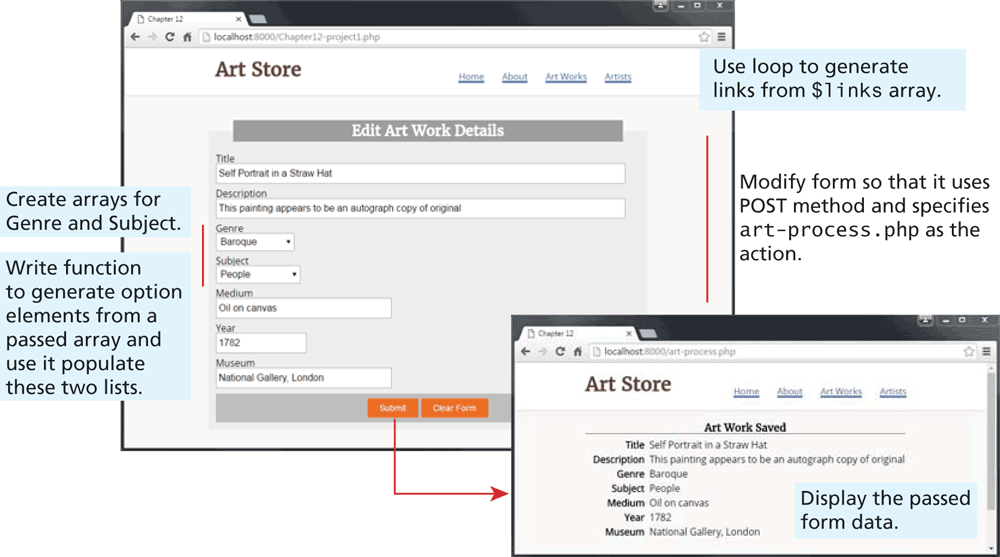
You have been provided with two files: the data entry form (ch12-proj2.php) and the page that will process the form data (art-process.php). Examine both in the browser.
Modify ch12-proj21.php so that it uses the POST method and specify art-process.php as the form action.
Write a loop that uses the
$linksarray in the data.inc.php to generate the hyperlinks in the header.Define two string arrays, one containing the genres Abstract, Baroque, Gothic, and Renaissance, and the other containing the subjects Animals, Landscape, and People.
Write a function that is passed a string array and which returns a string containing each array element within an
<option>element. Use this function to output the Genre and Subject<select>lists.Modify art-process.php so that it displays the all the values that were entered into the form, as shown in Figure 12.31. This will require using the appropriate superglobal array.
Figure 12.31 Completed Project 2
Guidance and Testing
Test the page. Be sure to verify appropriate error messages are displayed when art-process.php is requested without POST data.
Project 3: Working with HTTP Headers
Difficulty Level: Intermediate
Overview
Demonstrate your ability to create a data-driven PHP page, use superglobal data, and to modify HTTP header.
Instructions
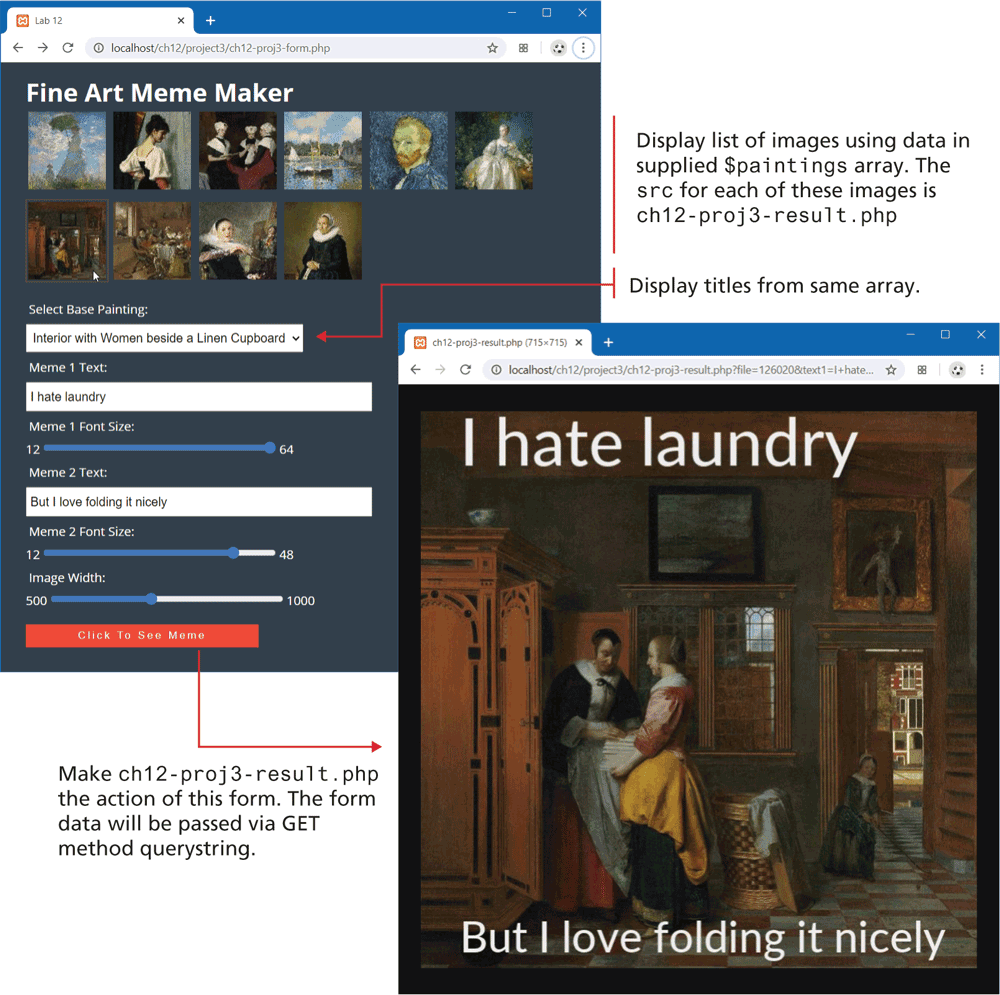
Examine ch12-proj3-form.php and view in browser and then the editor. Notice that it contains a
<form>usingmethod=getandaction=ch12-proj3-result.php. Examine data.inc.php that contains the data for the paintings to be displayed in this form. The ch12-proj3-form.html shows the markup that your code will have to generate.You will implement ch12-proj3-result.php using code similar to that shown in Figure 12.29, except rather than hard-coded font sizes and text labels, you will use the form data passed to it. Examining the form elements in ch12-proj3-form.php will indicate the values to use with the $_GET superglobal array.
Implement as well a
widthquery string that, if present, will use theimagescale()function to return an image of the specified width (the height will be the same as the width).You can use this
widthparameter to generate the thumbnails at the top of ch12-proj3-form.php by adding a loop within the grid-container<section>. Simply loop through the supplied data array, and echo an<img>element with thesrcattribute set to ch12-proj3-result.php that has afilequerystring parameter set to the filename from the data array and awidthquerystring parameter set to 100. For the supplied JavaScript to work correctly, also set thedata-valueattribute of theimgto the filename also.Generate the options for the
<select>list using a PHP loop. Each<option>should have the value set to the filename.When done, the form and the result will look like that shown in Figure 12.32.
Figure 12.32 Completed Project 3
Guidance and Testing
Again, break this problem down into smaller steps. The key functionality requires a working ch12-proj3-result.php so steps 2 and 3 will have to be implemented early on.
Once your project is working, try saving the generated image file to your computer and then examine it in your operating system. Unlike a JavaScript version of this functionality, this example actually generates an image file containing the text.
12.9.4 Reference
1. PHP, “Classes and Objects.” [Online]. http:/
/ php.net/ manual/ en/ language.oop5.php.