11.7 Chapter Summary
This chapter has provided an overview of the most popular JavaScript framework: the React library, which was originally created by Facebook. It discussed the role of JavaScript frameworks in general and demonstrated how the component-based approach of React ultimately makes for a more composable system for creating and maintaining web applications. React certainly has a learning curve, which required learning how to use props, state, and behaviors with both functional and class components. Because React uses its own JSX language, build tools are typically used to transform JSX into JavaScript: this chapter made use of the build process provided by the create-react-app application. Finally, the chapter briefly looked at the React lifecycle and how to extend React with components libraries.
11.7.1 Key Terms
11.7.2 Review Questions
What are the key advantages and disadvantages of using a software framework when constructing web applications?
What is a single-page application? Why are frameworks helpful in their creation?
What were the original use cases for jQuery? Why is jQuery less important today than it was a decade ago?
How are functional components different from class components?
What are the advantages of React’s component-based approach to constructing user interfaces?
Describe the difference between props and state in React.
What are the differences between controlled versus uncontrolled form components? Why would you use one over the other?
What does the term props-drilling refer to? Why is it necessary in React?
Why are build tools necessary for production React sites?
Provide a brief discussion of the React lifecycle. When should data be fetched from an external API?
Why is routing needed in React?
Why might one make use of a state mechanism such as Redux or Context Provider?
11.7.3 Hands-On Practice
Project 1: Editor
Difficulty Level: Beginner
Overview
This project requires the creation of multiple interconnected components. Figure 11.20 illustrates what the finished version should look like along with the required component hierarchy. Changing any of the form fields on the right will update the movie display on the left.
Figure 11.20 Completed Project 1

Instructions
The starting of the components and their
render()methods have been provided. The data is contained within the file movie-data.js. You can complete this project using the techniques covered in sections 11.2 and 11.3. You could instead use create-react-app as your starting point.Implement the rest of the
MovieList,SingleMovie, andMovieLinkcomponents. ForMovieList, you will need to render a<SingleMovie>for each movie in the passed list of movies usingmap(). You will need to pass a movie object toSingleMovie. ForSingleMovie, you will need to replace the sample data with data from the passed-in movie object. In the footer area, you will render a<MovieLink>and pass it thetmdbIDproperty from the movie object.MovieLinkmust be a functional component. It will return markup similar to the following (though you will replace 1366 with the passedtmdbIDvalue):<a className="button card-footer-item" href="https://www.themoviedb.org/movie/1366" > <img src="images/tmdb.svg" width="30" /> </a>In the
Appcomponent, you will add the<MovieList>component to the render. Be sure to pass it the list of movies in state. Test.In the
Appcomponent, usemap()to output a<MovieForm>for each movie. Be sure to pass both index and key values to eachMovieForm. Also pass thesaveChangesmethod to eachMovieForm. Test.Make
MovieForma Controlled Form Component. This will require creating some type of handler method withinMovieFormthat will call thesaveChangesmethod that has been passed in (see also next step).Implement
saveChangesin theAppcomponent. Notice that it expects a movie object that contains within it the new data. Your method will use the index to replace the movie object from the movies data with the new data, and then update the state. Test.
Guidance and Testing
Break this problem down into smaller steps. Verify each component works as you create them.
Project 2: Favorites List
Difficulty Level: Intermediate
Overview
This project builds on the completed Test Your Knowledge #2 by adding a favorites list.
Instructions
Use your completed Test Your Knowledge #2 as the starting point for this project.
The
PhotoThumbcomponent already has an Add Favorite button (the heart icon). You are going to implement its functionality. When the user clicks on this button, it will add a new favorite to an array stored in state, which should update the display in the Favorites component (it will be blank row at first between the header and the photo browser).You will need to create two new components: one called
FavoriteBar, the other calledFavoriteItem(there is already a CSS class defined in the provided CSS named favorites).FavoriteBarshould display a list ofFavoriteItemcomponents. Since thefavoritesCSS class uses grid layout, yourFavoriteItemcomponent will need to wrap the image in a block-level item, such as a<div>. You will also need to add theFavoriteBarcomponent to therenderfunction ofApp.For each thumbnail in FavoriteItem, you will need to add a click handler that will remove the image from the favorites list. The supplied CSS uses the :hover pseudo-element to visually indicate what will happen when the user clicks an image in the list.
Implement the hide/show functionality in
FavoriteBar.
Guidance and Testing
Break this problem down into smaller steps. First verify the add to favorites and remove from favorites functions work simply by outputting the revised list to the console.
Once you are sure the add and remove functions work, implement the functionality in the new components.
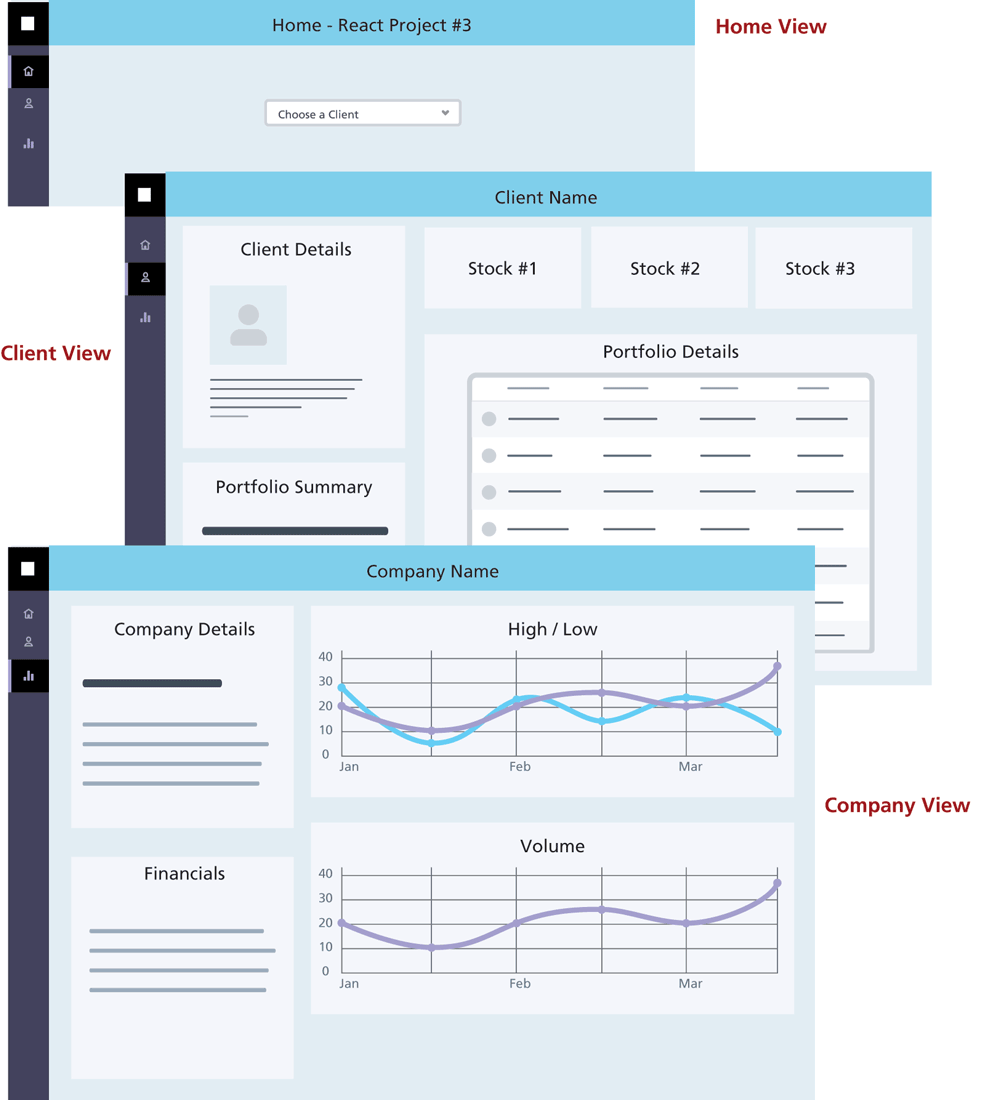
Project 3: Stock Dashboard
Difficulty Level: Advanced
Overview
In this project, you will be creating a more complex dashboard application. Figure 11.21 illustrates a wireframe diagram for this application. You will not be supplied any user interface: you can create your own styling or make use of a third-party React UI component library. The provided readme file contains URLs for the three APIs (Client API, Portfolio API, History API) and the location for the company logo images.
Figure 11.21 Wireframe for Project 3
Instructions
This project is a single-page application containing three views: Home, Client, and Company. Your application must display different views depending on the left-side menu selection. It should default to the Home view.
When your application starts, it should display the Home view. This will contain just a single
<select>list with a list of client names obtained from the client API. When the user selects a client, the Client view will be displayed.The client view will display the information obtained from the Client API. The portfolio for the client can be obtained from the Portfolio API using the id for the current client. The entire client’s stock portfolio details should be displayed in a table: it should display the company stock symbol, the company name, the current value of that stock from the History API, the number of that stocks in the portfolio, and the total value (number owned x current stock value) for this portfolio item. Display the top three stocks in terms of their total value near the top of the view (in the box, display the stock symbol and its total value in the portfolio. The portfolio summary should display the following values: total current portfolio value, the number of portfolio items, total number of stocks.
When the user clicks on a company name or a stock symbol, switch to the Company View. It should display information about the company obtained from the Company API, which includes financial information. The History API provides three months of daily stock values. Display two lines charts using that data: one with the daily high and low values, the other with the daily volume values.
Guidance and Testing
Break this problem down into smaller steps. It’s going to require multiple components.
Examine the different APIs in a browser first so you can see the structure of the data.
11.7.4 References
3. Eric Eblliot, Composing Software: An exploration of Functional Programming and Object Composition in JavaScript (LeanPub, 2018).