11.4 React Build Approach
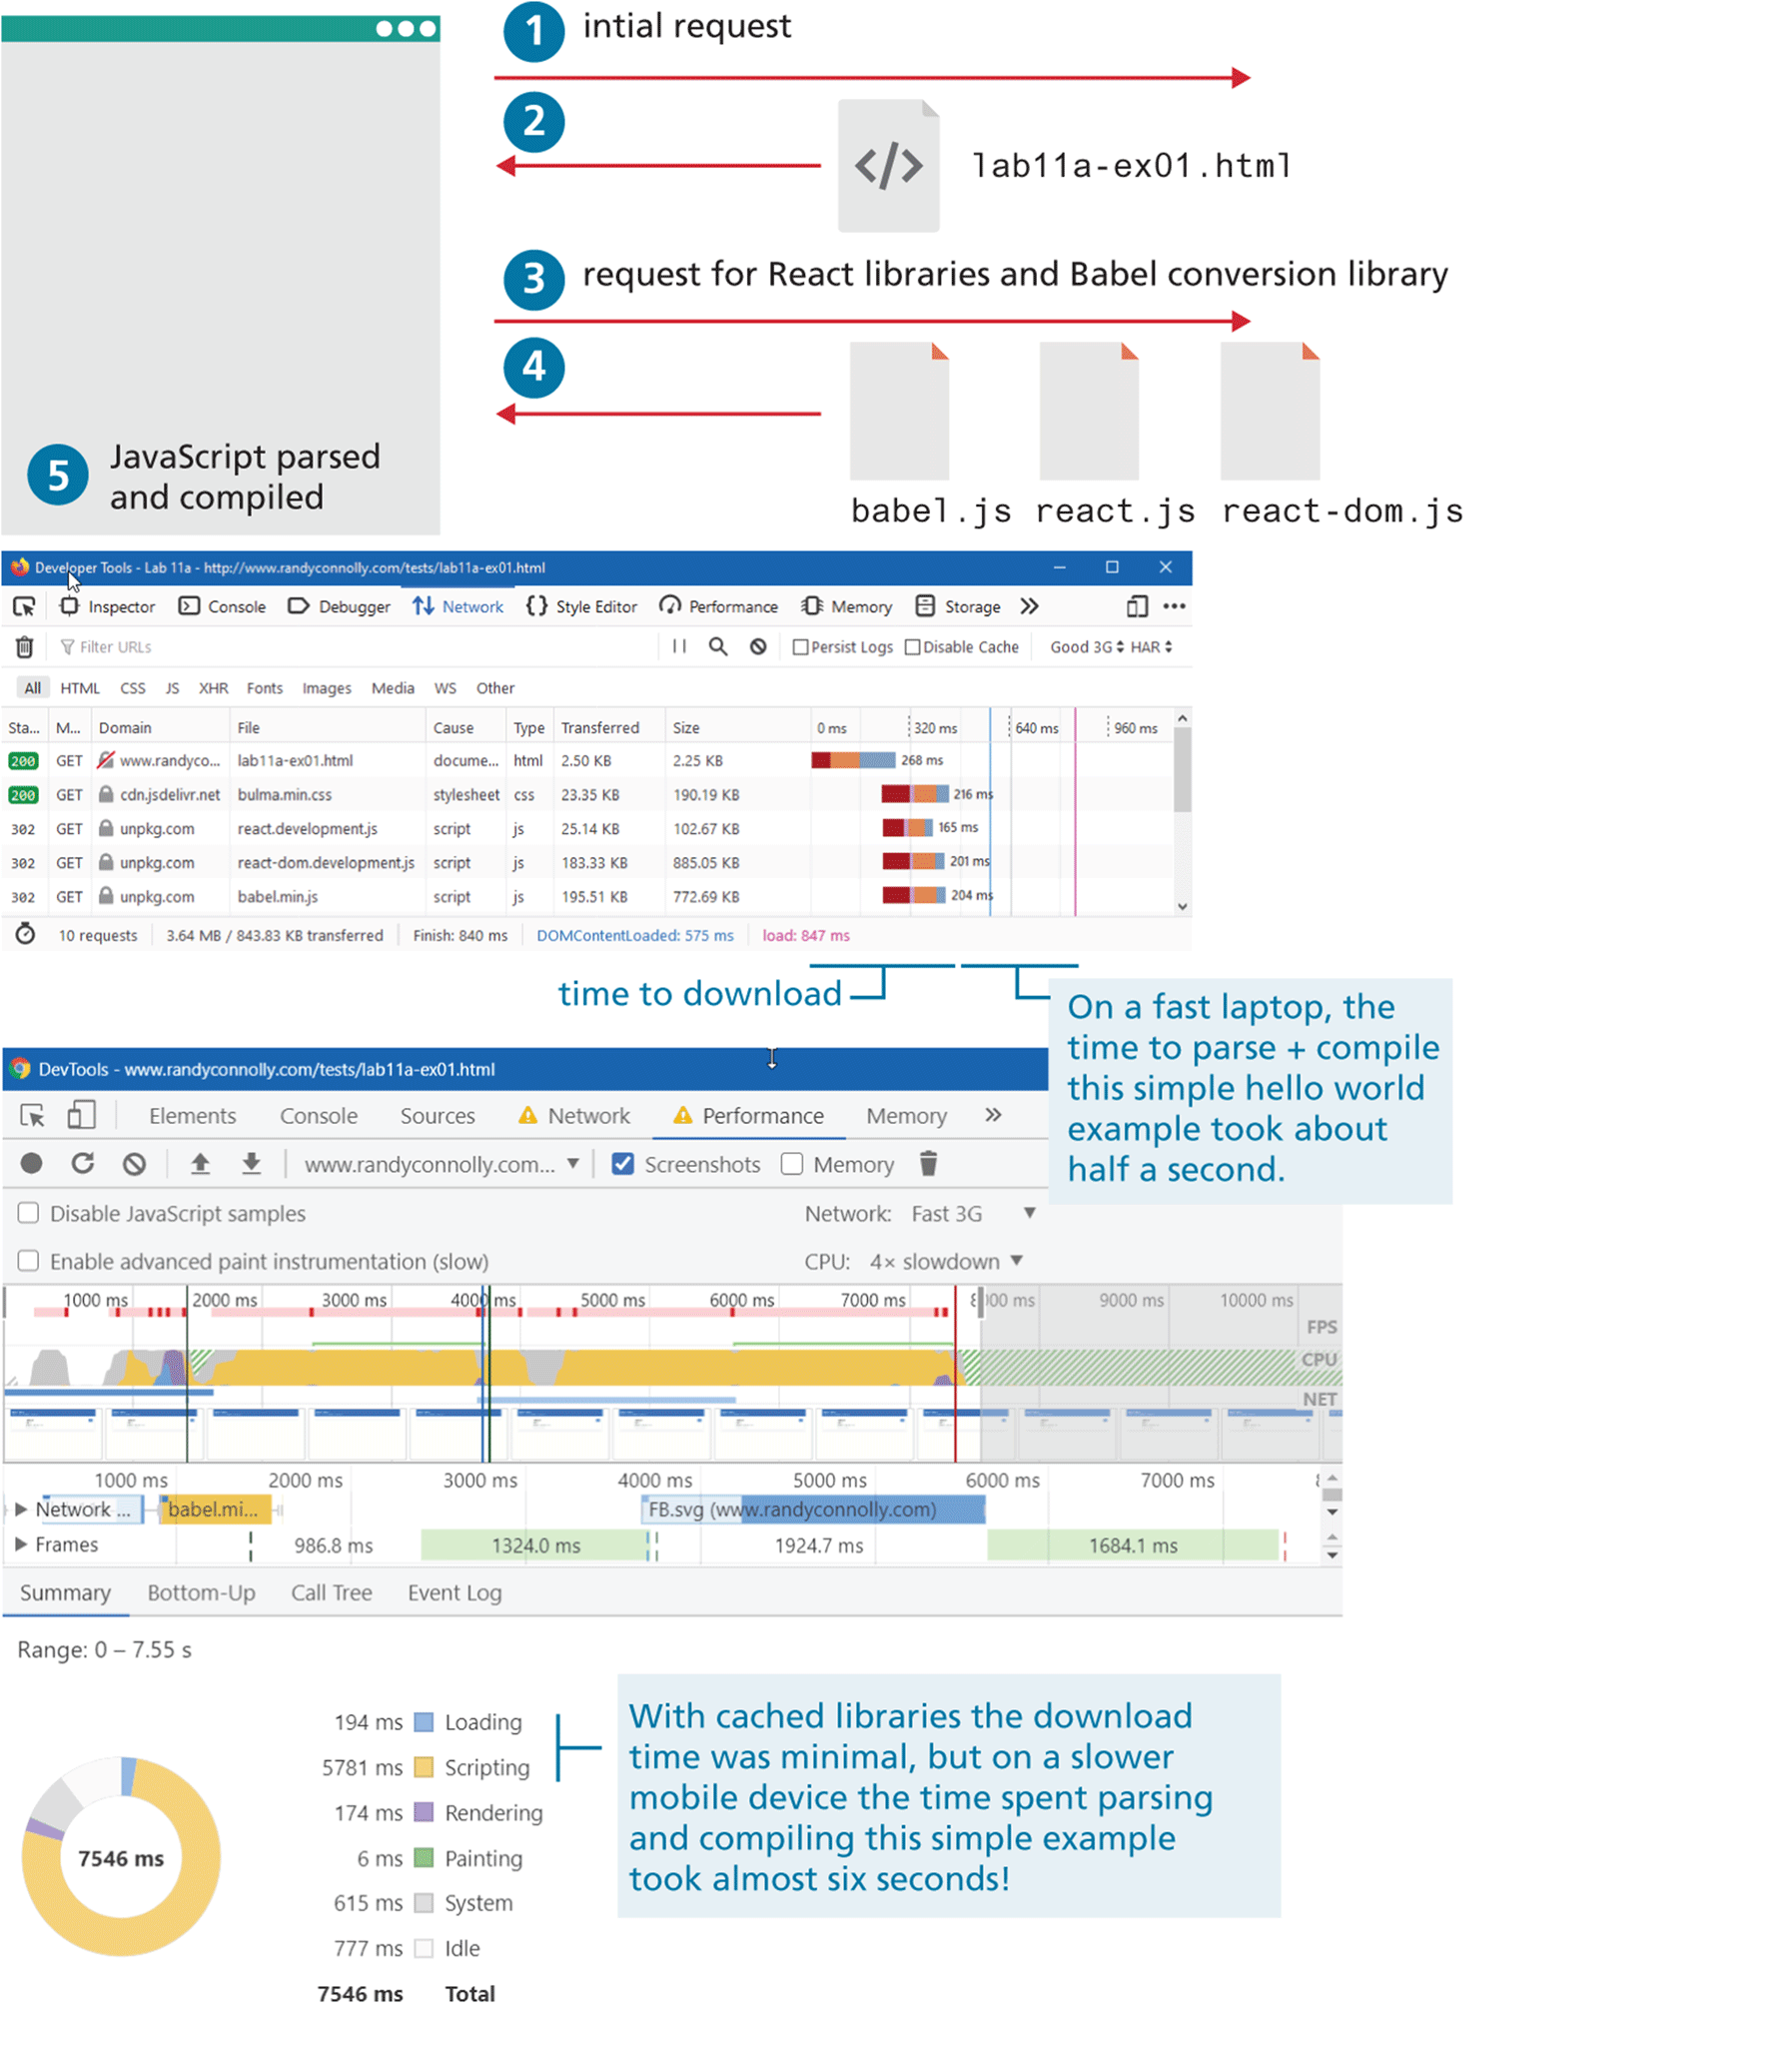
So far in the chapter you have made use of an in-browser conversion library from Babel which converted the JSX you wrote into JavaScript. This conversion happened at run-time and was necessary because the browser doesn’t understand JSX. While a convenient approach when first learning React, it is not an acceptable approach for production sites. Why not? Production sites need to be as fast and responsive as possible: the additional ½- to 1-second delay in TTI necessitated by downloading, parsing, and compiling the Babel conversion scripts plus the in-browser conversion of JSX to JavaScript every time a user visits a page will result in a measurable decrease in user satisfaction.
Figure 11.13 illustrates the time consumed by the five steps your browser must perform in order to execute the in-browser Babel approach. The first screen capture in the figure shows the FireFox Network tab that shows the time costs in downloading and parsing the JavaScript on my fast laptop. The second screen capture shows the Google Performance report for a slower mobile device. As you can see, on a slower device, the time cost involved in parsing and compiling all this additional JavaScript is very substantial: almost 6 seconds of delay before this very simple React page is interactive.
Figure 11.13 React via runtime conversion versus design-time conversion
Some of these delays can be eliminated by doing the translation of JSX to JavaScript at design time instead. This necessitates having some type of build step, which so far in this book you have not yet encountered. But for most production sites (regardless of whether they are using React), a build tool is an indispensable part of the development workflow. Why is this the case? The short answer is that they help manage dependencies in the site’s code base.
11.4.1 Build Tools
Perhaps the best way to visualize the problem of dependencies in JavaScript is to examine Figure 11.14. In the illustration, there are five separate JavaScript files with dependencies (i.e., they are calling functions or using variables defined in other files).
Figure 11.14 Problem of dependencies between JavaScript files
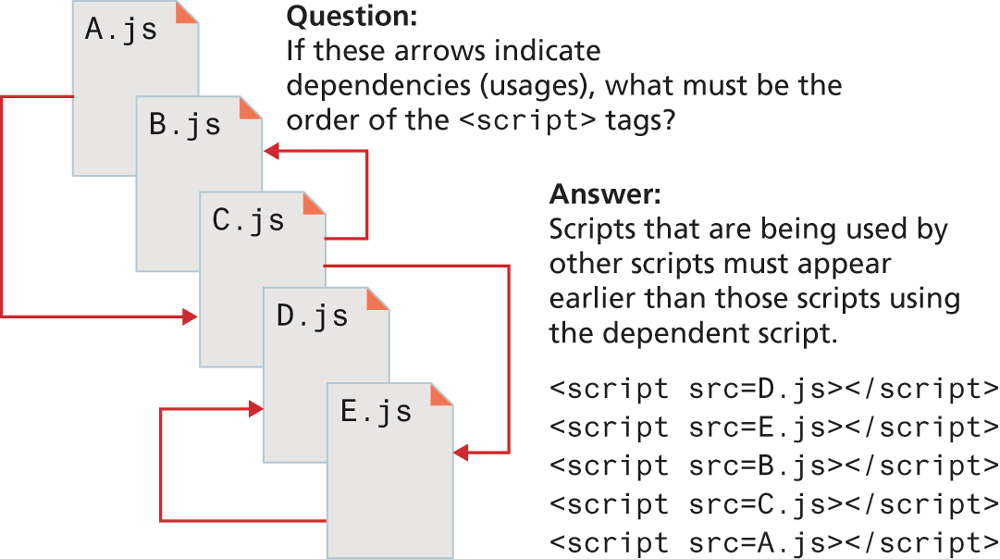
As you can see, the dependency chain between the files would require a very specific order in terms of their appearance via the <script> tag on the page. You could eliminate this problem by combining all these files into a single file: however, you lose the maintainability advantage of splitting your code base into multiple files.
A build tool can not only manage this particular problem, but also handle a variety of other repetitive, complex, and tedious tasks. A build tool is used to build and manage your code base. It typically can perform tasks such as:
Run transcompilers (e.g., JSX to JavaScript, TypeScript to JavaScript, SASS to CSS).
Bundle files together into a single file or split a single large file into smaller files.
Minify CSS and JavaScript.
Create either development or production builds of projects.
Run testing tools.
Listen to folders for changes.
Listen to folders for changes, and when one occurs, automatically run build tools and may even load file in browser.
Some popular build tools include webpack, Gulp, and Browserify. Of these, webpack appears to be the most popular at the time of writing (Spring 2020). With webpack, you configure your build within a package.json file and then use a CLI tool to perform the build.
11.4.2 Create React App
The previous pages described why a developer will typically use a build tool to convert JSX into JavaScript at develop-time. Setting up build tools is a time-consuming process and requires learning the relatively complex configuration process of most build tools.
To make the process of creating React applications easier, a variety of pre-created starting solutions are available that has pre-configured build setup. By far the most widely used of these solutions is create-react-app from the React team (https:/
Overview
Create React App (CRA) installs a CLI tool that installs boiler-plate starting files for a React project. It also installs the necessary software and then configures a webpack-based build chain using webpack. It is especially well suited to create single-page applications and encourages developers to put each React component into a separate file, which generally results in a more manageable code base. It defaults to a development build that includes helpful error messages; a smaller and minimized production build can be generated with just a single command.
The Create React App requires that you first install Node, which will also install npm, which is used for downloading and installing JavaScript packages, and npx, which is used for executing program packages. In Chapter 13, you will learn more about Node, npm, and npx.
Figure 11.15 illustrates the process of using Create React App and what it generates for you. While it might seem complicated at first glance, most of the labor is involved in the blue and yellow steps, that is, in installing software and then creating the application using the create-react-app tool. After that, most of your development time will be within the green steps, where the building and browser testing can happen with no intervention from the developer because of the build listeners. The final production build step will only be necessary when your app is ready for hosting. For lab exercises or maybe even assignments, you might never perform this step.
Figure 11.15 Create React App
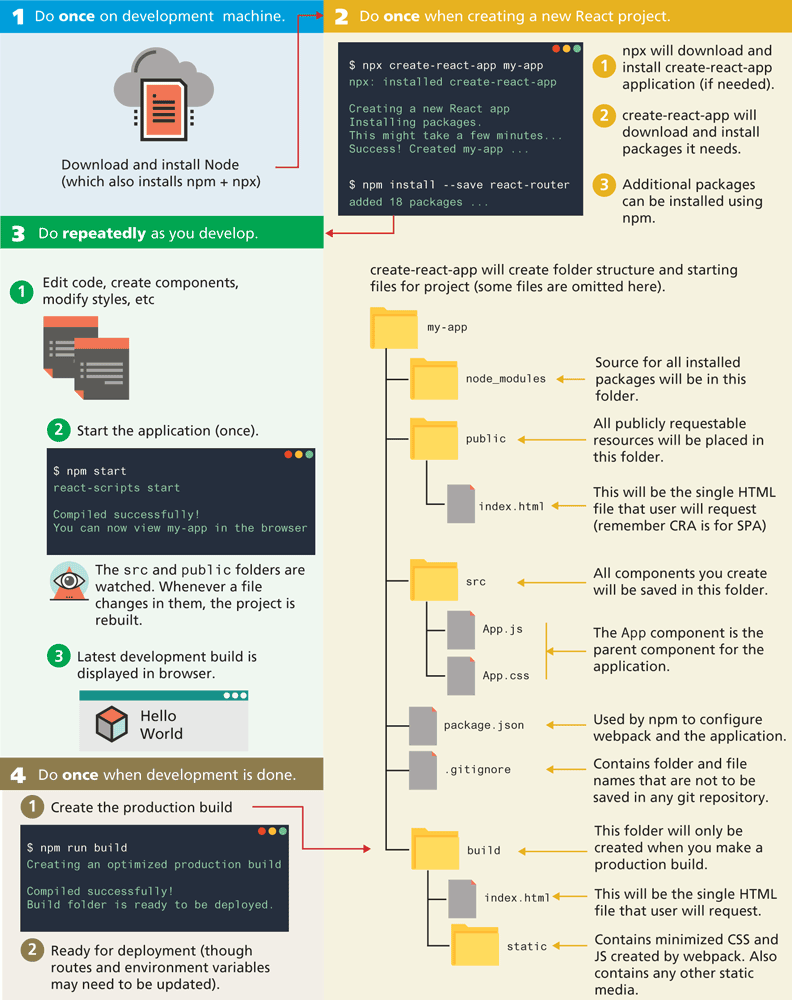
Take note of the node_modules folder in Figure 11.5. It will contain dozens and dozens of folders, each containing JavaScript files. This folder is used to contain source code downloaded by npm. Some of this code is used to run the create-react-app infrastructure; some of it is used by React. The builder will combine and include any JavaScript in this folder needed for production.
Listing 11.8 illustrates what a sample component would look like using the one-file-per-component approach used by create-react-app. It uses JavaScript modules, which we covered in Chapter 10. Recall that in a module, all identifiers are private and only accessible within that module. To use identifiers from other modules requires the use of import statements and to make an identifier within a module available outside the module requires an export statement.
Listing 11.8 Sample React component using create-react-app
import React from 'react';
import HeaderBar from './HeaderBar.js';
// the extension is optional
import HeaderMenu from './HeaderMenu';
const Header = (props) {
  return (
    <header className="header">
      <HeaderBar />
      <HeaderMenu />
    </header>
  );
}
export default Header;
Notice that the path specified in the import statements in Listing 11.8 assumes the imported components exist in the same folder. What if this wasn’t the case? If the components are in different folders, then you would simply change the path. For instance, it is common to keep the App.js file in the root of the src folder, but put all other required components in subfolders within the src folder. Thus the import code in the App.js would look similar to the following:
import React from 'react';
import Header from './components/Header.js';
import PhotoBrowser from './components/PhotoBrowser.js';
In Sections 11.5 and 11.6, our code examples will assume the use of create-react-app and make use of this module approach.
11.4.3 Other React Build Approaches
The Create React App starting kit is extremely popular, and at the time of writing, it appears that the vast majority of online examples make use of it. It is especially well suited for learning scenarios and for single-page applications.
Nonetheless, there are reasons for choosing a different tool suite when creating React applications. Not every use of React is a single-page application. For instance, you might be creating a component library to be used by other developers: in such a case, a simpler tool chain such as Neutrino (https:/
One way to improve the client performance of React-based sites is to do JavaScript-to-HTML rendering on the server at design time. This is known as server-rendering and one of the most popular technologies for doing that is provided by Next.js (https:/
Another popular alternative to Create React App is Gatsby (https:/