11.3 Props, State, Behavior, and Forms
While React components provide a convenient way to compose your page’s user interface as a series of composable custom elements, they don’t, by themselves, seem all that useful. In this section, you will learn how to make components do more via props, state, and behavior. Props provide a way to pass data into a component. State provides a way for a component to have its own internal data, and behavior provides a way for a component to respond to events.
11.3.1 Props
In the example functional components from the previous section, you will have likely noticed that the function takes a single parameter, which by convention is named props. The props parameter is an object that contains any values passed to the function via markup attributes. This provides an easy way to make React components more general purpose and adaptable to multiple uses. Figure 11.6 illustrates how props are used (and also illustrates that arrow syntax can be used with functional components).
Figure 11.6 Using props
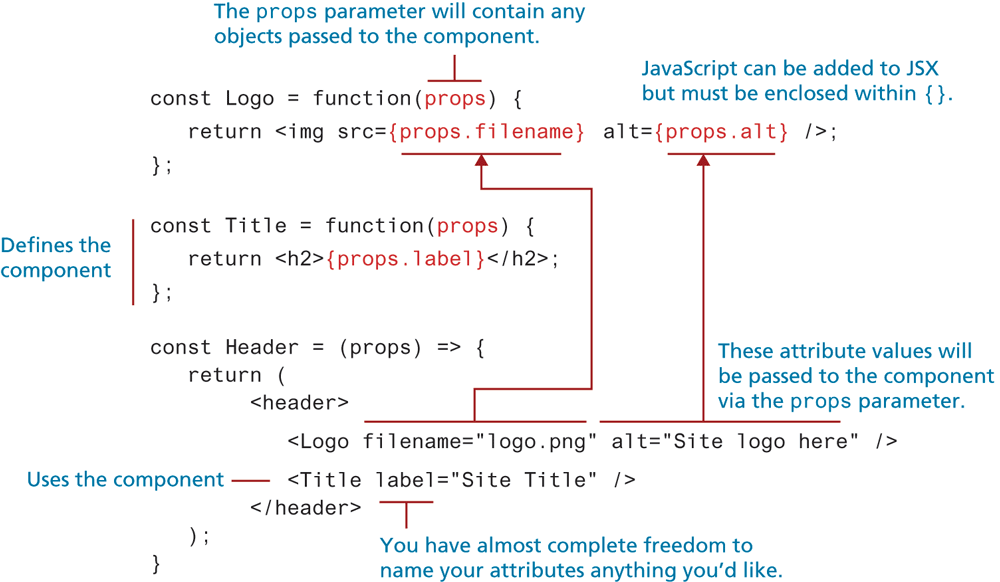
Notice the {} brackets around the props references in Logo and Title. The {} brackets in JSX are used to surround or “inject” JavaScript in the markup. Notice that there is no need to surround the src and alt attributes in Logo with quotes, since the filename and alt attributes in Logo were set to string values.
React’s documentation states that “All React components must act like pure functions with respect to their props.” What does this mean? A pure function is one that does not modify its parameters. For instance, this function is pure:
function IamPure(obj) {
   let foo = obj.name + " changed";
   return foo;
}
The following function is not pure since it modifies the content of its obj parameter:
function IamNotPure(obj) {
   obj.name = obj.name + " changed";
   return true;
}
Therefore, the statement about components acting like pure functions translates to: props must be treated as read-only.
Passing Complex Objects via Props
Props can be used to contain any data. For instance, imagine that you have the following array of movie objects (here the array is hard-coded; later you will learn how to populate such an array in React using an external API).
const movieData = [
   { id:17, title:"American Beauty", year:1999 },
   { id:651, title:"Sense and Sensibility", year:1995 },
   { id:1144, title:"Casablanca", year:1942 }
];
You could pass this array into a component via props:
<MovieList movies={movieData} />How would MovieList then display this data? One way would be to iterate through the array and create an array of <li> items:
const MovieList = (props) => {
   const items = [];
   for (let m of props.movies) {
      items.push( <li>{m.title}</li> );
   }
   return <ul>{ items }</ul>;
}
A more concise approach (and the one that you will likely see when examining React code online) is to use the map() array function covered in Chapter 10 (recall that map() is used to transform each element in an array into something else; it returns an array of the same size but with transformed elements).
const MovieList = (props) => {
   const items = props.movies.map( m => <li>{m.title}</li> );
   return <ul>{ items }</ul>;
}
If you examined the result in the browser, you would see this React warning in the console: Each child in a list should have a unique "key" prop. React uses keys to uniquely identify child elements in a collection of elements. While you don’t always need this capability, it is relatively easy to add a unique key to each item using an index provided by map():
props.movies.map( (m,indx) => <li key={indx}>{m.title}</li> );In the above example, the temporary variable items is created, but it is not actually necessary. It is common to instead to use map() directly in the return as shown in the following example. Notice also that instead of using the index from the map, it uses the id property of the movie object as the unique key value.
const MovieList = (props) => {
   return (
     <ul>{ props.movies.map( m => <li key={m.id}>{m.title}</li>) }</ul>
   );
}
This code is, however, starting to get a little complicated. We might decide to separate out the <li> elements as their own component, as shown in Listing 11.2.
Listing 11.2 Using map to display a collection of elements
const App = (props) => {
   const movieData = [
      { id: 17, title: "American Beauty", year: 1999 },
      { id: 651, title: "Sense and Sensibility", year: 1995 },
      { id:1144, title: "Casablanca", year:1942 }
   ];
   return (
     <main>
        <Title label="Iterating a Props Array" />
        <MovieList movies={movieData} />
     </main>
   );
}
const MovieList = (props) => {
   return (
     <ul>
        { props.movies.map( m => <MovieListItem movie={m} key={m.id} />)}
     </ul>
   );
}
const MovieListItem = (props) => {
   return <li>{props.movie.title}</li>;
}
const Title = function(props) {
   return <h2>{props.label}</h2>;
};
ReactDOM.render(<App />, document.querySelector('#react-container'));
What if you wanted to use props in a class component? In the next section on state, you will discover that working with state in a class component requires adding a constructor function to the class. When a constructor function is used in a class component, then some additional code for props is required, as shown in Listing 11.3. Notice that within the render() function, access to the props variable is through the this keyword because it is defined within React.Component.
Listing 11.3 Props within class components
class Company extends React.Component {
   constructor(props) {
      super(props);
   }
   render() {
      return (
        <div className="card">
           <h2>{this.props.name}</h2>
           <p>{this.props.description}</p>
        </div>
      );
   }
}
The examples so far have all passed props data via attributes on the element, but there is another way that you may occasionally encounter. For instance, in Listing 11.2, there was the following element:
<Title label="Iterating a Props Array" />An alternative way to pass the label information would be by nesting the data as child content rather than using an attribute:
<Title>Iterating a Props Array</Title>Within the Title component, you could access this nested data by using props.children:
const Title = function(props) {
   return <h2>{props.children}</h2>;
};11.3.2 State
Props allow components to be more generalizable and reusable. However, props data is read-only. What if you want a component to have its own data and you want that data to be mutable? In Listing 11.2, the App component has its own data (the array MovieData). We might want to provide a mechanism, for instance a data-entry form, in which the user could modify this data. To do this, we won’t use props but state. Until the introduction of React Hooks in 2019, using state has necessitated using a class component instead of a functional component. Figure 11.7, which displays a counter that updates every second, illustrates how state has traditionally been used within a class component. (It should be noted that this isn’t the ideal way to update a timer in React: while not a best practice it does help illustrate the idea that state is for component data that changes.)
Figure 11.7 React state within a class component

You may be wondering why state was used in Figure 11.7 and not props. You need to use state instead of props whenever a component’s data is going to be altered.
Notice that the class code in Figure 11.7 uses a constructor function to initialize the state values. In fact, it is only in the constructor that you are allowed to assign state directly in such a fashion. Outside of the constructor (for instance, within the callback function passed to setInterval), state can only be changed via the setState() function, as shown in the following.
this.setState( { heading: "new heading", count: 43 } );As you can see, state in React is an object containing other objects. So why then do we need setState() to change this object? That is, why doesn’t React allow us to change state directly via this.state? What exactly happens when setState() is called?
React merges the object you provide as a parameter to setState() into the current state. In our example in Figure 11.7, the state after this call to setState() would replace the old value of currentSeconds with the new value.
So why is setState() required? To ensure that the view (user interface) accurately reflects the underlying model (data), React will call the render() function whenever state or the props values are changed. That is, React reacts to changes in a component’s data. The setState() function thus not only changes the data, but also communicates to React that data has been changed so that it can eventually update the view as well.
To fully appreciate the usefulness of state in React, you will need to learn how behaviors are added to React components (which will allow us to modify data based on user actions).
 Note
Note
A component’s state data is available only to that component. Components can neither access their parent’s state data nor their children’s state data. If you wish to share a state value with a child component, it needs to be passed to it via props by the parent, as shown in the following example.
class Parent extends React.Component {
   constructor(props) {
      super(props);
      this.state = { heading: "Using State"};
   }
   render() {
      return <Child heading={this.state.heading} />;
   }
}
11.3.3 Behaviors
A key topic in Chapter 9 was learning how to respond to events in JavaScript using addEventListener(). Events are also important in React components, but the technique for handling them is superficially similar to the old-fashioned inline handlers as covered back in Section 8.2.1 of Chapter 8. For instance, imagine that you wanted to enhance the MovieListItem component in Listing 11.2 so that each list item also contains a button allowing the user to find out more about that particular movie. You can define a handler method within MovieListItem and then reference it via an onClick attribute, as shown in the following:
const MovieListItem = (props) => {
   const handleClick = () => {
      alert('handling the click id=' + props.movie.id);
   }
   return (
      <li>
         {props.movie.title}
         <button onClick={handleClick}>View</button>
      </li>);
}
Notice that you don’t use addEventListener for events in React. Why not? Because it is part of the DOM. Recall from an earlier discussion in this chapter that React lets your code modify the virtual DOM and not the real DOM; it does this for efficiency reasons (i.e., to reduce the number of needed browser-repaints). React events are named using camelCase, instead of lower case.
Event Handling in Class Components
What if MovieListItem was a class component instead? It would need to reference the function handler with the this keyword, as shown in the following.
class MovieListItem extends React.Component {
   handleClick = () => {
      alert('handling the click id=' + this.props.movie.id);
   }
   render() {
      return (
      <li>
         {this.props.movie.title}
         <button onClick={this.handleClick}>View</button>
      </li>);
   }
}
There is one big potential “gotcha” with event handlers in React class components. In the previous code, the handleClick function was defined using arrow syntax. This works as you’d expect due to the changed nature of this in arrow functions (recall from Chapter 8 that in arrow functions this refers to lexical context not the run-time context). But what if you had not defined handleClick using arrow syntax. The this keyword would have the wrong binding and the reference to this.handleClick would not work. Prior to arrow functions, React developer would typically address this limitation by explicitly binding "this" to each function directly within the constructor, as shown in the following:
class MovieListItem extends React.Component {
   constructor(props) {
      super(props);

       // bind "this"
      this.handleClick = this.handleClick.bind(this);
   }
   ...
}
Passing Data to Event Handlers
In the previous examples of using event handlers in React, the handler had no parameters. React event handlers can also accept an event parameter (typically named e) just like the regular JavaScript event handlers you used in Chapters 9 and 10. But what if you wanted to pass some other data to the handler? In Listing 11.4 you can see how this is typically achieved in React.
Listing 11.4 Passing other data to event handler
const App = (props) => {
   const movieData = [{ id: 17, title: "American Beauty", year: 1999 }, ... ];

   const handleClick = (movie) => {
      alert('handling the click for ' + movie.title);
   }
   return (
      <ul>
         { movieData.map( m =>
              <li><button onClick={ () => handleClick(m) }>
                     View {m.title} </button></li>
         )}
      </ul> );
}
Notice that the event handler is another function (defined using arrow syntax) with no parameter; this function calls the handleClick function, passing it the data it requires. What if it also needed the e event parameter also? We would need to include it in our invocation:
onClick={ (e) => handleClick(e, m) }Event-Driven Conditional Rendering
In the example components we have examined so far, they always rendered the same content (though customized by props data). It is quite common for components to render different content based on state data, which is known as conditionalrendering. For instance, imagine we have a component that displays information about a single company along with an edit button. If the user clicks on the edit button, the component will instead display the information within a form (and also change the label on the edit button to “Save”). Listing 11.5 illustrates an example of conditional rendering. Notice that the render() function calls two different methods (renderNormal and renderEdit) based on the status of the editing state variable, which gets changed in response to user actions. Figure 11.8 illustrates the two different possible appearances of the Company component.
Listing 11.5 Conditional rendering
class Company extends React.Component {
   constructor(props) {
      super(props);
      this.state = {editing: false};
   }
   editClick = () => {
      this.setState( {editing: true} );
   }
   saveClick = () => {
      this.setState( {editing: false} );
   }
   render() {
      if (this.state.editing) {
         return this.renderEdit();
      }
      else {
         return this.renderNormal();
      }
   }
   renderNormal() {
      return (
         <article>
            <h2>{this.props.children} </h2>
            <p>Symbol {this.props.symbol}</p>
            <p>Sector: {this.props.sector}</p>
            <p>HQ: {this.props.hq}</p>
            <button onClick={this.editClick}>Edit</button>
         </article>
      );
   }
   renderEdit() {
      return (
         <article>
            <h2>input type="text" defaultValue={this.props.children}</h2>
            <p>Symbol:<input type="text"                  defaultValue={this.props.symbol} /></p>
            <p>Sector:<input type="text"                              defaultValue ={this.props.sector} /></p>
            <p>HQ: <input type="text" defaultValue={this.props.hq} /></p>
            <button onClick={this.saveClick}>Save</button>
         </article>
      );
   }
}
Figure 11.8 Conditional rendering of Listing 11.5

Using Hooks for State
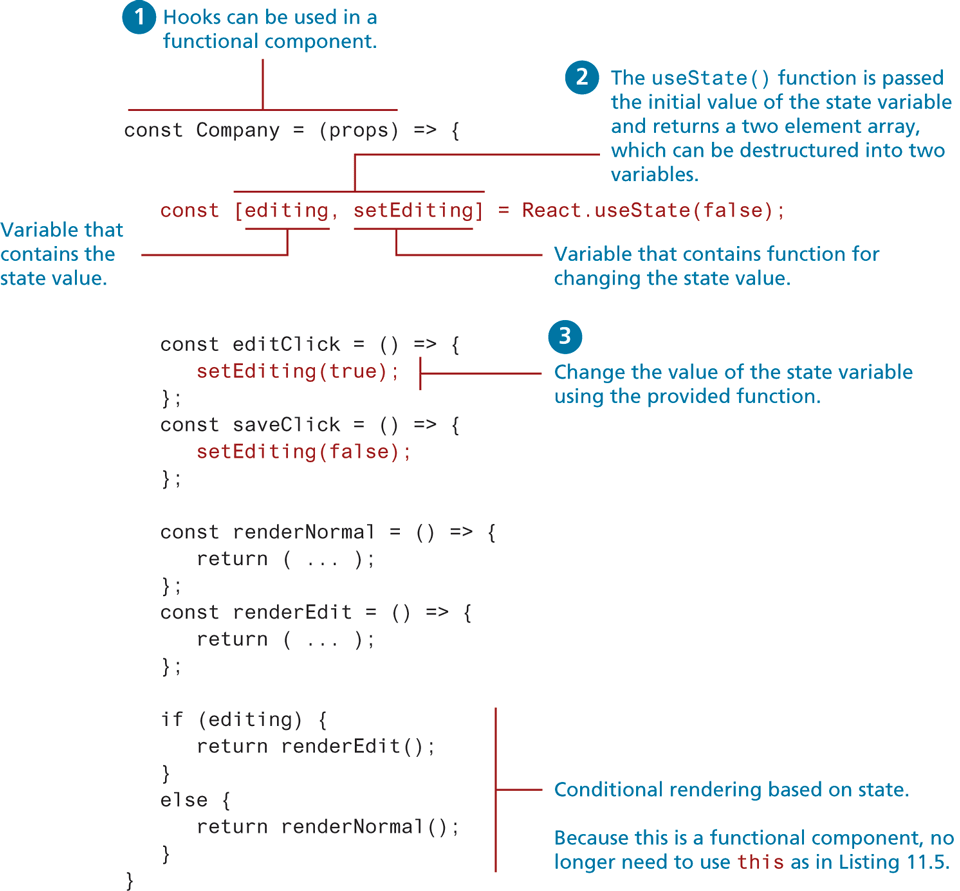
Hooks were added to React in version 16.8 (March 2019), and provided new approaches to several common React tasks. Perhaps the most important of these was its new approach to working with state, one that allowed functional components to use state. Figure 11.9 illustrates the use of Hooks that is equivalent to that shown in Listing 11.5.
In general, functional components require less code than class components. Writing less code generally means fewer bugs. Now that React Hooks allows functional components to work with state and lifecycle methods, it is likely that functional components with Hooks will become the preferred approach amongst most developers moving forward.
Note
In Figure 11.9, the useState() function is prefaced with a reference to the React object. In Section 11.4 and beyond, you will be making use of modules and an import statement which will mean you can simply call the useState function:
const [edit, setEdit] = useState(false);Figure 11.9 Using hooks to provide state to functional components
11.3.4 Forms in React
Forms operate differently in React than other elements, since form elements in HTML manage their own internal mutable state. For instance, a <textarea> element has a value property, while a <select> element has a selectedIndex property. With React, we can let the HTML form elements continue to maintain responsibility for their state (known as uncontrolled form components), or we can let the React components containing the form elements maintain the mutable state (these are known as controlled form components).
Controlled Form Components
With controlled form components, the form’s state is managed by the developer using React state. Generally speaking, this is the preferred approach to working with forms in React. In this approach, you will set the form element’s value using the value attribute, and update the underlying state when the form element's value changes. For instance, if you were using a class component, your render() function might have something similar to the following for one of the form elements:
<input type="text" name="sector" value={this.state.sector}
       onChange={this.handleSectorChange}  />
The class component would then need to implement the handler method which would update the component state with the current value of the element:
class SampleForm extends React.Component {
   constructor(props) {
      super(props);
      this.state = { sector: "", ... };
   }
   handleSectorChange = (e) => {
      this.setState( {sector: e.target.value} );
   }
   ...
}
With React Hooks, controlled form components can be used within functional components as well. Listing 11.6 illustrates how the edit form in Listing 11.5 could be implemented using controlled form components and React Hooks. Notice that instead of creating individual handler functions, the code in the listing simply passes an anonymous function which calls the setter function for the state value.
Listing 11.6 Controlled form components using Hooks
const Company = (props) => {
   ...
   const renderEdit = () => {
      return (
         <article className="box media ">
            <div className="media-content">
               <h2><input type="text" value={name}
                   onChange={ (e) => setName( e.target.value ) } /></h2>
               <p>Symbol: <input type="text" value={symbol}
                   onChange={ (e) => setSymbol( e.target.value ) } /></p>
               <p>Sector: <input type="text" value={sector}
                   onChange={ (e) => setSector( e.target.value ) } /></p>
               <p>HQ: <input type="text" value={hq}
                   onChange={ (e) => setHq( e.target.value ) } /></p>
            </div>
            ...
         </article>
      );
   };
   const [editing, setEditing] = React.useState(false);
   // initialize the state variables to the data passed into the component
   const [ name, setName] = React.useState( props.children );
   const [ symbol, setSymbol] = React.useState( props.symbol );
   const [ sector, setSector] = React.useState( props.sector );
   const [ hq, setHq] = React.useState( props.hq );
   ...
}
Uncontrolled Form Components
With uncontrolled form components, the form’s state is managed by the DOM: you no longer need to create handler methods for form state updates. Instead, you retrieve the values from the form using a special ref object. What is a ref? It is a special object in React that allows you to access DOM nodes. You can think of it as a type of pointer into a DOM element.
For instance, let’s imagine you have a class component that will display the form. With the uncontrolled approach, you will generally create instance variables which will contain the references to the different DOM elements:
class SampleForm extends React.Component {
   constructor(props) {
     super(props);
     // setting instance variables to refs
     this.symbol = React.createRef();
     this.sector = React.createRef();
   }
   render() {
     return (
        <form onSubmit={this.handleSubmit} >
          <input name="symbol" type="text" ref={this.symbol} />
          <input name="sector" type="text" ref={this.sector} />
          <input type="submit" />
        </form>
     );
   }
   handleSubmit = (e) => {
     e.preventDefault();
     let values = `Current values are
            ${this.symbol.current.value}
            ${this.sector.current.value}`;
     alert(values);
   }
}
Notice that current property of each ref object is used to reference the underlying DOM property or method. In this case, the code is interested in the form element’s value property, but you can access any DOM property or method via current.
So which should you use? There is some debate about this question; some argue that letting the browser maintain state for long and complex forms is sensible, especially if you need access to DOM events such as focus. On the other hand, the official React documents state that in general you should use controlled form components.
11.3.5 Component Data Flow
So far in this section you have learned about two types of component data in React: props and state. The key feature of props data is that it is read-only. The key feature of state data is that while it can be altered by its component, it belongs to the component and is unavailable outside of the component. But what if two components want access to the same data? What if one component wants to display some data and another component wants to edit that same data? There are several approaches in React to this problem. Figure 11.10 illustrates a typical scenario.
Figure 11.10 Sharing data between components
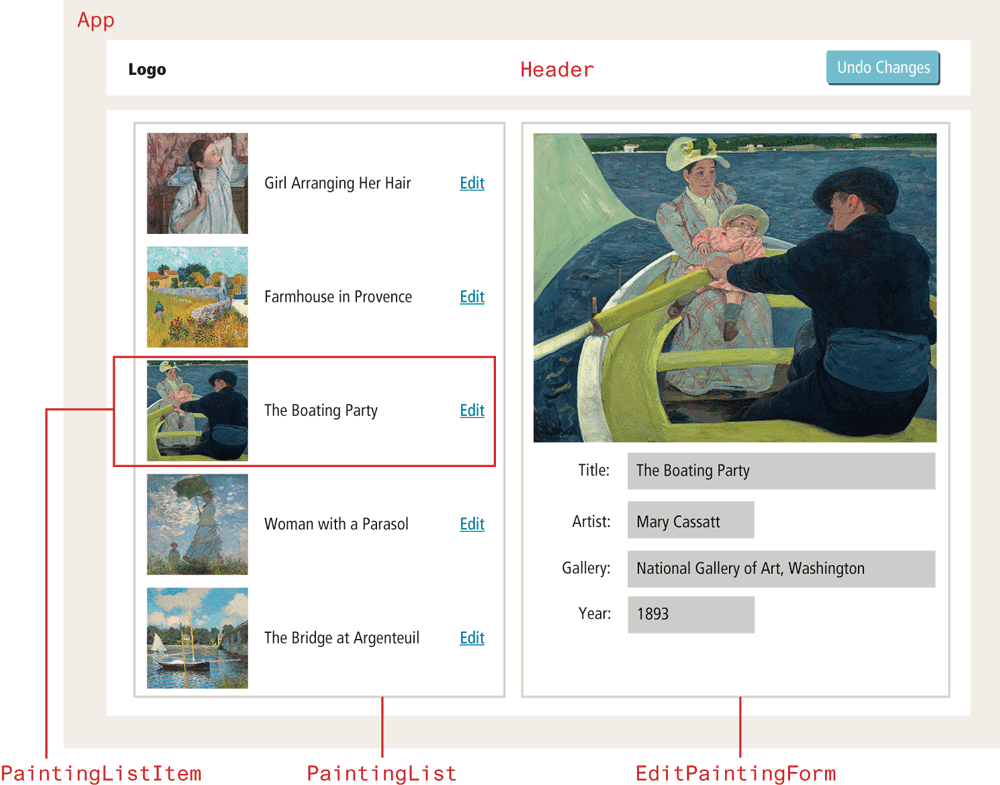
In the page shown in Figure 11.10, there are five components: App, Header, PaintingList, PaintingListItem, and EditPaintingForm. Which of these components appear to have data? Clearly, PaintingList, PaintingListItem, and EditPaintingForm. Is the data they are displaying props data or state data?
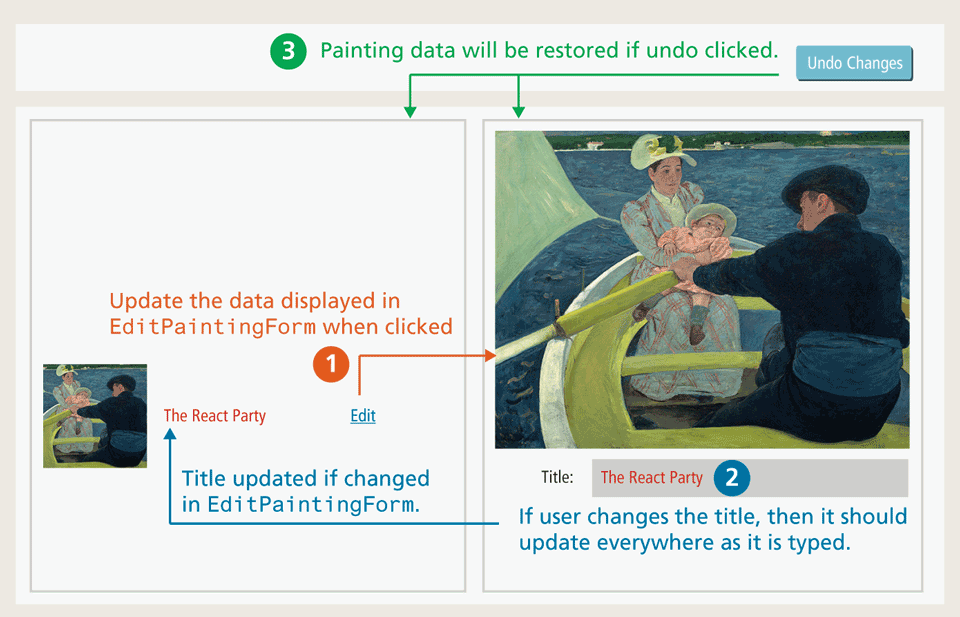
Recall that props data is read-only: from Figure 11.10, you can see that data in the edit form can change, so somewhere state data is going to be needed. The key issue here is that these different components need to communicate changes with each other, as shown in Figure 11.11. However, remember that components can’t access the state of their parents, siblings, or children. So how can you implement the data flows shown in Figure 11.11?
Figure 11.11 Data communication between components
The general solution in React is that changeable data will “belong” to the parent whose children will be using it. Thus, for the page shown in Figures 11.10 and 11.11, the data will belong to the App component. What does this mean? The App component will be responsible for maintaining the data in state (since it can change) and then pass that data to its child components via props. What data? In this example, the list of paintings (since the edit form can change the data) and the current painting (which changes when user clicks the edit button) will be in state, as shown in the following (for now, assume the data variable contains an array of painting data retrieved from somewhere):
const App = () => {
  // painting list is stored in state
  const [paintings, setPaintings] = useState(data);
  // current painting is stored in state
  const [currentPainting, setCurrentPainting] = useState(data[0]);
  return (
    <article className="app">
      <Header />
      <div className="box">
        <PaintingList paintings={paintings} current={currentPainting}/>
        <EditPaintingForm painting={currentPainting} />
      </div>
    </article>
  );
};
How will the PaintingList component communicate with its sibling EditPaintingForm to inform it that it must display the data for a different painting? How will EditPaintingForm inform PaintingList that its data has been changed by the user?
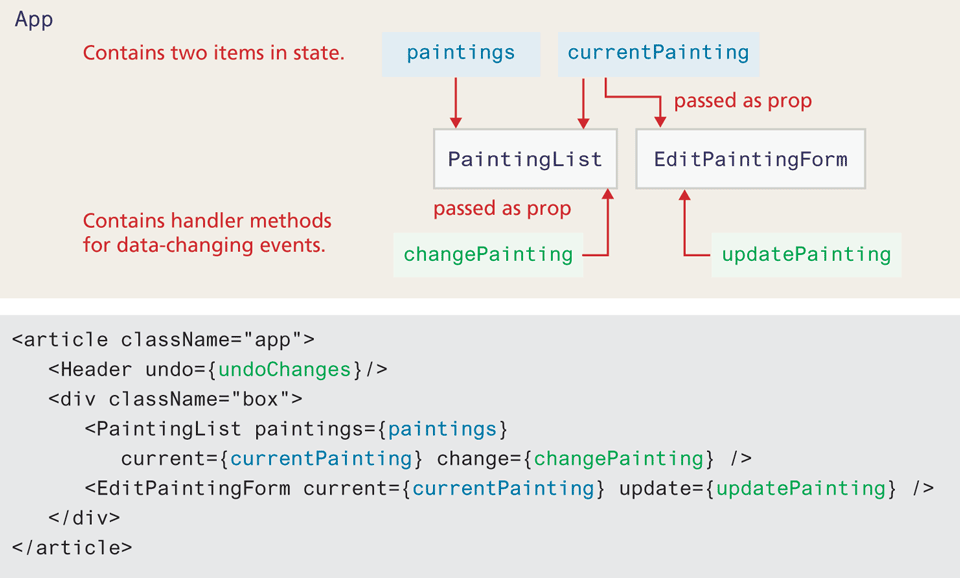
The solution is to let the parent (in this case App) do it. How? By passing in the necessary handlers to the children via props, as shown in Listing 11.7. Notice that the parent passes the update handler to the EditPaintingForm component. This handler will be called by the child component, but the handler itself is defined in the parent because that’s where the data resides. This data flow is sometimes referred to as prop-drilling and is illustrated in Figure 11.12. The nearby Test Your Knowledge will step you through the creation of this page.
Listing 11.7 Passing event handlers down to children controls
const App = () => {
  ...
  const updatePainting = (modifiedPainting) => {
    // create a shallow copy of the array
    const updatedList = [...paintings];
    // find the painting to modify
    const index =
       updatedList.findIndex( p => p.id == modifiedPainting.id);
    // replace it
    updatedList[index] = modifiedPainting;
    // update state
    setPaintings(updatedList);
    setCurrentPainting(modifiedPainting);
  }
  return (
    <article className="app">
       ...
       <EditPaintingForm current={currentPainting}
                 update={updatePainting} />
    </article>
  );
}

const EditPaintingForm = (props) => {
  ...
  // handler called when user changes a form value
  const handleInputChange = (e) => {
    // create a shallow copy of the object
    const modifiedPainting = {...props.current};
    // get the name and value of the form element that called this handler
    const {name, value} = e.target;
    // change the painting property using bracket notation
    modifiedPainting[name] = value;
    // now tell the parent to update the painting data with this new data
    props.update(modifiedPainting);
  }
  const {id,title,artist,year} = props.current;
  return (
    <section className="paintingForm">
      <input type="text" name="title" value={title}
          onChange={ handleInputChange } />
      <input type="text" name="artist" value={artist}
          onChange={ handleInputChange } />
      ...
    </section>
  );
}
Figure 11.12 Implementing data flow between components
Test Your Knowledge #1
In this exercise, you will create a page containing five React components. The HTML that your page must eventually render has been provided in the file lab11a-test01-markup-only.html. The CSS has been provided, though it’s possible (but not necessary) you may want to change it based on the HTML that your components render. The starting code provides an array of painting objects (later in the chapter, you will learn how to fetch data from an API in React instead). As shown in Figure 11.11, there are three user interactions: clicking on a painting in the list will display the painting’s data in the form; changing form data will change it in the list as well; clicking undo will revert the painting data to its original state.
With React, you may prefer to start working first on the most “outer” component (in this case App), or you may decide to start working first from the most “inner” component (which in this case is PaintingListItem), or start with the simplest (in this case that would be the Header component). For this exercise, we will focus initially just on rendering data and markup, and then add behaviors later.
Create the
Headerfunctional component. The button won’t do anything yet. Remember that you can look atlab11a-test01-markup-only.htmlto see what markup your component should render.Create the
PaintingListfunctional component. Initially just have this component render the root<section>element with some temporary text.Create the
EditPaintingFormfunctional component. Initially just have this component render the root<section>element with the<form>and<div>elements. Assume a single painting object is passed via props (as shown in Figure 11.12) whose data will be displayed by the component.Modify the
Appfunctional component so that it uses these three components (there is boilerplate text in the start file which indicates where they are to be located).Create the
PaintingListItemfunctional component. Assume a single painting object is passed via props (as shown in Figure 11.12) whose data will be displayed by the component.Your
PaintingListcomponent is going to display multiplePaintingListItemcomponents (one for each painting). Assume the entire array of paintings is passed (as shown in Figure 11.12). Use themap()function to render each painting object as aPaintingListItem(see Listing 11.2 for reminder how to do this). Verify this works.Now start adding in the state data. As shown in Figures 11.11 and 11.12, state will be implemented in the parent
Appcomponent. SinceAppwas initially created as a functional component, you can use the Hooks approach; if you wish to use the traditional React state approach, you will have to convertAppinto a class component. What state data will you need? As can be seen in Figure 11.12, you will need a list of paintings and the current painting (whose data will be editable in the form and which will be displayed with the different background color in the list). This state data will be passed via props to your other components. Verify this works.Now start adding in the behaviors. Add an
onClickevent handler to the<div>element in thePaintingListItemcomponent (we are doing this instead of having an explicit Edit link as in Figure 11.10). This will call the change handler that is passed intoPaintingListandPaintingListItem. As shown in Figures 11.11 and 11.12, this will be implemented in the parentAppcomponent. The change handler will change the current painting state variable. Verify this works.Add in the editing behavior. Use the controlled form components approach. The change handler in
EditPaintingFormshould create a new painting object which is a copy of the current painting, except for what has changed in the form, and then pass that object to the update method in theAppparent. When this is completed, changing a value in the form will also change the value in the painting list display as well. Verify this works.Finally, add in some conditional rendering to
PaintingListItemso that it displays the current painting differently and implement the Undo changes button (simply set the paintings state variable equal to the initial data array).