11.2 Introducing React
Within a few pages, you will be creating React-based web pages that contain components, data state, and behaviors. But before getting there, let’s begin with a very simple example.
Figure 11.3 illustrates the code for a simple React page that displays a single hyperlink. It makes use of external JavaScript libraries along with the Babel library that will perform the necessary conversions of JSX to JavaScript at run-time. This example doesn’t include any JSX yet, however. You will notice that this example’s HTML contains just a single element (a <div>). JavaScript is used to populate this element in a way that looks somewhat similar to the DOM creation method from Chapter 10.
Figure 11.3 Simple React example
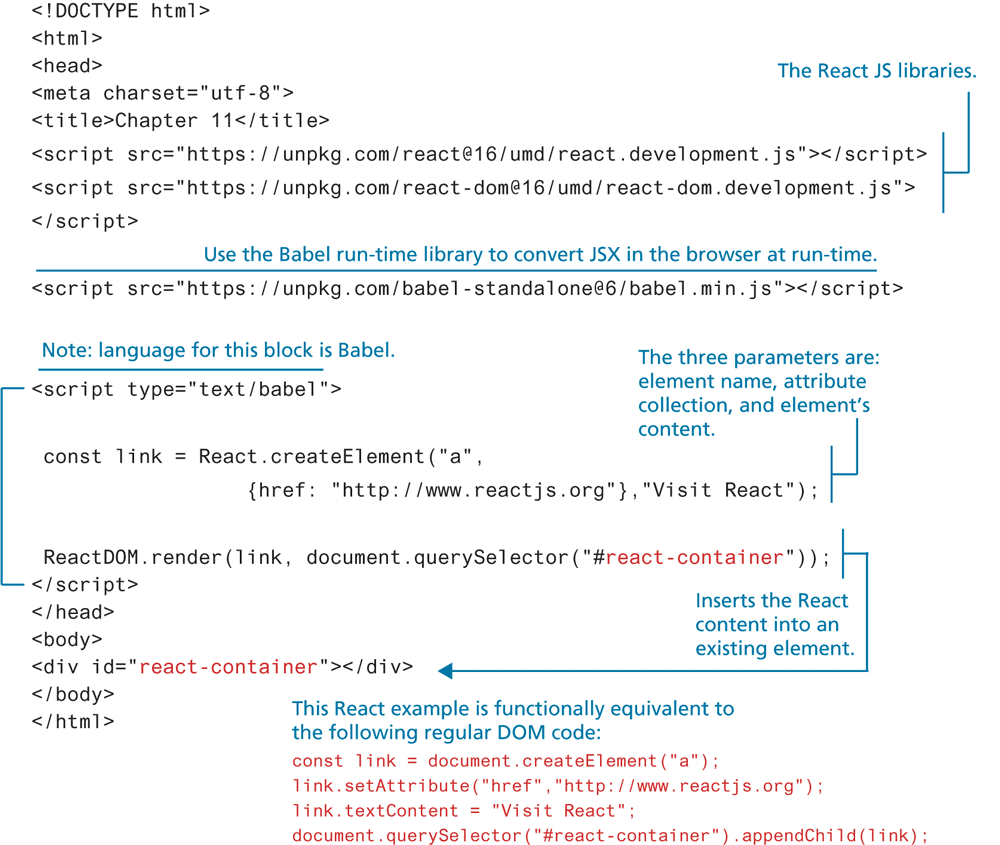
This simple example doesn’t really illustrate any of the advantages provided by React. Clearly creating elements with React.createElement() is quite cumbersome. As an alternative, React allows us to use JSX instead, which, while strange at first, is an easy way to create elements. To do this, we can replace our link line in Figure 11.3 with the following.
const link = <a href="http:/This is an example of JSX. This JSX code will need to be eventually converted into regular JavaScript before the browser can understand it. This example is using the Babel run-time library, which converts the line above into JavaScript, as shown in Figure 11.4.
Figure 11.4 JSX to JavaScript conversion
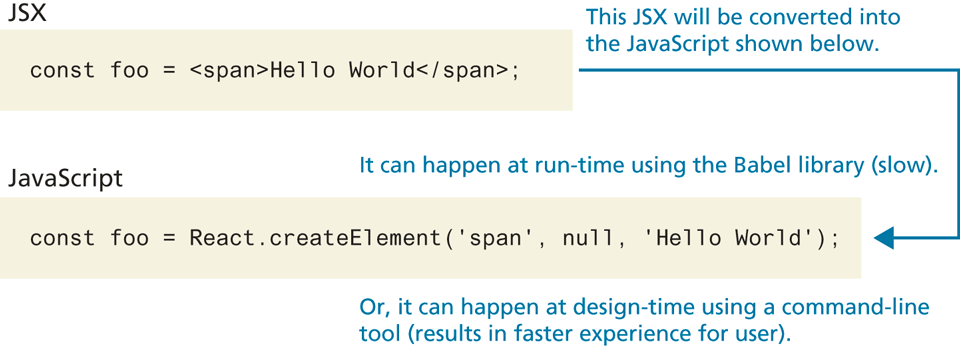
As the figure indicates, this conversion from JSX to JavaScript can happen at run-time or design-time. Outside of tutorial examples, one will almost always want to do this conversion at design-time. You will learn how to do this in Section 11.4.
Your JSX can span multiple lines (which can improve readability). Thus the link example above could be written as follows:
const link = <a href="http://www.reactjs.org">
                  Visit React
             </a>;
JSX Syntax
JSX follows the same syntactical rules as XML. These rules are quite straightforward:
Element names are composed of any of the valid characters (most punctuation symbols and spaces are not allowed) in XML.
Element names can’t start with a number.
There must be a single root element. A root element is one that contains all the other elements.
All elements must have a closing element (or be self-closing).
Elements must be properly nested.
Elements can contain attributes.
Attribute values must always be within quotes.
Element and attribute names are case sensitive.
These rules may be familiar to developers familiar with XHTML, the standard for HTML that predated HTML5. The two key rules are: the necessity for quoted attributes and that there can only be a single root element. This means the following example contains two syntax errors (the error messages will appear in the browser console):
const example = <span>Hello World</span>
                <a href=http://www.reactjs.org>Visit React</a>;
The lack of quotes around the href attribute value will be flagged as an error. The lack of a root element will also be flagged (the error message will be something similar to “Adjacent JSX elements must be wrapped in an enclosing tag”). You could fix this error by nesting these two elements within another one.
const example = <div>
                   <span>Hello World</span>
                   <a href="http://www.reactjs.org">Visit React</a>;
                </div>;
Finally, there are some attributes in HTML that are not allowed in JSX. For instance, the class attribute in HTML is used to indicate which CSS class to use to style the element. But since the keyword class has a different meaning in JavaScript, you cannot use it in JSX (remember that JSX eventually gets converted to JavaScript). Instead, you have to use className:
const heading = <h1 className="text-dark">Title goes here </h1>11.2.1 React Components
A component in React is a block of user interface functionality. The power of components in React is that they allow the developer to break down the user interface into smaller independent pieces that can be reused, combined, and nested together. As you work with React, you will compose your application by nesting multiple components, as shown in Figure 11.5.
Figure 11.5 Composing an interface with React components
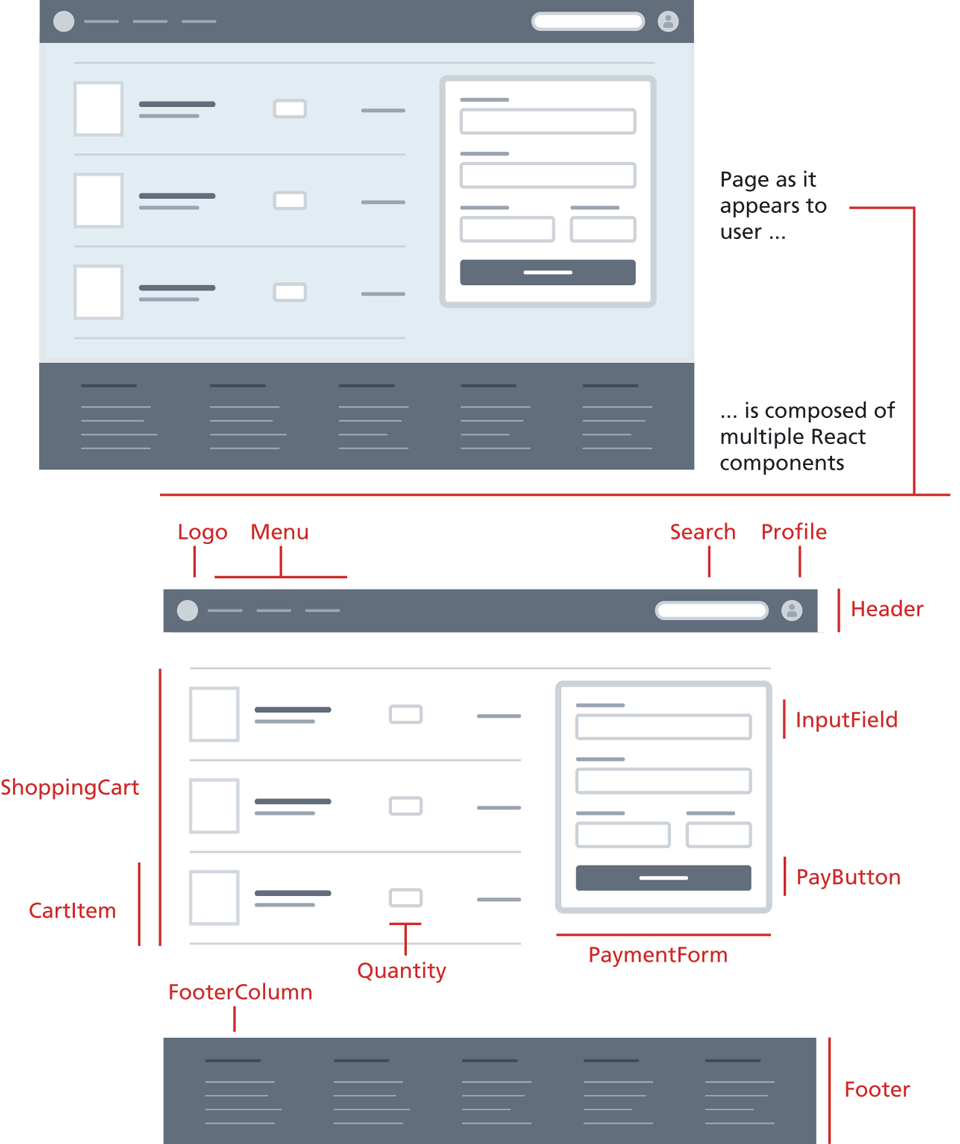
What makes the component model of React especially appealing (once you get used to thinking and working in React’s terms) is that you can use components either programmatically or declaratively (i.e., once a component has been created, it can be used via markup). For instance, the Header component in Figure 11.5 might be added to the page using the following JSX:
<Header>
  <Logo />
  <Menu />
  <Search initial="Find product"/>
  <Profile userId="34"/>
</Header>
Like any markup elements, React components can also include attributes. Composing a user interface using components expressed as markup elements should feel familiar to web developers already used to constructing simple interfaces using HTML. If React components are used via markup, how are they created?
The short answer is via JavaScript. Essentially, a React component is simply a function that returns a single React element (remember that a React element can contain other elements). There are two types of components in React: functional components and class components.
Functional Components
The simplest way to create a component in React is to use functions. For instance, the following code creates a functional component.
const Logo = function(props) {
   return <img src="logo.png" alt="logo" />;
};
Notice that the Logo function contains a single parameter named props. This props parameter is an important part of how React components work: it provides a mechanism for passing information into a component.
Once you have created a functional component, you can reference it via markup. For instance, to use it with ReactDOM.render, you could add it via JSX, as shown in the following.
ReactDOM.render(<Logo />, document.querySelector('#react-container'));This ability to reference components via markup allows you to compose your pages as a series of nested components, as shown in Listing 11.1. Notice the () brackets around the returned JSX markup in the Header function. These are necessary if your returned content spans several lines. In JavaScript if you have a return statement with no return value on the same line, a semicolon will be implicitly be added to the end of the return, meaning it will return nothing. To prevent this, you simply wrap your returned JSX in () brackets.
Listing 11.1 Nested functional components
const Logo = function(props) {
return <img src="logo.png" alt="logo" />;
};
const Title = function(props) {
return <h2>Site Title</h2>;
};
const Header = function(props) {
return (
<header>
<Logo />
<Title />
</header>
);
}
ReactDOM.render(<Header />, document.querySelector('#react-container'));You can also make use of a component multiple times. For instance, in Listing 11.1, you could have repeated Logo multiple times:
<header>
   <Logo />
   <Logo />
   <Logo />
</header>
Class Components
The (slightly) more complicated way to create a React component is to use the JavaScript class keyword, which was covered in Section 10.2.2. of Chapter 10. Recall that classes were added to JavaScript in ES6, and are actually just an alternate syntax that combines function constructors (Chapter 8) and function prototypes (Chapter 10). You could rewrite the Header component from Listing 11.1 as a class component as follows:
class Header extends React.Component {
   render() {
      return (
         <header>
            <Logo />
            <Title />
         </header>
      );
   }
}
Recall from Chapter 10 that methods/functions within classes use a new syntax that doesn’t require the use of the function keyword.
The render function must be named render. React has a very specific lifecycle (covered in Section 11.5) in that the React environment will call specifically named functions at certain points of time. The render function is required in all class components.
So why would we use a class component? Until React Hooks (covered in section 11.3) became available in mid-2019, class components were the only way to access state (covered in 11.3.2) or use other lifecycle methods.
 Note
Note
React expects user-defined components (whether functional or class) to start with a capital letter. React assumes elements that begin with a lower-case letter to be built-in elements (in the browser, this would DOM elements).