10.6 Chapter Summary
This chapter covered a lot of material. It began with some additional language features in JavaScript. These included array functions, prototypes and classes, and modules. The heart of the chapter was the long section on asynchronous coding, which began with fetch, and then continued onto promises and the async...await keywords. The focus then switched to browser APIs (such as localStorage) and external APIs such as Google Maps.
10.6.1 Key Terms
10.6.2 Review Questions
Use the
map()function to transform an array of country names into an array of<li>DOM elements that contain those names.Why are prototypes more efficient than function constructors?
What are classes in JavaScript? How do they differ from protoypes?
What problems do modules solve in JavaScript? What is their main limitation?
What are the advantages of using asynchronous requests over traditional synchronous ones?
What is a
Promisein JavaScript? What problem do they solve?What is the purpose of
async ... awaitin JavaScript? What problem does it address?What is cross-origin resource sharing? What relevance does it have for JavaScript applications using asynchronous requests?
How are web APIs different from browser APIs and external APIs?
10.6.3 Hands-On Practice
Project 1: Text Viewer
Difficulty Level: Intermediate
Overview
This project uses fetch to retrieve data and applies the DOM techniques from the previous chapter. It also uses one of the array functions from the beginning of the chapter. Figure 10.27 indicates what the final result should look like in the browser.
Figure 10.27 Completed Project 1
Instructions
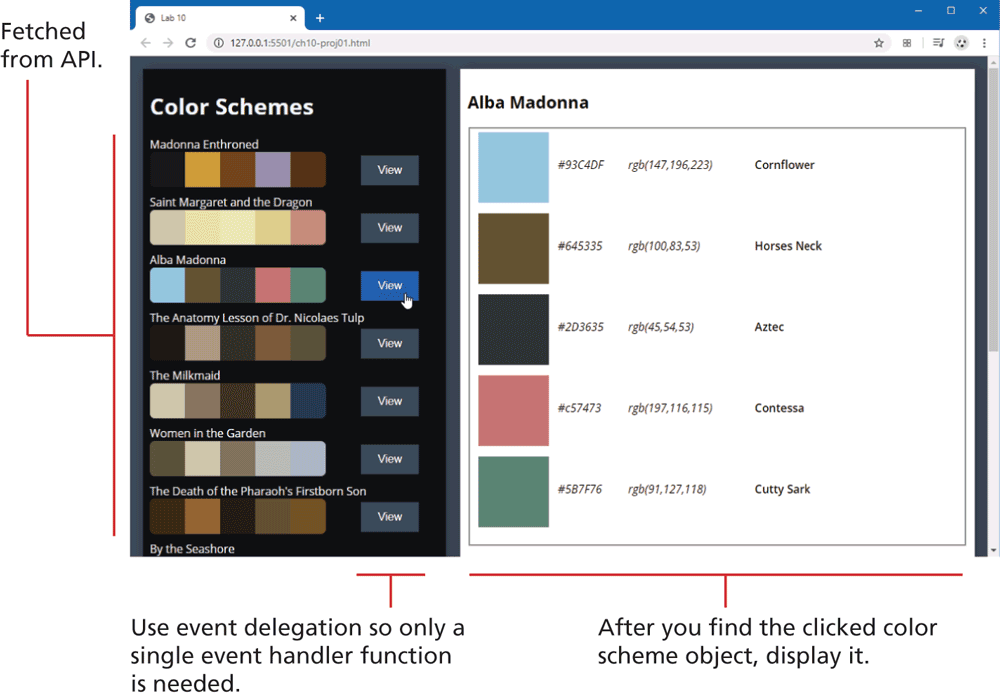
You have been provided with the necessary styling and markup already. Examine ch10-proj01.html in the editor of your choice. Notice the sample markup for the color scheme list items. This will be eventually commented out and replaced with JavaScript code that programmatically generates this markup. There is also a loading animation that will need to be displayed/hidden.
Examine ch10-proj01.js in the editor of your choice. In it, you will see the URL for the external API that will provide the color scheme data. Examine this URL in the browser in order to see the structure of the data.
Fetch this scheme data from the API and display it within the
<article>element. As you can see from the sample supplied markup, this will require creating<h3>,<section>,<div>, and<button>elements.Display the loading animation before the fetch and then hide it after the data is retrieved.
Set up a single click event handler for all the View buttons. This will require using event delegation. When the user clicks a view button, display the scheme details in the
<aside>element. As you can see from the sample supplied markup, this will require creating<div>elements within the supplied<fieldset>. You will also have to change the<h2>content to the clicked scheme name. Hint: use thefind()method to retrieve the correct scheme object from thedata-idproperty of the clicked button. Also, remember to clear out the previous content of the<fieldset>by setting itsinnerHTMLto"".
Guidance and Testing
Break this problem down into smaller steps. First verify the fetch works, perhaps with a simple
console.logstatement. Then write a function that generates the markup for a single color scheme in the<article>and test to make sure it works. This will require a loop, so try usingforEach()instead of aforloop.Then add in support for the loading animation.
Before generating the scheme details, add in the event handler using event delegation and verify (again using
console.log) if you are able to retrieve the correct scheme object usingfind().Finally, write a function that generates the scheme details. This will require a loop, so try using
forEach()instead of aforloop.
Project 2: Text Viewer
Difficulty Level: Intermediate
Overview
This project focuses on the first two sections of the chapter (array functions and prototypes/classes/modules). It also uses fetch to retrieve data. Figure 10.28 indicates what the final result should look like in the browser.
Figure 10.28 Completed Project 2
Instructions
You have been provided with the necessary styling and markup already. Examine ch10-proj02.html in the editor of your choice. Notice the containers for the fetched data in the
<aside>and<section>elements. Notice the sample markup for the play data. This will be eventually commented out and replaced with JavaScript code that programmatically generates this markup.Examine ch10-proj02.js in the editor of your choice. In it, you will see the URL for the external API that will provide the color scheme data. Examine this URL in the browser in order to see the structure of the data. A Shakespeare play contains multiple acts; each act contains multiple scenes. (To reduce the size of the downloaded files, not all acts and scenes have been included).
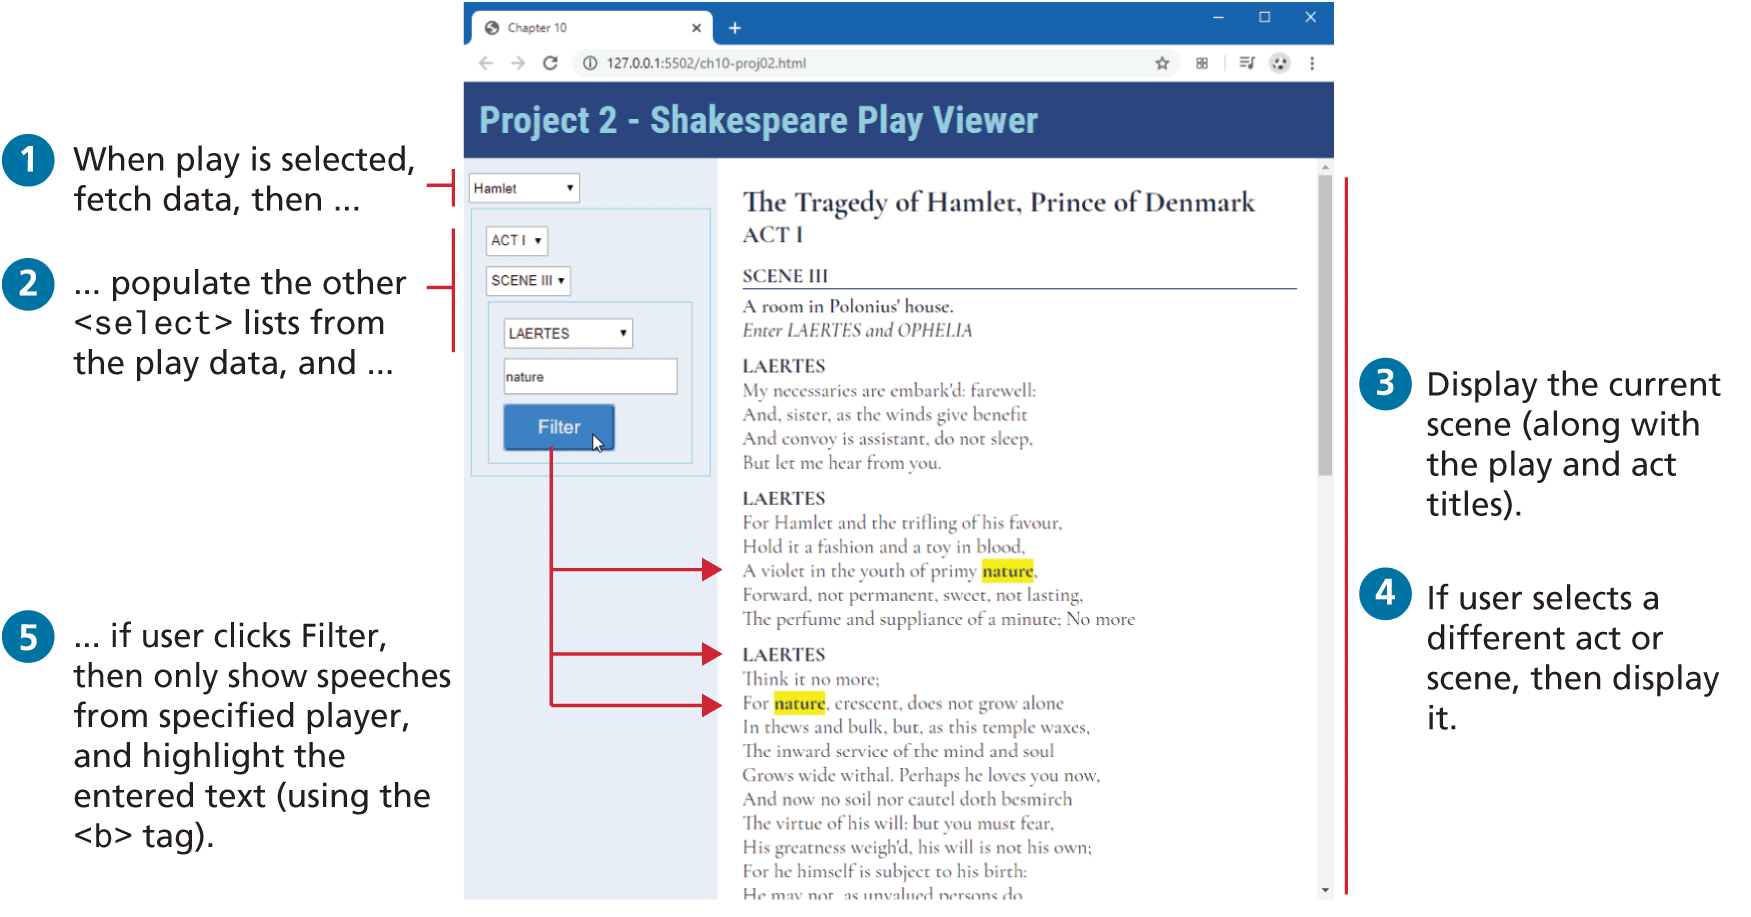
Add a change event handler to the first
<select>, which contains a preset list of plays. When the user selects a play, fetch the play data by adding thevalueattribute of the<option>for the play as a query string, as shown in the comments in ch10-proj02.js. When the fetched play is retrieved, populate the three other<select>elements from this data. Also populate the<section id="playHere">,<article id="actHere">, and<div id="sceneHere">elements with the first scene from the first act of the selected play.To make the code more manageable, create classes named
Play,Act, andScene, which will be responsible for outputting the relevant DOM elements. Using object-oriented techniques, thePlayclass will contain a list ofActobjects, theActclass will contain a list ofSceneobjects, while theSceneclass will contain a list of speeches. These classes will reside within a JavaScript module named play-module.js.Add event handlers to the other <select> elements. They will change what part of the play is displayed.
The filter button will highlight all occurrences of the user-entered text in the play and only show the speeches from the specified player.
Guidance and Testing
Break this problem down into smaller steps. First verify the fetch works, perhaps with a simple
console.logstatement. Then populate the<select>lists based on the fetched data.You may decide to move your code into classes within your module after you finished your code, or you may decide to work with classes and modules right from the start. This latter approach was that used by the author.
Project 3: Stock Dashboard
Difficulty Level: Advanced
Overview
This project focuses on browser and external APIs. It also uses fetch, classes, and modules. Figure 10.29 indicates what the final result should look like in the browser.
Figure 10.29 Completed Project 3
Instructions
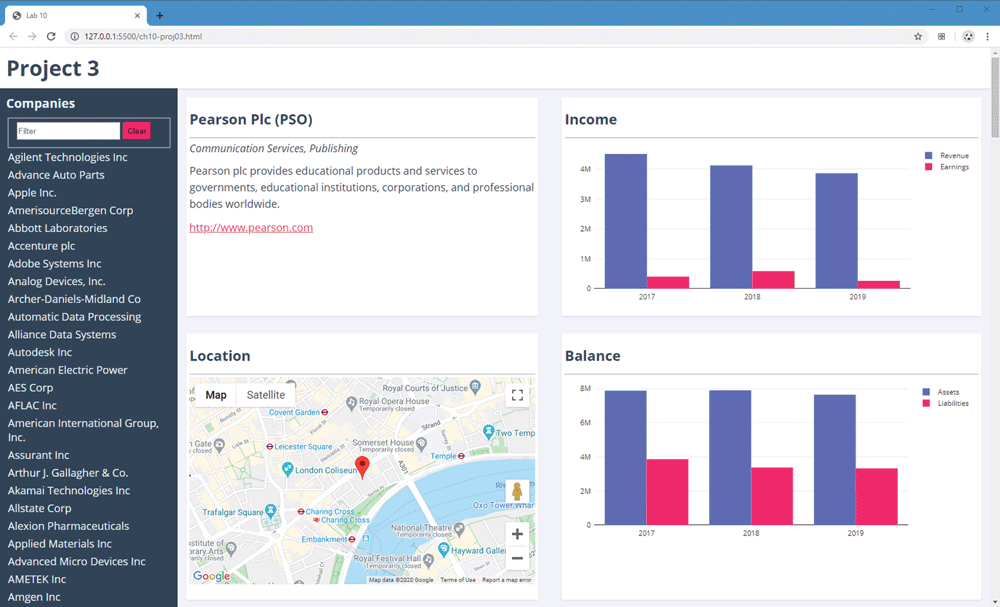
You have been provided with the necessary styling and markup already. Examine ch10-proj03.html in the editor of your choice. Examine ch10-proj03.js. In it, you will see the URL for the external API that will provide the color scheme data. Examine this URL in the browser in order to see the structure of the data.
Create a class named
CompanyCollectionwithin the module companies.js. This class will have the responsibility of fetching the data and displaying it in<ul id="companiesList">. Each<li>will need to contain the stock symbol value via thedata-idattribute.Add a single click event handler for this
<ul>. This will require event delegation. When the user clicks a list item, then display the following information in the four different<article>boxes: the company information, the latitude and longitude of the company using Google Maps, and the financial information. Not every company has financial information, so your code has to handle that possibility.Add the ability to filter the company list by responding to the change event of the
<input>element. This won’t get triggered until the user enters text in the box and presses enter. Use thefilter()array function to display just the companies whose name contains the entered text. The Clear button will display all companies.
Guidance and Testing
Break this problem down into smaller steps. First verify if the fetch works, then implement it within the class within the module. Then implement the click event handler and display the company information in one of the boxes.
Implement the Google Map functionality and then the charts.
10.6.4 References
1. Kyle Simpson, You Don’t Know JavaScript: this & Object Prototypes (O’Reilly, 2014).
3. https://babeljs.io/