10.3 Asynchronous Coding with JavaScript
Writing asynchronous code is an important part of practical JavaScript. But what is asynchronous code? Simply stated, it is code that is doing (or seemingly doing) multiple things at once. In multi-tasking operating systems, asynchronous execution is often achieved via threads: each thread can do only one task at a time, but the operating system switches between threads. Modern CPUs also contain multiple processors that can also execute different tasks at the same time.
But what about JavaScript? How does it manage asynchronous coding given that within the browser, JavaScript is mainly single-threaded? The way it works is that the browser manages multiple threads. One of these is for the execution of the page’s JavaScript. Other threads are for things like the timer, working with files, accessing a web cam, or fetching data from the network. Your JavaScript code interacts with these threads through callback functions.
You thus have already been writing code that is somewhat asynchronous. In Chapter 9, you learned how to work with events. You wrote handlers or callback functions that would be executed when the events happen in the future during runtime. Similarly, you also worked briefly with the setTimeout() function that is passed a function that gets called after the specified time has elapsed.
As briefly discussed back at the beginning of Chapter 8, many contemporary web sites make use of asynchronous JavaScript data requests of Web APIs, thereby allowing a page to be dynamically updated without requiring additional HTTP requests. A web API is simply a web resource that returns data instead of HTML, CSS, JavaScript, or images. As can be seen in Figure 10.8, when a web browser makes a request, the Content-Type header in the HTTP response tells the browser how it should display or handle the content. This means that any given web API can be examined in the browser.
Figure 10.8 Web API versus web page

How are asynchronous data requests different from the normal HTTP request–response loop? To answer this, you might want to remind yourself about how the “normal” HTTP request–response loop looks. Figure 10.9 illustrates the processing flow for a page that requires updates based on user input using the normal synchronous non-AJAX page request–response loop.
Figure 10.9 Normal HTTP request–response loop
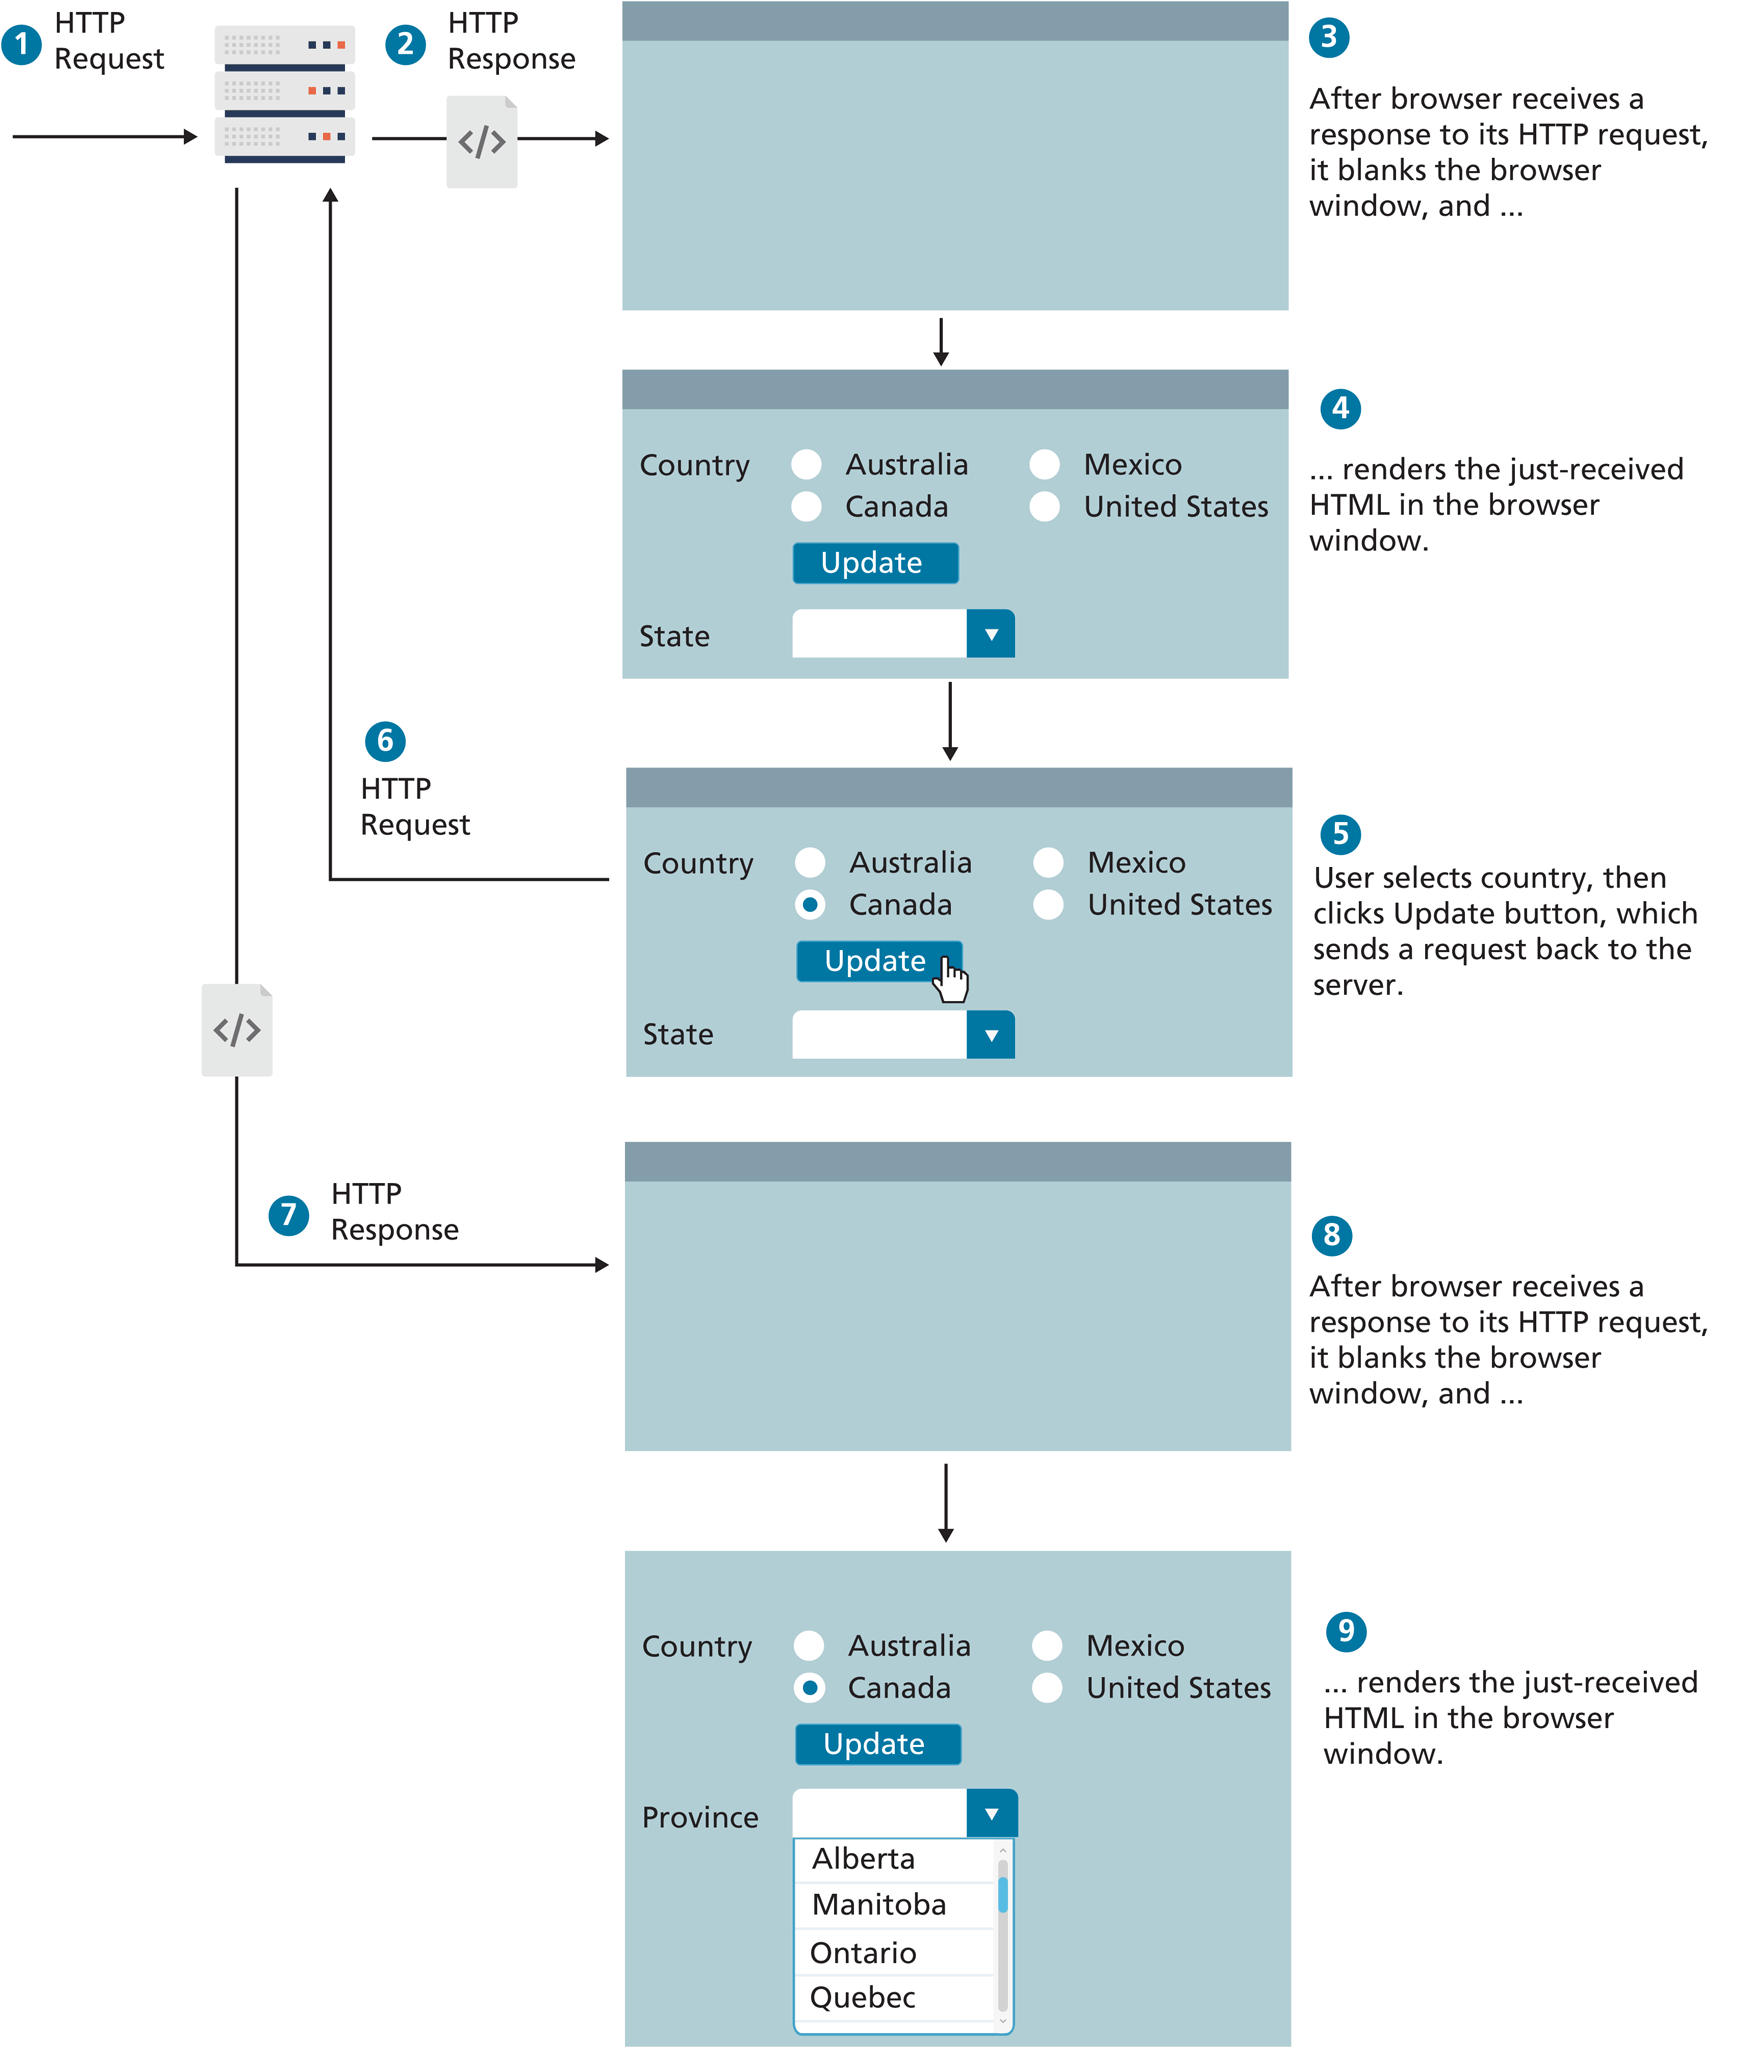
As you can see in Figure 10.9, such interaction requires multiple requests to the server, which not only slows the user experience, it also puts the server under extra load, especially if each request is invoking a server-side script.
With ever-increasing access to processing power and bandwidth, sometimes it can be hard to tell just how much impact these requests to the server have; nonetheless, it’s important to recognize that the performance penalty of running extra server-side scripts can be substantial, especially under heavy loads.
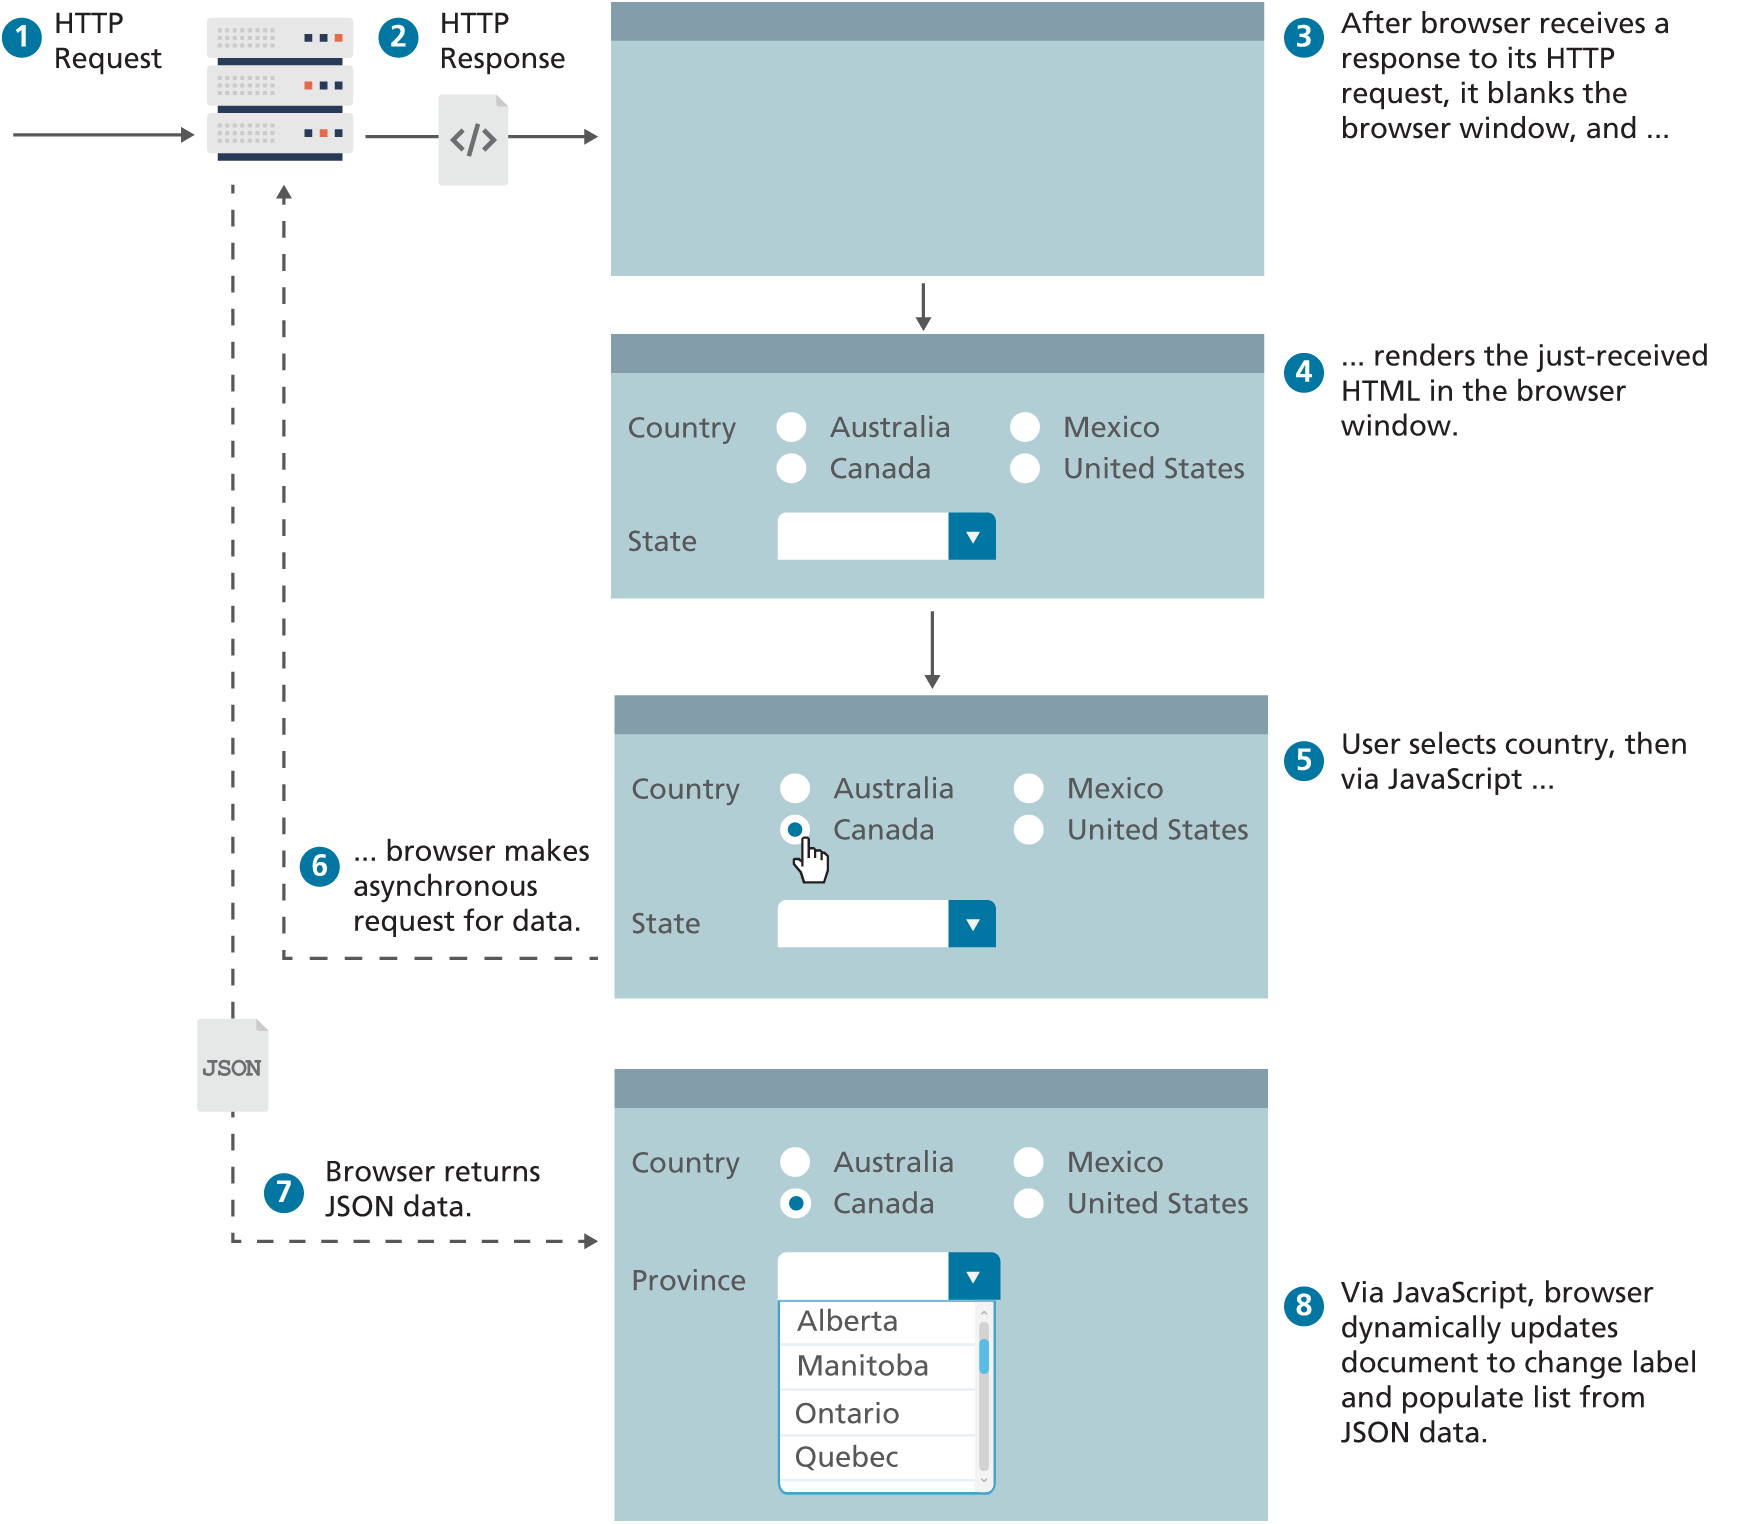
Asynchronous JavaScript data requests provide web authors with a way to avoid the visual and temporal deficiencies of normal HTTP interactions. With asynchronous JavaScript, it is possible to update sections of a page by making special requests of the server in the background, creating the illusion of continuity. Figure 10.10 illustrates how the interaction shown in Figure 10.9 would differ in a web page using asynchronous JavaScript data requests.
Figure 10.10 Asynchronous data requests
Originally, asynchronous requests in JavaScript required complicated programming using Mozilla’s XMLHttpRequest object or Internet Explorer’s ActiveX wrapper. The jQuery framework (briefly covered in Chapter 11) grew in popularity in part because it simplified the process of making asynchronous requests in different browsers by defining high-level methods that worked on any browser, hiding the implementation details from the developer. Contemporary browsers now support the fetch() function, which means external libraries are now no longer needed to easily make asynchronous requests. The next section illustrates several uses of this fetch()approach.
10.3.1 Fetching Data from a Web API
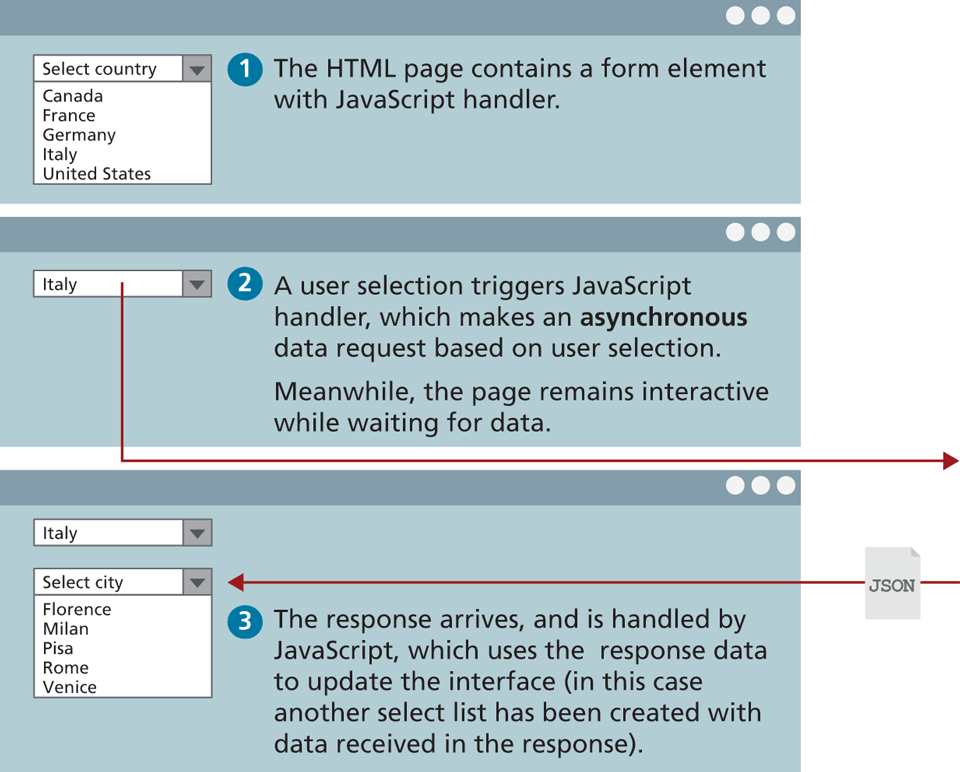
To illustrate fetch, consider the scenario of a page containing a <select> element as illustrated in Figure 10.11. When the user selects from the country list, the page makes an asynchronous request in order to retrieve a list of cities for that country. Making a request for the country Italy could easily be encoded as the URL request GET/api/cities.php?country=italy (note: we are assuming here that this API service is hosted on our own server).
Figure 10.11 Illustration of a list being updated asynchronously
To make this request using fetch, you could begin by writing the following code:
let cities = fetch('/api/cities.php?country=italy');So what does cities contain after this call? You might expect it to contain the requested JSON data. But it doesn’t. Why? Because it will take time for this service to execute and respond to our request. Indeed, the service may even be unavailable and will thus not return any data. What the above fetch will return instead is a special Promise object. Section 10.3.2 below explores promises in more detail (including how to create your own promises); for now, think of a promise as a proxy for data that will eventually arrive.
Promises in JavaScript are usually handled by invoking two methods: then() for responding to the successful arrival of data, and catch() for responding to an unsuccessful arrival. Each of these methods is passed a callback function, which is invoked when the success or failure events occur. For instance, our handling code for the successful arrival of data might look like the following (with added console messages to help us understand the order):
console.log('before the fetch()');
let prom = fetch('/api/cities.php?country=italy');
prom.then( function(response) {
    // do something with this data
    console.warn('response received!!!');
});
console.log('after the then()');
So which order will the messages be displayed in the console? As can be seen in Figure 10.12, the ‘response received!!!’ message will be displayed last, even though it appears earlier in the code. This is a common feature of the event-driven nature of JavaScript and hopefully is already familiar to you from your practice with the material in Chapter 9. Think back to the following example of event coding from Chapter 9:
console.log('before the handler is defined');
obj.addEventListener('click', () => {
    console.warn('event will happen in the future');
});
console.log('after the handler is defined');
Figure 10.12 Illustration of fetch behavior in the browser console

The console.warn will only happen at some point in the future when the user clicks the object and thus won’t appear in the console until after the second console.log. Something exactly equivalent happens with fetch. Figure 10.12 also illustrates how the fetch() function returns a Promise object and how this object changes over time once it receives data.
Our handler for the successful receipt of data from the service is actually still incomplete. We still need to extract the JSON data from the HTTP response. We can do this by having our then() handler return the JSON data. You might be tempted to try something similar to the following:
let data = prom.then( function(response) {
    return response.json();
});
console.log(data);
What do you think the console.log(data) statement will output? It won’t output the JSON data. It will output instead another pending Promise object. Why?
Recall that this then() function will be invoked and exited before the data is received from the service. Thus, the console.log(data) line will also be executed before the data is received. Your code needs to wait until it receives the data (that is, after the callback in the then() handler is invoked) before it can process the data. Your code should look like this instead:
let data = cities.then( function(response) {
return response.json();
});
data.then( function (data) {
// now finally do something with the JSON data
console.log(data);
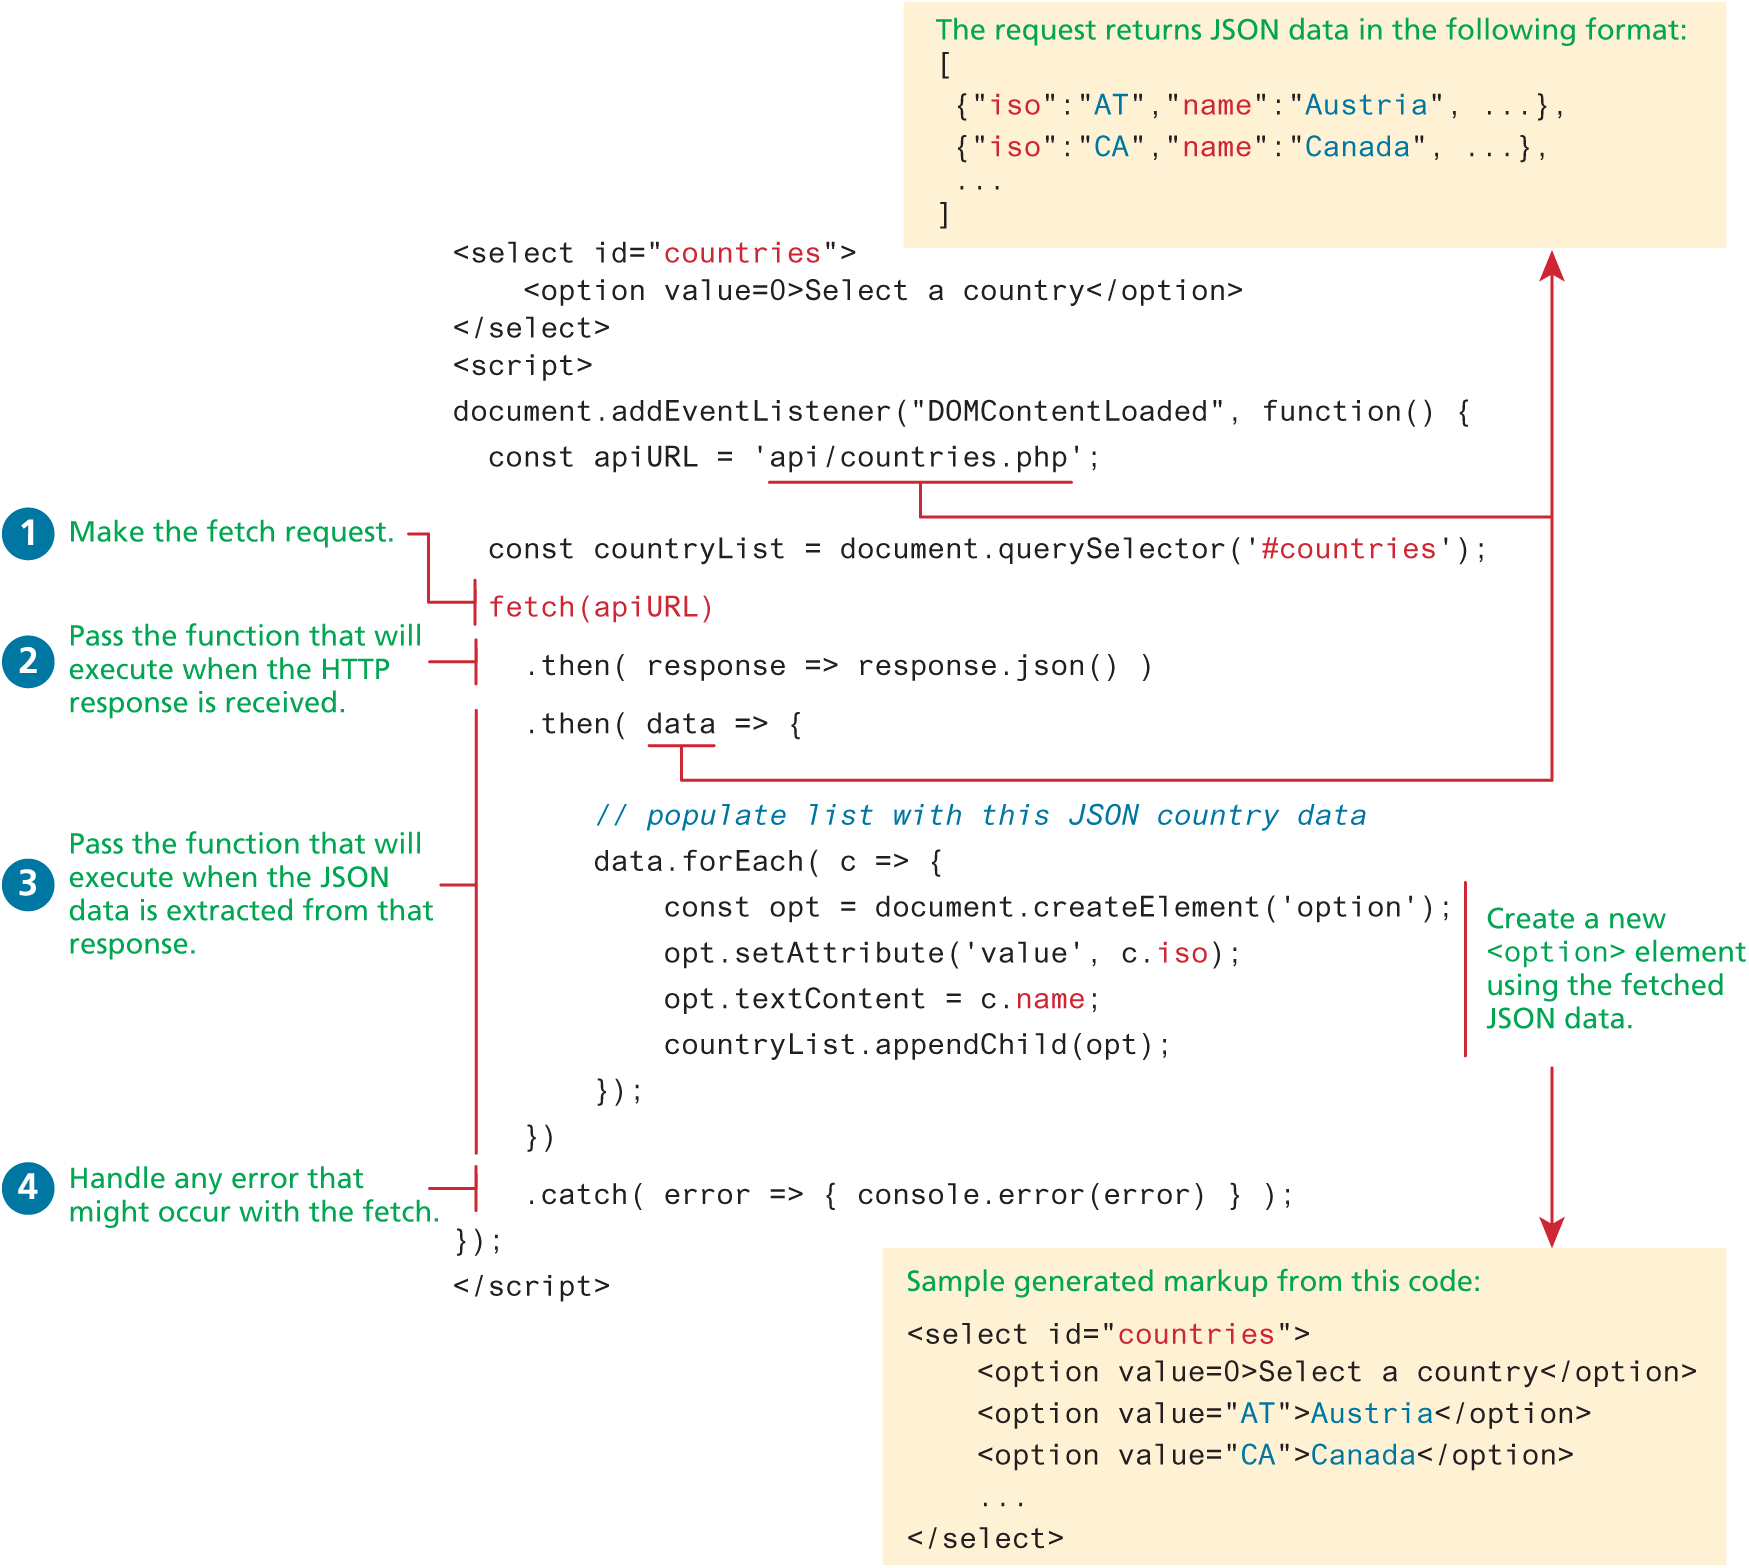
});While this code will work, it is much more common (and much cleaner) to simply chain your then() calls directly onto the fetch() itself. Figure 10.13 illustrates this approach (and also uses arrow syntax for the callback functions) and uses the received JSON data to populate a <select> element.
Figure 10.13 Example of asynchronous request using fetch
 Note
Note
Unlike a regular HTTP request, a fetch request never receives cookies. By default, it doesn’t send cookies either. This default behavior will be an issue for APIs that expect credential information (such as a session id). In such a case, you can modify the default behavior by adding an options parameter to the fetch call, as shown below:
fetch(url, { credentials: 'include' } )Checking for Errors
It is always possible that a fetch() call does not succeed. In the example in Figure 10.13, the catch() handler was added to the fetch chain in order to handle the possibility that a network error or CORS problem was encountered. However, if a 404 status is returned (that is, the requested URL was not available), the catch will not trigger since that is not a network error. For this reason one should always check if the Response.ok property has a value of true, as shown in the following:
fetch(url)
  .then( response => {
    if (response.ok) {
      return response.json()
    } else {
      throw new Error('Fetch did not work');
    }
  })
By throwing an error, the catch() handler will get executed. If you wanted to supply more information to that handler, you could instead use the Promise.reject() function:
if (response.ok) {
  return response.json()
} else {
  return Promise.reject({
     status: response.status,
     statusText: response.statusText
  });
}
Note
In almost all of the fetch examples in this chapter and in the associated lab, this additional error handling code is not included. Why? It adds additional 5–7 lines of code, which increases the size and length of code samples in the illustrations and listings. Since vertical space is at a premium on the printed page, we have omitted this error checking to simplify the code and to preserve vertical space. But in your own coding (say, in assignments or real-world sites), this error checking code should be included.
Common Mistakes with Fetch
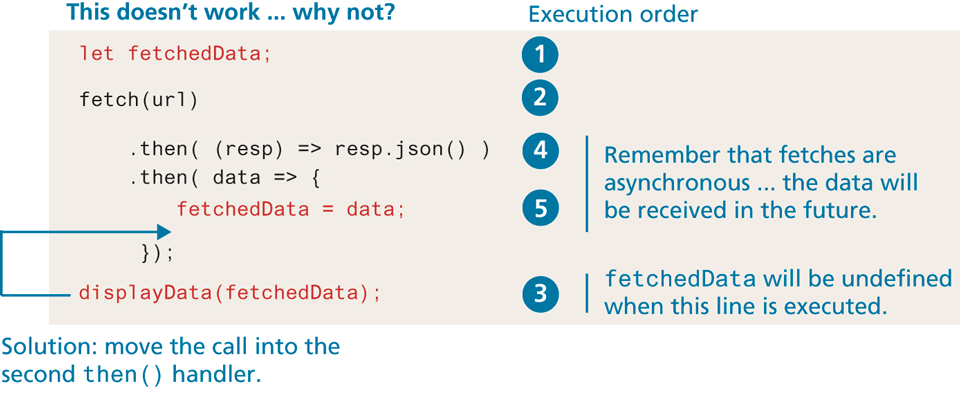
Our students often struggle at first with using fetch and often commit some version of the mistake shown in Figure 10.14. If you need to do any type of processing with the fetched data, such as modifying the DOM, setting up event handlers, or doing another fetch based on that data, it must happen within the second then() of the fetch. Unfortunately, this can result in a confusing programming structure of multiple nested fetches.
Figure 10.14 Common fetch mistake
Multiple Fetches
What if you wanted to consume a second fetch based on data received from the first fetch, and a third fetch based on data from the second fetch? Listing 10.8 illustrates an example of such a case. While we could simplify our code somewhat by extracting the event handler code into a separate function, it does illustrate a very common coding result with asynchronous code: the triangle-shaped, nested brackets-within-brackets structure, sometimes referred to as “callback hell.” In the next two sections, you will learn more about two newer additions to JavaScript that improve the type of code illustrated in Listing 10.8.
Listing 10.8 Too many nested callbacks
// define API endpoints and other element references
const domain = 'http://randyconnolly.com/funwebdev/3rd/api/travel/';

const countryAPI = domain + 'countries.php';
const cityAPI = domain + 'cities.php?isoimages=';
const imageAPI = domain + 'images.php?city=';

// after DOM is loaded then ...
document.addEventListener("DOMContentLoaded", () => {

  // 1. fetch small list of countries with images
  fetch(countryAPI)
    .then( response => response.json() )
    .then( countries => {
        // 2. then fetch the cities with images for first country
        fetch(cityAPI + countries[0].iso)
           .then( response => response.json() )
           .then( cities => {
               // 3. then fetch the images for first city
               fetch(imageAPI + cities[0].id)
                  .then( response => response.json() )
                  .then( images => {
                      // 4. then finally display the first image
                      result.textContent = images[0].description;
                  })
                  .catch( error => { console.error(error) } );
           })
           .catch( error => { console.error(error) } );
        })
    .catch( error => { console.error(error) } );
});
Cross-Origin Resource Sharing
As you will see when we get to Chapter 16 on security, cross-origin scripting is a way by which some malicious software can gain access to the content of other web pages you are surfing despite the scripts being hosted on another domain. Since modern browsers prevent cross-origin requests by default (which is good for security), sharing content legitimately between two domains becomes harder. For instance, by default, JavaScript requests for images on images.funwebdev.com from the domain www.funwebdev.com will result in denied requests because subdomains are considered different origins.
Cross-origin resource sharing (CORS) is a mechanism that uses new HTTP headers in the HTML5 standard that allows a JavaScript application in one origin (i.e., a protocol, domain, and port) to access resources from a different origin. If an API site wants to allow any domain to access its content through JavaScript, it would add the following header to all of its responses:
Access-Control-Allow-Origin: *The browser, seeing the header, would permit any cross-origin request to proceed (since * is a wildcard), thus allowing requests that would be denied otherwise (by default). A better usage is to specify specific domains that are allowed rather than cast the gates open to each and every domain. For instance, if we add the following header to our responses from the images.funwebdev.com domain, then we will prevent all cross-site requests, except those originating from www.funwebdev.com:
Access-Control-Allow-Origin: www.funwebdev.com Note
The web services from www.randyconnolly.com used in this chapter all have the Access-Control-Allow-Origin header set to * so that they can be used by all students.
Fetching Using Other HTTP Methods
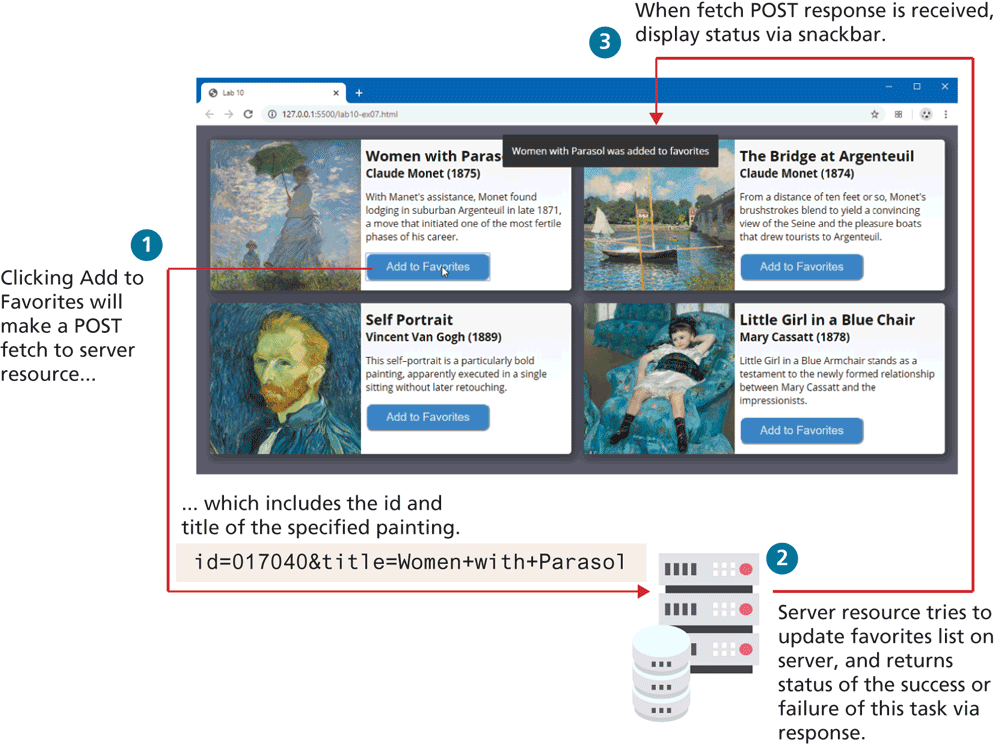
By default, fetch uses the HTTP GET method. There are times when you will instead want to use POST, or even PUT or DELETE (you will use these methods in Chapter 13). For instance, imagine you wanted to add an item to a favorites list or to a shopping cart in an asynchronous manner. This would typically require sending data (for instance, the product and the quantity) to the server, so a POST fetch makes the most sense. Figure 10.15 illustrates the process flow which is implemented in Listing 10.9. You may be curious about the term “snackbar,” which is a brief message that appears at the top or bottom of a screen.
Figure 10.15 Process flow for fetching via POST example
Listing 10.9 Fetching via POST example
// set up button handlers here using event delegation
document.querySelector('main').addEventListener('click', (e) => {
if (e.target && e.target.nodeName.toLowerCase() == 'button') {
// retrieve data from button
let id = e.target.getAttribute('data-id');
// get painting object for this button
let p = paintings.find( p => p.id == id);
// We will be posting the painting id and title to favorites
let formBody = new FormData();
formBody.set("id",p.id);
formBody.set("title",p.title);
const opt = {
method: 'POST',
body: formBody
};
const url = "http:/Each Add to Favorites button is going to POST the painting id and title to the external API. One way to construct the data the page will be posting is to use the JavaScript FormData object. Additionally, in order to have fetch make a POST request, you will need to construct an options object that contains the data to post and which will be passed into the fetch() function.
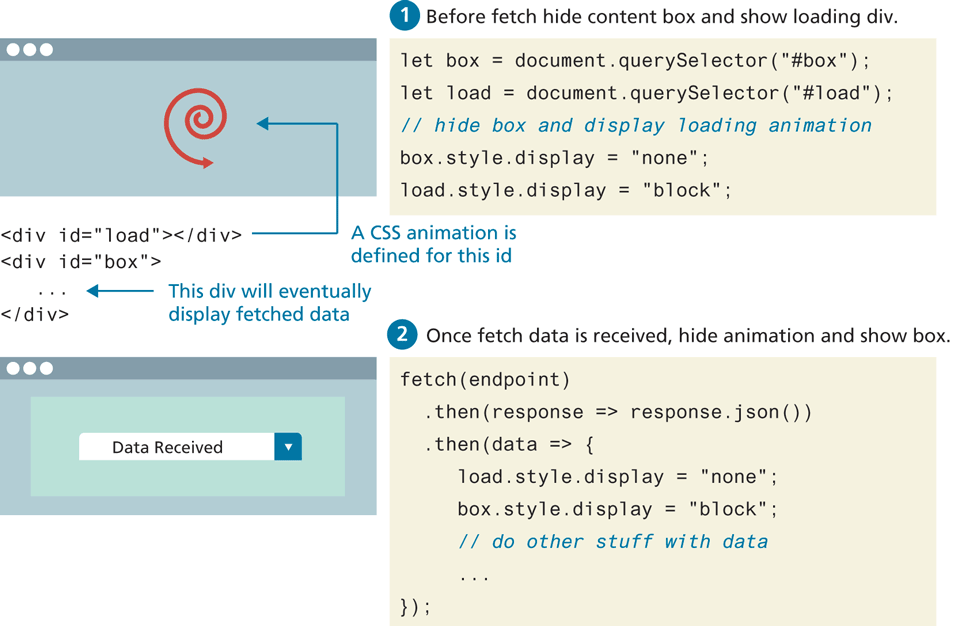
Adding a Loading Animation
Fetching takes time. A common user interface feature is to supply the user with a loading animation while the data is being fetched. Integrating a loading animation is quite straightforward: it simply requires showing or hiding an element that contains either an animated GIF, or, even better, CSS that uses animation. Figure 10.16 illustrates the code for this process: first the animation container is displayed and the container for the fetched data is hidden before the fetch; after the fetch, the reverse is the case.
Figure 10.16 Adding a loading animation
Test Your Knowledge #3
In this exercise, you will be working with nested fetches. You will be modifying lab10-test03.js and consuming two APIs. The URLs for the two APIs and the location of the photo image files are included in the JavaScript file. The result will look similar to that shown in Figure 10.17.
You will do the first fetch after the user clicks the load button; you will use the fetched country information to populate the
<select>list. Be sure to first empty the<select>element (by setting itsinnerHtmlproperty to ""); otherwise each time the button is clicked, the list size will grow. For each<option>element, set itsvalueattribute to theisoproperty of each country object. Display the first loading animation and hide the<main>element while the fetch is working.When the user selects a country, you will do another fetch to retrieve the photos for that country. This will require adding a query string to the photo URL that contains the
isoof the country (which can be obtained from thevalueproperty of the<select>). The query string must use the nameiso; for instance, to retrieve the photos from Canada, the query string would be:iso=CA.
The fetched photo data has a filename property that can be appended to the supplied image URL and used for the src attribute of the generated <img>. Set the title and alt attributes of the image to the photo’s title property.
Display the second loading animation while the second fetch is working. Be sure to also empty the <section> element before adding photos to it.
Figure 10.17 Test Your Knowledge #3

10.3.2 Promises
One of the key problems with the callback coding approach in JavaScript are the hierarchies of nested callback handlers (for instance, the nested fetches in Listing 10.8), which can quickly become quite complicated to understand and debug. This is especially true with asynchronous coding, in which some code can’t be executed until some other callback occurs first.
Promises provide a language mechanism for making callback coding less complicated. Like the name suggests, a Promise is a placeholder (also known as a proxy) for a value that we don’t have now but will arrive later (that is, it is pending). Eventually, that promise will be completed (that is, it is resolved or fulfilled), and we will receive the data, or it won’t, and we will get an error instead (that is, it is rejected).
Figure 10.18 illustrates how JavaScript promises are a programming analogy of familiar experiences of our own non-programming life. For instance, when I (one of the authors) was a graduate student, the library at the university I attended was mainly just a gigantic warehouse of books. Unlike the small libraries I was familiar with, I couldn’t simply wander through the shelves on my own. Instead, I had to look up the book details on the card catalogue system (this was pre-Internet), and then make an in-person request of one of the librarians. The librarian would submit the request, give me a request receipt (essentially a paper promise), and later (sometimes hours, sometimes days) I would receive a phone call to tell me my requested book was available.
Figure 10.18 Promises in real life and in JavaScript
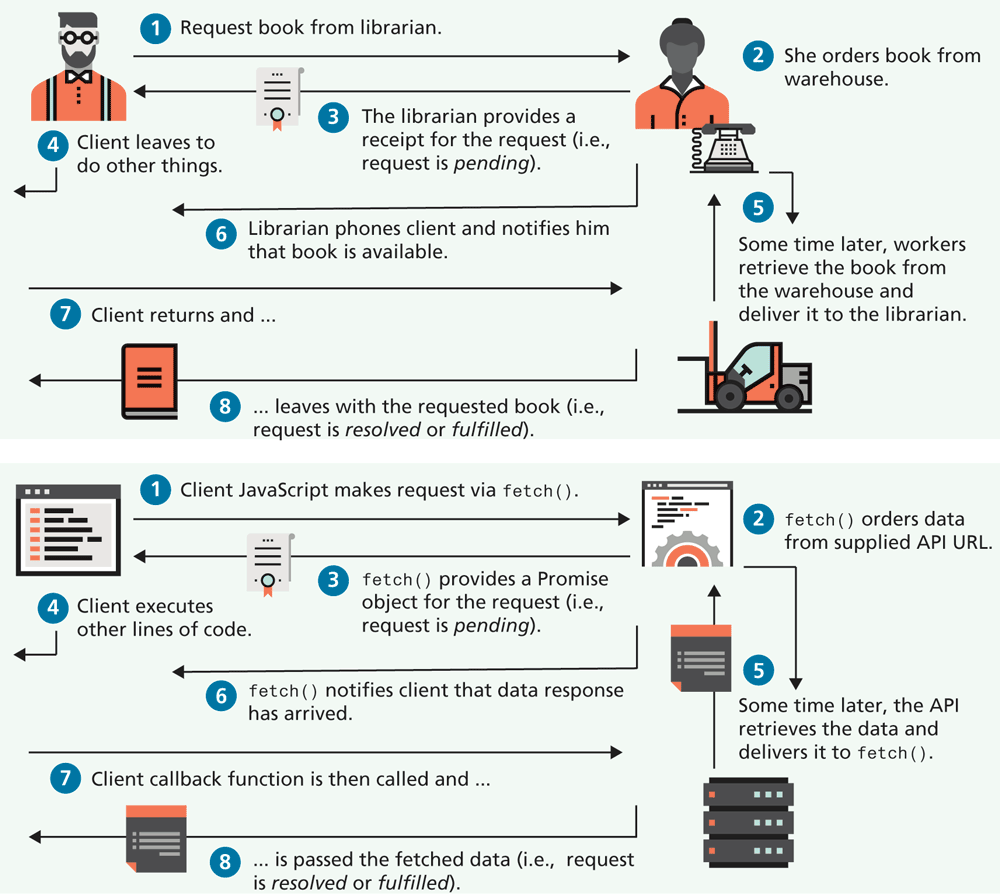
As can be seen in Figure 10.18, the structure of this experience is essentially identical to how promises work in JavaScript. You saw in the previous section that the fetch() method for making asynchronous requests for data uses Promise objects.
In the last section, you saw that the fetch() function returned a Promise object, and that this object has both a then() and a catch() method, which are passed a callback function that is called when the promise is resolved or rejected. (And, while we never used it, there is also a finally() method which can be called after all the then() and a catch() methods are invoked.
Creating a Promise
Promises have uses outside of fetch. Indeed, you can create your own promises that can mitigate some of the nested callback complexity inherent to a lot of JavaScript coding. Creating a promise is quite simple: you simply instantiate a Promise object, as shown in the following:
new Promise ( aHandler ) {
   // code that either resolves the promise or rejects it
}
This example certainly doesn’t illustrate that much. For promises to make some sense, we must first understand that the handler function passed to the Promise constructor must take two parameters: a resolve() function and a reject() function. Thus, creating a promise typically looks like the following:
const promiseObj = new Promise( (resolve, reject) => {
  if (someCondition)
     resolve(someValue);
  else
     reject(someMessage);
});
promiseObj
  .then( someValue => {
     // success, promise was achieved!
   })
  .catch( someMessage => {
     // oh no, promise was not satisfied!!
   });
Both the then() and a catch() methods return another Promise, which allows the calls to be chained together.
Again, this still might not make much sense. To illustrate promises a bit better, let’s take a hypothetical example of a set of tasks that need to execute once an image is uploaded by the user (for instance, in our travel site, a user might upload one of her photos to the site). Once the image is uploaded, our hypothetical site might need to accomplish the following tasks (also illustrated in Figure 10.19):
transfer the image to a cloud storage environment (such as AWS S3),
then extract textual tags that describe the content of the image using a machine learning service,
then create a compressed version of the uploaded image for faster previews of this image.
These three tasks could happen independently of each other, or perhaps the second and third tasks could occur in any order after the first. This problem is an ideal one for promises.
Figure 10.19 Example problem solved using promises
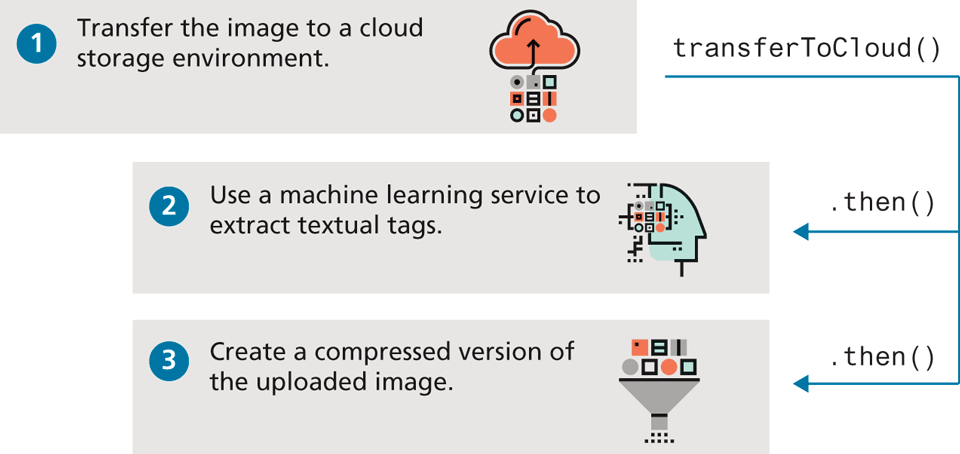
Each of these three tasks will be encapsulated as separate functions, each of which will use promises. A single coordinator will chain the promises together, eliminating the need for nested callbacks. For instance, the function that implements the upload to the cloud storage might look like that shown in Listing 10.10 (it is simplified greatly for clarity sake and assumes that the transfer happens immediately and is synchronous). Let’s assume that the other two asynchronous tasks are implemented via the functions extractTags() and compressImage(). The code that calls and coordinates these three tasks becomes quite simple, as can be seen in the invocation of transferToCloud() in Listing 10.10. The equivalent code using callbacks and no promises would instead consist of a nested set of function calls at least three levels deep.
Listing 10.10 Creating Promises
// promisified version of the transfer task
function transferToCloud(filename) {
   return new Promise( (resolve, reject) => {
      // just have a made-up AWS url for now
     let cloudURL =
          "http://bucket.s3-aws-region.amazonaws.com/makebelieve.jpg";
     // if passed filename exists then upload ...
     if ( existsOnServer(filename) ) {
         performTransfer(filename, cloudURL);
         resolve(cloudURL);
     } else {
         reject( new Error('filename does not exist'));
     }
   });
}
// use this function
transferToCloud(file)
   .then( url => extractTags(url) )
   .then( url => compressImage(url) )
   .catch( err => logThisError(err) );
Working with Multiple Promises
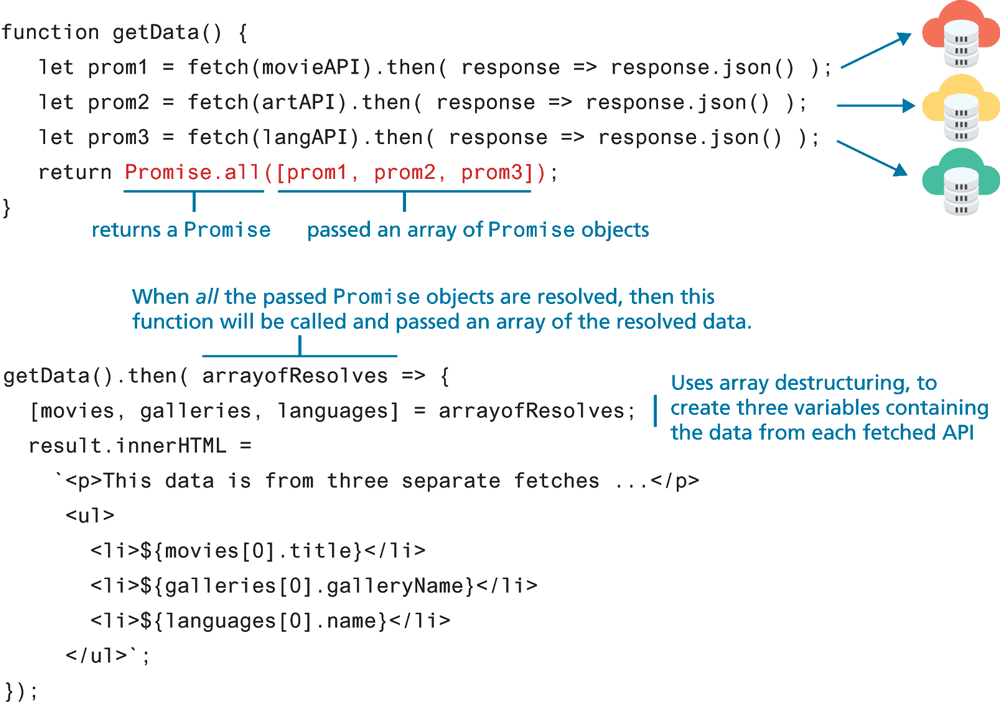
Earlier, Listing 10.8 illustrated a situation where fetches needed to be nested within one another since the next task/fetch required the previous task/fetch to be completed. What if we needed to complete, say, three fetches but we didn’t care what order they were run? Instead of nesting the fetches as in Listing 10.8, we could make use of the Promise.all() method, which returns a single Promise when a group of Promise objects have been resolved.
The Promise.all() method is typically passed an array of Promise objects that can be satisfied in any order. Figure 10.20 illustrates how this approach can be used. Notice that it returns a Promise, thus the then() method needs to be passed a function that will get executed when all the passed Promise objects are resolved. That function will be passed an array containing, in the case of multiple fetches, multiple retrieved JSON data arrays.
Figure 10.20 Executing multiple Promises in parallel
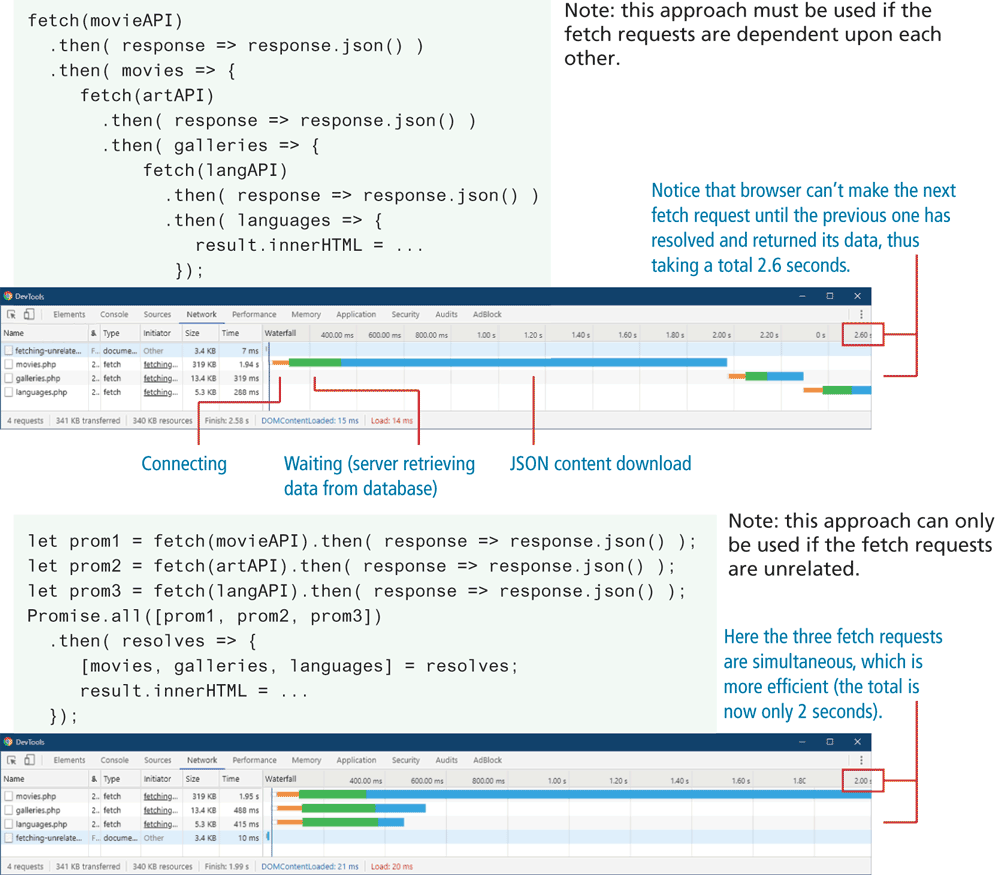
Potentially, the Promise.all() approach can be more efficient when each individual fetch is independent of each other. Figure 10.21 contains screen captures of the Google Chrome Network Inspector status for two versions, one using nested fetches and one using the Promise.all() approach. With the nested approach, the browser can’t make the next fetch request until the previous one is resolved (that is, the data has been returned); with the Promise.all() approach, all three fetches can be made simultaneously, which is more time efficient.
Figure 10.21 Potential performance benefits of parallel invocations of fetch
10.3.3 Async and Await
In the previous section, you learned how to use (and create) promises as a way of taming the code complexities of using asynchronous functions. While certainly a significant improvement over multiple nested callback functions, recent iterations of the JavaScript language have added additional language support for asynchronous operations, which further improves and simplifies the code needed for these operations.
Promises can reduce the typical nesting of callback operations, but they don’t eliminate them. ES7 introduced the async...await keywords that can both simplify the coding and even eliminate the typical nesting structure of typical asynchronous coding.
Do you remember this sample line from the earlier section on fetch? What content is contained in the variable obj in the following line?
let obj = fetch(url);The answer, you may recall, is a Promise; the then() method of the Promise object needs to be called and passed a callback function that will use the data from the promisified function fetch. Sometimes our code needs to go off and do other important things while the data is being retrieved. In many other circumstances, however, we would be willing for our code to wait for the data to return from the service if it meant our code could be cleaner with fewer callbacks. The await keyword (which has been supported in all the main browsers since about 2017) provides exactly that functionality, namely, the ability to treat asynchronous functions that return Promise objects as if they were synchronous. For instance, we could rewrite the previous example line as follows:
let obj = await fetch(url);Now, obj will contain whatever the resolve() function of the fetch() returns, which in this case is the response from the fetch. Notice that no callback function is necessary!
Since our fetch actually requires two then() calls, we similarly will need to use await twice also:
let response = await fetch(url);
let data = await response.json();
There is an important limitation with using the await keyword: it must occur within a function prefaced with the async keyword, for instance, as shown in the following:
async function getData(url) {
   let response = await fetch(url);
   let data = await response.json();
   return data;
}
In this case, you could also combine the two promises using a single then() call:
async function getData(url) {
   let data = await fetch(url)
                 .then( async (response) => await response.json() );
   return data;
}
The reason why the async keyword is needed in front of the function is to indicate that the function is still asynchronous; the waiting only happens within the async function itself. Code after the call to the async function will still get called after the await line in the async function is called, but before it is satisfied. The nearby Dive Deeper illustrates this important caveat.
The async...await keywords can be used with any function that returns a Promise (and not just fetch). Can you rewrite the code at the end of Listing 10.10 to use async...await? It might look like the following:
// using async...await
async function processImage(file) {
   let url = await transferToCloud(file);
   let tags = await extractTags(url);
   let thumbURL = await compressImage(url);
}
What about error handling? We can simply wrap the three lines within the function in a try...catch block (see Listing 10.11).
Listing 10.11 Using async and await
async function processImage(file) {
   try {
      const url = await transferToCloud(file);
      const tagProm = extractTags(url);
      const thumbProm = compressImage(url);
      /* uses array destructuring to put each returned item into         its own variable */
      [ tags, thumbURL ] = await Promise.all([tagProm, thumbProm]);
      /* do something with the returned data (in this case simply    output it) */
      console.warn(tags, thumbURL);
   } catch (err) {
      console.error(err);
   }
}
// also notice you call async function in same way as any function
processImage('cats.jpg');
What if we wanted to invoke two functions asynchronously at the same time only after the first function has successfully returned with its data? The promise-only version still required nesting callbacks within callbacks. Listing 10.11 illustrates how the async and await approach provides a much cleaner solution.
Test Your Knowledge #4
In this exercise, you will extend Test Your Knowledge #3. As you can see in Figure 10.23, this exercise will contain four <select> elements, which will be populated from four APIs. You will also use async...await.
Figure 10.23 Completed Test Your Knowledge # 4

Examine lab10-test04.js and test out the URLs of the four APIs included in the starting code.
These API fetches are unrelated, so they can happen at the same time using
Promise.all(). Use this method in conjunction withasync...await. Once the data is retrieved, sort each data set using thenameorlastName(for users) property.Populate the four select lists using the following properties from the retrieved data:
Continents:
code(valueattribute of each option),name(textContentof each option)Countries:
iso(valueattribute of each option),name(textContentof each option)Cities:
id(valueattribute of each option),name(textContentof each option)Users:
id(valueattribute of each option),lastName(textContentof each option)Add event handlers for the
inputevent of each select. When the user chooses an item from one of the lists, then use the photo API to retrieve photos for the specified continent, country, city, or user. You will supply a different query string parameter based on which filter criteria to use. For instance:images.php?continent=NA images.php?iso=CA images.php?city=252920 images.php?user=2Once you have retrieved the images, display them in the same manner as in Test Your Knowledge #3.