10.2 Prototypes, Classes, and Modules
In Chapter 8, you learned how to use constructor functions as an approach for creating multiple instances of objects that need to have the same properties. While the constructor function is simple to use, it can be an inefficient approach for objects that contain methods. For instance, consider the function constructor in Listing 10.4. It can be used to create a single card object (in contemporary web design, a card refers to a boxed feature that contains an image at the top, a title, and then additional content).
Listing 10.4 Sample inefficient function constructor and some instances
function Card(title, src, content) {
   this.title = title;
   this.src = src;
   this.content = content;
   // returns the markup for the card as a string
   this.makeMarkup = function() {
      return
         `<div class="card">
            <img src="${this.src}" alt="${this.title}" >
            <div>
               <h4>${this.title}</h4>
              <p>${this.content}</p>
            </div>
         </div>`;
   }
   // returns the DOM elements for the entire card
   this.makeElement = function() {
      // create and populate the elements
      let cardDiv = document.createElement('div');
      cardDiv.setAttribute('class','card');
      let img = document.createElement('img');
      img.src = this.src;
      let div = document.createElement('div');
      let h4 = document.createElement('h4');
      h4.innerHTML = this.title;
      let p = document.createElement('p');
      p.innerHTML = this.content;
      // add the child elements to their parents
      div.appendChild(h4);
      div.appendChild(p);
      cardDiv.append(img);
      cardDiv.appendChild(div);
      return cardDiv;
   }
}
// now create a whole bunch of Card objects and display them
const container = document.querySelector("#container");
const c1 = new Card("Van Gogh", "019170.jpg", "Self Portrait");
container.appendChild( c1.makeElement() );
const c2 = new Card("Monet", "017080.jpg", "The Bridge at Argenteuil");
container.appendChild( c2.makeElement() );
// ...
const c100 = new Card("Monet", "017040.jpg", "Woman with a Parasol");
container.appendChild( c100.makeElement() );
Although the function constructor used in Listing 10.4 works, it is not a memory-efficient approach. Why? Because new makeMarkup() and makeElement() function objects are created for each new Card object instance. Figure 10.3 illustrates how multiple instances of the Card object contain multiple (identical) definitions of these two functions (recall that a function expression is an object whose content is the definition of the function).
Figure 10.3 The memory impact of functions in objects
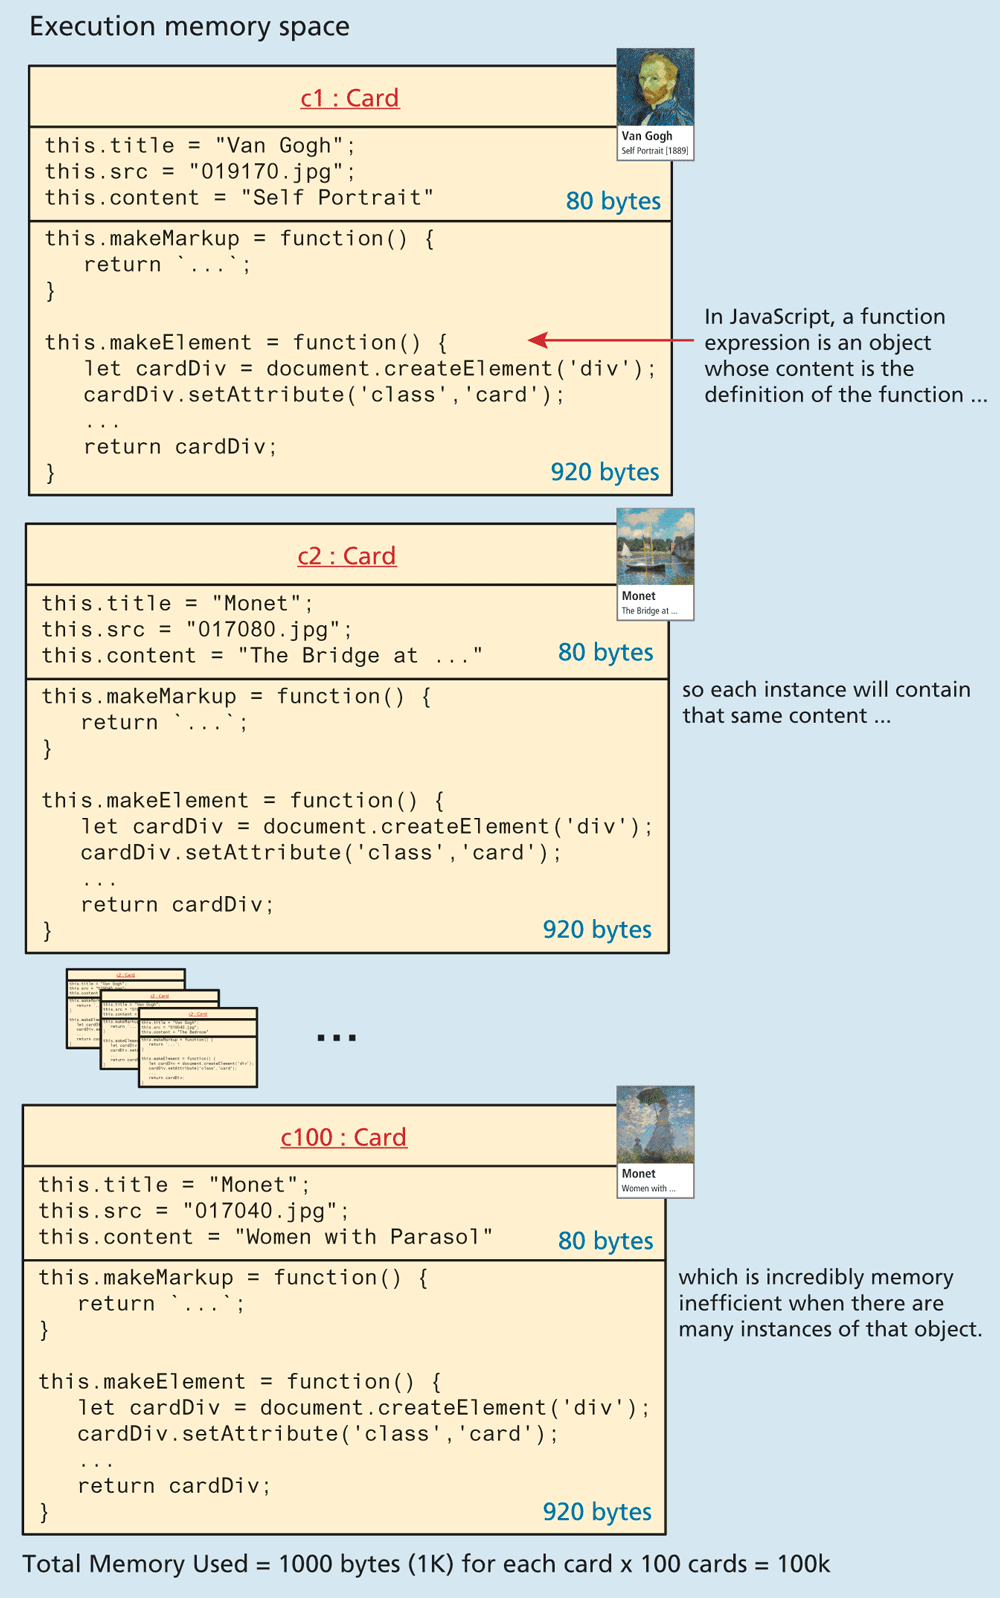
Just imagine if you had to create 100 or 1000 Card objects. You would be redefining every method 100 or 1000 times, which could have a noticeable effect on client execution speeds and browser responsiveness due to the memory consumption. To prevent this needless waste of memory, a better approach is to define each of these functions just once using prototypes.
10.2.1 Using Prototypes
Prototypes are an essential syntax mechanism in JavaScript, used to make JavaScript behave more like an object-oriented language. Every function object has a prototype property, which is initially an empty object. What makes the prototype property powerful is that the prototype properties are defined once for all instances of an object created with the new keyword from a constructor function.
So now in our example, we can move the definition of the makeMarkup() and makeElement() methods out of the constructor function and into the prototype, as shown in Listing 10.5.
Listing 10.5 Using a prototype
function Card(title, src, content) {
this.title = title;
this.src = src;
this.content = content;
}
Card.prototype.makeMarkup = function() {
return
`<div class="card">
<img src="${this.src}" alt="${this.title}" >
<div>
<h4>${this.title}</h4>
<p>${this.content}</p>
</div>
</div>`;
};
Card.prototype.makeElement = function() {
let cardDiv = document.createElement('div');
cardDiv.setAttribute('class','card');
let img = document.createElement('img');
img.src = this.src;
let div = document.createElement('div');
let h4 = document.createElement('h4');
h4.innerHTML = this.title;
let p = document.createElement('p');
p.innerHTML = this.content;
div.appendChild(h4);
div.appendChild(p);
cardDiv.append(img);
cardDiv.appendChild(div);
return cardDiv;
};
// You use prototype functions as if they were declared in the object
const container = document.querySelector("#container");
const c1 = new Card("Van Gogh", "019170.jpg", "Self Portrait");
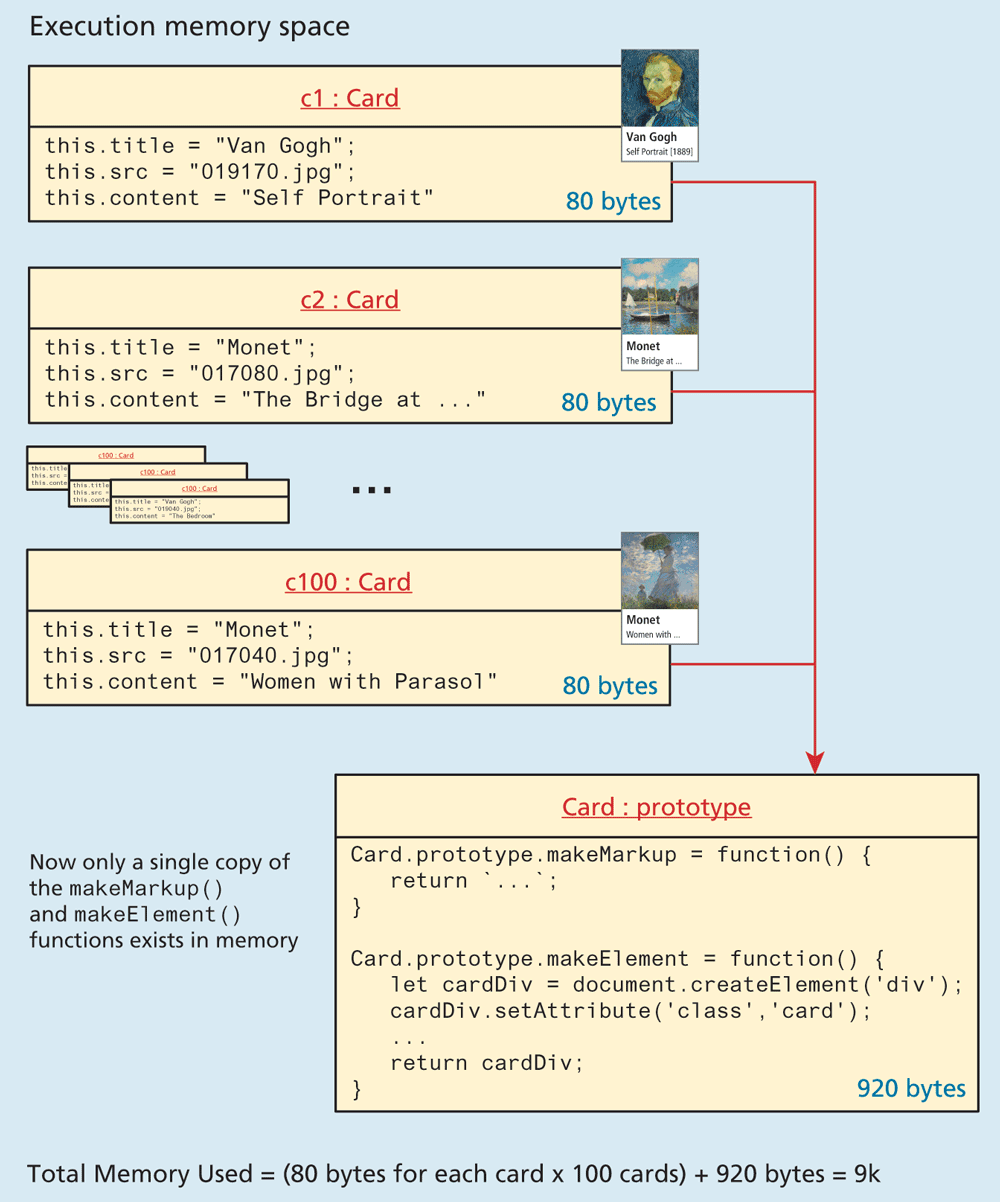
container.appendChild( c1.makeElement() );This approach is far superior because it defines the method only once, no matter how many instances of Card are created. In Figure 10.3, there are 100 definitions of the two functions in the 100 instances of Card; in contrast, the use of a prototype in Figure 10.4 is much more efficient. Since all instances of a Card in Figure 10.4 share the same prototype object, the function declaration only happens one time and is shared with all Card instances (and is thus much more memory efficient: 9K vs 100K).
Figure 10.4 Using the prototype property
Using Prototypes to Extend Other Objects
In addition to the obvious application of prototypes to our own constructor functions, prototypes enable you to extend existing objects (including built-in objects) by adding to their prototypes. Imagine a method added to the String object that allows you to count instances of a character. Listing 10.6 defines just such a method, named countChars() that takes a character as a parameter.
Listing 10.6 Extending a built-in object using the prototype
String.prototype.countChars = function (c) {
   let count=0;
   for (let i=0;i<this.length;i++) {
      if (this.charAt(i) == c)
      count++;
   }
   return count;
}
Now any new instances of String will have this method available to them. You could use the new method on any strings instantiated after the prototype definition was added. For instance, the following example will output HELLO WORLD has 3 letter L's.
const msg = "HELLO WORLD";
console.log(msg + " has" + msg.countChars("L") + " letter L's");
10.2.2 Classes
In the previous pages, you have learned that in JavaScript, prototypes are used to extend the functionality of existing objects (or, what we might call inheritance in a traditional object-oriented language like Java or C#). ES6 in fact added classes to JavaScript, but in reality, they are merely “syntactical sugar” for JavaScript’s prototype approach to inheritance. That is, a class provides an alternate syntax for a function constructor and the extension of it via its prototype.
Consider the example of a JavaScript class in Listing 10.7. It is an alternate way to create the same outcome as that shown back in Listing 10.5.
Listing 10.7 Implementing Listing 10.5 using class syntax
  class Card {
    // constructor replaces the function constructor
    constructor(title, src, content) {
      this.title = title;
      this.src = src;
      this.content = content;
    }
    // class methods replace prototypes
    makeMarkup() {
      return
          `<div class="card">
            <img src="${this.src}" alt="${this.title}" >
            <div>
                <h4>${this.title}<h4>
                <P>${this.content}</P>
            </div>
          </div>`;
    }
    // notice that they use new function property shorthand syntax
    makeElement() {
      let cardDiv = document.createElement('div');
      cardDiv.setAttribute('class','card');
      let img = document.createElement('img');
      img.src = this.src;
      let div = document.createElement('div');
      let h4 = document.createElement('h4');
      h4.innerHTML = this.title;
      let p = document.createElement('p');
      p.innerHTML = this.content;

      div.appendChild(h4);
      div.appendChild(p);

      cardDiv.append(img);
      cardDiv.appendChild(div);
      return cardDiv;
    }
  }
  // Use the class
  const container = document.querySelector("#container");
  const c1 = new Card("Van Gogh", "images/019170.jpg", "Self Portrait");
  container.append( c1.makeElement() );
It is important to remember that this new JavaScript class is not a class like in Java. In Java, a class is a static definition, a template to be used in the creation of future objects. In JavaScript, a class ultimately is just an alternate syntax for combining prototype functions with the function constructor. This might be clearer by looking at the alternate expression syntax for classes:
const Card = class {
  constructor(title, src, content) {
    ...
  }
  makeMarkup() {
    ...
  }
  makeElement() {
    ...
  }
};

// now demonstrate that Card is actually a function object
console.log(Card.name + ' has ' + Card.length + ' parameters');
While the class syntax provides a familiar alternate syntax for working with functions, the developer community has not universally adopted it (in contrast to arrow syntax, which has been widely used). As summed up by Kyle Simpson in his short You Don’t Know JavaScript: this & Object Prototypes book: the ES6 “class contributes to the ongoing confusion of ‘class’ in JavaScript that has plagued the language for nearly two decades. In some respects, it asks more questions than it answers, and it feels like a very unnatural fit on top of the elegant simplicity of the Prototype mechanism.”1
Regardless of these concerns, the React framework, which has become one of the most widely adopted frameworks in the past several years (and which is covered in Chapter 11), does use JavaScript class syntax, so it is likely that as a JavaScript developer you will encounter this syntax more and more moving forward.
Extending a Class
One of the key features of class-based programming languages such as Java or C# is the ability of a class to inherit the properties and methods of another class. JavaScript classes provide a similar capability via the extends keyword. For instance, the following code creates a new class AnimatedCard that extends the parent Card class:
class AnimatedCard extends Card {
   constructor(title, src, content, effect) {
      super(title, src, content)
      this.effect=effect;
   }
   makeElement() {
     let element = super.makeElement();
     ...
   }
}
// notice that instance of AnimatedClass also has access to functions
// (e.g., makeMarkup) that are defined in the parent Card class
let x1 = new AnimatedCard("Monet", "017060.jpg", "Lilies", "fade");
console.log(x1.makeMarkup());
Notice the references to super in the constructor function and in the makeElement() method, which invokes the relevant function of the parent class.
There are additional syntactical features of classes in JavaScript, including getters/setters and static functions that we are not covering due to space limitations. If interested, you can examine, for instance, the MDN documentation online for more information on these topics.
10.2.3 Modules
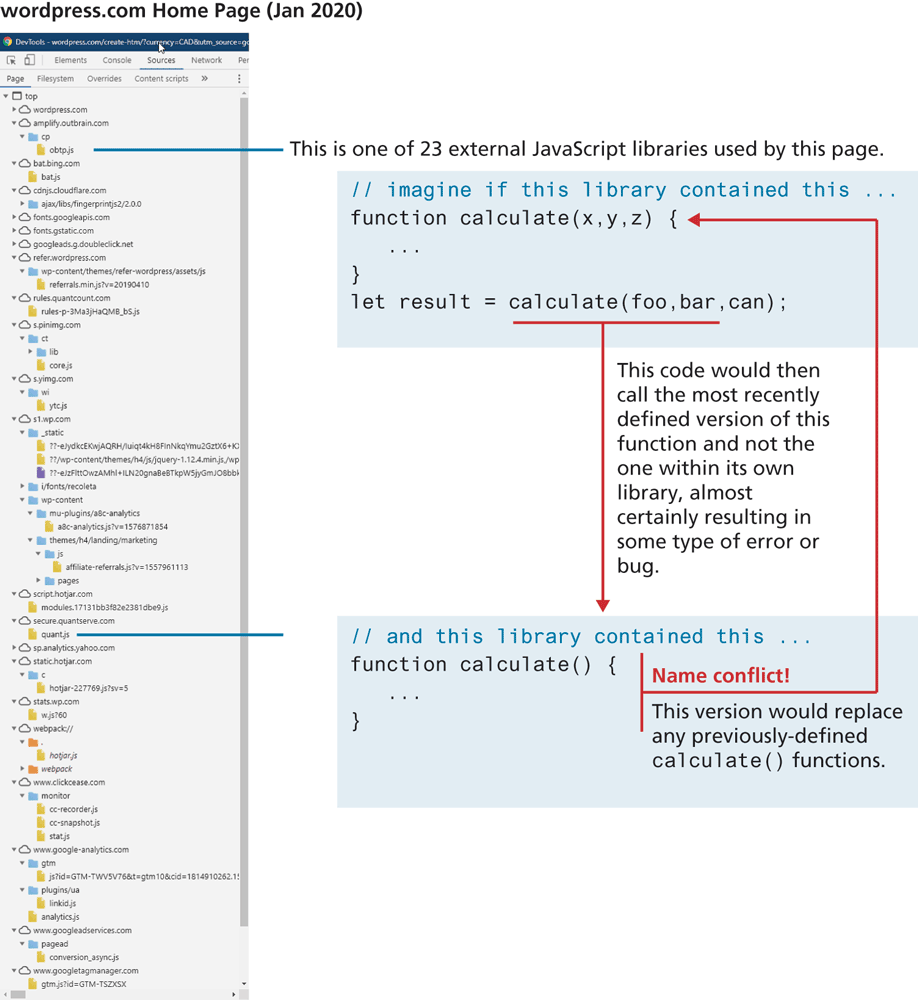
It doesn’t take long for a JavaScript application to contain a lot of functions. By default, every literal (let or const variable or function) created outside of a {} block will have global scope. As shown in Figure 10.5, complex contemporary JavaScript applications might contain hundreds of literals defined in dozens of .js files, so some way of preventing name conflicts (that is, preventing JavaScript in one library from overwriting variables or functions defined in another library) becomes especially important as a JavaScript project grows in size.
Figure 10.5 Name conflicts in JavaScript
The Node JavaScript environment on the server-side has long used the require() function as its approach to prevent different external JavaScript libraries from interfering with each other. For instance, in Chapter 13, you will write code similar to the following at the beginning of your Node scripts:
const server = require('http');
const url = require('url');
server.createServer(function (req, res) {
  const path = url.parse(req.url, true);
   ...
});
In this case, the Node script is using the http and the url external modules. These are external JavaScript libraries that are copied into your system via a special tool (npm) and saved in a special location (the node_modules folder).
ES6 provides its own module syntax for achieving these same ends. An ES6 module is simply a file that contains JavaScript. Unlike a regular JavaScript external file, literals defined within the module are scoped to that module. That is, in a module, functions and variables are private to that module. You do have to tell the browser that a JavaScript file is a module and not just a regular external JavaScript file within the <script> element. This is achieved via the type attribute as shown in the following:
<script src="art.js" type="module"></script>While modules have been supported by all modern browsers since late 2017, if you need to support older browsers, you can use the nomodule fallback flag. For instance, you could use the following two script tags together:
<script src="art.js" type="module" ></script>
<script src="art-fallback.js" nomodule ></script>
Browsers that support modules will ignore the nomodule file; older browsers will ignore the first script that has the type="module" flag. This is quite powerful since we could put not only the non-module fallback code in art-fallback.js but also any replacement code for other ES6 features not supported by older browsers. However, modules won’t work when you are running your page from the local file system; it must instead be on a web server (see nearby note).
 Note
Note
Unlike normal JavaScript <script> libraries, modules are loaded using same-origin policy restrictions. What this means is that the module file must be sent with the appropriate Content-Type HTTP header. Unfortunately, when you are testing a file stored locally on your development computer (that is, not on a web server), the local file will not have this header set, and you will see a run-time error in your browser console similar to:
Access to script from origin null has been blocked by CORS policyThe solution? Make use of modules only when your markup and JavaScript are on a web server. It is possible, however, to configure your local development machine so that it has a server. For instance, in Microsoft Visual Code, you can install the Live Server extension so that your pages are viewed on http://localhost with the correct HTTP headers.
Within a module, any literals are private to that module and thus unavailable outside the module. To make content in the module file available to other scripts outside the module, you have to make use of the export keyword. This can be done when the literal is defined. For instance, in the art.js module, you could have the following definitions:
export function formatArtist(first, last) {
   totallyPrivate();
   return first + ' ' + last;
}
export function createArtistImage(artist) {
   return `<img src="images/artists/${artist.id}.jpg" >`;
}
function totallyPrivate() {
   console.log("I am private");
}
By defining formatArtist and createArtistImage with the export keyword, we are indicating that these functions can be called outside the module. The totallyPrivate function does not have this keyword and thus can only be called within this module.
As an alternative syntax, you can leave your functions without the export keyword, and instead add an export statement to the end of the module:
function formatArtist(first, last) { ... }
function createArtistImage(artist) { ... }
function totallyPrivate() { ... }
export { formatArtist, createArtistImage }
Only another module can use a module; this means any code in any other <script> must also have the type="module" flag. Also, you have to explicitly tell the browser which other modules you are using via the import keyword. For instance, if we want to make use of one of the functions defined within the art module, we would need something similar to the following:
<script type="module">
   import { formatArtist, createArtistImage }  from "./art.js";
   console.log( formatArtist("Pablo", "Picasso") );
   // this will generate a run-time error since it's private
   totallyPrivate();
</script>
Notice that the import statement requires specifying the path of the file containing the module source code. It has to be either an absolute URL (e.g., “http://. . . ”) or begins with a “./ ” or “ / ” before the filename.
The import statement as shown above contains a comma-delimited list of the exports that we will potentially be using. To import all the available exports in a module, you can use the * wildcard in conjunction with a name that will be used as a reference for the module. For instance, we could replace the previous code with the following:
import * as art from "./art.js";
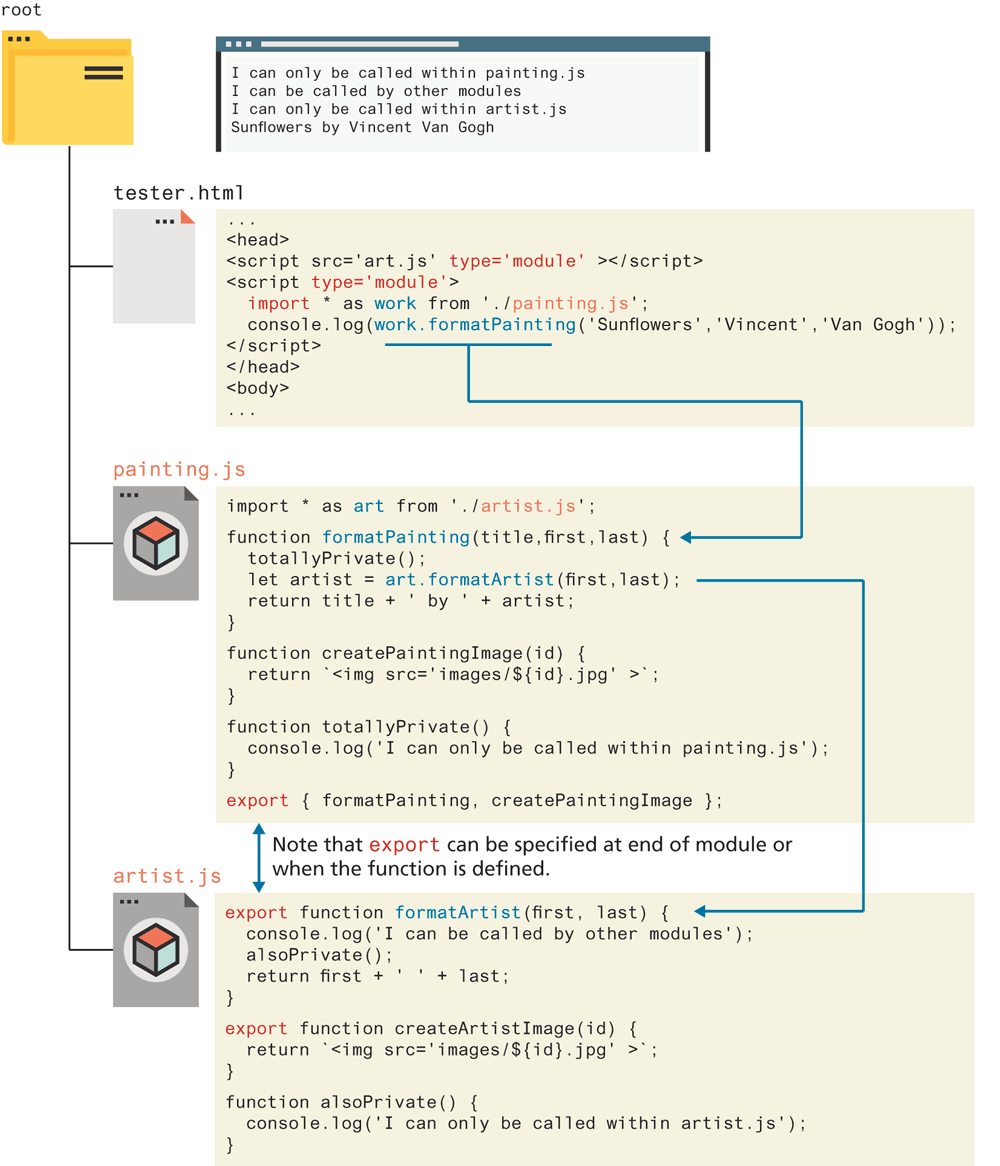
console.log( art.formatArtist("Pablo", "Picasso") );Figure 10.6 provides a visual illustration of the module system in JavaScript.
Figure 10.6 Modules in JavaScript
Test Your Knowledge #2
You will be modifying a file named gallery.js. This is going to be a module that will be used in your other files. It already has some sample data in it.
In this module, create a JavaScript class named
GalleryItemthat represents a gallery list item. Its constructor should take two arguments: the gallery name and the gallery id.Add a method/function to the class named
render()that returns a DOM element that represents a<li>element. ThetextContentof the element should be the gallery name. Add an attribute nameddata-idthat is set to the gallery id.Add a function to the module named
getSampleGalleries(), which returns thegalleriesarray. Export bothGalleryItemandgetSampleGalleriesat the end of the module.Modify the file lab10-test02.js so that it imports
getSampleGalleriesfrom the gallery module. Use thegetSampleGalleries()function to retrieve the sample data.Loop through the sample data. For each
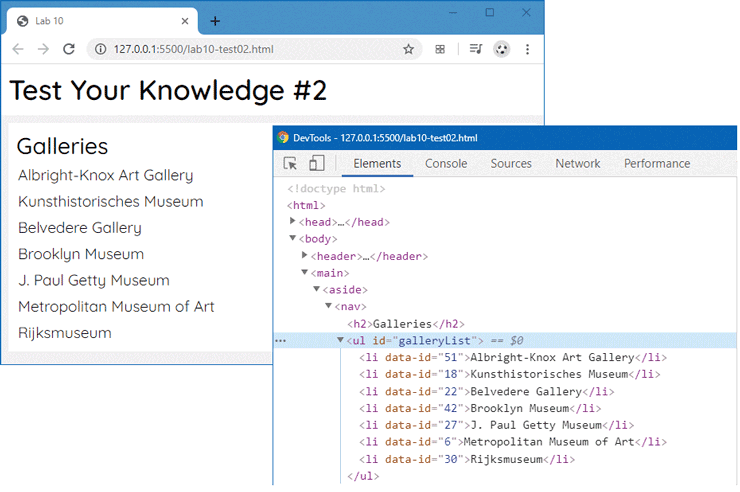
GalleryItem, add the element returned from itsrender()method to the<ul>list usingappendChild().Add in the necessary <script> tags to lab10-test02.html. The result should look similar to that shown in Figure 10.7.
Figure 10.7 Finished Test Your Knowledge #2