9.7 Chapter Summary
This chapter covered the rest of the knowledge and techniques needed for practical JavaScript programming. It began with the Document Object Model, knowledge of which is essential for almost any real-world JavaScript programming. As we saw, the DOM can be used to dynamically manipulate an HTML document. The chapter then built on that DOM knowledge and covered event handling. We learned about the different approaches to handling events as well as the different event types. Some form-handling examples were also illustrated. The reader is now ready for the advanced JavaScript that will be introduced in Chapter 10.
9.7.1 Key Terms
9.7.2 Review Questions
What are some key DOM objects?
What are the five key DOM selection methods? Provide an example of each one.
Assuming you have the HTML shown in Listing 9.9, write the DOM code to select all the text within
<label>elements that haveclass=icon. Write the code as well to select all the<input>elements withtype=text.Why are the DOM family relations properties (e.g.,
firstChild,nextSibling, etc.) less reliable than the DOM selection methods when it comes to selecting elements?Assuming you have the HTML shown in Figure 9.4, write the DOM code to change the dates shown within the first
<time>element to the current date. Also, write the DOM code to add a new<li>element (along with a link and country text) to the<nav>element.Why is the event listener approach to event handling preferred over the other two approaches?
What is event delegation? What benefits does it potentially provide?
Assuming you have the HTML shown in Figure 9.4 and the CSS classes shown in Figure 9.6, write the event handling code that will toggle (add or remove) the CSS class
boxto the<footer>element whenever the user clicks one of the<li>elements within the<nav>element.Why is JavaScript form validation not sufficient when validating form data?
Discuss the role that regular expressions have in error and exception handling.
9.7.3 Hands-On Practice
Project 1: Enhanced Media Player
Difficulty Level: Beginner
Overview
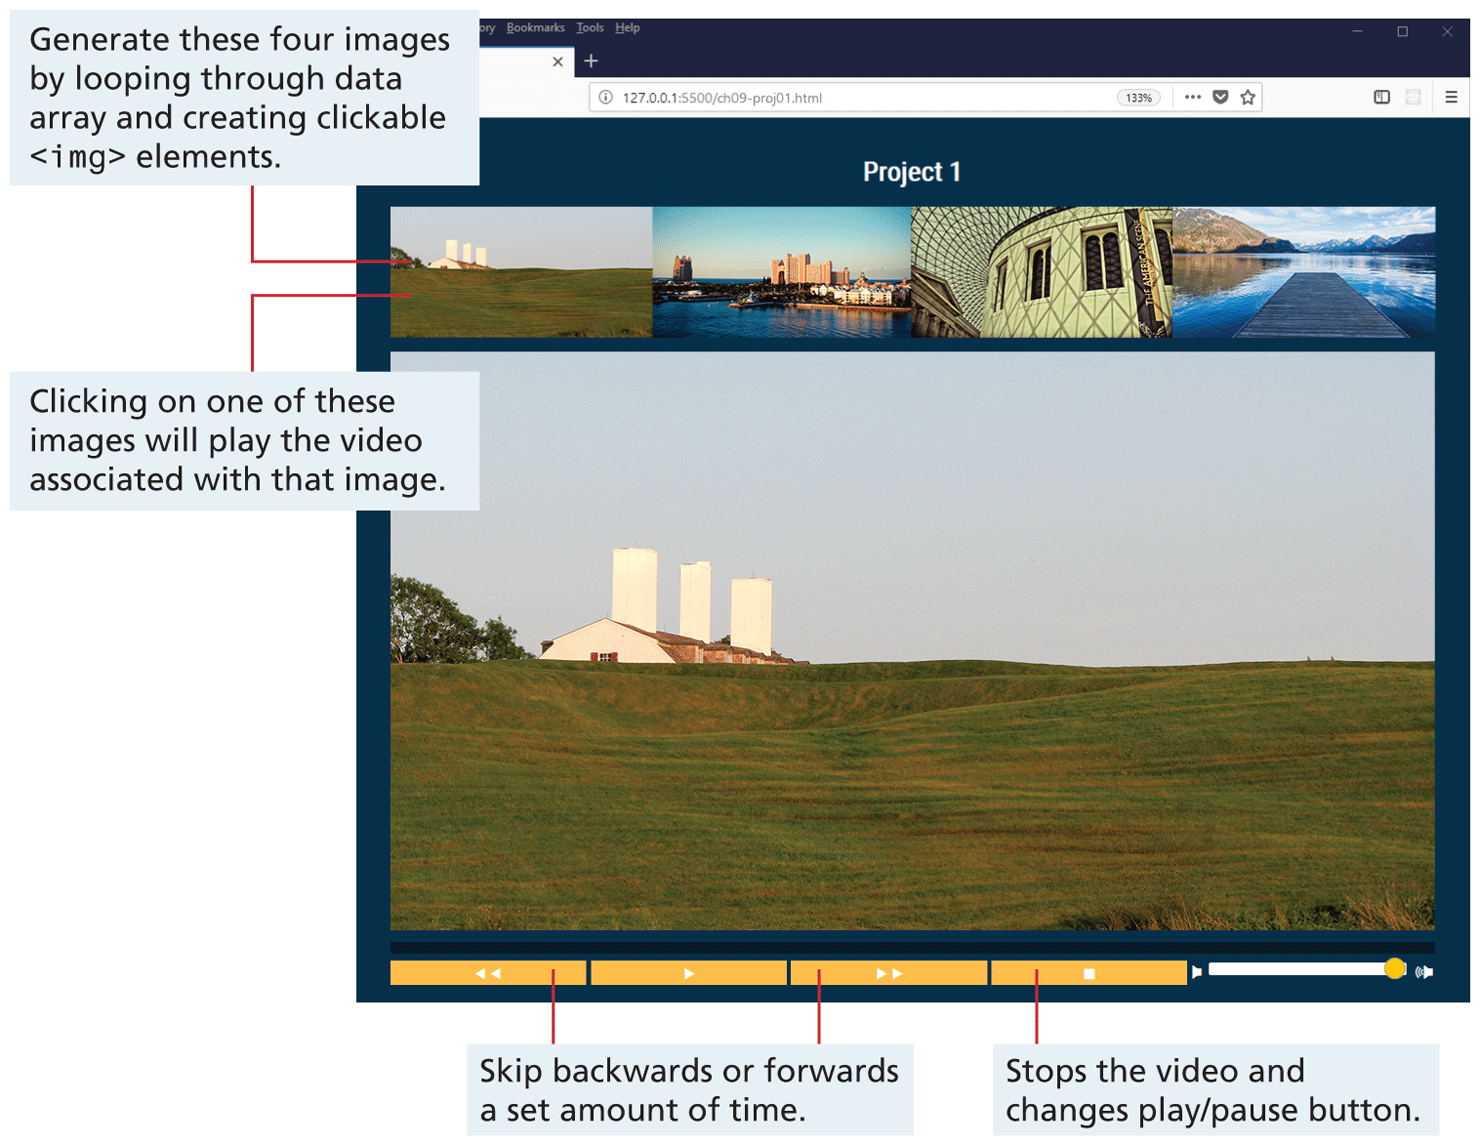
This project expands the media player exercise from the lab. It provides an opportunity for some straightforward DOM manipulations and event handling. Figure 9.25 indicates what the final result should look like in the browser (video files may be different than those shown here).
Figure 9.25 Finished project 1
Instructions
You have been provided with the necessary styling and markup already. Examine (chapter09-project01.html) in the editor of your choice.
Examine ch09-proj01.js and notice the
filesarray. The four elements in that array correspond to the name of the corresponding image and video files in the images and videos folders.Begin by modifying ch09-proj01.js and create a list of available videos by looping through the provided
filesarray and adding the relevant<img>elements to the<aside>element. The actual images are located in theimagessubfolder. In your loop, you will also need to set up a click event handler for each image; when the image is clicked, the current video will stop playing and change thesrcattribute of the video to that indicated by the clicked image.Implement the stop button. This simply requires pausing the video, changing its
currentTimeproperty to zero, and updating the play/pause button and progress track.Implement the skip forward and skip backwards buttons. These buttons have a time value in their
data-skipproperty. Simply adjust the video’scurrentTimeproperty by the value of the button’sdata-skipproperty.
Test
Test your page in a browser and verify the stop, forward, and back buttons work.
Click on one of the four images above the video. They should change the active video correctly.
Project 2: Painting Viewer
Difficulty Level: Intermediate
Overview
This project requires DOM element manipulation and event handling. Its functionality can be seen in Figure 9.26.
Figure 9.26 Finished project 2

Instructions
You have been provided with the necessary styling and markup already. Examine chapter09-project02.html in the editor of your choice. You will be programmatically adding elements based on user actions and data in the supplied JSON file.
Examine paintings.json. This data file consists of an array of paintings. The
idof each painting element corresponds to the image file name (there is a smaller version and a larger version in two different subfolders inside of the images folder). Each painting also has an array of features. You will be displaying rectangles based on the x,y coordinates of the features. When the user mouses over a feature rectangle, your page will display the feature description below the painting.Begin by modifying ch09-proj02.js and add a
DOMContentLoadedevent handler. All of your code will be inside that handler. Your handler will need to use theJSON.parse()method to transform the JSON data into a JavaScript object. You will also need to loop through the data array and generate a list of thmbnail images of the paintings inside the supplied<ul>element. To make click processing easier, you will also want to add theidvalue of the painting using thedatasetproperty (see Section 9.3.6).You must use event delegation (i.e., a single event handler) to process all clicks in the painting list. When a painting is clicked, first empty the
<figure>element (simply by assigning empty string to theinnerHTMLproperty). This is necessary to remove the previously displayed image features. After emptying the<figure>, display a larger version of the painting (inside the supplied<figure>element) and display its title and artist in the supplied<h2>and<h3>elements. This will require you to find the painting in your painting array that matches the id value of the clicked thumbnail; you can do this via a simple loop or make use of thefind()function (covered in the next chapter). You will also need to perform the next two steps as well.When a new painting is clicked, you will also need to loop through the
featuresarray for that painting and display rectangles on top of the painting. Each feature has the upper-left and lower-right coordinates for the feature. Each rectangle will be a<div>element that you programmatically construct and append to the<figure>. You will need to assign it the class box (the CSS for this class has been provided) and set theposition,left,top,width, andheightproperties. The respective values for these properties will beabsolute, the upper-left x value fromfeaturesarray element, the upper-left y value fromfeaturesarray element, while thewidthandheightare calculated by subtracting the lower-right x,y from upper-left x,y. Note: theleft,top,width, andheightproperties must include the px unit when assigning the value.For each rectangle, you will also need to set up
mouseoverandmouseoutevent handlers. For themouseover, you will need to set thetextContentproperty of the provided description<div>with the description property of the feature data for that rectangle. Formouseout, simply empty the content of thetextContent.
Test
First verify that the list of paintings is being generated and displayed correctly.
Verify that the click functionality of the painting list is working correctly. It should display the correct painting image, title, and artist name.
Verify that the rectangles are being displayed correctly and that the mouse over and mouse out functionality works correctly.
Project 3: Stock Portfolio Dashboard
Difficulty Level: Advanced
Overview
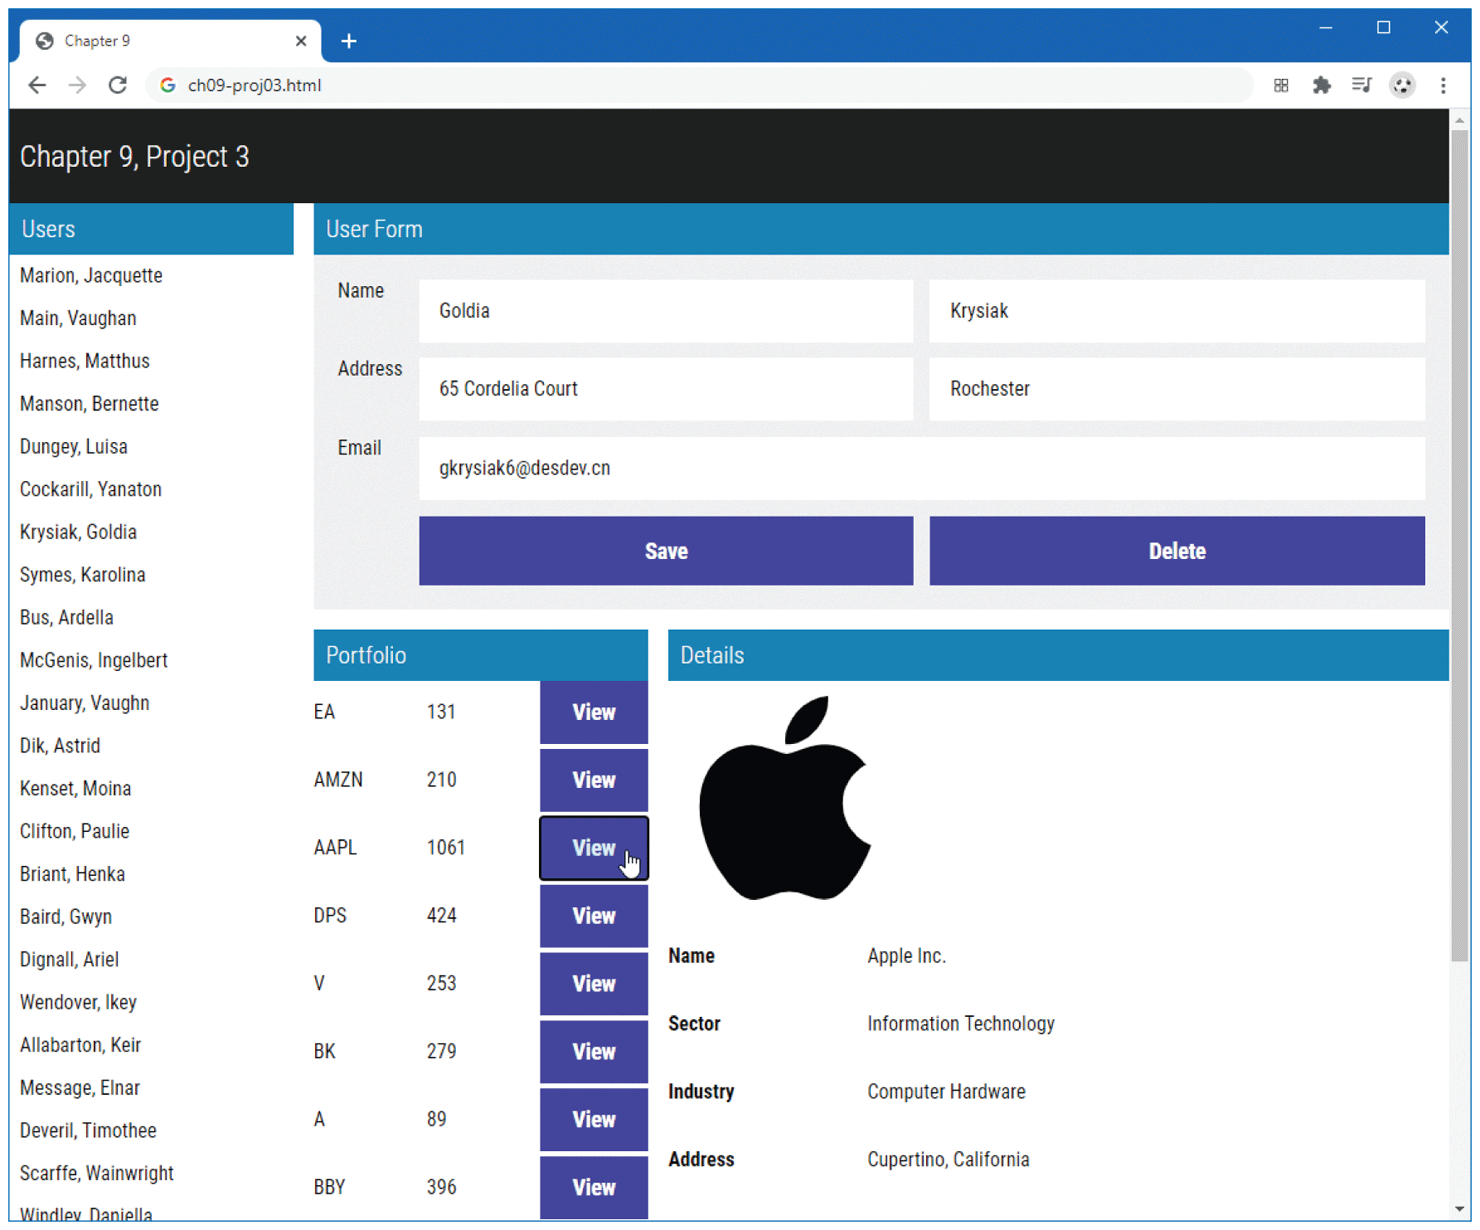
This project is a more ambitious use of DOM manipulations and event handling to create a dashboard for examining user stock portfolio holdings. Its functionality can be seen in Figure 9.27.
Figure 9.27 Finished project 3
Instructions
You have been provided with the necessary styling and markup already. Examine ch09-proj03.html in the editor of your choice.
You have been provided with three JSON data files: users.json, stocks-complete.json, and single-user.json. The file users.json contains an array of objects consisting of an individual user’s information and the stocks he or she owns (i.e., his or her portfolio). Information about each stock/company is contained in stocks-complete.json. Examine single-user.json, which contains a single example of the objects contained in users.json (and will not be used by your application since it is only provided for illustration purposes).
Begin by modifying ch09-proj03.js and add a
DOMContentLoadedevent handler. All of your code will be inside that handler. Your handler will need to use theJSON.parse()method to transform the JSON data in the two JSON data files into JavaScript objects. Initially, your code should hide the details<section>by setting its display property to none.Generate the user list by looping through the objects in
users.jsonand adding<li>elements to the user list<ul>. To make click processing easier, you will also want to add the id value of the user using thedatasetproperty (see Section 9.3.6).Use event delegation to handle all click events in the user list. If a list item is clicked, then unhide the details
<section>and display the user information in the user details form and display their stock portfolio holdings in the portfolio section. This will require you to find the user in your array that matches theidvalue of the clicked thumbnail; you can do this via a simple loop or make use of thefind()function (covered in the next chapter).Rather than use event delegation, assign a click event handler to each View button in the portfolio list. When the user clicks one of these buttons, display the information for that stock in the stock details section.
For an additional challenge, implement the Save and Delete buttons. Both of these buttons should revise the in-memory data and its display. Probably the easiest approach after modifying the data array is to simply re-display the user list as if no user was selected. Don’t worry about changing the underlying JSON file. In the next chapter, you will implement this type of functionality but make use of external web services to handle the retrieval and modification of server-based data. You will also need to make use of the
preventDefault()method of the event argument in the handlers for these two buttons as well.
Test
First verify that the list of users is being generated and displayed correctly.
Verify that the click functionality of the user list is working correctly. It should display the correct user information in the form and the correct portfolio information for that user.
Verify that the view stock functionality is working correctly.
If implementing the save and delete buttons, verify that they work correctly.
9.7.4 References
1. W3C. Document Object Model. [Online]. http:/
/ www.w3.org/ DOM/ . 2. W3C. Selectors API. [Online]. http:/
/ www.w3.org/ TR/ selectors-api/ #examples. 3. IEEE. [Online]. https:/
/ standards.ieee.org/ standard/ 1003_1-2017.html 4. Ivaylo Gerchev. Essential Tools & Libraries for Modern JavaScript Developers. [Online]. http:/
/ www.sitepoint.com/ essential-tools-libraries-modern-javascript-developers.