9.5 Forms in JavaScript
Chapter 5 covered the HTML for data entry forms. In that chapter, it was mentioned that user form input should be validated on both the client side and the server side. It will soon be time for us to look at how we can use JavaScript for this task. But JavaScript within forms is more than just the client-side validation of form data; JavaScript is also used to improve the user experience of the typical browser-based form.
As a result, when working with forms in JavaScript, we are typically interested in three types of events: movement between elements, data being changed within a form element, and the final submission of the form. The remainder of this chapter provides some examples for working with each of these form events. Each of these examples will work from the sample form in Listing 9.9 (you can see what this form looks like in the browser with additional CSS in Figure 9.18). This example makes use of CSS classes defined by the popular Font Awesome toolkit (http:/
Listing 9.9 A basic HTML form
<form method="post" action="login.php" id="loginForm">
    <label class="icon" for="username"><i class="fa fa-user fa-fw"> </i></label>
    <input type="text" name="username" id="username" placeholder="User Name" />

    <label class="icon" for="email"><i class="fa fa-envelope fa-fw"> </i></label>
    <input type="text" name="email" id="email" placeholder="Email" />

    <label class="icon" for="pass"><i class="fa fa-key fa-fw"></i> </label>
    <input type="password" name="pass" id="pass" placeholder="Password" />

    <label class="icon" for="region"><i class="fa fa-home fa-fw"></i> </label>
    <input type="radio" name="region" id="europe" value="Europe" class="bigRadio"><span>Europe</span>
    <input type="radio" name="region" id="usa" value="United States" class="bigRadio"><span>United States</span>

    <label class="icon" for="payment">
       <i class="fa fa-fw" id="payLabel"></i></label>
    <select name="payment" id="payment"></select>

    <label class="icon" id="long" for="save">
       <i class="fa fa-database fa-fw"></i> Remember Me</label>
    <input type="checkbox" name="save" id="save" class="bigCheckBox" />

    <button type="submit" ><i class="fa fa-reply fa-fw"></i> Register </button>
</form>
<div id="errors" class="hidden"></div>
9.5.1 Responding to Form Movement Events
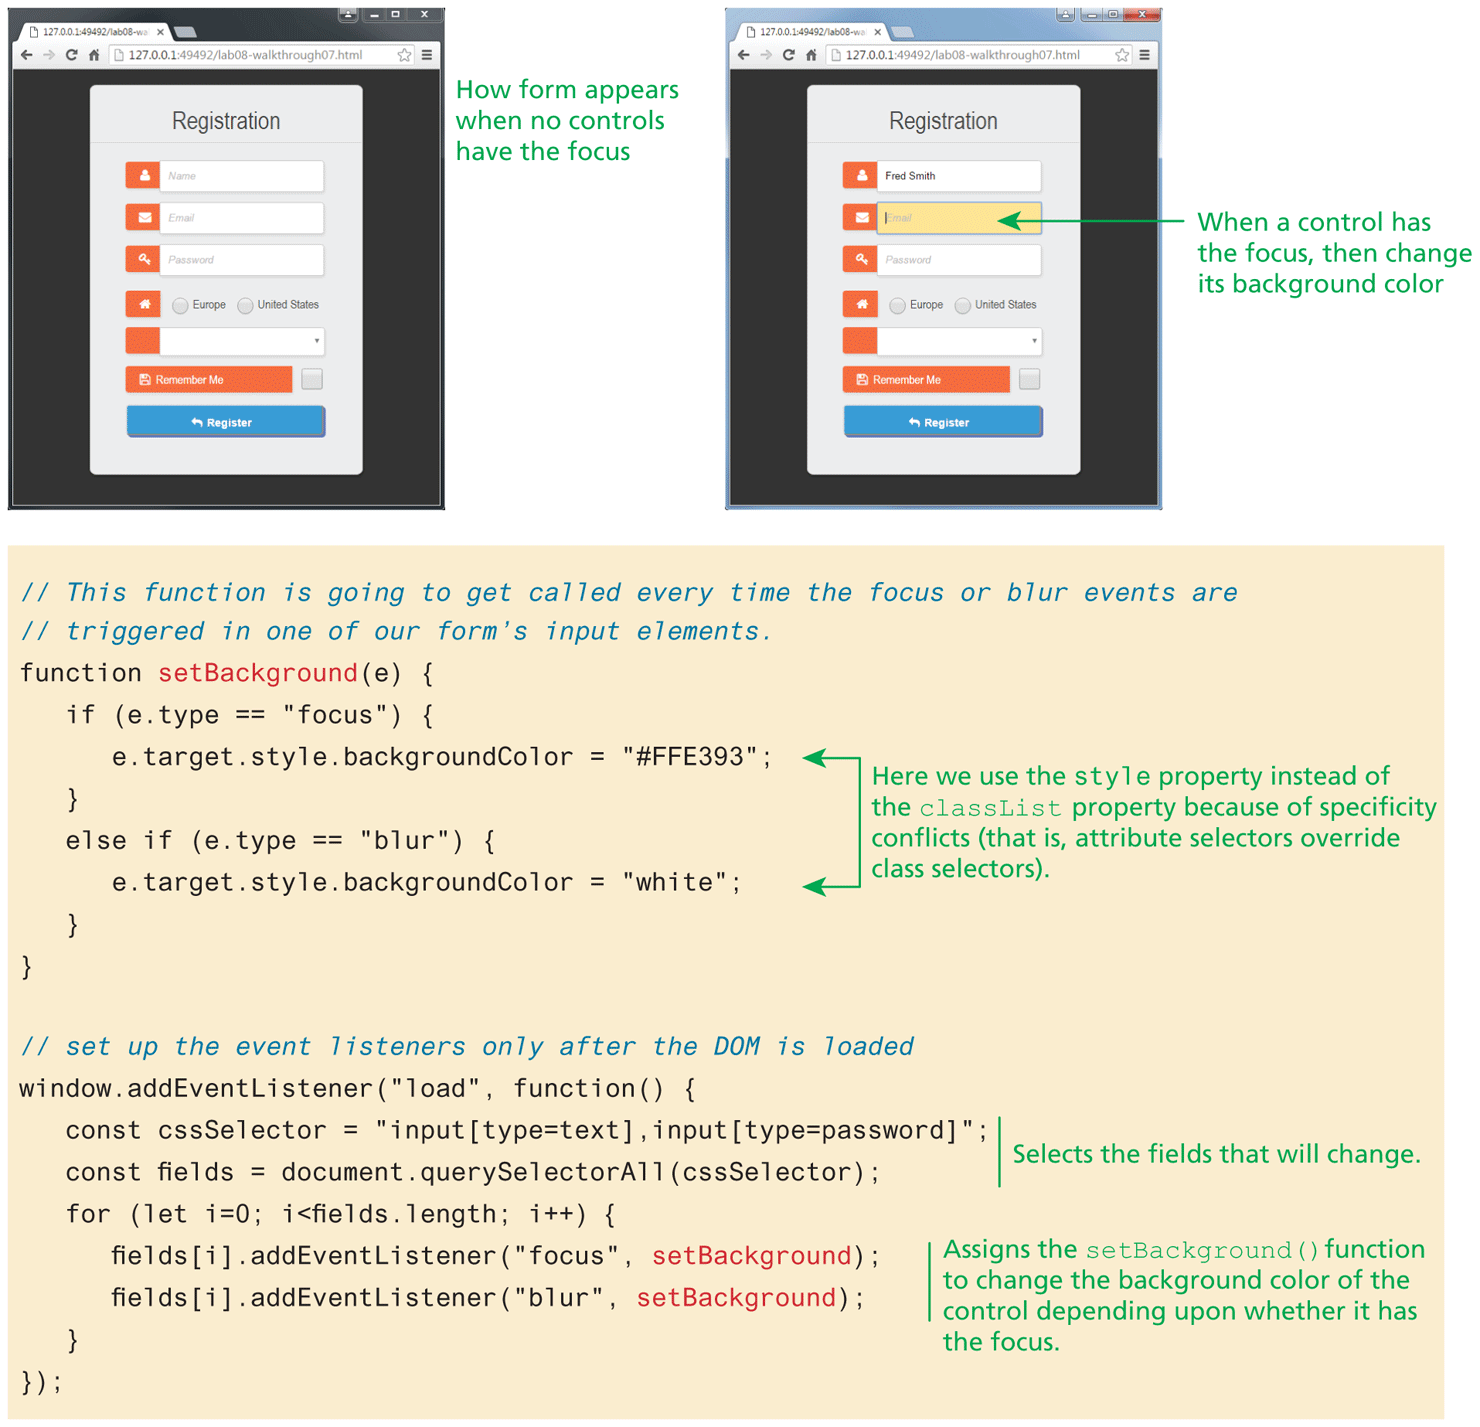
Table 9.8 listed the different form events that we can respond to in JavaScript. The blur and focus events trigger whenever a form control loses the focus (e.g., the user can no longer change its content or trigger the control) or gains the focus (the user can change its content or trigger the control). One typical use of these events is to dynamically change the appearance of the control that has the focus. For instance, the code shown in Figure 9.18 assigns the setBackground() function to change the background color of the control depending upon whether it has the focus, as shown in the sample screen captures.
Figure 9.18 Responding to the focus and blur events
9.5.2 Responding to Form Changes Events
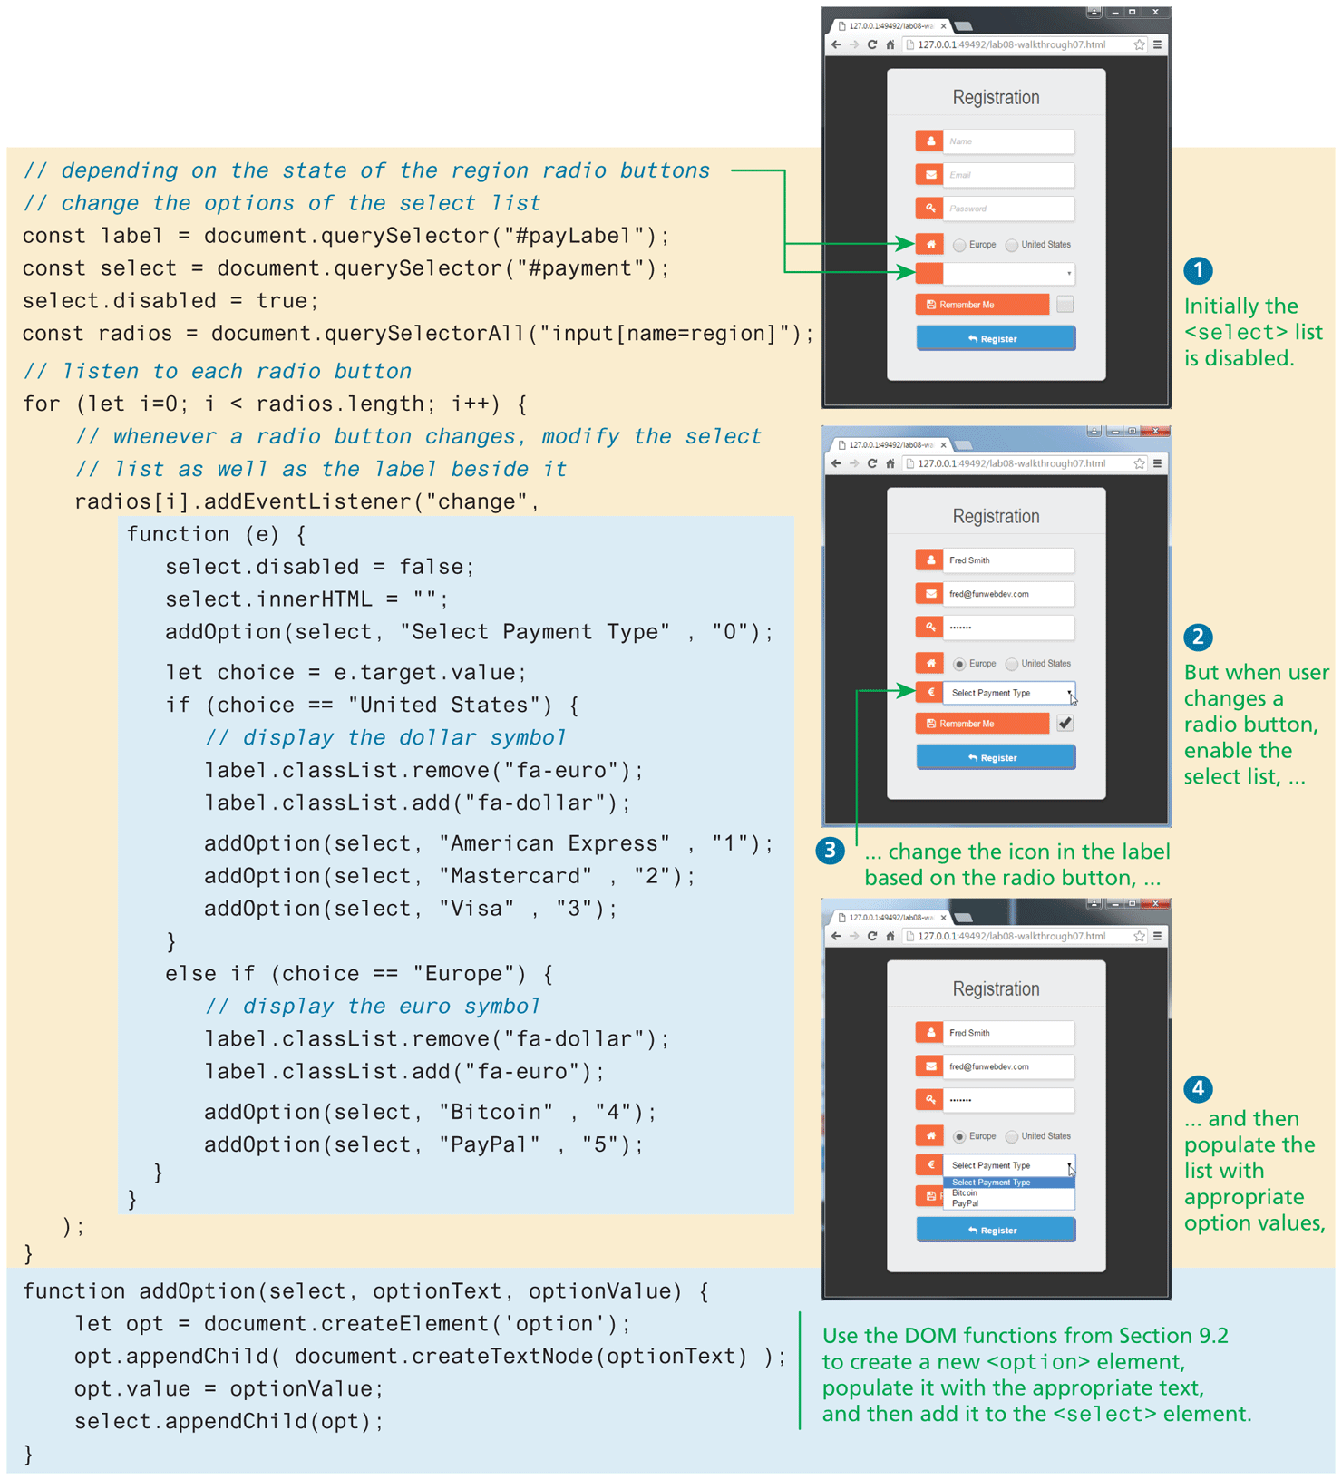
One of the great benefits of JavaScript is that we can quickly make changes to the page without making a round trip to the server. This capability is often present within data-entry forms. We may want to change the options available within a form based on earlier user entry. For instance, in the example form in Listing 9.9, we may want the payment options to be different based on the value of the region radio button. Figure 9.19 demonstrates how we can add event listeners to the change event of the radio buttons; when one of these buttons changes its value, then the callback function will set the available payment options based on the selected region. The listing also changes the associated payment label as well.
Figure 9.19 Responding to the change events
9.5.3 Validating a Submitted Form
Form validation continues to be one of the most common applications of JavaScript. Checking user inputs to ensure that they follow expected rules must happen on the server side for security reasons (in case JavaScript was circumvented); checking those same inputs on the client side using JavaScript will reduce server load and increase the perceived speed and responsiveness of the form. Some of the more common validation activities include email validation, number validation, and data validation. In practice, regular expressions (covered in Section 9.6) are used to concisely implement many of these validation checks. However, due to their complexity, novice developers often resort to copying regular expressions from the Internet without fully understanding what they are actually accomplishing. In this section, we will write basic validation scripts without using regular expressions to demonstrate how client-side validation in JavaScript works, leaving complicated regular expressions until Section 9.6.
Empty Field Validation
A common application of a client-side validation is to make sure the user entered something into a field (or selected a value). There’s certainly no point sending a request to log in if the username was left blank, so why not prevent the request from working? The way to check for an empty field in JavaScript is to compare a value to both null and the empty string (""), as shown in Listing 9.10.
Listing 9.10 A simple validation script to check for empty fields
const form = document.querySelector("#loginForm");
form.addEventListener("submit", (e) => {
     const fieldValue = document.querySelector("#username").value;
     if (fieldValue == null  ||  fieldValue == "") {
         // the field was empty. Stop form submission
         e.preventDefault();
         // Now tell the user something went wrong
         console.log("you must enter a username");
     }
});
Empty field validation operates a bit differently for checkboxes, radio buttons, and select lists. To ensure that a checkbox or button is ticked or selected, you will have to examine its checked property, as shown in the following example:
const rememberMe = document.querySelector("#save");
if (! rememberMe.checked) {
   // if here then the checkbox was not checked
   console.log("Remember me was not checked");
}

const radios = document.querySelectorAll("input[name=region]");
for (let rad of radios) {
    if (rad.checked) {
        // if here then this radio button was selected
        console.log(rad.value  + " was checked");
    }
}
For <select> lists, there are different ways to check if an item in the list has been selected. If the list is in the default state (i.e., it contains no <option> elements), then its selectedIndex property will be -1. However, if there are <option> elements and one hasn't yet been selected by the user, then the selectedIndex property will have a value of 0 (see Figure 9.20).
Figure 9.20 Properties of a select list
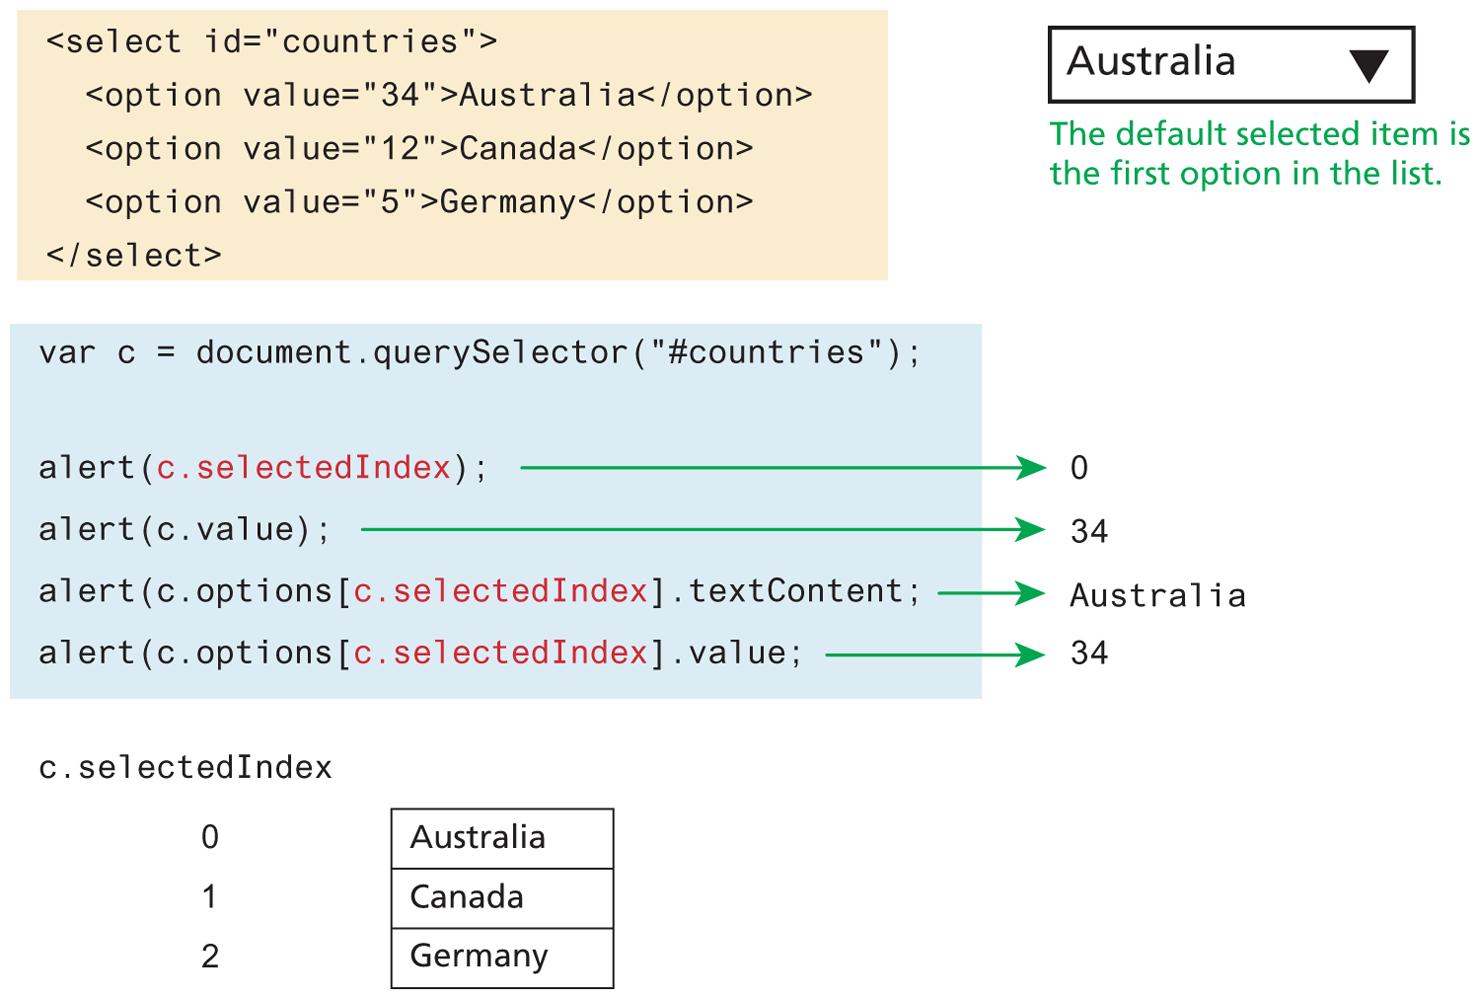
For this reason, it is common to make the first item in a <select> list equivalent to the default state, as shown in the following example:
<select id="countries">
  <option value="0">Select a country</option>
  <option value="12">Canada</option>
  ...
</select>
We now have a second way to check if the user has selected an item from this list: we can now use the value property as well as the selectedIndex property:
if (document.querySelector("#countries").value === 0) {
   console.log("Please select a country");
}
In the case of a <select> list that supports the selection of multiple items (i.e., if the multiple attribute has been set), you will not be able to use the value property since it only returns the first selected value. In such a case, you will have to use either the options property (in older browsers) or the newer selectedOptions property, since that returns an array containing the selected options, as shown in Listing 9.11.
Listing 9.11 Determining which items in multiselect list are selected
const multi = document.querySelector("#listbox");

// using the options technique is more work but supported everywhere
// it loops through each option and check if it is selected
for (let i=0; i < multi.options.length; i++) {
    if (multi.options[i].selected) {
        // this option was selected, do something with it ...
        console.log(multi.options[i].textContent);
    }
}

// the selectedOptions technique is simpler ...
// it only loops through the selected options
for (let i=0; i < multi.selectedOptions.length; i++) {
    console.log(multi.selectedOptions[i].textContent);
}
Number Validation
Number validation can take many forms. You might be asking users for their age, for example, and then allow them to type it rather than select it. Unfortunately, no simple functions exist for number validation like one might expect from a full-fledged library. Using parseInt(), isNAN(), and isFinite(), you can write your own number validation function.
Part of the problem is that JavaScript is dynamically typed, so "2" !== 2, but "2"==2. jQuery and a number of programmers have worked extensively on this issue and have come up with the function isNumeric() shown in Listing 9.12. Note: This function will not parse “European” style numbers with commas (i.e., 12.00 vs. 12,00).
Listing 9.12 A function to test for a numeric value
function isNumeric(n) {
    return !isNaN(parseFloat(n)) && isFinite(n);
}
More involved examples to validate email, phone numbers, or social security numbers would include checking for blank fields and making use of isNumeric and regular expressions.
9.5.4 Submitting Forms
Submitting a form using JavaScript requires having a node variable for the form element. Once the variable, say, formExample is acquired, one can simply call the submit() method:
const formExample = document.getElementById("loginForm");
formExample.submit();
This is often done in conjunction with calling preventDefault() on the submit event. This can be used to submit a form when the user did not click the submit button or to submit forms with no submit buttons at all (say we want to use an image instead). Also, this can allow JavaScript to do some processing before submitting a form, perhaps updating some values before transmitting.
It is possible to submit a form multiple times by clicking buttons quickly. This is an ability, however, you almost always want to prevent. Clicking a submit button twice shouldn't result in a double order! The easiest way to protect against this is to simply disable the submit button immediately in the event handler for the submit event. A more user-friendly approach would be to change the button label to let the user know the submission worked and remove or disable the event handler.