9.3 Events
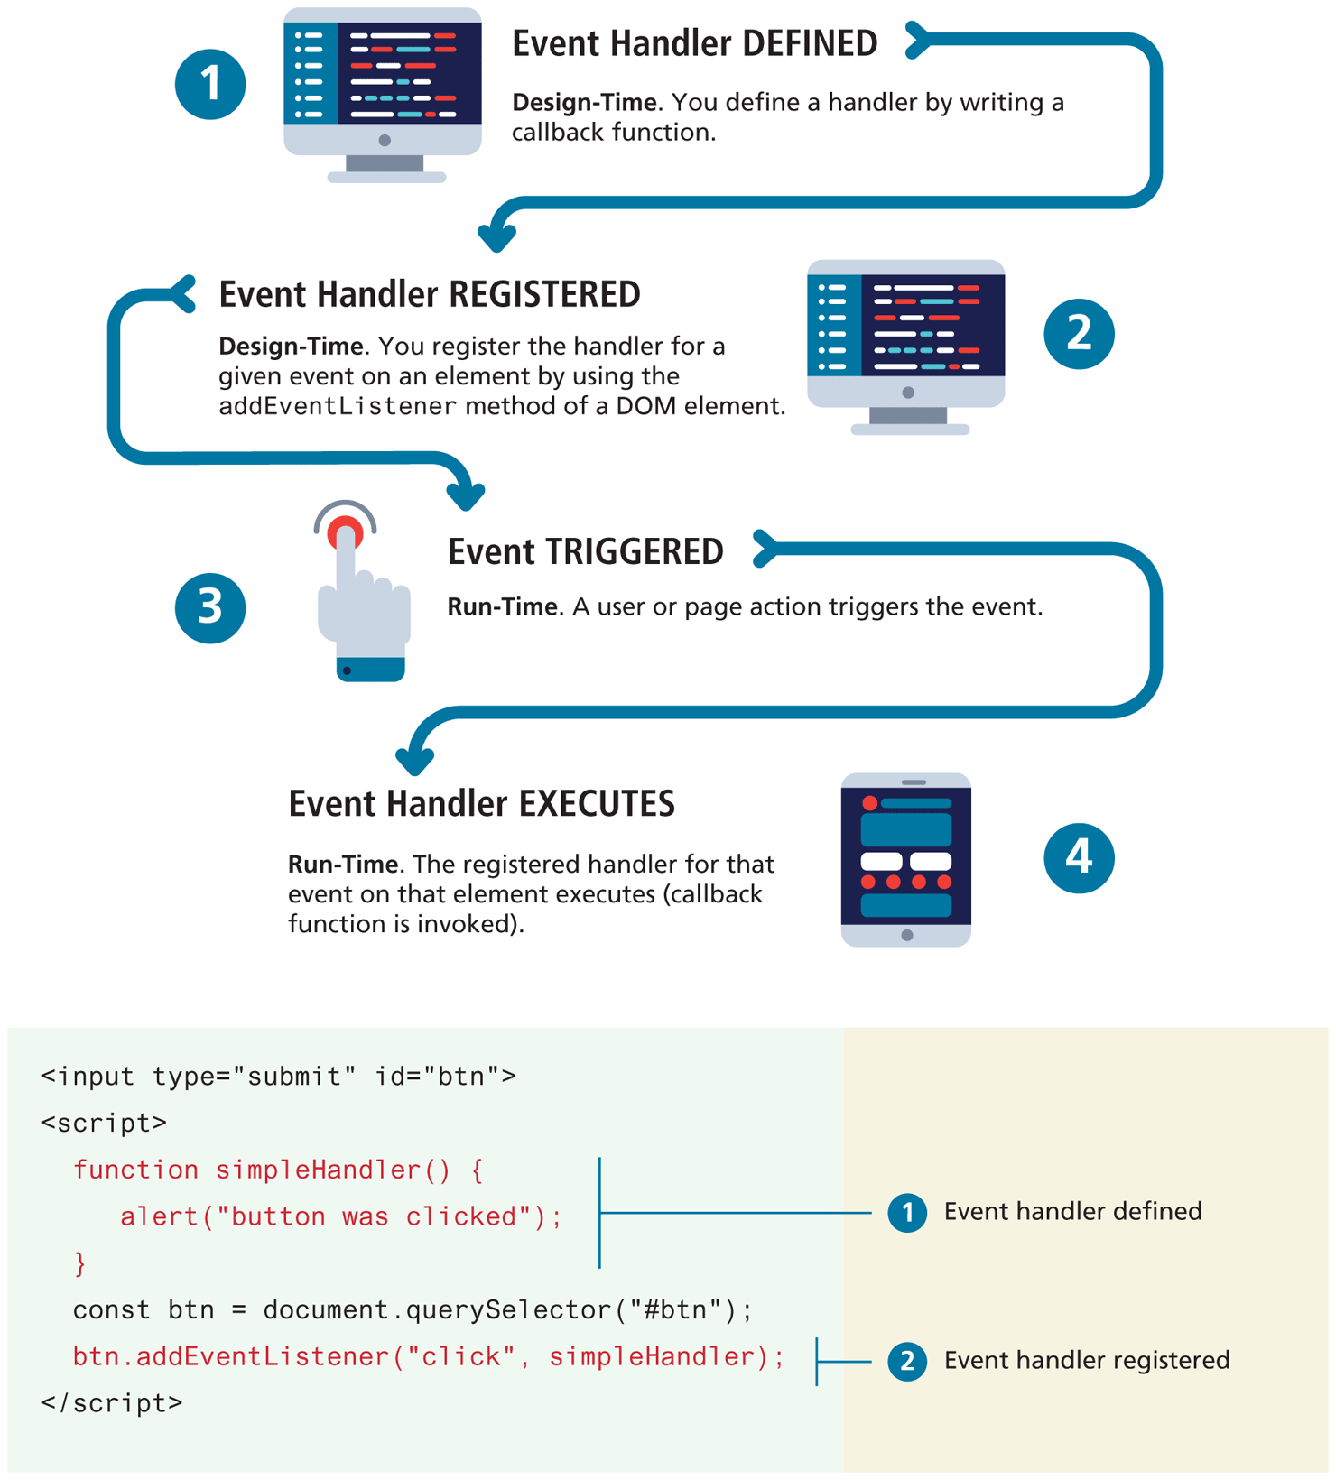
Events are an essential part of almost all real-world JavaScript programming. Figure 9.10 illustrates the four steps involved in JavaScript event processing. You begin by defining an event handler which is simply a callback function. That handler is then registered with a specific event for a specific element. From a programming perspective, that’s it. The next steps occur at runtime: the specific event is triggered, usually by some user action, and then the handler finally executes.
Figure 9.10 JavaScript event handling
9.3.1 Implementing an Event Handler
Figure 9.10 also illustrates the coding involved in implementing a simple event handler. Notice that an event handler is first defined, then registered to an element node object.
Registering an event handler requires passing a callback function to the addEventListener() method of a single node object. You may remember from Section 8.9.4 in the previous chapter that function expressions are full-fledged objects that can be passed as an argument to another function. Such a passed-in function is said to be a callback function and is commonly used in event-driven JavaScript programming.
Since the typical event handling callback is only used once, it is much more common to make use of an anonymous function passed to addEventListener(), as shown in Listing 9.3. The listing also illustrates how arrow syntax can make the callback code quite concise.
Listing 9.3 Listening to an event with an anonymous function, three versions
const btn = document.getElementById("btn");
btn.addEventListener("click", function () {
alert("used an anonymous function");
});
document.querySelector("#btn").addEventListener("click", function () {
alert("a different approach but same result");
});
document.querySelector("#btn").addEventListener("click", () => {
alert("arrow syntax but same result");
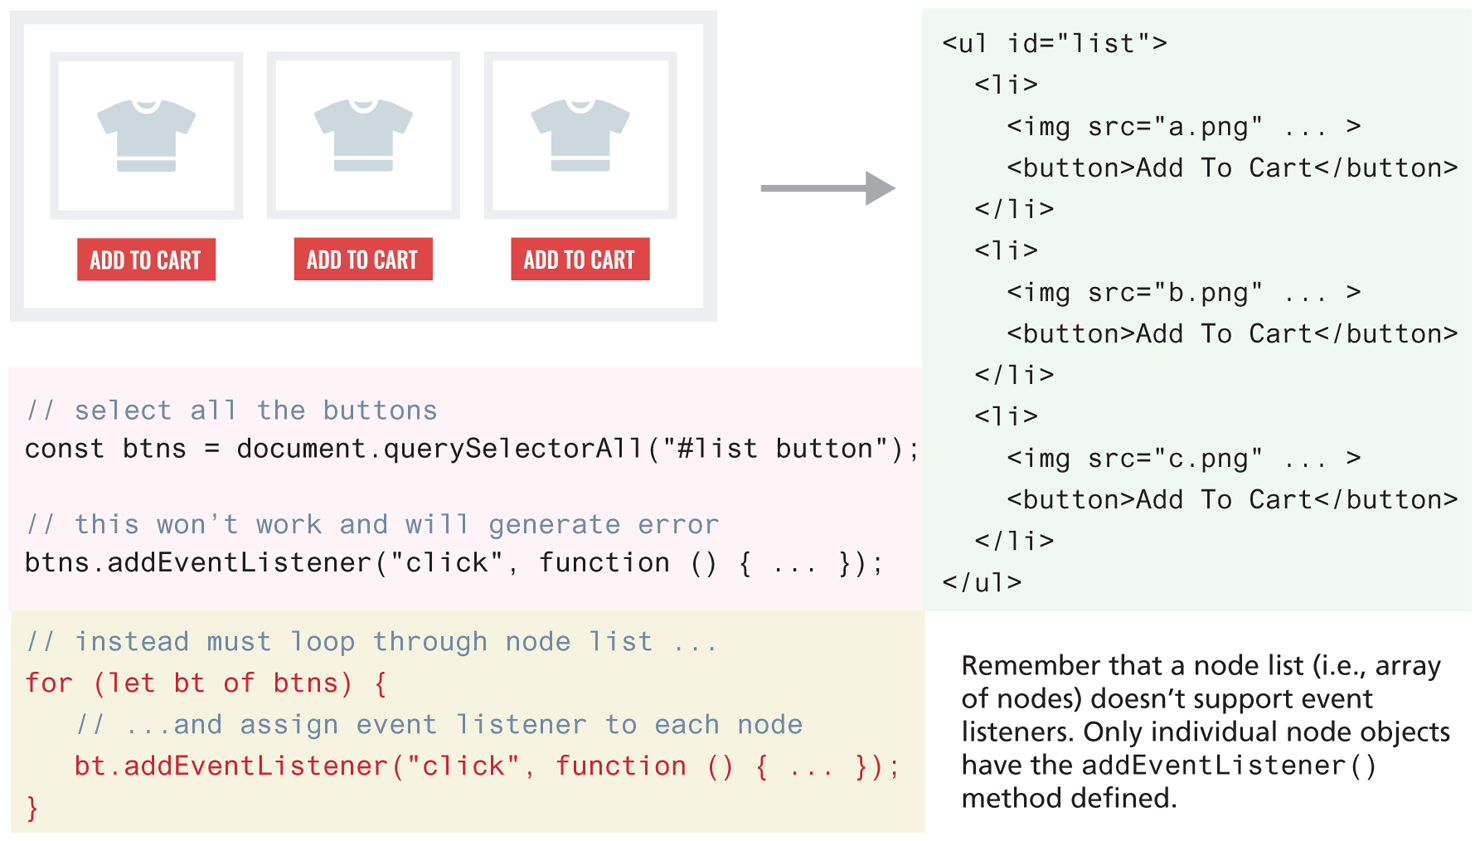
});It is important to remember that Node objects have an addEventListener() method, but NodeList objects do not. Figure 9.11 illustrates this point and demonstrates one of the correct ways to assign the same event handler to a group of elements.
Figure 9.11 Event handling with NodeList arrays
 Note
Note
Older Approaches to Event Handling
The addEventListener approach for event handling has only been the preferred approach to event handling since about 2010. If you look at older online resources (for instance, an old but popular posting on Stack Overflow), you might encounter two other approaches.
The oldest of these is to use inline event handling. In such a case, the handler is registered within the markup, as shown in the following two examples:
<input type="submit" onclick="simpleHandler" />
<input type="submit" onclick="function () { ... }" />
The problem with the inline approach is that the HTML markup and the corresponding JavaScript logic are woven together. For the programmer, to see which JavaScript functions are called requires searching carefully through the entire markup. Similarly, by adding programming into the markup, the ability of designers to work separately from programmers is reduced and application maintenance becomes complicated. For these reasons, it makes sense to avoid using the inline approach.
The other approach is to assign event handlers to the specific event property, as shown in the following example:
const btn = document.getElementById("example");
btn.onclick = function () { ... };
The drawback to this approach is that it only allows a single event handler for a given event for a given element. While that isn’t always a drawback, there is no advantage in using the event property approach, so we recommend using instead the addEventListener approach.
9.3.2 Page Loading and the DOM
As mentioned at the end of Section 9.2, a problem can occur if your JavaScript tries to programmatically reference a DOM element that has not yet been loaded. That is, if your code attempts to set up a listener on a not-yet-loaded element then an error will be triggered. To work around this issue, our DOM code so far in this chapter all had to exist at the end of our HTML document. While fine in the context of the simple examples so far, this isn’t really an acceptable solution for the long term. The better approach is to run your DOM manipulation code after one of the following two different page load events.
window.load.Fires when the entire page is loaded. This includes images and stylesheets, so on a slow connection or a page with a lot of images, the load event can take a long time to fire. While it is common to use this event (the Second Edition of the textbook always used this event), it is usually the wrong choice from a performance standpoint.document.DOMContentLoaded.Fires when the HTML document has been completely downloaded and parsed. Generally, this is the event you want to use.
Listing 9.4 illustrates how all your DOM manipulation code should be wrapped within a DOMContentLoaded event handler. Your DOM coding can now appear anywhere, including within the <head> element, which is the conventional place to add in your JavaScript code.
Listing 9.4 Wrapping DOM code within a DOMContentLoaded event handler
document.addEventListener('DOMContentLoaded', function() {

   const menu = document.querySelectorAll("#menu li");
   for (let item of menu) {
      item.addEventListener("click", function () {
         item.classList.toggle('shadow');
      });
   }

   const heading = document.querySelector("h3");
   heading.addEventListener('click', function() {
      heading.classList.toggle('shadow');
   });
});
9.3.3 Event Object
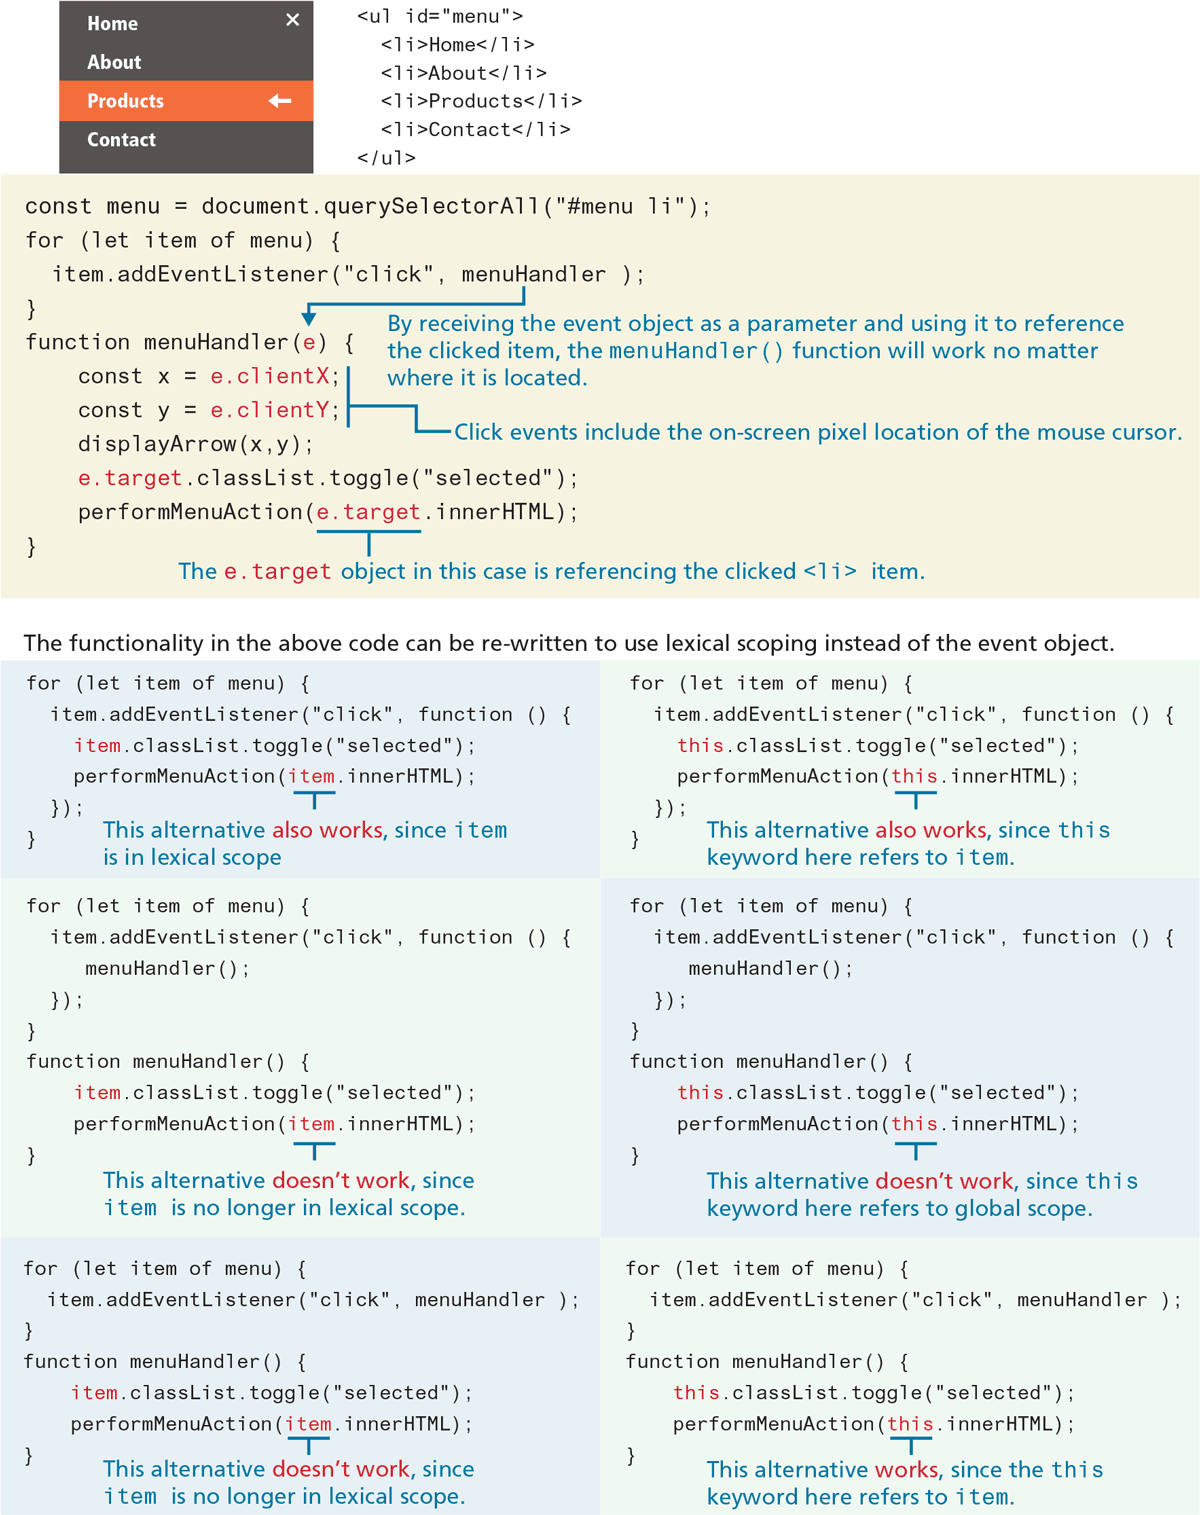
When an event is triggered, the browser will construct an event object that contains information about the event. Your handler won’t always need this information, but it sometimes will be absolutely essential. For instance, if you want to respond to keyboard events, your handler will almost always need to know which key was pressed. For some mouse event handling, you may need to know the precise location of the cursor when the mouse button was pressed. And sometimes you will want to create a generic event handler that won’t “know” what object generated the event, but that information will be in the event object.
Your event handlers can access this event object simply by including it as an argument to the callback function (by convention, this event object parameter is often named e).
Figure 9.12 demonstrates how this event parameter can be used. Notice how it can be used to provide information that is specific to the event (in this case, the click event) and information that is common to all events (in this case, the target property). The target property of the event object is especially useful. In the bottom portion of Figure 9.12, you can see that while you can sometimes rely on lexical scope to provide access to the object that generated the event, the target property can be relied on to always work, regardless of lexical scope.
Figure 9.12 Using the Event object
A complete examination of the event object is beyond the scope of this chapter. We will be using additional properties of this object in some of the remaining exercises on working with form, mouse, and keyboard events.
9.3.4 Event Propagation
One of the more powerful, but potentially confusing, issues with JavaScript events is that of event propagation. When an event fires on an element that has ancestor elements, the event propagates to those ancestors. There are two distinct approaches or phases of propagation: there is a capture phase and a bubbling phase, both of which are illustrated in Figure 9.13.
Figure 9.13 Event capture and bubbling
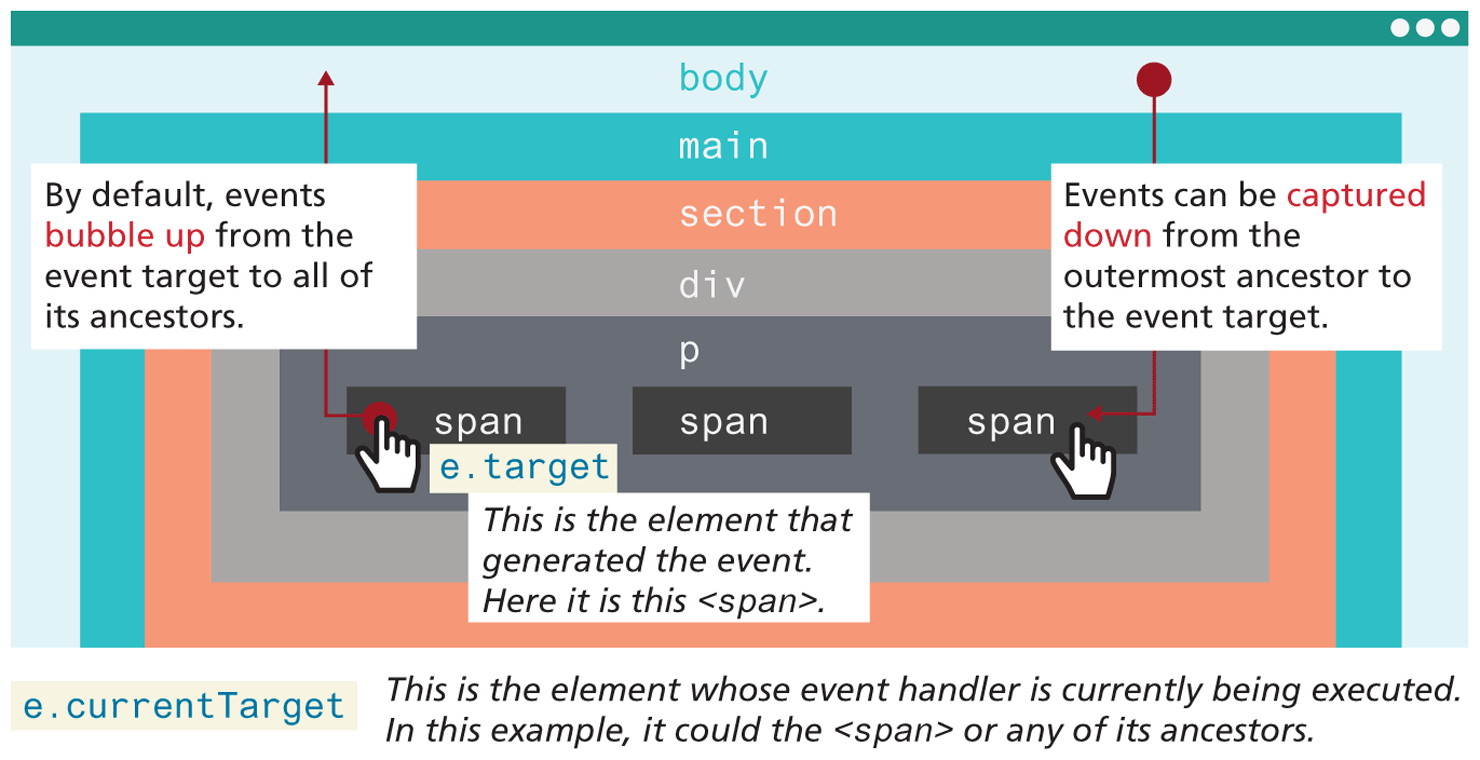
In the event capturing phase, the browser checks the outermost ancestor (the <html> element) to see if that element has an event handler registered for the triggered event, and if so, it is executed. It then proceeds to the next ancestor and performs the same steps; this continues until it reaches the element that triggered the event (that is, the event target).
In the event bubbling phase, the opposite occurs. The browser checks if the element that triggered the event has an event handler registered for that event, and if so, it is executed. It then proceeds outwards until it reaches the outermost ancestor.
By default, all events are registered in the bubbling phase. You can change this behavior and register an event instead for the capture phase by adding a capture argument to addEventListener as shown in the following:
const sec = document.querySelector('section');
sec.addEventListener('click', handler, {capture: true});
Occasionally, the bubbling of events can cause problems. You might want to do something special when an inner element is clicked, and do something else when an outer element is clicked. For instance, in Figure 9.14, there are elements nested within one another, and each of them has its own on-click behaviors. The problem here is event propagation. When the user clicks on the increment count button, the click handler for the increment <button> will trigger first. Unfortunately, because of event bubbling, it will then trigger the click event for the <div>, which will remove the item from the cart as if the user had clicked on the remove button. The event will then bubble up to the next ancestor (the <aside> element), and call its click handler, which will minimize the cart altogether.
Figure 9.14 Problems with event propagation
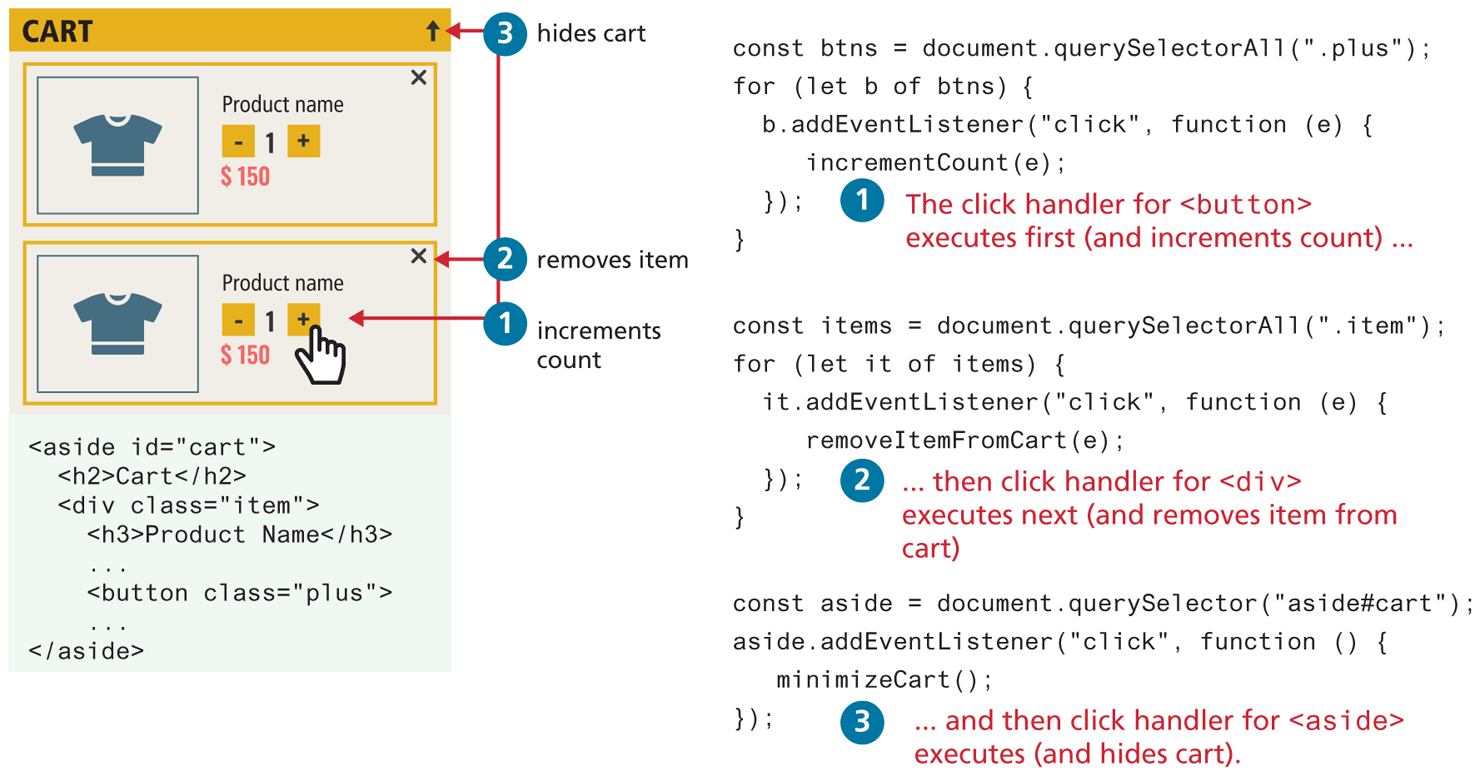
Thankfully, there is a solution to such problems. The stopPropagation() method of the event argument object will stop event propagation, both capturing and propagation. We could thus fix the propagation problem in Figure 9.14 using this method, as shown in Listing 9.5.
Listing 9.5 Stopping event propagation
const btns = document.querySelectorAll(".plus");
for (let b of btns) {
  b.addEventListener("click", function (e) {
     e.stopPropagation();
     incrementCount(e);
  });
}

const items = document.querySelectorAll(".item");
for (let it of items) {
  it.addEventListener("click", function (e) {
     e.stopPropagation();
     removeItemFromCart(e);
  });
}

const aside = document.querySelector("aside#cart");
aside.addEventListener("click", function () {
   minimizeCart();
});
9.3.5 Event Delegation
The last section ended by illustrating one of the potential pitfalls of event propagation. In this section, you will learn how one can take advantage of event propagation in order to create more efficient event handling.
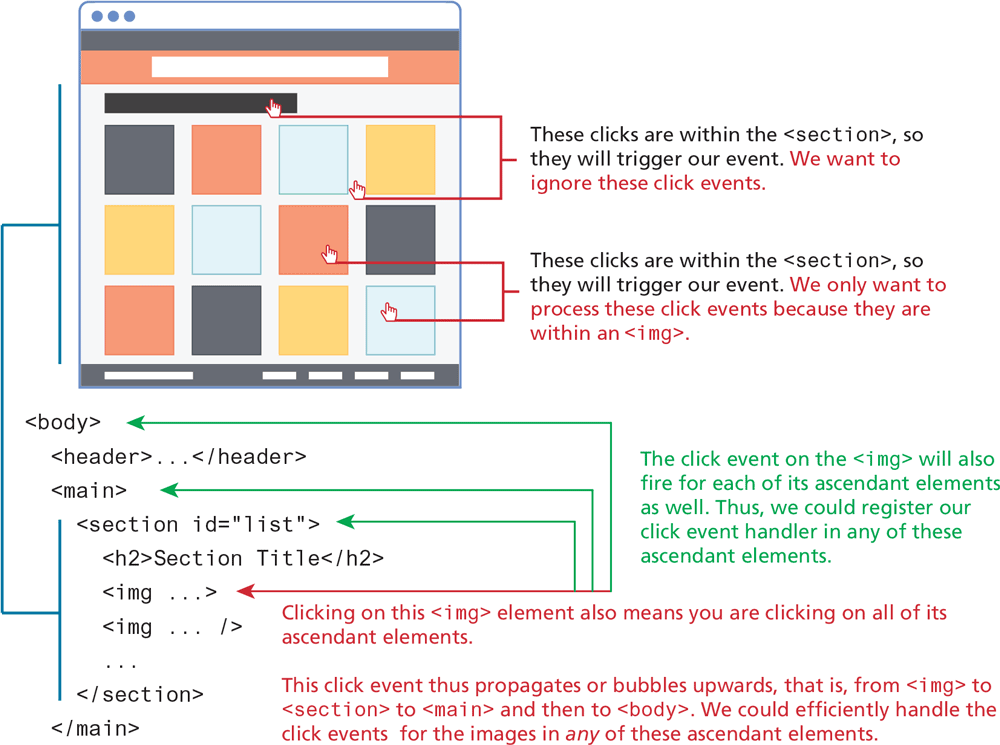
In Figure 9.14, for instance, duplicate event handlers are assigned to each element within a NodeList. An alternative is to use event delegation, which is a technique commonly used to avoid assigning numerous duplicate event listeners to a list of child events. Instead, it is possible to assign a single listener to the parent and make use of event bubbling. For instance, suppose we have numerous image thumbnails within a parent element, similar to the following:
<body>
 <header>...</header>
 <main>
   <section id="list">
     <h2>Section Title</h2>
     <img ... />
     <img ... />
     ...
   </section>
 </main>
</body>
Now what if you wanted to do something special when the user clicks the mouse on an <img> (for instance, change the styling of the image, or display its caption on top of the image). Based on our existing knowledge, you would probably write something like the following:
const images = document.querySelectorAll("#list img");
for (let img of images) {
  img.addEventListener("click", someHandler);
}
Notice that this solution adds an event listener to every <img> element. While this code is straightforward, it would be exceedingly memory inefficient if there were many images on the page. Also, this simple handler would get much more complicated if we also had the ability to dynamically add or remove images. In such a case, we would need to add event listeners to the new images or remove listeners to deleted images (since listeners will remain even if the objects are deleted).
Instead, we can add a single listener to the parent element, as shown in the following code:
const parent = document.querySelector("#list");
parent.addEventListener("click", function (e) {

 // e.target is the object that generated the event. We need
 // to verify that e.target exists and that it is one of the
 // <img> elements. Note: NodeName always returns upper case
 if (e.target && e.target.nodeName == "IMG") {
    doSomething(e.target);
 }
});
As you can see, this is a more complicated event handler. Since the user can click on all elements within the <section> element (as can be seen in Figure 9.15), the click event handler needs to determine if the user has clicked on one of the <img> elements within it. Notice also that the nodeName property returns an uppercase value, regardless of how it is defined in the markup.
Figure 9.15 Event delegation
9.3.6 Using the Dataset Property
One of the more challenging aspects of writing JavaScript involves differences in timing between what variables are available to a function handler when it is being defined and what variables are available to that same function when it is being executed.
For instance, imagine your code needs to dynamically create a list of images based on some type of data array. Imagine also that you need to do something when each image is clicked. In this click event handler, you will likely need to make a connection between the clicked image and its related data element. Thanks to lexical scope in JavaScript, you could write something like the following:
const imageData = [ { id: 345, src: 'a.png', … },
                   { id: 263, src: 'b.png', … }, … ];
for (let d of imageData) {
  const img = generateImgElement(d);
  parent.appendChild(img);

  img.addEventListener('click', function () {
     alert('You clicked image with id=' + d.id);
  }
}
Because of lexical scope in JavaScript, the event handler function has access to the variables that are in scope when function is defined also at runtime. But what if we wanted to use event delegation? Then our code might look like the following:
for (let d of imageData) {
   const img = generateImgElement(d);
   parent.appendChild(img);
}
parent.addEventListener('click', function (e) {
   if (e.target && e.target.nodeName == "IMG") {
      alert('You clicked image with id=' + XXXX);
  }
}
What should we use for XXXX? Here we have a situation where the function handler at runtime no longer has access to the relevant information.
The solution is to make use of the dataset property of the DOM element, which provides read/write access to custom data attributes (data-*) set on the element. For instance, you can make use of these via markup or via JavaScript. In markup, it can be added to any element as shown in the following:
<img src='file.png' id='a' data-id='5' data-country='Peru' />You could retrieve these custom data attributes in JavaScript via:
const link = document.querySelector('#a').
let id = link.dataset.id;
let c = link.dataset.country;
You can programmatically set or add custom data attributes via JavaScript as well.
link.dataset.country = 'Peru';Listing 9.6 illustrates how our sample problem could be fixed using the dataset property.
Listing 9.6 Using the dataset property
for (let d of imageData) {
   const img = generateImgElement(d);
   // add the key data to the <img> element
   img.dataset.key = d.key;
   parent.appendChild(img);
}
parent.addEventListener('click', function (e) {
   if (e.target && e.target.nodeName == "IMG") {
      let key = e.target.dataset.key;
      alert('You clicked image with key=' + key);
   }
});
Test Your Knowledge #3
Examine lab09-test03.html, view in browser, and then open lab09-test03.js in your editor. Modify the JavaScript file to implement the following functionality.
Add an event handler for the click event of each
<div>with thepanelclass. Be sure to assign this event handler after the DOM is loaded (i.e., after theDOMContentLoadedevent).In this event handler, you are going to either add or remove the class
openfrom the clicked panel (this will either expand or shrink the panel back to its original size). This can be achieved easily using thetoggle()method of theclassListproperty. The result should look similar to Figure 9.16 when panel is opened with a click.Figure 9.16 Finished Test Your Knowledge #3

This exercise is inspired from Wes Bos’ JavaScript30 sample project (https:/