9.2 Modifying the DOM
Listing 9.1 demonstrated how to access some of the node and element properties. You might naturally be wondering how one can practically make use of some of these properties. Since most of the properties listed in the previous tables are all read and write, this means that they can be programmatically changed.
9.2.1 Changing an Element’s Style
One common DOM task is to programmatically modify the styles associated with a particular element. This can be done by changing properties of the style property of that element. For instance, to change an element’s background color and add a three pixel border, we could use the following code:
const node = document.getElementById("someId");
node.style.backgroundColor = "#FFFF00";
node.style.borderWidth = "3px";
Armed with knowledge of CSS attributes you can easily change any style attribute. Note that the style property is itself an object, specifically a CSSStyleDeclaration type, which includes all the CSS attributes as properties and computes the current style from inline, external, and embedded styles. While you can directly change CSS style elements via this style property, it is generally preferable to change the appearance of an element instead using the className or classList properties because it allows the styles to be created outside the code and thus is more accessible to designers. Using this practice, we would change the background color by having two styles defined and changing them with JavaScript code. Figure 9.6 illustrates how CSS styles can be programmatically manipulated in JavaScript.
Figure 9.6 Manipulating the CSS classes of an element
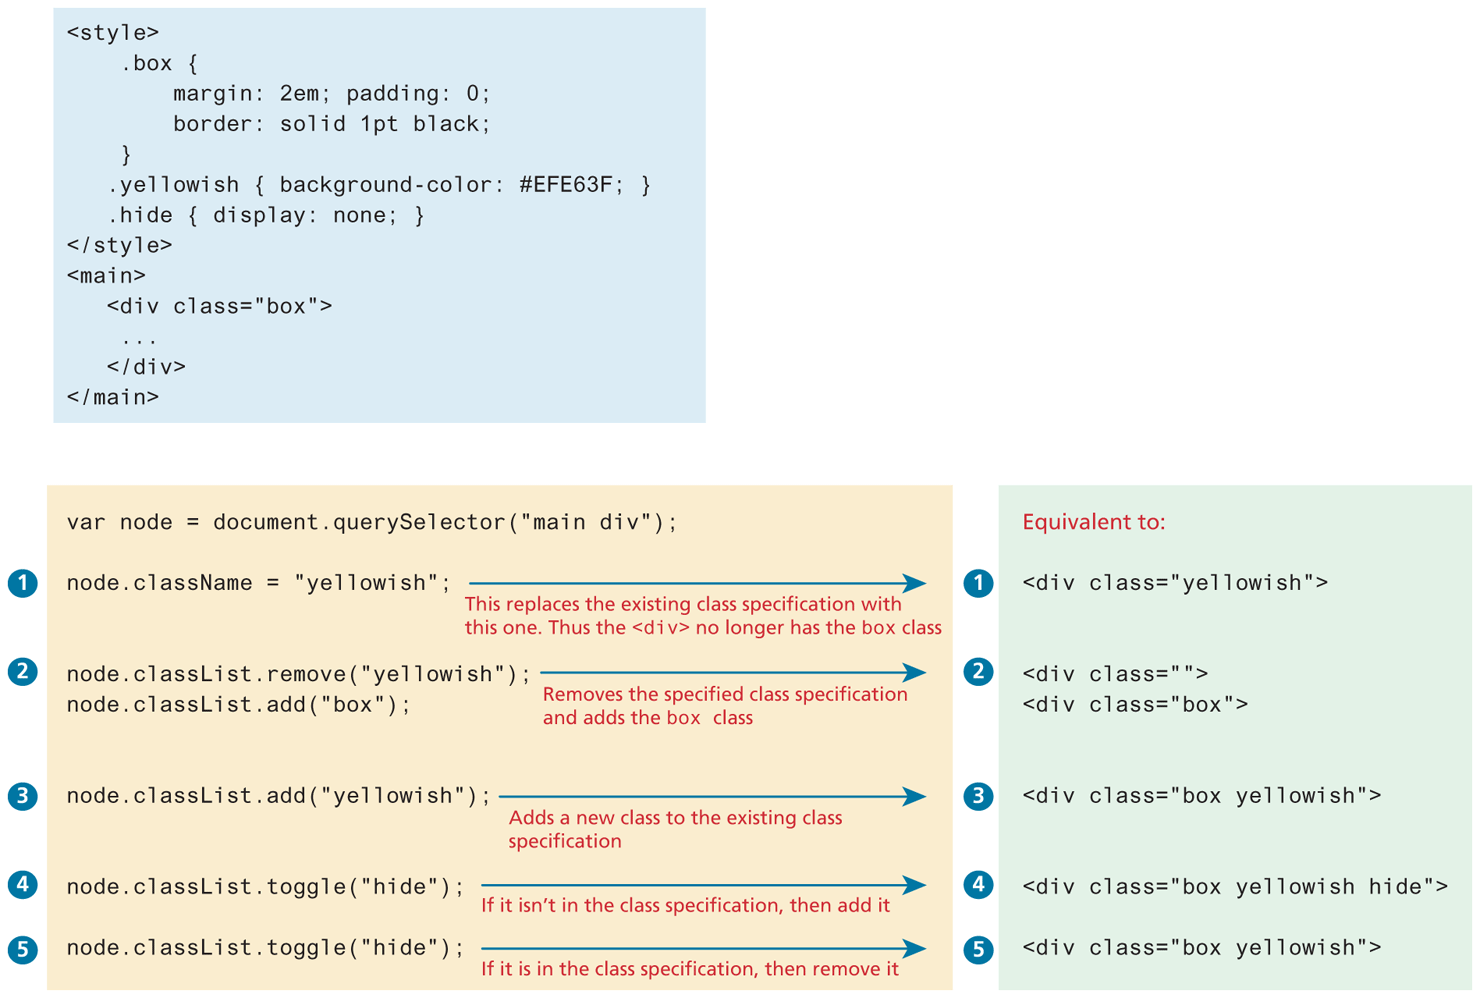
A common use of the classList property is to toggle the use of a class. For instance, we might want an element to not be visible until some user action triggers its visibility, which can be done simply using the toggle() function.
// assume that a CSS class called hide has been defined
// if hide is set, remove it; otherwise add
node.classList.toggle("hide");
9.2.2 InnerHTML vs textContent vs DOM Manipulation
Listing 9.1 illustrated how you can programmatically access the content of an element node through its innerHTML or textContent property. These properties can also be used to modify the content of any given element. For instance, you could change the content of the <div> in Listing 9.1 using the following:
const div = document.querySelector("#main");
div.innerHTML = '<a href="#"><img src="ab.gif"></a>';
This replaces the existing content with the new content. You could populate the <div> with a list using, for instance, the following two approaches:
// the <ul> already exists somewhere
const list = document.querySelector("#main ul");
// first approach, construct string with content first
let items = '';
for (let i=0; i<5; i++) {
   items += '<li>Item ' + i + '</li>';
}
// then assign innerHTML to content
list.innerHTML = items;

// second approach, add content to innerHTML incrementally
list.innerHTML = '';
for (let i=0; i<5; i++) {
   list.innerHTML += '<li>Item ' + i + '</li>';
}
While the second approach is simpler, it is quite a bit slower, since the browser has to recalculate and potentially repaint the layout with each iteration.
Regardless of performance, both approaches are generally discouraged (even though you will likely see many examples online that use these approaches) because they are potentially vulnerable to Cross-Site Scripting (XSS) attacks, in which user-generated input containing malicious JavaScript is output using innerHTML. In practice, when you need to change the inner text of an element, it is preferable to use the textContent property instead of innerHTML since any markup is stripped from it. And when you need to generate HTML elements, it is better to use the appropriate DOM manipulation methods covered in the next section.
 Pro Tip
You may remember from last chapter that JavaScript programmers need to minimize the number of global variables within their code. Thus, it is common to chain DOM calls together. For instance, consider the following code:
const node = document.getElementById("name");
node.className = "hidden";
This adds a new identifier (node) to the current scope. We could eliminate this by simply chaining the calls together as shown in the following example:
document.getElementById("name").className = "hidden";This version is generally preferred since it adds no identifiers to the global scope. However, too much chaining can make your code harder to read and understand.
9.2.3 DOM Manipulation Methods
As mentioned in the last section, using the innerHTML property to add HTML elements is generally discouraged, partly for security reasons, partly for performance reasons, and partly because it’s possible with innerHTML to assign badly formed HTML since it is simply using strings. The better approach is to use the more verbose, but safer DOM manipulation methods.
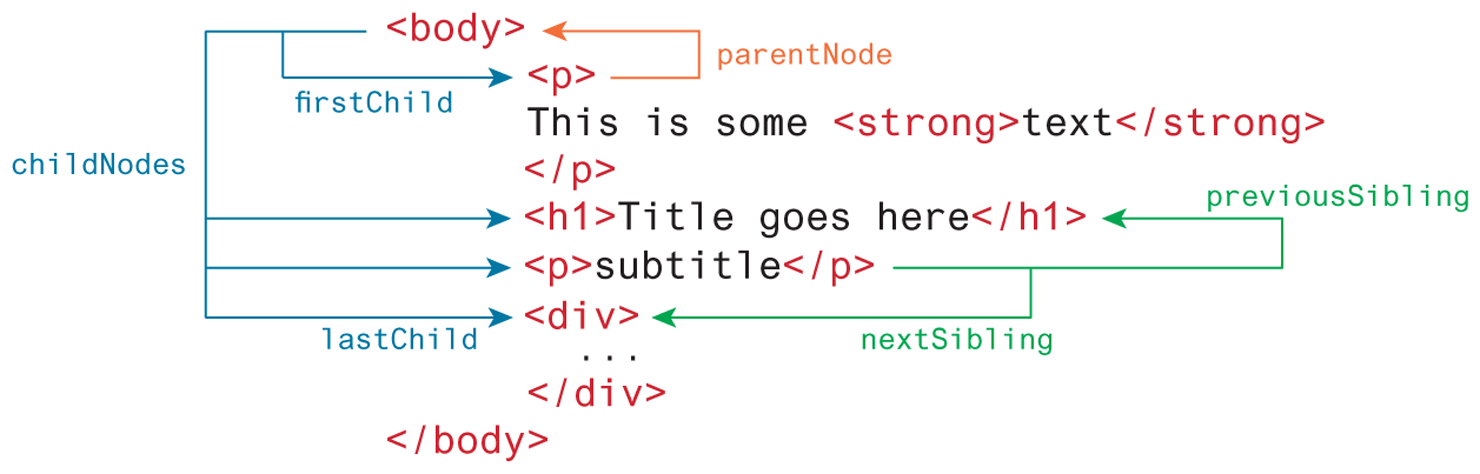
Each node in the DOM has a variety of “family relations” properties and methods for navigating between elements and for adding or removing elements from the document hierarchy. These properties are illustrated in Figure 9.7.
Figure 9.7 DOM family relations
As can be read in the nearby note, these child and sibling properties can be an unreliable mechanism for selecting nodes, and thus, in general, you will instead use the selector methods in Table 9.2. The related document and node methods for creating and removing elements in the DOM tree (and which are shown in Table 9.5) are, in contrast, exceptionally useful.
Table 9.5 DOM Manipulation Methods
| Method | Description |
|---|---|
appendChild |
Adds a new child node to the end of the current node.
|
createAttribute |
Creates a new attribute node.
|
createElement |
Creates an HTML element node.
|
createTextNode |
Creates a text node.
|
insertAdjacentElement |
Inserts a new child node at one of four positions relative to the current node. |
insertAdjacentText |
Inserts a new text node at one of four positions relative to the current node. |
insertBefore |
Inserts a new child node before a reference node in the current node.
|
removeChild |
Removes a child from the current node.
|
replaceChild |
Replaces a child node with a different child.
|
 Note
Note
The illustration of the DOM family relations shown in Figure 9.7 is somewhat misleading. These relations would only be as shown in the diagram if all white space was removed around the tags. Take a look back at Figure 9.2. Notice how the spaces around the elements actually act as text nodes, and these text nodes can make the DOM family navigation properties less reliable than one might like. For instance, you might think that after following code executes, node will be pointing to the <strong> element in Figure 9.7, but this will not be the case. If the spacing in document is the same as the spacing shown in Figure 9.7, it will be null instead, since the first reference to firstChild in fact references the textNode representing the white space between the <body> and <p> element.
let node = document.getElementsByTagName("body").firstChild.firstChild;As a consequence, if you are using these family navigation properties, you typically need to add conditional checks to ensure that a given node is the type expected.
if (node.nodeType === Node.ELEMENT_NODE) {
   // do something amazing
else {
   // ignore
}
This type of coding can get pretty frustrating, and for that reason, it is generally easier and safer to use one of the selector methods in Table 9.2, rather than the family navigation properties in Figure 9.7.
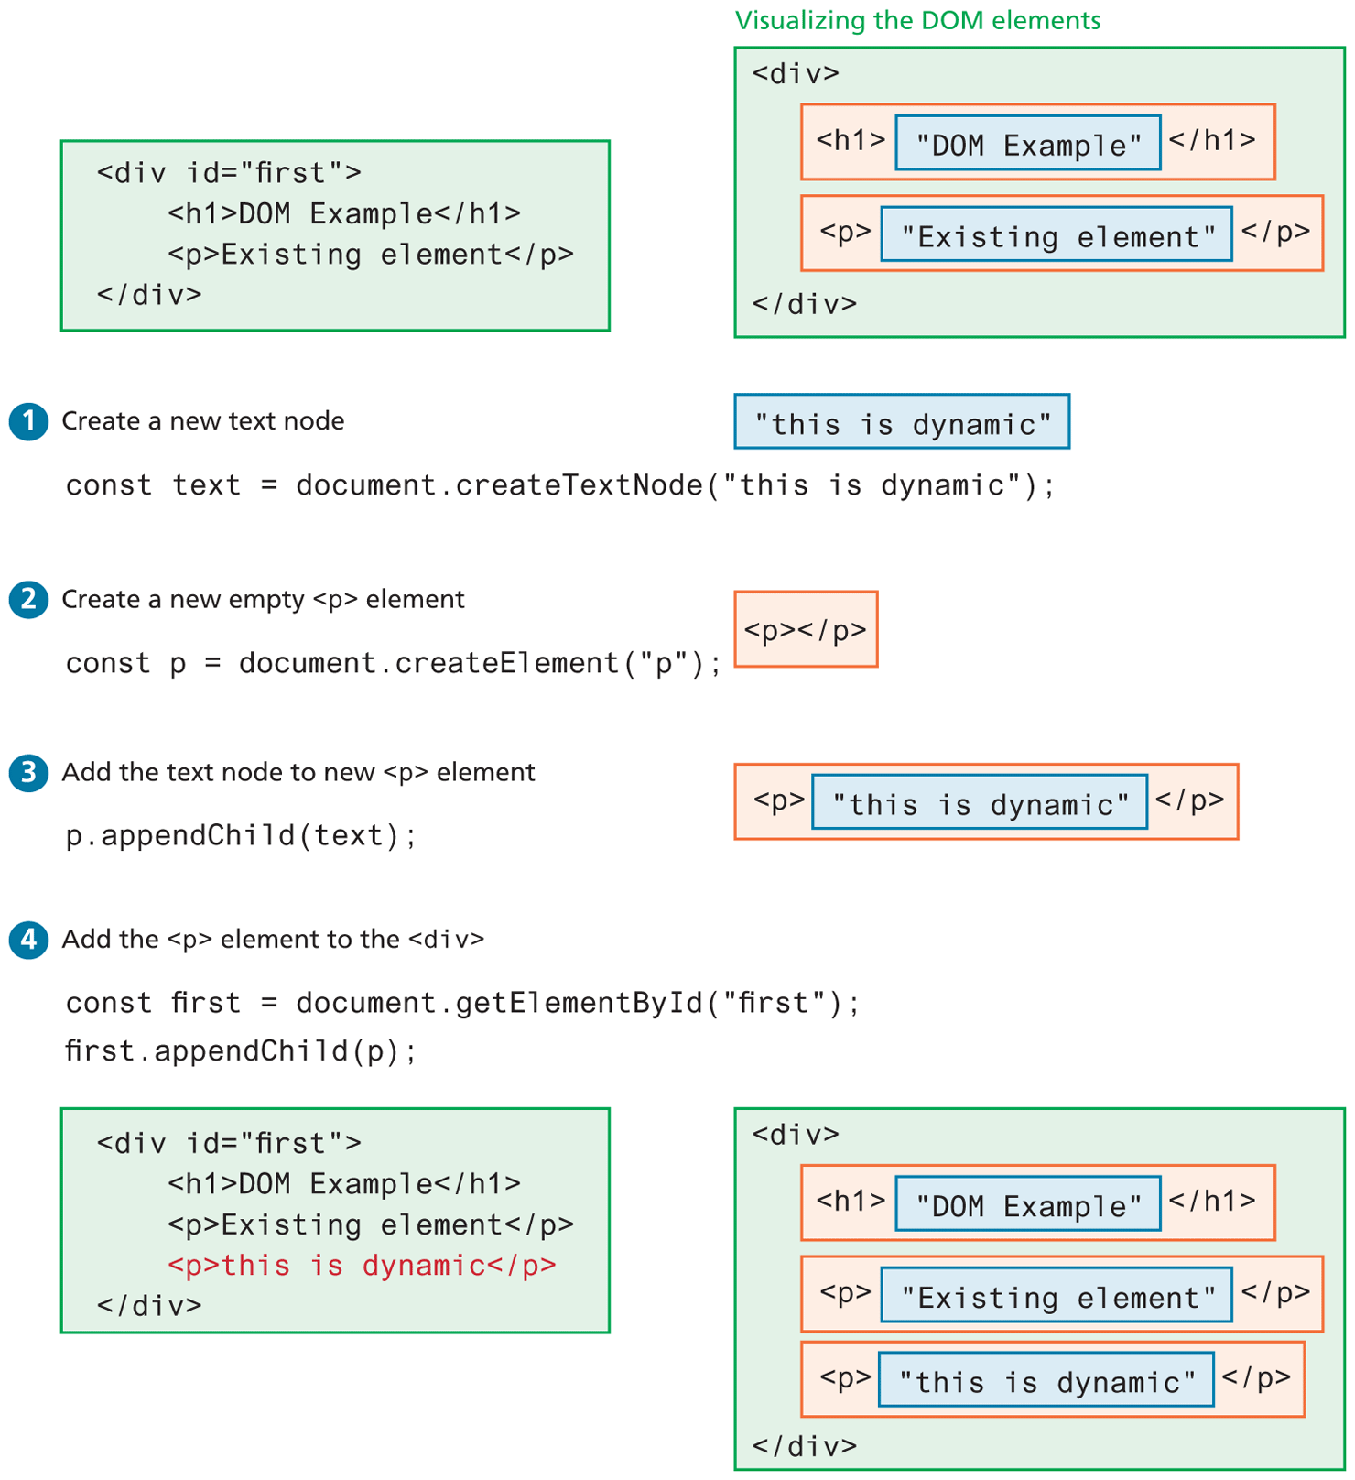
Listing 9.2 demonstrates how the selection and modification methods work together. In this example, the HTML content of a <div> element is dynamically modified. Figure 9.8 illustrates how the programming code in Listing 9.2 works.
Listing 9.2 Dynamically creating elements
<div id="first">
    <h1>DOM Example</h1>
    <p>Existing element</p>
</div>

<script>
// begin by creating two new nodes
const text = document.createTextNode("this is dynamic");
const p = document.createElement("p");

// add the text node to the <p> element node
p.appendChild(text);

// now add the new <p> element to the <div>
const first = document.getElementById("first");
first.appendChild(p);
</script>
Figure 9.8 Visualizing the DOM modification
9.2.4 DOM Timing
Before finishing this section on using the DOM, it should be emphasized that the timing of any DOM code is very important. That is, you cannot access or modify the DOM until it has been loaded.
For instance, in Listing 9.2, the DOM programming is written after the markup that is to be manipulated. This should ensure that the elements exist in the DOM before the code executes. While the “should” in the previous sentence sounds comforting, for a programmer, “should” (i.e., probably) is not good enough: we want “will”—that is, certainty!
For this reason, we typically want to wait until we know for sure that the DOM has been loaded before we execute any DOM manipulation code. To do this requires knowledge from our next section on event handling.
Test Your Knowledge #2
In Chapter 8, in the fourth Test Your Knowledge, you used the document.write() method to output structured markup content. In this exercise, you will use DOM methods to dynamically add similarly structured content instead so that your output looks similar to that shown in Figure 9.9.
Examine lab09-test02.html. It provides the sample markup for a single photo. You will replace that markup with JavaScript in the following steps. For now, either comment out the markup or cut it and paste into a temporary file for referencing later.
Modify lab09-test02.js in your editor. You will need to select the
<section>element that has anid=parent. Loop through the photos array and create a<figure>element that will get appended to the parent element. You may want to examine photos.json again to reacquaint yourself with its structure.Within that loop, you will need to dynamically create the
<img>element using the appropriate DOM methods. Populate itssrcandaltattributes from the photo data.After the image is created, you will need to create the
<figcaption>element. This element will contain the following child elements which will also be dynamically generated from the photo data:<h2>,<p>, and<span>. For the<span>elements, you will need to loop through thecolorsarray inside eachphotoobject and set thebackgroundColorproperty of the<span>to the hex value. Append the<figcaption>to the<figure>.Be sure to append the created elements to the appropriate parent. Because of all the nested elements, this code can get pretty messy. Be sure to make use of your own helper functions to keep your code more manageable.
Figure 9.9 Finished Test Your Knowledge #2
