9.1 The Document Object Model (DOM)
While JavaScript is now used in a variety of different contexts, by far the most common is the browser. Within the browser context, JavaScript needs a way to interact with the HTML document in which it is contained. As such, there needs to be some way of programmatically accessing the elements and attributes within the HTML. This is accomplished through an application programming interface (API) called the Document Object Model (DOM).
According to the W3C, the DOM is a
platform- and language-neutral interface that will allow programs and scripts to dynamically access and update the content, structure and style of documents.1
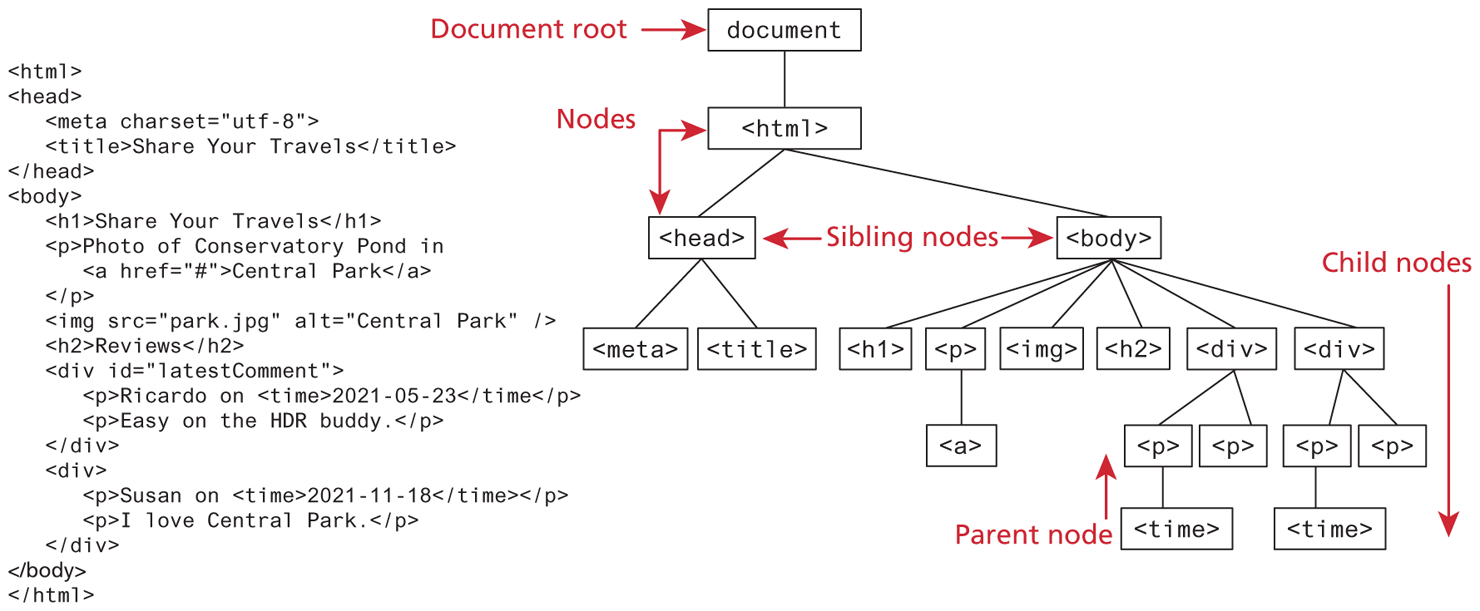
We already know all about the DOM, but by another name. The tree structure from Chapter 3 (shown again in Figure 9.1) is formally called the DOM Tree with the root, or topmost object called the Document Root. You already know how to specify the style of documents using CSS; with JavaScript and the DOM, you now can do so dynamically as well at runtime, in response to user events. Thus, we can summarize and say that the DOM provides a standardized, hierarchical (tree-like) way to access and manipulate the contents of an HTML document.
Figure 9.1 DOM tree
9.1.1 Nodes and NodeLists
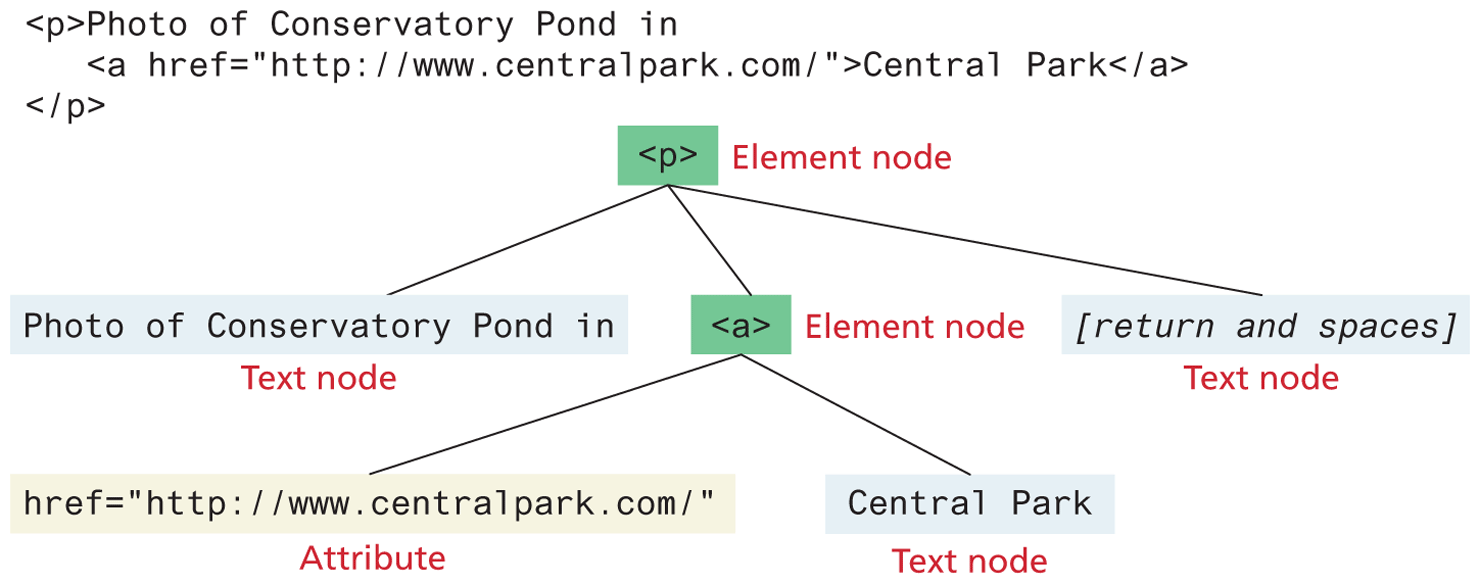
In the DOM, each element within the HTML document is called a node. If the DOM is a tree, then each node is an individual branch. As can be seen in Figure 9.2, there are element nodes and text nodes (plus a few other uncommonly encountered ones). Attribute nodes were part of the original DOM specification, but since DOM 4 in 2015, attribute nodes have been deprecated and thus attributes no longer have the methods and properties of nodes.
Figure 9.2 DOM nodes
All nodes in the DOM share a common set of properties and methods. These properties and methods allow you to retrieve information about the node, manipulate its properties (for instance, changing its CSS properties or retrieving its text content), and even create new content. Some of these properties are available to all nodes; others are only available to, for instance, element nodes. Furthermore, depending on the element, some nodes will have specific properties for the specific element. Table 9.1 lists some of the more important properties that all nodes, regardless of type, share.
Table 9.1 Some Essential Node Object Properties
| Property | Description |
|---|---|
childNodes |
A NodeList of child nodes for this node |
firstChild |
First child node of this node |
lastChild |
Last child of this node |
nextSibling |
Next sibling node for this node |
nodeName |
Name of the node |
nodeType |
Type of the node |
nodeValue |
Value of the node |
parentNode |
Parent node for this node |
previousSibling |
Previous sibling node for this node |
textContent |
Represents the text content (stripped of any tags) of the node |
The DOM also defines a specialized object called a NodeList that represents a collection of nodes. It operates very similarly to an array (e.g., you use numeric indexes within square brackets), even though it doesn’t have all array methods and properties because NodeList and Array inherit from different prototypes (you will learn about prototypes in the next chapter).
As we will see, many of the most common programming tasks that we typically perform in JavaScript involve finding one or more nodes and then modifying them via those properties and methods.
9.1.2 Document Object
The DOM document object is the root JavaScript object representing the entire HTML document. It contains some properties and methods that we will use extensively in our development and is globally accessible via the document object reference.
The properties of this document object cover a wide-range of information about the page. Some of these are read-only, but others are modifiable. Like any other JavaScript object, you can access its properties using either dot notation or square bracket notation, as illustrated in the following example:
// retrieve the URL of the current page
let a = document.URL;
// retrieve the page encoding, for example  ISO-8859-1
let b = document["inputEncoding"];
In addition to these properties, there are several essential methods you will use all the time. The last chapter introduced you to one of these, the document.write() method. To help us better familiarize ourselves with this object, we will group the methods into these three categories:
Selection methods
Family manipulation methods
Event methods
We will cover each of these in the next several sections.
9.1.3 Selection Methods
The most important DOM methods (remember that we often use the term "methods" throughout the book to refer to functions of an object) are those that allow you to select one or more document elements; they are shown in Table 9.2.
Table 9.2 Selection DOM Methods
| Method | Description |
|---|---|
getElementById("id") |
Returns the single element node whose id attribute matches the passed id. |
getElementsByClassName("name") |
Returns a NodeList of elements whose class name matches the passed name. |
getElementsByTagName("name") |
Returns a NodeList of elements whose tag name matches the passed name. |
querySelector("selector") |
Returns the first element node that matches the passed CSS selector. |
querySelectorAll("selector") |
Returns a NodeList of elements that match the passed CSS selector. |
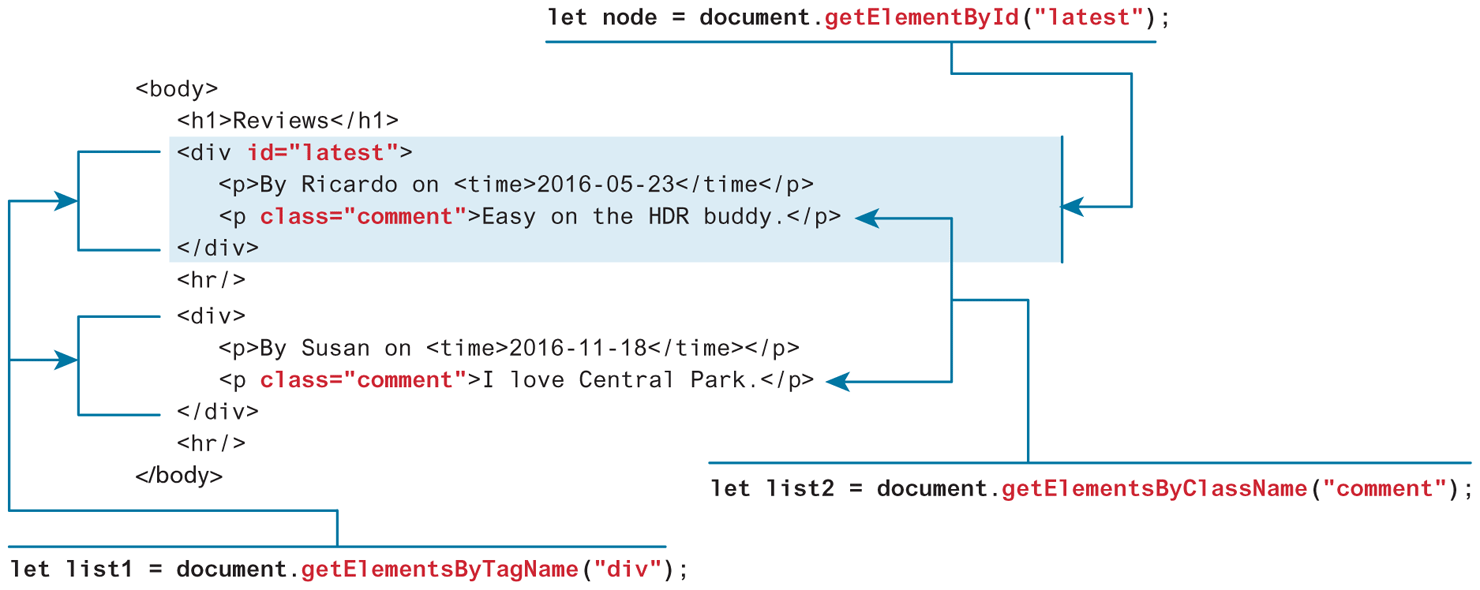
The relationship between the first three methods listed in Table 9.2 is shown in Figure 9.3. The method getElementById() is perhaps the most commonly used of these selection methods. It returns a single DOM Element (covered as follows) that matches the id passed as an argument. The other two methods getElementsByTagName() and getElementsByClassName() return a NodeList (in WebKit browsers such as Chrome) or a HTMLCollection (in FireFox). Both have a near identical object model. As mentioned in the previous section, a NodeList (or a HTMLCollection) is similar (but not identical) to an array of Node elements.
Figure 9.3 Using the getElement selection methods
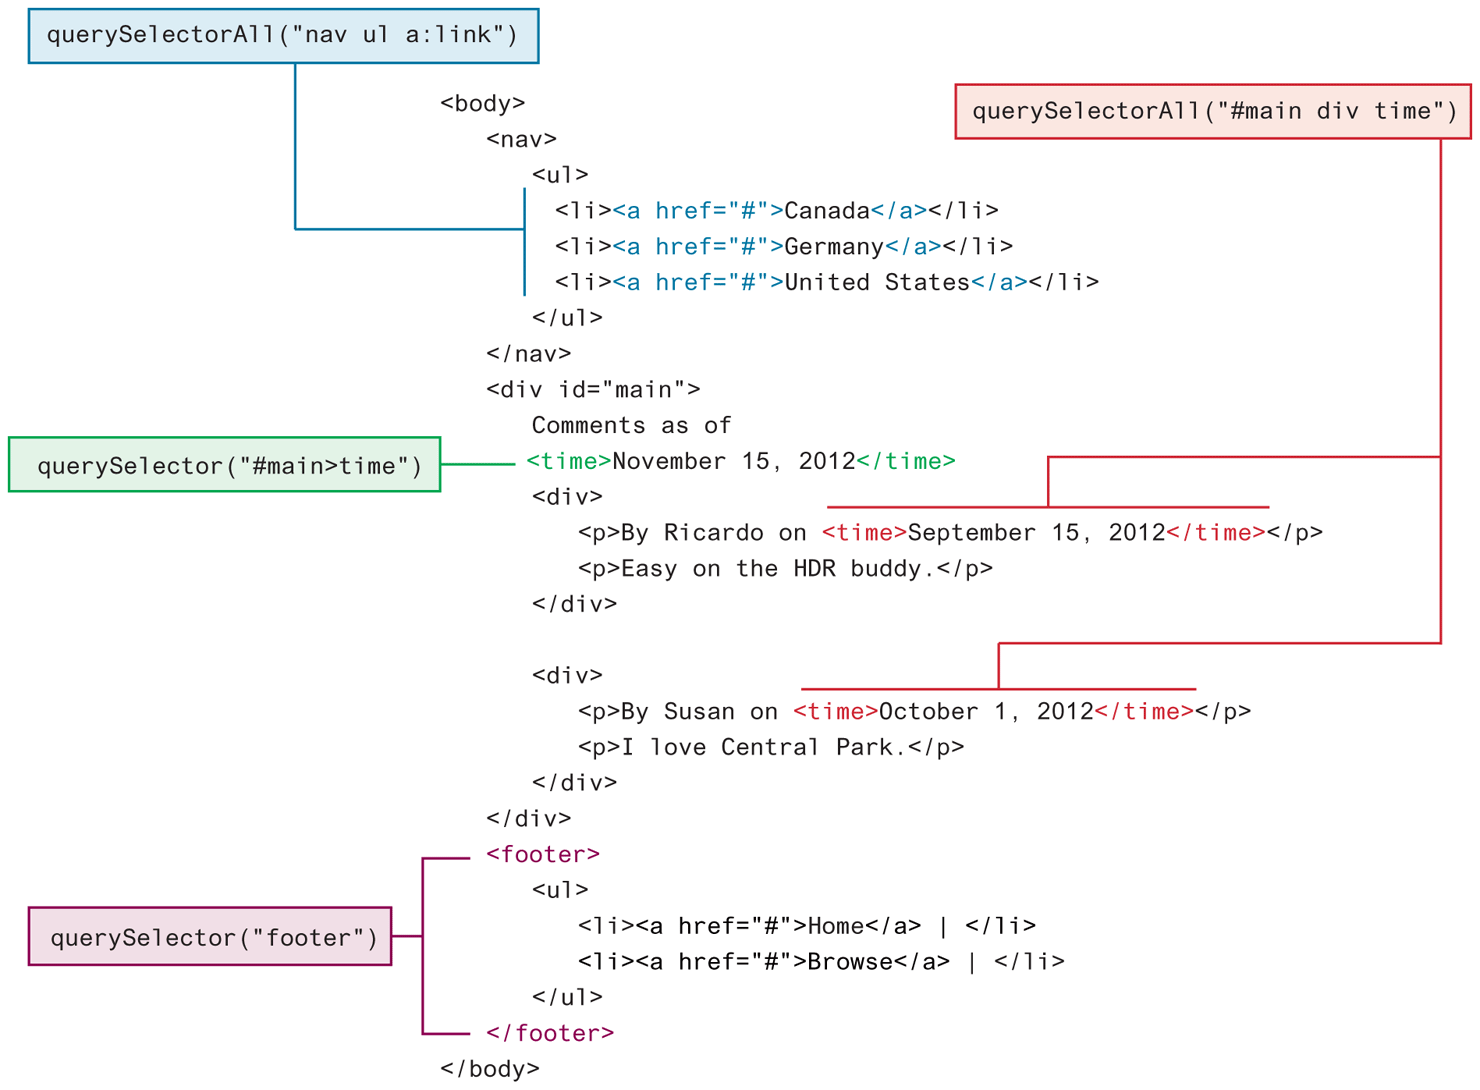
Selectors are a powerful mechanism for selecting elements in CSS. Until about 2012, there was no easy, cross-browser mechanism for selecting nodes in JavaScript using CSS selectors (this was one of the key reasons behind jQuery’s popularity amongst JavaScript developers). The newer querySelector() and querySelectorAll() methods allow you to query for DOM elements much the same way you specify CSS styles and are now universally supported in all modern desktop and mobile browsers.2 Figure 9.4 illustrates how these methods provide a much more powerful way to select elements than the getElement methods shown in Figure 9.3.
Figure 9.4 Using querySelector and querySelectorAll selection methods
9.1.4 Element Node Object
The type of object returned by the methods getElementById() and querySelector() described in the previous section is an Element Node object. This represents an HTML element in the hierarchy, contained between the opening <> and closing </> tags for this element. As you may already have figured out, an element can itself contain more elements. Every element node has the node properties shown in Table 9.1. It also has a variety of additional properties, the most important of which are shown in Table 9.3.
Table 9.3 Some Essential Element Node Properties
| Property | Description |
|---|---|
classList |
A read-only list of CSS classes assigned to this element. This list has a variety of helper methods for manipulating this list. |
className |
The current value for the class attribute of this HTML element. |
id |
The current value for the id of this element. |
innerHTML |
Represents all the content (text and tags) of the element. |
style |
The style attribute of an element. This returns a CSSStyleDeclaration object that contains sub-properties that correspond to the various CSS properties. |
tagName |
The tag name for the element. |
While these properties are available for all HTML elements, there are some HTML elements (for instance, the <input>, <img>, and <a> elements) that have additional properties that can be manipulated (some of these additional properties are listed in Table 9.4). Listing 9.1 shows how these properties can be programmatically accessed. Notice how using one or more of the selection methods is an essential part of the DOM workflow.
Table 9.4 Some Specific HTML DOM Element Properties for Certain Tag Types
| Property | Description | Tags |
|---|---|---|
href |
Used in <a> tags to specify the linking URL. |
a |
name |
Used to identify a tag. Unlike id which is available to all tags, name is limited to certain form-related tags. |
a, input, textarea, form |
src |
Links to an external URL that should be loaded into the page (as opposed to href which is a link to follow when clicked). |
img, input, iframe, script |
value |
Provides access to the value attribute of input tags. Typically used to access the user’s input into a form field. |
input, textarea, submit |
Listing 9.1 Accessing elements and their properties
<p id="here">hello <span>there</span></p>
<ul>
    <li>France</li>
    <li>Spain</li>
    <li>Thailand</li>
</ul>
<div id="main">
    <a href="somewhere.html"><img src="whatever.gif" class="thumb"></a>
</div>

<script>
    const node = document.getElementById("here");
    // outputs: hello <span>there</span>
    console.log(node.innerHTML);
    // outputs: hello there
    console.log(node.textContent);

    const items = document.getElementsByTagName("li");
    for (let i=0; i<items.length; i++) {
        // outputs: France, then Spain, then Thailand
        console.log(items[i].textContent);
    }

    const link = document.querySelector("#main a");
    // outputs: somewhere.html
    console.log(link.href);

    const img = document.querySelector("#main img");
    // outputs: whatever.gif
    console.log(img.src);
    // outputs: thumb
    console.log(img.className);
</script>
Test Your Knowledge #1
Examine lab09-test01.html and then open lab09-test01.js in your editor. Modify the JavaScript file to implement the following functionality.
Use
getElementByIdto add a border via CSS to the<ul>element with the name "thumb-list".Use
querySelectorto set thevalueproperty of the<textarea>to thetextContentproperty of the<p>element.Use
querySelectorAllto add a box shadow to each of the<img>elements within the<ul>element. The CSS property name isbox-shadowso the JavaScript DOM property name will be boxShadow. To see a samplebox-shadow, look at the example for the box class in lab09-ex01.css. Remember that you will need to use a loop. The result should look similar to that shown in Figure 9.5.Figure 9.5 Finished Test Your Knowledge #1
