5.3 Introducing Forms
Forms provide the user with an alternative way to interact with a web server. Up to now, clicking hyperlinks was the only mechanism available to the user for communicating with the server. Forms provide a much richer mechanism. Using a form, the user can enter text, choose items from lists, and click buttons. Typically, programs running on the server will take the input from HTML forms and do something with it, such as save it in a database, interact with an external web service, or customize subsequent HTML based on that input.
Prior to HTML5, there was a limited number of data-entry controls available in HTML forms. There were controls for entering text, controls for choosing from a list, buttons, checkboxes, and radio buttons. HTML5 has added a number of new controls as well as more customization options for the existing controls.
5.3.1 Form Structure
A form is constructed in HTML in the same manner as tables or lists—that is, using special HTML elements. Figure 5.11 illustrates a typical HTML form.
Figure 5.11 Sample HTML form
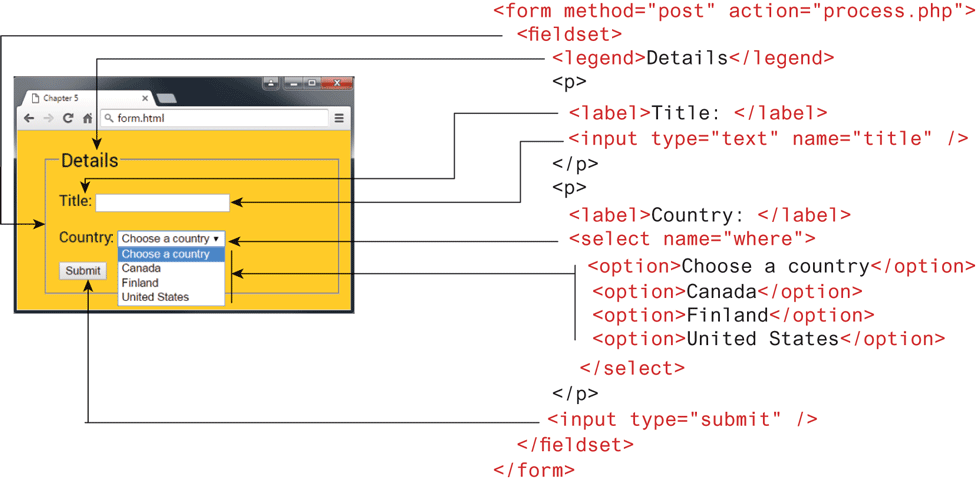
Notice that a form is defined by a <form> element, which is a container for other elements that represent the various input elements within the form as well as plain text and almost any other HTML element. The meaning of the various attributes shown in Figure 5.11 is described later.
 Note
Note
While a form can contain most other HTML elements, a form cannot contain another <form> element.
5.3.2 How Forms Work
While forms are constructed with HTML elements, a form also requires some type of server-side resource that processes the user’s form input, as shown in Figure 5.12.
Figure 5.12 How forms work
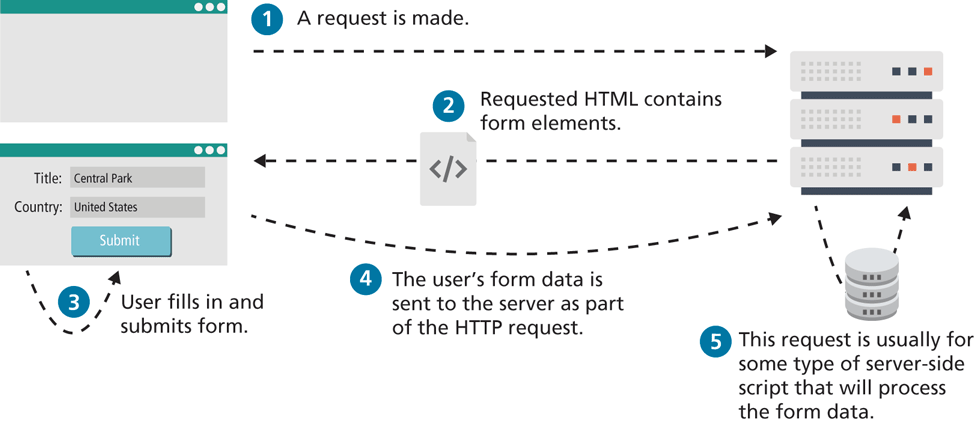
The process begins with a request for an HTML page that contains some type of form on it. This could be something as complex as a user registration form or as simple as a search box. After the user fills out the form, there needs to be some mechanism for submitting the form data back to the server. This is typically achieved via a submit button, but through JavaScript, it is possible to submit form data using some other type of mechanism.
Because interaction between the browser and the web server is governed by the HTTP protocol, the form data must be sent to the server via a standard HTTP request. This request is typically some type of server-side program that will process the form data in some way; this could include checking it for validity, storing it in a database, or sending it in an email. In Chapter 12, you will learn how to write PHP scripts to process form input. In the remainder of this chapter, you will learn only how to construct the user interface of forms through HTML.
5.3.3 Query Strings
You may be wondering how the browser “sends” the data to the server. As mentioned in Chapter 2, this occurs via an HTTP request. But how is the data packaged in a request?
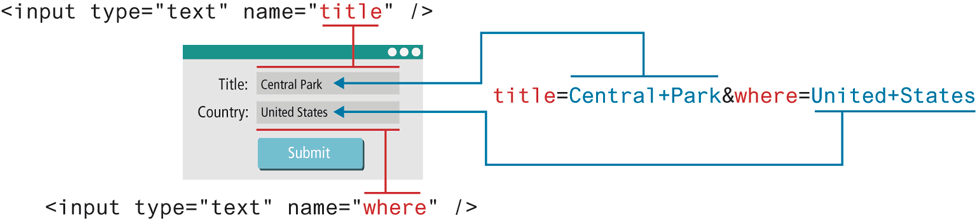
The browser packages the user’s data input into something called a query string. A query string is a series of name=value pairs separated by ampersands (the & character). In the example shown in Figure 5.12, the names in the query string were defined by the HTML form (see Figure 5.11); each form element (i.e., the first <input> elements and the <select> element) contains a name attribute, which is used to define the name for the form data in the query string. The values in the query string are the data entered by the user.
Figure 5.13 illustrates how the form data (and its connection to form elements) is packaged into a query string.
Figure 5.13 Query string data and its connection to the form elements
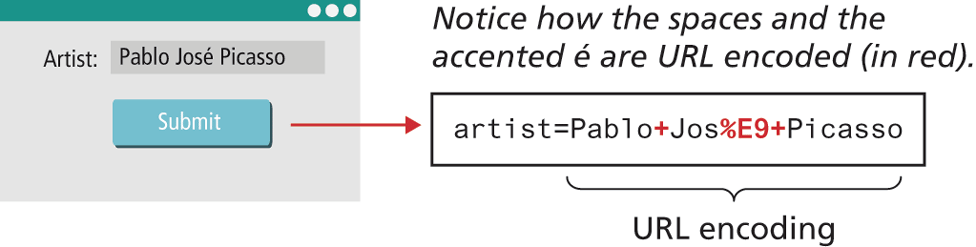
Query strings have certain rules defined by the HTTP protocol. Certain characters such as spaces, punctuation symbols, and foreign characters cannot be part of a query string. Instead, such special symbols must be URL encoded (also called percent encoded), as shown in Figure 5.14.
Figure 5.14 URL encoding
5.3.4 The <form> Element
The example HTML form shown in Figure 5.11 contains two important attributes that are essential features of any form, namely, the action and the method attributes.
The action attribute specifies the URL of the server-side resource that will process the form data. This could be a resource on the same server as the form or a completely different server. In this example (and of course in this book as well), we will be using PHP pages to process the form data. There are other server technologies, each with their own extensions, such as ASP.NET (.aspx), ASP (.asp), and Java Server Pages (.jsp). Some server setups, it should be noted, hide the extension of their server-side programs.
The method attribute specifies how the query string data will be transmitted from the browser to the server. There are two possibilities: GET and POST.
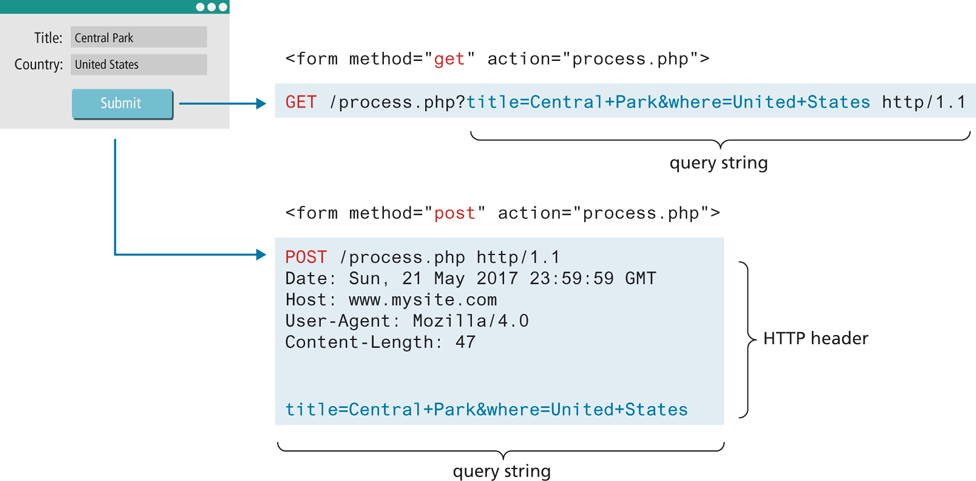
What is the difference between GET and POST? The difference resides in where the browser locates the user’s form input in the subsequent HTTP request. With GET, the browser locates the data in the URL of the request; with POST, the form data is located in the HTTP header after the HTTP variables. Figure 5.15 illustrates how the two methods differ.
Figure 5.15 GET versus POST
Which of these two methods should one use? Table 5.1 lists the key advantages and disadvantages of each method.
Table 5.1 GET versus POST
| Type | Advantages and Disadvantages |
|---|---|
GET |
Data can be clearly seen in the address bar. This may be an advantage during development but a disadvantage in production. Data remains in browser history and cache. Again this may be beneficial to some users, but it is a security risk on public computers. Data can be bookmarked (also an advantage and a disadvantage). There is a limit on the number of characters in the returned form data. |
POST |
Data can contain binary data. Data is hidden from user. Submitted data is not stored in cache, history, or bookmarks. |
Generally, form data is sent using the POST method. However, the GET method is useful when you are testing or developing a system, since you can examine the query string directly in the browser’s address bar. Since the GET method uses the URL to transmit the query string, form data will be saved when the user bookmarks a page, which may be desirable, but is generally a potential security risk for shared use computers. And needless to say, any time passwords are being transmitted, they should be transmitted via the POST method.
Note
It should be noted that while the POST method “hides” form data in the HTTP header, it is by no means unavailable for examination. Browser tools allow any user to easily inspect the HTTP header. As a result, the POST method is NOT sufficient from a security standpoint. Transmitting sensitive information in a form (for instance, login information) typically involves encryption using the HTTPS protocol. Chapter 16 will discuss form security in more detail.