4.9 Chapter Summary
Cascading Style Sheets are a vital component of any modern website. This chapter provided a detailed overview of most of the major features of CSS. While we still have yet to learn how to use CSS to create layout (which is relatively complicated and is the focus of Chapter 7), this chapter has covered a large percentage of the CSS that most web programmers will need to learn.
4.9.1 Key Terms
box model
CSS
CSS variable
4.9.2 Review Questions
What are the main benefits of using CSS?
Compare the approach the W3C has used with CSS3 in comparison to CSS2.1.
What are the different parts of a CSS style rule?
What is the difference between a relative and an absolute measure unit in CSS? Why are relative units preferred over absolute units in CSS?
What is an element selector and a grouped element selector? Provide an example of each.
What are class selectors? What are id selectors? Briefly discuss why you would use one over the other.
What are contextual selectors? Identify the four different contextual selectors.
What are pseudo-class selectors? What are they commonly used for?
What does cascade in CSS refer to?
What are the three cascade principles used by browsers when style rules conflict? Briefly describe each.
Illustrate the CSS box model. Be sure to label each of the components of the box.
What is a web font stack? Why are they necessary?
What are the advantages and disadvantages of using a CSS framework? What are the different categories of CSS framework?
What are CSS variables? What problem do they address?
4.9.3 Hands-On Practice
Project 1: Simple Styling
Difficulty Level: Beginner
Overview
This project requires you to use some simple CSS styling.
Instructions
Examine ch04-proj01.html in the browser. Do not make any changes to this file.
Edit the file styles.css by defining styles so that it looks similar to that shown in Figure 4.41. The steps below provide more details.
Figure 4.41 Completed Project 1
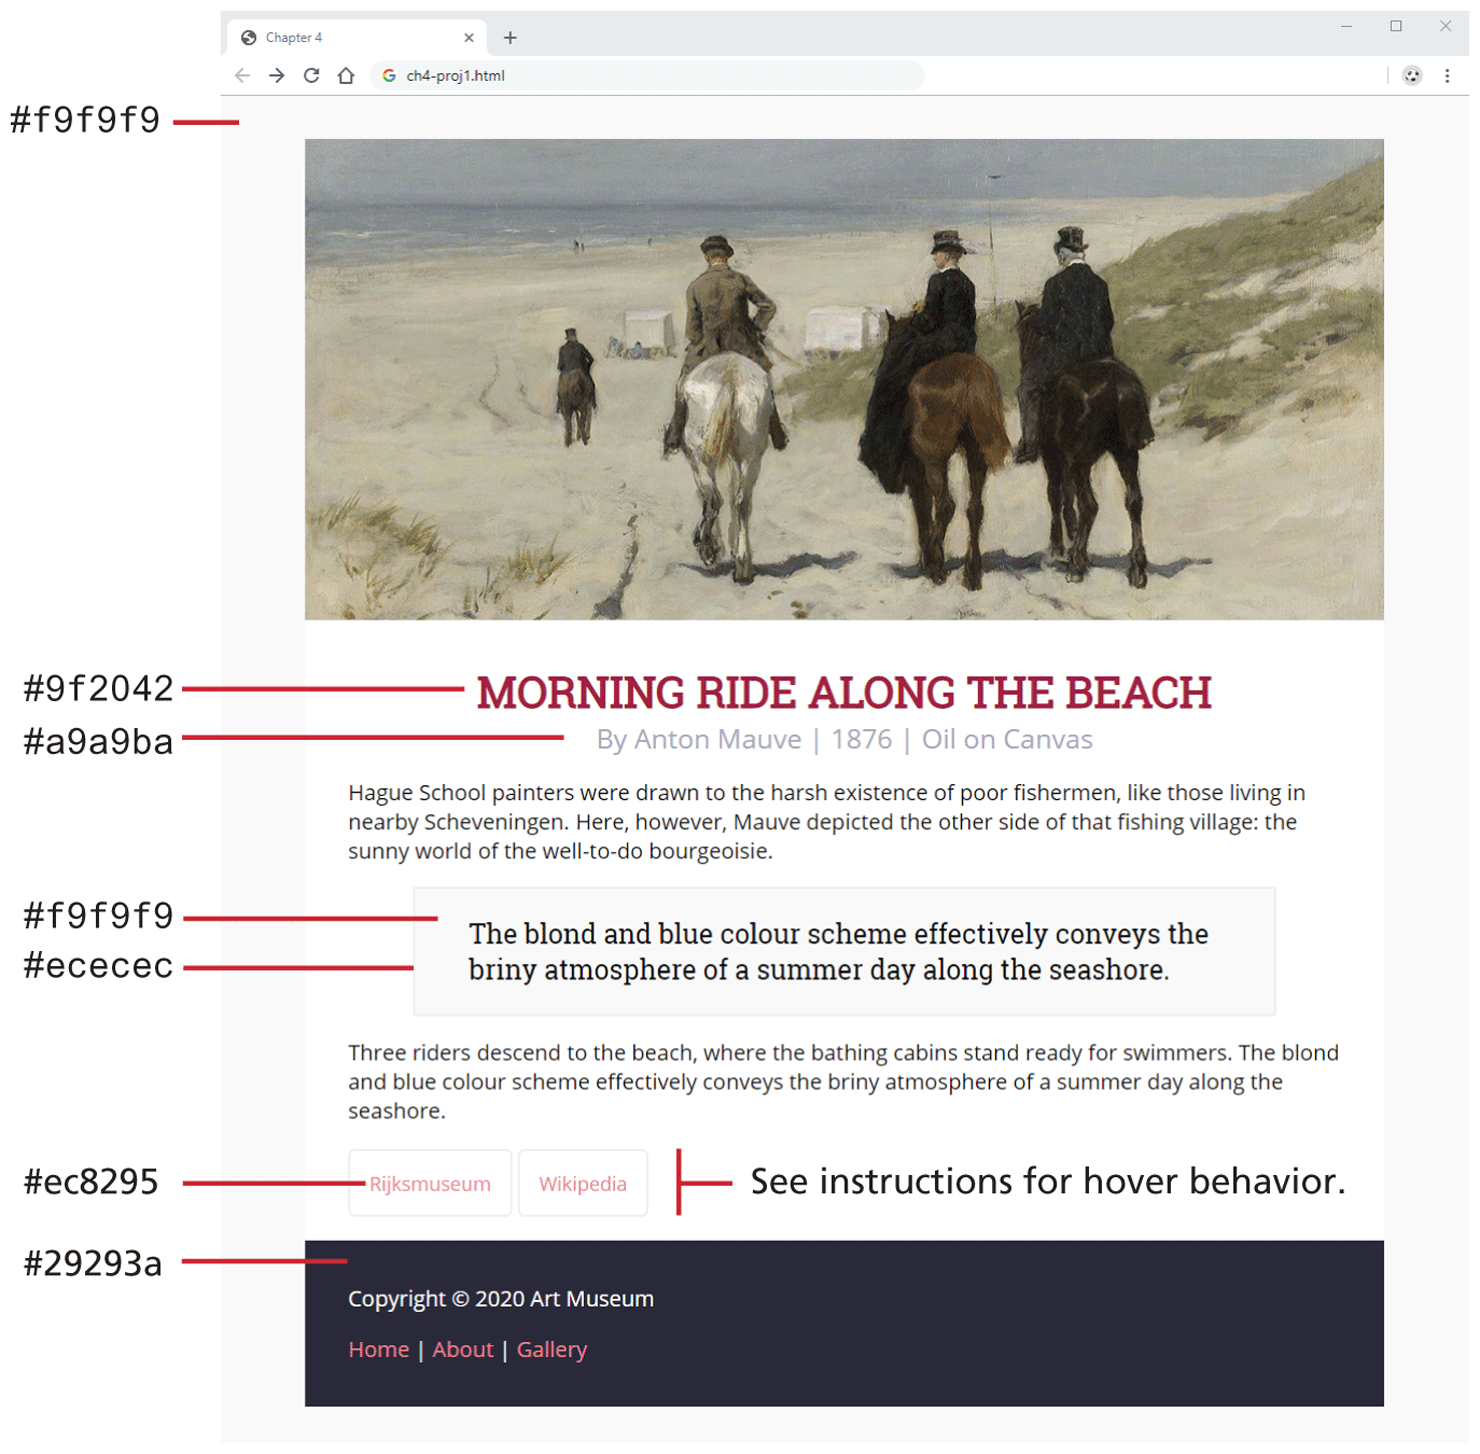
The
<body>element has top margin of 0em, left and right margins of 4em, and a bottom margin of 0em.The font for the
<h1>and<blockquote>is Roboto Slab with a size of 2rem and 1.25rem. The font everywhere else is Open Sans with a size of 0.9rem, 1rem, or 1.25rem.You will have to adjust margin, padding, and border properties for multiple elements.
The links have the same color for visited and not-visited. For the two external links, you will need to add borders with rounded corners. You will also need to define hover so that the background color is #a9a9ba, and the text color is #9f2042.
You will have to make use of text-transform, text-align, and text-decoration properties.
Set the width property of the image so it scales to its container’s size (use a % value).
Guidance and Testing
CSS can be overwhelming at times. The instructions above break the task down into smaller steps. Test each step along the way in a browser.
When completed, test at different browser sizes.
Project 2: Using Boxes
Difficulty Level: Intermediate
Overview
This project requires a bit more complicated CSS styling. The focus here is on working with box properties.
Instructions
Examine ch04-proj02.html in a browser and then in the editor of your choice. Do not make any changes to this file.
Edit the file ch04-proj02.css by defining styles so that it looks similar to that shown in Figure 4.42. The steps below provide more details.
Figure 4.42 Completed Project 2
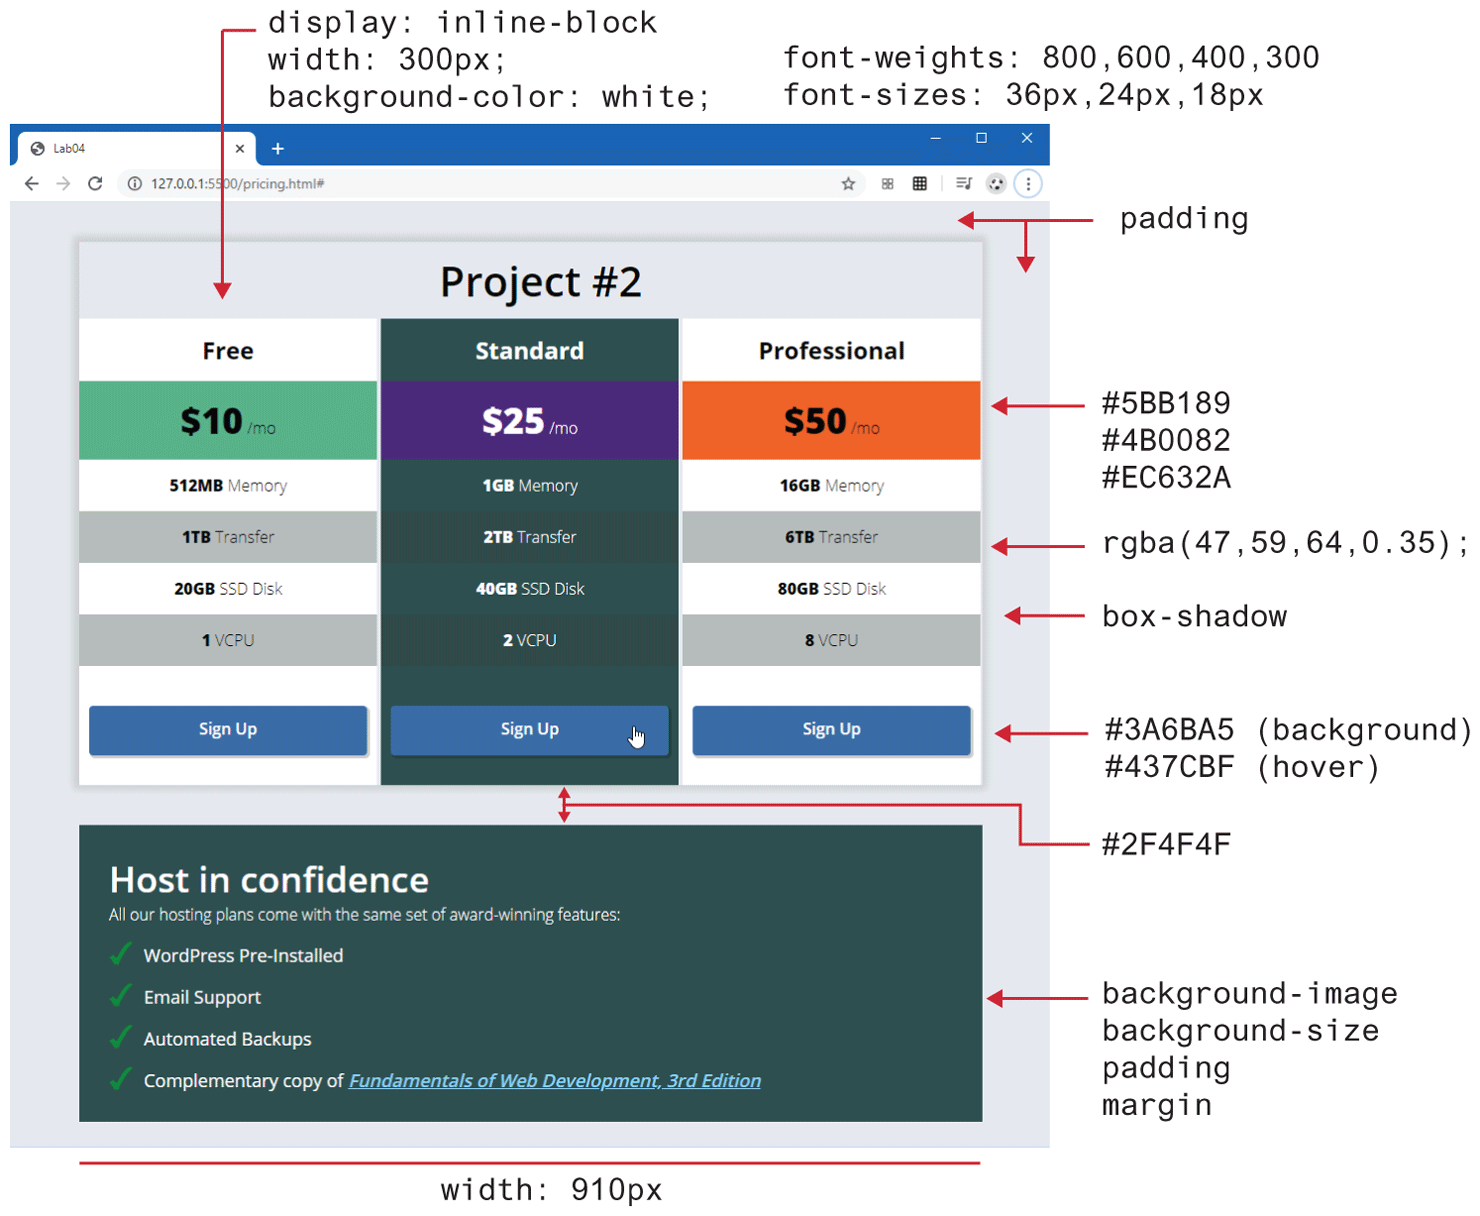
Add about
40pxpadding to the<body>. Set the width of the<section>to910px. You will need a variety of different text styling, using a variety of different font sizes and font weights, as shown in Figure 4.42.Each of the column
<div>elements must have itsdisplayproperty set toinline-block. This will allow the<div>elements to “sit” together on the same line. In Chapter 7, you will learn other techniques for achieving this effect. Also set some of the other column properties to the values shown in Figure 4.41. The second column will have a different background color. Remove the list bullets by setting thelist-style-typeto none.For the list items within each column, make every second item a different color using the
nth-childpseudo selector. Use thergba()function, which will darken the underlying background color.Specify the link, visited, and hover formatting of the Sign Up link. Notice the rounded corners and the box shadow.
For the bottom “confidence”
<div>, the list items have a background image (checkmark.svg). Set thebackground-sizeproperty to24px. Thepadding-leftand themarginof each<li>item will have to be modified so they don’t overlap the checkmark image. Remove the bullet from each list item.
Guidance and Testing
CSS can be overwhelming at times. The instructions above break the task down into smaller steps. Test each step along the way in a browser. It’s not important that your page matches exactly the image shown in Figure 4.41. You are only trying to get it pretty similar.
Project 3: Home Page Prototype
Difficulty Level: Advanced
Overview
In this project, you will make use of your knowledge of CSS to create a sample home page with navigation, large hero image, and three “card” boxes.
Instructions
Examine ch04-proj03.css in a browser and then in the editor of your choice. Do not make any changes to this file.
Edit the file ch04-proj03.css by defining styles so that it looks similar to that shown in Figure 4.43. The steps below provide more details.
Figure 4.43 Completed Project 3
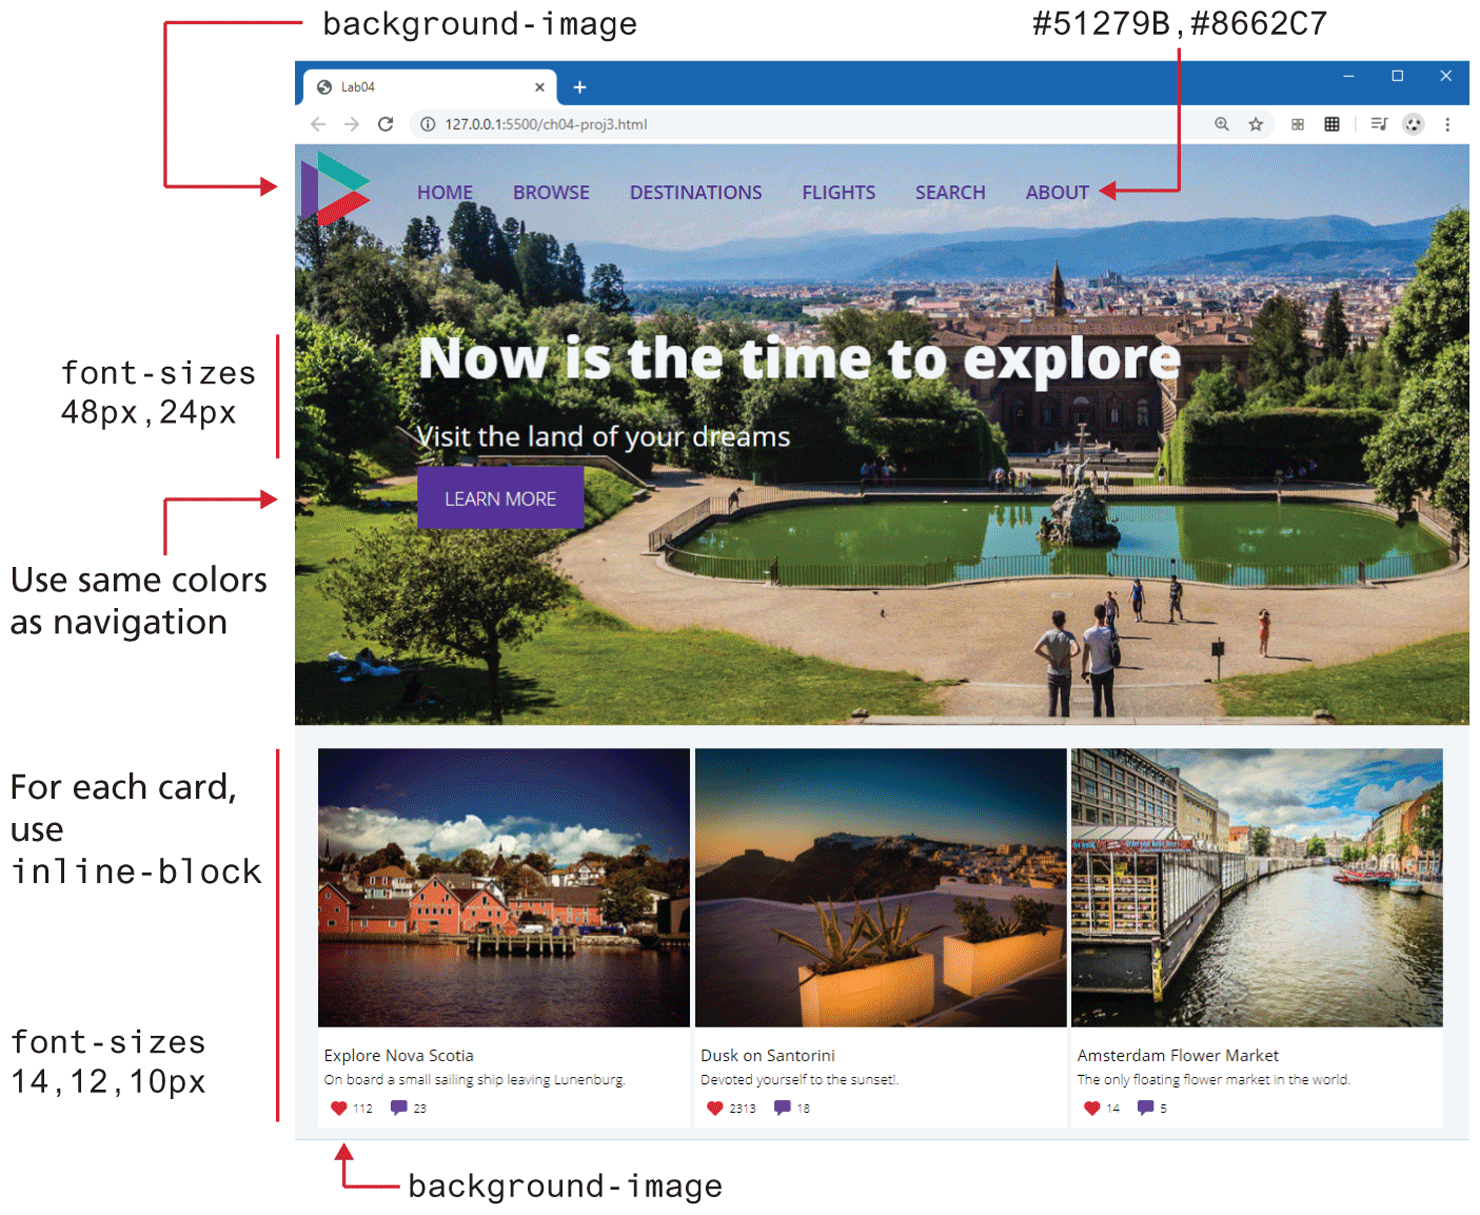
The
<header>will contain abackground-image. Set itsbackground-sizeto cover. Set the width of the<header>to 100% and itsmin-heightto500px.Add the logo in the top-left corner as a
background-imageto the<nav>element. Set its size to about 60px. Thepaddingandheightof the<nav>will also have to be set based on the size of the logo.For each list item in the
<nav>element, remove the list bullets by setting thelist-style-typetonone. Make the list horizontal by setting the display property of each<li>toinline-block. Set the link, visited, and hover colors of the navigation links.Set the margin of the
<div>within the<header>to position it roughly in the vertical middle of the big photo. Set its left margin so it is aligned with the navigation.The card
<div>elements need to be on a single line, so set the display property of each card toinline-block. For the<div>within the card (and its contents), set theirpaddingandmarginsto get a similar appearance as Figure 4.43.For the heart and comment
<span>elements, use the background-image, background-size, padding, and margin properties to get a similar appearance as Figure 4.43.
Guidance and Testing
This project requires more styling changes, and so it is important to break it down into smaller steps. The instructions above help with this, but you could do many of these steps in a different order. Some developers like getting a small set of related elements styled correctly; others like to instead get the bigger structural elements styled first. You will have to find your own preferred approach.
Test each step along the way in a browser. It’s not important that your page matches exactly the image shown in Figure 4.43. You are only trying to get it pretty similar.
Remember: many of our students struggle with CSS. It’s normal if you struggle at times as well!
4.9.4 References
1. E. A. Meyer, CSS: The Definitive Guide, O'Reilly, 2017.
2. L. Verou, CSS Secrets: Better Solutions to Everyday Web Design Problems, O'Reilly, 2015.
3. K. J. Grant, CSS In Depth, Manning Publications, 2018.
4. CSS-Tricks [Online]. css-tricks.com.
5. T. Olsson and P. O’Brien, CSS Reference. [Online]. http:/
/ reference.sitepoint.com/ css. 6. V. Friedman, “CSS Specificity: Things You Should Know.” [Online]. http:/
/ coding.smashingmagazine.com/ 2007/ 07/ 27/ css-specificity-things-you-should-know/ . 7. Adam Wathan, email correspondence.