4.4 Selectors
As teachers, we often need to be able to relay a message or instruction to either individual students or groups of students in our classrooms. In spoken language, we have a variety of different approaches we can use. We can identify those students by saying things like, “All of you talking in the last row,” or “All of you sitting in an aisle seat,” or “All of you whose name begins with ‘C,’ ” or “All first-year students,” or “John Smith.” Each of these statements identifies or selects a different (but possibly overlapping) set of students. Once we have used our student selector, we can then provide some type of message or instruction, such as “Talk more quietly,” “Hand in your exams,” or “Stop texting while I am speaking.”
In a similar way, when defining CSS rules, you will need to first use a selector to tell the browser which elements will be affected by the property values. CSS selectors allow you to select individual or multiple HTML elements.
 Note
Note
In the last chapter, Figure 3.5 illustrated some of the familial terminologies (such as descendants, ancestors, siblings, etc.) that are used to describe the relationships between elements in an HTML document. The Document Object Model (DOM) is how a browser represents an HTML page internally. This DOM is akin to a tree representing the overall hierarchical structure of the document.
As you progress through these chapters on CSS, you will at times have to think about the elements in your HTML document in terms of their position within the hierarchy. Figure 4.3 illustrates a sample document structure as a hierarchical tree.
Figure 4.3 Document outline/tree

The topic of selectors has become more complicated than it was when we started teaching CSS in the late 1990s. There are now a variety of new selectors that are supported by all modern browsers. Before we get to those, let us look at the three basic selector types that have been around since the earliest CSS2 specification.
4.4.1 Element Selectors
Element selectors select all instances of a given HTML element. The example CSS rules in Figure 4.2 illustrate two element selectors. You can also select all elements by using the universal element selector, which is the * (asterisk) character.
You can select a group of elements by separating the different element names with commas. This is a sensible way to reduce the size and complexity of your CSS files by combining multiple identical rules into a single rule. An example grouped selector is shown in Listing 4.4, along with its equivalent as three separate rules.
Listing 4.4 Sample grouped selector
/* commas allow you to group selectors */
p, div, aside {
   margin: 0;
   padding: 0;
}
/* the above single grouped selector is equivalent to the following: */
p {
   margin: 0;
   padding: 0;
}
div {
   margin: 0;
   padding: 0;
}
aside {
   margin: 0;
   padding: 0;
}
4.4.2 Class Selectors
A class selector allows you to simultaneously target different HTML elements regardless of their position in the document tree. If a series of HTML elements have been labeled with the same class attribute value, then you can target them for styling by using a class selector, which takes the form: period (.) followed by the class name.
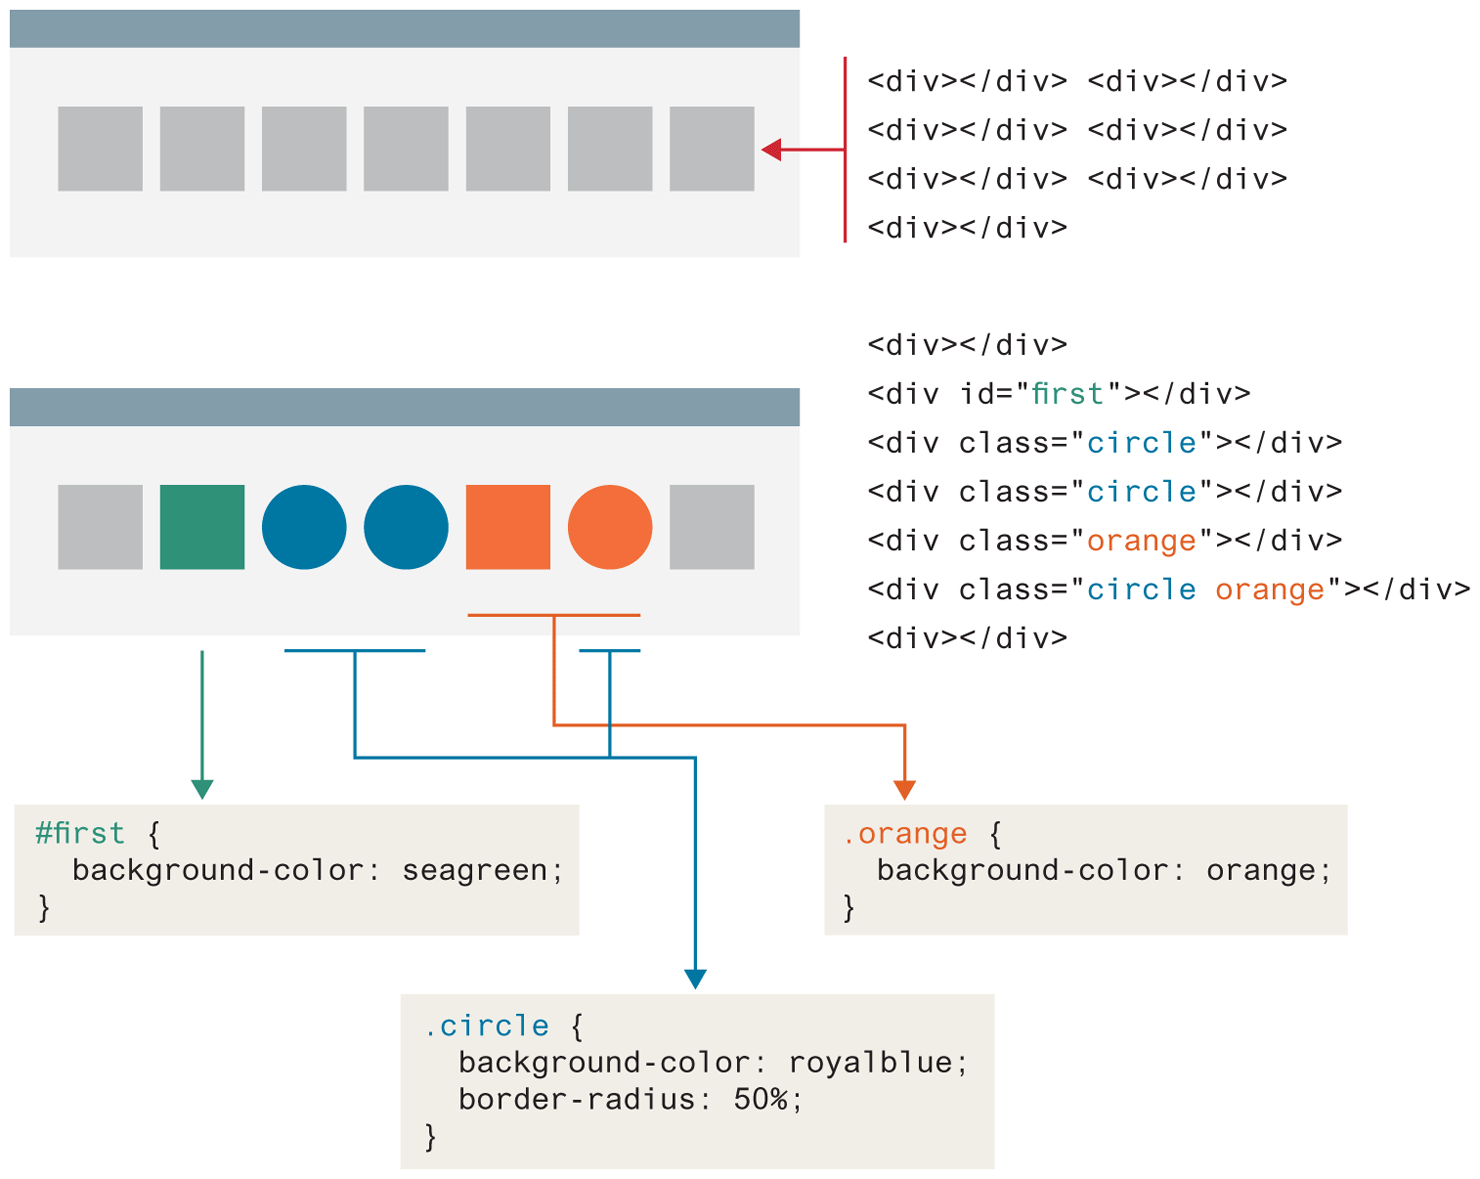
Figure 4.4 illustrates the use of a class selector. Notice that an element can be tagged with multiple classes. In Figure 4.4, both the orange and circle classes are assigned to the second last <div> element.
Figure 4.4 Id and class selector example
 Pro Tip
Grouped selectors are often used as a way to quickly reset or remove browser defaults. The goal of doing so is to reduce browser inconsistencies with things such as margins, line heights, and font sizes. These reset styles can be placed in their own CSS file (perhaps called reset.css) and linked to the page before any other external style sheets. An example of a simplified reset is shown below:
html, body, div, span, h1, h2, h3, h4, h5, h6, p {
  margin: 0;
  padding: 0;
  border: 0;
  font-size: 100%;
  vertical-align: baseline;
}
An alternative to resetting/removing browser defaults is to normalize them—that is, ensure all browsers use the same default settings for all elements. Many popular sites make use of normalize.css, which can be found at https:/
4.4.3 Id Selectors
An id selector allows you to target a specific element by its id attribute regardless of its type or position. If an HTML element has been labeled with an id attribute, then you can target it for styling by using an id selector, which takes the form: pound/hash (#) followed by the id name. Figure 4.4 illustrates the use of an id selector.
Note
Id selectors should only be used when referencing a single HTML element since an id attribute can only be assigned to a single HTML element. Class selectors should be used when (potentially) referencing several related elements.
It is worth noting, however, that the browser is quite forgiving when it comes to id selectors. While you should only use a given id attribute once in the markup, the browser is willing to let you use it multiple times!
4.4.4 Attribute Selectors
An attribute selector provides a way to select HTML elements either by the presence of an element attribute or by the value of an attribute. This can be a very powerful technique, but because of uneven support by some of the browsers in the past, not all web authors have used them.
Attribute selectors can be a very helpful technique in the styling of hyperlinks and form elements. In the next chapter, you will learn the HTML for constructing forms. Many of the different form widgets, such as text boxes, radio buttons, and password fields, are all constructed from the same <input> element. You use the type attribute to indicate which form widget you want. You typically will want to style the different widgets in quite different ways; the attribute selector provides a common way to achieve this goal. Figure 4.5 illustrates two different uses of attribute selectors: the first to style form elements and the second to style links to PDF files differently than other links.
Figure 4.5 Attribute selector example
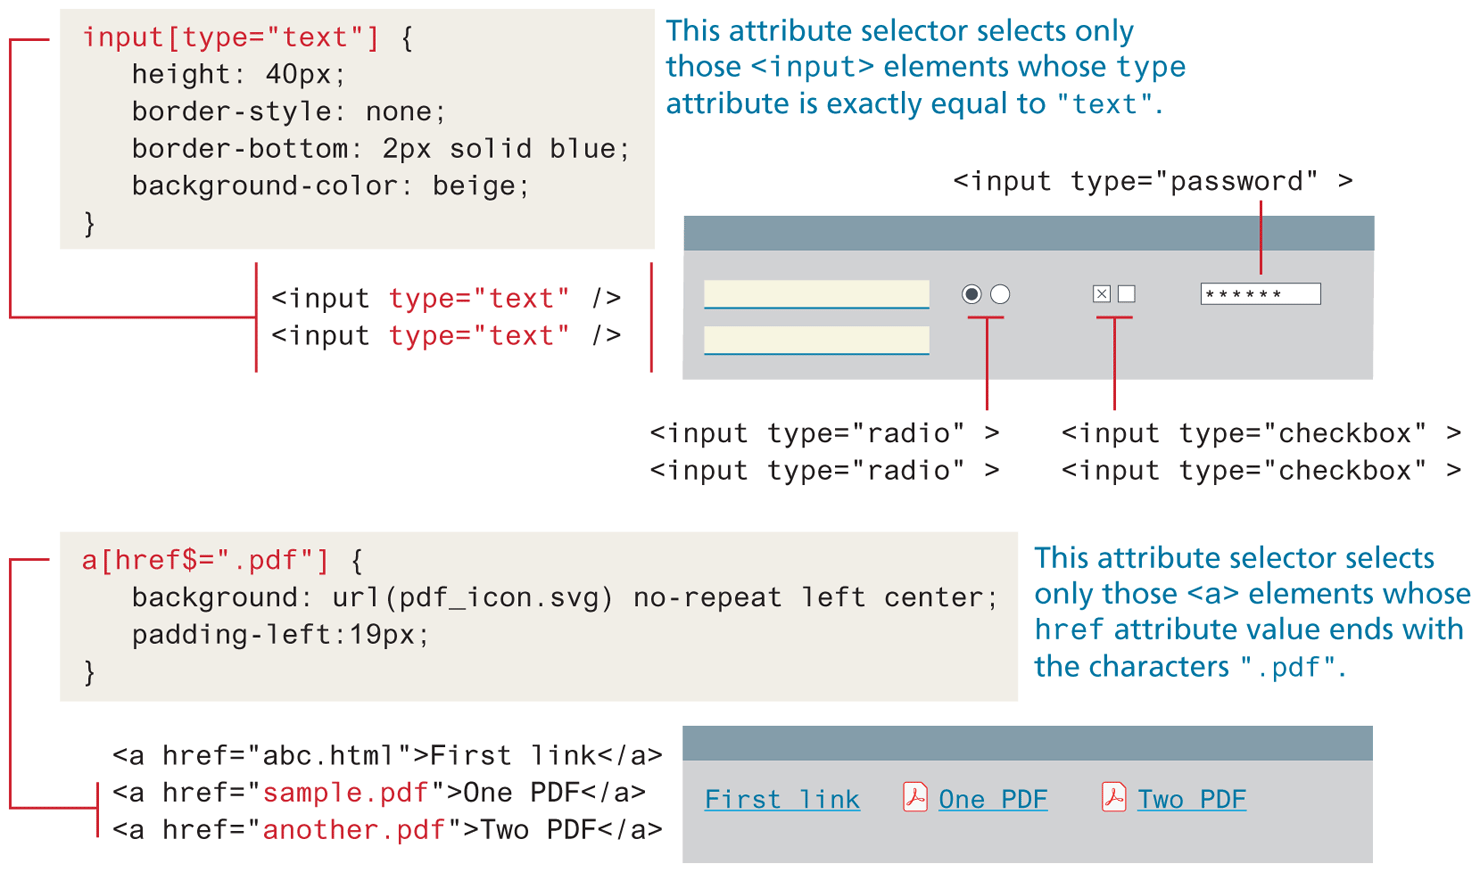
Table 4.4 summarizes some of the most common ways one can construct attribute selectors in CSS.
Table 4.4 Attribute Selectors
| Selector | Matches | Example |
|---|---|---|
| [] | A specific attribute. |
Matches any element with a title attribute |
| [=] | A specific attribute with a specific value. |
Matches any |
| [~=] | A specific attribute whose value matches at least one of the words in a space-delimited list of words. |
Matches any |
| [^=] | A specific attribute whose value begins with a specified value. |
Matches any |
| [*=] | A specific attribute whose value contains a substring. |
Matches any |
| [$=] | A specific attribute whose value ends with a specified value. |
Matches any |
4.4.5 Pseudo-Element and Pseudo-Class Selectors
A pseudo-element selector is a way to select something that does not exist explicitly as an element in the HTML document tree but which is still a recognizable selectable object. For instance, you can select the first line or first letter of any HTML element using a pseudo-element selector. A pseudo-class selector does apply to an HTML element but targets either a particular state or a variety of family relationships. Table 4.5 lists some of the more common pseudo-class and pseudo-element selectors.
Table 4.5 Common Pseudo-Class and Pseudo-Element Selectors
| Selector | Type | Description |
|---|---|---|
a:link |
pseudo-class | Selects links that have not been visited. |
a:visited |
pseudo-class | Selects links that have been visited. |
:focus |
pseudo-class | Selects elements (such as text boxes or list boxes) that have the input focus. |
:hover |
pseudo-class | Selects elements that the mouse pointer is currently above. |
:active |
pseudo-class | Selects an element that is being activated by the user. A typical example is a link that is being clicked. |
:checked |
pseudo-class | Selects a form element that is currently checked. A typical example might be a radio button or a check box. |
:first-child |
pseudo-class | Selects an element that is the first child of its parent. A common use is to provide different styling to the first element in a list. |
:last-child |
pseudo-class | Selects last child element within parent. |
:nth-child() |
pseudo-class | Selects child elements based on algebraic expression. |
:first-letter |
pseudo-element | Selects the first letter of an element. Useful for adding drop-caps to a paragraph. |
:first-line |
pseudo-element | Selects the first line of an element. |
The most common use of this type of selectors is for targeting link states and for adding hover styling for other elements. By default, the browser displays link text blue and visited text links purple. Figure 4.6 illustrates the use of pseudo-class selectors to style hover behavior and the appearance of links. Do be aware that hover state does not occur on touch screen devices. Note the syntax of pseudo-class selectors: the colon (:) followed by the pseudo-class selector name. Do be aware that a space is not allowed after the colon.
Figure 4.6 Styling a link using pseudo-class selectors
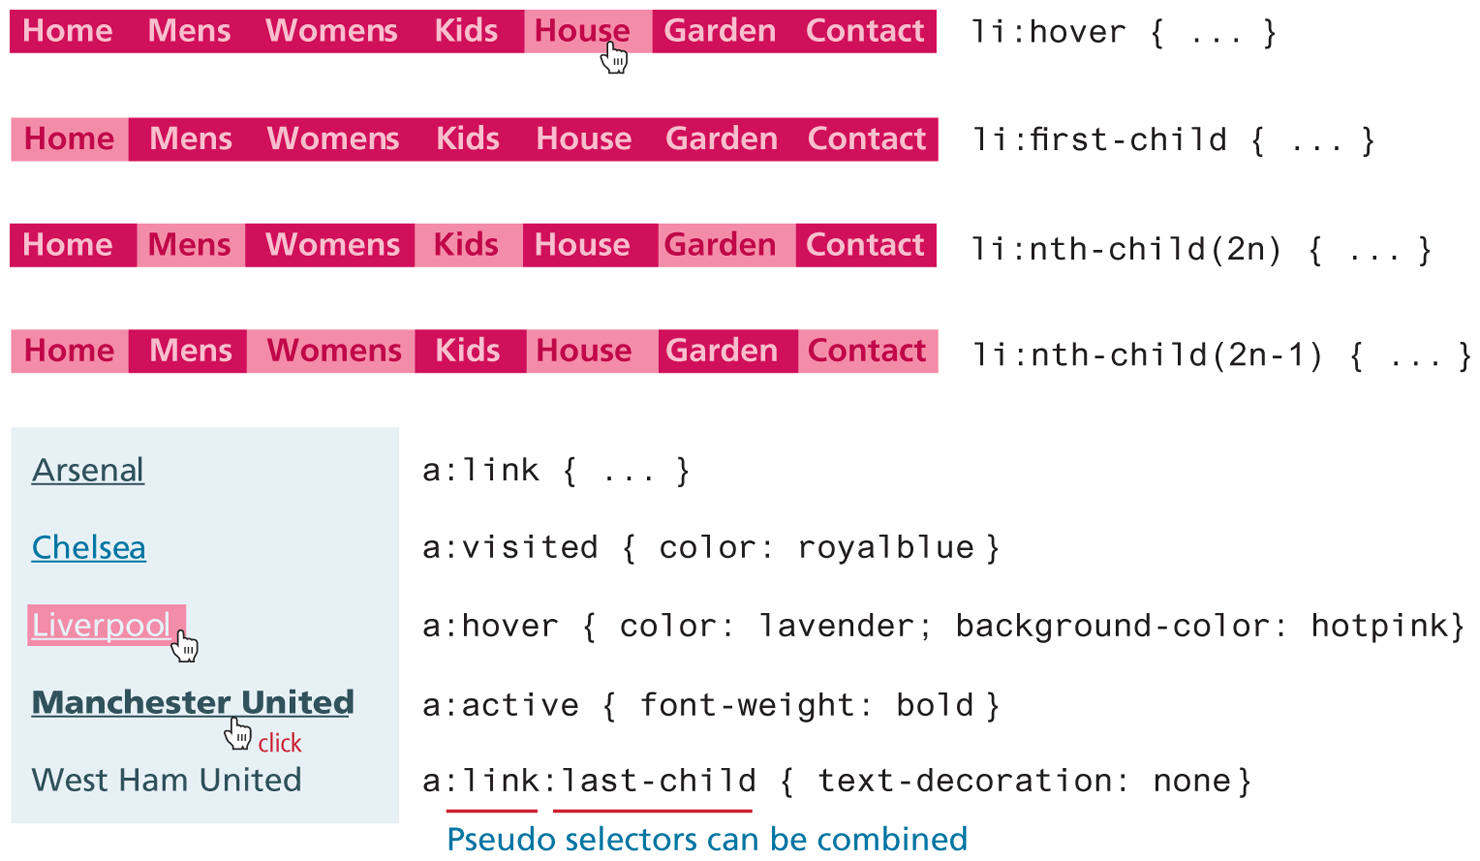
Believe it or not, the order of these pseudo-class elements is important. The :link and :visited pseudo-classes should appear before the others. Some developers use a mnemonic to help them remember the order. My favorite is “Lord Vader, Former Handle Anakin” for Link, Visited, Focus, Hover, Active.
Note
At different points in this book, you will see the use of "#" as the url for <a> elements. This is a common practice used by developers when they are first testing a design. The designer might know that there is a link somewhere, but the precise URL might still be unknown. In such a case, using the "#" url is helpful: the browser will recognize them as links, but nothing will happen when they are clicked. Later, using the source code editor’s search functionality will make it easy to find links that need to be finalized.
4.4.6 Contextual Selectors
A contextual selector (in CSS3 also called combinators) allows you to select elements based on their ancestors, descendants, or siblings. That is, it selects elements based on their context or their relation to other elements in the document tree. While some of these contextual selectors are used relatively infrequently, almost all web authors find themselves using descendant selectors.
A descendant selector matches all elements that are contained within another element. The character used to indicate descendant selection is the space character. Figure 4.7 illustrates the syntax and usage of the syntax of the descendant selector.
Figure 4.7 Syntax of a descendant selection
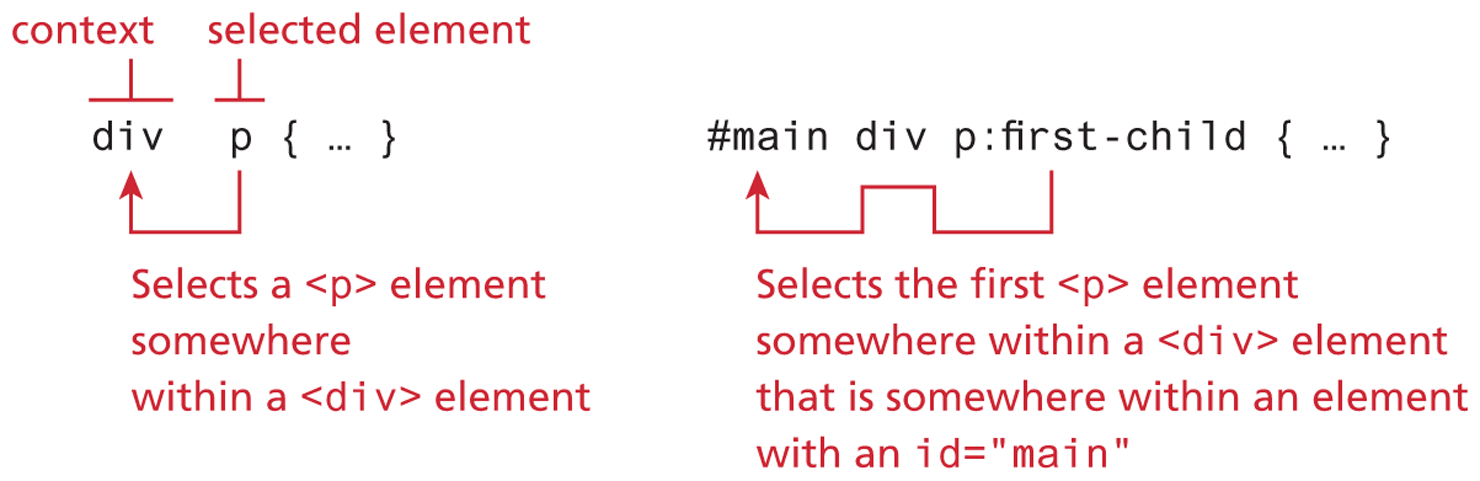
Table 4.6 describes the other contextual selectors.
Table 4.6 Contextual Selectors
| Selector | Matches | Example |
|---|---|---|
| Descendant | A specified element that is contained somewhere within another specified element. |
Selects a |
| Child | A specified element that is a direct child of the specified element. |
Selects an |
| Adjacent sibling | A specified element that is the next sibling (i.e., comes directly after) of the specified element. |
Selects the first |
| General sibling | All following elements that shares the same parent as the specified element. |
Selects all the |
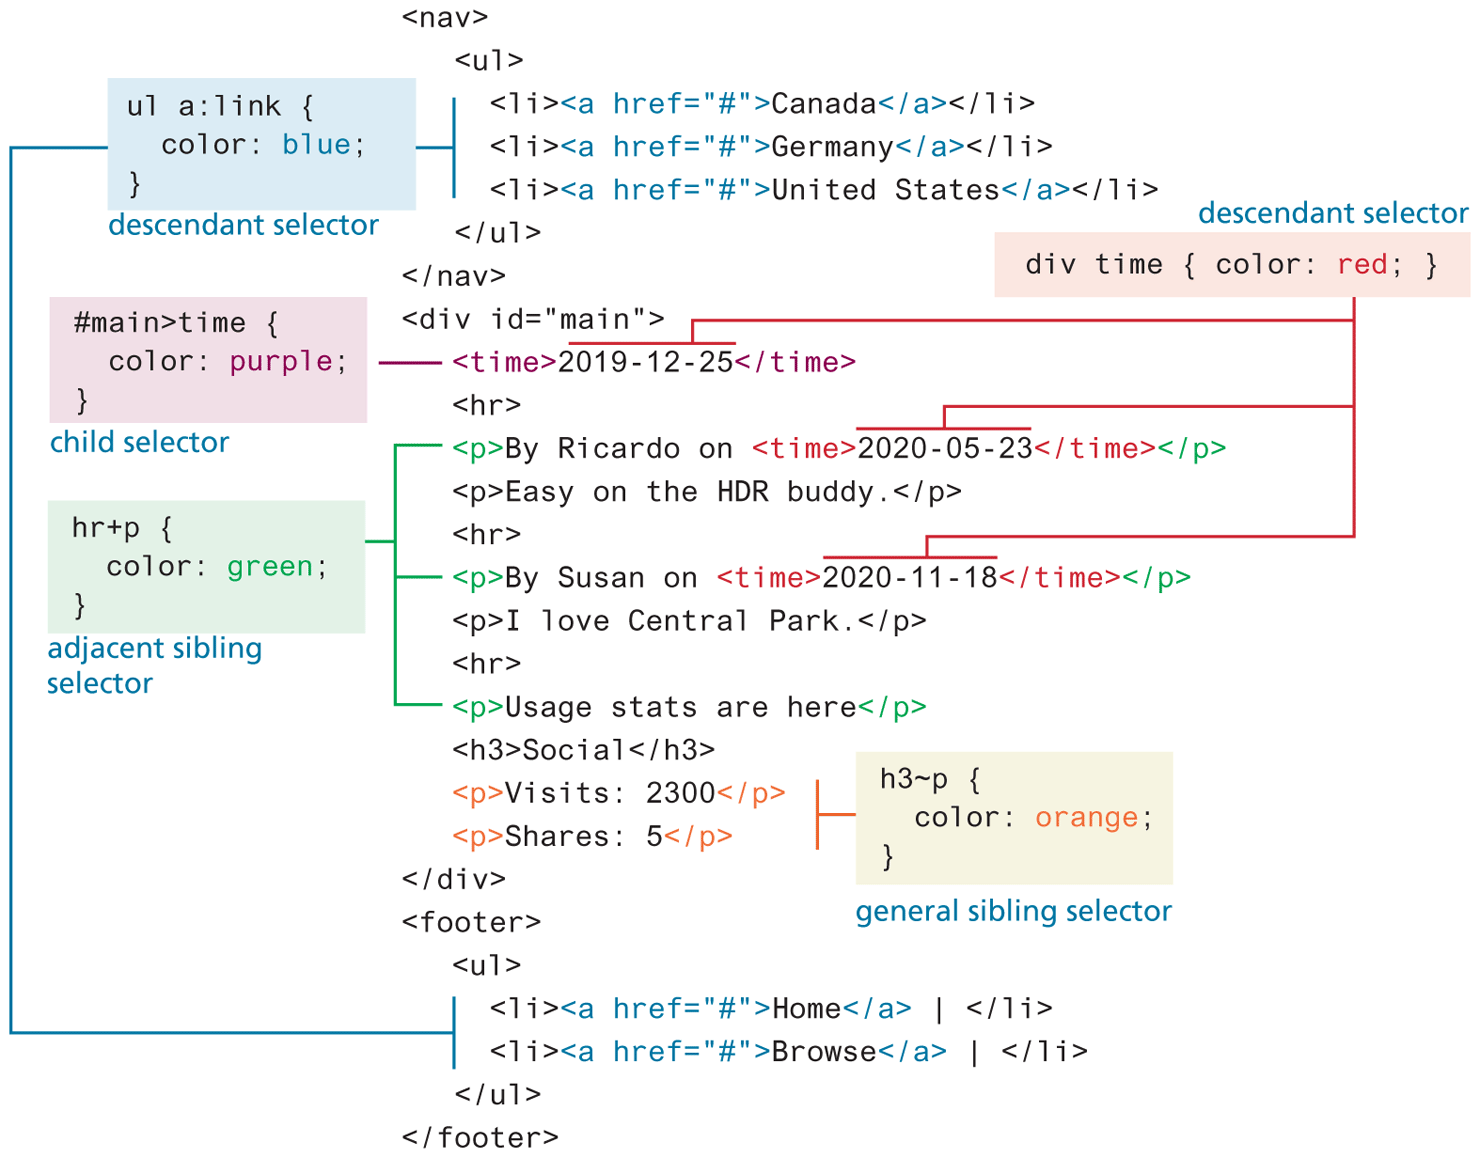
Figure 4.8 illustrates some sample uses of a variety of different contextual selectors. An interesting question about the selectors in Figure 4.8 is, “What will be the color of the first <time> element?” Will it be red or purple (since it is targeted by two different selectors)? It will, in fact, be purple. The reason why (because it has a higher specificity) will be covered in the next section.
Figure 4.8 Contextual selectors in action
Note
You can combine contextual selectors with grouped selectors. The comma is like the logical OR operator. Thus, the grouped selector:
div#main div time, footer ul li { color: red; }
is equivalent to:
div#main div time { color: red; }
footer ul li { color: red; }
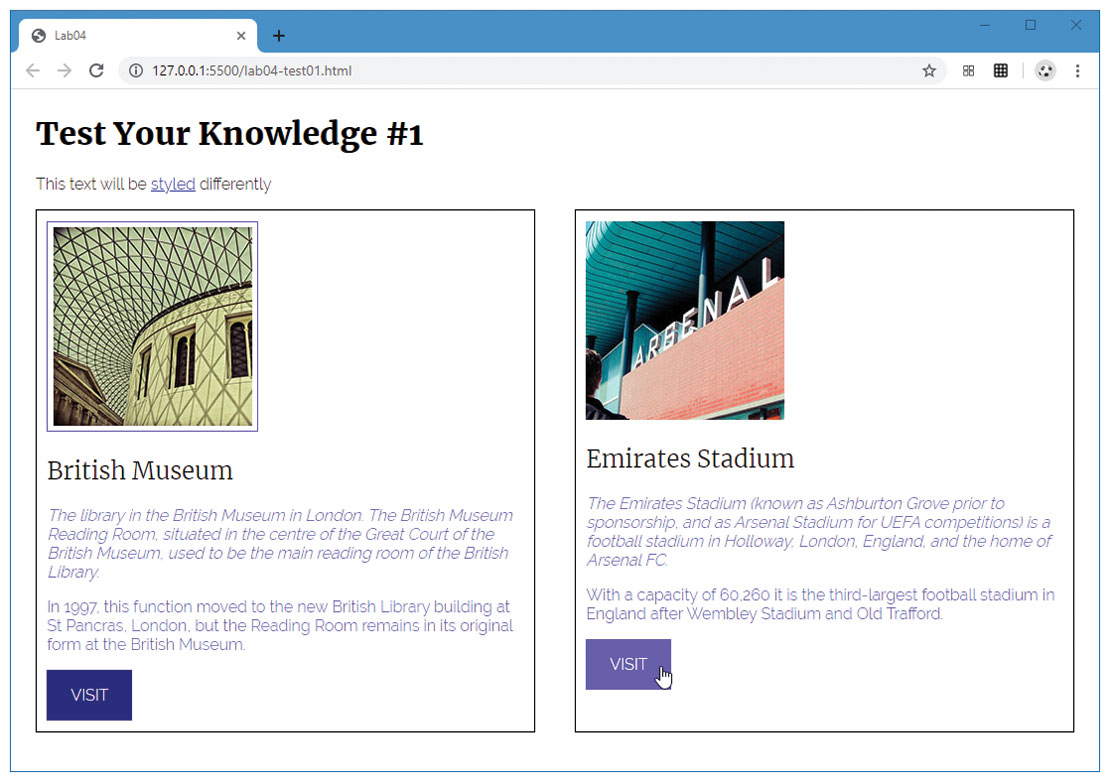
Test Your Knowledge #1
You have been provided markup in lab04-test01.html and styles within comments in to styles/lab04-test01.css.
Uncomment the styles and add CSS selectors so that it looks similar to that shown in Figure 4.10. You cannot modify the markup, so this will require working with selectors.
Figure 4.10 Completed Test Your Knowledge #1