3.5 Quick Tour of HTML Elements
HTML5 contains many structural and presentation elements—too many to completely cover in this book. Rather than comprehensively cover all these elements, this chapter will provide a quick overview of the most common elements. Figure 3.10 contains the HTML we will examine in more detail (note that some of the structural tags like <html> and <body> from the previous section are omitted in this example for brevity’s sake). Figure 3.11 illustrates how the markup in Figure 3.10 appears in the browser.
Figure 3.10 Sample HTML5 document
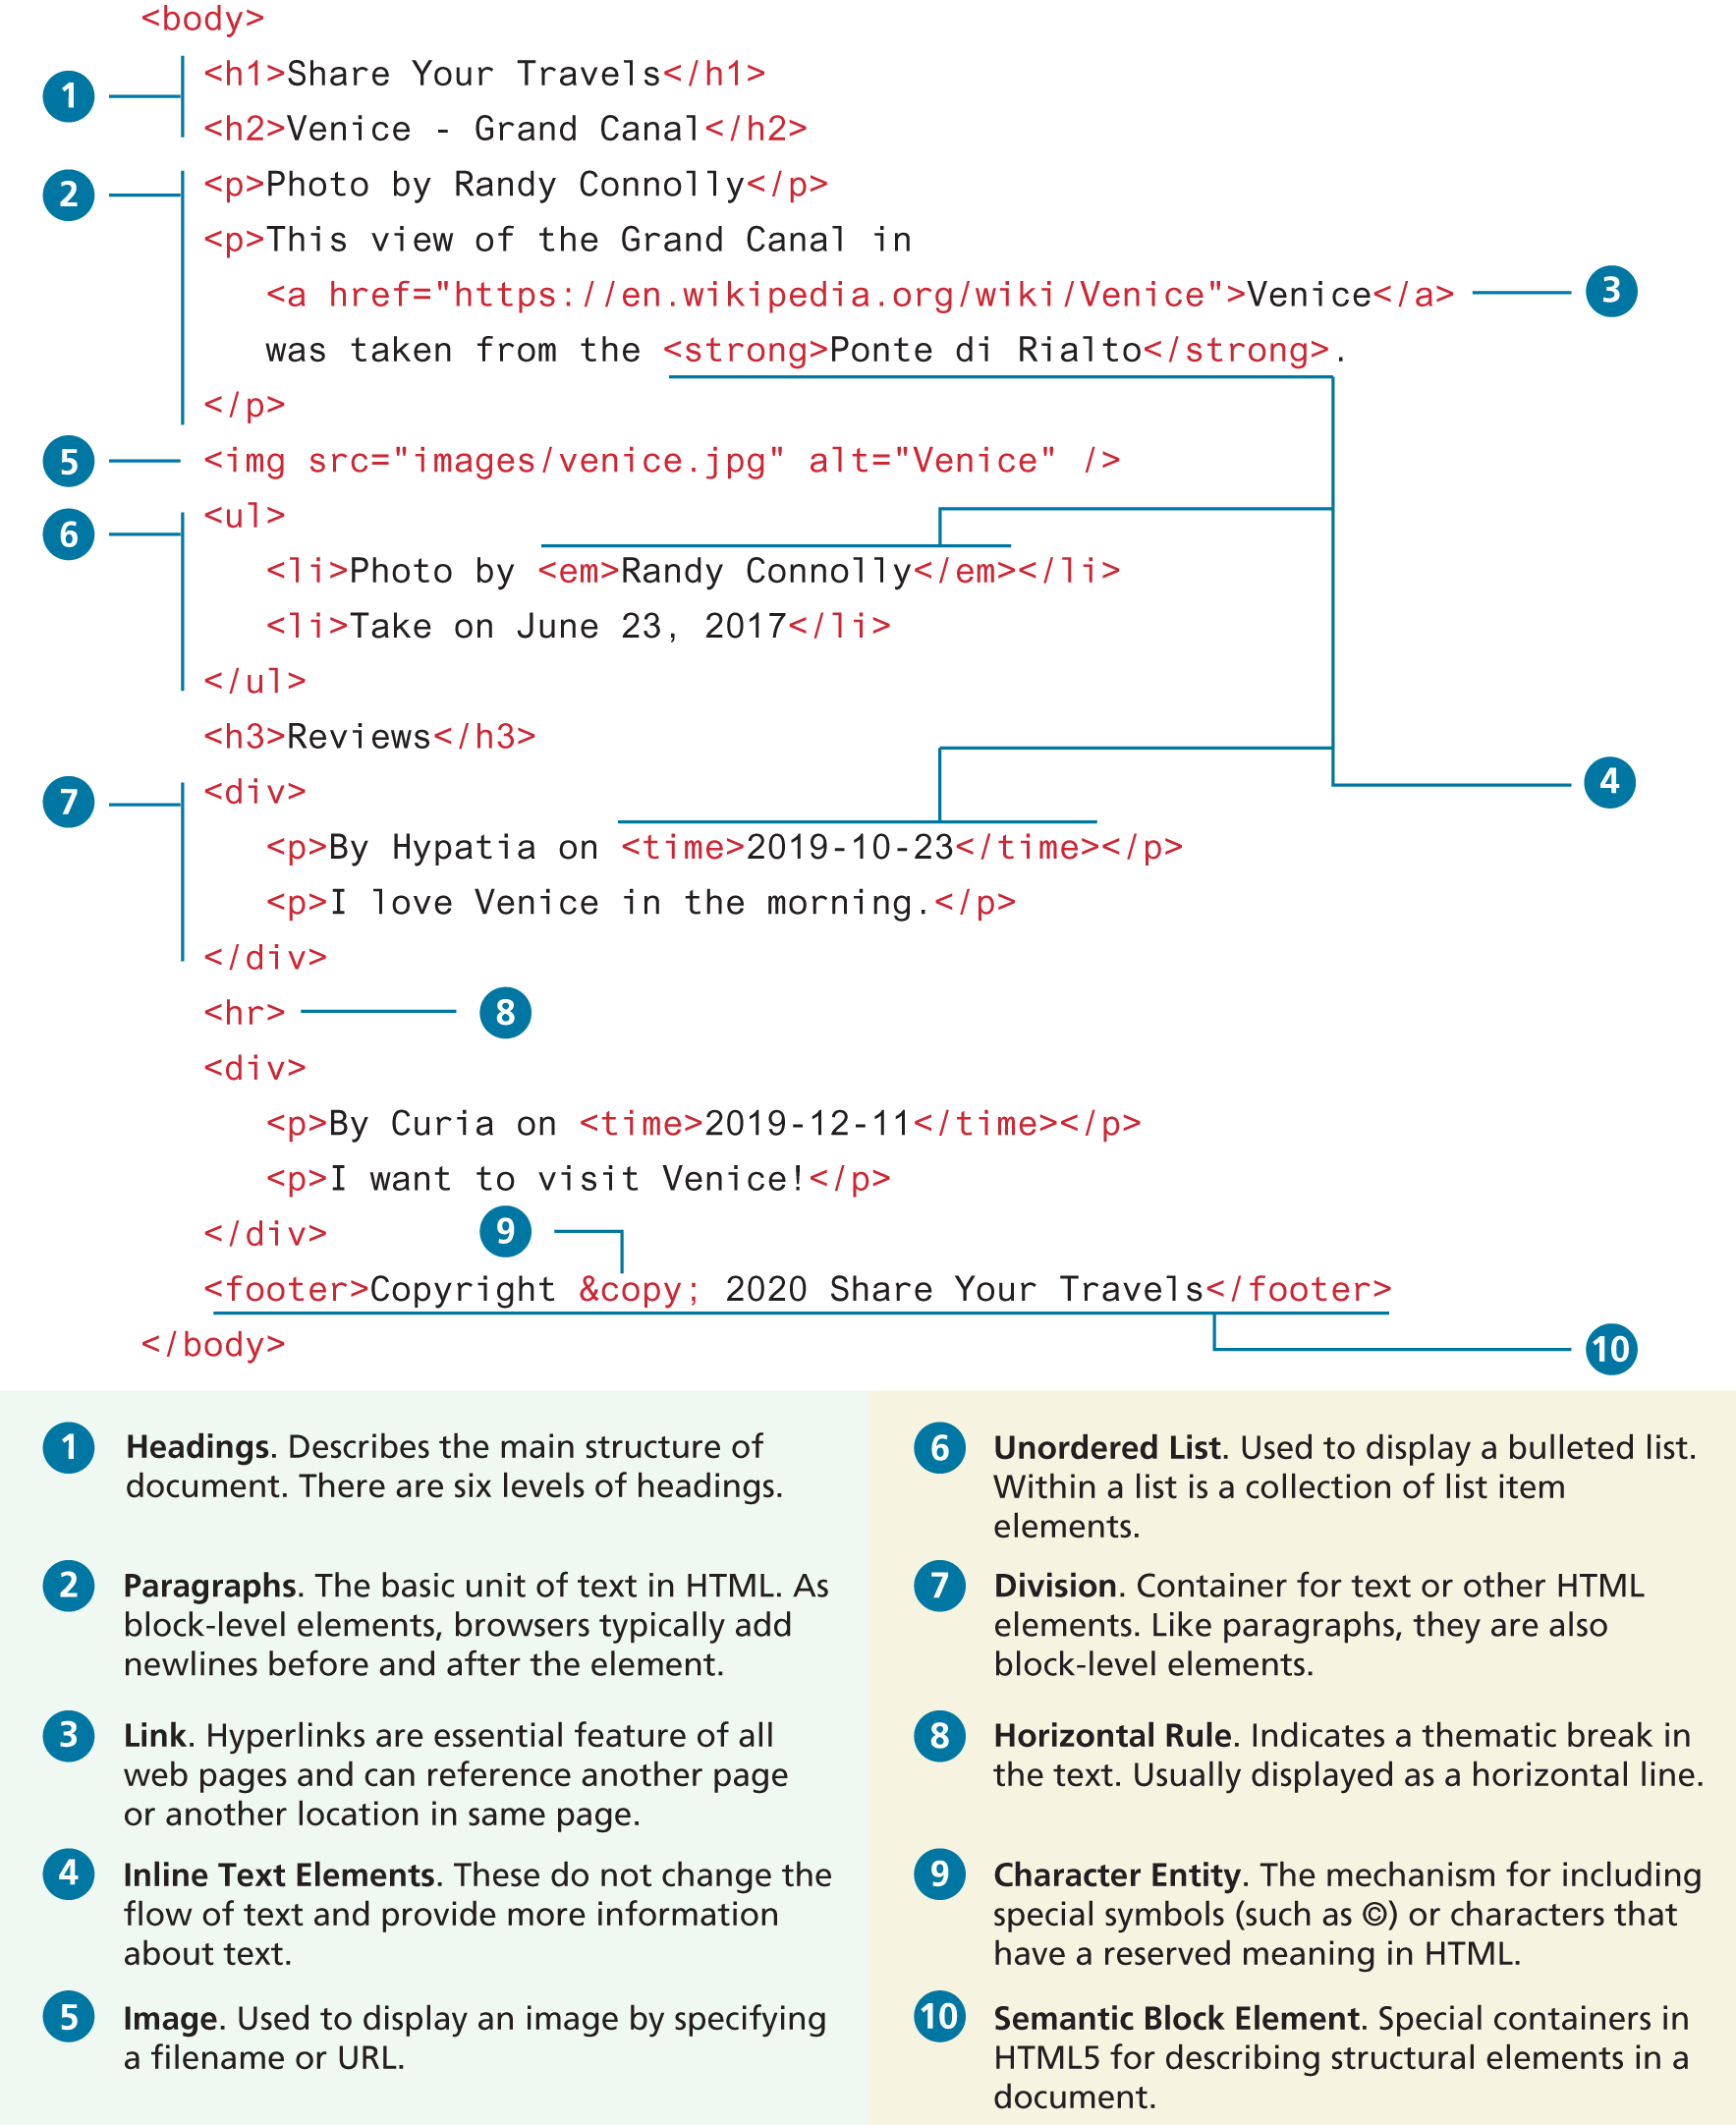
Figure 3.11 Figure 3.10 in the browser

3.5.1 Headings
Item ![]() in Figure 3.10 defines two different headings. HTML provides six levels of heading (
in Figure 3.10 defines two different headings. HTML provides six levels of heading (h1 through h6), with the higher heading number indicating a heading of less importance. In the real-world documents shown in Figure 3.7, you saw that headings are an essential way for document authors to show their readers the structure of the document.
Headings are also used by the browser to create a document outline for the page. Every web page has a document outline. This outline is not something that you see. Rather, it is an internal data representation of the control on the page. This document outline is used by the browser to render the page. It is also potentially used by web authors when they write JavaScript to manipulate elements in the document or when they use CSS to style different HTML elements.
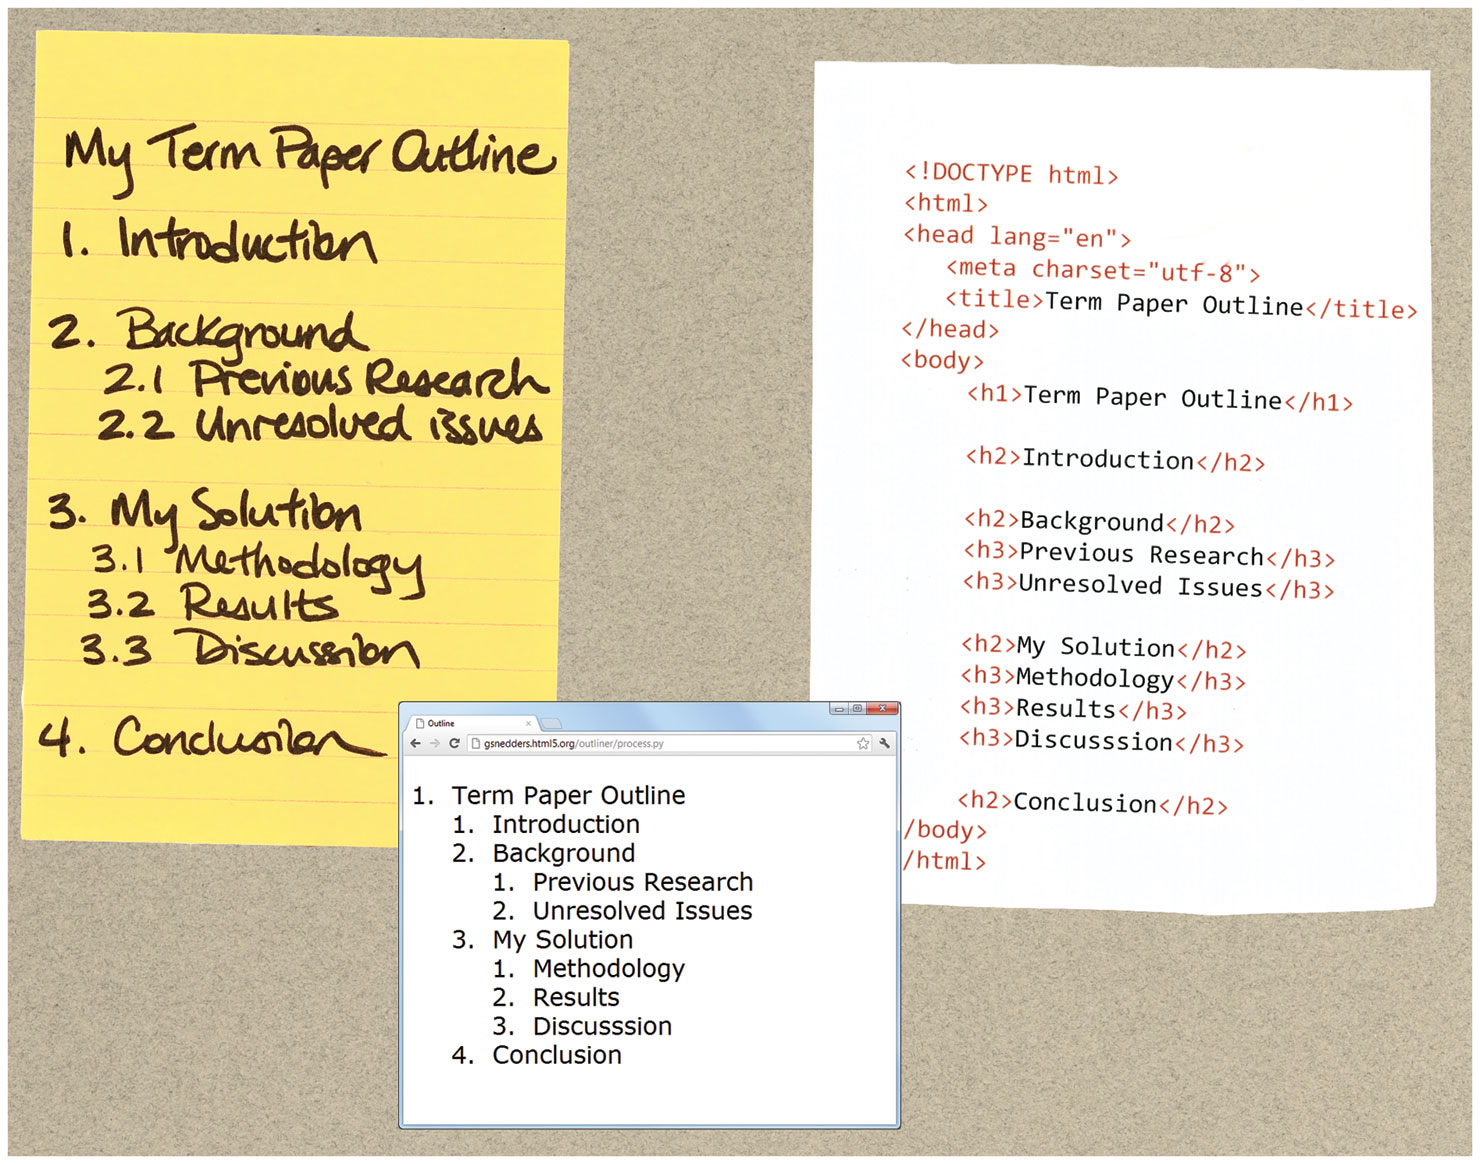
This document outline is constructed from headings and other structural tags in your content and is analogous to the outlines you may have created for your own term papers in school (see Figure 3.12). There is a variety of web-based tools that can be used to see the document outline. Figure 3.12 illustrates one of these tools; this one is available from http:/
Figure 3.12 Example document outlines
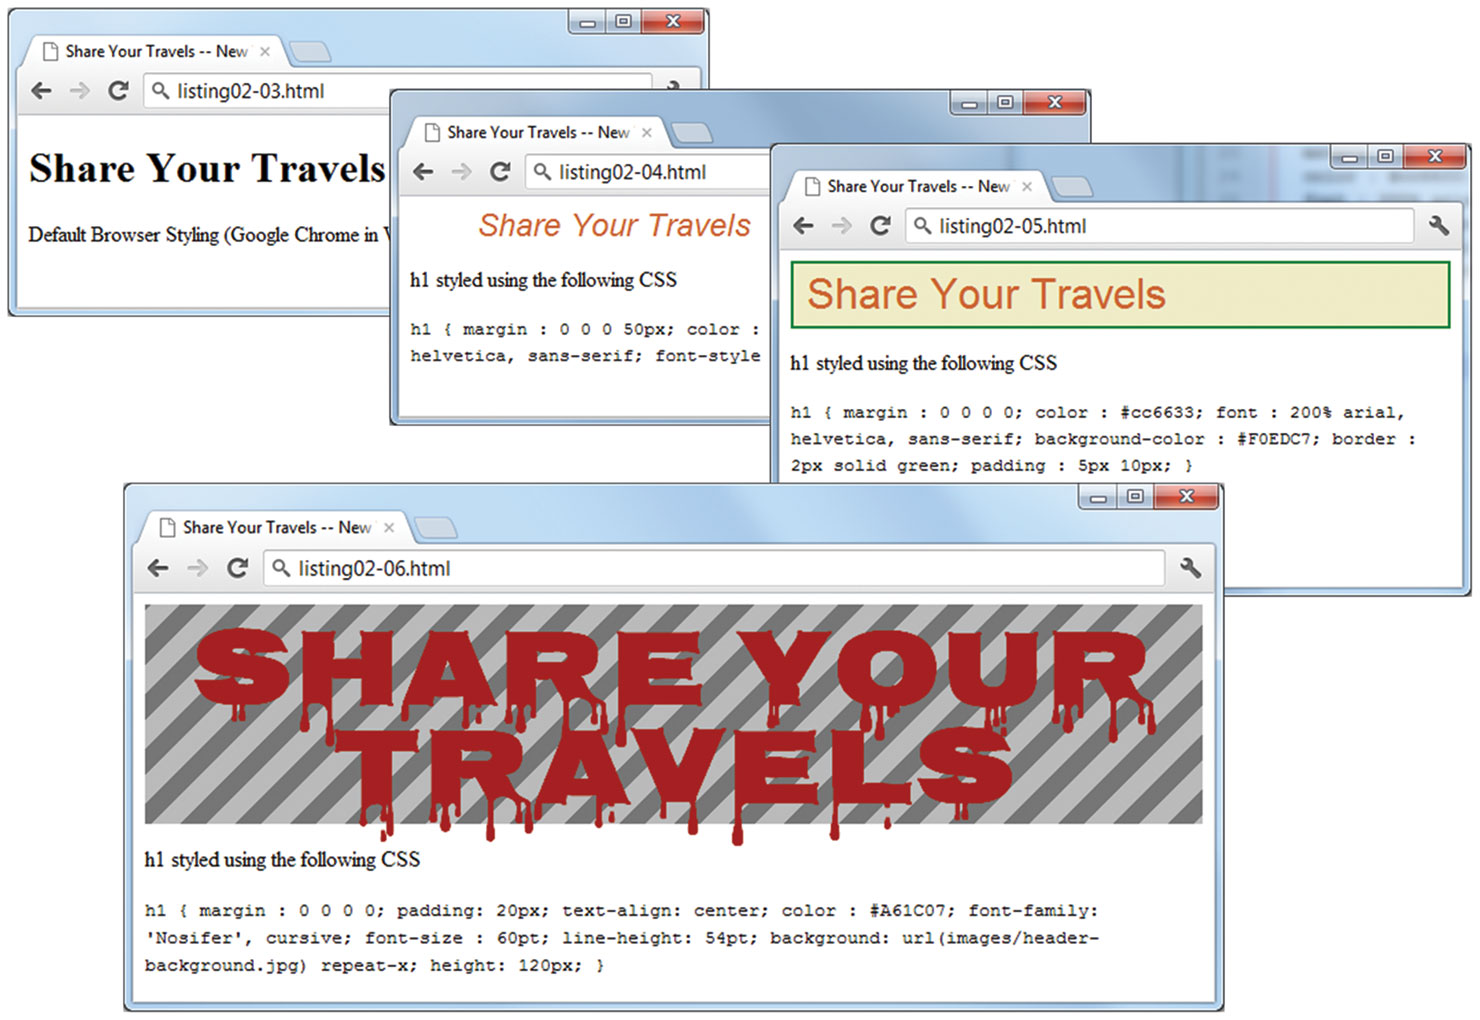
The browser has its own default styling for each heading level. However, these are easily modified and customized via CSS. Figure 3.13 illustrates just some of the possible ways to style a heading.
Figure 3.13 Alternate CSS stylings of the same heading
 Note
Note
Why does this look so awful? Plain HTML is just that . . . plain looking. To make our pages look more stylish, you need to style the elements using CSS, which you will learn in Chapters 4 and 7.
In practice, specify a heading level that is semantically accurate; do not choose a heading level because of its default presentation (e.g., choosing <h3> because you want your text to be bold and 16pt). Rather, choose the heading level because it is appropriate (e.g., choosing <h3> because it is a third-level heading and not a primary or secondary heading).
 Pro Tip
Sometimes it is not obvious what content is a primary heading. For instance, some authors make the site logo an <h1>, the page title an <h2>, and every other heading an <h3> or less. Other authors don’t use a heading level for the site logo, but make the page title an <h1>.
3.5.2 Paragraphs and Divisions
Item ![]() in Figure 3.10 defines two paragraphs, the most basic unit of text in an HTML document. Notice that the
in Figure 3.10 defines two paragraphs, the most basic unit of text in an HTML document. Notice that the <p> tag is a container and can contain HTML and other inline HTML elements (the <strong> and <a> elements in Figure 3.10). This term refers to HTML elements that do not cause a paragraph break but are part of the regular “flow” of the text and are discussed in more detail in Section 3.5.4.
The indenting on the second paragraph element is optional. Some developers like to use indenting to differentiate a container from its content. It is purely a convention and has no effect on the display of the content.
Don’t confuse the <p> element with the line break element (<br>). The former is a container for text and other inline elements. The line break element forces a line break. It is suitable for text whose content belongs in a single paragraph but which must have specific line breaks: for example, addresses and poems.
Item ![]() in Figure 3.10 illustrates the definition of a
in Figure 3.10 illustrates the definition of a <div> element. This element is also a container element and is used to create a logical grouping of content (text and other HTML elements, including containers such as <p> and other <div> elements).
The <div> element has no intrinsic presentation or semantic value; it is frequently used in contemporary CSS-based layouts to mark out sections. Finally, item ![]() in Figure 3.10 shows an
in Figure 3.10 shows an <hr> element, which is used to add a “break” between paragraphs or <div> elements. Browsers generally style the <hr> element as a horizontal rule.
3.5.3 Links
Item ![]() in Figure 3.10 defines a hyperlink. Links are an essential feature of all web pages. Links are created using the
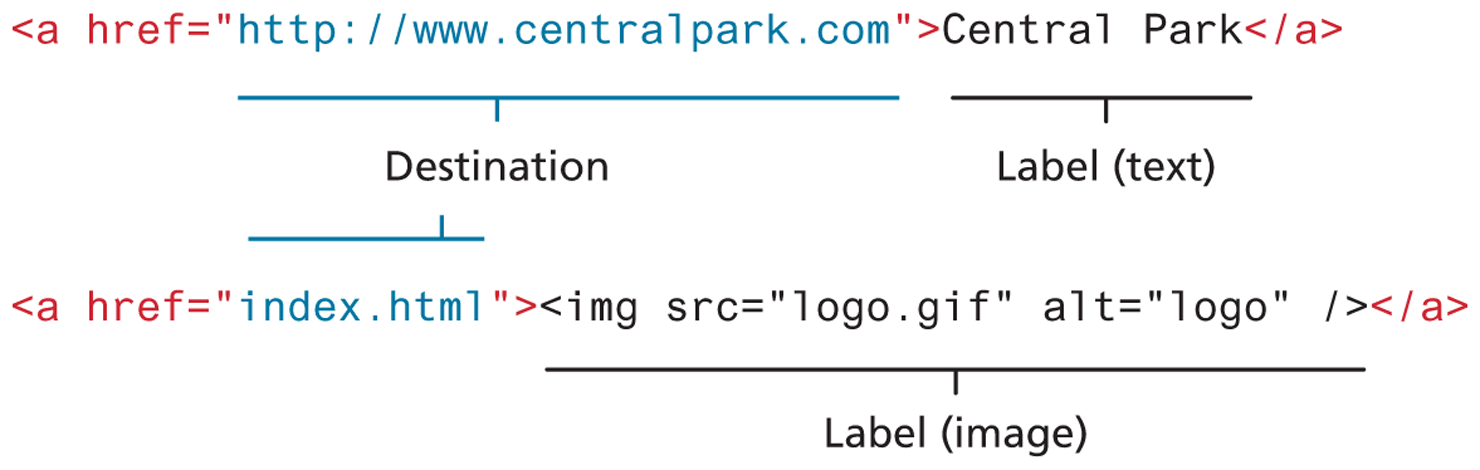
in Figure 3.10 defines a hyperlink. Links are an essential feature of all web pages. Links are created using the <a> element (the “a” stands for anchor). A link has two main parts: the destination and the label. As can be seen in Figure 3.14, the label of a link can be text or another HTML element, such as an image.
Figure 3.14 Two parts of a link
You can use the anchor element to create a wide range of links. These include the following:
Links to external sites (or to individual resources, such as images or movies on an external site).
Links to other pages or resources within the current site.
Links to other places within the current page.
Links to particular locations on another page (whether on the same site or on an external site).
Links that are instructions to the browser to start the user’s email program.
Links that are instructions to the browser to execute a JavaScript function.
Links that are instructions to the mobile browser to make a phone call.
Links that are instructions to other programs (e.g., Skype, FaceTime, FaceBook Messenger).
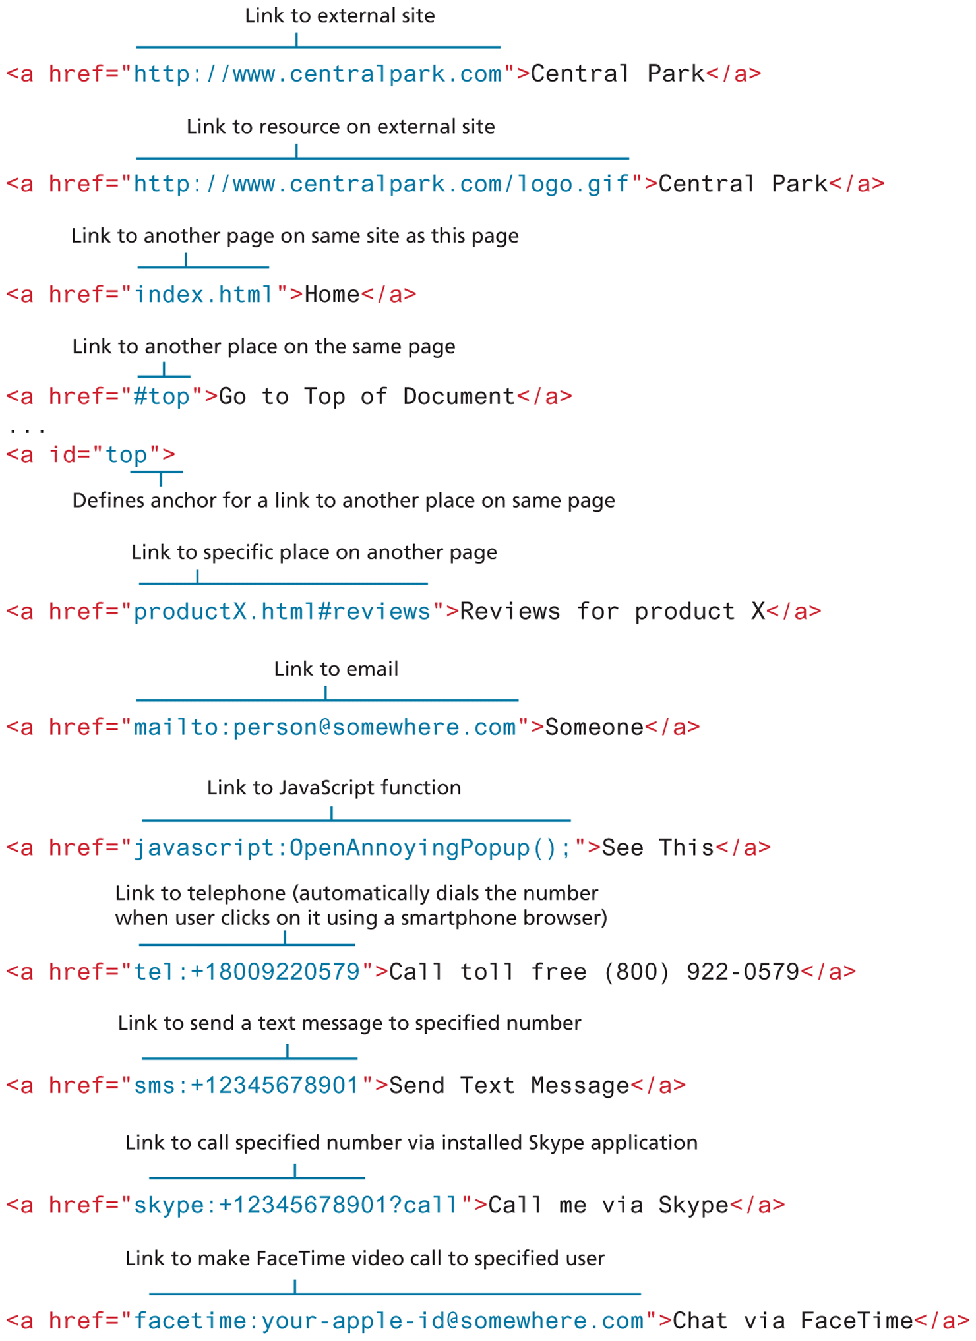
Figure 3.15 illustrates the different ways to construct link destinations.
Figure 3.15 Different link destinations
3.5.4 URL Relative Referencing
Whether we are constructing links with the <a> element, referencing images with the <img> element, or including external JavaScript or CSS files, we need to be able to successfully reference files within our site. This requires learning the syntax for so-called relative referencing. As you can see from Figure 3.15, when referencing a page or resource on an external site, a full absolute reference is required: that is, a complete URL as described in Chapter 2 with a protocol (typically, http:// or https://), the domain name, any paths, and then finally the file name of the desired resource.
Note
Links with the label “Click Here” were once a staple of the web. Today, such links are frowned upon, as they do not provide any information to users as to where the link will take them. Link labels should be descriptive. So instead of using the text “Click here to see the race results” simply make the link text “Race Results” or “See Race Results.”
However, when referencing a resource that is on the same server as your HTML document, you can use briefer relative referencing. If the URL does not include the “http://” then the browser will request the current server for the file. If all the resources for the site reside within the same directory (also referred to as a folder), then you can reference those other resources simply via their file name.
However, most real-world sites contain too many files to put them all within a single directory. For these situations, a relative pathname is required along with the file name. The pathname tells the browser where to locate the file on the server.
Pathnames on the web follow Unix conventions. Forward slashes (“/”) are used to separate directory names from each other and from file names. Double-periods (“..”) are used to reference a directory “above” the current one in the directory tree. Figure 3.17 illustrates the file structure of an example site. Table 3.1 provides additional explanations and examples of the different types of URL referencing.
Figure 3.17 Example site directory tree
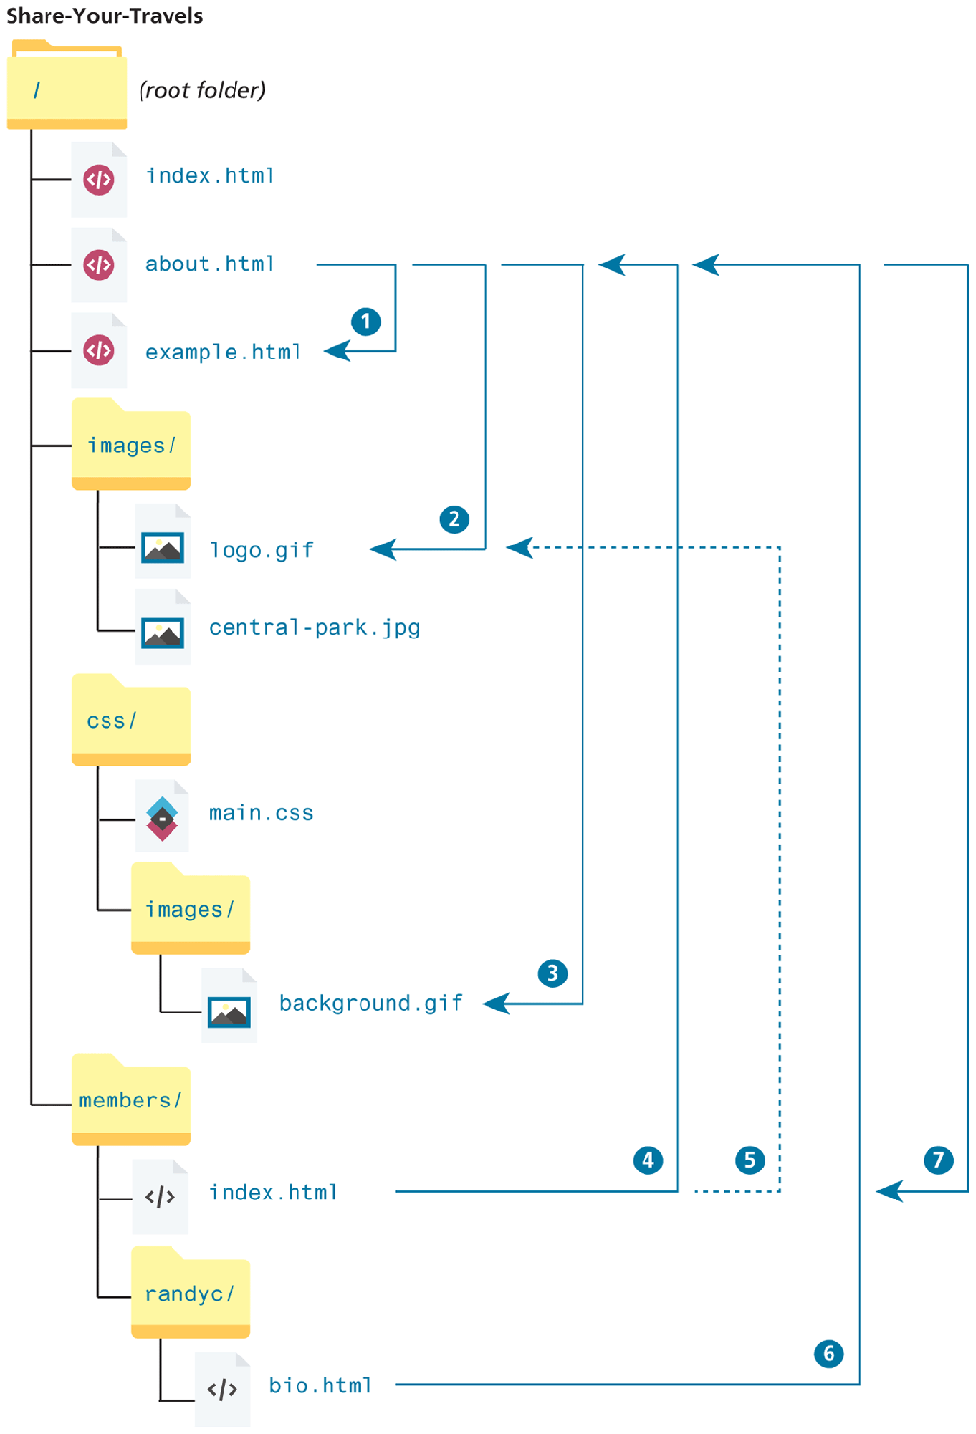
Table 3.1 Sample Relative Referencing
| Relative Link Type | Example |
|---|---|
To link to a file within the same folder, simply use the file name. |
To link to example.html from about.html (in Figure 3.17), use:
|
To link to a file within a subdirectory, use the name of the subdirectory and a slash before the file name. |
To link to logo.gif from about.html, use:
|
To link to a file that is multiple subdirectories below the current one, construct the full path by including each subdirectory name (separated by slashes) before the file name. |
To link to background.gif from about.html, use:
|
Use “../” to reference a folder above the current one. If trying to reference a file several levels above the current one, simply string together multiple “../”. |
To link to about.html from index.html in members, use:
To link to about.html from bio.html, use:
|
Use “../” to move up to the appropriate level, and then use the same technique as for child or grandchild directories. |
To link to about.html from index.html in members, use:
To link to background.gif from bio.html, use:
|
An alternative approach for ancestor and sibling references is to use the so-called root reference approach. In this approach, begin the reference with the root reference (the “ |
To link to about.html from bio.html, use:
To link to background.gif from bio.html, use:
|
Web servers allow references to directory names without file names. In such a case, the web server will serve the default document, which is usually a file called index.html (apache) or default.html (IIS). Again, this will only generally work on the web server. |
To link to index.html in members from about.html, use either:
Or
|
Pro Tip
You can force a link to open in a new browser window by adding the target= "_blank" attribute to any link.
In general, most web developers believe that forcing a link to open in a new window is not a good practice as it takes control of something (whether a page should be viewed in its own browser window) that rightly belongs to the user away from the user. Nonetheless, some clients will insist that any link to an external site must show up in a new window.
3.5.5 Inline Text Elements
Back in Figure 3.10 the HTML example used three different inline text elements (namely, the <strong>, <time>, and <em> elements). They are called inline elements because they do not disrupt the flow of text (i.e., cause a line break). HTML defines over 30 of these elements. Table 3.2 lists some of the most commonly used of these elements.
Table 3.2 Common Text-Level Semantic Elements
| Element | Description |
|---|---|
<a> |
Anchor used for hyperlinks. |
<abbr> |
An abbreviation |
<br> |
Line break |
<cite> |
Citation (i.e., a reference to another work) |
<code> |
Used for displaying code, such as markup or programming code |
<em> |
Emphasis |
<mark> |
For displaying highlighted text |
<small> |
For displaying the fine-print, that is, “nonvital” text, such as copyright or legal notices |
<span> |
The inline equivalent of the <div> element. It is generally used to mark text that will receive special formatting using CSS |
<strong> |
For content that is strongly important |
<time> |
For displaying time and date data |
3.5.6 Images
Item ![]() in Figure 3.10 defines an image. Chapter 6 examines the different types of graphic file formats. Figure 3.18 illustrates the key attributes of the
in Figure 3.10 defines an image. Chapter 6 examines the different types of graphic file formats. Figure 3.18 illustrates the key attributes of the <img> element. Notice in Figure 3.18 that attributes such as title, width, and height are optional. Chapter 6 on Web Media will go into the <img> and related <picture> elements in more detail.
Figure 3.18 The <img> element

While the <img> tag is the oldest method for displaying an image, it is not the only way. In fact, it is very common for images to be added to HTML elements via the background-image property in CSS, a technique you will see in Chapter 4. For purely decorative images, such as background gradients and patterns, logos, border art, and so on, it makes semantic sense to keep such images out of the markup and in CSS where they more rightly belong. But when the images are content, such as the images in a gallery or the image of a product in a product details page, then the <img> tag is the appropriate approach.
Chapter 6 examines the different types of graphic file formats. Figure 3.18 illustrates the key attributes of the <img> element.
3.5.7 Character Entities
Item ![]() in Figure 3.10 illustrates the use of a character entity. These are special characters for symbols for which there is either no easy way to type them via a keyboard (such as the copyright symbol or accented characters) or which have a reserved meaning in HTML (for instance the “<” or “>” symbols). There are many HTML character entities. They can be used in an HTML document by using the entity name or the entity number. Some of the most common are listed in Table 3.3.
in Figure 3.10 illustrates the use of a character entity. These are special characters for symbols for which there is either no easy way to type them via a keyboard (such as the copyright symbol or accented characters) or which have a reserved meaning in HTML (for instance the “<” or “>” symbols). There are many HTML character entities. They can be used in an HTML document by using the entity name or the entity number. Some of the most common are listed in Table 3.3.
Table 3.3 Common Character Entities
| Entity Name | Entity Number | Description |
|---|---|---|
|
  |
Nonbreakable space. The browser ignores multiple spaces in the source HTML file. If you need to display multiple spaces, you can do so using the nonbreakable space entity. |
< |
< |
Less than symbol (“<”). |
> |
> |
Greater than symbol (“>”). |
© |
© |
The © copyright symbol |
€ |
€ |
The € euro symbol. |
™ |
™ |
The ™ trademark symbol. |
ü |
ü |
The ü— that is, small u with umlaut mark. |
Pro Tip
HTML with UTF8 encoding supports the use of emojis directly in your HTML. For instance, the following markup is valid and will be displayed correctly by the browser.
<h1>Grocery List</h1>
 – Watermelon</p>
 – Tomato</p>
While you can simply copy and paste an emoji directly into your text editor, it is also possible to add it by using its numeric representation (also known as a codepoint). For instance, the official codepoint for the watermelon emoji is U+1F349. To use that codepoint, simply replace the U+ with &#x. Thus, the markup for our watermelon line, could be:
<p>🍉 – Watermelon</p>Since emojis can’t be viewed by the visually impaired, you can add some additional accessibility attributes to make it clearer to those using a speech reader in their browser, as shown below:
<p><span role=image aria-label=tomato> </span> – Tomato</p>3.5.8 Lists
Item ![]() in Figure 3.10 illustrates a list, one of the most common block-level elements in HTML. There are three types of list in HTML:
in Figure 3.10 illustrates a list, one of the most common block-level elements in HTML. There are three types of list in HTML:
Unordered lists. Collections of items in no particular order; these are by default rendered by the browser as a bulleted list. However, it is common in CSS to style unordered lists without the bullets. Unordered lists have become the conventional way to markup navigational menus.
Ordered lists. Collections of items that have a set order; these are by default rendered by the browser as a numbered list.
Description lists. Collection of name and description/definition pairs. These tend to be used infrequently. Perhaps the most common example would be a FAQ list. Unlike the other two lists (which contain
<li>items within either a<ul>or<ol>parent container), the container for a description list is the<dl>element. It contains<dt>(term or name to be described) and<dd>(describes each term) pairs for each item in the list.
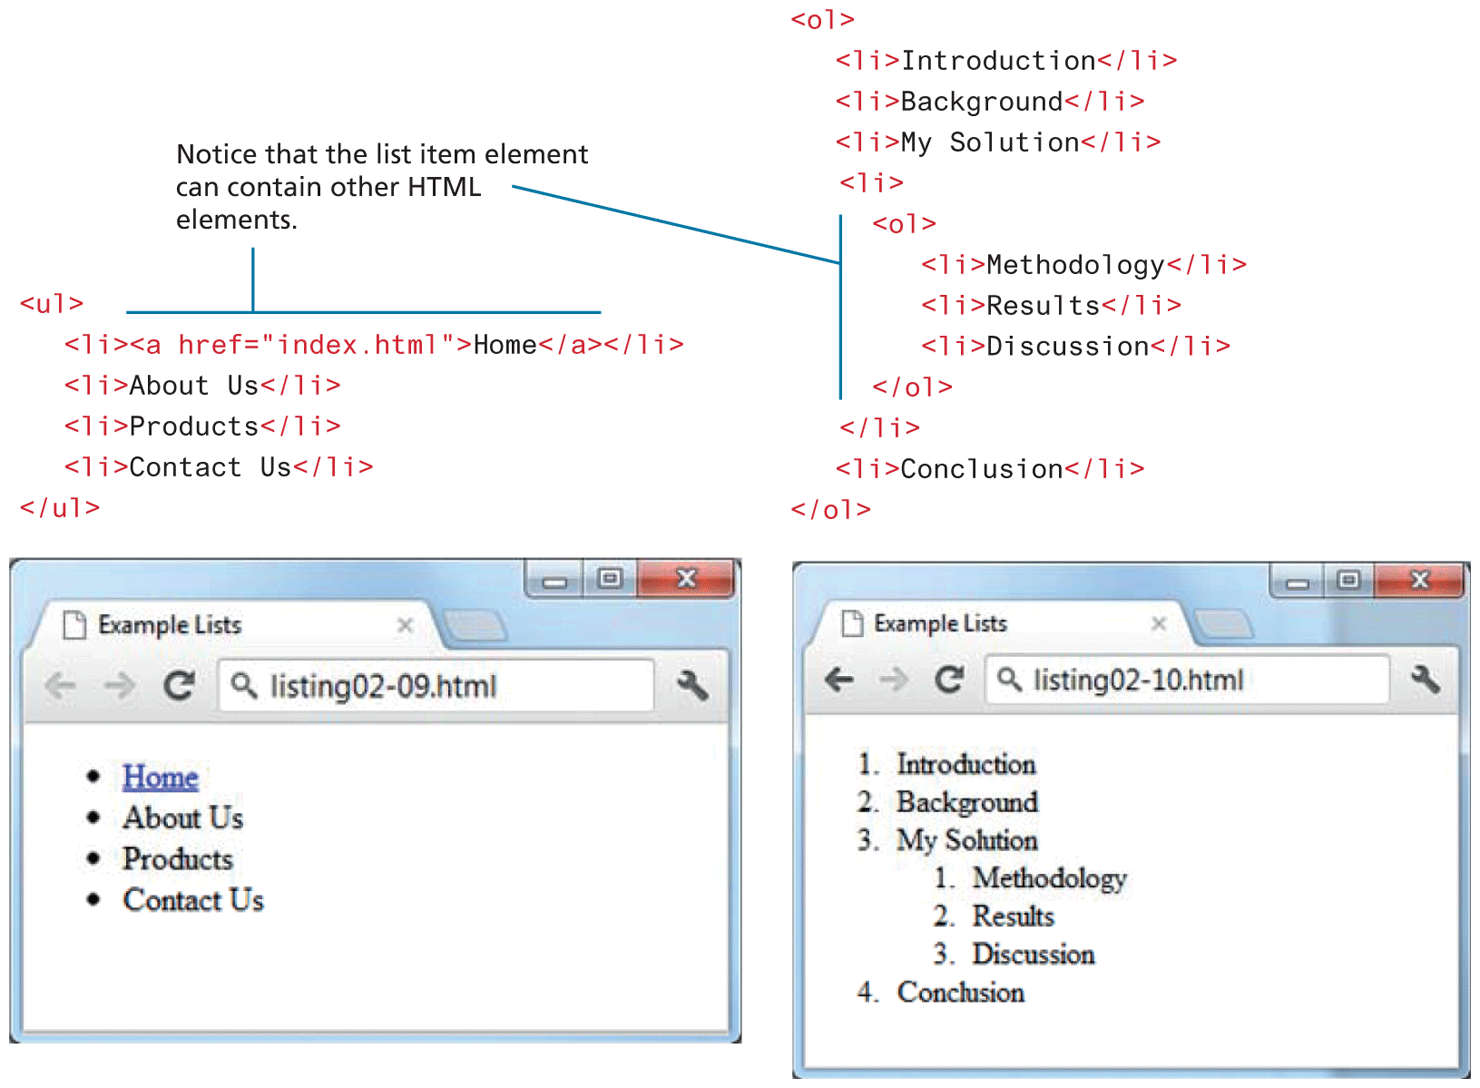
As can be seen in Figure 3.19, the ordered and unordered list elements are container elements containing list item elements (<li>). Other HTML elements can be included within the <li> container, as shown in the first list item of the unordered list in Figure 3.19. Notice as well in the ordered list example in Figure 3.19 that this nesting can include another list.
Figure 3.19 List elements and their default rendering
Test Your Knowledge #1
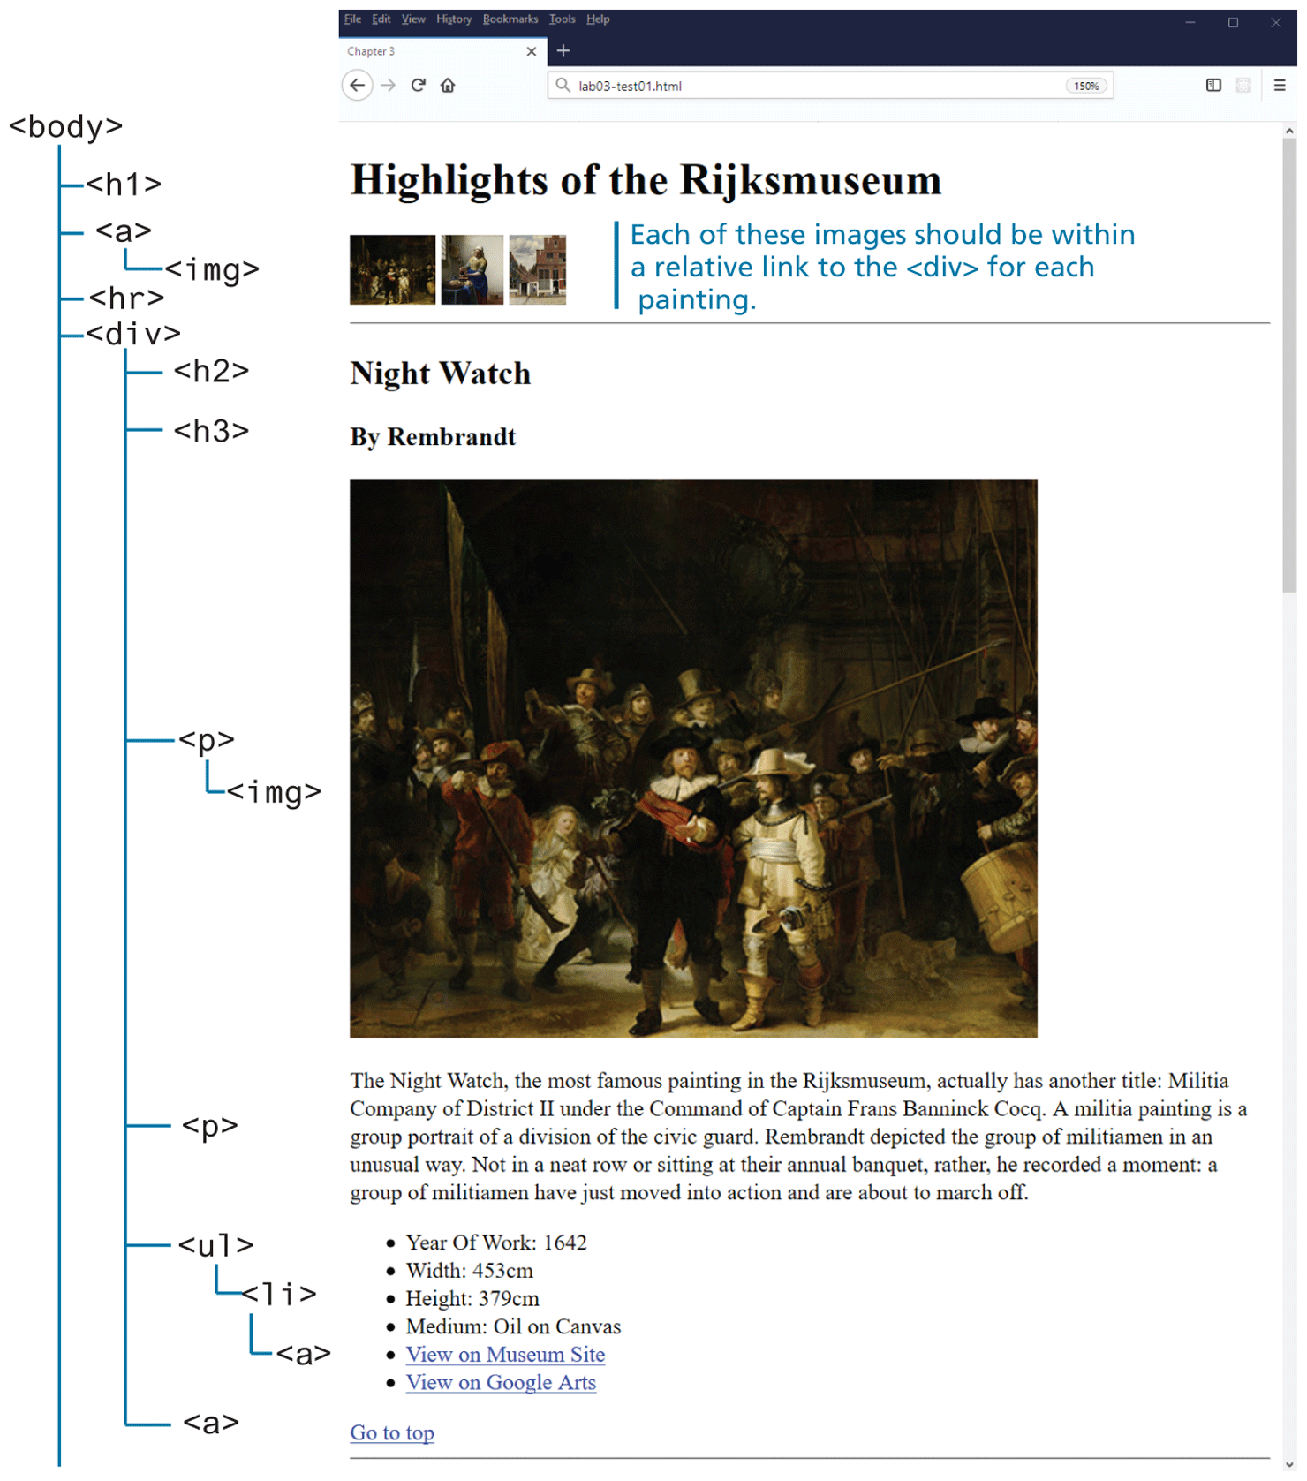
The file ch03-test01.html contains text content: you will be adding in HTML tags so that it looks similar to that shown in Figure 3.20.
Add in the appropriate structure tags (html, head, body).
Each painting is its own
<div>. Figure 3.20 indicates the appropriate tags to use.Finally, turn the small thumbnail images at the top into links to the
<div>for that painting. At the end of each <div>, add another link that jumps to the top of the page. Examine Figure 3.15 in the book for guidance on this step.
Figure 3.20 Completed Test Your Knowledge #1