In the introduction of this book, I boiled cryptography down to two concepts: confidentiality and authentication. In real-world applications, confidentiality is (usually) the least of your problems; authentication is where most of the complexity arises. I know I’ve already talked a lot about authentication throughout this book, but it can be a confusing concept as it is used with different meanings in cryptography. For this reason, this chapter starts with an introduction of what authentication really is about. As usual with cryptography, no protocol is a panacea, and the rest of the chapter will teach you a large number of authentication protocols that are used in real-world applications.
By now, you have heard of authentication many times, so let’s recap. You learned about
Authentication in cryptographic primitives like message authentication codes (covered in chapter 3) and authenticated encryption (covered in chapter 4)
Authentication in cryptographic protocols like TLS (covered in chapter 9) and Signal (covered in chapter 10), where one or more participants of a protocol can be authenticated
In the first case, authentication refers to the authenticity (or integrity) of messages. In the latter case, authentication refers to proving who you are to someone else. These are different concepts covered by the same word, which can be quite confusing! But both usages are correct as the Oxford English Dictionary (http://www.oed.com/) points out:
Authentication. The process or action of proving or showing something to be true, genuine, or valid.
For this reason, you should think of authentication as a term used in cryptography to convey two different concepts depending on the context:
Message/payload authentication—You’re proving that a message is genuine and hasn’t been modified since its creation. (For example, are these messages authenticated or can someone tamper with them?)
Origin/entity/identity authentication—You’re proving that an entity really is who they say they are. (For example, am I actually communicating with google.com?)
Bottom line: authentication is about proving that something is what it is supposed to be, and that something can be a person, a message, or something else. In this chapter, I will use the term authentication only to refer to identifying people or machines. In other words, identity authentication. By the way, you already saw a lot about this type of authentication:
In chapter 9, on secure transport, you learned that machines can authenticate other machines at scale by using public key infrastructures (PKIs).
In chapter 10, on end-to-end encryption, you learned about ways humans can authenticate one another at scale by using trust on first use (TOFU) (and verifying later) or by using the web of trust (WOT) techniques.
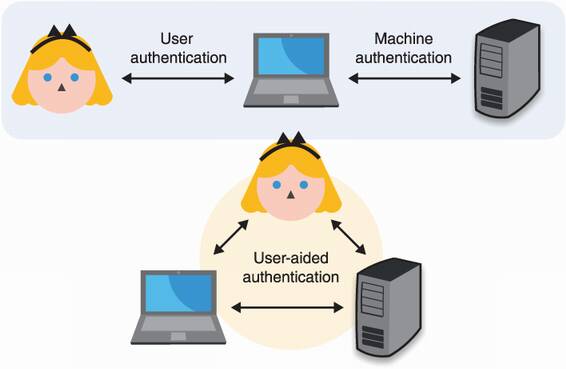
In this chapter, you will learn the following two other cases not previously mentioned. (I recap these in figure 11.1.)
User authentication, or how machines authenticate humans—beep boop
User-aided authentication, or how humans can help machines authenticate one another
Figure 11.1 In this book, I talk about origin authentication in three types of scenarios. User authentication happens when a device authenticates a human being. Machine authentication happens when a machine authenticates another machine. User-aided authentication happens when a human is involved in a machine authenticating another machine.
Another aspect of identity authentication is the identity part. Indeed, how do we define someone like Alice in a cryptographic protocol? How can a machine authenticate you and me? There is, unfortunately (or fortunately), an inherent gap between flesh and bits. To bridge reality and the digital world, we always assume that Alice is the only one who knows some secret data, and to prove her identity, she has to demonstrate knowledge of that secret data. For example, she could be sending her password or she could be signing a random challenge using the private key associated with her public key.
Alright, that’s enough intro. If this section didn’t make too much sense, the multitude of examples that are to follow will. Let’s now first have a look at the many ways machines have found to authenticate us humans!
The first part of this chapter is about how machines authenticate humans or, in other words, user authentication. There are many ways to do this, and no solution is a panacea. But in most user authentication scenarios, we assume that
For example, you can imagine that the server is authenticated to the user via the web public key infrastructure (PKI) and that the connection is secured via TLS (both covered in chapter 9). In a sense, most of this section is about upgrading a one-way authenticated connection to a mutually-authenticated connection as figure 11.2 illustrates.

Figure 11.2 User authentication typically happens over a channel that is already secured but where only the server is authenticated. A typical example is when you browse the web using HTTPS and log into a web page using your credentials.
I have to warn you: user authentication is a vast land of broken promises. You must have used passwords many times to authenticate to different web pages, and your own experience probably resembles something like this:
You change your password after recovering your account or because the website forces you to.
If you’re out of luck, your password (or a hash of it) is leaked in a series of database breaches.
Note I will ignore password/account recovery in this chapter, as they have little to do with cryptography. Just know that they are often tied to the way you first registered. For example, if you registered with the IT department at your workplace, then you’ll probably have to go see them if you lose your password, and they can be the weakest link in your system if you are not careful. Indeed, if I can recover your account by calling a number and giving someone your birth date, then no amount of cool cryptography at login time will help.
A naive way to implement the previous user authentication flow is to store the user password at registration and then ask the user for it at login time. As mentioned in chapter 3, once successfully authenticated, a user is typically given a cookie that can be sent in every subsequent request instead of a username and password. But wait; if the server stores your password in cleartext, then any breach of its databases reveals your password to the attackers. These attackers will then be able to use it to log into any websites where you use the same password to register.
A better way to store passwords would be to use a password hashing algorithm like the standardized Argon2 you’ve learned about in chapter 2. This would effectively prevent a smash-and-grab type of attack on the database to leak your password, although an intruder that overextends their welcome would still be able to see your password every time you log in. Yet, a lot of websites and companies still store passwords in cleartext.
Moreover, humans are naturally bad at passwords. We are usually most comfortable with small and easy-to-remember passwords. And, if possible, we would want to just reuse the same password everywhere.
81% of all hacking-related breaches leverage stolen or weak passwords.
—Verizon Data Breach Report (2017)
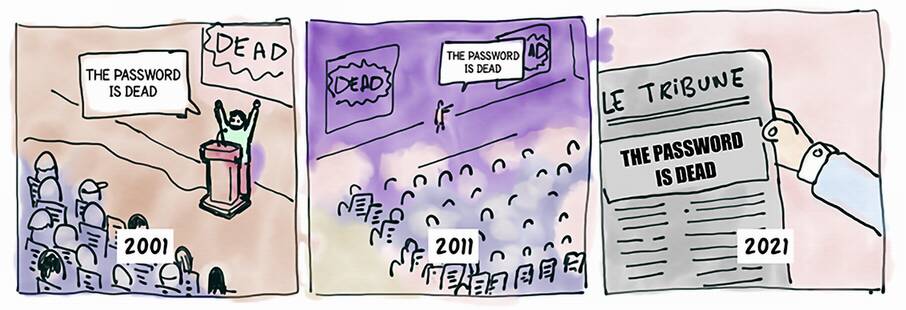
The problem of weak passwords and password reuse has led to many silly and annoying design patterns that attempt to force users to take passwords more seriously. For example, some websites require you to use special characters in your passwords or force you to change your password every 6 months, and so on. Furthermore, many protocols attempt to “fix” passwords or to get rid of them altogether. Every year, new security experts seem to think that the concept of “password” is dead. Yet, it is still the most widely used user authentication mechanism.
So here you have it, passwords are probably here to stay. Yet, there exist many protocols that improve or replace passwords. Let’s take a look at those.
OK, password reuse is bad, so what can we do about it? Naively, users could use different passwords for different websites, but there are two problems with this approach:
To alleviate these concerns, two solutions have been widely adopted:
Single sign-on (SSO)—The idea of SSO is to allow users to connect to many different services by proving that they own the account of a single service. This way, the user only has to remember the password associated with that one service in order to be able to connect to many services. Think “connect with Facebook” type of buttons as figure 11.3 illustrates.
Password managers—The previous SSO approach is convenient if the different services you use all support it, but this is obviously not scalable for scenarios like the web. A better approach in these extreme cases is to improve the clients as opposed to attempting to fix the issue on the server side. Nowadays, modern browsers have built-in password managers that can suggest complex passwords when you register on new websites, and they can remember all of your passwords as long as you remember one master password.
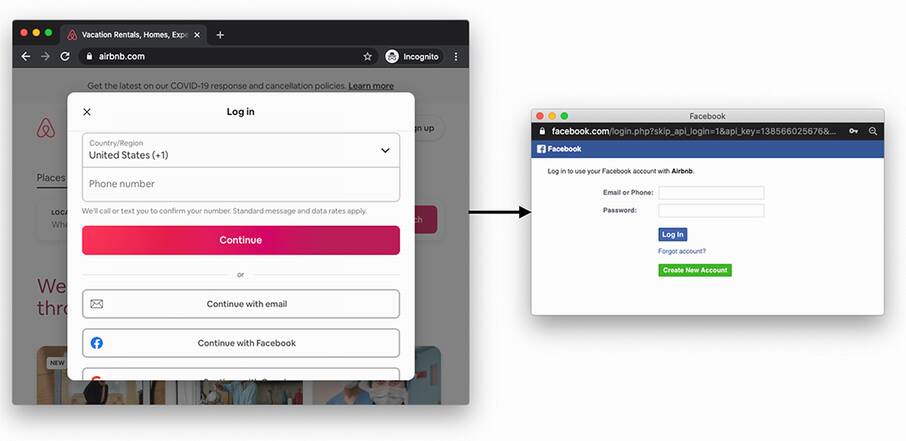
Figure 11.3 An example of single sign-on (SSO) on the web. By having an account on Facebook or Google, a user can connect to new services (in this example, Airbnb) without having to think about a new password.
The concept of SSO is not new in the enterprise world, but its success with normal end-users is relatively recent. Today, two protocols are the main competitors when it comes to setting up SSO:
Security Assertion Markup Language 2.0 (SAML)—A protocol using the Extensible Markup Language (XML) encoding.
OpenID Connect (OIDC)—An extension to the OAuth 2.0 (RFC 6749) authorization protocol using the JavaScript Object Notation (JSON) encoding.
SAML is still widely used, mostly in an enterprise setting, but it is (at this point) a legacy protocol. OIDC, on the other hand, can be seen everywhere on web and mobile applications. You most likely already used it!
Authentication protocols are often considered hard to get right. OAuth2, the protocol OIDC relies on, is notorious for being easy to misuse. On the other hand, OIDC is well specified (see https://openid.net). Make sure that you follow the standards and that you look at best practices, as this can save you from a lot of trouble.
Note Here’s another example of a pretty large company deciding not to follow this advice. In May 2020, the Sign-in with Apple SSO flow that took a departure from OIDC was found to be vulnerable. Anyone could have obtained a valid ID token for any Apple account just by querying Apple’s servers.
SSO is great for users as it reduces the number of passwords they have to manage, but it does not remove passwords altogether. The user still has to use passwords to connect to OIDC providers. So next, let’s see how cryptography can help hide passwords.
The previous section surveyed solutions that attempt to simplify identity management for users, allowing them to authenticate to multiple services using only one account linked to a single service. While protocols like OIDC are great, as they effectively decrease the number of passwords users have to manage, they don’t change the fact that some service still needs to see the user’s password in cleartext. Even if the password is stored after password hashing it, it is still sent in clear every time the user registers, changes their password, or logs in.
Cryptographic protocols called asymmetric (or augmented) password-authenticated key exchanges (PAKEs) attempt to provide user authentication without having users ever communicate their passwords directly to the server. This contrasts with symmetric or balanced PAKEs protocols, where both sides know the password.
The most popular asymmetric PAKE at the moment is the Secure Remote Password (SRP) protocol, which was standardized for the first time in 2000 in RFC 2944 (“Telnet Authentication: SRP”) and later integrated into TLS via RFC 5054 (“Using the Secure Remote Password (SRP) Protocol for TLS Authentication”). It is quite an old protocol and has a number of flaws. For example, if the registration flow is intercepted by a MITM attacker, the attacker would then be able to impersonate and log in as the victim. It also does not play well with modern protocols as it cannot be instantiated on elliptic curves, and worse, it is incompatible with TLS 1.3.
Since the invention of SRP, many asymmetric PAKEs have been proposed and standardized. In the summer of 2019, the Crypto Forum Research Group (CFRG) of the IETF started a PAKE selection process with the goal to pick one algorithm to standardize for each category of PAKEs: symmetric/balanced and asymmetric/ augmented. In March 2020, the CFRG announced the end of the PAKE selection process, selecting
CPace—The recommended symmetric/balanced PAKE, invented by Haase and Benoît Labrique
OPAQUE—The recommended asymmetric/augmented PAKE, invented by Stanislaw Jarecki, Hugo Krawczyk, and Jiayu Xu
In this section, I talk about OPAQUE, which (in early 2021) is still in the process of being standardized. In the second section of this chapter, you will learn more about symmetric PAKEs and CPace.
OPAQUE takes its name from the homonym O-PAKE, where O refers to the term oblivious. This is because OPAQUE relies on a cryptographic primitive that I have not yet mentioned in this book: an oblivious pseudorandom function (OPRF).
Oblivious pseudorandom functions (OPRFs)
OPRFs are a two-participant protocol that mimics the PRFs that you learned about in chapter 3. As a reminder, a PRF is somewhat equivalent to what one would expect of a MAC: it takes a key and an input and gives you a totally random output of a fixed length.
Note The term oblivious in cryptography generally refers to protocols where one party computes a cryptographic operation without knowing the input provided by another party.
Here is how an OPRF works at a high level:
Alice wants to compute a PRF over an input but wants the input to remain secret. She “blinds” her input with a random value (called a blinding factor) and sends this to Bob.
Bob runs the OPRFs on this blinded value with his secret key, but the output is still blinded so it’s useless for Bob. Bob then sends this back to Alice.
Alice finally “unblinds” the result using the same blinding factor she previously used to obtain the real output.
It is important to note that every time Alice wants to go over this protocol, she has to create a different blinding factor. But no matter what blinding factor she uses, as long as she uses the same input, she will always obtain the same result. I illustrate this in figure 11.4.
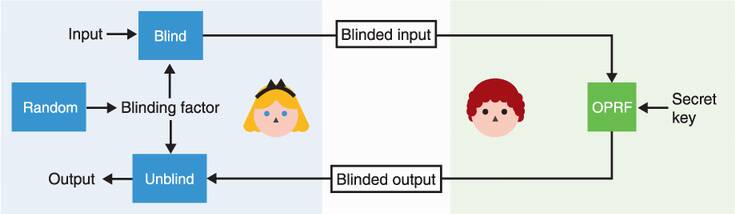
Figure 11.4 An oblivious PRF (OPRF) is a construction that allows one party to compute a PRF over the input of another party without learning that input. To do this, Alice first generates a random blinding factor, then blinds her input with that before sending it to Bob. Bob uses his secret key to compute the PRF over the blinded value, then sends the blinded output to Alice who can unblind it. The result does not depend on the value of the blinding factor.
Here’s an example of an OPRF protocol implemented in a group where the discrete logarithm problem is hard:
Bob computes blinded_output = blinded_inputk, where k is the secret key.
Alice can then unblind the produced result by computing output = blinded_output1/r = xk, where 1/r is the inverse of r.
How OPAQUE uses this interesting construction is the whole trick behind the asymmetric PAKE.
The OPAQUE asymmetric PAKE, how does it work?
The idea is that we want a client, let’s say Alice, to be able to do an authenticated key exchange with some server. We also assume that Alice already knows the server’s public key or already has a way to authenticate it (the server could be an HTTPS website and, thus, Alice can use the web PKI). Let’s see how we could build this to progressively understand how OPAQUE works.
First idea: use public key cryptography to authenticate Alice’s side of the connection. If Alice owns a long-term key pair and the server knows the public key, she can simply use her private key to perform a mutually authenticated key exchange with the server, or she can sign a challenge given by the server. Unfortunately, an asymmetric private key is too long, and Alice can only remember her password. She could store a key pair on her current device, but she also wants to be able to log in from another device later.
Second idea: Alice can derive the asymmetric private key from her password, using a password-based key derivation function (KDF) like Argon2, which you learned about in chapter 2 and chapter 8. Alice’s public key could then be stored on the server. If we want to avoid someone testing a password against the whole database in case of a database breach, we can have the server supply each user with a different salt that they have to use with the password-based KDF.
This is pretty good already, but there’s one attack that OPAQUE wants to discard: a precomputation attack. I can try to log in as you, receive your salt, and then precompute a huge number of asymmetric private keys and their associated public keys offline. The day the database is compromised, I can quickly see if I can find your public key and the associated password in my huge list of precomputed asymmetric public keys.
Third idea: This is where the main trick of OPAQUE comes in! We can use the OPRF protocol with Alice’s password in order to derive the asymmetric private key. If the server uses a different key per user, that’s as good as having salts (attacks can only target one user at a time). This way, an attacker that wants to precompute asymmetric private keys based on guesses of our password has to perform online queries (preventing offline brute force attacks). Online queries are good because they can be rate-limited (preventing more than 10 sign-in attempts per hour, for example) in order to prevent these kinds of online brute force attacks.
Note that this is actually not how OPAQUE works: instead of having the user derive an asymmetric private key, OPAQUE has the user derive a symmetric key. The symmetric key is then used to encrypt a backup of your asymmetric key pair and some additional data (which can include the server’s public key, for example). I illustrate the algorithm in figure 11.5.
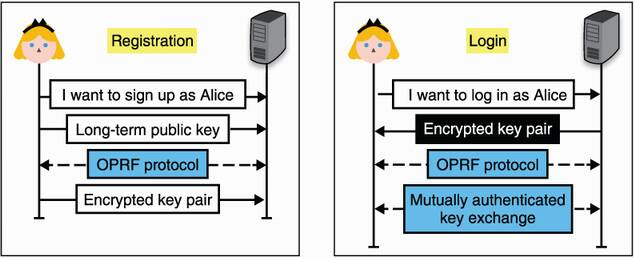
Figure 11.5 To register to a server using OPAQUE, Alice generates a long-term key pair and sends her public key to the server, which stores it and associates it with Alice’s identity. She then uses the OPRF protocol to obtain a strong symmetric key from her password and sends an encrypted backup of her key pair to the server. To log in, she obtains her encrypted key pair from the server, then performs the OPRF protocol with her password to obtain a symmetric key capable of decrypting her key pair. All that’s left is to perform a mutually authenticated key exchange (or possibly sign a challenge) with this key.
Before going to the next section, let’s review what you’ve learned here. Figure 11.6 illustrates this.
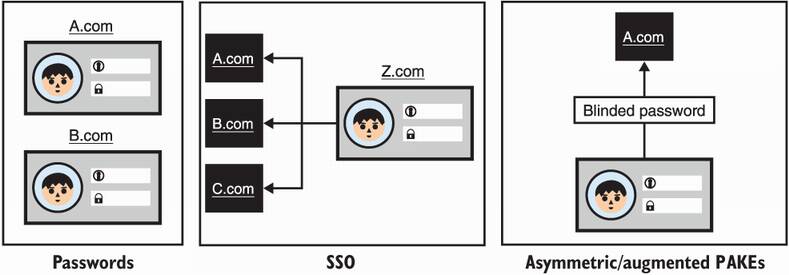
Figure 11.6 Passwords are a handy way to authenticate users as they live in someone’s head and can be used on any device. On the other hand, users have trouble creating strong passwords, and because users tend to reuse passwords across websites, password breaches can be damaging. SSO allows you to connect to many services using one (or a few) service(s), while asymmetric (or augmented) password-authenticated key exchanges allow you to authenticate without the server ever learning your real password.
Alright, so far so good. You’ve learned about different protocols that applications can leverage to authenticate users with passwords. But, as you’ve heard, passwords are also not that great. They are vulnerable to brute force attacks, tend to be reused, stolen, and so on. What is available to us if we can afford to avoid using passwords?
And the answer is—keys! And, as you know, there are two types of keys in cryptography and both types can be useful:
This section goes over solutions that are based on symmetric keys, while the next section goes over solutions based on asymmetric keys. Let’s imagine that Alice registers with a service using a symmetric key (often generated by the server and communicated to you via a QR code). A naive way to authenticate Alice later would be to simply ask her to send the symmetric key. This is, of course, not great, as a compromise of her secret would give an attacker unlimited access to her account. Instead, Alice can derive what are called one-time passwords (OTPs) from the symmetric key and send those in place of the longer-term symmetric key. Even though an OTP is not a password, the name indicates that an OTP can be used in place of a password and warns that it should never be reused.
The idea behind OTP-based user authentication is straightforward: your security comes from the knowledge of a (usually) 16- to 32-byte uniformly random symmetric key instead of a low-entropy password. This symmetric key allows you to generate OTPs on demand as figure 11.7 illustrates.

Figure 11.7 A one-time password (OTP) algorithm allows you to create as many one-time passwords as you want from a symmetric key and some additional data. The additional data is different, depending on the OTP algorithm.
OTP-based authentication is most often implemented in mobile applications (see figure 11.8 for a popular example) or in security keys (a small device that you can plug in the USB port of your computer). There are two main schemes that one can use to produce OTPs:
The HMAC-based one-time password (HOTP) algorithm, standardized in RFC 4226, which is an OTP algorithm where the additional data is a counter.
The time-based one-time password (TOTP) algorithm, standardized in RFC 6238, which is an OTP algorithm where the additional data is the time.
Most applications nowadays use TOTP because HOTP requires both the client and the server to store a state (a counter). Storing a state can lead to issues if one side falls out of synchrony and cannot produce (or validate) legitimate OTPs anymore.
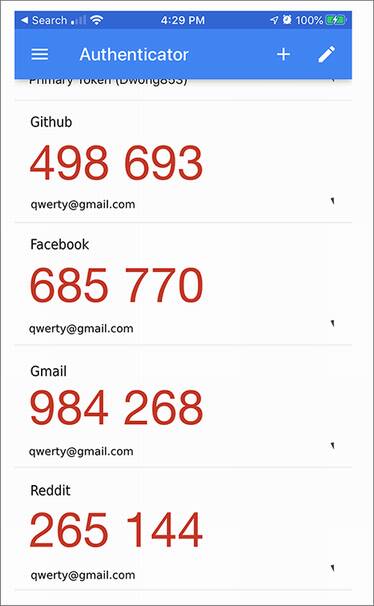
Figure 11.8 A screenshot of the Google Authenticator mobile app. The application allows you to store unique per-application symmetric keys that can then be used with the TOTP scheme to generate 6-digit, one-time passwords (OTPs), valid only for 30 seconds.
In most cases, this is how TOTP works:
When registering, the service communicates a symmetric key to the user (perhaps using a QR code). The user then adds this key to a TOTP application.
When logging in, the user can use the TOTP application to compute a one-time password. This is done by computing HMAC(symmetric_key, time), where time represents the current time (rounded to the minute in order to make a one-time password valid for 60 seconds). Then
a) The TOTP application displays to the user the derived one-time password, truncated and in a human-readable base (for example, reduced to 6 characters in base 10 to make it all digits).
b) The user either copies or types the one-time password into the relevant application.
c) The application retrieves the user’s associated symmetric key and computes the one-time password in the same way as the user did. If the result matches the received one-time password, the user is successfully authenticated.
Of course, the comparison between the user’s OTP and the one computed on the server must be done in constant time. This is similar to MAC authentication tag checks. I demonstrate this flow in figure 11.9.
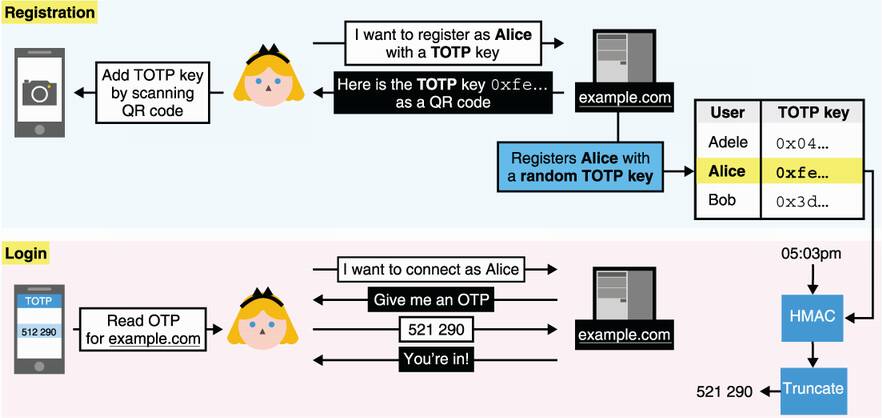
Figure 11.9 Alice registers with example.com using TOTP as authentication. She imports a symmetric key from the website into her TOTP application. Later, she can ask the application to compute a one-time password for example.com and use it to authenticate with the website. The website, example.com, fetches the symmetric key associated with Alice and computes the one-time password using HMAC and the current time. The website next compares the one-time password in constant time with what Alice sends.
This TOTP-based authentication flow is not ideal, though. There are a number of things that could be improved, for example:
For this reason, symmetric keys are yet another not-perfect replacement for passwords. Next, let’s see how using asymmetric keys can address these downsides.
Now that we’re dealing with public key cryptography, there’s more than one way we can use asymmetric keys to authenticate to a server. We can
Use our asymmetric key inside a key exchange to authenticate our side of the connection
Use our asymmetric key in an already secured connection with an authenticated server
Let’s take a look at each method.
Mutual authentication in key exchanges
You’ve already heard about the first method: using the asymmetric key inside a key exchange. In chapter 9, I mentioned that a TLS server can request the client to use a certificate as part of the handshake. Often, companies will provision their employees’ devices with a unique per-employee certificate that allows them to authenticate to internal services. Figure 11.10 provides an idea of what it looks like from a user’s perspective.
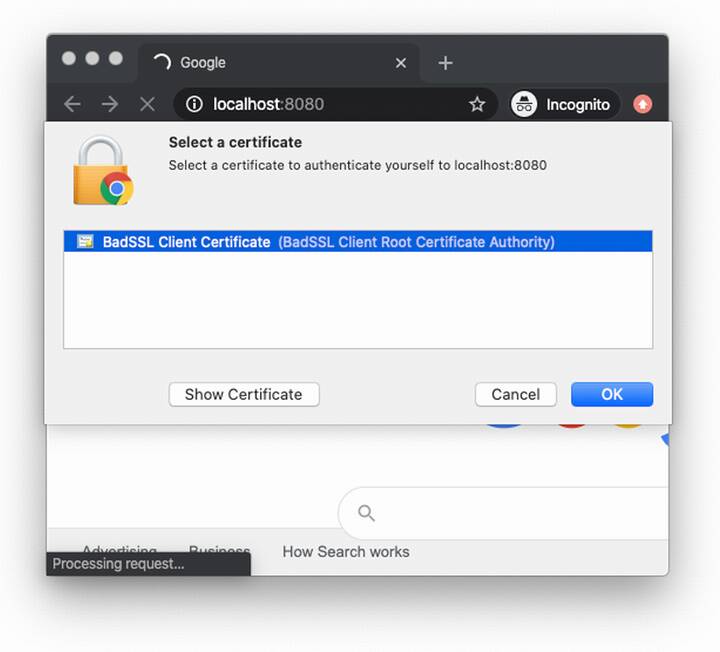
Figure 11.10 A page prompting the user’s browser for a client certificate. The user can then select which certificate to use from a list of locally installed certificates. In the TLS handshake, the client certificate’s key is then used to sign the handshake transcript, including the client’s ephemeral public key, which is used as part of the handshake.
Client-side certificates are pretty straightforward. For example, in TLS 1.3, a server can request the client to authenticate during the handshake by sending a CertificateRequest message. The client then responds by sending its certificate in a Certificate message, followed by a signature of all messages sent and received in a CertificateVerify message (which includes the ephemeral public key used in the key exchange). The client is authenticated if the server can recognize the certificate and successfully verify the client’s signature. Another example is the Secure Shell (SSH) protocol, which also has the client sign parts of the handshake with a public key known to the server.
Note that signing is not the only way to authenticate with public key cryptography during the handshake phase. The Noise protocol framework (covered in chapter 9 as well) has several handshake patterns that enable client-side authentication using just DH key exchanges.
Post-handshake user authentication with FIDO2
The second type of authentication with asymmetric keys uses an already secure connection where only the server is authenticated. To do this, a server can simply ask the client to sign a random challenge. This way, replay attacks are prevented.
One interesting standard in this space is the Fast IDentity Online 2 (FIDO2). FIDO2 is an open standard that defines how to use asymmetric keys to authenticate users. The standard specifically targets phishing attacks, and for this reason, FIDO2 is made to work only with hardware authenticators. Hardware authenticators are simply physical components that can generate and store signing keys and can sign arbitrary challenges. FIDO2 is split into two specifications (figure 11.11):
Client to Authenticator Protocol (CTAP)—CTAP specifies a protocol that roaming authenticators and clients can use to communicate with one another. Roaming authenticators are hardware authenticators that are external to your main device. A client in the CTAP specification is defined as the software that wants to query these authenticators as part of an authentication protocol. Thus, a client can be an operating system, a native application like a browser, and so on.
Web Authentication (WebAuthn)—WebAuthn is the protocol that web browsers and web applications can use to authenticate users with hardware authenticators. It, thus, must be implemented by browsers to support authenticators. If you are building a web application and want to support user authentication via hardware authenticators, WebAuthn is what you need to use.
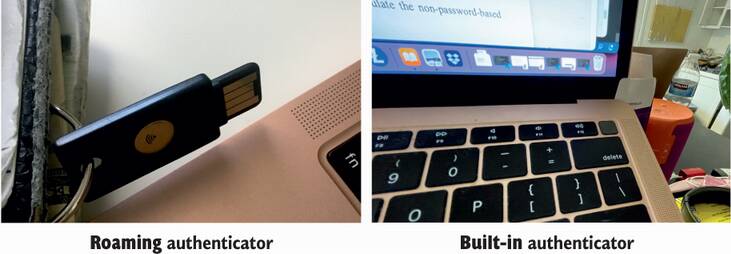
Figure 11.11 Two types of hardware authenticators that can be used with FIDO2: (on the left) a Yubikey, a roaming authenticator, and (on the right) TouchID, a built-in authenticator.
WebAuthn allows websites to use not only roaming authenticators but also platform authenticators. Platform authenticators are built-in authenticators provided by a device. They are implemented differently by various platforms and are often protected by biometrics (for example, a fingerprint reader, facial recognition, and so on).
We are now ending the first part of this chapter. But before I do this, figure 11.12 recaps the nonpassword-based authentication protocols I’ve talked about.
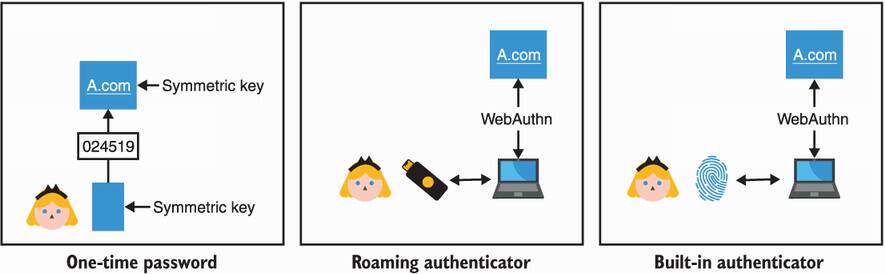
Figure 11.12 To authenticate without using a password, applications can allow users to either use symmetric keys via OTP-based protocols or use asymmetric keys via the FIDO2 standard. FIDO2 supports different types of authenticators, roaming authenticators (via the CTAP standard) or built-in authenticators.
Now that you have learned about many different techniques and protocols that exist to either improve passwords or replace them with stronger cryptographic solutions, you might be wondering, which one you should use? Each of these solutions have their own caveats, and no single solution might do it. If not, combine multiple ones! This idea is called multi-factor authentication (MFA). Actually, chances are that you might have already used OTPs or FIDO2 as a second authentication factor in addition to (and not in place of) passwords.
This concludes the first half of this chapter on authenticating users. Next, let’s take a look at how humans can help devices to authenticate each other.
Humans help machines to authenticate one another every day—EVERY DAY! You’ve done it by pairing your wireless headphones with your phone, or by pairing your phone with your car, or by connecting some device to your home WiFi, and so on. And as with any pairing, what’s underneath is most probably a key exchange.
The authentication protocols in the last section took place in already secured channels (perhaps with TLS), where the server was authenticated. Most of this section, in contrast, attempts to provide a secure channel to two devices that do not know how to authenticate each other. In that sense, what you’ll learn in this section is how humans can help to upgrade an insecure connection into a mutually authenticated connection. For this reason, the techniques you will learn about next should be reminiscent of some of the trust establishment techniques in the end-to-end protocols of chapter 10, except that there, two humans were trying to authenticate themselves to each other.
Nowadays, the most common insecure connections that you will run into, those that do not go through the internet, are protocols based on short-range radio frequencies like Bluetooth, WiFi, and Near Field Communication (NFC). NFC is what you use to pay with your phone or with your bank card’s “contactless” payment. Devices that use these communication protocols tend to range from low-power electronics to full-featured computers. This already sets some constraints for us:
The device you are trying to connect to might not offer a screen to display a key or a way to manually enter a key. We call this provisioning the device. For example, most wireless audio headsets today only have a few buttons and that’s it.
As a human is part of the validation process, having to type or compare long strings is often deemed impractical and not user-friendly. For this reason, many protocols attempt to shorten security-related strings to 4- or 6-digit PINs.
You’re probably thinking back at some of your device-pairing experiences and realizing now that a lot of them just worked. For example
You then tried to find the device in the Bluetooth list on your phone.
After clicking the device icon, it successfully paired the device with your phone.
If you read chapter 10, this should remind you of trust on first use (TOFU). Except, this time we also have a few more cards in our hand:
Proximity—Both devices have to be close to each other, especially if using the NFC protocol.
Time—Device pairing is often time-constrained. It is common that if, for example, in a 30-second window, the pairing is not successful, the process must be manually restarted.
Unlike TOFU though, these real-life scenarios usually do not allow you to validate after the fact that you’ve connected to the right device. This is not ideal, and one should strive for better security if possible.
Note By the way, this is what the Bluetooth core specification actually calls the TOFU-like protocol: “Just Works.” I should mention that all built-in Bluetooth security protocols are currently broken due to many attacks, including the latest KNOB attack released in 2019 (https://knobattack.com). The techniques surveyed in this chapter are nonetheless secure—if designed and implemented correctly.
What’s next in our toolkit? This is what we will see in this section: ways for a human to help devices to authenticate themselves. Spoiler alert:
You’ll see that cryptographic keys are always the most secure approach but not necessarily the most user-friendly.
You’ll learn about symmetric PAKEs and how you can input the same password on two devices to connect them securely.
You’ll learn about protocols based on short authenticated strings (SAS), which authenticate a key exchange after the fact by having you compare and match two short strings displayed by the two devices.
Naively, the first approach to connect a user to a device would be to reuse protocols that you learned about in chapter 9 or chapter 10 (for example, TLS or Noise) and to provision both devices with a symmetric shared secret or, better, with long-term public keys in order to provide forward secrecy to future sessions. This means that you need two things for each device to learn the other device’s public key:
As we will see, this is not always straightforward or user-friendly. But remember, we have a human in the mix who can observe and (maybe) play with the two devices. This is unlike other scenarios that we’ve seen before, and we can use this to our advantage!
The Authentication Problem - One of the main issues in cryptography is the establishment of a secure peer-to-peer (or group) communication over an insecure channel. With no assumption, such as availability of an extra secure channel, this task is impossible. However, given some assumption(s), there exists many ways to set up a secure communication.
—Sylvain Pasini (“Secure Communication Using Authenticated Channels,” 2009)
All the protocols that follow are based on the fact that you (the human in charge) have an additional out-of-band channel. This allows you to securely communicate some information. The addition of this out-of-band channel can be modeled as the two devices having access to two types of channels (illustrated in figure 11.13):
An insecure channel—Think about a Bluetooth or a WiFi connection with a device. By default, the user has no way of authenticating the device and can, thus, be MITM’d.
An authenticated channel—Think about a screen on a device. The channel provides integrity/authenticity of the information communicated but poor confidentiality (someone could be looking over your shoulder).
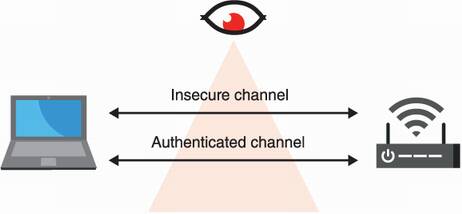
Figure 11.13 User-aided authentication protocols that allow a human to pair two devices are modeled with two types of channels between the devices: an insecure channel (for example, NFC, Bluetooth, WiFi, and so on), which we assume is adversary-controlled, and an authenticated channel (for example, real life), which does not provide confidentiality but can be used to exchange relatively small amounts of information.
As this out-of-band channel provides poor confidentiality, we usually do not want to use it to export secrets but rather public data. For example, a public key or some digest can be displayed by the device’s screen. But once you have exported a public key, you still need the other device to import it. For example, if the key is a QR code, then the other device might be able to scan it, or if the key is encoded in a human-readable format, then the user could manually type it in the other device using a keyboard. Once both devices are provisioned with each other’s public keys, you can use any protocols I’ve mentioned in chapter 9 to perform a mutually authenticated key exchange with the two devices.
What I want you to get from this section is that using cryptographic keys in your protocol is always the most secure way to achieve something, but it is not always the most user-friendly way. Yet, real-world cryptography is full of compromise and trade-offs, and this is why the next two schemes not only exist, but are the most popular ways to authenticate devices.
Let’s see how we can use passwords to bootstrap a mutually authenticated key exchange in cases where you cannot export and import long public keys. Then we’ll look at how short authenticated strings can help in situations where importing data into one or both of the devices is just not possible.
The previous solution is what you should be doing, if possible, as it relies on strong asymmetric keys as a root of trust. Yet, it turns out that, in practice, typing a long string representing a key with some cumbersome keypad manually is tedious. What about these dear passwords? They are so much shorter and, thus, easier to deal with. We love passwords right? Perhaps we don’t, but users do, and real-world cryptography is full of compromises. So be it.
In the section on asymmetric password-authenticated key exchanges, I mentioned that a symmetric (or balanced) version exists where two peers who know a common password can perform a mutually authenticated key exchange. This is exactly what we need.
Composable Password Authenticated Connection Establishment (CPace) was proposed in 2008 by Björn Haase and Benoît Labrique and was chosen in early 2020 as the official recommendation of the CFRG (the Crypto Forum Research Group). The algorithm is currently being standardized as an RFC. The protocol, simplified, looks something like the following (figure 11.14 illustrates the algorithm):
Two devices derive a generator (for some predetermined cyclic group) based on a common password.
Then the two devices use this generator to perform an ephemeral DH key exchange on top of it.
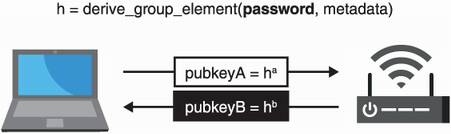
Figure 11.14 The CPace PAKE works by having the two devices create a generator based on a password and then use it to perform as a base for the usual ephemeral DH key exchange.
The devil is in the details, of course, and as a modern specification, CPace targets elliptic curve “gotchas” and defines when one must verify that a received point is in the right group (due to the trendy Curve25519 that, unfortunately, does not span a prime group). It also specifies how one derives a generator based on a password when in an elliptic curve group (using so-called hash-to-curve algorithms) and how to do this (using not only a common password but also an unique session ID and some additional contextual metadata like peer IP addresses and so on).
These steps are important as both peers must derive a generator h in a way that prevents them from knowing its discrete logarithm x such that gx = h. Finally, the session key is derived from the DH key exchange output, the transcript (the ephemeral public keys), and the unique session ID.
Intuitively, you can see that impersonating one of the peers and sending a group element as part of the handshake means that you’re sending a public key, which is associated with a private key you cannot know. This means that you can never perform a DH key exchange if you don’t know the password. The transcript just looks like a normal DH key exchange, and so, no luck there (as long as DH is secure).
In the second part of this chapter, you saw different protocols that allow two devices to be paired with the help of a human. Yet, I mentioned that some devices are so constrained that they cannot make use of those protocols. Let’s take a look at a scheme that is used when the two devices cannot import keys but can display some limited amount of data to the user (perhaps via a screen, or by turning on some LEDs, or by emitting some sounds, and so on).
First, remember that in chapter 10, you learned about authenticating a session post-handshake (after the key exchange) using fingerprints (hashes of the transcript). We could use something like this as we have our out-of-band channel to communicate these fingerprints. If the user can successfully compare and match the fingerprints obtained from both devices, then the user knows that the key exchange was not MITM’d.
The problem with fingerprints is that they are long byte strings (typically, 32 bytes long), which might be hard to display to the user. They are also cumbersome to compare. But for device pairing, we can use much shorter byte strings because we are doing the comparison in real time! We call these short authenticated strings (SAS). SAS are used a lot, notably by Bluetooth, due to them being quite user-friendly (see figure 11.15 for an example).
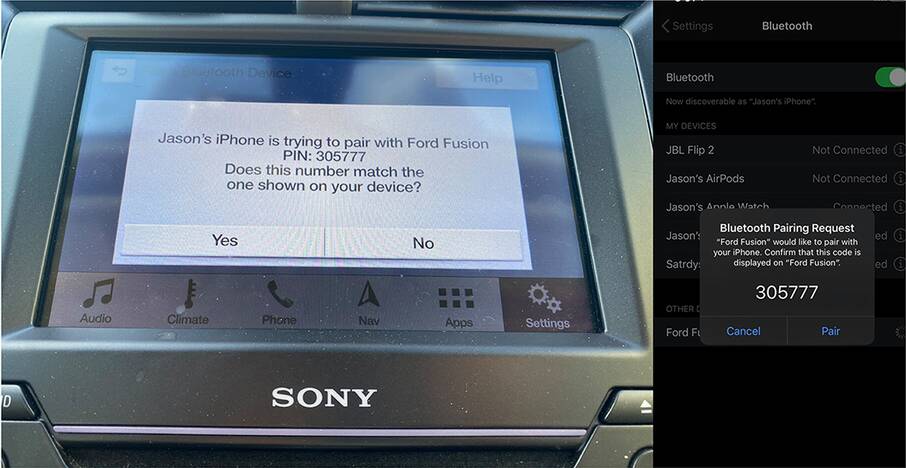
Figure 11.15 To pair a phone with a car via Bluetooth, the Numeric Comparison mode can be used to generate a short authenticated string (SAS) of the secure connection negotiated between the two devices. Unfortunately, as I stated earlier in this chapter, due to the KNOB attack, Bluetooth’s security protocols are currently broken (as of 2021). If you control both devices, you need to implement your own SAS protocol.
There aren’t any standards for SAS-based schemes, but most protocols (including Bluetooth’s numeric comparison) implement a variant of the Manually Authenticated Diffie-Hellman (MA-DH). MA-DH is a simple key exchange with an additional trick that makes it hard for an attacker to actively man-in-the-middle the protocol. You might ask, why not just create SAS from truncating a fingerprint? Why the need for a trick?
An SAS is typically a 6-digit number, which can be obtained by truncating a hash of the transcript to less than 20 bits and converting that to numbers in base 10. SAS is, thus, dangerously small, which makes it much easier for an attacker to obtain a second pre-image on the truncated hash. In figure 11.16, we take the example of two devices (although we use Alice and Bob) performing an unauthenticated key exchange. An active MITM attacker can substitute Alice’s public key with their own public key in the first message. Once the attacker receives Bob’s public key, they would know what SAS Bob will compute (a truncated hash based on the attacker’s public key and on Bob’s public key). The attacker just has to generate many public keys in order to find one (public_keyE2) that will make the SAS of Alice’s match with Bob’s.
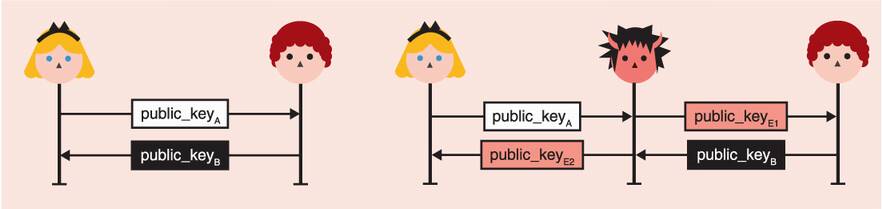
Figure 11.16 A typical unauthenticated key exchange (on the left) can be intercepted by an active MITM attacker (on the right), who can then substitute the public keys of both Alice and Bob. A MITM attack is successful if both Alice and Bob generate the same short authenticated string. That is, if HASH(public_keyA || public_keyE2) and HASH(public_keyE2 || public_keyB) match.
Generating a public key to make both SAS match is actually pretty easy. Imagine that the SAS is 20 bits, then after only 220 computations, you should find a second pre-image that will have both Alice and Bob generate the same SAS. This should be pretty instant to compute, even on a cheap phone.
The trick behind SAS-based key exchanges is to prevent the attacker from being able to choose their second public key, forcing the two SAS to match. To do this, Alice simply sends a commitment of her public key before seeing Bob’s public key (as in figure 11.17).
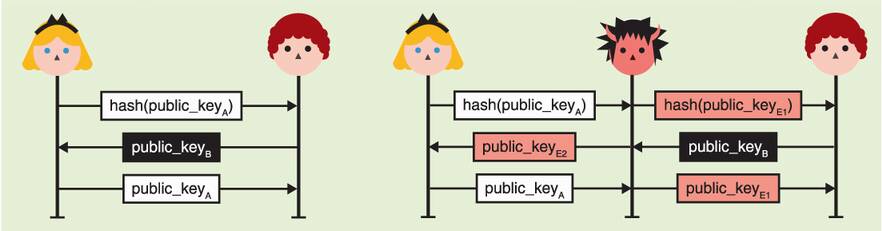
Figure 11.17 The diagram on the left pictures a secure SAS-based protocol in which Alice first sends a commitment of her public key. She then only reveals her public key after receiving Bob’s public key. As she committed to it, she cannot freely choose her key pair based on Bob’s key. If the exchange is actively MITM’d (diagram on the right), the attacker cannot choose either key pairs to force Alice’s and Bob’s SAS to match.
As with the previous insecure scheme, the attacker’s choice of public_keyE1 does not give them any advantage. But now, they also cannot choose a public_keyE2 that helps because they do not know Bob’s SAS at this point in the protocol. They are forced to “shoot in the dark” and hope that Alice’s and Bob’s SAS will match.
If a SAS is 20 bits, that’s a probability of 1 out of 1,048,576. An attacker can have more chances by running the protocol multiple times, but keep in mind that every instance of the protocol must have the user manually match a SAS. Effectively, this friction naturally prevents an attacker from getting too many lottery tickets.
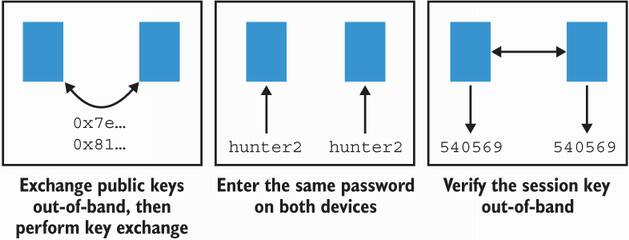
Figure 11.18 You’ve learned about three techniques to pair two devices: (1) a user can either help the devices obtain each other’s public keys so that they can perform a key exchange; (2) a user can enter the same password on two devices so that they can perform a symmetric password-authenticated key exchange; or (3) a user can verify a fingerprint of the key exchange after the fact to confirm that no MITM attacker intercepted the pairing.
This is it! Figure 11.18 reviews the different techniques you learned in the second part of this chapter. I’ll see you in chapter 12.
User authentication protocols (protocols for machines to authenticate humans) often take place over secure connections, where only the machine (server) has been authenticated. In this sense, it upgrades a one-way authenticated connection to a mutually authenticated connection.
User authentication protocols make heavy use of passwords. Passwords have proven to be a somewhat practical solution and one that is widely accepted by users. But they have also led to many issues due to poor password hygiene, low entropy, and password database breaches.
There are two ways to avoid having users carry multiple passwords (and possibly reuse passwords):
A solution for servers to avoid learning about and storing their users’ passwords is to use an asymmetric password-authenticated key exchange (asymmetric PAKE). An asymmetric PAKE (like OPAQUE) allows users to authenticate to a known server using passwords but without having to actually reveal their passwords to the server.
Solutions to avoid passwords altogether are for users to use symmetric keys via one-time passwords (OTP) algorithms or to use asymmetric keys via standards like FIDO2.
User-aided authentication protocols often take place over insecure connections (WiFi, Bluetooth, NFC) and help two devices to authenticate each other. To secure connections in these scenarios, user-aided protocols assume that the two participants possess an additional authenticated (but not confidential) channel that they can use (for example, a screen on the device).
Exporting a device’s public key to another device could allow strongly mutually authenticated key exchanges to happen. These flows are, unfortunately, not user-friendly and sometimes not possible due to device constraints (no way to export or import keys, for example).
Symmetric password-authenticated key exchanges (symmetric PAKEs) like CPace can decrease the burden for the user to import a long public key by only having to manually input a password in a device. Symmetric PAKEs are already used by most people to connect to their home WiFi, for example.
Protocols based on short authenticated strings (SAS) can provide security for devices that cannot import keys or passwords but are able to display a short string after a key exchange takes place. This short string must be the same on both devices in order to ensure that the unauthenticated key exchange was not actively MITM’d.