In chapter 4, you learned about authenticated encryption, a cryptographic primitive used to encrypt data but limited by its symmetry (both sides of a connection had to share the same key). In this chapter, I’ll lift this restriction by introducing asymmetric encryption, a primitive to encrypt to someone else’s key without knowing the key. Without surprise, asymmetric encryption makes use of key pairs and encryption will use public keys instead of symmetric keys.
Halfway through this chapter, you will see that asymmetric encryption is limited by the size of the data it can encrypt and by the rate at which it can encrypt it. To remove this obstacle, I’ll show you how to mix asymmetric encryption with authenticated encryption to form what we call hybrid encryption. Let’s get started!
Note For this chapter, you’ll need to have read chapter 4 on authenticated encryption and chapter 5 on key exchanges.
The first step in knowing how to encrypt a message is understanding asymmetric encryption (also called public key encryption). In this section, you will learn about this cryptographic primitive and its properties. Let’s take a look at the following real-world scenario: encrypted emails.
You probably know that all the emails you send are sent “in the clear” for anyone sitting in between you and your recipient’s email provider to read. That’s not great. How do you fix this? You could use a cryptographic primitive like AES-GCM, which you learned about in chapter 4. To do that, you would need to set up a different shared symmetric secret for each person that wants to message you.
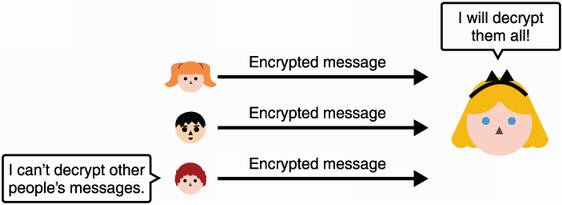
But you can’t expect to know in advance who’ll want to message you, and generating and exchanging new symmetric keys will get tedious as more and more people want to encrypt messages to you. This is where asymmetric encryption helps by allowing anyone in possession of your public key to encrypt messages to you. Furthermore, you are the only one who can decrypt these messages using the associated private key that only you own. See figure 6.1 for an illustration of asymmetric encryption.
Figure 6.1 With asymmetric encryption, anyone can use Alice’s public key to send her encrypted messages. Only Alice, who owns the associated private key, can decrypt these messages.
To set up asymmetric encryption, you first need to generate a key pair via some algorithm. As with any setup function for cryptographic algorithms, the key generation algorithm accepts a security parameter. This security parameter usually translates to “how big do you want your keys to be?” where bigger means more secure. Figure 6.2 illustrates this step.
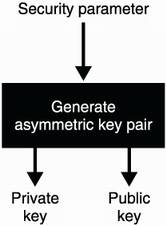
Figure 6.2 To use asymmetric encryption, you first need to generate a key pair. Depending on the security parameters you provide, you can generate keys of different security strengths.
The key generation algorithm generates a key pair comprised of two different parts: the public key part (as the name indicates) can be published and shared without much concerns, while the private key must remain secret. Similar to the key generation algorithms of other cryptographic primitives, a security parameter is required in order to decide on the bit security of the algorithm. Anyone can then use the public key part to encrypt messages, and you can use the private key part to decrypt as figure 6.3 illustrates. And similar to authenticated decryption, decryption can fail if presented with incoherent ciphertext.
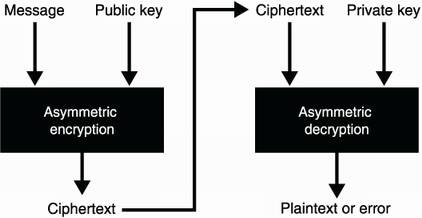
Figure 6.3 Asymmetric encryption allows one to encrypt a message (plaintext) using a recipient’s public key. The recipient can then use a different algorithm to decrypt the encrypted message (ciphertext) using a private key that’s related to the public key used previously.
Note that so far we haven’t talked about authentication. Consider both sides of the wire:
For now, we will imagine that we obtained Alice’s public key in a really secure way. In chapter 7, which covers digital signatures, you will learn how real-world protocols solve this bootstrapping issue in practice. You will also learn in chapter 7 how you can communicate to Alice who you really are, in a cryptographic way. Spoiler alert: you’ll be signing your messages.
Let’s move on to the next section where you’ll learn about how asymmetric encryption is used in practice (and also why it’s rarely used as-is in practice).
You might be thinking asymmetric encryption is probably enough to start encrypting your emails. In reality, asymmetric encryption is quite limited due to the restricted length of messages it can encrypt. The speed of asymmetric encryption and decryption is also slow in comparison to symmetric encryption. This is due to asymmetric constructions implementing math operations, as opposed to symmetric primitives that often just manipulate bits.
In this section, you will learn about these limitations, what asymmetric encryption is actually used for in practice, and finally, how cryptography overcomes these impediments. This section is divided in two parts for the two main use cases of asymmetric encryption:
Key exchanges—You will see that it is quite natural to perform a key exchange (or key agreement) with an asymmetric encryption primitive.
Hybrid encryption—You will see that the use cases for asymmetric encryption are quite limited due to the maximum size of what you can encrypt. To encrypt larger messages, you will learn about a more useful primitive called hybrid encryption.
It turns out that asymmetric encryption can be used to perform a key exchange—the same kind as the ones we saw in chapter 5! In order to do this, you can start by generating a symmetric key and encrypt it with Alice’s public key—what we also call encapsulating a key—as figure 6.4 demonstrates.
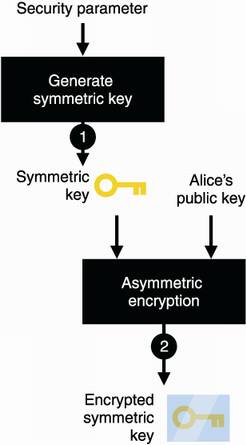
Figure 6.4 To use asymmetric encryption as a key exchange primitive, you (1) generate a symmetric key and then (2) encrypt it with Alice’s public key.
You can then send the ciphertext to Alice, who will be able to decrypt it and learn the symmetric key. Subsequently, you will have both a shared secret! Figure 6.5 illustrates the complete flow.
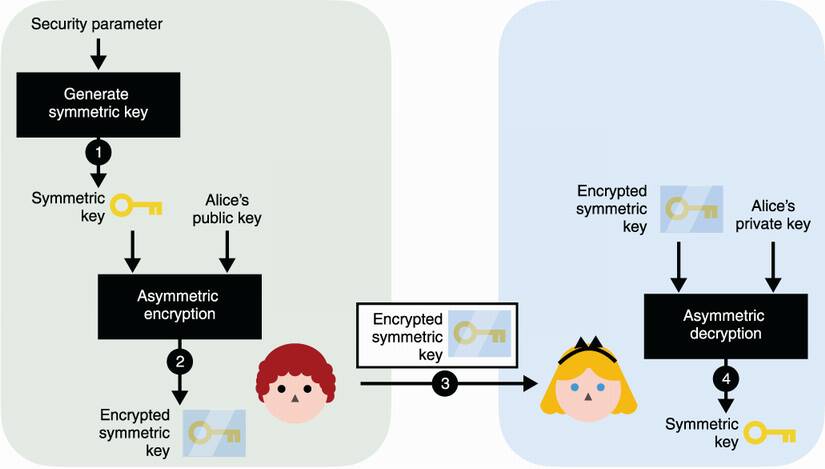
Figure 6.5 To use asymmetric encryption as a key exchange primitive, you can (1) generate a symmetric key and (2) encrypt it with Alice’s public key. After (3) sending it to Alice, she can (4) decrypt it with her associated private key. At the end of the protocol, you both have the shared secret, while no one else is able to derive it from observing the encrypted symmetric key alone.
Using asymmetric encryption to perform a key exchange is usually done with an algorithm called RSA (following the names of its inventors Rivest, Shamir, and Adleman) and used in many internet protocols. Today, RSA is often not the preferred way of doing a key exchange, and it is being used less and less in protocols in favor of Elliptic Curve Diffie-Hellman (ECDH). This is mostly due to historical reasons (many vulnerabilities have been discovered with RSA implementations and standards) and the attractiveness of the smaller parameter sizes offered by ECDH.
In practice, asymmetric encryption can only encrypt messages up to a certain length. For example, the size of plaintext messages that can be encrypted by RSA are limited by the security parameters that were used during the generation of the key pair (and more specifically by the size of the modulus). Nowadays, with the security parameters used (4,096-bit modulus), the limit is approximately 500 ASCII characters—pretty small. Therefore, most applications make use of hybrid encryption, whose limitation is tied to the encryption limits of the authenticated encryption algorithm used.
Hybrid encryption has the same interface as asymmetric encryption in practice (see figure 6.6). People can encrypt messages with a public key, and the one who owns the associated private key can decrypt the encrypted messages. The real difference is in the size limitations of the messages that you can encrypt.
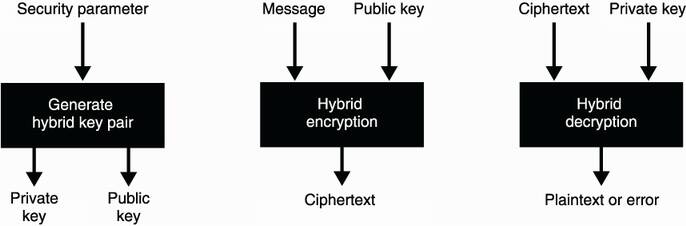
Figure 6.6 Hybrid encryption has the same interface as asymmetric encryption except that messages that can be encrypted are much larger in size.
Under the cover, hybrid encryption is simply the combination of an asymmetric cryptographic primitive with a symmetric cryptographic primitive (hence the name). Specifically, it is a non-interactive key exchange with the recipient, followed by the encryption of a message with an authenticated encryption algorithm.
Warning You could also use a simple symmetric encryption primitive instead of an authenticated encryption primitive, but symmetric encryption does not protect against someone tampering with your encrypted messages. This is why we never use symmetric encryption alone in practice (as seen in chapter 4).
Let’s learn about how hybrid encryption works! If you want to encrypt a message to Alice, you first generate a symmetric key and encrypt your message with it and then use an authenticated encryption algorithm as figure 6.7 illustrates.
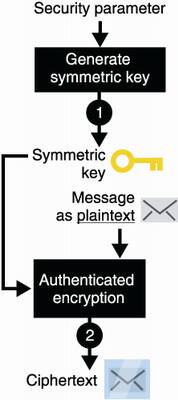
Figure 6.7 To encrypt a message to Alice using hybrid encryption with asymmetric encryption, you (1) generate a symmetric key for an authenticated encryption algorithm, then you (2) use the symmetric key to encrypt your message to Alice.
Once you have encrypted your message, Alice still cannot decrypt it without the knowledge of the symmetric key. How do we provide Alice with that symmetric key? Asymmetrically encrypt the symmetric key with Alice’s public key as in figure 6.8.
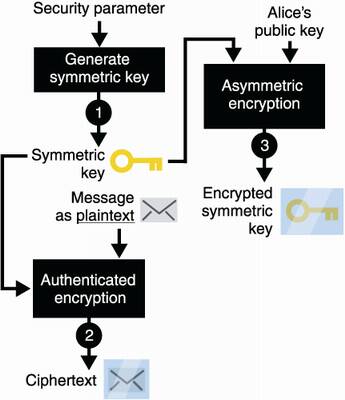
Figure 6.8 Building on figure 6.7, you (3) encrypt the symmetric key itself by using Alice’s public key and an asymmetric encryption algorithm.
Finally, you can send both results to Alice. These include
This is enough information for Alice to decrypt the message. I illustrate the full flow in figure 6.9.

Figure 6.9 Building on figure 6.8, (4) after you send both the encrypted symmetric key and the encrypted message to Alice, (5) Alice decrypts the symmetric key using her private key. (6) She then uses the symmetric key to decrypt the encrypted message. (Note that steps 5 and 6 can both fail and return errors if the communications are tampered with by a MITM attacker at step 4.)
And this is how we can use the best of both worlds: mixing asymmetric encryption and symmetric encryption to encrypt large amounts of data to a public key. We often call the first asymmetric part of the algorithm a key encapsulation mechanism (KEM) and the second symmetric part a data encapsulation mechanism (DEM).
Before we move to the next section and learn about the different algorithms and standards that exist for both asymmetric encryption and hybrid encryption, let’s see (in practice) how you can use a cryptographic library to perform hybrid encryption. To do this, I chose the Tink cryptography library. Tink was developed by a team of cryptographers at Google to support large teams inside and outside of the company. Because of the scale of the project, conscious design choices were made and sane functions were exposed in order to prevent developers from misusing cryptographic primitives. In addition, Tink is available in several programming languages ( Java, C++, Obj-C, and Golang).
Listing 6.1 Hybrid encryption in Java
import com.google.crypto.tink.HybridDecrypt;
import com.google.crypto.tink.HybridEncrypt;
import com.google.crypto.tink.hybrid.HybridKeyTemplates
➥ .ECIES_P256_HKDF_HMAC_SHA256_AES128_GCM;
import com.google.crypto.tink.KeysetHandle;

KeysetHandle privkey = KeysetHandle.generateNew(          ❶
   ECIES_P256_HKDF_HMAC_SHA256_AES128_GCM);               ❶

KeysetHandle publicKeysetHandle =                         ❷
   privkey.getPublicKeysetHandle();                       ❷

HybridEncrypt hybridEncrypt =                             ❸
   publicKeysetHandle.getPrimitive(                       ❸
      HybridEncrypt.class);                               ❸
byte[] ciphertext = hybridEncrypt.encrypt(                ❸
   plaintext, associatedData);                            ❸

HybridDecrypt hybridDecrypt =                             ❹
   privkey.getPrimitive(HybridDecrypt.class);             ❹
byte[] plaintext = hybridDecrypt.decrypt(                 ❹
   ciphertext, associatedData);                           ❹
❶ Generates keys for a specific hybrid encryption scheme
❷ Obtains the public key part that we can publish or share
❸ Anyone who knows this public key can use it to encrypt plaintext and can authenticate some associated data.
❹ Decrypts an encrypted message using the same associated data. If the decryption fails, it throws an exception.
One note to help you understand the ECIES_P256_HKDF_HMAC_SHA256_AES128_GCM string: ECIES (for Elliptic Curve Integrated Encryption Scheme) is the hybrid encryption standard to use. You’ll learn about this later in this chapter. The rest of the string lists the algorithms used to instantiate ECIES:
P256 is the NIST standardized elliptic curve you learned about in chapter 5.
HKDF is a key derivation function you will learn about in chapter 8.
HMAC is the message authentication code you learned about in chapter 3.
SHA-256 is the hash function you learned about in chapter 2.
AES-128-GCM is the AES-GCM authenticated encryption algorithm using a 128-bit key you learned about in chapter 4.
See how everything is starting to fit together? In the next section, you will learn about RSA and ECIES, the two widely adopted standards for asymmetric encryption and hybrid encryption.
It is time for us to look at the standards that define asymmetric encryption and hybrid encryption in practice. Historically, both of these primitives have not been spared by cryptanalysts, and many vulnerabilities and weaknesses have been found in both standards and implementations. This is why I will start this section with an introduction to the RSA asymmetric encryption algorithm and how not to use it. The rest of the chapter will go through the actual standards you can follow to use asymmetric and hybrid encryptions:
RSA-OAEP—The main standard to perform asymmetric encryption with RSA
ECIES—The main standard to perform hybrid encryption with Elliptic Curve Diffie-Hellman (ECDH)
In this section, you will learn about the RSA public key encryption algorithm and how it has been standardized throughout the years. This is useful to understand other secure schemes based on RSA.
Unfortunately, RSA has caught quite some bad rap since it was first published in 1977. One of the popular theories is that RSA is too easy to understand and implement, and thus, many people do it themselves, which leads to a lot of vulnerable implementations. It’s an interesting idea, but it misses the whole story. While the concept of RSA (often called textbook RSA) is insecure if implemented naively, even standards have been found to be broken! But not so fast, to understand these issues, you will first need to learn how RSA works.
Remember the multiplicative group of numbers modulo a prime p? (We talked about it in chapter 5.) It is the set of strictly positive integers:
Let’s imagine that one of these numbers is our message. For p large enough, let’s say 4,096 bits, our message can contain around 500 characters tops.
Note For computers, a message is just a series of bytes, which can also be interpreted as a number.
We have seen that by exponentiating a number (let’s say our message), we can generate other numbers that form a subgroup. I illustrate this in figure 6.10.
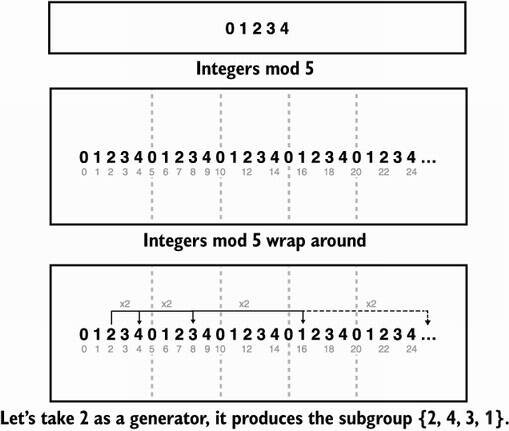
Figure 6.10 Integers modulo a prime (here 5) are divided in different subgroups. By picking an element as a generator (let’s say the number 2) and exponentiating it, we can generate a subgroup. For RSA, the generator is the message.
This is useful for us when defining how to encrypt with RSA. To do this, we publish a public exponent e (for encryption) and a prime number p. (In reality p cannot be prime, but we’ll ignore that for a moment.) To encrypt a message m, one computes
For example, to encrypt the message m = 2 with e = 2 and p = 5, we compute
And this is the idea behind encryption with RSA!
Note Usually, a small number is chosen as the public exponent e so that encryption is fast. Historically, standards and implementations seem to have settled on the prime number 65,537 for the public exponent.
This is great! You now have a way for people to encrypt messages to you. But how do you decrypt those? Remember, if you continue to exponentiate a generator, you actually go back to the original number (see figure 6.11).
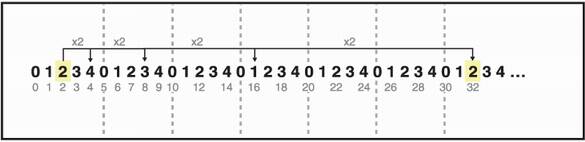
Figure 6.11 Let’s say that our message is the number 2. By exponentiating it, we can obtain other numbers in our group. If we exponentiate it enough, we go back to our original message, 2. We say that the group is cyclic. This property can be used to recover a message after it has been raised to some power.
This should give you an idea of how to implement decryption: find out how much you need to exponentiate a ciphertext in order to recover the original generator (which is the message). Let’s say that you know such a number, which we’ll call the private exponent d (d for decryption). If you receive
you should be able to raise it to the power d to recover the message:
ciphertextd = (messagee)d = messagee×d = message mod p
The actual mathematics behind finding this private exponent d is a bit tricky. Simply put, you compute the inverse of the public exponent modulo the order (number of elements) of the group:
We have an efficient algorithm to compute modular inverses (like the Extended Euclidean algorithm), and so this is not a problem. We do have another problem though! For a prime p, the order is simply p – 1, and thus, it’s easy for anyone to calculate the private exponent. This is because every element in this equation besides d is public.
One way we could prevent others from computing the private exponent from the public exponent is to hide the order of our group. This is the brilliant idea behind RSA: if our modulus is not a prime anymore but a product of a prime N = p × q (where p and q are large primes known only to you), then the order of our multiplicative group is not easy to compute as long as we don’t know p and q!
We’re all good! To recapitulate, this is how RSA works:
1) Generate two large prime numbers p and q.
2) Choose a random public exponent e or a fixed one like e = 65537.
3) Your public key is the public exponent e and the public modulus N = p × q.
4) Derive your private exponent d = e–1 mod (p – 1) (q – 1).
For decryption of the ciphertext, compute ciphertextd mod N.
Figure 6.12 reviews how RSA works in practice.

Figure 6.12 RSA encryption works by exponentiating a number (our message) with the public exponent e modulo the public modulus N = p × q. RSA decryption works by exponentiating the encrypted number with the private exponent d modulo the public modulus N.
We say that RSA relies on the factorization problem. Without the knowledge of p and q, no one can compute the order; thus, no one but you can compute the private exponent from the public exponent. This is similar to how Diffie-Hellman was based on the discrete logarithm problem (see figure 6.13).
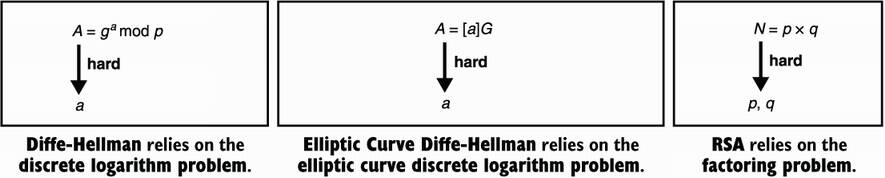
Figure 6.13 Diffie-Hellman (DH), Elliptic Curve Diffie-Hellman (ECDH), and RSA are asymmetric algorithms that rely on three distinct problems in mathematics that we believe to be hard. Hard meaning that we do not know efficient algorithms to solve them when instantiated with large numbers.
Thus, textbook RSA works modulo a composite number N = p × q, where p and q are two large primes that need to remain secret. Now that you understand how RSA works, let’s see how insecure it is in practice and what standards do to make it secure.
You learned about “textbook RSA,” which is insecure by default for many reasons. Before you can learn about the secure version of RSA, let’s see what you need to avoid.
There are many reasons why you cannot use textbook RSA directly. One example is that if you encrypt small messages (for example m = 2), then some malicious actor can encrypt all the small numbers between 0 and 100, for example, and quickly observe if any of their encrypted numbers match your ciphertext. If it does, they will know what you encrypted.
Standards fix this issue by making your messages too big to be brute-forced in such a way. Specifically, they maximize the size of a message (before encryption) with a nondeterministic padding. For example, the RSA PKCS#1 v1.5 standard defines a padding that adds a number of random bytes to the message. I illustrate this in figure 6.14.
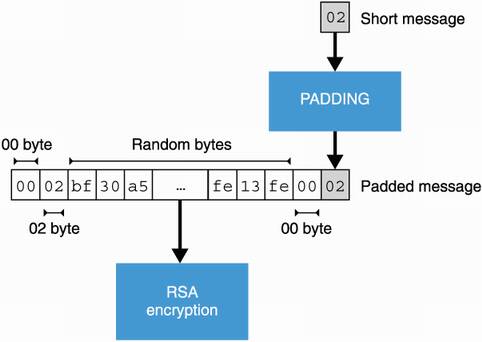
Figure 6.14 The RSA PKCS#1 v1.5 standard specifies a padding to apply to a message prior to encryption. The padding must be reversible (so that decryption can get rid of it) and must add enough random bytes to the message in order to avoid brute force attacks.
The PKCS#1 standard is actually the first standard based on RSA, published as part of a series of Public Key Cryptography Standard (PKCS) documents written by the RSA company in the early 90s. While the PKCS#1 standard fixes some known issues, in 1998, Bleichenbacher found a practical attack on PKCS#1 v1.5 that allowed an attacker to decrypt messages encrypted with the padding specified by the standard. As it required a million messages, it is infamously called the million message attack. Mitigations were later found, but interestingly, over the years, the attack has been rediscovered again and again as researchers found that the mitigations were too hard to implement securely (if at all).
To understand why the attack was possible, you need to understand that RSA ciphertexts are malleable : you can tamper with an RSA ciphertext without invalidating its decryption. If I observe the ciphertext c = me mod N, then I can submit the following ciphertext:
I used the number 3 as an example here, but I can multiply the original message with whatever number I want. In practice, a message must be well-formed (due to the padding), and thus, tampering with a ciphertext should break the decryption. Nevertheless, it happens that sometimes, even after the malicious modification, the padding is accepted after decryption.
Bleichenbacher made use of this property in his million message attack on RSA PKCS#1 v1.5. His attack works by intercepting an encrypted message, modifying it, and sending it to the person in charge of decrypting it. By observing if that person can decrypt it (the padding remained valid), we obtain some information about the message range. Because the first two bytes are 0x0002, we know that the decryption is smaller than some value. By doing this iteratively, we can narrow that range down to the original message itself.
Even though the Bleichenbacher attack is well-known, there are still many systems in use today that implement RSA PKCS#1 v1.5 for encryption. As part of my work as a security consultant, I found many applications that were vulnerable to this attack—so be careful!
In 1998, version 2.0 of the same PKCS#1 standard was released with a new padding scheme for RSA called Optimal Asymmetric Encryption Padding (OAEP). Unlike its predecessor, PKCS#1 v1.5, OAEP is not vulnerable to Bleichenbacher’s attack and is, thus, a strong standard to use for RSA encryption nowadays. Let’s see how OAEP works and prevents the previously discussed attacks.
First, let’s mention that like most cryptographic algorithms, OAEP comes with a key generation algorithm. This takes a security parameter as figure 6.15 illustrates.
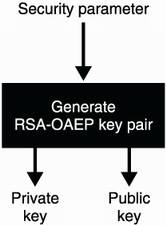
Figure 6.15 RSA-OAEP, like many public key algorithms, first needs to generate a key pair that can be used later in the other algorithms provided by the cryptographic primitive.
This algorithm takes a security parameter, which is a number of bits. As with Diffie-Hellman, operations happen in the set of numbers modulo a large number. When we talk about the security of an instantiation of RSA, we usually refer to the size of that large modulus. This is similar to Diffie-Hellman if you remember.
Currently, most guidelines (see https://keylength.com) estimate a modulus between 2,048 and 4,096 bits to provide 128-bit security. As these estimations are quite different, most applications seem to conservatively settle on 4,096-bit parameters.
Note We saw that RSA’s large modulus is not a prime but a product N = p × q of two large prime numbers p and q. For a 4,096-bit modulus, the key generation algorithm typically splits things in the middle and generates both p and q of size approximately 2,048 bits.
To encrypt, the algorithm first pads the message and mixes it with a random number generated per encryption. The result is then encrypted with RSA. To decrypt the ciphertext, the process is reversed as figure 6.16 shows.
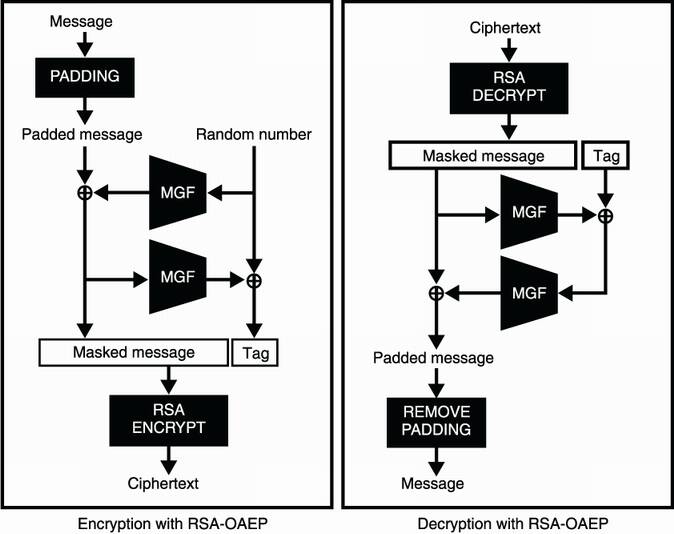
Figure 6.16 RSA-OAEP works by mixing the message with a random number prior to encryption. The mixing can be reverted after decryption. At the center of the algorithm, a mask generation function (MGF) is used to randomize and enlarge or reduce an input.
RSA-OAEP uses this mixing in order to make sure that if a few bits of what is encrypted with RSA leak, no information on the plaintext can be obtained. Indeed, to reverse the OAEP padding, you need to obtain (close to) all the bytes of the OAEP padded plaintext! In addition, Bleichenbacher’s attack should not work anymore because the scheme makes it impossible to obtain well-formed plaintext by modifying a ciphertext.
Note Plaintext-awareness is the property that makes it too difficult for an attacker to create a ciphertext that will successfully decrypt (of course without the help of encryption). Due to the plaintext-awareness provided by OAEP, Bleichenbacher’s attack does not work on the scheme.
Inside of OAEP, MGF stands for mask generation function. In practice, an MGF is an extendable output function (XOF); you learned about XOFs in chapter 2. As MGFs were invented before XOFs, they are built using a hash function that hashes the input repeatedly with a counter (see figure 6.17). And this is how OAEP works!
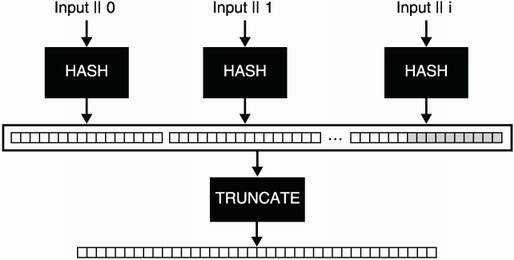
Figure 6.17 A mask generation function (MGF) is simply a function that takes an arbitrary length input and produces a random-looking arbitrary length output. It works by hashing an input and a counter, concatenating the digests together, and truncating the result to obtain the length desired.
Furthermore, the design of OAEP is not perfect; better constructions have been proposed and standardized over the years. One example is RSA-KEM, which has stronger proofs of security and is much simpler to implement securely. You can observe how much more elegant the design is in figure 6.18.
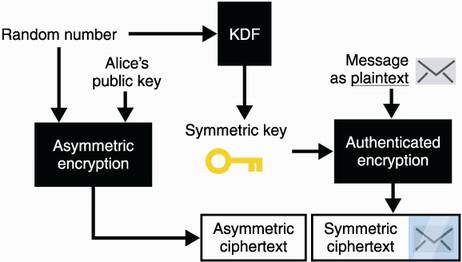
Figure 6.18 RSA-KEM is an encryption scheme that works by simply encrypting a random number under RSA. No padding is needed. We can pass the random number through a key derivation function (KDF) to obtain a symmetric key. We then use the symmetric key to encrypt a message via an authenticated encryption algorithm.
Note the key derivation function (KDF) in use here. It is another cryptographic primitive that can be replaced with an MGF or a XOF. I’ll talk more about what KDFs are in chapter 8 on randomness and secrets.
Nowadays, most protocols and applications that use RSA either still implement the insecure PKCS#1 v1.5 or OAEP. On the other hand, more and more protocols are moving away from RSA encryption in favor of Elliptic Curve Diffie-Hellman (ECDH) for both key exchanges and hybrid encryption. This is understandable as ECDH provides shorter public keys and benefits, in general, from much better standards and much safer implementations.
While there exist many hybrid encryption schemes, the most widely adopted standard is Elliptic Curve Integrated Encryption Scheme (ECIES). The scheme has been specified to be used with ECDH and is included in many standards like ANSI X9.63, ISO/IEC 18033-2, IEEE 1363a, and SECG SEC 1. Unfortunately, every standard seems to implement a different variant, and different cryptographic libraries implement hybrid encryption differently, in part due to this.
For this reason, I rarely see two similar implementations of hybrid encryption in the wild. It is important to understand that while this is annoying, if all the participants of the protocol use the same implementation or document the details of the hybrid encryption scheme they have implemented, then there would be no issues.
ECIES works similarly to the hybrid encryption scheme explained in section 6.2. The difference is that we implement the KEM part with an ECDH key exchange instead of with an asymmetric encryption primitive. Let’s explain this step by step.
First, if you want to encrypt a message to Alice, you use an (EC)DH-based key exchange with Alice’s public key and a key pair that you generate for the occasion (this is called an ephemeral key pair). You can then use the obtained shared secret with an authenticated symmetric encryption algorithm like AES-GCM to encrypt a longer message to her. Figure 6.19 illustrates this.
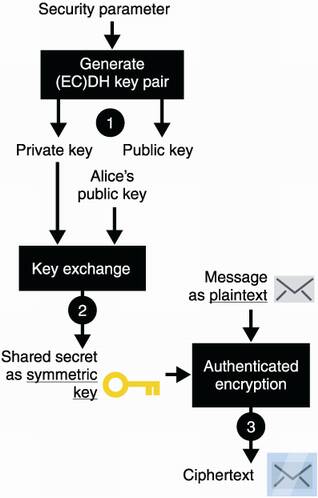
Figure 6.19 To encrypt a message to Alice using hybrid encryption with (EC)DH, you (1) generate an ephemeral (elliptic curve) DH key pair. Then (2) perform a key exchange with your ephemeral private key and Alice’s public key. (3) Use the resulting shared secret as a symmetric key to an authenticated encryption algorithm to encrypt your message.
After this, you can send the ephemeral public key and the ciphertext to Alice. Alice can use your ephemeral public key to perform a key exchange with her own key pair. She can then use the result to decrypt the ciphertext and retrieve the original message. The result is either the original message or an error if the public key or the encrypted message are tampered with in transit. Figure 6.20 illustrates the full flow.
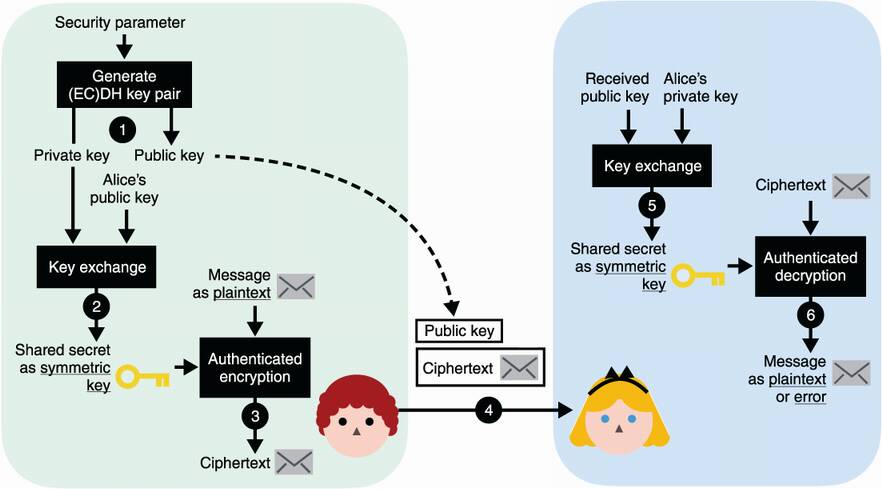
Figure 6.20 Building on figure 6.19, (4) after you send your ephemeral public key and your encrypted message to Alice, (5) Alice can perform a key exchange with her private key and your ephemeral public key. (6) She finally uses the resulting shared secret as a symmetric key to decrypt the encrypted message with the same authenticated encryption algorithm.
And this is pretty much how ECIES work. There also exists a variant of ECIES using Diffie-Hellman, called IES, that works pretty much the same way, but not many people seem to use it.
And that’s it for the different standards you can use. In the next chapter, you’ll learn about signatures, which will be the last, and perhaps most important, public key cryptography algorithm of part 1.
We rarely use asymmetric encryption to encrypt messages directly. This is due to the relatively low size limitations of the data that asymmetric encryption can encrypt.
Hybrid encryption can encrypt much larger messages by combining asymmetric encryption (or a key exchange) with a symmetric authenticated encryption algorithm.
The RSA PKCS#1 version 1.5 standard for asymmetric encryption is broken in most settings. Prefer the RSA-OAEP algorithm standardized in RSA PKCS#1 version 2.2.
ECIES is the most widely used hybrid encryption scheme. It is preferred over RSA-based schemes due to its parameter sizes and its reliance on solid standards.
Different cryptographic libraries might implement hybrid encryption differently. This is not a problem in practice if interoperable applications use the same implementations.