20
Styling and Deploying an App

Learning Log is fully functional now, but it has no styling and runs only on your local machine. In this chapter, you’ll style the project in a simple but professional manner and then deploy it to a live server so anyone in the world can make an account and use it.
For the styling, we’ll use the Bootstrap library, a collection of tools for styling web applications so they look professional on all modern devices, from a small phone to a large desktop monitor. To do this, we’ll use the django-bootstrap5 app, which will also give you practice using apps made by other Django developers.
We’ll deploy Learning Log using Platform.sh, a site that lets you push your project to one of its servers, making it available to anyone with an internet connection. We’ll also start using a version control system called Git to track changes to the project.
When you’re finished with Learning Log, you’ll be able to develop simple web applications, give them a professional look and feel, and deploy them to a live server. You’ll also be able to use more advanced learning resources as you develop your skills.
Styling Learning Log
We’ve purposely ignored styling until now to focus on Learning Log’s functionality first. This is a good way to approach development, because an app is only useful if it works. Once an app is working, its appearance is critical so people will want to use it.
In this section, we’ll install the django-bootstrap5 app and add it to the project. We’ll then use it to style the individual pages in the project, so all the pages have a consistent look and feel.
The django-bootstrap5 App
We’ll use django-bootstrap5 to integrate Bootstrap into our project. This app downloads the required Bootstrap files, places them in an appropriate location in your project, and makes the styling directives available in your project’s templates.
To install django-bootstrap5, issue the following command in an active virtual environment:
(ll_env)learning_log$ pip install django-bootstrap5
--snip--
Successfully installed beautifulsoup4-4.11.1 django-bootstrap5-21.3
    soupsieve-2.3.2.post1
Next, we need to add django-bootstrap5 to INSTALLED_APPS in settings.py:
settings.py
--snip--
INSTALLED_APPS = [
    # My apps.
    'learning_logs',
    'accounts',

    # Third party apps.
    'django_bootstrap5',

    # Default django apps.
    'django.contrib.admin',
    --snip--
Start a new section called Third party apps, for apps created by other developers, and add 'django_bootstrap5' to this section. Make sure you place this section after My apps but before the section containing Django’s default apps.
Using Bootstrap to Style Learning Log
Bootstrap is a large collection of styling tools. It also has a number of templates you can apply to your project to create an overall style. It’s much easier to use these templates than to use individual styling tools. To see the templates Bootstrap offers, go to https://getbootstrap.com and click Examples. We’ll use the Navbar static template, which provides a simple top navigation bar and a container for the page’s content.
Figure 20-1 shows what the home page will look like after we apply Bootstrap’s template to base.html and modify index.html slightly.
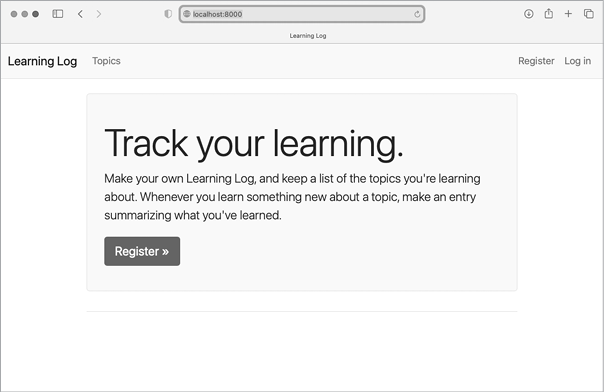
Figure 20-1: The Learning Log home page using Bootstrap
Modifying base.html
We need to rewrite base.html using the Bootstrap template. We’ll develop the new base.html in sections. This is a large file; you may want to copy this file from the online resources, available at https://ehmatthes.github.io/pcc_3e. If you do copy the file, you should still read through the following section to understand the changes that were made.
Defining the HTML Headers
The first change we’ll make to base.html defines the HTML headers in the file. We’ll also add some requirements for using Bootstrap in our templates, and give the page a title. Delete everything in base.html and replace it with the following code:
base.html
❶ <!doctype html>
❷ <html lang="en">
❸ <head>
  <meta charset="utf-8">
  <meta name="viewport" content="width=device-width, initial-scale=1">
❹   <title>Learning Log</title>

❺   {% load django_bootstrap5 %}
  {% bootstrap_css %}
  {% bootstrap_javascript %}

</head>
We first declare this file as an HTML document ❶ written in English ❷. An HTML file is divided into two main parts: the head and the body. The head of the file begins with an opening <head> tag ❸. The head of an HTML file doesn’t hold any of the page’s content; it just tells the browser what it needs to know to display the page correctly. We include a <title> element for the page, which will display in the browser’s title bar whenever Learning Log is open ❹.
Before closing the head section, we load the collection of template tags available in django-bootstrap5 ❺. The template tag {% bootstrap_css %} is a custom tag from django-bootstrap5; it loads all of the CSS files required to implement Bootstrap styles. The tag that follows enables all the interactive behavior you might use on a page, such as collapsible navigation bars. The closing </head> tag appears on the last line.
All Bootstrap styling options are now available in any template that inherits from base.html. If you want to use custom template tags from django-bootstrap5, each template will need to include the {% load django_bootstrap5 %} tag.
Defining the Navigation Bar
The code that defines the navigation bar at the top of the page is fairly long, because it has to work equally well on narrow phone screens and wide desktop monitors. We’ll work through the navigation bar in sections.
Here’s the first part of the navigation bar:
base.html
--snip--
</head>
<body>

❶   <nav class="navbar navbar-expand-md navbar-light bg-light mb-4 border">
    <div class="container-fluid">
❷       <a class="navbar-brand" href="{% url 'learning_logs:index' %}">
          Learning Log</a>

❸       <button class="navbar-toggler" type="button" data-bs-toggle="collapse"
        data-bs-target="#navbarCollapse" aria-controls="navbarCollapse"
        aria-expanded="false" aria-label="Toggle navigation">
        <span class="navbar-toggler-icon"></span>
      </button>

❹       <div class="collapse navbar-collapse" id="navbarCollapse">
❺         <ul class="navbar-nav me-auto mb-2 mb-md-0">
❻           <li class="nav-item">
❼             <a class="nav-link" href="{% url 'learning_logs:topics' %}">
              Topics</a></li>
        </ul> <!-- End of links on left side of navbar -->
      </div> <!-- Closes collapsible parts of navbar -->

    </div> <!-- Closes navbar's container -->
  </nav> <!-- End of navbar -->

❽ {% block content %}{% endblock content %}

</body>
</html>
The first new element is the opening <body> tag. The body of an HTML file contains the content users will see on a page. Next we have a <nav> element, which opens the code for the navigation bar at the top of the page ❶. Everything contained in this element is styled according to the Bootstrap style rules defined by the selectors navbar, navbar-expand-md, and the rest that you see here. A selector determines which elements on a page a certain style rule applies to. The navbar-light and bg-light selectors style the navigation bar with a light-themed background. The mb in mb-4 is short for margin-bottom; this selector ensures that a little space appears between the navigation bar and the rest of the page. The border selector provides a thin border around the light background to set it off a little from the rest of the page.
The <div> tag on the next line opens a resizable container that will hold the overall navigation bar. The term div is short for division; you build a web page by dividing it into sections and defining style and behavior rules that apply to that section. Any styling or behavior rules that are defined in an opening <div> tag affect everything you see until its corresponding closing tag, written as </div>.
Next we set the project’s name, Learning Log, to appear as the first element on the navigation bar ❷. This will also serve as a link to the home page, just as it’s been doing in the minimally styled version of the project we built in the previous two chapters. The navbar-brand selector styles this link so it stands out from the rest of the links and helps add some branding to the site.
The Bootstrap template then defines a button that appears if the browser window is too narrow to display the whole navigation bar horizontally ❸. When the user clicks the button, the navigation elements appear in a drop-down list. The collapse reference causes the navigation bar to collapse when the user shrinks the browser window or when the site is displayed on devices with small screens.
Next, we open a new section (<div>) of the navigation bar ❹. This is the part of the navigation bar that can collapse depending on the size of the browser window.
Bootstrap defines navigation elements as items in an unordered list ❺, with style rules that make it look nothing like a list. Every link or element you need on the bar can be included as an item in an unordered list ❻. Here, the only item in the list is our link to the topics page ❼. Notice the closing </li> tag at the end of the link; every opening tag needs a corresponding closing tag.
The rest of the lines shown here close out all of the tags that have been opened. In HTML, a comment is written like this:
<!-- This is an HTML comment. -->Closing tags don’t usually have comments, but if you’re new to HTML, it can be really helpful to label some of your closing tags. A single missing tag or an extra tag can throw off the layout of an entire page. We include the content block ❽ and the closing </body> and </html> tags as well.
We’re not finished with the navigation bar, but we now have a complete HTML document. If runserver is currently active, stop the current server and restart it. Go to the project’s home page, and you should see a navigation bar that has some of the elements shown in Figure 20-1. Now let’s add the rest of the elements to the navigation bar.
Adding User Account Links
We still need to add the links associated with user accounts. We’ll start by adding all of the account-related links except the logout form.
Make the following changes to base.html:
base.html
        --snip--
        </ul> <!-- End of links on left side of navbar -->

        <!-- Account-related links -->
❶         <ul class="navbar-nav ms-auto mb-2 mb-md-0">

❷           {% if user.is_authenticated %}
            <li class="nav-item">
❸               <span class="navbar-text me-2">Hello, {{ user.username }}.
                </span></li>
❹           {% else %}
            <li class="nav-item">
              <a class="nav-link" href="{% url 'accounts:register' %}">
                  Register</a></li>
            <li class="nav-item">
              <a class="nav-link" href="{% url 'accounts:login' %}">
                  Log in</a></li>
          {% endif %}

        </ul> <!-- End of account-related links -->

      </div> <!-- Closes collapsible parts of navbar -->
      --snip--
We begin a new set of links by using another opening <ul> tag ❶. You can have as many groups of links as you need on a page. The selector ms-auto is short for margin-start-automatic: this selector examines the other elements in the navigation bar and works out a left (start) margin that pushes this group of links to the right side of the browser window.
The if block is the same conditional block we used earlier to display appropriate messages to users, depending on whether they’re logged in ❷. The block is a little longer now because there are some styling rules inside the conditional tags. The greeting for authenticated users is wrapped in a <span> element ❸. A span element styles pieces of text or elements of a page that are part of a longer line. While div elements create their own divisions in a page, span elements are continuous within a larger section. This can be confusing at first, because many pages have deeply nested div elements. Here, we’re using the span element to style informational text on the navigation bar: in this case, the logged-in user’s name.
In the else block, which runs for unauthenticated users, we include the links for registering a new account and logging in ❹. These should look just like the link to the topics page.
If you wanted to add more links to the navigation bar, you’d add another <li> item to one of the <ul> groups that we’ve defined, using styling directives like the ones you’ve seen here.
Now let’s add the logout form to the navigation bar.
Adding the Logout Form to the Navigation Bar
When we first wrote the logout form, we added it to the bottom of base.html. Now let’s put it in a better place, in the navigation bar:
base.html
        --snip--
        </ul> <!-- End of account-related links -->

        {% if user.is_authenticated %}
          <form action="{% url 'accounts:logout' %}" method='post'>
            {% csrf_token %}
❶             <button name='submit' class='btn btn-outline-secondary btn-sm'>
                Log out</button>
          </form>
        {% endif %}

      </div> <!-- Closes collapsible parts of navbar -->
      --snip--
The logout form should be placed after the set of account-related links, but inside the collapsible section of the navigation bar. The only change in the form is the addition of a number of Bootstrap styling classes in the <button> element, which apply Bootstrap styling elements to the logout button ❶.
Reload the home page, and you should be able to log in and out using any of the accounts you’ve created.
There’s still a bit more we need to add to base.html. We need to define two blocks that the individual pages can use to place the content specific to those pages.
Defining the Main Part of the Page
The rest of base.html contains the main part of the page:
base.html
  --snip--
  </nav> <!-- End of navbar -->

❶   <main class="container">
❷     <div class="pb-2 mb-2 border-bottom">
      {% block page_header %}{% endblock page_header %}
    </div>
❸     <div>
      {% block content %}{% endblock content %}
    </div>
  </main>

</body>
</html>
We first open a <main> tag ❶. The main element is used for the most significant part of the body of a page. Here we assign the bootstrap selector container, which is a simple way to group elements on a page. We’ll place two div elements in this container.
The first div element contains a page_header block ❷. We’ll use this block to title most pages. To make this section stand out from the rest of the page, we place some padding below the header. Padding refers to space between an element’s content and its border. The selector pb-2 is a bootstrap directive that provides a moderate amount of padding at the bottom of the styled element. A margin is the space between an element’s border and other elements on the page. The selector mb-2 provides a moderate amount of margin at the bottom of this div. We want a border on the bottom of this block, so we use the selector border-bottom, which provides a thin border at the bottom of the page_header block.
We then define one more div element that contains the block content ❸. We don’t apply any specific style to this block, so we can style the content of any page as we see fit for that page. The end of the base.html file has closing tags for the main, body, and html elements.
When you load Learning Log’s home page in a browser, you should see a professional-looking navigation bar that matches the one shown in Figure 20-1. Try resizing the window so it’s really narrow; a button should replace the navigation bar. Click the button, and all the links should appear in a drop-down list.
Styling the Home Page Using a Jumbotron
To update the home page, we’ll use a Bootstrap element called a jumbotron, a large box that stands out from the rest of the page. Typically, it’s used on home pages to hold a brief description of the overall project and a call to action that invites the viewer to get involved.
Here’s the revised index.html file:
index.html
{% extends "learning_logs/base.html" %}
❶ {% block page_header %}
❷ <div class="p-3 mb-4 bg-light border rounded-3">
<div class="container-fluid py-4">
❸ <h1 class="display-3">Track your learning.</h1>
❹ <p class="lead">Make your own Learning Log, and keep a list of the
topics you're learning about. Whenever you learn something new
about a topic, make an entry summarizing what you've learned.</p>
❺ <a class="btn btn-primary btn-lg mt-1"
href="{% url 'accounts:register' %}">Register »</a>
</div>
</div>
{% endblock page_header %}We first tell Django that we’re about to define what goes in the page_header block ❶. A jumbotron is implemented as a pair of div elements with a set of styling directives applied to them ❷. The outer div has padding and margin settings, a light background color, and rounded corners. The inner div is a container that changes along with the window size and has some padding as well. The py-4 selector adds padding to the top and bottom of the div element. Feel free to adjust the numbers in these settings and see how the home page changes.
Inside the jumbotron are three elements. The first is a short message, Track your learning, that gives new visitors a sense of what Learning Log does ❸. The <h1> element is a first-level header, and the display-3 selector adds a thinner and taller look to this particular header. We also include a longer message that provides more information about what the user can do with their learning log ❹. This is formatted as a lead paragraph, which is meant to stand out from regular paragraphs.
Rather than just using a text link, we create a button that invites users to register an account on Learning Log ❺. This is the same link as in the header, but the button stands out on the page and shows the viewer what they need to do in order to start using the project. The selectors you see here style this as a large button that represents a call to action. The code » is an HTML entity that looks like two right angle brackets combined (>>). Finally, we provide closing div tags and close the page_header block. With only two div elements in this file, it’s not particularly helpful to label the closing div tags. We aren’t adding anything else to this page, so we don’t need to define the content block in this template.
The home page now looks like Figure 20-1. This is a significant improvement over the unstyled version of the project!
Styling the Login Page
We’ve refined the overall appearance of the login page, but the login form itself doesn’t have any styling yet. Let’s make the form look consistent with the rest of the page by modifying login.html:
login.html
{% extends 'learning_logs/base.html' %}
❶ {% load django_bootstrap5 %}

❷ {% block page_header %}
  <h2>Log in to your account.</h2>
{% endblock page_header %}

{% block content %}

  <form action="{% url 'accounts:login' %}" method='post'>
    {% csrf_token %}
❸     {% bootstrap_form form %}
❹     {% bootstrap_button button_type="submit" content="Log in" %}
  </form>

{% endblock content %}
We first load the bootstrap5 template tags into this template ❶. We then define the page_header block, which tells the user what the page is for ❷. Notice that we’ve removed the {% if form.errors %} block from the template; django-bootstrap5 manages form errors automatically.
To display the form, we use the template tag {% bootstrap_form %} ❸; this replaces the {{ form.as_div }} element we were using in Chapter 19. The {% booststrap_form %} template tag inserts Bootstrap style rules into the form’s individual elements as the form is rendered. To generate the submit button, we use the {% bootstrap_button %} tag with arguments that designate it as a submit button, and give it the label Log in ❹.
Figure 20-2 shows the login form now. The page is much cleaner, with consistent styling and a clear purpose. Try logging in with an incorrect username or password; you’ll see that even the error messages are styled consistently and integrate well with the overall site.
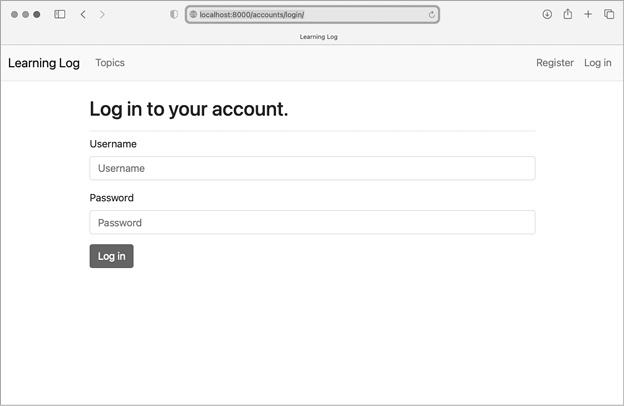
Figure 20-2: The login page styled with Bootstrap
Styling the Topics Page
Let’s make sure the pages for viewing information are styled appropriately as well, starting with the topics page:
topics.html
{% extends 'learning_logs/base.html' %}

{% block page_header %}
❶   <h1>Topics</h1>
{% endblock page_header %}

{% block content %}

❷   <ul class="list-group border-bottom pb-2 mb-4">
    {% for topic in topics %}
❸       <li class="list-group-item border-0">
        <a href="{% url 'learning_logs:topic' topic.id %}">
          {{ topic.text }}</a>
      </li>
    {% empty %}
❹       <li class="list-group-item border-0">No topics have been added yet.</li>
    {% endfor %}
  </ul>

  <a href="{% url 'learning_logs:new_topic' %}">Add a new topic</a>

{% endblock content %}
We don’t need the {% load bootstrap5 %} tag, because we’re not using any custom bootstrap5 template tags in this file. We move the heading Topics into the page_header block and make it an <h1> element instead of a simple paragraph ❶.
The main content on this page is a list of topics, so we use Bootstrap’s list group component to render the page. This applies a simple set of styling directives to the overall list and to each item in the list. When we open the <ul> tag, we first include the list-group class to apply the default style directives to the list ❷. We further customize the list by putting a border at the bottom of the list, a little padding below the list (pb-2), and a margin below the bottom border (mb-4).
Each item in the list needs the list-group-item class, and we customize the default style by removing the border around individual items ❸. The message that’s displayed when the list is empty needs these same classes ❹.
When you visit the topics page now, you should see a page with styling that matches the home page.
Styling the Entries on the Topic Page
On the topic page, we’ll use Bootstrap’s card component to make each entry stand out. A card is a nestable set of divs with flexible, predefined styles that are perfect for displaying a topic’s entries:
topic.html
{% extends 'learning_logs/base.html' %}

❶ {% block page_header %}
  <h1>{{ topic.text }}</h1>
{% endblock page_header %}

{% block content %}
  <p>
    <a href="{% url 'learning_logs:new_entry' topic.id %}">Add new entry</a>
  </p>

  {% for entry in entries %}
❷     <div class="card mb-3">
      <!-- Card header with timestamp and edit link -->
❸       <h4 class="card-header">
        {{ entry.date_added|date:'M d, Y H:i' }}
❹         <small><a href="{% url 'learning_logs:edit_entry' entry.id %}">
          edit entry</a></small>
      </h4>
      <!-- Card body with entry text -->
❺       <div class="card-body">{{ entry.text|linebreaks }}</div>
    </div>
  {% empty %}
❻     <p>There are no entries for this topic yet.</p>
  {% endfor %}

{% endblock content %}
We first place the topic in the page_header block ❶. Then we delete the unordered list structure previously used in this template. Instead of making each entry a list item, we open a div element with the selector card ❷. This card has two nested elements: one to hold the timestamp and the link to edit the entry, and another to hold the body of the entry. The card selector takes care of most of the styling we need for this div; we customize the card by adding a small margin to the bottom of each card (mb-3).
The first element in the card is a header, which is an <h4> element with the selector card-header ❸. This header contains the date the entry was made and a link to edit the entry. The <small> tag around the edit_entry link makes it appear a little smaller than the timestamp ❹. The second element is a div with the selector card-body ❺, which places the text of the entry in a simple box on the card. Notice that the Django code for including the information on the page hasn’t changed; only elements that affect the appearance of the page have. Since we no longer have an unordered list, we’ve replaced the list item tags around the empty list message with simple paragraph tags ❻.
Figure 20-3 shows the topic page with its new look. Learning Log’s functionality hasn’t changed, but it looks significantly more professional and inviting to users.
If you want to use a different Bootstrap template for a project, follow a process that’s similar to what we’ve done so far in this chapter. Copy the template you want to use into base.html, and modify the elements that contain actual content so the template displays your project’s information. Then use Bootstrap’s individual styling tools to style the content on each page.
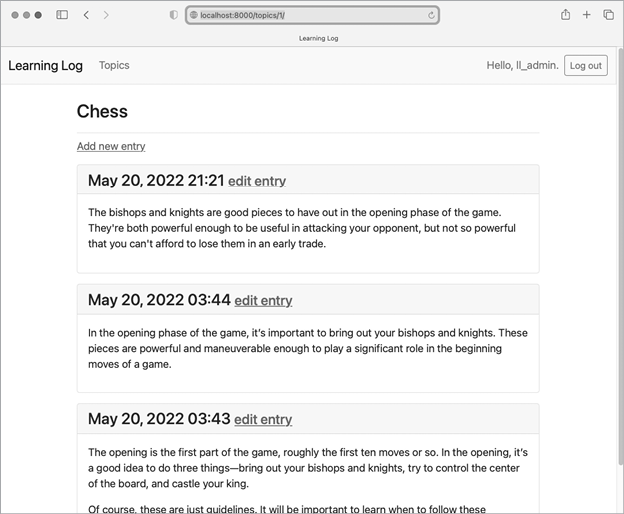
Figure 20-3: The topic page with Bootstrap styling
Deploying Learning Log
Now that we have a professional-looking project, let’s deploy it to a live server so anyone with an internet connection can use it. We’ll use Platform.sh, a web-based platform that allows you to manage the deployment of web applications. We’ll get Learning Log up and running on Platform.sh.
Making a Platform.sh Account
To make an account, go to https://platform.sh and click the Free Trial button. Platform.sh has a free tier that, as of this writing, does not require a credit card. The trial period allows you to deploy an app with minimal resources, which lets you test your project in a live deployment before committing to a paid hosting plan.
Installing the Platform.sh CLI
To deploy and manage a project on Platform.sh, you’ll need the tools available in the Command Line Interface (CLI). To install the latest version of the CLI, visit https://docs.platform.sh/development/cli.html and follow the instructions for your operating system.
On most systems, you can install the CLI by running the following command in a terminal:
$ curl -fsS https://platform.sh/cli/installer | phpAfter this command has finished running, you will need to open a new terminal window before you can use the CLI.
Installing platformshconfig
You’ll also need to install one additional package, platformshconfig. This package helps detect whether the project is running on your local system or on a Platform.sh server. In an active virtual environment, issue the following command:
(ll_env)learning_log$ pip install platformshconfigWe’ll use this package to modify the project’s settings when it’s running on the live server.
Creating a requirements.txt File
The remote server needs to know which packages Learning Log depends on, so we’ll use pip to generate a file listing them. Again, from an active virtual environment, issue the following command:
(ll_env)learning_log$ pip freeze > requirements.txtThe freeze command tells pip to write the names of all the packages currently installed in the project into the file requirements.txt. Open this file to see the packages and version numbers installed in your project:
requirements.txt
asgiref==3.5.2
beautifulsoup4==4.11.1
Django==4.1
django-bootstrap5==21.3
platformshconfig==2.4.0
soupsieve==2.3.2.post1
sqlparse==0.4.2
Learning Log already depends on specific versions of seven different packages, so it requires a matching environment to run properly on a remote server. (We installed three of these packages manually, and four of them were installed automatically as dependencies of these packages.)
When we deploy Learning Log, Platform.sh will install all the packages listed in requirements.txt, creating an environment with the same packages we’re using locally. Because of this, we can be confident the deployed project will function just like it has on our local system. This approach to managing a project is critical as you start to build and maintain multiple projects on your system.
Additional Deployment Requirements
The live server requires two additional packages. These packages are used to serve the project in a production environment, where many users can be making requests at the same time.
In the same directory where requirements.txt is saved, make a new file called requirements_remote.txt. Add the following two packages to it:
requirements_remote.txt
# Requirements for live project.
gunicorn
psycopg2
The gunicorn package responds to requests as they come in to the remote server; this takes the place of the development server we’ve been using locally. The psycopg2 package is required to let Django manage the Postgres database that Platform.sh uses. Postgres is an open source database that’s extremely well suited to production apps.
Adding Configuration Files
Every hosting platform requires some configuration for a project to run correctly on its servers. In this section, we’ll add three configuration files:
.platform.app.yaml This is the main configuration file for the project. This tells Platform.sh what kind of project we’re trying to deploy and what kinds of resources our project needs, and it includes commands for building the project on the server.
.platform/routes.yaml This file defines the routes to our project. When a request is received by Platform.sh, this is the configuration that helps direct these requests to our specific project.
.platform/services.yaml This file defines any additional services our project needs.
These are all YAML (YAML Ain’t Markup Language) files. YAML is a language designed for writing configuration files; it’s made to be read easily by both humans and computers. You can write or modify a typical YAML file by hand, but a computer can also read and interpret the file unambiguously.
YAML files are great for deployment configuration, because they give you a good deal of control over what happens during the deployment process.
Making Hidden Files Visible
Most operating systems hide files and folders that begin with a dot, such as .platform. When you open a file browser, you won’t see these kinds of files and folders by default. But as a programmer, you’ll need to see them. Here’s how to view hidden files, depending on your operating system:
- On Windows, open Windows Explorer, and then open a folder such as Desktop. Click the View tab, and make sure File name extensions and Hidden items are checked.
- On macOS, you can press ⌘-SHIFT-. (dot) in any Finder window to see hidden files and folders.
- On Linux systems such as Ubuntu, you can press CTRL-H in any file browser to display hidden files and folders. To make this setting permanent, open a file browser such as Nautilus and click the options tab (indicated by three lines). Select the Show Hidden Files checkbox.
The .platform.app.yaml Configuration File
The first configuration file is the longest, because it controls the overall deployment process. We’ll show it in parts; you can either enter it by hand in your text editor or download a copy from the online resources at https://ehmatthes.github.io/pcc_3e.
Here’s the first part of .platform.app.yaml, which should be saved in the same directory as manage.py:
.platform.app.yaml
❶ name: "ll_project"
type: "python:3.10"

❷ relationships:
    database: "db:postgresql"

# The configuration of the app when it's exposed to the web.
❸ web:
    upstream:
        socket_family: unix
    commands:
❹         start: "gunicorn -w 4 -b unix:$SOCKET ll_project.wsgi:application"
❺     locations:
        "/":
            passthru: true
        "/static":
            root: "static"
            expires: 1h
            allow: true

# The size of the persistent disk of the application (in MB).
❻ disk: 512
When you save this file, make sure you include the dot at the beginning of the filename. If you omit the dot, Platform.sh won’t find the file and your project will not be deployed.
You don’t need to understand everything in .platform.app.yaml at this point; I’ll highlight the most important parts of the configuration. The file starts off by specifying the name of the project, which we’re calling 'll_project' to be consistent with the name we used when starting the project ❶. We also need to specify the version of Python we’re using (3.10 at the time of this writing). You can find a list of supported versions at https://docs.platform.sh/languages/python.html.
Next is a section labeled relationships that defines other services the project needs ❷. Here the only relationship is to a Postgres database. After that is the web section ❸. The commands:start section tells Platform.sh what process to use to serve incoming requests. Here we’re specifying that gunicorn will handle requests ❹. This command takes the place of the python manage.py runserver command we’ve been using locally.
The locations section tells Platform.sh where to send incoming requests ❺. Most requests should be passed through to gunicorn; our urls.py files will tell gunicorn exactly how to handle those requests. Requests for static files will be handled separately and will be refreshed once an hour. The last line shows that we’re requesting 512MB of disk space on one of Platform.sh’s servers ❻.
The rest of .platform.app.yaml is as follows:
--snip--
disk: 512

# Set a local read/write mount for logs.
❶ mounts:
    "logs":
        source: local
        source_path: logs

# The hooks executed at various points in the lifecycle of the application.
❷ hooks:
    build: |
❸         pip install --upgrade pip
        pip install -r requirements.txt
        pip install -r requirements_remote.txt

        mkdir logs
❹         python manage.py collectstatic
        rm -rf logs
❺     deploy: |
        python manage.py migrate
The mounts section ❶ lets us define directories where we can read and write data while the project is running. This section defines a logs/ directory for the deployed project.
The hooks section ❷ defines actions that are taken at various points during the deployment process. In the build section, we install all the packages that are required to serve the project in the live environment ❸. We also run collectstatic ❹, which collects all the static files needed for the project into one place so they can be served efficiently.
Finally, in the deploy section ❺, we specify that migrations should be run each time the project is deployed. In a simple project, this will have no effect when there have been no changes.
The other two configuration files are much shorter; let’s write them now.
The routes.yaml Configuration File
A route is the path a request takes as it’s processed by the server. When a request is received by Platform.sh, it needs to know where to send the request.
Make a new folder called .platform, in the same directory as manage.py. Make sure you include the dot at the beginning of the name. Inside that folder, make a file called routes.yaml and enter the following:
.platform/routes.yaml
# Each route describes how an incoming URL will be processed by Platform.sh.

"https://{default}/":
    type: upstream
    upstream: "ll_project:http"

"https://www.{default}/":
    type: redirect
    to: "https://{default}/"
This file makes sure requests like https://project_url.com and www.project_url.com all get routed to the same place.
The services.yaml Configuration File
This last configuration file specifies services that our project needs in order to run. Save this file in the .platform/ directory, alongside routes.yaml:
.platform/routes.yaml
# Each service listed will be deployed in its own container as part of your
#   Platform.sh project.

db:
    type: postgresql:12
    disk: 1024
This file defines one service, a Postgres database.
Modifying settings.py for Platform.sh
Now we need to add a section at the end of settings.py to modify some settings for the Platform.sh environment. Add this code to the very end of settings.py:
settings.py
--snip--
# Platform.sh settings.
❶ from platformshconfig import Config

config = Config()
❷ if config.is_valid_platform():
❸     ALLOWED_HOSTS.append('.platformsh.site')

❹     if config.appDir:
        STATIC_ROOT = Path(config.appDir) / 'static'
❺     if config.projectEntropy:
        SECRET_KEY = config.projectEntropy

    if not config.in_build():
❻         db_settings = config.credentials('database')
        DATABASES = {
            'default': {
                'ENGINE': 'django.db.backends.postgresql',
                'NAME': db_settings['path'],
                'USER': db_settings['username'],
                'PASSWORD': db_settings['password'],
                'HOST': db_settings['host'],
                'PORT': db_settings['port'],
            },
        }
We normally place import statements at the beginning of a module, but in this case, it’s helpful to keep all the remote-specific settings in one section. Here we import Config from platformshconfig ❶, which helps determine settings on the remote server. We only modify settings if the method config.is_valid_platform() returns True ❷, indicating the settings are being used on a Platform.sh server.
We modify ALLOWED_HOSTS to allow the project to be served by hosts ending in .platformsh.site ❸. All projects deployed to the free tier will be served using this host. If settings are being loaded in the deployed app’s directory ❹, we set STATIC_ROOT so that static files are served correctly. We also set a more secure SECRET_KEY on the remote server ❺.
Finally, we configure the production database ❻. This is only set if the build process has finished running and the project is being served. Everything you see here is necessary to let Django talk to the Postgres server that Platform.sh set up for the project.
Using Git to Track the Project’s Files
As discussed in Chapter 17, Git is a version control program that allows you to take a snapshot of the code in your project each time you implement a new feature successfully. If anything goes wrong, you can easily return to the last working snapshot of your project; for example, if you accidentally introduce a bug while working on a new feature. Each snapshot is called a commit.
Using Git, you can try implementing new features without worrying about breaking your project. When you’re deploying to a live server, you need to make sure you’re deploying a working version of your project. To read more about Git and version control, see Appendix D.
Installing Git
Git may already be installed on your system. To find out, open a new terminal window and issue the command git --version:
(ll_env)learning_log$ git --version
git version 2.30.1 (Apple Git-130)
If you get a message indicating that Git is not installed, see the installation instructions in Appendix D.
Configuring Git
Git keeps track of who makes changes to a project, even when only one person is working on the project. To do this, Git needs to know your username and email. You must provide a username, but you can make up an email for your practice projects:
(ll_env)learning_log$ git config --global user.name "eric"
(ll_env)learning_log$ git config --global user.email "eric@example.com"
If you forget this step, Git will prompt you for this information when you make your first commit.
Ignoring Files
We don’t need Git to track every file in the project, so we’ll tell it to ignore some files. Create a file called .gitignore in the folder that contains manage.py. Notice that this filename begins with a dot and has no file extension. Here’s the code that goes in .gitignore:
.gitignore
ll_env/
__pycache__/
*.sqlite3
We tell Git to ignore the entire ll_env directory, because we can re-create it automatically at any time. We also don’t track the __pycache__ directory, which contains the .pyc files that are created automatically when the .py files are executed. We don’t track changes to the local database, because it’s a bad habit: if you’re ever using SQLite on a server, you might accidentally overwrite the live database with your local test database when you push the project to the server. The asterisk in *.sqlite3 tells Git to ignore any file that ends with the extension .sqlite3.
Committing the Project
We need to initialize a Git repository for Learning Log, add all the necessary files to the repository, and commit the initial state of the project. Here’s how to do that:
❶ (ll_env)learning_log$ git init
Initialized empty Git repository in /Users/eric/.../learning_log/.git/
❷ (ll_env)learning_log$ git add .
❸ (ll_env)learning_log$ git commit -am "Ready for deployment to Platform.sh."
[main (root-commit) c7ffaad] Ready for deployment to Platform.sh.
 42 files changed, 879 insertions(+)
 create mode 100644 .gitignore
 create mode 100644 .platform.app.yaml
 --snip--
 create mode 100644 requirements_remote.txt
❹ (ll_env)learning_log$ git status
On branch main
nothing to commit, working tree clean
(ll_env)learning_log$
We issue the git init command to initialize an empty repository in the directory containing Learning Log ❶. We then use the git add . command, which adds all the files that aren’t being ignored to the repository ❷. (Don’t forget the dot.) Next, we issue the command git commit -am "commit message": the -a flag tells Git to include all changed files in this commit, and the -m flag tells Git to record a log message ❸.
Issuing the git status command ❹ indicates that we’re on the main branch and that our working tree is clean. This is the status you’ll want to see anytime you push your project to a remote server.
Creating a Project on Platform.sh
At this point, the Learning Log project still runs on our local system and is also configured to run correctly on a remote server. We’ll use the Platform.sh CLI to create a new project on the server and then push our project to the remote server.
Make sure you’re in a terminal, at the learning_log/ directory, and issue the following command:
(ll_env)learning_log$ platform login
Opened URL: http://127.0.0.1:5000
Please use the browser to log in.
--snip--
❶ Do you want to create an SSH configuration file automatically? [Y/n] Y
This command will open a browser tab where you can log in. Once you’re logged in, you can close the browser tab and return to the terminal. If you’re prompted about creating an SSH configuration file ❶, enter Y so you can connect to the remote server later.
Now we’ll create a project. There’s a lot of output, so we’ll look at the creation process in sections. Start by issuing the create command:
(ll_env)learning_log$ platform create
* Project title (--title)
Default: Untitled Project
❶ > ll_project

* Region (--region)
The region where the project will be hosted
  --snip--
  [us-3.platform.sh] Moses Lake, United States (AZURE) [514 gC02eq/kWh]
❷ > us-3.platform.sh
* Plan (--plan)
Default: development
Enter a number to choose:
  [0] development
  --snip--
❸ > 0

* Environments (--environments)
The number of environments
Default: 3
❹ > 3

* Storage (--storage)
The amount of storage per environment, in GiB
Default: 5
❺ > 5
The first prompt asks for a name for the project ❶, so we use the name ll_project. The next prompt asks which region we’d like the server to be in ❷. Choose the server closest to you; for me, that’s us-3.platform.sh. For the rest of the prompts, you can accept the defaults: a server on the lowest development plan ❸, three environments for the project ❹, and 5GB of storage for the overall project ❺.
There are three more prompts to respond to:
Default branch (--default-branch)
The default Git branch name for the project (the production environment)
Default: main
❶ > main

Git repository detected: /Users/eric/.../learning_log
❷ Set the new project ll_project as the remote for this repository? [Y/n] Y

The estimated monthly cost of this project is: $10 USD
❸ Are you sure you want to continue? [Y/n] Y

The Platform.sh Bot is activating your project

      ▀▄   ▄▀
    █▄█▀███▀█▄█
    ▀█████████▀
     ▄▀     ▀▄

The project is now ready!
A Git repository can have multiple branches; Platform.sh is asking us if the default branch for the project should be main ❶. It then asks if we want to connect the local project’s repository to the remote repository ❷. Finally, we’re informed that this project will cost about $10 per month if we keep it running beyond the free trial period ❸. If you haven’t entered a credit card yet, you shouldn’t have to worry about this cost. Platform.sh will simply suspend your project if you exceed the free trial’s limits without adding a credit card.
Pushing to Platform.sh
The last step before seeing the live version of the project is to push our code to the remote server. To do that, issue the following command:
(ll_env)learning_log$ platform push
❶ Are you sure you want to push to the main (production) branch? [Y/n] Y
--snip--
The authenticity of host 'git.us-3.platform.sh (...)' can't be established.
RSA key fingerprint is SHA256:Tvn...7PM
❷ Are you sure you want to continue connecting (yes/no/[fingerprint])? Y
Pushing HEAD to the existing environment main
  --snip--
  To git.us-3.platform.sh:3pp3mqcexhlvy.git
   * [new branch]      HEAD -> main
When you issue the command platform push, you’ll be asked for one more confirmation that you want to push the project ❶. You may also see a message about the authenticity of Platform.sh, if this is your first time connecting to the site ❷. Enter Y for each of these prompts, and you’ll see a bunch of output scroll by. This output will probably look confusing at first, but if anything goes wrong, it’s really useful to have during troubleshooting. If you skim through the output, you can see where Platform.sh installs necessary packages, collects static files, applies migrations, and sets up URLs for the project.
Viewing the Live Project
Once the push is complete, you can open the project:
(ll_env)learning_log$ platform url
Enter a number to open a URL
  [0] https://main-bvxea6i-wmye2fx7wwqgu.us-3.platformsh.site/
  --snip--
 > 0
The platform url command lists the URLs associated with a deployed project; you’ll be given a choice of several URLs that are all valid for your project. Choose one, and your project should open in a new browser tab! This will look just like the project we’ve been running locally, but you can share this URL with anyone in the world, and they can access and use your project.
Refining the Platform.sh Deployment
Now we’ll refine the deployment by creating a superuser, just as we did locally. We’ll also make the project more secure by changing the setting DEBUG to False, so error messages won’t show users any extra information that they could use to attack the server.
Creating a Superuser on Platform.sh
The database for the live project has been set up, but it’s completely empty. All the users we created earlier only exist in our local version of the project.
To create a superuser on the live version of the project, we’ll start an SSH (secure socket shell) session where we can run management commands on the remote server:
(ll_env)learning_log$ platform environment:ssh

 ___ _      _    __                    _
| _ \ |__ _| |_ / _|___ _ _ _ __    __| |_
|  _/ / _` |  _|  _/ _ \ '_| '  \ _(_-< ' \
|_| |_\__,_|\__|_| \___/_| |_|_|_(_)__/_||_|

 Welcome to Platform.sh.

❶ web@ll_project.0:~$ ls
accounts  learning_logs  ll_project  logs  manage.py  requirements.txt
    requirements_remote.txt  static
❷ web@ll_project.0:~$ python manage.py createsuperuser
❸ Username (leave blank to use 'web'): ll_admin_live
Email address:
Password:
Password (again):
Superuser created successfully.
❹ web@ll_project.0:~$ exit
logout
Connection to ssh.us-3.platform.sh closed.
❺ (ll_env)learning_log$
When you first run the platform environment:ssh command, you may get another prompt about the authenticity of this host. If you see this message, enter Y and you should be logged in to a remote terminal session.
After running the ssh command, your terminal acts just like a terminal on the remote server. Note that your prompt has changed to indicate that you’re in a web session associated with the project named ll_project ❶. If you issue the ls command, you’ll see the files that have been pushed to the Platform.sh server.
Issue the same createsuperuser command we used in Chapter 18 ❷. This time, I entered an admin username, ll_admin_live, that’s distinct from the one I used locally ❸. When you’re finished working in the remote terminal session, enter the exit command ❹. Your prompt will indicate that you’re working in your local system again ❺.
Now you can add /admin/ to the end of the URL for the live app and log in to the admin site. If others have already started using your project, be aware that you’ll have access to all their data! Take this responsibility seriously, and users will continue to trust you with their data.
Securing the Live Project
There’s one glaring security issue in the way our project is currently deployed: the setting DEBUG = True in settings.py, which provides debug messages when errors occur. Django’s error pages give you vital debugging information when you’re developing a project; however, they give way too much information to attackers if you leave them enabled on a live server.
To see how bad this is, go to the home page of your deployed project. Log in to a user’s account and add /topics/999/ to the end of the home page URL. Assuming you haven’t made thousands of topics, you should see a page with the message DoesNotExist at /topics/999/. If you scroll down, you should see a whole bunch of information about the project and the server. You won’t want your users to see this, and you certainly wouldn’t want this information available to anyone interested in attacking the site.
We can prevent this information from being shown on the live site by setting DEBUG = False in the part of settings.py that only applies to the deployed version of the project. This way you’ll continue to see debugging information locally, where that information is useful, but it won’t show up on the live site.
Open settings.py in your text editor, and add one line of code to the part that modifies settings for Platform.sh:
settings.py
--snip--
if config.is_valid_platform():
    ALLOWED_HOSTS.append('.platformsh.site')
    DEBUG = False
    --snip--
All the work to set up configuration for the deployed version of the project has paid off. When we want to adjust the live version of the project, we just change the relevant part of the configuration we set up earlier.
Committing and Pushing Changes
Now we need to commit the changes made to settings.py and push the changes to Platform.sh. Here’s a terminal session showing the first part of this process:
❶ (ll_env)learning_log$ git commit -am "Set DEBUG False on live site."
[main d2ad0f7] Set DEBUG False on live site.
  1 file changed, 1 insertion(+)
❷ (ll_env)learning_log$ git status
On branch main
nothing to commit, working tree clean
(ll_env)learning_log$
We issue the git commit command with a short but descriptive commit message ❶. Remember the -am flag makes sure Git commits all the files that have changed and records the log message. Git recognizes that one file has changed and commits this change to the repository.
Running git status shows that we’re working on the main branch of the repository and that there are now no new changes to commit ❷. It’s important to check the status before pushing to a remote server. If you don’t see a clean status, then some changes haven’t been committed and those changes won’t be pushed to the server. You can try issuing the commit command again; if you’re not sure how to resolve the issue, read through Appendix D to better understand how to work with Git.
Now let’s push the updated repository to Platform.sh:
(ll_env)learning_log$ platform push
Are you sure you want to push to the main (production) branch? [Y/n] Y
Pushing HEAD to the existing environment main
--snip--
  To git.us-3.platform.sh:wmye2fx7wwqgu.git
     fce0206..d2ad0f7  HEAD -> main
(ll_env)learning_log$
Platform.sh recognizes that the repository has been updated, and it rebuilds the project to make sure all the changes have been taken into account. It doesn’t rebuild the database, so we haven’t lost any data.
To make sure this change took effect, visit the /topics/999/ URL again. You should see just the message Server Error (500), with no sensitive information about the project at all.
Creating Custom Error Pages
In Chapter 19, we configured Learning Log to return a 404 error if the user requests a topic or entry that doesn’t belong to them. Now you’ve seen a 500 server error as well. A 404 error usually means your Django code is correct, but the object being requested doesn’t exist. A 500 error usually means there’s an error in the code you’ve written, such as an error in a function in views.py. Django currently returns the same generic error page in both situations, but we can write our own 404 and 500 error page templates that match Learning Log’s overall appearance. These templates belong in the root template directory.
Making Custom Templates
In the learning_log folder, make a new folder called templates. Then make a new file called 404.html; the path to this file should be learning_log/templates/404.html. Here’s the code for this file:
404.html
{% extends "learning_logs/base.html" %}

{% block page_header %}
  <h2>The item you requested is not available. (404)</h2>
{% endblock page_header %}
This simple template provides the generic 404 error page information but is styled to match the rest of the site.
Make another file called 500.html using the following code:
500.html
{% extends "learning_logs/base.html" %}

{% block page_header %}
  <h2>There has been an internal error. (500)</h2>
{% endblock page_header %}
These new files require a slight change to settings.py.
settings.py
--snip--
TEMPLATES = [
    {
        'BACKEND': 'django.template.backends.django.DjangoTemplates',
        'DIRS': [BASE_DIR / 'templates'],
        'APP_DIRS': True,
        --snip--
    },
]
--snip--
This change tells Django to look in the root template directory for the error page templates and any other templates that aren’t associated with a particular app.
Pushing the Changes to Platform.sh
Now we need to commit the changes we just made and push them to Platform.sh:
❶ (ll_env)learning_log$ git add .
❷ (ll_env)learning_log$ git commit -am "Added custom 404 and 500 error pages."
 3 files changed, 11 insertions(+), 1 deletion(-)
 create mode 100644 templates/404.html
 create mode 100644 templates/500.html
❸ (ll_env)learning_log$ platform push
--snip--
  To git.us-3.platform.sh:wmye2fx7wwqgu.git
     d2ad0f7..9f042ef  HEAD -> main
(ll_env)learning_log$
We issue the git add . command ❶ because we created some new files in the project. Then we commit the changes ❷ and push the updated project to Platform.sh ❸.
Now when an error page appears, it should have the same styling as the rest of the site, making for a smoother user experience when errors arise.
Ongoing Development
You might want to further develop Learning Log after your initial push to a live server, or you might want to develop your own projects to deploy. When doing so, there’s a fairly consistent process for updating your projects.
First, you’ll make the necessary changes to your local project. If your changes result in any new files, add those files to the Git repository using the command git add . (making sure to include the dot at the end of the command). Any change that requires a database migration will need this command, because each migration generates a new migration file.
Second, commit the changes to your repository using git commit -am "commit message". Then push your changes to Platform.sh, using the command platform push. Visit your live project and make sure the changes you expect to see have taken effect.
It’s easy to make mistakes during this process, so don’t be surprised when something goes wrong. If the code doesn’t work, review what you’ve done and try to spot the mistake. If you can’t find the mistake or you can’t figure out how to undo it, refer to the suggestions for getting help in Appendix C. Don’t be shy about asking for help: everyone else learned to build projects by asking the same questions you’re likely to ask, so someone will be happy to help you. Solving each problem that arises helps you steadily develop your skills until you’re building meaningful, reliable projects and answering other people’s questions as well.
Deleting a Project on Platform.sh
It’s great practice to run through the deployment process a number of times with the same project or with a series of small projects, to get the hang of deployment. But you’ll need to know how to delete a project that’s been deployed. Platform.sh also limits the number of projects you can host for free, and you don’t want to clutter your account with practice projects.
You can delete a project using the CLI:
(ll_env)learning_log$ platform project:deleteYou’ll be asked to confirm that you want to take this destructive action. Respond to the prompts, and your project will be deleted.
The command platform create also gave the local Git repository a reference to the remote repository on Platform.sh’s servers. You can remove this remote from the command line as well:
(ll_env)learning_log$ git remote
platform
(ll_env)learning_log$ git remote remove platform
The command git remote lists the names of all remote URLs associated with the current repository. The command git remote remove remote_name deletes these remote URLs from the local repository.
You can also delete a project’s resources by logging in to the Platform.sh website and visiting your dashboard at https://console.platform.sh. This page lists all your active projects. Click the three dots in a project’s box, and click Edit Plan. This is a pricing page for the project; click the Delete Project button at the bottom of the page, and you’ll be shown a confirmation page where you can follow through with the deletion. Even if you deleted your project using the CLI, it’s a good idea to familiarize yourself with the dashboard of any hosting provider you deploy to.
Summary
In this chapter, you learned to give your projects a simple but professional appearance using the Bootstrap library and the django-bootstrap5 app. With Bootstrap, the styles you choose will work consistently on almost any device people use to access your project.
You learned about Bootstrap’s templates and used the Navbar static template to create a simple look and feel for Learning Log. You used a jumbotron to make a home page’s message stand out, and learned to style all the pages in a site consistently.
In the final part of the project, you learned how to deploy a project to a remote server so anyone can access it. You made a Platform.sh account and installed some tools that help manage the deployment process. You used Git to commit the working project to a repository, and then pushed the repository to a remote server on Platform.sh. Finally, you learned to begin securing your app by setting DEBUG = False on the live server. You also made custom error pages, so the inevitable errors that come up will look well-handled.
Now that you’ve finished Learning Log, you can start building your own projects. Start simple, and make sure the project works before adding complexity. Enjoy your continued learning, and good luck with your projects!