Object.assign and the spread operator to build new objectsClass inheritance is very rarely (perhaps never) the best approach in JavaScript.
In chapter 2, we looked at some of the scaffolding needed to create prototype chains to model inheritance and how classes streamline this process. Remember that the goal of using inheritance is to improve reusability. Now we’ll continue the topic of assembling your objects to achieve the same level of code reuse, but in a way that doesn’t require you to think in terms of inheritance.
The first technique, discovered by Kyle Simpson, is called Objects Linked to Other Objects (OLOO) and relies on Object.create to create associations among the objects that constitute your domain model. This technique has the simplicity of classes of stripping away the complicated prototype jargon while setting up the prototype chain properly. This pattern is interesting because it allows you to look at your domain model as a collection of peer objects that delegate to one another to carry out their work.
The second approach is based on composing objects that capture a small set of behavior known as mixins to create a much richer model, as you can see on full display in the works of Eric Elliot, Douglas Crockford, and other JavaScript experts. In this case, instead of acquiring properties from a long prototype chain, mixins allow you to integrate various independent pieces of behavior and/or data into a single object. A good example of this technique outside JavaScript is a CSS preprocessor such as Sass. You can use @mixins to group repetitive stylesheet information and apply it to many rule sets. In many cases, this technique is preferred to @extends.
In this chapter, we’ll be talking about links between objects as being explicit (set directly in code) or implicit (wired via JavaScript’s runtime). These types of links are important to understand before jumping into the patterns mentioned in this section.
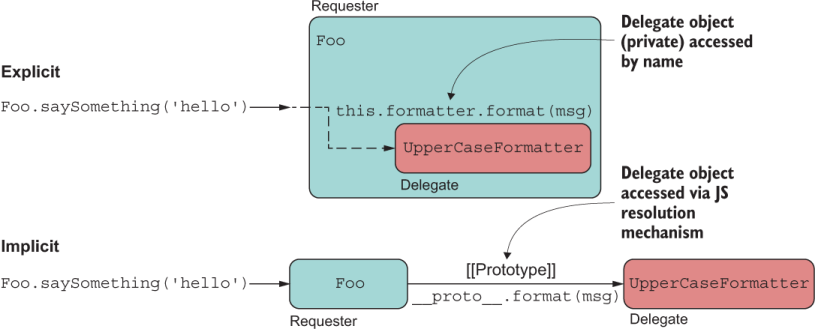
In JavaScript, you can associate objects in two ways: implicitly and explicitly. Both types of association allow one object to send messages to another (aka delegation), but they behave a bit differently. Figure 3.1 illustrates the difference.
Figure 3.1 Explicit delegation occurs through a property known directly by name. Implicit delegation occurs through JavaScript’s prototype lookup process, chained by the internal __proto__ property.
Let’s start with implicit (implied) links.
An implicit link is known only internally—in other words, is not visible in the code. In JavaScript, links to objects that delegate behavior by using the [[Prototype]] internal reference can be considered implicit because the runtime uses it to send messages to other objects (up the chain, in the case of inheritance) on your behalf as part of property resolution, as shown in the next listing.
Listing 3.1 Implicit reference between Foo and UpperCaseFormatter
const Foo = Object.create(UpperCaseFormatter);
Foo.saySomething = function saySomething(msg) {
  console.log(this.format(msg));                    ❶
}
Foo.saySomething('hello'); // Prints HELLO
❶ format is resolved through the prototype chain.
The association formed is one in which object A delegates to B by an “is a” relationship, and the same object context (this) is used to access the full set of behavior. In this example, we say that Foo “is a” UpperCaseFormatter.
Implicit linking or delegation is the fundamental method of accessing properties and behavior in prototype-based languages. This method is used by all the object construction patterns we’ve discussed so far (classes and constructor functions) and is also used by OLOO and mixins, which we’ll discuss in sections 3.2 and 3.5, respectively.
On the other hand, objects are linked explicitly when the link is well-known and visibly set in code, perhaps through a public or private property. I don’t cover this technique in the book, but it’s important to look at a simple example for comparison, shown in the next listing.
Listing 3.2 Explicit link between Foo and UpperCaseFormatter
const UpperCaseFormatter = {
  format: function(msg) {
    return msg.toUpperCase();
  }
};

const Foo = {
  formatter: UpperCaseFormatter,          ❶
  saySomething: function print(msg) {
    console.log(this.formatter !== null
        ? this.formatter.format(msg)
        : msg
    );
  }
};

Foo.saySomething('hello'); // Prints HELLO
❶ Explicitly passes an object to another
Again, if we were to label these relationships, when the relation is explicit, we say that some object A delegates to B with a “uses” label, also known as object composition. In this case, Foo uses UpperCaseFormatter to carry out its work, and both objects have different life cycles. In this configuration, it’s sensible to check whether this.formatter !== null. Visually, you can see the explicit relationship because UpperCaseFormatter’s properties are accessed by delegating through a known reference (formatter), explicitly typed in the code.
In the case of an implicit link, the life cycles of both objects are intertwined, in that UpperCaseFormatter’s properties would be accessed via this; it’s understood that the runtime is resolving these properties via __proto__.
Now that you understand this fundamental difference, let’s begin with a pattern that uses implicit links to achieve behavior delegation.
The OLOO pattern was presented by Kyle Simpson in his book series You Don’t Know JS (mentioned in chapter 2) as well as his entertaining and thorough video series “Deep JavaScript Foundations” (https://frontendmasters.com/courses/javascript-foundations). This pattern is interesting to study because it changes our mindset when it comes to visualizing parent-child relationships among objects. OLOO’s view of differential inheritance is different from the mental model of classes in that it doesn’t consider child objects to derive from a base object. Rather, it considers objects peers that link together and delegate functionality by passing messages to each other. All that inheritance-related terminology disappears, and we no longer say that an object inherits from another; we say that it links to another, which is a much simpler model to understand.
Furthermore, OLOO keeps the good parts of the language while throwing away the deceiving class-based design and the complex prototype configuration of the constructor function pattern. OLOO still uses the [[Prototype]], but that mechanism is cleverly hidden behind Object.create and provides a much simpler userland model for designing objects. If you were to look under the hood of Object.create (http://mng.bz/ zxnB), you’ll see the minimal implementation of the constructor functions pattern, shown in the next listing.
Listing 3.3 Under the hood of Object.create
Object.create = function(proto, propertiesObject) {
    if (typeof proto !== 'object' && typeof proto !== 'function') {
       throw new TypeError('Object prototype may only be an Object: ' +
          proto);
    }

    function F() {}           ❶
    F.prototype = proto;      ❷
    return new F();           ❸
};
❶ Creates a new superfluous constructor function, F
❷ Sets the prototype of the constructor function
❸ Returns the new object invoking the new keyword
Now that we know that Object.create takes care of the boilerplate code for us, let’s take proper advantage of it and use it to wire up the chain connecting all our objects. I’ll start showing you this pattern with a simple example that introduces some of the components of this pattern. In this snippet of code, we’ll begin to play with the concept of the blockchain data structure. A Blockchain is an object that stores consecutive elements, called blocks:
const MyStore = {
   init(element) {
      this.length = 0;
      this.push(element);
   },
   push(b) {
      this[this.length] = b;
      return ++this.length;
   }
}

const Blockchain = Object.create(MyStore);

const chain = Object.create(Blockchain);
chain.init(createGenesisBlock);
chain.push(new Block(...));
chain.length; // 2
In this example, we first link the objects MyStore and Blockchain; then we link the object chain (which we consider to be the actual instance object with all the functionality) with Blockchain. In the definition of MyStore, the init initializer method is in charge of typical object constructor logic that sets the properties of the new instance. As you can see from the preceding code snippet, chain properly delegates to properties of its peers: init, push, and length.
Another interesting aspect of OLOO is that after Object.create(Blockchain) is called, all the links get created in memory. Blockchain knows about init and push because of the prototype chain, but the objects have not been initialized because init has not been called. At this point, the shape of the object is in memory and instantiated, but actual initialization of the data happens when init is called, which sets everything in motion, populates the first block in the chain, and returns a ready-to-use object to its caller. As you can see, the objects are linked properly:
MyStore.isPrototypeOf(Blockchain); // true
chain.__proto__.init // [Function: init]
You can think of init as having some of the responsibilities of a class constructor. But unlike a class constructor, which performs construction and initialization at the same time, OLOO separates the two actions as different steps. Separating declaration from use allows you to define and lazily pass around the actual object representation (a template, perhaps) as a first-class object, similar to passing a class definition around. Then you can initialize this lazily built, minimal object with its full set of data only when needed.
This pattern resembles the Builder pattern (https://en.wikipedia.org/wiki/Builder _pattern), which is used a lot in object-oriented design.
But if you’d like to call both steps fluently inline, you can do so easily by returning this from the init method:
const MyStore = {
   init(element) {
      this.length = 0;
      this.push(element);
      return this;
   },
   //...
}

const Blockchain = Object.create(MyStore);

const chain = Object.create(Blockchain).init(createGenesisBlock);
chain.push(new Block(...));
chain.length; // 2
A noticeable difference with OLOO compared with constructor functions and classes is that the reliance in the prototypal inheritance is much more controlled and less exposed. When MyStore.isPrototypeOf(Blockchain) is true, you can’t inadvertently change the shape of all initialized objects, protecting you from prototype pollution. In fact, MyStore and Blockchain are not constructor functions at all, so they do not have a prototype property to do this:
MyStore.prototype;    // undefined
Blockchain.prototype; // undefined
Now that you’ve seen the pattern in a simple scenario, let’s use this same idea to refactor Transaction. The next listing shows a simple OLOO implementation; listing 3.5 shows the full implementation.
Listing 3.4 HashTransaction with simple object linking
const Transaction = {
  init(sender, recipient, funds = 0.0) {                   ❶
    this.sender = sender;
    this.recipient = recipient;
    this.funds = Number(funds);
    return this;                                           ❷
  },
  displayTransaction() {
    return `Transaction from ${this.sender} to ${this.recipient} for
      ${this.funds}`;
  }
}

const HashTransaction = Object.create(Transaction);

HashTransaction.calculateHash = function calculateHash() {
    const data = [this.sender, this.recipient, this.funds].join('');
    let hash = 0, i = 0;
    while (i < data.length) {
      hash = ((hash << 5) - hash + data.charCodeAt(i++)) << 0;
    }
    return hash**2;
}

const tx = Object.create(HashTransaction)
    .init('luis@tjoj.com', 'luke@tjoj.com', 10);           ❸

tx.sender;      // 'luis@tjoj.com'
tx.recipient;   // 'luke@tjoj.com'
tx.calculateHash(); // 64284210552842720
tx.displayTransaction();                                   ❹
❶ The init method is the exact equivalent of a class constructor (merely a convention; you can use any method name you like).
❷ Because the object is returned directly, results in the properties of this object contained inside the specialized object
❸ Uses Object.create to build new objects and nicely separate prototype linkage from object initialization
❹ This method is invoked through the prototype chain.
Everything should look straightforward so far. The only thing we’ve added compared to the MyStore example is a bit more functionality to each object. Figure 3.2 shows the structure of the objects and the links among them.

Figure 3.2 Surface view of how the three object peers are linked
Figure 3.2 shows that you can establish implicit links among objects and at the same time remove the prototypal boilerplate code that you would have otherwise needed to write with classes and (to greater extent) constructor functions. The following listing builds out the full-fledged Transaction object in all its glory.
Listing 3.5 Modeling Transaction with behavior delegation (OLOO)
const Transaction = {                                            ❶
   init(sender, recipient, funds = 0.0) {                        ❷
     const _feePercent = 0.6;                                    ❸

     this.sender = sender;
     this.recipient = recipient;
     this.funds = Number(funds);

     this.netTotal = function() {
       return _precisionRound(this.funds * _feePercent, 2);
     }

     function _precisionRound(number, precision) {               ❸
       const factor = Math.pow(10, precision);
       return Math.round(number * factor) / factor;
     }
     return this;                                                ❹
   },

   displayTransaction() {
     return `Transaction from ${this.sender} to ${this.recipient}
       for ${this.funds}`;
   }
}

const HashTransaction = Object.create(Transaction)               ❺

HashTransaction.init = function HashTransaction(                 ❻
   sender, recipient, funds
  ) {
    Transaction.init.call(this, sender, recipient, funds);       ❼
    this.transactionId = this.calculateHash();
    return this;
}

HashTransaction.calculateHash = function calculateHash() {
    // same as before...
}
❶ The entire chain is based on simple objects, with Transaction at the base of the hierarchy.
❷ The init functions are analogous to a class’s constructor. Also, the use of the function keyword is deliberate to establish the proper behavior of this.
❸ Private properties are nicely encapsulated in the object’s closure, allowing only privileged methods to access them.
❹ Because I’m using a plain function as constructor, there is no implied this, so we need to return it ourselves.
❺ Using JavaScript’s Object.create properly creates the implicit delegation linkage using [[Prototype]].
❻ The init functions are analogous to a class’s constructor. Also, the use of the function keyword is deliberate to establish the proper behavior of this.
❼ Equivalent to the use of super within a child class’s constructor
This code is the same as in listing 3.4 but adds more initialization logic to HashTransaction to clearly separate initialization from instantiation. Figure 3.3 shows a more complete diagram.
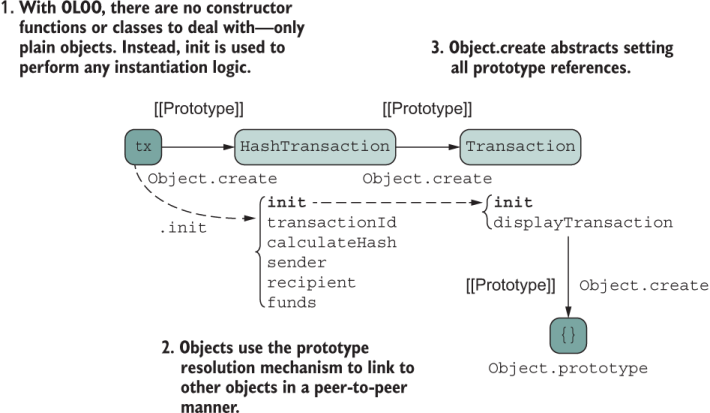
Figure 3.3 A full-fledged implementation of the OLOO pattern to implement HashTransaction, linking to Transaction to delegate basic functionality
As figure 3.3 shows, the init function nicely encapsulates any private state inside its lexical scope (à la the Module pattern) and exposes only what’s needed through this. You could take the opportunity to define any private functions that are needed as part of object construction, and nothing would leak out to the caller. Also, you see a very visible management of the object context (this) being passed from one init block to the next upstream until reaching the parent object. This is not done to create the prototype linkage (as Object.create does that for you), but to initialize the entire chain up to the base object.
Up to now, you’ve learned about object modeling techniques that share the idea of using the prototype resolution mechanism with implicit links to delegate to other objects, whether that delegation is up the chain or along the chain. But all these techniques lack the ability to share behavior from more than one object, because prototypes establish a single, unidirectional path in which properties are dynamically resolved. These situations do not occur frequently in software, but when they do, the prototype chain is insufficient to model them correctly. Take a simple example extracted from nature. Amphibians are animals with both aquatic and terrestrial characteristics. If you were to map out the objects Amphibian, Aquatic, and Terrestrial, how could you model this relationship in a prototypal manner so that Amphibian links to both AquaticAnimal and TerrestrialAnimal? Multiple inheritance, perhaps?
You don’t need to use inheritance at all. Let’s explore another software construction pattern that relies on object composition. It’s important to add that when I mention composition of objects, I’m not referring to the well-known object-oriented pattern that goes by that name. This pattern is much simpler. Here, I’m referring to the ability to assemble a rich object by gluing together small individual pieces or traits—composition in the structural sense. JavaScript’s object model is one of a kind that lets us perform this task, and the API to use is Object.assign. Section 3.3 discusses this API first and then shows you how it’s used to compose objects. You’ll use the API to implement mixins in section 3.4.
Software evolves quickly, and requirements change drastically. The problem with prototypal object models is that they tend to become too rigid and brittle over time, making it difficult to introduce big changes to your model with the guarantee that those changes won’t break something else up or along the chain of delegation. Mishandling base objects higher up in the hierarchy may cause rippling downstream effects throughout your model—an issue known as the fragile base class problem. You can use patterns to minimize this problem by physically copying properties down to derived objects.
State copying over state sharing isn’t a new concept. Instead of assembling rigid hierarchies of objects, why don’t you build objects by handing them copies of all the properties they need? With JavaScript, in which objects are dynamic bags of properties, this process is simple. JavaScript allows you to glue together various pieces (bags) of properties (call them partial objects, if you will) to create a whole, feature-rich object, like pouring the contents of several bags into a larger one. This process is done not by linking to a prototype, but by integrating or merging copies of simpler, individual objects.
Aside from instantiation, from the perspective of the user, using objects built this way feels no different from the approaches listed earlier; the shape of the object on the surface is the same. From a code-reasoning point of view, however, the process is radically different. In the following sections, we explore the JavaScript APIs that support this process and some behind-the-scenes features that make it possible.
You can use Object.assign to merge the properties of various objects. In this section, we’ll discuss in depth how to use this API. Object.assign is a nice little Swiss army knife to have in your tool belt. It comes in handy in several use cases. Suppose that you’re developing a mashup of several API responses and would like to deliver the response body as a single JSON. Another common task is to perform a shallow clone by assigning the properties of an object to a new, empty object {}. Many libraries that accept configuration objects as arguments use Object.assign to provide defaults. In the next listing, the function doSomething takes a config object that allows the user to specify settings for the hypothetical logic carried out by this function.
Listing 3.6 Using Object.assign to implement options with defaults
function doSomething(config = {}) {
  config = Object.assign(
    {
      foo: 'foo',
      bar: 'bar',        ❶
      baz: 'baz'
    }, config);

   console.log(`Using config ${config.foo}, ${config.bar}, ${config.bar}`);
}

doSomething();               // Prints Using config foo, bar, bar
doSomething({foo: 'hello'}); // Prints Using config hello, bar, bar
By merging the user-provided object with defaults, it’s easy to obtain the desired config. Object.assign copies the enumerable properties that one or more objects owns (as defined by Object#hasOwnProperty) into a target object, returning the target object. The following listing shows a simple example.
Listing 3.7 Using Object.assign to merge two objects into a new object
const a = {
  a: 'a'            ❶
};
const b = {
  b: 'b'            ❶
};

Object.assign({}, a, b);  //{ a: 'a', b: 'b' }
❶ These properties are enumerable and owned by the object, so they get copied.
In this case, all the objects in question have their properties as enumerable: true, which means that Object.assign will scan and copy them.
Now consider a non-enumerable property, which will be skipped:
const a = {
  a: 'a'
};

const b = {};
Object.defineProperty(b, 'b', {
  value: 'b',
  enumerable: false
});

Object.assign({}, a, b);  //{ a: 'a' }
You can find enumerable properties by iterating over an object, using a construct such as for...in for properties that have enumerable: true. You can control this meta-attribute as well as three others (writable, configurable, and value) at the point of definition. Recall from chapter 2 that the meta-object containing these four attributes is known as a property or data descriptor.
Following Object#hasOwnProperty, owned properties refer to properties found directly in the source objects, not properties accessible via their prototype. In the following code snippet, the inherited property parent is never assigned to the target object:
const parent = {
  parent: 'parent'
};

const c = Object.create(parent);
c.c = 'c';

Object.assign({}, c);  // { c: 'c' }
Now consider a property with the same name, with the objects being merged. In this case, the rule is that the object to the right overrides the set of properties of the object to the left in the list. Here’s a simple use case:
This rule is important, and I’ll circle back to it in section 3.4.2.
At this point, you may be thinking that Object.assign simply copies properties right to left. Well, not always. There’s a subtle difference between definition and assignment.
Assigning a value to an existing property doesn’t define how a property behaves, the way that Object.defineProperty does. Assignment falls back to defining a property only if an assignment is made for a property that doesn’t exist. Hence, for new properties, JavaScript uses the [[DefineOwnProperty]] internal process as outlined in the specification, and for existing properties, it uses [[Set]], which won’t alter the property’s meta-attributes, as happened in our first example with doSomething (see the following listing).
Listing 3.8 Using Object.assign to assign values to new and existing properties
function doSomething(config = {}) {
  config = Object.assign(
    {
      foo: 'foo',
      bar: 'bar',           ❶
      baz: 'baz'
    }, config);

   console.log(`Using config ${config.foo}, ${config.bar}, ${config.bar}`);
}

doSomething({foo: 'hello'});
❶ foo gets set to 'hello', and bar and baz are newly defined during Object.assign.
Most of the time, this distinction makes no difference, but sometimes it does. Let’s explore the difference with another example:
const Transaction = {
    sender: 'luis@tjoj.com'
};
Object.assign(Transaction, { sender: 'luke@tjoj.com' });
The preceding call works as expected, and sender is set to 'luke@tjoj.com'. But what if sender wasn’t a string property, but a setter method? According to the specification, Object.assign invokes the [[Set]] meta-operation for an existing property key. Consider the scenario in the next listing.
Listing 3.9 Object.assign invokes [[Set]] when encountering the same property name
const Transaction = {
   _sender: 'luis@tjoj.com',

   get sender() {
      return this._sender;
   },
   set sender(newEmail) {
      this._sender = Transaction.validateEmail(newEmail);
   }
};


const EMAIL_REGEX = /^(([^<>()\[\]\\.,;:\s@"]+(\.[^<>()\[\]\\.,;:\s@"]+)*)|   ❶
(".+"))@((\[[0-9]{1,3}\.[0-9]{1,3}\.[0-9]{1,3}\.[0-9]{1,3}\])|(([a-zA-Z\-0-9] ❶
+\.)+[a-zA-Z]{2,}))$/;                                                        ❶


Transaction.validateEmail = function validateEmail(email) {
  if (EMAIL_REGEX.test(email.toLowerCase())) {
    return email;
  }
  throw new Error(`Invalid email ${email}`);
};

Object.assign(Transaction, { sender: 'invalid@email' }); // Error!            ❷
❶ A regular expression that matches valid email addresses
❷ Sending input with invalid email address
Here, sender is considered to be an existing property and gets processed through JavaScript’s internal [[Set]] property, causing the setter logic to execute and fail when the email address is badly formatted.
Now that you understand the basic workings of this built-in API, let’s use it to support our last object construction pattern: mixins.
The idea behind composing or assembling objects is a bit different from the approaches you’ve seen so far. With prototypes, you link to a single object to share its state and behavior, but with mixins, you copy fine-grained pieces of multiple independent slices of objects that together represent the entirety of the object’s API. This section teaches you how to use Object.assign to achieve a technique called concatenative object extension with mixins.
Think of mixins as adding flavors to your ice cream or toppings to your sandwich; every new addition adds a twist to the overall flavor but doesn’t overpower it. Before we dive into our final version of Transaction, let’s study a simple use case. Consider these trivial object literals:
const HasBread = {
  bread: 'Wheat',
  toasted: true
};

const HasToppings = {
  sauce: 'Ranch'
};

const HasTomatoes = {
  tomatoe: 'Cherry',
  cut: 'diced'
};

const HasMeat = {
  meat: 'Chicken',
  term: 'Grilled'
};
Our Sandwich object can be created by joining any or all of these parts:
const Sandwich = (size = '6', unit = 'in') =>
   Object.assign({
    size, unit
  },
  HasBread,
  HasToppings,
  HasTomatoes,
  HasMeat
);

const footLong = Sandwich(1, 'ft');
footLong.tomatoe; // 'Cherry'
More succinctly, you can take advantage of the spread operator:
const Sandwich = (size = '6', unit = 'in') => ({
  size, unit,
  ...HasBread,
  ...HasToppings,
  ...HasTomatoes,
  ...HasMeat
});
A mixin object like HasBread doesn’t provide much value on its own, but it can be used to enhance some target object—Sandwich, in this case. Going back briefly to the OLOO pattern, you may have caught a glimpse of it as the properties (methods and data) of a parent object were added during the execution of the derived object’s constructor. This process repeats at every level of the linked object graph. In fact, to ease the transition of using Object.assign as a means to define object relationships, consider a slight twist on the OLOO example that combines the object-linking step (const HashTransaction = Object.create(Transaction)) and defines new properties on this new object, as shown next.
Listing 3.10 OLOO implemented with Object.assign
const Transaction = {
  init(sender, recipient, funds = 0.0) {
    this.sender = sender;
    this.recipient = recipient;
    this.funds = Number(funds);
    return this;
  },
  displayTransaction() {
    return `Transaction from ${this.sender} to ${this.recipient} for
       ${this.funds}`;
  }
}

const HashTransaction = Object.assign(       ❶
  Object.create(Transaction),
  {
      calculateHash() {
        const data = [this.sender, this.recipient, this.funds].join('');
        let hash = 0, i = 0;
        while (i < data.length) {
          hash = ((hash << 5) - hash + data.charCodeAt(i++)) << 0;
        }
        return hash**2;
    }
  }
);
❶ Defines the properties of HashTransaction through assignment using Object.assign
A mixin is an object with simple behavior, typically made from one or two methods. In this case, there’s one method, calculateHash, which we’ll refactor into its own object in section 3.5.1. The simpler mixins are, the easier they are to compose and reuse in many parts of your code. Mixins should have a narrow focus, much smaller than a class. They could capture a single responsibility or perhaps even a slice of a responsibility. It’s acceptable for a mixin to look incomplete as long as it’s self-sustaining and has everything needed to carry out its task.
NOTE This book discusses mixins only superficially. For more information on the mixin pattern, check out Composing Software, by Eric Elliot (https:// leanpub.com/composingsoftware).
Object composition promotes creating HAS-A or USES-A rather than IS-A relationships among objects. So instead of implicitly delegating to an object’s parent, you circumvent inheritance and copy all the properties you need directly to the target object. You can imagine this process as being analogous to squashing an inheritance hierarchy two or three levels deep into a single object literal. Because you’re adding new properties to an object after it’s been defined, this process is called dynamic or concatenative object extension.
Mixins might sound a little complicated, but the pattern has been widely used for some time. I mentioned its use in CSS preprocessors, but there are others uses in JavaScript itself. In browsers, the behavior instilled by the global window object is in part implemented by the WindowOrWorkerGlobalScope mixin. Similarly, browser events are handled by the WindowEventHandlers mixin. These mixins are used to group a common set of properties between the global objects used in browsers (window) as well as the Web Worker API (self). The browsers premix this code for you, of course, so that you don’t have to, but consider a more obvious example. If you’ve ever used the popular Mocha and Chai unit testing libraries, you probably know that you can extend their functionality by injecting new behavior dynamically, using
chai.use(function (_chai, utils) {
   // ...
});
The method name (use) is appropriate. Many other third-party libraries already take advantage of this feature. To streamline testing with promises, for example, you can extend Chai with the chai-as-promised (https://www.npmjs.com/package/chai-as -promised) library:
chai.use(chaiAsPromised);
Dynamic concatenation embodies the principle of composition well: combine simple objects to build a complex one, which we’re achieving here.
Circling back to Transaction, we’ll use the class definition we started in chapter 2 as its core structure, with mixins to borrow shared modules of code. The first thing you’ll notice is that the definition of calculateHash is not part of the class declaration anymore; it was moved to an object called HasHash. Separating calculateHash into own module will make it easier to add hashing behavior to other classes of our domain, such as Block and Blockchain. As listing 3.11 shows, instead of a simple object, a function allows us to configure the hashing behavior as needed with arguments, such as specifying the fields of the object used as part of the hashing process.
NOTE For these mixins, because we’re returning a new object, we’re going to use arrow functions to save some typing. A regular function declaration would work equally well.
Listing 3.11 Defining the HasHash mixin
const HasHash = keys => ({
  calculateHash() {
    const data = keys.map(f => this[f]).join('');      ❶
    let hash = 0, i = 0;
    while (i < data.length) {
      hash = ((hash << 5) - hash + data.charCodeAt(i++)) << 0;
    }
    return hash**2;
  }
});
❶ Creates a string from the values of the specified property keys
HasHash is a mixin wrapped by a function expression, so the mixin part is this object literal:
{
  calculateHash() {
    const data = keys.map(f => this[f]).join('');
    let hash = 0, i = 0;
    while (i < data.length) {
      hash = ((hash << 5) - hash + data.charCodeAt(i++)) << 0;
    }
    return hash**2;
  }
});
For completeness, if we replace this body of code in the OLOO example (listing 3.10), we obtain the result in the next listing.
Listing 3.12 OLOO pattern for Transaction using the HasHash mixin
const Transaction = {
  init(sender, recipient, funds = 0.0) {
    this.sender = sender;
    this.recipient = recipient;
    this.funds = Number(funds);
    return this;
  },
  displayTransaction() {
    return `Transaction from ${this.sender} to ${this.recipient}
       for ${this.funds}`;
  }
}

const HashTransaction = Object.assign(
  Object.create(Transaction),
  HasHash(['sender', 'recipient', 'funds'])     ❶
);
❶ Copies the properties of the mixin returned by calling HasHash. By using a function, it’s simple to specify which properties of the object’s state the mixin has access to as part of calculating the object’s hash value.
Listing 3.13 shows the final version of Transaction (class + mixins). This code integrates all the mixins into the class prototype reference so that the same hashing functionality is available to all instances of Transaction. The Object.assign call with all mixins happens at the end.
Listing 3.13 Transaction object using mixin concatenation
class Transaction {
   transactionId = '';                                         ❶
   timestamp = Date.now();
   #feePercent = 0.6;

  constructor(sender, recipient, funds = 0.0, description = 'Generic') {
    this.sender = sender;
    this.recipient = recipient;
    this.funds = Number(funds);
    this.description = description;
    this.transactionId = this.calculateHash();
  }

  displayTransaction() {
    return `Transaction ${this.description} from ${this.sender} to
       ${this.recipient} for ${this.funds}`;
  }

  get netTotal() {
     return  Transaction.#precisionRound(
        this.funds * this.#feePercent, 2);
  }

  static #precisionRound(number, precision) {
     const factor = Math.pow(10, precision);
     return Math.round(number * factor) / factor;
  }
}

Object.assign(                                                ❷
   Transaction.prototype,
   HasHash(['timestamp', 'sender', 'recipient', 'funds']),
   HasSignature(['sender', 'recipient', 'funds']),            ❸
   HasValidation()                                            ❹
)
❶ The transactionId is set in the constructor by calling calculateHash, dynamically assigned to this instance’s prototype and available to all instances.
❷ Using Object.assign to glue together (or include) the objects that make up a Transaction
❸ The HasSignature mixin handles signature generation and verification.
❹ HasValidation groups common validation tasks for any object (to be discussed in chapter 5).
NOTE Using a class (such as Transaction) as the target object for dynamic mixin extension is the scenario you’ll most likely encounter in your own coding due to the popularity of classes. But you can use mixins with any of the construction patterns discussed so far.
You may find this pattern, also known as traits, in programming languages such as PHP (https://www.php.net/manual/en/language.oop5.traits.php). When you use classes, all the properties are added to the class’s prototype reference. For this reason, we use Object.assign to extend the class’s prototype dynamically and avoid having to repeat the logic of assigning mixins every time we need a new transaction.
Also, from a memory-efficient point of view, augmenting the prototype object causes all transaction objects to have the same set of properties. Instantiating a new Transaction looks the same as in chapter 2:
const tx = new Transaction('luis@tjoj.com', 'luke@tjoj.com', 10);
tx.transactionId; // 241936169696765470
The important thing to notice is that although this version of Transaction is different from the previous ones, it retains the best parts by
Using the convenient syntax of classes to nicely group and encapsulate all the pertinent transactional details.
Integrating reusable pieces from other mixins for maximum code reuse.
Separating the object definition (such as Transaction class) and mixin configuration from instantiation, akin to OLOO.
Integrating only the direct, public interface of a mixin object by skipping nonenumerable and not-owned properties (because it uses Object.assign).
Allowing mixins to encapsulate hidden properties and methods of their own that only its public API can use, but that do not become part of the overall object and are not reachable from the class. The reverse is also true: mixins don’t have access to any private (#) properties declared inside the class. Only their public interfaces communicate, which prevents a tighter form of coupling. I’ll come back to this topic in section 3.5.1.
Avoiding deep and cumbersome prototype configurations, making objects flatter and therefore simpler to use and combine with other parts of the code.
Now that you know how the mixins integrate into the bigger object, let’s evaluate the structure of a mixin.
In this section, we’re going to discuss the shape of the mixins used in our blockchain application. Transaction uses two important extensions that implement the two main cryptographic concepts underpinning blockchain technology: hashing (HasHash) and digital signatures (HasSignature). Our current version of HasHash still does not produce cryptographically secure hashes. We need to improve that algorithm, but we’ll save the nitty-gritty of the logic for chapter 4 and focus only on its shape for now. When we have the public interface and calls wired up, swapping algorithms in and out is simple.
Listings 3.14 and 3.15 show the updated structures of HasHash and HasSignature, respectively.
const DEFAULT_ALGO_SHA256 = 'SHA256';      ❶
const DEFAULT_ENCODING_HEX = 'hex';        ❶

const HasHash = (
  keys,
  options = { algorithm: DEFAULT_ALGO_SHA256,
              encoding:  DEFAULT_ENCODING_HEX }
) => ({
  calculateHash () {
    //...
  }
})
❶ Default options passed to configure the hashing process. Here, we’re using the SHA256 algorithm with hexadecimal encoding.
Because HasHash accepts a list of keys representing the properties involved in computing the hash, it could work with with any target object. Here’s an example:
const hashable = Object.assign(
   { foo: 'foo', bar: 'bar' },
   HasHash(['foo', 'bar'])
);

hashable.calculateHash();  // '1610053822743955500'
Coming back to encapsulation, assuming that the mixins are their own modules (chapter 6), any data outside the scope of the mixin function (such as DEFAULT_ALGO_SHA256) is virtually private and self-contained, as it is part of the mixin function’s closure.
With a similar structure, the next listing contains the skeleton for HasSignature. This mixin packs a bit more behavior.
Listing 3.15 HasSignature mixin
const DEFAULT_ENCODING_HEX = 'hex';
const DEFAULT_SIGN_ALGO = 'RSA-SHA256';

const HasSignature = (
  keys,
  options = {
    algorithm: DEFAULT_SIGN_ALGO,
    encoding: DEFAULT_ENCODING_HEX
  }
) => ({

  generateSignature(privateKey) {
    //...

  },
  verifySignature(publicKey, signature) {
    //...
  }
});
The body of these methods deals with using Node.js’s crypto modules to sign the contents of an object, as well as read and verify public/private key pairs, which we don’t cover in this book. Feel free to visit the code repo for the internals. Keep in mind, though, that in the real world of open, distributed ledgers, the public key is what identifies a user’s wallet to rest of the world. From the caller’s point of view, the next listing shows how you would use HasSignature.
Listing 3.16 Using HasSignature to sign the contents of an object
const signable = Object.assign(
   { foo: 'foo', bar: 'bar' },
   HasSignature(['foo', 'bar'])
);
const publicKey = fs.readFileSync('test-public.pem', 'utf8');
const privateKey = fs.readFileSync('test-private.pem', 'utf8');

const signature = signable.generateSignature(privateKey);        ❶

signable.verifySignature(publicKey, signature); // true          ❷
❶ Signs the object’s data, using the private key
❷ You can verify that the signature is correct by using the corresponding public key.
You’ve seen examples of HasHash and HasSignature. I cover HasValidation (another mixin) and its internal logic in chapter 5. Note that I named these mixins with the full intention of showing that composition is happening, clearly establishing HAS-A relationships with the target objects, as shown in figure 3.4.
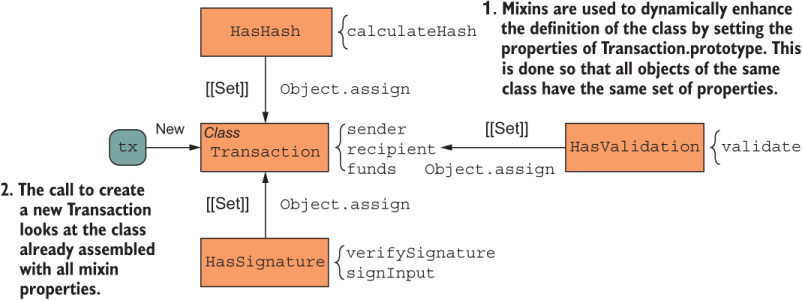
Figure 3.4 When using composition, the mechanism by which an object is built consists of gluing together other independent objects: HasHash, HasSignature, and HasValidation. The properties of each one get mashed up into a single source, forming a single object from the user’s point of view.
Figure 3.4 shows a theoretical or conceptual view of object composition. Practically speaking, after the target object is formed, the Transaction class looks like figure 3.5 to the caller.
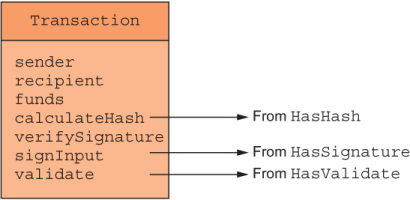
Figure 3.5 Shape of Transaction after object assignment
It might seem that with the composition of mixins, we can obtain something similar to multiple inheritance—a controversial software topic. If you’ve done some research on this topic, you’ve come across the “diamond of death” problem. The problem refers to the ambiguity present when a class extends multiple classes, each declaring the same method. Languages with sophisticated support for this feature, such as Scala, overcome the problem by using a technique known as linearization. In section 3.4.2, we’ll see how JavaScript solves this problem.
Generally speaking, mixins have two main benefits over traditional inheritance schemes:
Mixins reduce some limitations of single inheritance by enabling a developer to reuse sets of methods freely from several independent objects rather than one.
The algorithm that Object.assign uses removes the ambiguity caused by multiple inheritance and makes this process predictable.
The first point is a direct result of the prototype chain mechanism, as there’s a 1-1 correspondence between an object and its prototype. Concatenation overcomes this limitation because you are free to mash together as many objects as needed into a single one.
The second point is more puzzling. How can mixins fix the infamous diamond problem? The premise of the problem is easy to understand: a child class C extends from two parent classes, B1 and B2, and each of these classes in turn extends from a base class A. This problem is more common in class-oriented languages, which label relationships to parent classes as IS-A. From that standpoint, how can a class be a template for two different things? Consider the animal taxonomies example again (figure 3.6). At the base, you may have a class Animal, with child classes TerrestrialAnimal and AquaticAnimal.
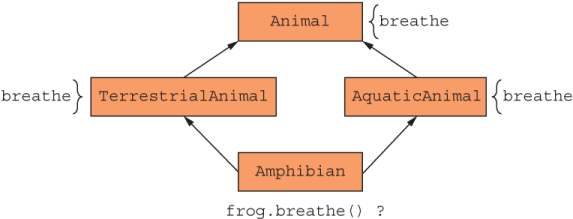
Figure 3.6 The classic diamond problem of multiple inheritance. Assuming that a class may extend form multiple other classes with a conflicting method signature, which method is dispatched at runtime?
First, a little biology lesson: amphibians such as frogs, toads, and salamanders start as larvae, with gills to breathe underwater, and later mature to adults with lungs to breathe air. Some amphibians even rely on their skins as a secondary respiratory alternative. It makes perfect sense for a class Amphibian to extend from both of these classes. But when frog.breathe is called, which implementation will it pick? With software, we can’t leave the answer to Mother Nature.
As you might expect, we can use mixins to model this type of object:
const TerrestrialAnimal = {
   walk() {
      ...
   },
   breathe() {
     return 'Using my lungs to breathe';
   }
};

const AquaticAnimal = {
   swim() {
      ...
   },
   breathe() {
     return 'Using my gills to breathe';
   }
};

const Amphibian = name => Object.assign(
   {
     name
   },
   AquaticAnimal,
   TerrestrialAnimal
);

const frog = Amphibian('Frog');

frog.walk();

frog.swim();
To return to the original question, if frog calls breathe, which implementation does it use? Seemingly, we have entered a diamond situation. But the rules of Object.assign remove this ambiguity because it’s predictable: always favor the properties of the object that gets added last. You can picture this situation by collapsing the diamond of death to a straight line (hence, linearizing) in an orderly sequence. Linearizing the diamond problem would look like figure 3.7.

Figure 3.7 Applying linearization to a multiple inheritance situation
The way in which Object.assign is implemented allows the same behavior to occur. Behind the scenes, the implementation works like figure 3.8.

Figure 3.8 Multiple inheritance is possible with Object.assign’s mechanism that takes care of establishing a predictable order in which source objects are assigned to the target.
Now if you call breathe on the frog object, you always get the expected result, choosing TerrestrialAnimal as the implementation:
frog.breathe(); // 'Using my lungs to breathe'
Merging objects this way is so common that since ECMAScript 2018, we can streamline this technique even more. Instead of using the Object.assign API directly, we have language support to accomplish something similar, using the spread operator over objects. This operator gives you a compact, idiomatic syntax to copy the state of an object in an immutable way.
In section 3.3, I briefly mention some examples in which Object.assign is useful. The spread operator works equally well for each of those cases. Consider the example of performing shallow clones of some object obj:
const clone = { ...obj };
const toad = Object.assign({}, obj);
We can use the spread operator to create object templates:
const toad = { ...frog, name: 'Toad' };
In a single line, we copied all owned properties from frog and overrode the name property to yield a new object called toad. From a practical point of view, Object .assign and the spread operator have similar uses, the exception being that the spread operator yields a new object instead of assigning to an existing object. In most cases, this exception doesn’t matter, but if we were to use the spread operator with the Transaction class where we opted to augment prototype directly, the code would fail with an error. So
Transaction.prototype = {
  ...HasHash(['timestamp', 'sender', 'recipient', 'funds']),
  ...HasSignature(['sender', 'recipient', 'funds']),
  ...HasValidation()
}
would throw an error in strict mode:
TypeError: Cannot assign to read only property 'prototype' of function 'class Transaction...
Although both patterns allow you to create objects by combining others, that subtle difference is enough for us to continue using Object.assign in our application. In section 3.5, we use this pattern to complete the main classes of our domain model.
Now that you have a good understanding of dynamic object concatenation, to see the benefits of code reuse, we’ll apply it to other parts of our application. In this section, you’ll see how the mixins we’ve created so far apply to more than Transaction. To keep things a bit consistent in the domain layer, and because you’re more likely to run into classes in the wild, I’ll use classes to model the concepts of Blockchain, Block, and Wallet. In listing 3.12, I showed how to use mixins with OLOO. Both patterns use implicit linking, so you should be able to port this code to OLOO style without much effort.
First, let’s define the Blockchain class in the next listing with a similar structure.
Listing 3.17 Blockchain definition with mixins
class Blockchain {

  #blocks = new Map();

  constructor(genesis = createGenesisBlock()) {
     this.#blocks.set(genesis.hash, genesis);
  }

  height() {
     return this.#blocks.size;
  }

  lookup(hash) {
    const h = hash;
    if (this.#blocks.has(h)) {
      return this.#blocks.get(h);
    }
    throw new Error(`Block with hash ${h} not found!`);
  }

  push(newBlock) {
     this.#blocks.set(newBlock.hash, newBlock);
     return newBlock;
     }
}

function createGenesisBlock(previousHash = '0'.repeat(64)) {
  //...
}

Object.assign(Blockchain.prototype, HasValidation());       ❶
❶ As with Transaction, extends blockchain with validation functionality. (Full implementation of validation logic is covered in chapter 5.)
A blockchain stores blocks, which in turn store transactions. Listing 3.17 shows a basic class declaration of Block, which we’ll fill in as we go along. The most important job of this class is to manage a collection of transactions and the hashing calculation by using its previous hash. What makes tampering detectable in a blockchain is that every block’s hash depends on the hashes of all the previous blocks, starting with the genesis. So if a block is tampered with, all you need to do is recompute its hash and compare it with the original to detect the malfeasance. The next listing shows how Block also mixes HasHash.
class Block {
  #blockchain;

  constructor(index, previousHash, data = []) {
    this.index = index;
    this.data = data;                                           ❶
    this.previousHash = previousHash;                           ❷
    this.timestamp = Date.now();
    this.hash = this.calculateHash();                           ❷
  }

  set blockchain(b) {
    this.#blockchain = b;
    return this;
  }

  isGenesis() {
    return this.previousHash === '0'.repeat(64);
  }
}

Object.assign(
   Block.prototype,
   HasHash(['index', 'timestamp', 'previousHash', 'data']),     ❸
   HasValidation()
);
❶ A block’s data field can contain a collection of pending transactions found in the blockchain at the moment a new block is mined or mined transactions found after the block is mined into the chain.
❷ Every block always contains the hash of the block that preceded it (which establishes the chain).
❸ HasHash augments Block with hashing functionality.
As of now, we’ve built the skeleton of most of the domain layer of our application. As you read on, you will learn more about JavaScript and programming a blockchain as we continue to add the finer details to this code. For additional reference, figure 3.9 shows the objects and the shared mixins we’ve created so far.
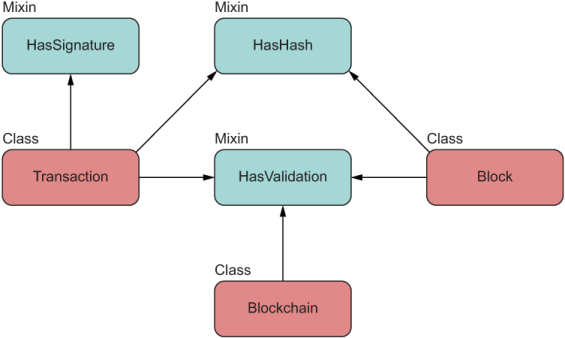
Figure 3.9 The main objects at play, with their respective mixins. As you can see, mixins are designed to be shared structures.
Furthermore, to make teaching blockchain simpler, I tried to avoid some of the cryptography topics by using email addresses to identify a transaction’s sender and recipient. In the real world, emails are way too personal for a public ledger, in which user information always needs to be secure. A transaction stores sender and receiver addresses in the form of cryptographically secure public keys. When you visit the blockchain application’s source code in GitHub, you’ll see keys being used instead of emails. This information identifies each user’s digital Wallet, as shown in the following listing. Think of a Wallet as being your personal banking mobile app.
class Wallet {
  constructor(publicKey, privateKey) {
    this.publicKey = publicKey
    this.privateKey = privateKey
  }
  get address() {
    return this.publicKey
  }
  balance(ledger) {
    //...              ❶
  }
}
❶ Details deferred to chapter 4
Figure 3.10 shows the basic interactions among blocks, transactions, wallets, and blockchain.
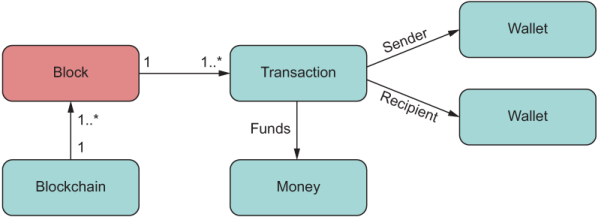
Figure 3.10 The main objects at play in our simple blockchain application. I have not shown Money, a value object that describes an amount and currency.
In this chapter, we explored two more object construction patterns: OLOO (also known as simple object linking) and concatenative object extension (also known as mixins). Parting from the techniques you reviewed in chapter 2, these alternatives give you more flexibility in modeling your objects.
There’s always a downside, however. JavaScript engines highly optimize processes that take advantage of the [[Prototype]] mechanism. When deviating a bit by using mixins instead of object hierarchies, which prefer more state copying and are more resilient to fragile base objects or prototype pollution, we create a slightly bigger combined memory footprint because we have a lot more objects in memory. We mitigated this situation by extending a class’s prototype instead of mixin into new instances directly, as the next listing shows.
Listing 3.20 Assigning mixins to a single instance of Transaction
Object.assign(
   new Transaction(...),                                      ❶
   HasHash(['timestamp', 'sender', 'recipient', 'funds']),
   HasSignature(['sender', 'recipient', 'funds']),
   HasValidation()
)
❶ Creates a new object each time with a copy of all methods
With this code, you would have to repeat this complex construction call every time you need a new transaction. In most or all of your cases, having to copy state is negligible, considering that most performance bottlenecks in applications occur with I/O bound calls (database, network, file system, and others). Nevertheless, it’s important to pay attention to this situation in those rare cases in which you’d need hundreds of these objects.
Another issue to pay attention to is the implicit assumption that a mixin makes about the target object in which it’s embedded. You might have seen this assumption when we discussed the code inside HasHash in section 3.5. The next listing shows that code again.
const HasHash = keys => ({
  calculateHash() {
    const data = keys.map(f => this[f]).join('');       ❶
    let hash = 0, i = 0;
    while (i < data.length) {
      hash = ((hash << 5) - hash + data.charCodeAt(i++)) << 0;
    }
    return hash**2;
  }
});
❶ Creates an implicit dependency between the mixin and the whole object
As you can see, this is the glue between the whole object and its mixins. Mixins bind really tightly to the public interface of its target object and can become fragile when target objects are further extended and mixin code starts to change. Also, from an optics perspective, it’s hard to see the shape of the objects being coupled here. You’d have to navigate to all objects that mix this behavior to understand whether the code will work for all of them.
There’s no hard-and-fast rule about whether to use linking-based models versus inheritance-based models. As with all software, the answer depends on the types of problems you’re solving, the team’s expertise, and how complex your domain model is. Unlike other languages, however, JavaScript gives you options.
Now that we’ve examined JavaScript’s object model in great depth, it’s time to start talking about functions. One interesting fact about JavaScript is that functions are also objects in the language (aka first-class functions). In chapter 4, you’ll learn how to exploit the benefits of first-class functions and see how they enable functional programming.
JavaScript offers behavior delegation via implicit links and mixins for building objects in a compositional manner.
Behavior delegation is the natural way to model objects in JavaScript. It uses the implicit delegation mechanism present in JavaScript’s lookup process and the prototype chain.
Object concatenation offers a simple approach based on structural object composition, which allows you to build objects by attaching (embedding) behavior from other independent objects.
You can use mixins to extend objects (or classes) dynamically and favor structural composition over inheritance.
Mixins address the issue of multiple inheritance through a mechanism known as mixin linearization.
JavaScript offers a shortcut for Object.assign by using the spread operator, although Object.assign and the spread operator are not interchangeable.