Building the Home Page
A typical web page has a skeleton that looks like this:
| | <!DOCTYPE html> |
| | <html lang="en-US"> |
| | <head> |
| | <meta charset="utf-8"> |
| | <title>Title</title> |
| | </head> |
| | <body> |
| | <!-- some content goes here --> |
| | </body> |
| | </html> |
Every time you create a page, you start with a skeleton such as this and then fill in the body section. Your site will likely have a lot more common elements like navigation, a banner, and a footer. As you build out your site, you end up duplicating all of this content on every page, which is difficult to manage if you do it by hand. That’s why dynamic sites are so popular; they provide mechanisms to reduce duplication by separating the content from the layout.
In a Hugo site, you define layouts that contain this skeleton, so you can keep this boilerplate code in a central location. Your content pages contain only the content, and Hugo applies a layout based on the type of content.
Hugo needs a layout for the home page of your site, a layout for other content pages, and a layout that shows a list of pages, like an archive index or a product list. The following figure illustrates this relationship:
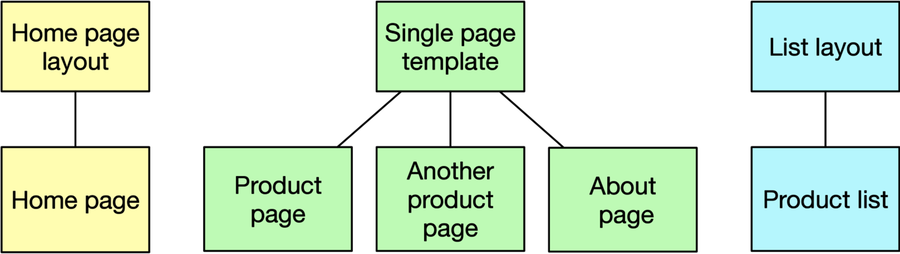
As you can see in the figure, the “home page” of the site has its own layout. The “Product list” page has a “list layout” associated with it. However, the two product pages and the “About” page all share a layout.
In this chapter, you’ll create a layout for the home page and another layout for single pages, and they’ll have nearly identical content. You’ll build a layout for list pages in the next chapter.
Let’s start with the home page layout. Hugo uses a separate layout for the home page because it assumes you’ll want your home page to have a different look than other content pages. For example, your home page might contain a list of recent blog posts or articles, or show previews of other content. Or it might have a larger banner image than other pages. For now, you’ll keep the home page simple.
Create the file layouts/index.html and add the following code, which defines an HTML skeleton for the home page:
| | <!DOCTYPE html> |
| | <html lang="en-US"> |
| | <head> |
| | <meta charset="utf-8"> |
| | <title>{{ .Site.Title }}</title> |
| | </head> |
| | <body> |
| | |
| | <h1>{{ .Site.Title}}</h1> |
| | |
| | {{ .Content }} |
| | |
| | </body> |
| | </html> |
To pull in data and content, Hugo uses Go’s http/templates library[12] in its layouts. While you don’t need a deep understanding of how the templating language works, it’s worth exploring when you want to build more complex templates.
In addition to the HTML code, there are some spots between double curly braces. This is how you define where content goes, and the content can come from many places. The {{ .Site.Title }} lines pull the title field out of the config.toml file you just edited and place it into the <title> and <h1> tags. The .Site prefix tells Hugo to get the value from the site’s data rather than from the page’s data. As you’ll see shortly, pages have their own data that you can use.
The {{ .Content }} line displays the content for the page, which will come from an associated Markdown document in your site’s content folder. Note that this doesn’t use the .Site prefix, because this data is related to the page. When you’re working with a Hugo layout, there’s a “scope”, or “context” that contains the data you want to access. The current context in a template is represented by the dot. In a Hugo layout, the context is set to the Page context, which looks something like this:
| | Context (.) |
| | ├── Site. |
| | │ └── Title |
| | ├── Title |
| | └── Content |
For convenience, Hugo makes all of the site’s data available in the Page context under the Site key. That’s why you can do .Site.Title to get the site’s title. To get the page title, you’d use .Title. There are many more pieces of data available to you within this context, and you’ll use many of them later in the book.
You’ve added the {{ .Content }} statement to the home page layout, but you’re probably wondering where the content comes from. For the site’s home page, Hugo will look for the content in a file named _index.md in the content directory. This special filename is how Hugo finds content for all index pages, like the home page and lists of content like tags, categories, or other collections you’ll create.
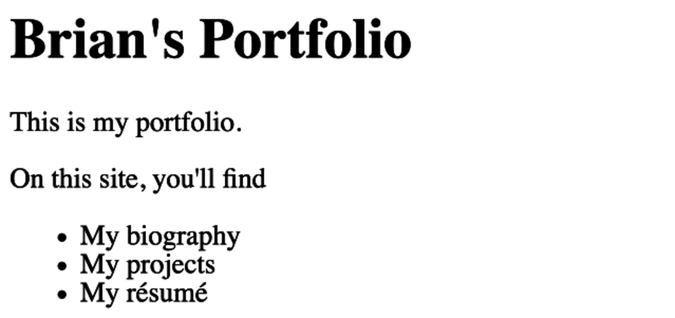
Create the content/_index.md file and open it in your editor. You can place any valid Markdown content into this file. For this example, add a couple sentences and a list of what’s on the site:
| | This is my portfolio. |
| | |
| | On this site, you'll find |
| | |
| | * My biography |
| | * My projects |
| | * My résumé |
After you’ve added your content, save the file.
Time to test things out. Hugo has a built-in development server that you can use to preview your site while you build it. Run the following command to start the server:
| | $ hugo server |
Hugo builds your site and displays the following output in your console letting you know that the server is running:
| | ... |
| | Web Server is available at http://localhost:1313/ (bind address 127.0.0.1) |
| | Press Ctrl+C to stop |
Visit http://localhost:1313 in your web browser and you’ll see your home page:
Use your browser’s View Source feature and you’ll see the layout and your content combined:
| | <!DOCTYPE html> |
| | <html lang="en-US"> |
| | <head> |
| | <meta name="generator" content="Hugo 0.68.3" /> |
| | <script src="/livereload.js?port=1313&mindelay=10&v=2" |
| | data-no-instant defer></script> |
| | <meta charset="utf-8"> |
| | <title>Brian's Portfolio</title> |
| | </head> |
| | <body> |
| | <h1>Brian's Portfolio</h1> |
| | <p>This is my portfolio.</p> |
| | <p>On this site, you’ll find</p> |
| | <ul> |
| | <li>My biography</li> |
| | <li>My projects</li> |
| | <li>My résumé</li> |
| | </ul> |
| | </body> |
| | </html> |
Hugo’s development server automatically reloads files when they change. Open the content/_index.md file in your text editor and make some changes to the content. When you save the file, the changes appear in your browser automatically. There’s no need to install a separate server or browser extension. The single Hugo binary handles it all for you by injecting a little bit of JavaScript at the bottom of each page which handles reloading the page.
In your terminal, press CTRL+C to stop the Hugo server. You’re ready to add another page to the site, but this time you will do it with Hugo’s content generator.