Chapter 13. Orchestrating services on a cluster of Docker hosts with Swarm
- How Docker application deployments work and options
- Deploying a multitier application to Docker Swarm
- How Swarm attempts to converge the Docker application deployment to the desired state declared by operators
- How Swarm ensures the desired number of replicas are running around the cluster within the declared placement and resource constraints
- Routing of request traffic from a cluster node to network service instances and how collaborating services reach each other using Docker networks
- Controlling placement of Docker Service containers within the cluster
13.1. Clustering with Docker Swarm
Application developers and operators frequently deploy services onto multiple hosts to achieve greater availability and scalability. When an application is deployed across multiple hosts, the redundancy in the application’s deployment provides capacity that can serve requests when a host fails or is removed from service. Deploying across multiple hosts also permits the application to use more compute resources than any single host can provide.
For example, say you run an e-commerce site that usually performs well on a single host, but is a slow during big promotions that drive peak load twice as high as normal. This site might benefit from being redeployed onto three hosts. Then you should have enough capacity to handle peak traffic even if one host fails or is out of service for an upgrade. In this chapter, we will show you how to model and deploy a web API across a cluster of hosts managed with Swarm.
Docker Swarm provides a sophisticated platform for deploying and operating a containerized application across a set of Docker hosts. Docker’s deployment tooling automates the process for deploying a new Docker service to the cluster or changes to an existing service. Service configuration changes may include anything declared in the service definition (docker-compose.yml) such as image, container command, resource limits, exposed ports, mounts, and consumed secrets. Once deployed, Swarm supervises the application so that problems are detected and repaired. Additionally, Swarm routes requests from the application’s users to the service’s containers.
In this chapter, we will examine how Docker Swarm supports each of these functions. We will build on the service, configuration, and secret resources explored in chapters 11 and 12. We will also leverage your fundamental knowledge of Docker containers (chapter 2), resource limits (chapter 6), and networking (chapter 5).
13.1.1. Introducing Docker Swarm mode
Docker Swarm is a clustering technology that connects a set of hosts running Docker and lets you run applications built using Docker services across those machines. Swarm orchestrates the deployment and operation of Docker services across the collection of machines. Swarm schedules tasks according to the application’s resource requirements and machine capabilities. The Swarm clustering software is included in the Docker Engine and command-line tool. You can enable Swarm mode and start using Swarm without installing any additional components. Figure 13.1 shows how the components of a Docker Swarm deployment relate to each other and how the machines of the cluster collaborate to run applications.
Figure 13.1. Swarm cluster deployment
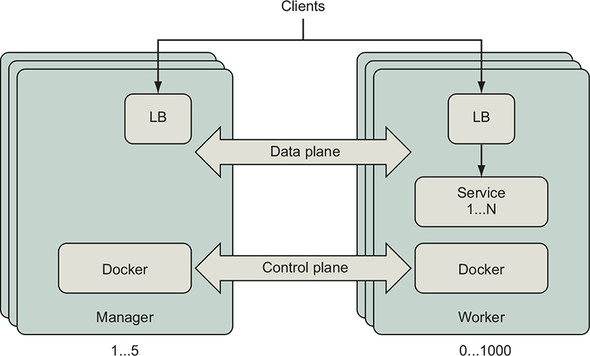
When you join a Docker Engine to a Swarm cluster, you specify whether that machine should be a manager or a worker. Managers listen for instructions to create, change, or remove definitions for entities such as Docker services, configuration, and secrets. Managers instruct worker nodes to create containers and volumes that implement Docker service instances. Managers continuously converge the cluster to the state you have declared it should be in. The control plane connecting the cluster’s Docker Engines depicts the communication of the desired cluster state and events related to realizing that state. Clients of a Docker service may send requests to any node of the cluster on the port published for that service. Swarm’s network mesh will route the request from whichever node received the request to a healthy service container that can handle it. Swarm deploys and manages lightweight, dedicated load-balancer and network routing components to receive and transport network traffic for each published port. Section 13.3.1 explains the Swarm network mesh in detail. Let’s deploy a cluster to work through the examples in this chapter.
Swarm clusters can be deployed in many topologies. Each cluster has at least one manager to safeguard cluster state and orchestrate services across workers. Swarm managers require a majority of the managers to be available in order to coordinate and record a change to the cluster. Most production Swarm deployments should have three or five nodes in the manager role. Increasing the number of managers will improve availability of the Swarm control plane, but will also increase the time it takes for managers to acknowledge a change to the cluster. See the Swarm Admin Guide for a detailed explanation of the trade-offs (https://docs.docker.com/engine/swarm/admin_guide/). Swarm clusters can scale reliably to hundreds of worker nodes. The community has demonstrated tests of a single Swarm with thousands of worker nodes (see the Swarm3K project at https://dzone.com/articles/docker-swarm-lessons-from-swarm3k).
Swarm, the native clustered application deployment option provided by Docker, supports the Docker application model well. Many people will find Swarm simpler to deploy, use, and manage than other container clustering technologies. You may find it useful to deploy small Swarm clusters for an individual team or project. A large Swarm cluster can be partitioned into multiple zones by using labels, and then you can place service instances into the proper zone by using scheduling constraints. You can label cluster resources with metadata meaningful to your organization such as environment=dev or zone=private so the cluster’s actual management model matches your own terminology.
13.1.2. Deploying a Swarm cluster
You have many options for building a swarm from a cluster of nodes. The examples in this chapter use a Swarm cluster with five nodes, though most of the examples work on a single node, such as Docker for Mac. You may provision a Swarm cluster however you like. Because of the wide variety of provisioning options and the rate of change, we recommend you follow an up-to-date guide to provision a Swarm cluster on your favorite infrastructure provider. Many people deploy test clusters with docker-machine on cloud providers such as DigitalOcean and Amazon Web Services.
The examples in this chapter were created and tested using Play with Docker (https://labs.play-with-docker.com/). On the Play with Docker site, you can experiment with Docker and learn about it for free. The cluster was created using the Play with Docker template that provisions three manager and two worker nodes. You will need at least two workers to complete all of the exercises in this chapter.
The general process for deploying a Swarm cluster is as follows:
- Deploy at least three nodes with Docker Engine installed and running, preferably five.
- Ensure that network traffic is permitted between the machines on the following ports and protocols:
- TCP port 2377 for cluster management communications
- TCP and UDP port 7946 for communication among nodes
- UDP port 4789 for overlay network traffic
- Initialize a Swarm cluster by running docker swarm init on a manager.
- Record the Swarm cluster join tokens or display them again with docker swarm join-token.
- Join the manager and then worker nodes to the cluster with docker swarm join.
13.2. Deploying an application to a Swarm cluster
In this section, we will deploy an example web application with a common three-tier architecture. The application features a stateless API server connected to a PostgreSQL relational database. Both the API server and database will be managed as Docker services. The database will use a Docker volume to persist data across restarts. The API servers will communicate with the database over a private, secure network. This application will demonstrate how the Docker resources you have learned about in previous chapters translate to a deployment spanning multiple nodes.
13.2.1. Introducing Docker Swarm cluster resource types
Docker Swarm supports nearly all of the concepts discussed in this book, as illustrated in figure 13.2. When using Swarm, these resources are defined and managed at the cluster level.
Figure 13.2. Docker Swarm resource types
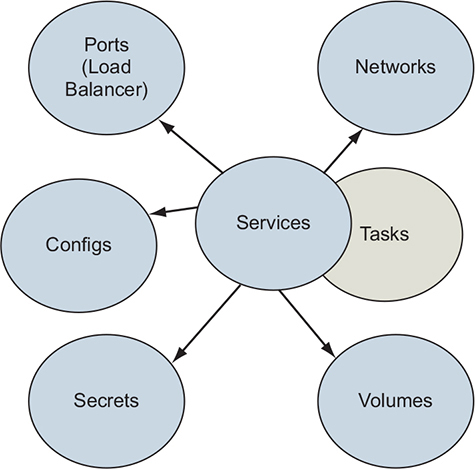
The key Docker Swarm resource types are as follows:
- Services— A Docker service defines the application processes that run on the Swarm cluster’s nodes. Swarm managers interpret the service definition and create tasks that are executed on the cluster’s manager and worker nodes. Services are introduced in chapter 11.
- Tasks— Tasks define a containerized process that Swarm will schedule and run once until completion. A task that exits may be replaced by a new task, depending on the restart policy defined by the service. Tasks also specify dependencies on other cluster resources such as networks and secrets.
- Networks— Applications can use Docker overlay networks for traffic between services. Docker networks have low overhead, so you can create network topologies that suit your desired security model. Section 13.3.2 describes overlay networks.
- Volumes— Volumes provide persistent storage to service tasks. These volumes are bound to a single node. Volumes and mounts are described in chapter 4.
- Configs and secrets— Configurations and secrets (chapter 12) provide environment-specific configurations to services deployed on the cluster.
The example application uses each of these Docker resource types.
13.2.2. Defining an application and its dependencies by using Docker services
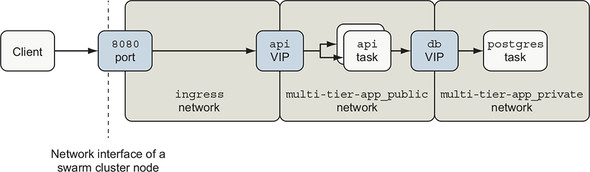
The example application we will work with in this chapter is a simple web application with three tiers: a load balancer, API server, and PostgreSQL database. We will model this application with Docker and then deploy it to our Swarm cluster. Logically, the application deployment will look like figure 13.3.
Figure 13.3. Logical architecture of example application

The application has an API server with two endpoints: / and /counter. The API service publishes a port to the cluster’s edge that is implemented by Swarm’s built-in load balancer. Requests to the / endpoint will return information about the container that handled the request. The /counter endpoint will increment an integer with each request. The value of the counter is stored in a PostgreSQL database.
Let’s define the application a piece at a time by using the Docker Compose version 3 format and synthesize the concepts covered in previous chapters. After that, we will deploy it with the docker stack command. This application definition is available in full at https://github.com/dockerinaction/ch13_multi_tier_app.git. Clone that repo to follow along as the application is explained piece by piece.
The application uses two networks, a public network handling requests coming from external clients, and a private network that is more trusted. These networks are described in the docker-compose.yml application descriptor as follows:
version: '3.7'

networks:
  public:
    driver: overlay
    driver_opts:
      encrypted: 'true'
  private:
    driver: overlay
    driver_opts:
      encrypted: 'true'
    attachable: true
Note
The value true is quoted for driver_opts because Docker requires a string or number. The value of true is unquoted for attachable because Docker requires a boolean.
Both networks are defined by adding named entries to a top-level networks key in the application descriptor. The team that built this application has an end-to-end encryption requirement. The application definition satisfies a large portion of that requirement by encrypting all of the traffic on the networks used by the application. The only remaining work is to secure communications on the service’s published port by using TLS. Section 13.3 explains why applications should secure the published ports, and chapter 12’s greetings application showed one way to do this. This highlights an interesting feature of Swarm: it is easy to satisfy many transport encryption requirements by using a relatively simple, auditable configuration in the deployment descriptor.
Next, the database needs persistent storage for its data. We define a Docker volume under a top-level volumes key:
volumes:
  db-data:
Notice that no options are defined for this volume. Swarm will use Docker’s built-in local volume driver to create it. The volume will be local to that Swarm node and not replicated, backed up, or shared elsewhere. Some Docker volume plugins can create and manage volumes that persist and share data across nodes; the Docker Cloudstor and REX-Ray plugins are good examples.
Before we move on to the service definition, create a reference to the password that will be used by the API to access the PostgreSQL database. The password will be configured in the Swarm cluster as one of the first steps of the deployment process. Add a top-level secrets key that instructs the password to be retrieved from the cluster’s secret resources:
secrets
  ch13_multi_tier_app-POSTGRES_PASSWORD:
    external: true                           1
- 1 Retrieves from cluster’s secret resources
Now we are ready to define the application’s services. Let’s start with the database by defining a postgres service under a top-level services key:
services:
  postgres:
      image: postgres:9.6.6
      networks:
        - private
      volumes:
        - db-data:/var/lib/postgresql/data
      secrets:
        - source: ch13_multi_tier_app-POSTGRES_PASSWORD      1
          target: POSTGRES_PASSWORD
          uid: '999'                                         2
          gid: '999'
          mode: 0400
      environment:
          POSTGRES_USER: 'exercise'
          POSTGRES_PASSWORD_FILE: '/run/secrets/POSTGRES_PASSWORD'
          POSTGRES_DB: 'exercise'
      deploy:
          replicas: 1                                        3
          update_config:
            order: 'stop-first'
          rollback_config:
            order: 'stop-first'
          resources:
            limits:

              cpus: '1.00'
              memory: 50M
            reservations:
              cpus: '0.25'
              memory: 50M
- 1 Injects PostgreSQL password from a cluster-managed secret
- 2 The postgres user (uid: 999) managed by the container needs to read the file.
- 3 Ensures at-most one instance of PostgreSQL by limiting replicas to 1 and stopping after first update or rollback failure
This database service will use the official PostgreSQL image to start a database. That PostgreSQL container will attach to (only) the private network, mount the db-data volume, and use the POSTGRES_* environment variables to initialize the database. The POSTGRES_DB and POSTGRES_USER environment variables determine the name of the database and the user we will use to access the database, respectively. However, you should avoid providing secrets such as passwords to processes via environment variables because they are leaked easily.
A better way is to read that secret from a file that is managed safely. Docker supports this directly with its secrets functionality. The PostgreSQL image also has support for reading sensitive data such as the POSTGRES_PASSWORD from a file. For this stack definition, Docker will retrieve the PostgreSQL password from the cluster’s ch13_multi_tier_app-POSTGRES_PASSWORD secret resource definition. Swarm places the secret’s value in a file mounted into the container at /run/secrets/POSTGRES_PASSWORD. The PostgreSQL process switches to a user with user ID 999 when it starts up, so the secret file’s owner is configured to be readable by that user.
Note
All processes that execute inside a Docker container can access all the environment variables of that container. However, access to data in files is controlled by file permissions. So nobody can read a $SECRET environment variable, but not the /run/secrets/SECRET file unless file ownership and permissions permit reading by nobody. For details, see chapter 12, which explores Docker configurations and secrets in detail.
Does it look like anything is missing from the postgres service definition? One thing that is not clear is how clients will connect to the database.
When using a Docker overlay network, applications connected to a given network will be able to communicate with each other on any port. No firewalls exist between applications attached to a Docker network. Because PostgreSQL listens on port 5432 by default and no firewall is present, other applications that are also attached to that private network will be able to connect to the postgres service on that port.
Now let’s add a service definition for the API under the services key:
api:
      image: ${IMAGE_REPOSITORY:-dockerinaction/ch13_multi_tier_app}:api
      networks:
        - public

        - private
      ports:
        - '8080:80'
      secrets:
        - source: ch13_multi_tier_app-POSTGRES_PASSWORD
          target: POSTGRES_PASSWORD
          mode: 0400
      environment:
        POSTGRES_HOST: 'postgres'
        POSTGRES_PORT: '5432'
        POSTGRES_USER: 'exercise'
        POSTGRES_DB: 'exercise'
        POSTGRES_PASSWORD_FILE: '/run/secrets/POSTGRES_PASSWORD'
      depends_on:
        - postgres
      deploy:
          replicas: 2
          restart_policy:
              condition: on-failure
              max_attempts: 10
              delay: 5s
          update_config:
              parallelism: 1
              delay: 5s
          resources:
            limits:
              cpus: '0.50'
              memory: 15M
            reservations:
              cpus: '0.25'
              memory: 15M
The API servers are attached to both the public and private network. Clients of the API server issue requests to port 8080 of the cluster. The Swarm network routing mesh will forward client requests from the edge of the network to a task and ultimately into an API server container on port 80. The API servers connect to PostgreSQL, which is attached to only the private network. The API servers are configured to connect to PostgreSQL by using the information defined in the POSTGRES_* environment variables.
Notice that the PostgreSQL user’s password is also provided to the API server via a Docker secret. As with the postgres service, the secret is mounted into each API service container as a file. Though the API service uses an image built from scratch and includes only a static Golang binary, the secret mount still works because Docker manages the underlying tmpfs filesystem mount for you. Docker goes to great lengths to help you manage and use secrets safely.
The rest of the API service definition manages the specifics of how Swarm should deploy the service. The depends_on key contains a list of other services that the API server depends on—in this case, postgres. When we deploy the stack, Swarm will start the postgres service before api. The deploy key declares how Swarm should deploy the api service across the cluster.
In this configuration, Swarm will deploy two replicas to the cluster and try to keep that many tasks running to support the service. The restart_policy determines how Swarm handles a service task exiting or entering a failed state, according to its health check.
Here, Swarm will restart the task when it fails to start. Restart is a misnomer, as Swarm will actually start a new container rather than restart the failed container. Swarm restarts service tasks an infinite number of times by default. The API service’s configuration restarts tasks up to 10 times with a 5-second delay between each restart.
Service authors should think through their restart strategies carefully to determine how long and how many attempts Swarm should make to start a service. First, it’s rarely useful to try indefinitely. Second, infinite retry processes could exhaust cluster resources that are consumed when new containers start, but aren’t cleaned up quickly enough.
The API service uses a simple update_config that limits the rollout of updates to the service to one task at a time. In this configuration, Swarm will update the service by shutting down a task with the old configuration, start one with the new configuration, and wait until the new task is healthy prior to moving on to replacing the next task in the service. The delay configuration introduces an interval between task replacement actions to keep the cluster and traffic to the service stable during the rollout.
Many configuration options exist for restart, update, and rollback configurations that were discussed in chapter 11. You can fine-tune these to complement the application’s behavior and create a robust deployment process.
13.2.3. Deploying the application
In this section, we will deploy the application we’ve defined to a Swarm cluster. We will use the docker stack command introduced in chapter 11 to do that. Figure 13.4 shows how this command will be communicated to the cluster.
Figure 13.4. Communication path for Docker control plane
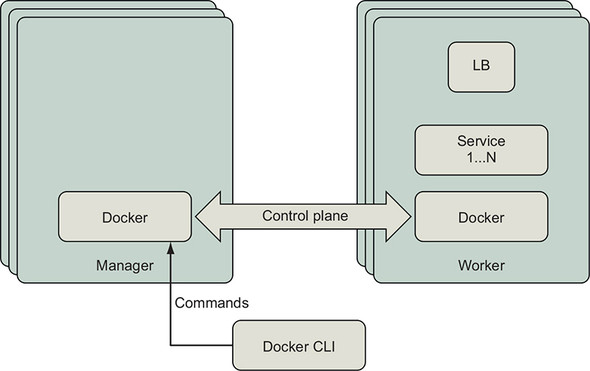
Docker services, networks, and other swarm resources are managed by issuing the appropriate docker command to a manager node of the swarm cluster. When you issue a command with the docker CLI, it will connect to the Docker Engine API and request updates to the swarm cluster’s state. The leader of the swarm will orchestrate the changes required to converge the actual application resources on the cluster to the desired state.
If you issue Docker commands to manage the cluster or its resources to a worker node, you will receive an error:
[worker1] $ docker node ls
Error response from daemon: This node is not a swarm manager. Worker
nodes can't be used to view or modify cluster state. Please run this
command on a manager node or promote the current node to a manager.
Open a command shell to any of the manager nodes in your cluster. List the cluster’s nodes with docker node ls:
[manager1] $ docker node ls
ID                            HOSTNAME            STATUS
AVAILABILITY        MANAGER STATUS      ENGINE VERSION
7baqi6gedujmycxwufj939r44 *   manager1            Ready
Active              Reachable           18.06.1-ce
bbqicrevqkfu8w4f9wli1tjcr     manager2            Ready
Active              Leader              18.06.1-ce
hdpskn4q93f5ou1whw9ht8y01     manager3            Ready
Active              Reachable           18.06.1-ce
xle0g72ydvj24sf40vnaw08n0     worker1             Ready
Active                                  18.06.1-ce
l6fkyzqglocnwc0y4va2anfho     worker2             Ready
Active                                  18.06.1-ce
[manager1] $
In the preceding output, notice that the command was executed from the node named manager1. This node is operating in a manager role but is not currently the leader of the cluster. When a cluster management command is issued to this node, it will be forwarded to the leader for processing.
Use Git to clone the application to the manager node and change into the ch13_multi_tier_app directory:
git clone https://github.com/dockerinaction/ch13_multi_tier_app.git
cd ch13_multi_tier_app
We are now ready to deploy the application with docker stack. The stack subcommand can deploy applications defined in two formats. The first format is the Docker Compose format we will be using. The second is the older and less popular Distributed Application Bundle (DAB) format. Because we are using the Docker Compose format, we will specify the path(s) to the compose file with --compose-file. Let’s deploy our Compose application to Swarm now:
docker stack deploy --compose-file docker-compose.yml multi-tier-app
The application deployment should fail with an error indicating that ch13_multi_tier_app-POSTGRES_PASSWORD was not found:
$ docker stack deploy --compose-file docker-compose.yml multi-tier-app
Creating network multi-tier-app_private
Creating network multi-tier-app_public
service postgres: secret not found: ch13_multi_tier_app-POSTGRES_PASSWORD
The docker command output shows Swarm was able to create the networks, but not the services. Swarm requires that all cluster-level resources that a service depends on exist prior to proceeding with the deployment. So Docker halted the application deployment when it determined a resource dependency was missing. The resources that were created have been left as is and can be used in subsequent deployment attempts. These predeployment checks help build robust application delivery processes. The fail-fast deployment behavior helped us quickly discover a missing dependency.
The missing cluster-level resource that this application depends on is the ch13_multi_tier_app-POSTGRES_PASSWORD secret. Recall that the application’s reference to that secret said that it was defined externally:
secrets:
  ch13_multi_tier_app-POSTGRES_PASSWORD:
    external: true              # Retrieve from cluster's secret resources
In this context, external means defined outside the application deployment definition and provided by Swarm. Let’s store the application’s database password as a Docker secret in the Swarm cluster now:
echo 'mydbpass72' | docker secret create \
    ch13_multi_tier_app-POSTGRES_PASSWORD -
Note
The only place this password is defined is in this Docker secret managed by Swarm. You can use any valid PostgreSQL password you want. Feel free to change it. This demonstrates how easy it is to safely handle secrets in distributed applications with Swarm.
The docker secret command should succeed and print the random identifier that Docker assigned to manage the secret. You can verify that the secret was created by listing the secrets in your cluster:
docker secret ls --format "table {{.ID}} {{.Name}} {{.CreatedAt}}" 1
- 1 Formats output as a table with secret identifier, name, and time since creation (optional)
The listing should show the secret was created recently:
ID NAME CREATED
<random id> ch13_multi_tier_app-POSTGRES_PASSWORD 6 seconds ago
Now let’s try deploying the stack again:
[manager1] $ docker stack deploy \
   --compose-file docker-compose.yml multi-tier-app
Creating service multi-tier-app_postgres
Creating service multi-tier-app_api
The docker stack command should report that it has created two Docker services for the multitier app: multi-tier-app_postgres and multi-tier-app_api. List the services and check their status:
docker service ls \
    --format "table {{.Name}} {{.Mode}} {{.Replicas}}"     1
- 1 Formats output as a table with service name, mode, and replicas (optional)
That command will produce output like this:
NAME MODE REPLICAS
multi-tier-app_api replicated 2/2
multi-tier-app_postgres replicated 1/1
Each of the services has the expected number of replicas. There is one task for PostgreSQL and two tasks for the API shown in the REPLICAS column.
You can check that the api service started up correctly by inspecting logs:
docker service logs --follow multi-tier-app_api
Each api task should log a message saying that it is initializing, reading the PostgreSQL password from a file, and listening for requests. For example:
$ docker service logs --no-task-ids multi-tier-app_api
multi-tier-app_api.1@worker1    | 2019/02/02 21:25:22 \
    Initializing api server
multi-tier-app_api.1@worker1    | 2019/02/02 21:25:22 \
    Will read postgres password from '/run/secrets/POSTGRES_PASSWORD'
multi-tier-app_api.1@worker1    | 2019/02/02 21:25:22 \
    dial tcp: lookup postgres on 127.0.0.11:53: no such host
multi-tier-app_api.1@worker1    | 2019/02/02 21:25:23 \
    dial tcp 10.0.0.12:5432: connect: connection refused
multi-tier-app_api.1@worker1    | 2019/02/02 21:25:25 \
    Initialization complete, starting http service
multi-tier-app_api.2@manager1   | 2019/02/02 21:25:22 \
    Initializing api server
multi-tier-app_api.2@manager1    | 2019/02/02 21:25:22 \
    Will read postgres password from '/run/secrets/POSTGRES_PASSWORD'
multi-tier-app_api.2@manager1    | 2019/02/02 21:25:22 \
    dial tcp: lookup postgres on 127.0.0.11:53: no such host
multi-tier-app_api.2@manager1    | 2019/02/02 21:25:23 \
    dial tcp: lookup postgres on 127.0.0.11:53: no such host
multi-tier-app_api.2@manager1    | 2019/02/02 21:25:25 \
    Initialization complete, starting http service
The docker service logs <service name> command streams log messages from the node where service tasks are deployed to your terminal. You may view the logs of any service by issuing this command to Docker Engine on a manager node, but not a worker. When you view service logs, Docker Engine connects to the engines in the cluster where its tasks have run, retrieves the logs, and returns them to you.
From the log messages, we can see that these api tasks appear to be running on the worker1 and manager1 nodes. Your service tasks may have started on different nodes. We can verify this with the docker service ps command, which lists a service’s tasks. Run this:
docker service ps \
    --format "table {{.ID}} {{.Name}} {{.Node}} {{.CurrentState}}" \     1
    multi-tier-app_api
- 1 Formats output as a table with essential task data (optional)
This command will produce output like this:
ID NAME NODE CURRENT STATE
5jk32y4agzst multi-tier-app_api.1 worker1 Running 16 minutes ago
nh5trkrpojlc multi-tier-app_api.2 manager1 Running 16 minutes ago
The docker service ps command reports that two tasks are running for the api service, as expected. Notice that the tasks are named in the form <stack name>_<service name>.<replica slot number>; for example, multi-tier-app_api.1. Each task also gets a unique ID. The docker service ps command lists the tasks and their status for a service no matter where they are running on the cluster.
By contrast, when running docker container ps on the manager1 node, it shows only the single container running on that node:
$ docker container ps --format "table {{.ID}} {{.Names}} {{.Status}}"
CONTAINER ID NAMES STATUS
4a95fa59a7f8 multi-tier-app_api.2.nh5trkrpojlc3knysxza3sffl \
    Up 27 minutes (healthy)
The container name for a service task is constructed from the task name and unique task ID. Both ps commands report that this task is running and healthy. The api server’s image defines a HEALTHCHECK, so we can be confident this is true.
Great—our application deployed successfully, and everything looks healthy!
Open a web browser and point it to port 8080 on any node of your cluster. Play with Docker users should have an 8080 hyperlink at the top of the web console. You can also use a curl command to issue an HTTP request from one of the cluster nodes to port 8080:
curl http://localhost:8080
The api server should respond with a simple message similar to the following:
Welcome to the API Server!
Container id 256e1c4fb6cb responded at 2019-02-03 00:31:23.0915026 +0000 UTC
Tip
If you are using Play with Docker, the detail page for each cluster node will have a link to ports published on that node. You can open that link or use it with curl.
When you make that request several times, you should see different container IDs serving your requests. This shell script will issue four HTTP requests and produce the output that follows:
$ for i in `seq 1 4`; do curl http://localhost:8080; sleep 1; done;      1
Welcome to the API Server!                                               2
Server 9c2eea9f140c responded at 2019-02-05 17:51:41.2050856 +0000 UTC
Welcome to the API Server!
Server 81fbc94415e3 responded at 2019-02-05 17:51:42.1957773 +0000 UTC
Welcome to the API Server!
Server 9c2eea9f140c responded at 2019-02-05 17:51:43.2172085 +0000 UTC
Welcome to the API Server!
Server 81fbc94415e3 responded at 2019-02-05 17:51:44.241654 +0000 UTC
- 1 Bash shell commands to issue four requests to the application; you can replace “localhost” with the hostname of any cluster node.
- 2 Output from each HTTP request
Here, the curl program issues an HTTP GET request to a cluster node. In the preceding example, the curl program runs on one of the cluster’s nodes and sends the request to that node, localhost, on port 8080. As there are no firewalls preventing curl from opening a socket to that network location, Docker Swarm’s service mesh will handle the connection to port 8080 and route the request to a live container. We will investigate how requests are routed to Docker services in more detail next.
13.3. Communicating with services running on a Swarm cluster
Docker makes it easy for clients outside a Swarm cluster to connect to services running in the cluster. Swarm also helps services running within the cluster to find and contact each other when they share a Docker network. In this section, we will first explore how Docker exposes services to the world outside the cluster. Then we will look at how Docker services communicate with each other by using Swarm’s service discovery and overlay networking features.
13.3.1. Routing client requests to services by using the Swarm routing mesh
The Swarm routing mesh provides a simple way to expose a service running on a container cluster with the outside world, which is one of Swarm’s most compelling features. The routing mesh combines several sophisticated network building blocks to publish a service port. Figure 13.5 depicts the logical network topology Swarm creates for the example application.
Figure 13.5. Swarm network components for example app
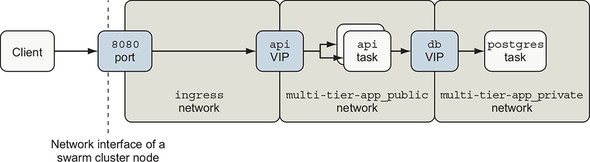
Swarm sets up a listener on each node of the cluster for each published service port. You can configure the port to listen for TCP, UDP, or both kinds of traffic. Client applications can connect to this port on any cluster node and issue requests.
Swarm implements this listener with a combination of Linux iptables and ipvs features. An iptables rule redirects traffic to a dedicated virtual IP (VIP) allocated for the service. The service’s dedicated VIP is made available across the swarm cluster by using a Linux kernel feature called IP Virtual Server, ipvs. IPVS is a transport-layer load balancer that forwards requests for TCP or UDP services to their real endpoints. IPVS is not an application-layer load balancer for protocols such as HTTP. Swarm creates a VIP for each published Service port using ipvs. It then attaches the VIP to the ingress network, which is available across the Swarm cluster.
Returning to our example application, when traffic reaches a cluster node on TCP port 8080, iptables reroutes that traffic to the api service VIP attached to the ingress network. IPVS forwards traffic from the VIP to the ultimate endpoints, which are Docker service tasks.
Swarm’s routing mesh will handle the connection from the client, connect to a healthy service task, and forward the client’s request data to the service task. Figure 13.6 shows how Swarm routs curl’s HTTP request to an API service task and back.
Figure 13.6. Routing an HTTP request to a service task
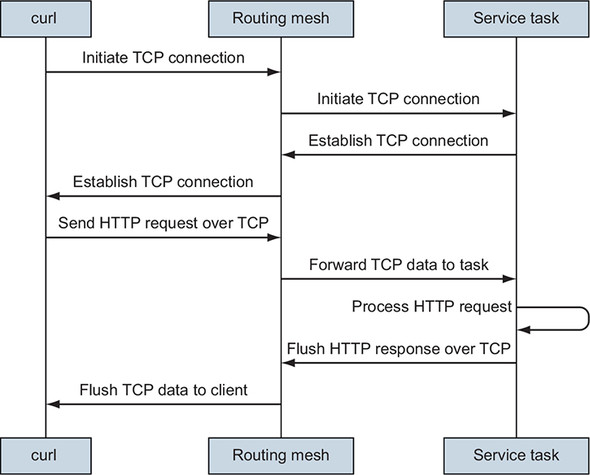
When a program connects to a published port, Swarm will attempt to connect to a healthy task for that service. If the service has been scaled to zero replicas or no healthy tasks exist, the routing mesh will refuse to initiate the network connection. Once the TCP connection is established, the client may move on to the next stage of transmission. In the case of the API service, the client writes an HTTP GET request onto the TCP socket connection. The routing mesh receives that data and sends it to the task handling this connection.
It’s important to note that a service task does not need to be running on the node that handles the client’s connection. Publishing a port establishes a stable ingress point for a Docker service that is independent of the transient locations of that service’s tasks within the Swarm cluster. You can inspect the ports published by a service with docker service inspect:
$ docker service inspect --format="{{json .Endpoint.Spec.Ports}}" \
    multi-tier-app_api
[
  {
    "Protocol": "tcp",
    "TargetPort": 80,
    "PublishedPort": 8080,
    "PublishMode": "ingress"
  }
]
This output indicates that multi-tier-app_api has a listener attached to the ingress network on TCP port 8080, and that traffic will be routed into service tasks on port 80.
An alternate PublishMode called host bypasses the routing mesh and attachment to the ingress network. When using this mode, clients connect directly to the service task on a given host. If a task is deployed there, it can handle the connection; otherwise, the connection attempt will fail.
This PublishMode is likely most appropriate for services that are deployed in global mode so that there is one, and only one, task for a particular service on a cluster node. This ensures that a task is available to handle requests and avoids port collisions. Global services are explained in more detail in section 13.4.3.
Clients interact with the example application’s API service by using HTTP. HTTP is an application protocol (layer 7) that is transported over the TCP/IP (layer 4) networking protocol. Docker also supports services that listen on UDP/IP (layer 4). The Swarm routing mesh relies on IPVS, which routes and balances network traffic at layer 4.
The distinction between routing at layer 4 versus layer 7 is important. Because Swarm routes and load-balances connections at the IP layer, it means client connections will be balanced across backend service tasks, not HTTP requests. When one client issues many requests over a single connection, all of those requests will go to a single task, and will not be distributed across all backend service tasks as you might expect. Note that Docker Enterprise Edition supports load balancing of the HTTP protocol (layer 7), and third-party solutions exist as well.
13.3.2. Working with overlay networks
Docker Swarm offers a type of network resource called an overlay network, illustrated in figure 13.7. This network, whose traffic is logically segmented from other networks, runs on top of another network. The Docker Engines of a Swarm cluster can create overlay networks that connect containers running on different Docker hosts. In a Docker overlay network, only the containers attached to that network can communicate with other containers on that network. An overlay network isolates the communication between containers attached to that network from other networks.
Figure 13.7. Layered view of overlay networks
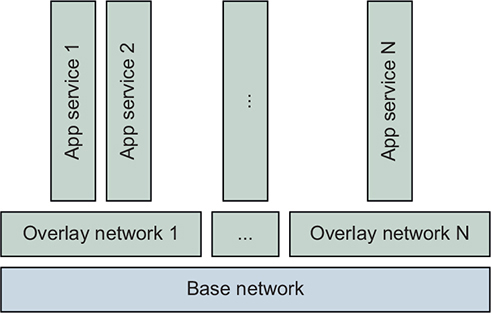
One way to think about an overlay network is that it enhances the user-defined bridge networks described in chapter 5 to span Docker hosts. Just as with a user-defined bridge network, all containers attached to an overlay network can communicate with each other directly as peers. A special example of an overlay network is the ingress network.
The ingress network is a special-purpose overlay network that it is created by Docker when you initialize a swarm. The ingress network’s only responsibility is to route traffic from external clients connected to ports published by Docker services within the cluster. This network is managed by Swarm, and only Swarm can attach containers to the ingress network. You should be aware that the default configuration of the ingress network is not encrypted.
If your application needs end-to-end encryption, all services that publish ports should terminate their connections with TLS. TLS certificates can be stored as Docker secrets and retrieved by services on startup, just as we have demonstrated with passwords in this chapter and TLS certificates in chapter 12.
Next, we will explore how Docker helps services discover and connect to each other on a shared network.
13.3.3. Discovering services on an overlay network
Docker services use the Domain Name System (DNS) to discover the location of other Docker services on a Docker network that they share. A program can connect to a Docker service if it knows the name of that service. In our example application, the api server is configured with the name of the database service via the POSTGRES_HOST environment variable:
api:
  # ... snip ...
      environment:
        POSTGRES_HOST: 'postgres'
When an api task creates a connection to the PostgreSQL database, it will resolve the postgres name to an IP by using DNS. Containers attached to a Docker overlay network are automatically configured by Docker to perform DNS lookups via a special resolver, 127.0.0.11. This is also true for user-defined bridge and MACVLAN networks. The Docker Engine handles DNS lookups made to 127.0.0.1. If the name resolution request is for a Docker service that is present on that network, Docker will respond with the location of that service’s virtual IP. If the lookup is for another name, Docker will forward the request on to the normal DNS resolver for that container host.
In our example application, that means when the api service looks up postgres, the Docker Engine on that host will respond with the virtual IP of the postgres service endpoint; for example, 10.0.27.2. The api database connection driver can establish a connection to this virtual IP, and Swarm will route the connection to the postgres service task, which could be at 10.0.27.3. You may have expected this convenient name resolution and network routing functionality to exist, but not all container orchestrators work this way.
If you recall figure 13.5 shown previously, you may also have an explanation for something that looked unusual. Figure 13.8 reproduces that diagram here.
Figure 13.8. Swarm network components for example app
The api service has three virtual IPs establishing its presence on each of three overlay networks it is attached to: ingress, multi-tier-app_public, and multi-tier-app_private. If you inspect the api service’s endpoints, you should see output that verifies this with VirtualIPs on those three networks:
docker service inspect --format '{{ json .Endpoint.VirtualIPs }}' \
    multi-tier-app_api
[
  {
    "NetworkID": "5oruhwaq4996xfpdp194k82td",    1
    "Addr": "10.255.0.8/16"
  },
  {
    "NetworkID": "rah2lj4tw67lgn87of6n5nihc",    2
    "Addr": "10.0.2.2/24"
  },
  {
    "NetworkID": "vc12njqthcq1shhqtk4eph697",    3
    "Addr": "10.0.3.2/24"
  }
]
- 1 ingress network
- 2 multi-tier-app_private network
- 3 multi-tier-app_public network
Follow along with a little experiment that demonstrates the discoverability of services attached to a network and even the containers behind them. Start a shell and attach it to the multi-tier-app_private network:
docker container run --rm -it --network multi-tier-app_private \
    alpine:3.8 sh
We can attach our shell container to the application’s private network because it was defined as attachable:
private:
    driver: overlay
    driver_opts:
      encrypted: "true"
    attachable: true
By default, only Swarm can attach containers for service tasks to a network. This private network was made attachable specifically for this service discovery exercise.
Ping the postgres service once. You should see output like this:
/ # ping -c 1 postgres
PING postgres (10.0.2.6): 56 data bytes
64 bytes from 10.0.2.6: seq=0 ttl=64 time=0.110 ms

--- postgres ping statistics ---
1 packets transmitted, 1 packets received, 0% packet loss
round-trip min/avg/max = 0.110/0.110/0.110 ms
/ # ping -c 1 api
PING api (10.0.2.2): 56 data bytes
64 bytes from 10.0.2.2: seq=0 ttl=64 time=0.082 ms

--- api ping statistics ---
1 packets transmitted, 1 packets received, 0% packet loss
round-trip min/avg/max = 0.082/0.082/0.082 ms
Let’s use Netcat to issue a request manually from your shell on the private network to the api service:
$ printf 'GET / HTTP/1.0\nHost: api\n\n' | nc api 80 1
- 1 Creates an HTTP request and pipes through Netcat to the API
You should see output similar to that in the previous section:
HTTP/1.0 200 OK
Connection: close
Content-Type: text/plain; charset=utf-8
Date: Wed, 13 Feb 2019 05:21:43 GMT
Content-Length: 98

Welcome to the API Server!
Server 82f4ab268c2a responded at 2019-02-13 05:21:43.3537073 +0000 UTC
We successfully issued a request to the api service from a shell attached to the private network. This works because the api service is attached to the private network in addition to the public and ingress networks. You can also connect to the PostgreSQL DB from your shell:
/ # nc -vz postgres 5432
postgres (10.0.2.6:5432) open
This Netcat command opens a socket to the postgres hostname on port 5432 and then closes it right away. Netcat’s output indicates that it succeeded in connecting to the postgres VIP, 10.0.2.6. This might surprise you. After all, if you review the postgres service definition, you can confirm that we never published or exposed any ports. What’s going on here?
Communication between containers attached to a given Docker network is completely open. There are no firewalls between containers on a Docker overlay network. Because the PostgreSQL server is listening on port 5432 and is attached to the private network, any other container attached to that network can connect to it.
This behavior might be convenient in some cases. However, you may need to approach access control between connected services differently than you are accustomed to. We will discuss some ideas for isolating service-to-service communications next.
13.3.4. Isolating service-to-service communication with overlay networks
Many people control access to a service by restricting the network connections that can be made to that service. For example, it is common to use a firewall that permits traffic to flow from service A to service B, but not permit traffic in the reverse direction from B to A. This approach does not translate well to Docker overlay networks because there are no firewalls between peers connected to a given network. Traffic flows freely in both directions. The only access-control mechanism available for an overlay network is attachment (or not) to the network.
However, you can achieve substantial isolation of application traffic flows with Docker overlay networks. Overlay networks are lightweight and easy to create with Swarm so they can be used as a design tool to create secure application communication topologies. You can use fine-grained, application-specific networks for your application deployments and avoid sharing services to achieve isolation. The example application demonstrates this approach, with the exception of making the private network attachable.
The key point to remember is that while traffic flows on a tightly scoped network may be isolated to a few containers, there is no such thing as using a network identity to authenticate and authorize traffic. When an application needs to control access to its functionality, the application must verify the identity and authorization of clients at the application level. The example application controls access to the postgres database by using the PostgreSQL user and password. This ensures that only the api service can interact with the database in our deployment. The api service is meant to be used anonymously, so it does not implement authentication, but it certainly could.
One challenge you may run into is integrating centralized, shared services such as a logging service. Suppose an application such as our example and a centralized logging service are attached to a shared network. Docker networks would enable the logging service to contact the api or postgres service if it (or an attacker) chooses to do so.
The solution to this problem is to deploy the centralized logging service or other shared services as a Docker service that publishes a port. Swarm will set up a listener for the logging service on the ingress network. Clients running inside the cluster can connect to this service like any other published service. Connections from tasks and containers running inside the cluster will be routed to the logging service as described in section 13.3.1. Because the logging service’s listener will be available on every node of the Swarm cluster, the logging service should authenticate its clients.
Let’s demonstrate this idea with a simple echo service that replies with whatever input you send it. First create the service:
docker service create --name echo --publish '8000:8' busybox:1.29 \
    nc -v -lk -p 8 -e /bin/cat
If you send data to the echo service using port 8000 of a cluster node using Netcat (nc):
echo "Hello netcat my old friend, I've come to test connections again." \
    | nc -v -w 3 192.168.1.26 8000                                         1
- 1 Replace 192.168.1.26 with the IP of one of your cluster’s nodes or use $(hostname -i) to substitute the current host IP on Linux.
Netcat should print a response similar to this:
192.168.1.26 (192.168.1.26:8000) open
Hello netcat my old friend, I've come to test connections again.
Clients should connect to shared services by using a port published by that service. Switch to or reopen the shell we created in the previous section so we can verify a few things:
docker container run --rm -it --network multi-tier-app_private \
    alpine:3.8 sh
Then, if you try to ping the echo service, the ping will report an error:
/ $ ping -c 1 echo
ping: bad address 'echo'
The same occurs with nslookup when trying to resolve the hostname echo:
/ $ nslookup echo
nslookup: can't resolve '(null)': Name does not resolve
The echo service’s name doesn’t resolve when attached to the multi-tier-app_private network. The api service needs to connect to the port published by the echo service at the cluster’s edge, just like processes running outside the Swarm cluster. The only route to the echo service is through the ingress network.
We can say a few good things about this design. First, all clients reach the echo service in a uniform way, through a published port. Second, because we didn’t join the echo service to any networks (besides the implicit ingress network join), it is isolated and cannot connect to other services, except for those that are published. Third, Swarm has pushed application authentication responsibilities into the application layer, where they belong.
One of the main implications with this design is that an application described with Docker Compose may rely on two sets of names for services and their locations. First, some services are scoped to and defined within the application’s deployment (for example, api depends on postgres). Second, there are services such as the echo service that an application may depend on, but that are managed with a different deployment life cycle and have a different scope. These latter services may be shared by many applications. This second kind of service needs to be registered with a registry such as the corporate-wide DNS so that applications can discover its location. Next we will examine how client connections are balanced behind a service VIP after its location has been discovered.
13.3.5. Load balancing
Let’s explore how Docker client connections are balanced across a Docker service’s tasks. Clients usually connect to Docker services through a virtual IP. Docker services have a property called endpoint-mode that defaults to vip. We have been using this default vip endpoint mode for all of our examples so far. When a service uses the vip endpoint mode, clients will access the service through the VIP. Connections to that VIP will be load-balanced automatically by Docker.
For example, in section 13.3.3, we attached a shell to the multi-tier-app_private network and used Netcat to issue an HTTP request to the api. When Netcat resolved the api hostname to an IP, Docker’s internal DNS replied with the VIP of the api service. In that case, more than one healthy service task was available. Docker’s network routing implementation is responsible for distributing connections to the service VIP equally between the healthy tasks behind the VIP.
Docker’s network-based load-balancing implementation is used for all traffic routed through a VIP endpoint. That traffic could be from an internal overlay network or come in through a port published to the ingress network.
Docker does not guarantee which service task will handle a client’s request. Even when a client is running on the same node as a healthy service task, the client’s request may go to a healthy task on another node. This is true even for services deployed in global mode (distinct from endpoint mode), where an instance runs on each cluster node.
13.4. Placing service tasks on the cluster
In this section, we will investigate how Swarm places tasks around the cluster and tries to run the desired number of service replicas within declared constraints. First, we will introduce the coarse-grained controls Swarm has for managing task placement. Then we’ll show you how to control the placement of tasks by using affinity and anti-affinity to built-in and operator-specified node labels.
We will use a five-node swarm cluster created from a Play with Docker template, depicted in figure 13.9.
Figure 13.9. The test Swarm cluster
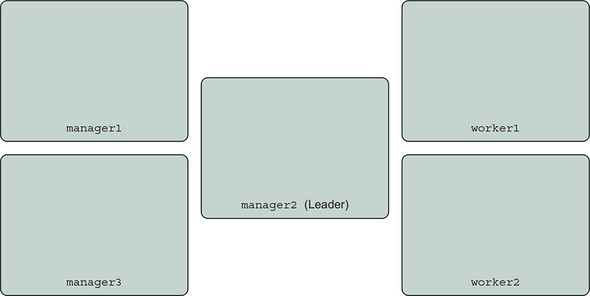
This cluster has three manager nodes and two worker nodes, which are named:
- manager1
- manager2
- manager3
- worker1
- worker2
13.4.1. Replicating services
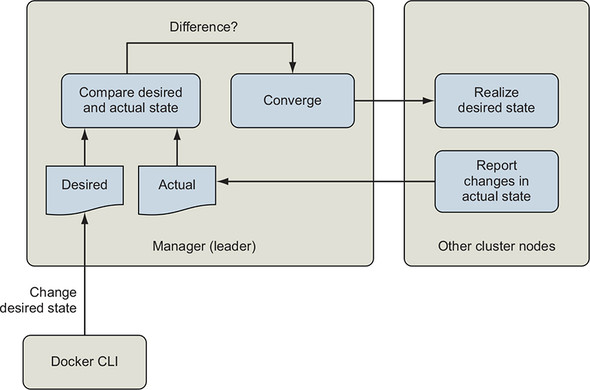
The default, and most commonly used, deployment mode for a Docker service is replicated. Swarm will try to keep the number of replicas specified in a service’s definition running at all times. Swarm continually reconciles the desired state of the service specified by the Docker Compose definition or docker service command, and the state of the service’s tasks on the cluster. This reconciliation loop, illustrated in figure 13.10, will continuously start or stop tasks to match so that the service has the desired number of healthy replicas.
Figure 13.10. Event reconciliation loop
Replicating a service is useful because you can scale the service to as many replicas as needed to handle the load and that your cluster has resources to support.
In this mode, Swarm will schedule a service task to start on a cluster node that has sufficient compute resources (memory, CPU) and that satisfies the service’s labelled constraints. Swarm tries to spread the service’s tasks across the cluster’s nodes. This strategy is helpful for improving service availability and smoothing load across nodes. We will control where tasks run in the next section. For now, let’s see what happens when we start scaling our example application’s api service.
The api service is configured to have two replicas by default. The deployment definition also reserves and limits the CPU and memory resources that each container can use:
      deploy:
          replicas: 2
          restart_policy:
              condition: on-failure
              max_attempts: 10
              delay: 5s
          update_config:
              parallelism: 1
              delay: 5s
          resources:
            limits:
              cpus: '0.50'
              memory: 15M
            reservations:
              cpus: '0.25'
              memory: 15M
When Swarm schedules each api task, it will look for a node with at least 15 MB of memory and 0.25 CPUs that have not been reserved for other tasks. Once a node with sufficient resources has been identified, Swarm will create a container for the task that is limited to (again) 15 MB of memory and may use up to 0.5 CPUs.
In aggregate, the api service begins with two replicas that reserve a total of 0.5 CPUs and 30 MB of memory. Now let’s scale up our service a bit with five replicas:
docker service scale multi-tier-app_api=5
The service now reserves 75 MB of memory and 1.25 CPUs in aggregate. Swarm was able to find resources for the api service’s tasks and spread them across this cluster:
$ docker service ps multi-tier-app_api \
    --filter 'desired-state=running' \
    --format 'table {{.ID}} {{.Name}} {{.Node}} {{.CurrentState}}'
ID           NAME                 NODE     CURRENT STATE
dekzyqgcc7fs multi-tier-app_api.1 worker1  Running 4 minutes ago
3el58dg6yewv multi-tier-app_api.2 manager1 Running 5 minutes ago
qqc72ylzi34m multi-tier-app_api.3 manager3 Running about a minute ago
miyugogsv2s7 multi-tier-app_api.4 manager2 Starting 4 seconds ago
zrp1o0aua29y multi-tier-app_api.7 worker1  Running 17 minutes ago
Now let’s demonstrate what it looks like when a service reserves all of a cluster’s resources. You should follow along only if you are using a cluster where it is OK for you to exhaust cluster resources and prevent other tasks from being scheduled. We’ll undo all of this when we’re done, but at some point, no new tasks that reserve CPU can be scheduled. We recommend that you do not run this resource exhaustion exercise on Play with Docker (PWD) because the underlying machines are shared by everyone using PWD.
First, let’s increase the CPU reservation of our api tasks from a quarter of a CPU to an entire CPU:
docker service update multi-tier-app_api --reserve-cpu 1.0 --limit-cpu 1.0
You will see Docker shuffling tasks around as it re-creates the containers for each task with the new limits on a node with capacity.
Now let’s try scaling the service to a larger number of replicas that will exhaust the cluster’s available resources. For example, if you’re running a five-node cluster and each node has 2 CPUs, then there should be 10 CPUs reservable in total.
The following output comes from a cluster with 10 reservable CPUs. The postgres service has reserved 1 CPU. The api service can be scaled successfully to 9 replicas:
$ docker service scale multi-tier-app_api=9
multi-tier-app_api scaled to 9
overall progress: 9 out of 9 tasks
1/9: running   [==================================================>]
... snip ...
9/9: running   [==================================================>]
verify: Service converged
All 10 CPUs are now reserved by the api and postgres services. When scaling the service to 10 replicas, the docker program appears to hang:
docker service scale multi-tier-app_api=10
multi-tier-app_api scaled to 10
overall progress: 9 out of 10 tasks
1/10: running   [==================================================>]
... snip ...
10/10: no suitable node (insufficient resources on 5 nodes)      1
- 1 Insufficient resources to create the 10th api task
The output reports there are insufficient resources on the cluster’s five nodes to launch a 10th task. The trouble occurs when Swarm tries to schedule a task for the 10th api service task slot. When you run the cluster out of reservable resources, you will need to interrupt the docker stack deploy command with a ^C keystroke to get your terminal back or wait for the command to time out. The Docker command will suggest that you run docker service ps multi-tier-app_api to get more info and check whether the service converges.
Go ahead and do that now and verify that api tasks are distributed across all of the cluster nodes and Swarm is unable to schedule the last task. In this case, we know the cluster will never converge unless we increase cluster capacity or reduce the desired number of replicas. Let’s revert our changes.
Docker Swarm does not support autoscaling services by using built-in functionality. Third-party solutions can use resource usage metrics such as CPU or memory utilization or application-level metrics such as HTTP requests per task. The Docker Flow project is a good place to start, https://monitor.dockerflow.com/auto-scaling/.
We have a few options for reverting the scaling changes. We can redeploy our stack from its source definition, roll back the service configuration changes with the docker service rollback subcommand, or “roll forward” and set the service scale directly to something that will work. Try rolling back:
$ docker service rollback multi-tier-app_api
multi-tier-app_api
rollback: manually requested rollback
overall progress: rolling back update: 9 out of 9 tasks
... snip ...
verify: Service converged
The service rollback subcommand shifts a service’s desired configuration back by one version. The previous configuration of multi-tier-app_api had nine replicas. You can confirm that this configuration has taken effect by running docker service ls. The output should show that the multi-tier-app_api service has the pre-exhaustion number of replicas running; for example, 9/9. You might wonder what will happen if you run rollback again. If you execute another rollback, Docker will restore the config with 10 service replicas, exhausting resources again. That is, Docker will roll back the rollback, leaving us where we started. Since we’d like to undo multiple changes, we’ll need another method.
The cleanest approach in our case is to redeploy the service from its source definition:
docker stack deploy --compose-file docker-compose.yml multi-tier-app
Take a look at the service’s tasks with docker service ps to ensure that the service has returned to the state declared in the Docker Compose application definition:
docker service ps multi-tier-app_api \
    --filter 'desired-state=running' \
    --format 'table {{.ID}} {{.Name}} {{.Node}} {{.CurrentState}}'
ID           NAME                 NODE     CURRENT STATE
h0to0a2lbm87 multi-tier-app_api.1 worker1  Running about a minute ago
v6sq9m14q3tw multi-tier-app_api.2 manager2 Running about a minute ago
The manual scaling changes are gone. There are two api tasks, as expected.
Notice that one task is running on the worker1 node and the other is running on manager2 nodes. This isn’t really the task placement we’d like for most deployments. Usually, we’d like to implement architectural goals like these:
- Reserve manager nodes for running the Swarm control plane so they have dedicated compute resources
- Isolate services that publish ports because they are easier to attack than private services
We’ll accomplish these goals and more using Swarm’s built-in features for constraining where tasks run in the next section.
13.4.2. Constraining where tasks run
We often want to control which nodes in a cluster that an application runs on. We might want to do this in order to isolate workloads into different environments or security zones, take advantage of special machine capabilities such as GPUs, or reserve a set of nodes for a critical function.
Docker services provide a feature called placement constraints that allow you to control the nodes a service’s tasks can be assigned to. With placement constraints, you can say where service tasks should or should not run. The constraints can use both built-in and user-defined properties of your cluster nodes. We’ll work through examples of each.
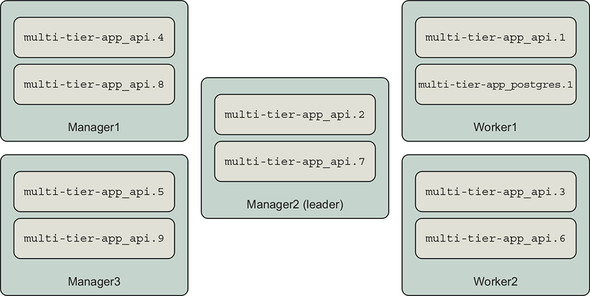
In the previous section, we saw that the api service was distributed to all nodes when scaled up. The api service ran on manager nodes as well on the same node as the postgres database, as shown in figure 13.11.
Figure 13.11. API service tasks are everywhere
Many system architects would adjust this deployment architecture so that manager nodes are dedicated to the running Swarm cluster. This is a good idea for important clusters because if a service consumes resources such as CPU, Swarm might fall behind in supervising tasks and responding to operational commands that would affect the operation of all services on the cluster. Also, because Swarm managers control the cluster, access to those nodes (and the Docker Engine API) should be controlled tightly. We can use Swarm’s node availability and service placement constraints to do this.
Let’s start by ensuring that our services do not run on manager nodes. All nodes in a Swarm cluster are available to run service tasks by default. However, we can reconfigure the availability of nodes by using the docker node update command’s --availability option. There are three availability options: active, pause, and drain. The active option means the schedule can assign new tasks to the node. The pause option means existing tasks will continue to run, but no new tasks will be scheduled to the node. The drain option means existing tasks will be shut down and restarted on another node, and no new tasks will be scheduled to that node.
So we can set the availability of the manager nodes to drain to keep service tasks from running on them:
docker node update --availability drain manager1
docker node update --availability drain manager2
docker node update --availability drain manager3
Once you run those commands, the output of docker node ls should reflect the changes in availability:
docker node ls --format 'table {{ .ID }} {{ .Hostname }} {{ .Availability }}'
ID                        HOSTNAME AVAILABILITY
ucetqsmbh23vuk6mwy9itv3xo manager1 Drain
b0jajao5mkzdd3ie91q1tewvj manager2 Drain
kxfab99xvgv71tm39zbeveglj manager3 Drain
rbw0c466qqi0d7k4niw01o3nc worker1  Active
u2382qjg6v9vr8z5lfwqrg5hf worker2  Active
We can verify that Swarm has migrated the multi-tier-app service tasks to the worker nodes:
docker service ps multi-tier-app_api multi-tier-app_postgres \
    --filter 'desired-state=running' \
    --format 'table {{ .Name }} {{ .Node }}'
NAME                      NODE
multi-tier-app_postgres.1 worker2
multi-tier-app_api.1      worker1
multi-tier-app_api.2      worker2
If you run docker container ps on the manager nodes, you should not see any containers related to service tasks, either.
Placement constraints work by expressing that a service either should or should not run on a node based on certain metadata. The general form of a constraint is as follows:
<node attribute> equals or does not equal <value>
When a service is constrained to running in a node, we say it has affinity for that node. When it must not run on a node, we say it has anti-affinity for that node. You will see these terms used throughout this and other discussions of service placement. Swarm’s constraint language denotes equality (a match) with ==, and inequality with !=. When a service defines multiple constraints, a node must satisfy all constraints for the task to be scheduled there. That is, multiple constraints are AND’d together. For example, suppose you want to run a service on swarm worker nodes that are not in the public security zone. Once you have configured the cluster’s zone metadata, you could achieve this by running the service with these constraints: node.role == worker and node .labels.zone != public.
Docker supports several node attributes that can be used as the basis of constraints:
- node.id— The unique identifier for the node in the Swarm cluster (for example, ucetqsmbh23vuk6mwy9itv3xo)
- node.hostname— The node’s hostname, (for example, worker2)
- node.role— The node’s role in the cluster, either manager or worker
- node.labels.<label name>— A label applied to the node by an operator (for example, a node with a zone=public label would have a node attribute of node.labels.zone=public)
- engine.labels— A set of labels describing key properties of the node and Docker Engine such as Docker version and operating system (for example, engine.labels.operatingsystem==ubuntu 16.04)
Let’s continue organizing our system by separating the worker nodes of our cluster into a public and a private zone. Once we have these zones, we will update the api and postgres services so their tasks run only in the desired zone.
You can label Swarm cluster nodes with your own metadata by using the docker node update command’s --label-add option. This option accepts a list of key/value pairs that will be added to the node’s metadata. There is also a --label-rm option to remove metadata from a node. This metadata will be available for use in constraining tasks to particular nodes.
Let’s identify worker1 as part of the private zone, and worker2 as part of the public zone:
$ docker node update --label-add zone=private worker1
worker1
$ docker node update --label-add zone=public worker2
worker2
Now constrain the api service to the public zone. The docker service create and update commands have options to add and remove task-scheduling constraints, --constraint-add and --constraint-rm, respectively. The constraint we added to the service tells Swarm to schedule only api service tasks on nodes with a zone label that equals public:
docker service update \
    --constraint-add 'node.labels.zone == public' \
    multi-tier-app_api
If all goes well, Docker will report that the api service’s tasks have converged to the new state:
multi-tier-app_api
overall progress: 2 out of 2 tasks
1/2: running   [==================================================>]
2/2: running   [==================================================>]
verify: Service converged
You can verify that the api tasks have been rescheduled to the worker2 node:
docker service ps multi-tier-app_api \
    --filter 'desired-state=running' \
    --format 'table {{ .Name }} {{ .Node }}'
NAME NODE
multi-tier-app_api.1 worker2
multi-tier-app_api.2 worker2
Unfortunately, we can’t display node label information in docker service ps output nor see the labels we’ve added with docker node ls. Currently, the only way to see a node’s labels is to inspect the node. Here’s a quick bash shell script to show the hostname, role, and label information for all nodes in a cluster:
for node_id in `docker node ls -q | head`; do
  docker node inspect \
  --format '{{.Description.Hostname}} {{.Spec.Role}} {{.Spec.Labels}}'\
  "${node_id}";
done;
This script should output the following:
manager1 manager map[]
manager2 manager map[]
manager3 manager map[]
worker1 worker map[zone:private]
worker2 worker map[zone:public]
This isn’t great, but it’s better than trying to recall which nodes have which labels.
The final adjustment we need to make to this system is to relocate the postgres database to the private zone. Before doing that, issue some queries to the api service’s /counter endpoint with curl:
curl http://127.0.0.1:8080/counter
The /counter endpoint inserts a record into a table with an auto-incrementing id column. When the api service responds, it prints out all of the IDs in the column. If you issue three requests to the endpoint, the output of the third response should be similar to the following:
# curl http://127.0.0.1:8080/counter
SERVER: c098f30dd3c4
DB_ADDR: postgres
DB_PORT: 5432
ID: 1
ID: 2
ID: 3
This may seem like a bit of a diversion, but inserting these records will help demonstrate a key point in a moment.
Let’s constrain the postgres task to the private zone:
$ docker service update --constraint-add 'node.labels.zone == private' \
    multi-tier-app_postgres
multi-tier-app_postgres
overall progress: 1 out of 1 tasks
1/1: running   [==================================================>]
verify: Service converged
The postgres task is now running on the worker1 node:
$ docker service ps multi-tier-app_postgres \
    --filter 'desired-state=running' \
    --format 'table {{ .Name }} {{ .Node }}'
NAME                      NODE
multi-tier-app_postgres.1 worker1
Now, if you issue a request to the /counter endpoint, you will see this:
$ curl http://127.0.0.1:8080/counter
SERVER: c098f30dd3c4
DB_ADDR: postgres
DB_PORT: 5432
ID: 1
The counter has been reset. Where did our data go? It was lost because the postgres database used a db-data volume that is local to a cluster node. Strictly speaking, the data wasn’t lost. If the postgres task migrates back to the worker2 node, it will mount the original volume and resume counting from 3. If you were following along on your own cluster and didn’t notice data loss, it’s probably because postgres happened to deploy to worker1 to start with. This lack of determinism and potential for data loss is not a good situation. What can we do about it?
The default Docker volume storage driver uses the node’s storage. This storage driver does not share or back up data across the Swarm cluster. There are Docker storage drivers that add features like this, including Docker CloudStor and Rex-Ray. Those drivers will enable you to create and share a volume across the cluster. You should investigate and test these drivers carefully before committing important data to them.
Another approach to ensure that a task runs consistently on a given node is to constrain it to a specific node. Relevant constraint options are node hostname, node ID, or a user-defined label. For now, let’s constrain the postgres task to the worker1 node to ensure that it doesn’t move from that node, even if the private zone expands:
docker service update --constraint-add 'node.hostname == worker1' \
    multi-tier-app_postgres
Now, the postgres service will not move from that node. Inspection of the service’s placement constraints shows that two are active:
$ docker service inspect \
    --format '{{json .Spec.TaskTemplate.Placement.Constraints }}' \
    multi-tier-app_postgres
["node.hostname == worker1","node.labels.zone == private"]
If we wanted to continue with these placement constraints, we would specify these in the example application’s docker-compose.yml. Here is how to express the postgres service’s constraints:
services:
  postgres:
    # ... snip ...
    deploy:
      # ... snip ...
        placement:
          constraints:
            - node.labels.zone == private
            - node.hostname == worker1
Now the placement constraints won’t be lost the next time we deploy the application by using docker stack deploy.
Note
You will need to perform a lot of careful engineering in order to safely run databases with important data on container clusters such as Swarm. The exact strategy will likely be specific to the database implementation so that you can take advantage of the database’s specific replication, backup, and data recovery strengths.
Now that we have explored how to constrain services to particular nodes, let’s go in the complete opposite direction and deploy a service everywhere with global services.
13.4.3. Using global services for one task per node
You can deploy one service task to each node in the Swarm cluster by declaring the service’s mode to be global. This is useful when you want to scale a service along with the size of the cluster. Common use cases include logging and monitoring services.
Let’s deploy a second instance of our echo service as a global service:
docker service create --name echo-global \
  --mode global \                            1
  --publish '9000:8' \                       2
  busybox:1.29 nc -v -lk -p 8 -e /bin/cat
- 1 Uses “global” instead of “replicated”
- 2 Publishes port 9000 to avoid collision with echo service
If you run docker service ls, you will see that the echo-global service is operating in global mode. The mode of the other services we have deployed so far will be replicated, the default.
You can verify that Swarm has deployed one task on each node that is available for task scheduling. This example uses the previous section’s Swarm cluster, in which only the worker nodes are available for tasks. The docker service ps command confirms there is one task on each of those nodes:
docker service ps echo-global \
    --filter 'desired-state=running' \
    --format 'table {{ .Name }} {{ .Node }}'
NAME                                  NODE
echo-global.u2382qjg6v9vr8z5lfwqrg5hf worker2
echo-global.rbw0c466qqi0d7k4niw01o3nc worker1
You can interact with echo-global service just as you did the echo service. Send a few messages by using the following command:
[worker1] $ echo 'hello' | nc 127.0.0.1 -w 3 9000 1
- 1 Sends to echo-global service using published port
Remember that client connections will be routed through the service’s virtual IP (see section 13.3.5). Because of Docker networking’s routing behavior, a client of a global service may connect to a task on another node instead of its own. The probability of connecting to a global service task on another node goes up with size of the cluster because connections are balanced uniformly. You can see the connection-based load balancing happening if you inspect the logs with docker service logs --follow --timestamps echo-global and send messages to the service.
The following output was produced by connecting to worker1 and sending messages 1 second apart:
2019-02-23T23:51:01.042747381Z echo-global.0.rx3o7rgl6gm9@worker2    |
connect to [::ffff:10.255.0.95]:8 from [::ffff:10.255.0.3]:40170
([::ffff:10.255.0.3]:40170)
2019-02-23T23:51:02.134314055Z echo-global.0.hp01yak2txv2@worker1    |

connect to [::ffff:10.255.0.94]:8 from [::ffff:10.255.0.3]:40172
([::ffff:10.255.0.3]:40172)
2019-02-23T23:51:03.264498966Z echo-global.0.rx3o7rgl6gm9@worker2    |
connect to [::ffff:10.255.0.95]:8 from [::ffff:10.255.0.3]:40174
([::ffff:10.255.0.3]:40174)
2019-02-23T23:51:04.398477263Z echo-global.0.hp01yak2txv2@worker1    |
connect to [::ffff:10.255.0.94]:8 from [::ffff:10.255.0.3]:40176
([::ffff:10.255.0.3]:40176)
2019-02-23T23:51:05.412948512Z echo-global.0.rx3o7rgl6gm9@worker2    |
connect to [::ffff:10.255.0.95]:8 from [::ffff:10.255.0.3]:40178
([::ffff:10.255.0.3]:40178)
The nc client program sending messages was running on worker1. This log output shows that the client’s connections that were routed bounce between the task on worker2, with IP ending in .95, and the task on worker1, with IP ending in .94.
13.4.4. Deploying real applications onto real clusters
The preceding exercises have shown how Swarm tries to converge an application’s actual deployed resources to the desired state indicated in the application’s deployment descriptor.
The desired state of the cluster changes as applications are updated, cluster resources such as nodes and shared networks are added or removed, or new configurations and secrets are provided by operators. Swarm processes these events and updates state in the internal log replicated among the cluster’s manager nodes. When Swarm sees an event that changes the desired state, the leader of the managers issues commands to the rest of the cluster to converge to the desired state. Swarm will converge to the desired state by starting or updating service tasks, overlay networks, and other resources within the constraints specified by operators.
You may be wondering which features of Swarm to start with. First, make an inventory of the kinds of applications you want to run and the types of Swarm resources they will need. Second, think about how you want to organize those applications running on the cluster. Third, decide whether the cluster will support stateful services such as databases and determine a strategy for managing data safely.
Remember, you can start by deploying stateless services that use only the networking, configuration, and secret management features of Swarm. This approach provides the opportunity to learn more about Swarm and the way services operate in a multihost environment without putting data at risk.
With thoughtful design and proactive monitoring of the cluster’s resources, you can ensure that applications have the resources they need, when they need it. You can also set expectations for which activities and data the cluster should host.
Summary
This chapter explored many aspects of running Docker services on a cluster of hosts managed by Swarm. The exercises demonstrated how to deploy several kinds of applications using Swarm’s most important and commonly used features. We saw what happens when a cluster runs out of resources and showed how to recover from that condition. We also reconfigured a cluster and service deployment to implement user-defined architectural goals. The key points to understand from this chapter are:
- Administrators define cluster-scoped resources such as networks, configurations, and secrets that are shared by services.
- Services define their own service-scoped resources in addition to using cluster-scoped resources.
- Swarm managers store and manage updates to the desired state of the cluster.
- Swarm managers converge actual application and resource deployments to the desired state when sufficient resources are available.
- Service tasks are ephemeral, and service updates cause tasks to be replaced with new containers.
- Service tasks can be scaled to the desired state as long as the cluster has enough resources available on nodes that fulfill the service’s placement constraints.