Chapter 11. Services with Docker and Compose
- Understanding services and how they relate to containers
- Basic service administration with Docker Swarm
- Building declarative environments with Docker Compose and YAML
- Iterating projects with Compose and the deploy command
- Scaling services and cleaning up
Today most of the software we run is designed to interact with other programs, not human users. The resulting webs of interdependent processes serve a collective purpose such as processing payments, running games, facilitating global communications, or delivering content. When you look closely at that web, you’ll find individual running processes that might be running in containers. Those processes are allocated memory and given time on the CPU. They are bound to a network and listen for requests from other programs on specific ports. Their network interface and port are registered with a naming system so they are discoverable on that network. But as you expand your view and examine more processes, you’ll notice that most of them share common characteristics and goals.
Any processes, functionality, or data that must be discoverable and available over a network is called a service. That name, service, is an abstraction. By encoding those goals into an abstract term, we simplify how we talk about the things that use this pattern. When we talk about a specific service, we do not need to expressly state that the name should be discoverable via DNS or the environment-appropriate service-discovery mechanism. We do not need to state that the service should be running when a client needs to use it. Those expectations are already communicated by common understanding of the service abstraction. The abstraction lets us focus on the things that make any specific service special.
We can reflect those same benefits in our tooling. Docker already does this for containers. Containers were described in chapter 6 as processes that were started using specific Linux namespaces, with specific filesystem views, and resource allotments. We don’t have to describe those specifics each time we talk about a container, nor do we have to do the work of creating those namespaces ourselves. Docker does this for us. Docker provides tooling for other abstractions as well, including service.
This chapter introduces the basic tooling that Docker provides for working with services in swarm mode. It covers the service life cycle, the role of an orchestrator, and how to interact with that orchestrator to deploy and manage services on your machine. You will use the tools described in this chapter throughout the remainder of the book. The same concepts, problems, and fundamental tooling are provided by all of the container orchestration systems including Kubernetes. The material that follows will be helpful in understanding whichever orchestrators you use in your daily job.
11.1. A service “Hello World!”
Getting started with services is as easy as getting started with containers. In this case, you can start a “Hello World!” web server locally by running these two commands:
docker swarm init                     1
docker service create \               2
    --publish 8080:80 \
    --name hello-world \
   dockerinaction/ch11_service_hw:v1
- 1 Enables the service abstraction
- 2 Starts the server on localhost:8080
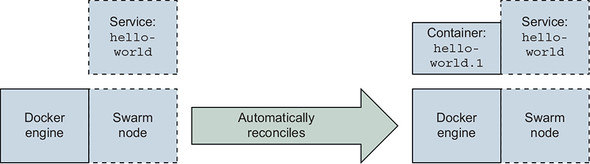
Unlike containers, Docker services are available only when Docker is running in swarm mode. Initializing swarm mode starts an internal database as well as a long-running loop in the Docker Engine that performs service orchestration; see figure 11.1. Swarm provides several other features that will be covered in the rest of the book. Running the init command in the preceding code enables the service management subcommands.
Figure 11.1. Initializing a swarm node

The service create subcommand defines a service named hello-world that should be available on port 8080, and uses the image, dockerinaction/ch11_service _hw:v1 as shown in figure 11.2.
Figure 11.2. Creating your first service

After you run these two commands, you should see a progress bar describing the state of the service. Once the progress is complete, it will be labeled Running, and the command will exit. At this point, you should be able to open http://localhost:8080 and see a nice little message, Hello, World! --ServiceV1. It will also display the task ID (container ID) that served the request.
A task is a swarm concept that represents a unit of work. Each task has one associated container. Although there could be other types of tasks that don’t use containers, those are not the subject of this chapter. Swarm works only with tasks. The underlying components transform task definitions into containers. This book is not concerned with Docker internals. For our purposes, you can consider the terms task and container roughly interchangeable.
Figure 11.3. The swarm node automatically creates a container to run the service software.
This should feel just like running a similar container example. Rather than focusing on how services and containers are similar, it is more enlightening to focus on how they differ. First, recognize that service workloads are implemented with containers. With the service running, run docker container ps to discover that there is a container running with a name, such as hello-world.1.pqamgg6bl5eh6p8j4fj503kur. There is nothing special about this container. Inspecting the container does not yield any particularly interesting results. You might notice a few Swarm-specific labels, but that is it. However, if you remove the container, something interesting happens. The remainder of this section describes the higher-level properties, the service life cycle, and how Swarm uses those to perform small automated miracles such as service resurrection.
11.1.1. Automated resurrection and replication
Bringing a service back to life is something most developers and operators are a bit too familiar with. For those people, manually killing the sole process running a service might feel like tempting fate. Like kicking an early model robot with artificial intelligence—it just feels like a bigger risk than we’d prefer to take. But with the right tools (and validation of those tools), we can be comfortable knowing that taking the risk probably won’t result in any Armageddon-like business scenario.
If you remove the sole container that is powering the hello-world service (from the previous section), the container will be stopped and removed, but after a few moments it will be back. Or at least another similarly configured container will be there in its place. Try this yourself: find the ID of the container running the server (using docker ps); use docker container rm -f to remove it; then issue a few docker container ps commands to verify that it has been removed, and watch a replacement appear. Next, dig into this resurrection by using the service subcommands shown in figure 11.4.
Figure 11.4. Timeline of Swarm reactions to changes in service specification and state
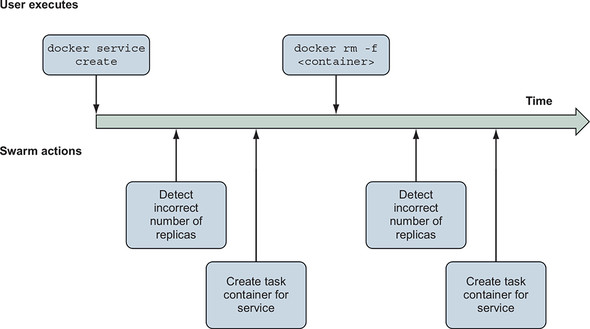
First, run docker service ls to list the running services. The list will include the hello-world service and show that one replica is running, indicated by 1/1 in the REPLICAS column of the command output. This is evidenced by the container that came back to life. Next, run docker service ps hello-world to list the containers associated with a specific service (hello-world in this case). The list includes two entries. The list will show the first entry with a Desired State of “Running,” and a Current State of “Running x minutes ago.” The second entry will be listed as Shutdown and Failed, respectively. These two columns hint at critical ideas, so let’s unpack them now. Consider this excerpt from docker service ps output:
NAME                DESIRED STATE       CURRENT STATE
hello-world.1       Running             Running less than a second ago
 \_ hello-world.1   Shutdown            Failed 16 seconds ago
Autonomous orchestrators—such as the Swarm components in Docker—track two things: desired state and the current state. The desired state is what the user wants the system to be doing, or what it is supposed to be doing. The current state describes what the system is actually doing. Orchestrators track these two descriptions of state and reconcile the two by changing the system.
In this example, the swarm orchestrator notices that the container for the hello-world service has failed. It doesn’t matter that you killed the process in this case. All the orchestrator knows is that the process has failed and that the desired state of the service is Running. Swarm knows how to make a process run: start a container for that service. And that is exactly what it does.
Using higher-level abstractions with autonomous orchestrators is more like a partnership than using a tool. Orchestrators remember how a system should be operating and manipulate it without being asked to do so by a user. So, in order to use orchestrators effectively, you need to understand how to describe systems and their operation. You can learn quite a bit about managing services by inspecting the hello-world service.
When you run docker service inspect hello-world, Docker will output the current desired state definition for the service. The resulting JSON document includes the following:
- Name of the service
- Service ID
- Versioning and timestamps
- A template for the container workloads
- A replication mode
- Rollout parameters
- Similar rollback parameters
- A description of the service endpoint
The first few items identify the service and its change history. It starts to get interesting with replication mode, and rollout and rollback parameters. Recall our definition of a service: any processes, functionality, or data that must be discoverable and available over a network. The difficulty of running a service is, by definition, more about managing availability of something on a network. So it shouldn’t be too surprising that a service definition is predominantly about how to run replicas, manage changes to the software, and route requests to the service endpoint to that software. These are the higher-level properties uniquely associated with the service abstraction. Let’s examine these in more depth.
A replication mode tells Swarm how to run replicas of the workload. Today there are two modes: replicated and global. A service in replicated mode will create and maintain a fixed number of replicas. This is the default mode, and you can experiment with that now by using the docker service scale command. Tell your swarm to run three replicas of the hello-world service by running the following:
docker service scale hello-world=3
After the containers start up, you can verify the work by using either docker container ps or docker service ps hello-world to list the individual containers (there should be three now). You should notice that the container-naming convention encodes the service replica number. For example, you should see a container with a name such as hello-world.3.pqamgg6bl5eh6p8j4fj503kur. If you scale the service back down, you’ll also notice that higher-numbered containers are removed first. So if you run docker service scale hello-world=2, the container named hello-world .3.pqamgg6bl5eh6p8j4fj503kur will be removed. But hello-world.1 and hello-world.2 will remain untouched.
The second mode, global, tells Docker to run one replica on each node in the swarm cluster. This mode is more difficult to experiment with at this point because you’re running only a single-node cluster (unless you’re skipping ahead). Services in global mode are useful for maintaining a common set of infrastructure services that must be available locally on each node in a cluster.
It isn’t important that you have a deep understanding of how replication works in a docker swarm at this point. But it is critical to understand that maintaining high service availability requires running replicas of that service software. Using replicas allows you to replace or change portions of the replica set, or survive failures without impacting the service availability. When you have replicas of software, certain operational stories become more complicated. For example, upgrading software is not as simple as stopping the old version and starting the new one. A few properties impact change management and deployment processes.
11.1.2. Automated rollout
Rolling out a new version of replicated service software is not particularly complicated, but you should consider a few important parameters when automating the process. You have to describe the characteristics of the deployment. Those include order, batch sizes, and delays. This is done by specifying constraints and parameters to the swarm orchestrator that it will respect during the deployment process. An illustration of a Docker swarm’s actions when deploying an update is shown in figure 11.5.
Figure 11.5. Timeline of automated deployment of an updated service definition to a Docker swarm
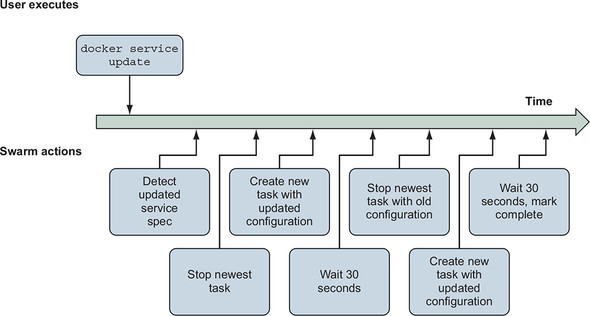
Consider this command to update the hello-world service created earlier in this chapter:
docker service update \
    --image dockerinaction/ch11_service_hw:v2 \     1
    --update-order stop-first \
    --update-parallelism 1 \
    --update-delay 30s \
    hello-world                                     2
- 1 The new image
- 2 The name of the service to update
This command tells Docker to change the hello-world service to use the image tagged v2. It further qualifies the deployment characteristics: only one replica should be updated at a time; wait for 30 seconds between updating each batch of replicas; and each replica should be stopped before its replacement is started. When you execute the command, Docker will report the deployment progress for each replica and the change overall. If everything goes well, it will close by stating that the Service converged. That is a particularly robotic way of telling the user that the command was successful. Converged is a technical way to say that current state of the service is the same as the desired state described by the command.
After you’ve updated the service, you should be able to reload the application in your browser and see that it has been signed --ServiceV2. This is not a particularly interesting example because everything just works. Things aren’t so simple in the real world. We use parallelism to balance the time it takes to update our service with protection for our users from failed transitions. We introduce delay between update batches to allow new service instances to become stable before starting (and to make sure that the underlying platform remains stable). In reality, 30 seconds might not be enough time. It depends on the application.
Docker and its Swarm components are application agnostic. They could never anticipate the behavior of all the applications that might be deployed or how they might fail at runtime. Instead, the Docker command line and API provide ways for the user to specify the methods for discovering problems and validating success, and the behavior for managing failed deployments.
11.1.3. Service health and rollback
A successful partnership with an orchestrator means clearly communicating the expected requirements and behavior of the workload you’re asking it to orchestrate. Although Docker can be sure that a stopped container is unhealthy, there is no universal and accurate definition of service health. This limits the safe assumptions that any orchestrator can make about service health, and deployment success or failure. Determining workload health or startup behavior expectations might be more nuanced than you’d expect unless you’re an experienced service owner.
Before getting too far into the details, start with a simple example. In the most obvious case of service health problems, the new containers might fail to start:
docker service update \
    --image dockerinaction/ch11_service_hw:start-failure \
    hello-world
When you execute this command, Docker will start a deployment on the hello-world service. Unlike the others, this change will fail. By default, Docker will pause the deployment after the first replica fails to start. The command will exit, but it will continue to attempt to start that container. If you run docker service ps hello-world, you will see that two of the replicas remain on the old version of the service, and the other replica keeps cycling through starting and failed states.
In this scenario, the deployment cannot proceed. The new version will never start. And as a result, the service is stuck at reduced capacity and will require human intervention to repair. Fix the immediate issue by using the --rollback flag on the update command:
docker service update \
    --rollback \
    hello-world
This command will ask Docker to reconcile the current state with the previous desired state. Docker will determine that it needs to change only one of the three replicas (the one that failed to start). It knows that the service is currently in a paused deployment and that only one of the replicas was transitioned to the current desired state. The other replicas will continue operating.
Knowing that rollback is appropriate for this service (no risk of incompatible application state changes), you can automate rollback when the deployment fails. Use the --update-failure-action flag to tell Swarm that failed deployments should roll back. But you should also explicitly tell Swarm which conditions should be considered a failure.
Suppose you’re running 100 replicas of a service and those are to be run on a large cluster of machines. Chances are that a certain set of conditions might prevent a replica from starting correctly. In that case, it might be appropriate to continue a deployment as long as a critical threshold of replicas are operational. In this next deployment, tell Swarm to tolerate start failures as long as one-third of the fleet is operational for illustrative purposes. You’ll use the --update-max-failure-ratio flag and specify 0.6:
docker service update \
    --update-failure-action rollback \
    --update-max-failure-ratio 0.6 \
    --image dockerinaction/ch11_service_hw:start-failure \
    hello-world
When you run this example, you’ll watch Docker attempt to deploy updated replicas one at a time. The first one will retry a few times before the delay expires and the next replica deployment starts. Immediately after the second replica fails, the whole deployment will be marked as failed and a rollback will be initiated. The output will look something like this:
hello-world overall progress: rolling back update: 2 out of 3 tasks 1/3: running [> ] 2/3: starting [=====> ] 3/3: running [> ] rollback: update rolled back due to failure or early termination oftask tdpv6fud16e4nbg3tx2jpikah service rolled back: rollback completed
After the command finishes, the service will be in the same state as it was prior to the update. You can verify this by running docker service ps hello-world. Note that one replica was untouched, while the other two were started much more recently and at nearly the same time. At this point, all the replicas will be running from the dockerinaction/ch11_service_hw:v2 image.
As we mentioned earlier, running is not the same thing as service health. There are plenty of ways that a program might be running, but not correctly. Like other orchestrators, Docker models health separately from process status and provides a few configuration points for specifying how to determine service health.
Docker is application agnostic. Rather than making assumptions about how to determine whether a specific task is healthy, it lets you specify a health check command. That command will be executed from within the container for each service replica. Docker will execute that command periodically on the specified schedule from within the task containers themselves. This behaves just like issuing a docker exec command. Health checks and related parameters can be specified at service creation time, changed or set on service updates, or even specified as image metadata by using the HEALTHCHECK Dockerfile directive.
Each service replica container (task) will inherit the definition of health and health check configuration from the service. When you want to manually inspect the health of a specific task in Docker, you need to inspect the container, not the service itself. Both the v1 and v2 versions of the service you’ve been using have health checks specified in the image. The images include a small custom program called httpping. It verifies that the service is responsive on localhost and that requests to / result in an HTTP 200 response code. The Dockerfiles include the following directive:
HEALTHCHECK --interval=10s CMD ["/bin/httpping"]
Run docker container ps to see that each hello-world replica is marked as healthy in the status column. You can further inspect the configuration by inspecting either the image or container.
Including some default health check configuration is a good idea for images containing service software, but it is not always available. Consider dockerinaction/ch11 _service_hw:no-health. This image is essentially the same as the v1 and v2 images, but it does not include any health check metadata. Update the hello-world service to use this version now:
docker service update \
    --update-failure-action rollback \
    --image dockerinaction/ch11_service_hw:no-health \
    hello-world
After deploying this version, you should be able to run docker container ps again and see that the containers are no longer marked healthy. Docker cannot determine whether the service is healthy without health check metadata. It knows only whether the software is running. Next, update the service to add the health check metadata from the command line:
docker service update \
    --health-cmd /bin/httpping \
    --health-interval 10s \
    hello-world
Health monitoring requires continuous evaluation. The interval specified here tells Docker how often to check the health of each service instance. When you run this command, you can verify that the service replicas are marked as healthy once again.
Today you can also tell Docker how many times to retry a health check before reporting an unhealthy status, a startup delay, and a time-out for running a health check command. These parameters help tune the behavior to accommodate most cases. Sometimes a default or current health check for a service is inappropriate for the way you are using it. In those cases, you can create or update a service with health checks disabled by using the --no-healthcheck flag.
During a deployment, a new container might not start. Or it might start but not quite work correctly (be unhealthy). But how do you define service health? Timing issues might blur those definitions. How long should you wait for an instance to become healthy? Some but not all of the service replicas might fail or be otherwise unhealthy. How many or what portion of replica deployment failure can your service tolerate? Once you can answer these questions, you can tell Docker about those thresholds and tune the signal of health from your application to the orchestrator. In the meantime, you’re free to delete the hello-world service:
docker service rm hello-world
Setting all of these parameters when you’re managing a service from the command line is a mess. When you’re managing several services, it can get even worse. In the next section, you’ll learn how to use the declarative tooling provided by Docker and make things more manageable.
11.2. Declarative service environments with Compose V3
Until this point in the book, you’ve used the Docker command line to individually create, change, remove, or interact with containers, images, networks, and volumes. We say that systems like this follow an imperative pattern. Imperative-style tools carry out commands issued by a user. The commands might retrieve specific information or describe a specific change. Programming languages and command-line tools follow an imperative pattern.
The benefit of imperative tools is that they give a user the ability to use primitive commands to describe much more complex flows and systems. But the commands must be followed exactly, in precise order, so that they have exclusive control of the working state. If another user or process is changing the state of the system at the same time, the two users might make undetectable conflicting changes.
Imperative systems have a few problems. It is burdensome for users to carefully plan and sequence all of the commands required to achieve a goal. Those plans are often challenging to audit or test. Timing or shared state issues are incredibly difficult to discover and test before deployment. And as most programmers will tell you, small or innocuous mistakes might radically change the outcome.
Imagine you’re responsible for building and maintaining a system that comprises 10, 100, or 1000 logical services, each with its own state, network attachment, and resource requirements. Now imagine that you are using raw containers to manage replicas of those services. It would be much more difficult to manage the raw containers than Docker services.
Docker services are declarative abstractions, as illustrated in figure 11.6. When we create a service, we declare that we want a certain number of replicas of that service, and Docker takes care of the individual commands required to maintain them. Declarative tools enable users to describe the new state of a system, rather than the steps required to change from the current state to the new state.
Figure 11.6. Declarative processing loop
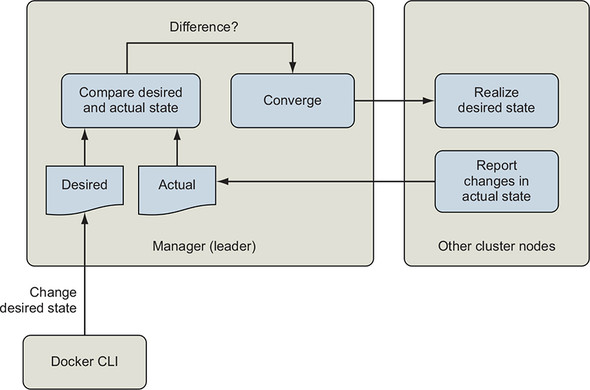
The Swarm orchestration system is a state reconciliation loop that continuously compares the declared state of the system that the user desires with the current state of the system. When it detects a difference, it uses a simple set of rules to change the system so that it matches the desired state.
Declarative tools close the issues with the imperative pattern. Declarative interfaces simplify the system by imposing constraints on how the system operates. This enables the declared policy to be implemented by one or a few well-tested engines that can converge the system to the declared state. They are easier to write, audit, and comprehend. Declarative statements or documents are wonderfully paired with version-control systems because they allow us to effectively version-control the state of the systems that they describe.
Imperative and declarative tools are not in competition. You will almost never use one without the other. For example, when we create or update a Docker service, we are using an imperative tool to describe a change to the system. Issuing the docker service create command is imperative, but it creates a declarative abstraction. It rolls up a whole world of lower-level management commands for creating and removing containers, evaluating health, pulling images, managing service discovery, and network routing.
As you build more complex systems of services, volumes, networks, and configuration, the number of imperative commands required to achieve your goals will become a new burden. When that happens, it is time to adopt a higher-level declarative abstraction. In this case, that abstraction is a stack or complete environment as described with Docker Compose.
When you need to model a whole environment of services, you should use a Docker stack. A stack describes collections of services, volumes, networks, and other configuration abstractions. The docker command line provides imperative commands for deploying, removing, and inspecting stacks. Stacks are created from a declarative description of an entire environment. These environments are described using the Docker Compose V3 file format. A Compose file that describes an environment with the hello-world service from earlier might look like the following:
version: "3.7"
services:
    hello-world:
        image: dockerinaction/ch11_service_hw:v1
        ports:
            - 8080:80
        deploy:
            replicas: 3
Compose files use Yet Another Markup Language (YAML). Not everyone is familiar with YAML, and that can be a hurdle to adopting several tools in this generation of infrastructure and workload management tooling. The good news is that people rarely use exotic YAML features. Most people stick to the basics.
This chapter is not an exhaustive survey of Compose or the properties you will use to manage services. The official Docker documentation should serve that purpose. Expect to find every command-line feature mirrored in Compose. The next section is a brief primer on YAML and Compose files.
11.2.1. A YAML primer
YAML is used to describe structured documents, which are made up of structures, lists, maps, and scalar values. Those features are defined as continuous blocks, where substructures are defined with nested block definitions in a style that will feel familiar to most high-level language programmers.
The default scope of a YAML document is a single file or stream. YAML provides a mechanism to specify multiple documents in the same file, but Docker will use only the first document it encounters in a Compose file. The standard filename for Compose files is docker-compose.yml.
Comment support is one of the most popular reasons to adopt YAML instead of JSON today. A YAML document can include a comment at the end of any line. Comments are marked by a space followed by a hash sign ( #). Any characters that follow until the end of the line are ignored by the parser. Empty lines between elements have no impact on the document structure.
YAML uses three types of data and two styles of describing that data, block and flow. Flow collections are specified similarly to collection literals in JavaScript and other languages. For example, the following is a list of strings in the flow style:
["PersonA","PersonB"]
The block style is more common and will be used in this primer except where noted. The three types of data are maps, lists, and scalar values.
Maps are defined by a set of unique properties in the form of key/value pairs that are delimited by a colon and space (: ). Whereas property names must be string values, property values can be any of the YAML data types except documents. A single structure cannot have multiple definitions for the same property. Consider this block style example:
image: "alpine"
command: echo hello world
This document contains a single map with two properties: image and command. The image property has a scalar string value, "alpine". The command property has a scalar string value, echo hello world. A scalar is a single value. The preceding example demonstrates two of the three flow scalar styles.
The value for image in the preceding example is specified in double-quote style, which is capable of expressing arbitrary strings, by using \ escape sequences. Most programmers are familiar with this string style.
The value for the command is written in plain style. The plain (unquoted) style has no identifying indicators and provides no form of escaping. It is therefore the most readable, most limited, and most context-sensitive style. A bunch of rules are used for plain style scalars. Plain scalars
- Must not be empty
- Must not contain leading or trailing whitespace characters
- Must not begin with an indicator character (for example, - or :) in places where doing so would cause an ambiguity
- Must never contain character combinations using a colon (:) and hash sign (#)
Lists (or block sequences) are series of nodes in which each element is denoted by a leading hyphen (-) indicator. For example:
- item 1
- item 2
- item 3
- # an empty item
- item 4
Finally, YAML uses indentation to indicate content scope. Scope determines which block each element belongs to. There are a few rules:
- Only spaces can be used for indentation.
- The amount of indentation does not matter as long as
- All peer elements (in the same scope) have the same amount of indentation.
- Any child elements are further indented.
These documents are equivalent:
top-level:
   second-level:          # three spaces
     third-level:         # two more spaces
      - "list item"       # single additional indent on items in this list
     another-third-level: # a third-level peer with the same two spaces
           fourth-level: "string scalar" # 6 more spaces
   another-second-level:  # a 2nd level peer with three spaces
               - a list item # list items in this scope have
                             # 15 total leading spaces
               - a peer item # A peer list item with a gap in the list
---
# every scope level adds exactly 1 space
top-level:
 second-level:
  third-level:
   - "list item"
  another-third-level:
   fourth-level: "string scalar"
 another-second-level:
  - a list item
  - a peer item
The full YAML 1.2 specification is available at http://yaml.org/spec/1.2/2009-07-21/spec.html and is quite readable. Armed with a basic understanding of YAML, you’re ready to jump into basic environment modeling with Compose.
11.2.2. Collections of services with Compose V3
Compose files describe every first-class Docker resource type: services, volumes, networks, secrets, and configs. Consider a collection of three services: a PostgreSQL database, a MariaDB database, and a web administrative interface for managing those databases. You might represent those services with this Compose file:
version: "3.7"
services:
    postgres:
        image: dockerinaction/postgres:11-alpine
        environment:
            POSTGRES_PASSWORD: example

    mariadb:
        image: dockerinaction/mariadb:10-bionic
        environment:
            MYSQL_ROOT_PASSWORD: example

    adminer:
        image: dockerinaction/adminer:4
        ports:
            - 8080:8080
Keep in mind that this document is in YAML, and all of the properties with the same indentation belong to the same map. This Compose file has two top-level properties: version and services. The version property tells the Compose interpreter which fields and structure to anticipate. The services property is a map of service names to service definitions. Each service definition is a map of properties.
In this case, the services map has three entries with keys: postgres, mariadb, and adminer. Each of those entries defines a service by using a small set of service properties such as image, environment, or ports. Declarative documents make it simple to concretely specify a full service definition. Doing so will reduce implicit dependencies on default values and reduce the educational overhead for your fellow team members. Omitting a property will use the default values (just as when using the command-line interface). These services each define the container image. The postgres and mariadb services specify environment variables. The adminer service uses ports to route requests to port 8080 on the host to port 8080 in the service container.
Creating and updating a stack
Now use this Compose file to create a stack. Remember, a Docker stack is a named collection of services, volumes, networks, secrets, and configs. The docker stack subcommands manage stacks. Create a new file called databases.yml in an empty directory. Edit the file and add the preceding Compose file contents. Create a new stack and deploy the services it describes by using the following command:
docker stack deploy -c databases.yml my-databases
When you run this command, Docker will display output like this:
Creating network my-databases_default
Creating service my-databases_postgres
Creating service my-databases_mariadb
Creating service my-databases_adminer
At this point, you can test the services by using your browser to navigate to http://localhost:8080. Services are discoverable by their names within a Docker network. You’ll need to keep that in mind when you use the adminer interface to connect to your postgres and mariadb services. The docker stack deploy subcommand is used to create and update stacks. It always takes the Compose file that represents the desired state of the stack. Whenever the Compose file that you use differs from the definitions used in the current stack, Docker will determine how the two differ and make the appropriate changes.
You can try this yourself. Tell Docker to create three replicas of the adminer service. Specify the replicas property under the deploy property of the adminer service. Your databases.yml file should look like this:
version: "3.7"
services:
    postgres:
        image: dockerinaction/postgres:11-alpine
        environment:
            POSTGRES_PASSWORD: example

    mariadb:
        image: dockerinaction/mariadb:10-bionic
        environment:
            MYSQL_ROOT_PASSWORD: example

    adminer:
        image: dockerinaction/adminer:4
        ports:
            - 8080:8080
        deploy:
            replicas: 3
After you’ve updated your Compose file, repeat the earlier docker stack deploy command:
docker stack deploy -c databases.yml my-databases
This time, the command will display a message noting that services are being updated, not created:
Updating service my-databases_mariadb (id: lpvun5ncnleb6mhqj8bbphsf6)
Updating service my-databases_adminer (id: i2gatqudz9pdsaoux7auaiicm)
Updating service my-databases_postgres (id: eejvkaqgbbl35glatt977m65a)
The message appears to indicate that all of the services are being changed. But that is not the case. You can use docker stack ps to list all of the tasks and their ages:
docker stack ps \
  --format '{{.Name}}\t{{.CurrentState}}' \
  my-databases                                 1
- 1 Specifies which stack to list
This command should filter for the interesting columns and report something like the following:
my-databases_mariadb.1  Running 3 minutes ago
my-databases_postgres.1 Running 3 minutes ago
my-databases_adminer.1  Running 3 minutes ago

my-databases_adminer.2  Running about a minute ago
my-databases_adminer.3  Running about a minute ago
This view hints that none of the original service containers were touched during the new deployment. The only new tasks are those additional replicas of the adminer service that were required to bring the system into the state described by the current version of the databases.yml file. You should note that the adminer service really doesn’t work well when multiple replicas are running. We’re using it here for illustrative purposes only.
Scaling down and removing services
When you’re using Docker and Compose, you never need to tear down or otherwise remove a whole stack when you’re redeploying or making changes. Let Docker figure it out and handle the change for you. Only one case is tricky to deal with when you’re working with declarative representations such as Compose: deletion.
Docker will delete service replicas automatically when you scale down. It always chooses the highest numbered replicas for removal. For example, if you have three replicas of the adminer service running, they will be named my-databases_adminer.1, my-databases_adminer.2, and my-databases_adminer.3. If you scale down to two replicas, Docker will delete the replica named my-databases_adminer.3. Things get weird when you try to delete a whole service.
Edit the databases.yml file to delete the mariadb service definition and set the adminer service to two replicas. The file should look like this:
version: "3.7"
services:
    postgres:
        image: dockerinaction/postgres:11-alpine
        environment:
            POSTGRES_PASSWORD: example

    adminer:
        image: dockerinaction/adminer:4
        ports:
            - 8080:8080
        deploy:
            replicas: 2
Now when you run docker stack deploy -c databases.yml my-databases, the command will generate output like this:
Updating service my-databases_postgres (id: lpvun5ncnleb6mhqj8bbphsf6)
Updating service my-databases_adminer  (id: i2gatqudz9pdsaoux7auaiicm)
The Compose file you provided to the stack deploy command did not have any reference to the mariadb service, so Docker did not make any changes to that service. When you list the tasks in your stack again, you’ll notice that the mariadb service is still running:
docker stack ps \
  --format '{{.Name}}\t{{.CurrentState}}' \
  my-databases                                   1
Running this command results in this output:
my-databases_mariadb.1  Running 7 minutes ago
my-databases_postgres.1 Running 7 minutes ago
my-databases_adminer.1  Running 7 minutes ago
my-databases_adminer.2  Running 5 minutes ago
You can see that the third replica of the adminer service has been removed, but the mariadb service is still running. This works as intended. Docker stacks can be created and managed with several Compose files. But doing so creates several error opportunities and is not recommended. There are two ways to delete services or other objects.
You can manually remove a service by using docker service remove. This works, but does not get any of the benefits of working with declarative representations. If this change is made manually and not reflected in your Compose files, the next docker stack deploy operation will create the service again. The cleanest way to remove services in a stack is by removing the service definition from your Compose file and then executing docker stack deploy with the --prune flag. Without further altering your databases.yml file, run the following:
docker stack deploy \
  -c databases.yml \
  --prune \
  my-databases
This command will report that the services described by databases.yml have been updated, but will also report that my-databases_mariadb has been removed. When you list the tasks again, you will see that this is the case:
my-databases_postgres.1 Running 8 minutes ago
my-databases_adminer.1  Running 8 minutes ago
my-databases_adminer.2  Running 6 minutes ago
The --prune flag will clean up any resource in the stack that isn’t explicitly referenced in the Compose file used for the deploy operation. For that reason, it is important to keep a Compose file that represents the entire environment. Otherwise, you might accidentally delete absent services or volumes, networks, secrets, and configs.
11.3. Stateful services and preserving data
The Docker stack that you’ve been working with includes a database service. In chapter 4, you learned how to use volumes to separate a container life cycle from the life cycle for the data it uses. This is especially important for databases. As specified earlier, the stack will create a new volume for the postgres service each time the container is replaced (for whatever reason), and a new volume will be created for each replica. This would cause problems in a real-world system for which stored data is an important part of service identity.
The best way to begin addressing this problem is by modeling volumes in Compose. Compose files use another top-level property named volumes. Like services, volumes is a map of volume definitions; the key is the name of the volume, and the value is a structure defining the volume properties. You do not need to specify values for every volume property. Docker will use defaults for omitted property values. The top-level property defines the volumes that can be used by services within the file. Using a volume in a service requires that you specify the dependency from the service that needs it.
A Compose service definition can include a volumes property. That property is a list of short or long volume specifications. Those correspond to the volumes and mount syntax supported by the Docker command line, respectively. We’ll use the long form to enhance databases.yml and add a volume to store the postgres data:
version: "3.7"
volumes:
    pgdata: # empty definition uses volume defaults
services:
    postgres:
        image: dockerinaction/postgres:11-alpine
        volumes:
            - type: volume
              source: pgdata # The named volume above
              target: /var/lib/postgresql/data
        environment:
            POSTGRES_PASSWORD: example
    adminer:
        image: dockerinaction/adminer:4
        ports:
            - 8080:8080
        deploy:
            replicas: 1 # Scale down to 1 replica so you can test
In this example, the file defines a volume named pgdata, and the postgres service mounts that volume at /var/lib/postgresql/data. That location is where the PostgreSQL software will store any database schema or data. Deploy the stack and inspect the results:
docker stack deploy \
  -c databases.yml \
  --prune \
  my-databases
Run docker volume ls after the changes have been applied to verify that the operation was successful:
DRIVER        VOLUME NAME
local         my-databases_pgdata
The name of the stack prefixes any resources created for it such as services or volumes. In this case, Docker created the volume you named pgdata with the prefix my-databases. You could spend time inspecting the service configuration or container further, but it is more interesting to perform a functional test.
Open http://localhost:8080 and use the adminer interface to manage the postgres database. Select the postgresql driver, use postgres as the hostname, postgres as the username, and example as the password. After you’ve logged in, create a few tables or insert some data. When you’re done, remove the postgres service:
docker service remove my-databases_postgres
Then restore the service by using the Compose file:
docker stack deploy \
  -c databases.yml \
  --prune \
  my-databases
Because the data is stored in a volume, Docker is able to attach the new database replica to the original pg-data volume. If the data wasn’t stored in the volume and existed in only the original replica, it would have been lost when the service was removed. Log into the database by using the adminer interface again (remember that the username is postgres, and password is example as specified in the Compose file). Examine the database and look for the changes you made. If you’ve followed these steps correctly, those changes and the data will be available.
This example uses two levels of naming indirection that make it a bit complicated to follow. Your browser is pointed at localhost, which loads the adminer service, but you’re telling adminer to access the database by using the postgres hostname. The next section explains that indirection, and describes the built-in Docker network enhancements and how to use them with services.
11.4. Load balancing, service discovery, and networks with Compose
In accessing the adminer interface from a web browser, you’re accessing the published port on the adminer service. Port publishing for a service is different from publishing a port on a container. Whereas containers directly map the port on the host interface to an interface for a specific container, services might be made up of many replica containers.
Container network DNS faces a similar challenge. When you’re resolving the network address of a named container, you’ll get the address of that container. But services might have replicas.
Docker accommodates services by creating virtual IP (VIP) addresses and balancing requests for a specific service between all of the associated replicas. When a program attached to a Docker network looks up the name of another service attached to that network, Docker’s built-in DNS resolver will respond with the virtual IP for that service’s location on the network. Figure 11.7 illustrates the logical flow of service name and IP resolution.
Figure 11.7. Docker network topology, service virtual IP addresses, and load balancing
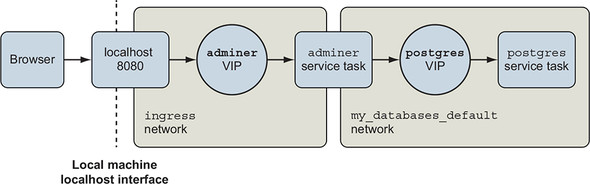
Likewise, when a request comes into the host interface for a published port or from an internal service, it will be routed to the target service’s virtual IP address. From there, it is forwarded to one of the service replicas. This means that there are a few more things to understand about Docker networks. When you’re using services, you’re using at least two Docker networks.
The first network is named ingress and handles all port forwarding from the host interface to services. It is created when you initialize Docker in swarm mode. In this stack, there is only one service with forwarded ports, adminer. You can plainly see the associated interface in the ingress network upon inspection:
"Containers": {
  "6f64f8aec8c2...": {
    "Name": "my-databases_adminer.1.leijm5mpoz8o3lf4yxd7khnqn",
    "EndpointID": "9401eca40941...",
    "MacAddress": "02:42:0a:ff:00:22",
    "IPv4Address": "10.255.0.34/16",
    "IPv6Address": ""
  },
  "ingress-sbox": {
    "Name": "ingress-endpoint",
    "EndpointID": "36c9b1b2d807...",
    "MacAddress": "02:42:0a:ff:00:02",
    "IPv4Address": "10.255.0.2/16",
    "IPv6Address": ""
  }
}
Every service that uses port forwarding will have an interface in this network; ingress is critical to the Docker service functionality.
The second network is shared between all of the services in your stack. The Compose file you used to create the my-databases stack does not define any networks, but if you watch closely during initial deployment, you’ll see that Docker will create a network for your stack named default. All services in your stack will be attached to this network by default, and all service-to-service communication will go through this network. When you inspect that network, you will see three entries like the following:
"Containers": {
  "3e57151c76bd...": {
    "Name": "my-databases_postgres.1.44phu5vee7lbu3r3ao38ffqfu",
    "EndpointID": "375fe1bf3bc8...",
    "MacAddress": "02:42:0a:00:05:0e",
    "IPv4Address": "10.0.5.14/24",
    "IPv6Address": ""
  },
  "6f64f8aec8c2...": {
    "Name": "my-databases_adminer.1.leijm5mpoz8o3lf4yxd7khnqn",
    "EndpointID": "7009ae008702...",
    "MacAddress": "02:42:0a:00:05:0f",
    "IPv4Address": "10.0.5.15/24",
    "IPv6Address": ""
  },
  "lb-my-databases_default": {
    "Name": "my-databases_default-endpoint",
    "EndpointID": "8b94baa16c94...",
    "MacAddress": "02:42:0a:00:05:04",
    "IPv4Address": "10.0.5.4/24",
    "IPv6Address": ""
  }
}
The top two interfaces are used by the individual containers running the postgres and adminer services. If you were to resolve the postgres service name to an IP address, you might expect the address 10.0.5.14 in response. But what you would get is something else not listed here. The address listed here is the container address, or the address that the internal load balancer would forward requests onto. The address you would get is listed under endpoints in the postgres service spec. When you run docker service inspect my-databases_postgres, part of the result will look like this:
"Endpoint": {
  "Spec": {
    "Mode": "vip"
  },
  "VirtualIPs": [
    {
      "NetworkID": "2wvn2x73bx55lrr0w08xk5am9",
      "Addr": "10.0.5.11/24"
    }
  ]
}
That virtual IP address is handled by the Docker internal load balancer. Connections to that address will be forwarded to one of the postgres service replicas.
You can change service network attachment or the networks Docker creates for a stack with Compose. Compose can create networks with specific names, types, driver options, or other properties. Working with networks is similar to volumes. There are two parts: a top-level networks property that includes network definitions, and a networks property of services, where you describe attachments. Consider this final example:
version: "3.7"
networks:
    foo:
        driver: overlay
volumes:
    pgdata: # empty definition uses volume defaults
services:
    postgres:
        image: dockerinaction/postgres:11-alpine
        volumes:
            - type: volume
              source: pgdata # The named volume above
              target: /var/lib/postgresql/data
        networks:
            - foo
        environment:
            POSTGRES_PASSWORD: example
    adminer:
        image: dockerinaction/adminer:4
        networks:
            - foo
        ports:
            - 8080:8080
        deploy:
            replicas: 1
This example replaces the my-databases_default network with a network called foo. The two configurations are functionally equivalent.
There are several occasions to model networks with Compose. For example, if you manage multiple stacks and want to communicate on a shared network, you would declare that network as shown previously, but instead of specifying the driver, you would use the external: true property and the network name. Or suppose you have multiple groups of related services, but those services should operate in isolation. You would define the networks at the top level and use different network attachments to isolate the groups.
Summary
This chapter introduces higher-level Docker abstractions and working with the Docker declarative tooling, and using Compose to model the desired state for multi-service applications. Compose and declarative tooling relieve much of the tedium associated with command-line management of containers. The chapter covers the following:
- A service is any process, functionality, or data that must be discoverable and available over a network.
- Orchestrators such as Swarm track and automatically reconcile user-provided desired state and the current state of Docker objects including services, volumes, and networks.
- Orchestrators automate service replication, resurrection, deployments, health checking, and rollback.
- The desired state is what the user wants the system to be doing, or what it is supposed to be doing. People can describe desired state in a declarative style by using Compose files.
- Compose files are structured documents represented in YAML.
- Declarative environment descriptions with Compose enable environment versioning, sharing, iteration, and consistency.
- Compose can model services, volumes, and networks. Consult the official Compose file reference material for a full description of its capabilities.