Chapter 10. Image pipelines
- The goals of Docker image pipelines
- Patterns for building images and using metadata to help consumers use your image
- Common approaches for testing that images are configured correctly and secure
- Patterns for tagging images so they can be identified and delivered to consumers
- Patterns for publishing images to runtime environments and registries
In chapter 8, you learned how to build Docker images automatically by using Dockerfiles and the docker build command. However, building the image is merely one critical step in a longer process for delivering functioning and trustworthy images. Image publishers should perform tests to verify that the image works under the expected operating conditions. Confidence in the correctness of the image artifact grows as it passes those tests. Next, it can finally be tagged and published to a registry for consumption. Consumers can deploy these images with confidence, knowing that many important requirements have already been verified.
These steps—preparing image material, building an image, testing, and finally publishing images to registries—are together called an image build pipeline. Pipelines help software authors quickly publish updates and efficiently deliver new features and fixes to consumers.
10.1. Goals of an image build pipeline
In this context, pipelines automate the process for building, testing, and publishing artifacts so they can be deployed to a runtime environment. Figure 10.1 illustrates the high-level process for building software or other artifacts in a pipeline. This process should be familiar to anyone using continuous integration (CI) practices and is not specific to Docker images.
Figure 10.1. Generic artifact build pipeline
![]()
People often automate build pipelines with continuous integration systems such as Jenkins, Travis CI, or Drone. Regardless of the specific pipeline-modeling technology, the goal of a build pipeline is to apply a consistent set of rigorous practices in creating deployable artifacts from source definitions. Differences between the specific tools employed in a pipeline are simply an implementation detail. A CI process for a Docker image is similar to other software artifacts and looks like figure 10.2.
Figure 10.2. A Docker image build pipeline
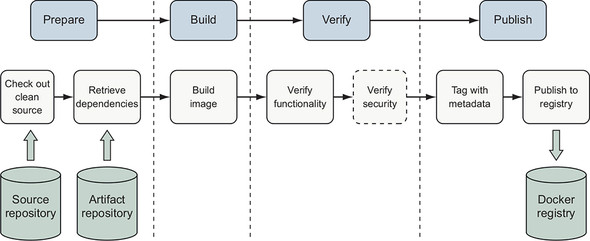
When building a Docker image, this process includes the following steps:
- Check out a clean copy of the source code defining the image and build scripts so the origin and process used to build the image is known.
- 2 Retrieve or generate artifacts that will be included in the image, such as the application package and runtime libraries.
- Build the image by using a Dockerfile.
- Verify that the image is structured and functions as intended.
- (Optional) Verify that the image does not contain known vulnerabilities.
- Tag the image so that it can be consumed easily.
- Publish the image to a registry or another distribution channel.
Application artifacts are the runtime scripts, binaries (.exe, .tgz, .zip), and configuration files produced by software authors. This image build process assumes the application artifacts have already been built, tested, and published to an artifact repository for inclusion in an image. The application artifact may be built inside a container, and this is how many modern CI systems operate. The exercises in this chapter will show how to build applications by using containers and how to package those application artifacts into a Docker image that runs the application. We will implement the build process by using a small and common set of tools available in UNIX-like environments. This pipeline’s concepts and basic commands should be easily transferrable into your organization’s own tooling.
10.2. Patterns for building images
Several patterns exist for building applications and images using containers. We will discuss three of the most popular patterns here:
- All-in-One— You use an all-in-one image to build and run the application.
- Build Plus Runtime— You use a build image with a separate, slimmer runtime image to build a containerized application.
- Build Plus Multiple Runtimes— You use a slim runtime image with variations for debugging and other supplemental use cases in a multi-stage build.
Figure 10.3. Image build pattern maturity
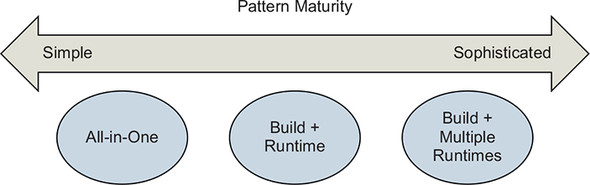
Multiple build patterns have evolved to produce images appropriate for particular consumption use cases. In this context, maturity refers to the design and process used to build the image, not the organization applying the pattern. When an image will be used for internal experimentation or as a portable development environment, the All-in-One pattern might be most appropriate. By contrast, when distributing a server that will be licensed and supported commercially, the Build Plus Runtime pattern will probably be most appropriate. A single software publishing organization will often use multiple patterns for building images that they use and distribute. Apply and modify the patterns described here to solve your own image build and delivery problems.
10.2.1. All-in-one images
All-in-one images include all the tools required to build and run an application. These tools might include software development kits (SDKs), package managers, shared libraries, language-specific build tooling, or other binary tools. This type of image will also commonly include default application runtime configuration. All-in-one images are the simplest way to get started containerizing an application. They are especially useful when containerizing a development environment or “legacy” application that has many dependencies.
Let’s use the All-in-One pattern to build a simple Java web server using the popular Spring Boot framework. Here is an all-in-one Dockerfile that builds the application into an image along with the build tools:
FROM maven:3.6-jdk-11

ENV WORKDIR=/project
RUN mkdir -p ${WORKDIR}
COPY . ${WORKDIR}
WORKDIR ${WORKDIR}
RUN mvn -f pom.xml clean verify
RUN cp ${WORKDIR}/target/ch10-0.1.0.jar /app.jar

ENTRYPOINT ["java","-jar","/app.jar"]
Clone the https://github.com/dockerinaction/ch10_patterns-for-building-images.git repo and build the project as follows:
docker image build -t dockerinaction/ch10:all-in-one \
    --file all-in-one.df .
In this Dockerfile, the source image is the community Maven 3.6 image, which also includes OpenJDK 11. The Dockerfile builds a simple Java web server, and the application artifact is added to the image. The image definition finishes with an ENTRYPOINT that runs the service by invoking java with the application artifact built in the image. This is about the simplest thing that could possibly work and a great approach for demonstrating, “Look, we can containerize our application!”
All-in-one images have downsides. Because they contain more tools than are necessary to run the application, attackers have more options to exploit an application, and images may need to update more frequently to accommodate change from a broad set of development and operational requirements. In addition, all-in-one images will be large, often 500 MB or more. The maven:3.6-jdk-11 base image used in the example is 614 MB to start with, and the final image is 708 MB. Large images put more stress on image distribution mechanisms, though this problem is relatively innocuous until you get to large-scale or very frequent releases.
This approach is good for creating a portable application image or development environment with little effort. The next pattern will show how to improve many characteristics of the runtime image by separating application build and runtime concerns.
10.2.2. Separate build and runtime images
The All-in-One pattern can be improved by creating separate build and runtime images. Specifically, in this approach, all of the application build and test tooling will be included in one image, and the other will contain only what the application requires at runtime.
You can build the application with a Maven container:
docker container run -it --rm \
  -v "$(pwd)":/project/ \
  -w /project/ \
  maven:3.6-jdk-11 \
  mvn clean verify
Maven compiles and packages the application artifact into the project’s target directory:
$ ls -la target/ch10-0.1.0.jar
-rw-r--r--  1 user  group  16142344 Jul  2 15:17 target/ch10-0.1.0.jar
In this approach, the application is built using a container created from the public Maven image. The application artifact is output to the host filesystem via the volume mount instead of storing it in the build image as in the All-in-One pattern. The runtime image is created using a simple Dockerfile that COPYs the application artifact into an image based on OpenJDK 10:
FROM openjdk:11-jdk-slim

COPY target/ch10-0.1.0.jar /app.jar

ENTRYPOINT ["java","-jar","/app.jar"]
Build the runtime image:
docker image build -t dockerinaction/ch10:simple-runtime \
    --file simple-runtime.df .
Now run the web server image:
docker container run --rm -it -p 8080:8080 dockerinaction/ch10:simple-runtime
The application runs just as it did in the previous all-in-one example. With this approach, the build-specific tools such as Maven and intermediate artifacts are no longer included in the runtime image. The runtime image is now much smaller (401 MB versus 708 MB!) and has a smaller attack surface.
This pattern is now supported and encouraged by many CI tools. The support usually comes in the ability to specify a Docker image to use as a hygienic execution environment for a step or the ability to run containerized build agents and assign steps to them.
10.2.3. Variations of runtime image via multi-stage builds
As your build and operational experience matures, you may find it useful to create small variations of an application image to support use cases such as debugging, specialized testing, or profiling. These use cases often require adding specialized tools or changing the application’s image. Multi-stage builds can be used to keep the specialized image synchronized with the application image and avoid duplication of image definitions. In this section, we will focus on the Build Plus Multiple Runtimes pattern of creating specialized images by using the multi-stage features of the FROM instruction introduced in chapter 8.
Let’s build a debug variation of our app-image based on our application image. The hierarchy will look like figure 10.4.
Figure 10.4. Image hierarchy for multi-stage build example
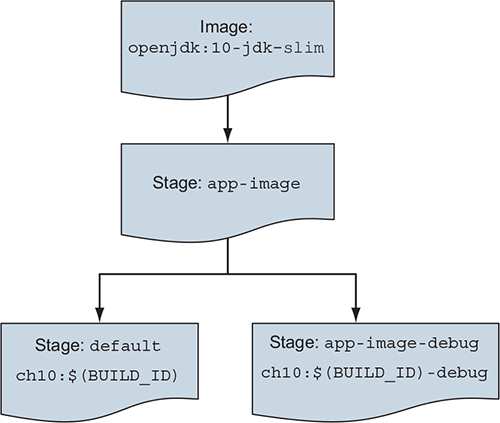
The multi-stage-runtime.df in the chapter’s example repository implements this hierarchy:
# The app-image build target defines the application image
FROM openjdk:11-jdk-slim as app-image                        1

ARG BUILD_ID=unknown
ARG BUILD_DATE=unknown
ARG VCS_REF=unknown

LABEL org.label-schema.version="${BUILD_ID}" \
      org.label-schema.build-date="${BUILD_DATE}" \
      org.label-schema.vcs-ref="${VCS_REF}" \

      org.label-schema.name="ch10" \
      org.label-schema.schema-version="1.0rc1"

COPY multi-stage-runtime.df /Dockerfile

COPY target/ch10-0.1.0.jar /app.jar

ENTRYPOINT ["java","-jar","/app.jar"]

FROM app-image as app-image-debug                          2
#COPY needed debugging tools into image
ENTRYPOINT ["sh"]

FROM app-image as default                                  3
- 1 app-image build stage starts from openjdk.
- 2 app-image-debug stage inherits and adds to the app-image.
- 3 default stage ensures app-image is produced by default.
The build stage of the main application image is declared as starting from openjdk:11-jdk-slim and named app-image:
# The app-image build target defines the application image
FROM openjdk:11-jdk-slim as app-image
…
Naming a build stage serves two important purposes. First, the stage name enables other build stages within the Dockerfile to use another stage easily. Second, build processes can build a stage by specifying that name as a build target. Build stage names are localized to the context of a Dockerfile and do not affect image tagging.
Let’s define a variation of the application image by adding a build stage to the Dockerfile that supports debugging:
FROM app-image as app-image-debug          1
#COPY needed debugging tools into image
ENTRYPOINT ["sh"]
- 1 Uses app-image as the base for the debug image
The debug application image definition specifies app-image as its base image and demonstrates making minor changes. In this case, the only change is to reconfigure the image’s entrypoint to be a shell instead of running the application. The debug image is otherwise identical to the main application image.
The docker image build command produces a single image regardless of how many stages are defined in the Dockerfile. You can use the build command’s --target option to select the stage to build the image. When you define multiple build stages in a Dockerfile, it is best to be explicit about what image you want to build. To build the debug image, invoke docker build and target the app-image-debug stage:
docker image build -t dockerinaction/ch10:multi-stage-runtime-debug \
    -f multi-stage-runtime.df \
    --target=app-image-debug .
The build process will execute the app-image-debug stage as well as the app-image stage it depends on to produce the debug image.
Note that when you build an image from a Dockerfile that defines multiple stages and do not specify a build target, Docker will build an image from the last stage defined in the Dockerfile. You can build an image for the main build stage defined in your Dockerfile by adding a trivial build stage at the end of the Dockerfile:
# Ensure app-image is the default image built with this Dockerfile
FROM app-image as default
This FROM statement defines a new build stage named default that is based on app-image. The default stage makes no additions to the last layer produced by app-image and is thus identical.
Now that we have covered several patterns for producing an image or family of closely related images, let’s discuss what metadata we should capture along with our images to facilitate delivery and operational processes.
10.3. Record metadata at image build time
As described in chapter 8, images can be annotated with metadata that is useful to consumers and operators via the LABEL instruction. You should use labels to capture at least the following data in your images:
- Application name
- Application version
- Build date and time
- Version-control commit identifier
In addition to image labels, consider adding the Dockerfile used to build the image and software package manifests to the image filesystem.
All this information is highly valuable when orchestrating deployments and debugging problems. Orchestrators can provide traceability by logging metadata to audit logs. Deployment tools can visualize the composition of a service deployment using the build time or version-control system (VCS) commit identifier. Including the source Dockerfile in the image can be a quick reference for people debugging a problem to navigate within a container. Orchestrators and security tools may find other metadata describing the image’s architectural role or security profile useful in deciding where the container should run or what it is permitted to do.
The Docker community Label Schema project has defined commonly used labels at http://label-schema.org/. Representing the recommended metadata by using the label schema and build arguments in Dockerfile looks like the following:
FROM openjdk:11-jdk-slim

ARG BUILD_ID=unknown
ARG BUILD_DATE=unknown
ARG VCS_REF=unknown

LABEL org.label-schema.version="${BUILD_ID}" \
      org.label-schema.build-date="${BUILD_DATE}" \
      org.label-schema.vcs-ref="${VCS_REF}" \
      org.label-schema.name="ch10" \
      org.label-schema.schema-version="1.0rc1"

COPY multi-stage-runtime.df /Dockerfile

COPY target/ch10-0.1.0.jar /app.jar

ENTRYPOINT ["java","-jar","/app.jar"]
Our build process is more complicated now that we have more steps: gather metadata, build application artifacts, build image. Let’s orchestrate the build process with a time-tested build tool, make.
10.3.1. Orchestrating the build with make
make, a widely available tool used to build programs, understands dependencies between the steps of a build process. Build process authors describe each step in a Makefile that make interprets and executes to complete the build. The make tool provides a flexible shell-like execution environment, so you can implement virtually any kind of build step.
The primary advantage of make over a standard shell script is that users declare dependencies between steps rather than directly implementing the flow of control between steps. These steps are called rules, and each rule is identified by a target name. Here is the general form of a make rule:
target … : prerequisites …     12
        recipe command 1       3
        recipe command 2
        …
- 1 target identifies the rule with a logical name or filename produced by the rule.
- 2 prerequisites is an optional list of targets to build before this target.
- 3 The recipe section contains the list of commands used to build the target.
When you run the make command, it constructs a dependency graph from the prerequisites declared for each rule. The command uses this graph to calculate the sequence of steps to build a specified target. make has many features and quirks that we will not describe here, but you can read more about it at https://www.gnu.org/software/make/manual/. One item of note is that make is famous for its sensitivity to whitespace characters, particularly tabs for indentation and spaces around variable declarations. You will probably find it easiest to use the Makefile provided in this chapter’s source repository (https://github.com/dockerinaction/ch10_patterns-for-building-images.git) instead of typing them in yourself. With our make primer complete, let’s return to building our Docker images.
If you are using Windows, you will probably find that make and several other commands used in this example are not available in your environment. The easiest solution will probably be to use a Linux virtual machine either locally or in the cloud. If you plan to develop software by using Docker on Windows, you should also investigate using the Windows Subsystem for Linux (WSL or WSL2) with Docker for Windows.
Here is a Makefile that will gather metadata, and then build, test, and tag the application artifact and images:
# if BUILD_ID is unset, compute metadata that will be used in builds
ifeq ($(strip $(BUILD_ID)),)
    VCS_REF := $(shell git rev-parse --short HEAD)
    BUILD_TIME_EPOCH := $(shell date +"%s")
    BUILD_TIME_RFC_3339 := \
            $(shell date -u -r $(BUILD_TIME_EPOCH) '+%Y-%m-%dT%I:%M:%SZ')
    BUILD_TIME_UTC := \
            $(shell date -u -r $(BUILD_TIME_EPOCH) +'%Y%m%d-%H%M%S')
    BUILD_ID := $(BUILD_TIME_UTC)-$(VCS_REF)
endif

ifeq ($(strip $(TAG)),)
    TAG := unknown
endif

.PHONY: clean
clean:
    @echo "Cleaning"
    rm -rf target

.PHONY: metadata
metadata:
    @echo "Gathering Metadata"
    @echo BUILD_TIME_EPOCH IS $(BUILD_TIME_EPOCH)
    @echo BUILD_TIME_RFC_3339 IS $(BUILD_TIME_RFC_3339)
    @echo BUILD_TIME_UTC IS $(BUILD_TIME_UTC)
    @echo BUILD_ID IS $(BUILD_ID)

target/ch10-0.1.0.jar:
    @echo "Building App Artifacts"
    docker run -it --rm  -v "$(shell pwd)":/project/ -w /project/ \
    maven:3.6-jdk-11 \
    mvn clean verify

.PHONY: app-artifacts
app-artifacts: target/ch10-0.1.0.jar

.PHONY: lint-dockerfile
lint-dockerfile:
    @set -e
    @echo "Linting Dockerfile"
    docker container run --rm -i hadolint/hadolint:v1.15.0 < \
            multi-stage-runtime.df

.PHONY: app-image
app-image: app-artifacts metadata lint-dockerfile          1
    @echo "Building App Image"
    docker image build -t dockerinaction/ch10:$(BUILD_ID) \
    -f multi-stage-runtime.df \
    --build-arg BUILD_ID='$(BUILD_ID)' \
    --build-arg BUILD_DATE='$(BUILD_TIME_RFC_3339)' \
    --build-arg VCS_REF='$(VCS_REF)' \
    .
    @echo "Built App Image. BUILD_ID: $(BUILD_ID)"

.PHONY: app-image-debug
app-image-debug: app-image
    @echo "Building Debug App Image"
    docker image build -t dockerinaction/ch10:$(BUILD_ID)-debug \
    -f multi-stage-runtime.df \
    --target=app-image-debug \
    --build-arg BUILD_ID='$(BUILD_ID)' \
    --build-arg BUILD_DATE='$(BUILD_TIME_RFC_3339)' \
    --build-arg VCS_REF='$(VCS_REF)' \
    .
    @echo "Built Debug App Image. BUILD_ID: $(BUILD_ID)"

.PHONY: image-tests
image-tests:
    @echo "Testing image structure"
    docker container run --rm -it \
    -v /var/run/docker.sock:/var/run/docker.sock \
    -v $(shell pwd)/structure-tests.yaml:/structure-tests.yaml \
    gcr.io/gcp-runtimes/container-structure-test:v1.6.0 test \
    --image dockerinaction/ch10:$(BUILD_ID) \
    --config /structure-tests.yaml

.PHONY: inspect-image-labels
inspect-image-labels:
    docker image inspect --format '{{ json .Config.Labels }}' \
            dockerinaction/ch10:$(BUILD_ID) | jq

.PHONY: tag
tag:
    @echo "Tagging Image"
    docker image tag dockerinaction/ch10:$(BUILD_ID)\
            dockerinaction/ch10:$(TAG)

.PHONY: all
all: app-artifacts app-image image-tests                  2
- 1 The app-image target requires building the app-artifacts, metadata, and linting target.
- 2 You can build everything with “make all”.
This Makefile defines a target for each build step we have discussed: gathering metadata, building the application, and building, testing, and tagging the image. Targets such as app-image have dependencies on other targets to ensure that steps execute in the right order. Because build metadata is essential for all steps, it is generated automatically unless a BUILD_ID is provided. The Makefile implements an image pipeline that you can run locally or use within a continuous integration or continuous delivery (CD) system. You can build the application artifacts and image by making the app-image target:
make app-image
Making the application artifacts will produce a lot of output as dependencies are retrieved and then code compiled. However, the application build should indicate success with a message like this:
[INFO] ------------------------------------------------------------------
[INFO] BUILD SUCCESS
[INFO] ------------------------------------------------------------------
Immediately following that, you should see a Gathering Metadata message followed by metadata for this build:
BUILD_TIME_EPOCH IS 1562106748
BUILD_TIME_RFC_3339 IS 2019-07-02T10:32:28Z
BUILD_TIME_UTC IS 20190702-223228
BUILD_ID IS 20190702-223228-ade3d65
The next step in the build process is the first quality-assurance step for our image. You should see a message like this:
Linting Dockerfile
docker container run --rm -i hadolint/hadolint:v1.15.0 < multi-stage-
     runtime.df
Before building the image, the Dockerfile is analyzed by a linting tool named hadolint (https://github.com/hadolint/hadolint). The linter checks Dockerfiles to verify that they follow best practices and identify common mistakes. As with other quality-assurance practices, you may choose to stop the image build pipeline when a linter reports a problem. Hadolint is one of several linters available for Dockerfiles. Because it parses the Dockerfile into an abstract syntax tree, it’s able to perform deeper and more complex analysis than approaches based on regular expressions. Hadolint identifies incorrectly specified or deprecated Dockerfile instructions, omitting a tag in the FROM image instruction, common mistakes when using apt, apk, pip, and npm package managers, and other commands specified in RUN instructions.
Once the Dockerfile has been linted, the app-image target executes and builds the application image. The docker image build command should indicate success with output similar to the following:
Successfully built 79b61fb87b96
Successfully tagged dockerinaction/ch10:20190702-223619-ade3d65
Built App Image. BUILD_ID: 20190702-223619-ade3d65
In this build process, each application image is tagged with a BUILD_ID computed from the time of the build and the current Git commit hash. The fresh Docker image is tagged with the repository and BUILD_ID, 20190702-223619-ade3d65 in this case. The 20190702-223619-ade3d65 tag now identifies Docker image ID 79b61fb87b96 in the dockerinaction/ch10 image repository. This style of BUILD_ID identifies the image with a high degree of precision in both wall clock time and version history. Capturing the time of an image build is an important practice because people understand time well, and many image builds will perform software package manager updates or other operations that may not produce the same result from build to build. Including the version control ID, 7c5fd3d, provides a convenient pointer back to the original source material used to build the image.
The steps that follow will make use of the BUILD_ID. You can make the BUILD_ID easily accessible by copying it from the last line of the app-image build step output in your terminal and exporting it as a variable in your shell:
export BUILD_ID=20190702-223619-ade3d65
You can inspect the metadata that was added to the image by inspecting the labels via this command:
make inspect-image-labels BUILD_ID=20190702-223619-ade3d65
Or you can use the following if you exported the BUILD_ID tag:
make inspect-image-labels BUILD_ID=$BUILD_ID
This command uses docker image inspect to show the image’s labels:
{
  "org.label-schema.build-date": "2019-07-02T10:36:19Z",
  "org.label-schema.name": "ch10",
  "org.label-schema.schema-version": "1.0rc1",
  "org.label-schema.vcs-ref": "ade3d65",
  "org.label-schema.version": "20190702-223619-ade3d65"
}
The application image is now ready for further testing and tagging prior to release. The image has a unique BUILD_ID tag that will conveniently identify the image through the rest of the delivery process. In the next section, we will examine ways to test that an image has been constructed correctly and is ready for deployment.
10.4. Testing images in a build pipeline
Image publishers can use several techniques in their build pipelines to build confidence in the produced artifacts. The Dockerfile linting step described in the previous section is one quality-assurance technique, but we can go further.
One of the principal advantages of the Docker image format is that image metadata and the filesystem can be easily analyzed by tools. For example, the image can be tested to verify it contains files required by the application, those files have appropriate permissions, and by executing key programs to verify that they run correctly. Docker images can be inspected to verify that traceability and deployment metadata has been added. Security-conscious users can scan the image for vulnerabilities. Publishers can stop the image delivery process if any of these steps fail, and together these steps raise the quality of published images significantly.
One popular tool for verifying the construction of a Docker image is the Container Structure Test tool (CST) from Google (https://github.com/GoogleContainerTools/container-structure-test). With this tool, authors can verify that an image (or image tarball) contains files with desired file permissions and ownership, commands execute with expected output, and the image contains particular metadata such as a label or command. Many of these inspections could be done by a traditional system configuration inspection tool such as Chef Inspec or Serverspec. However, CST’s approach is more appropriate for containers, as the tool operates on arbitrary images without requiring any tooling or libraries to be included inside the image. Let’s verify that the application artifact has the proper permissions and that the proper version of Java is installed by executing CST with the following configuration:
schemaVersion: "2.0.0"

# Verify the expected version of Java is available and executable
commandTests:
  - name: "java version"
    command: "java"
    args: ["-version"]
    exitCode: 0
    # OpenJDK java -version stderr will include a line like:
    # OpenJDK Runtime Environment 18.9 (build 11.0.3+7)
    expectedError: ["OpenJDK Runtime Environment.*build 11\\..*"]


# Verify the application archive is readable and owned by root
fileExistenceTests:
- name: 'application archive'
  path: '/app.jar'
  shouldExist: true
  permissions: '-rw-r--r--'
  uid: 0
  gid: 0
First, this configuration tells CST to invoke Java and output the version information. The OpenJDK Java runtime prints its version information to stderr, so CST is configured to match that string against the OpenJDK Runtime Environment.*build 11\..* regular expression. If you needed to ensure that the application runs against a specific version of Java, the regex could be made more specific and the base image updated to match.
Second, CST will verify that the application archive is at /app.jar, owned by root, and readable by everyone. Verifying file ownership and permissions might seem basic but helps prevent problems with bugs that are “invisible” because programs aren’t executable, readable, or in the executable PATH. Execute the image tests against the image you built earlier with the following command:
make image-tests BUILD_ID=$BUILD_ID
This command should produce a successful result:
Testing image structure
docker container run --rm -it \
    -v /var/run/docker.sock:/var/run/docker.sock \
    -v /Users/dia/structure-tests.yaml:/structure-tests.yaml \
    gcr.io/gcp-runtimes/container-structure-test:v1.6.0 test \
    --image dockerinaction/ch10:20181230-181226-61ceb6d \
    --config /structure-tests.yaml

=============================================
====== Test file: structure-tests.yaml ======
=============================================

INFO: stderr: openjdk version "11.0.3" 2019-04-16
OpenJDK Runtime Environment 18.9 (build 11.0.3+7)
OpenJDK 64-Bit Server VM 18.9 (build 11.0.3+7, mixed mode)

=== RUN: Command Test: java version
--- PASS
stderr: openjdk version "11.0.3" 2019-04-16
OpenJDK Runtime Environment 18.9 (build 11.0.3+7)
OpenJDK 64-Bit Server VM 18.9 (build 11.0.3+7, mixed mode)
INFO: File Existence Test: application archive
=== RUN: File Existence Test: application archive
--- PASS

=============================================
================== RESULTS ==================
=============================================
Passes:      2
Failures:    0
Total tests: 2

PASS
Many image authors want to scan images for vulnerabilities prior to publishing them and halt the delivery process when a significant vulnerability exists. We will give a quick overview of how these systems work and how they are typically integrated into an image build pipeline. Several image vulnerability scanning solutions are available from both commercial and community sources.
In general, image vulnerability scanning solutions rely on a lightweight scanning client program that runs in the image build pipeline. The scanning client examines the contents of the image and compares the software package metadata and file-system contents to vulnerability data retrieved from a centralized vulnerability database or API. Most of these scanning systems require registration with the vendor to use the service, so we will not integrate any of the tools into this image build workflow. After choosing an image-scanning tool, it should be easy to add another target to the build process.
Using a scanner to identify vulnerabilities in a single image is the first and most critical step in publishing images without vulnerabilities. The leading container security systems cover a wider set of scanning and remediation use cases than discussed in the image build pipeline example.
These systems incorporate vulnerability feeds with low false-positive rates, integrate with the organization’s Docker registries to identify issues in images that have already been published or were built by an external source, and notify maintainers of the base image or layer with a vulnerability to speed remediation. When evaluating container security systems, pay special attention to these features and the way each solution will integrate with your delivery and operational processes.
10.5. Patterns for tagging images
Once an image has been tested and is deemed ready for deployment in the next stage of delivery, the image should be tagged so that it is easy for consumers to find and use it. Several schemes for tagging images exist, and some are better for certain consumption patterns than others. The most important image-tagging features to understand are as follows:
- Tags are human-readable strings that point to a particular content-addressable image ID.
- Multiple tags may point to a single image ID.
- Tags are mutable and may be moved between images in a repository or removed entirely.
You can use all of these features to construct a scheme that works for an organization, but there is not a single scheme in use or only a single way to do it. Certain tagging schemes will work well for certain consumption patterns and not others.
10.5.1. Background
Docker image tags are mutable. An image repository owner can remove a tag from an image ID or move it from one ID to another. Image tag mutation is commonly used to identify the latest image in a series. The latest tag is used extensively within the Docker community to identify the most recent build of an image repository.
However, the latest tag causes a lot of confusion because there is no real agreement on what it means. Depending on the image repository or organization, any of the following are valid answers to “What does the latest tag identify?”
- The most recent image built by the CI system, regardless of source control branch
- The most recent image built by the CI system, from the main release branch
- The most recent image built from the stable release branch that has passed all the author’s tests
- The most recent image built from an active development branch that has passed all the author’s tests
- Nothing! Because the author has never pushed an image tagged latest or has not done so recently
Even trying to define latest prompts many questions. When adopting an image release tagging scheme, be sure to specify what the tag does and does not mean in your own context. Because tags can be mutated, you will also need to decide if and when consumers should pull images to receive updates to an image tag that already exists on the machine.
Common tagging and deployment schemes include the following:
- Continuous delivery with unique tags— Pipelines promote a single image with a unique tag through delivery stages.
- Continuous delivery with environment-specific artifacts— Pipelines produce environment-specific artifacts and promote them through development, stage, and production.
- Semantic versioning— Tag and publish images with a Major.Minor.Patch scheme that communicates the level of change in a release.
10.5.2. Continuous delivery with unique tags
The Unique Tags scheme, illustrated in figure 10.5, is a common and simple way to support continuous delivery of an application. In this scheme, the image is built and deployed into an environment by using the unique BUILD_ID tag. When people or automation decide that this version of the application is ready for promotion to the next environment, they run a deployment to that environment with the unique tag.
Figure 10.5. Continuous delivery with unique tags
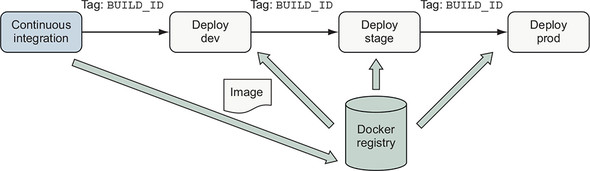
This scheme is simple to implement and supports continuous delivery of applications that use a linear release model without branching. The main disadvantage of this scheme is that people must deal with precise build identifiers instead of being able to use a latest or a dev tag. Because an image may be tagged multiple times, many teams apply and publish additional tags such as latest to provide a convenient way to consume the most recent image.
10.5.3. Configuration image per deployment stage
Some organizations package software releases into a distinct artifact for each stage of deployment. These packages are then deployed to dedicated internal environments for integration testing and have names such as dev and stage. Once the software has been tested in internal environments, the production package is deployed to the production environment. We could create a Docker image for each environment. Each image would include both the application artifact and environment-specific configuration. However, this is an antipattern because the main deployment artifact is built multiple times and is usually not tested prior to production.
A better way to support deployment to multiple environments is to create two kinds of images:
- A generic, environment-agnostic application image
- A set of environment-specific configuration images, with each image containing the environment-specific configuration files for that environment
Figure 10.6. Configuration image per environment
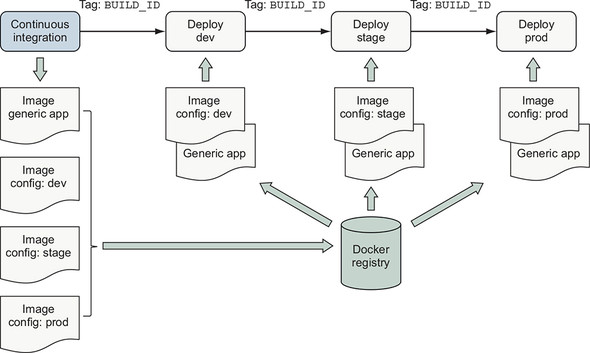
The generic application and environment-specific configuration images should be built at the same time and tagged with the same BUILD_ID. The deployment process identifies the software and configuration for deployment by using the BUILD_ID as described in the continuous delivery case. At deployment time, two containers are created. First, a configuration container is created from the environment-specific configuration image. Second, the application container is created from the generic application image, and that container mounts the config container’s filesystem as a volume.
Consuming environment-specific files from a config container’s filesystem is a popular application orchestration pattern and a variation of 12-factor application principles (https://12factor.net/). In chapter 12, you will see how Docker supports environment-specific configuration of services as a first-class feature of orchestration without using a secondary image.
This approach enables software authors and operators to support environment-specific variation while maintaining traceability back to the originating sources and preserving a simple deployment workflow.
10.5.4. Semantic versioning
Semantic versioning (https://semver.org/) is a popular approach to versioning artifacts with a version number of the form Major.Minor.Patch. The semantic versioning specification defines that as software changes, authors should increment the following:
- Major version when making incompatible API changes
- Minor version when adding functionality in a backward-compatible manner
- Patch version when making backward-compatible bug fixes
Semantic versioning helps both publishers and consumers manage expectations for the kind of changes a consumer is getting when updating an image dependency. Authors who publish images to a large number of consumers or who must maintain several release streams for a long time often find semantic versioning or a similar scheme attractive. Semantic versioning is a good choice for images that many people depend on as a base operating system, language runtime, or database.
Figure 10.7. Tag and publish image release with semantic versioning
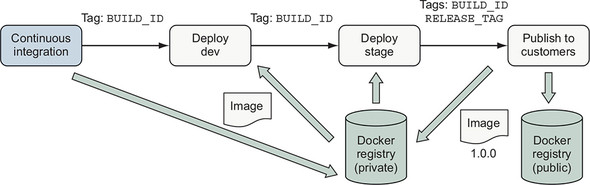
Suppose that after testing your image in dev and stage that you want to release your recent build of the example app as version 1.0.0 to your customers. You can use BUILD_ID to identify the image and tag it with 1.0.0:
make tag BUILD_ID=$BUILD_ID TAG=1.0.0
Tagging the image as version 1.0.0 signals that you are ready to maintain backward compatibility in the operation of the software. Now that you have tagged the image, you can push it to a registry for distribution. You may even choose to publish to multiple registries. Use multiple registries to keep images intended for internal use private and publish only official releases to the public registry for consumption by customers.
No matter what the scheme for identifying an image to promote, once the decision to promote the image is made, a promotion pipeline should resolve semantic tags (latest, dev, 7) to a unique tag or content-addressable identifier and deploy that image. This ensures that if the tag being promoted is moved to another image in the meantime, the image that people decided to promote is deployed instead of merely whatever image the tag is associated with at the time of deployment.
Summary
This chapter covered common goals, patterns, and techniques used to build and publish applications in Docker images. The options described in this chapter illustrate the range of options available when creating image delivery processes. With this foundation, you should be able to navigate, select, and customize options that are appropriate for delivering your own applications as Docker images. The key points to understand from this chapter are:
- Pipelines for building images have the same structure and goals for ensuring quality of Docker images as other software and infrastructure build pipelines.
- Tools for detecting bugs, security problems, and other image construction problems exist and can easily be incorporated into image build pipelines.
- Codify the image build process by using a build tool such as make and use that process in local development and CI/CD processes.
- Several patterns exist for organizing Docker image definitions. These patterns provide trade-offs in managing application build and deployment concerns, such as attack surface and image size versus sophistication.
- Information about the source and build process of an image should be recorded as image metadata to support traceability, debugging, and orchestration activities when deploying images.
- Docker image tags provide a foundation for delivering software to consumers by using styles ranging from continuous delivery in a private service deployment to publishing long-lived releases via semantic versioning to the public.